Electronic postcards with Victory Day. We complete the postcard with a St. George ribbon. Original postcards for veterans on Victory Day
May 9 is a big international holiday. There is no family that did not suffer losses in the Second World War. In 2017, it will be 72 years since the world defeated fascism and the personality cult of brutal dictators.
There are practically no veterans in dark blue and brown Soviet jackets hung with dozens of medals, and every year there are even fewer. Therefore, we do our best to respect the heroes to whom we owe our lives. And do-it-yourself greeting cards for May 9 are a good way to express gratitude for the peaceful sky and the bright future of our children.
Do-it-yourself postcards with Victory Day
There are many ways to express your gratitude with a May 9th postcard. A few of the options below should grab your attention, and detailed instructions will help keep your creativity organized.
Postcard application for May 9
An easy and beautiful way to make a postcard by May 9 is to decorate it with a beautiful application. If you opted for this technique, then below is a step-by-step instruction for you to make your needlework easy and entertaining.
Step #1
We stock up on materials
In order to make our postcard Happy Victory Day, we need the following materials:
- colored paper
- A5 color sheet (you can use any color)
- A3 blank sheet
- Several napkins
- St. George Ribbon
- stapler

Step #2
Making a flower
- Take a napkin and fold it 3 times
- Cut out the circle
- Slightly trim the edges
- We fix the middle

- Raising each layer and pressing it to the base, we make a clove out of a napkin

- There will be 3 flowers on the card, so we do the procedure a sufficient number of times
- This is the flower we should end up with:

Step #3
Making a stem
- We take colored paper, preferably green, and grease the edges with PVA glue
- We thinly twist the paper into a long tube (for convenience, it can be wrapped in a pencil, and then pulled out)

- Making 2 more tubes
Step #4
We make the basis for a postcard
- Fold an A3 sheet of paper in half
- On top we glue a colored sheet of A5 format

You can take paper of any color. The template base with thematic drawings for Victory Day also looks interesting.
Step #5
Making a postcard
- Glue flowers on the base

- Cut out and glue the leaves to the flowers

Step #5
Finishing touch
- We make a bow from St. George's ribbon (for reliability, you can fix it)
- Attached to a postcard

Volumetric postcard for May 9
A voluminous postcard for May 9 to Victory Day looks very nice and does not require a lot of time. At first glance, the technique may seem complicated, but in fact, you do not need to perfectly master the teachings of origami to make a decent postcard.
Step #1
We stock up on materials
- A5 colored paper
- A4 color cardboard
- Several napkins
- Green marker
- St. George Ribbon
- stapler
- Glue stick
- Super glue or silicone glue
Step #2
We make a three-dimensional star
- Take colored paper and fold it in half.

- We fold the extreme corner, lay it out, and then we do the same with the other side and lay it out again. Thus, you have outlined an even cross from the contour folds.

- We take the corner of the edge on the other side and press it to the center of the cross.

- We bend this very edge to the end of the paper.

- Bend the other edge, forming a single corner.

- Fold the plane in half.

- Trim the edge diagonally with scissors.

- Lay out the paper. It should look like this star.

- Slightly trim the edge of the main corner.

Step #3
We light the fire
- We take colored paper of red or orange color and bend it in half
- Draw a fire on the opposite side of the fold and carefully cut out

Thus, we get two flame applications.
- We push the flame into the star

- The base of the flame with glue on a pencil

It should be such an eternal flame.
Step #4
We decorate with flowers
- Using the instructions from the previous postcard, we make 3 carnations from napkins

Step #5
We decorate a postcard
- We take colored cardboard and glue our volumetric application

You can stick a thematic inscription on the postcard, as shown in the picture.
- With green felt-tip pens we draw the flowers of the stem
- Cut and glue leaves

Step #6
We complete the card with St. George's ribbon
- With the help of a stapler we fix several waves

- Attaching tape to superglue

Original ideas for postcards for Victory Day
If you belong to a number of creative people with wide creative limits or you are not afraid of difficulties and it’s just not enough for you to make a beautiful voluminous postcard, then we offer you some original ideas that will help you realize your inspiration and creativity.
Postcard for May 9 using the scrapbooking technique
Scrapbooking is a simple technique that involves the presence of printed cutout elements. It looks very interesting on postcards on May 9th. Perfectly maintains the style of the time. To heighten the effect, you can search the Internet for photos of old articles in which Soviet citizens were congratulated on Victory Day and use them in your postcard.

Postcards for May 9 using quilling technique
Quilling is a very interesting and entertaining technique for making postcards. It is not difficult to use and has very affordable materials. Long paper ribbons are glued to the postcard with an edge, laying out a pattern or picture on it.

Postcards for May 9 using the isothread technique
More sophisticated technique. Ideal for diligent and focused people. But with all the subtlety of the work - this is quite an interesting and entertaining activity. The postcards are decorated with the isothreading technique and are very beautiful and unique.

Postcard templates for May 9 using isothread technique


Drawn postcards for May 9
For those who know how to draw, there should be no barriers at all to make a beautiful postcard for Victory Day. People who have been endowed by nature with such talent are able to turn an ordinary sheet of paper into a masterpiece and a work of art. Drawn postcards are always relevant and preferable, because. this is real creative work.

Background for postcards on May 9
After experimenting a little with a couple of Victory Day cards, you can consider several options for the background. Instead of monochrome colored paper, you can decorate the base of the card with a themed background. This solution looks great.


Victory Day is a big international holiday. It is not at all surprising that on this day there are so many people who want to make a beautiful postcard with their own hands. We want to put a piece of our soul into a modest but touching gift. After all, this is the smallest thing that we can do for our heroes, to whom we try to express gratitude through a postcard for our lives and the bright future of our children.
Video: Beautiful do-it-yourself card for May 9
Hello friends!
May 9th is approaching. This is Victory Day. We are starting to prepare for an important event to congratulate our glorious warriors. And the best congratulations are postcards made by hand with love and soul.
On this significant day, we will go to the parade with joy and respect. Or we will visit the memorial with an eternal flame to lay flowers - carnations. It's great to take a walk to the city center with the kids and personally greet the veterans. This is where our crafts come in handy to personally hand them to the warring grandparents.
And besides, exhibitions and even competitions are organized on this topic in kindergartens and schools. And you can take first place. Therefore, I offer you my selection of ready-made works from the Internet. I recommend not to copy exactly, but to take ideas and create your own unique masterpiece!
Do-it-yourself postcards for Victory Day
To begin with, consider the options for creating crafts with children in different techniques. And then you can proceed directly to their creation.
The most necessary tools for postcards are thick and colored paper, cardboard, felt-tip pens, paints, scissors, glue, and sometimes improvised materials. And this is always the case in any home, especially with small children).
Here is the work in the quilling technique. We have already condemned it more than once, but let me remind you that this is a technique for twisting different shapes of tubes from strips of paper. These are the details from which a beautiful composition will then be created.

Composition with a dove of peace, a St. George ribbon and a three-dimensional star.

Here we use napkins, or rather balls from them. It is very easy to wind such lumps, which we then paste on cardboard.

Very beautiful postcard with a tank and a plane on the background of fireworks. And here are the materials at hand from ready-made flowers and an orange-black striped ribbon.
The most beautiful work is obtained if a piece of soul is invested in it. Therefore, create with passion, joy and inspiration!
You can repeat, just make a cruiser instead of a tank. What do you think?

Carnations and flowers in general are always in theme (except roses). These are such cute bouquets, and even tied with a victory ribbon, can be depicted on the front side.

The soldier's helmet well symbolizes our great holiday.

Excellent application of corrugated carnations.

Here is another visual creation in the style of quilling.

And we finish again with carnations. They are as relevant and in demand as ever in this subject.

As you can see, there are very simple works that can be easily done with kids 3-4 years old, and there are more difficult ones for school students. I wish you more imagination and ran to make a voluminous interesting option.
How to make congratulations on the dove of peace using the quilling technique?
The dove of peace symbolizes good intentions. This expression arose after the end of the Second World War.
Let's make a simple quilling craft with this good symbol. Easy-to-perform work will introduce children to new technology. By the way, in previous notes already.

We need:
- Curly and regular scissors
- colored cardboard
- colored paper
- Glue stick
- simple pencil
- Strips 0.5 cm wide and 30 cm long (green, purple and red)
- Toothpick
Work process:
1. Prepare all materials and tools. Let's find beautiful poems and print the dove. By the way, the bird template is at the bottom of my note.
2. We wind the rolls on toothpicks. To do this, cut one end of the stick in half. We fix the end of the strip there and wrap it tightly.
3. Cut a sheet of yellow cardboard with curly scissors. Then fold it in half.

4. Glue a sheet with verses on the inside of the cardboard.
Poems do not have to be printed. You can write them by hand.
5. Give the red and purple rolls the shape of arrows. And from green we will make crescents and leaves.
6. Cut out a strip 2.5-3 cm wide from black paper. And from orange paper we will make three strips of 0.5 cm each.

7. Glue the orange stripes onto the black tape. We will place her and the dove on the front side of the craft.
8. Glue our carnations under the bird. Just remember to make the stems as shown in the collage below.

A peaceful and kind postcard is ready! Feel free to give it as a gift. You can also participate in the competition.
We make an original and voluminous postcard
And let's do a simple but stylish work in the scrapbooking technique. Yes, and it is incredibly interesting and informative to create. Fortunately, ready-made kits in this technique are sold in any stationery store.
Simple crafts for kids in kindergarten on May 9
Now consider easy-to-make congratulations for the holiday. After all, it is often difficult for young children to do them on their own. But under the strict guidance of parents and educators, it is possible to make interesting work with simple symbols. Most often it is a St. George ribbon, carnations, appliqué from fireworks or a star.
Let's take a look at a small composition of napkin balls. We have already seen it with you at the beginning of the notes. And now let's see the progress of work.
We need 2 colors of plain napkins, paper glue, A4 sheet, white thin paper, scissors and a simple pencil.
1. Fold A4 sheet in half. This is a future postcard. Let's draw a star on it with a pencil, inside the nine and the words "May".
2. Now we will roll the balls from red napkins. We glue them along the contour. If there are not enough lumps, finish the new ones.
3. Make 20 circles and bend them in half. These are our petals. Stick them on the glue in the form of flowers. Inside each of them we glue three spools of a different color of napkins. Voila, and you're done!

Here are a couple of simple crafts in the form of applications.

The emphasis is on the number 9. It goes well with flowers and a striped ribbon.

Let's look at how to make simple carnations and voluminous stars. They are then easy to stick on a postcard. And here are a few easy ways to help.
Here we make cones, and then we get a prefabricated flower.

And another option from napkins. We fold them like an accordion and put them in a loop of woolen thread. We fluff the bud in the form of a carnation.

Here we make a flower from corrugated paper with a toothpick. In general, corrugated paper is ideal for creating flowers. It is thin and fluffy and takes the desired shape well.

Now let's look at master classes on voluminous five-pointed stars. And the first way is to fold a piece of paper, as indicated below.


At the end, we cut it off with scissors and unfold the finished five-pointed beauty.

If this seemed difficult to you, then here is a simpler option from a ready-made template. And it can be found and printed at the bottom of my note.

And see what you can do with these attributes.
Bright bouquet


Strict postcard with a star "I remember, I'm proud"

Create, craft with the kids and let your work be the best. Next, let's look at interesting thoughts about gifts for glorious warriors.
Interesting paper ideas to congratulate WWII veterans
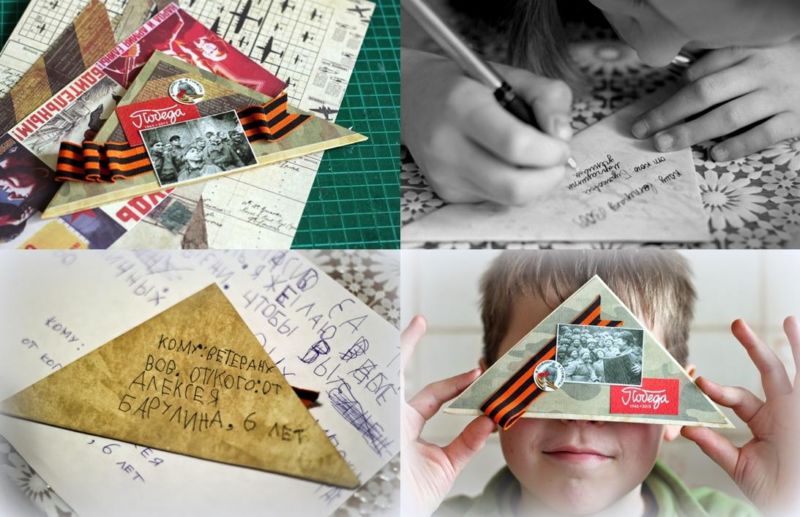
It has already become a tradition to congratulate our dear grandparents who fought with such triangular postcards. This is a front letter.
To make it, you need to fold a sheet of paper in the form of a triangle. On this sheet, it is best to write kind words and congratulations on Victory Day to veterans of the Great Patriotic War.
Oh, how our glorious soldiers at the front were waiting for news from their relatives and friends. Each such letter warmed them every day and gave them strength to fight for freedom from fascist oppression.
Such leaves are specially aged, make an unsightly appearance. So that they certainly correspond to real front-line letters. And you can decorate the front side again with a St. George ribbon, flowers, stars or a victorious Soviet emblem.
I will show you how to decorate news postcards.

Each such letter will delight and touch the veterans. Especially from children's hands.

Here decoration with ribbon and dahlias.

Simple news from sheets of notebooks in a cage.

Watch a short video on how to make an interesting craft. Good luck in your work!
Step-by-step master class on making work for school
I propose to make a wonderful postcard "Golden Star of the Hero". We will use simple materials such as colored paper and thick cardboard. The only thing is, stock up on curly scissors. With them, we will have to beautifully decorate the edges of the craft.

We need:
- Curly and regular scissors
- colored cardboard
- colored paper
- Glue stick
- simple pencil
- Ruler
Work process:
1. Prepare and purchase all materials.

Ribbon, star and order templates can be downloaded and printed at the bottom of the master class.
2. We transfer the printed template of the order to red paper. Cut it out of it.

3. Cut out a three-dimensional star from yellow paper.

4. Prepare the St. George ribbon and paint over the stripes in orange. And we also make 2 thin yellow stripes for the order.

5. We take a thick sheet of silver cardboard. We cut it from each edge with curly scissors. So we will give a beautiful shape.

6. We apply the order and ribbon in the center. We make notches, and then glue the details exactly on them.
7. Cut off the excess edge of the tape with curly scissors.

8. Glue 2 strips on the medal.

9. We make our star three-dimensional. To do this, bend it along the dotted lines. Then glue the edges on the order.
All is ready! You can donate to veterans!

And these are templates for the printer. St. George Ribbon.

Star.

Order of Victory.

Postcard templates for May 9 for download
Here I picked up various pictures on the topic of Victory to help you. They can be downloaded and printed on any printer.
Such pictures are immediately suitable for the front of postcards. It is good to supplement them with your own words and congratulations.


Here are the coloring pages.


A three-dimensional star can be downloaded, cut and bent in sections.

And a couple more pictures for the background.


Here I tell you bye-bye! But the topic of the Great Patriotic War and the upcoming holiday is not yet closed for us. I will prepare new crafts and congratulations for you!
Good and working day everyone! How are you? How are you? Today I wanted to please you again and surprise you with something special, in general, I thought about it and decided to start preparing you for the next upcoming event that awaits all of us this year, and it will take place as always in the last month of spring, namely May 9 .
Yes, this Victory Day smelled like gunpowder, this holiday ... In general, you understand what I mean. In our previous article, we considered all sorts of things. And in this one, I want to invite you to make holiday cards that you yourself and your children can easily and quickly complete.
After all, a gift made with your own hands is the most valuable, and especially for veterans. On this day, rallies and concerts will be held throughout the country, and at the end of everything, fireworks will be launched into the sky. Hooray!
Among what I saw on the Internet, I will tell you that there are a lot of cool and unique ideas, all of them are good in their own way. And you can make according to any pattern and bring such treasures to the exhibition to a school or kindergarten and take a prize.
For example, you can choose such a craft in the shape of an asterisk. It is done quite simply, cardboard is taken as the basis, cut out to the desired shape, and then pasted over with self-adhesive sparkling paper. But, and this is not all the necessary decorations, they can be any badges or something else, such as rhinestones or scrapbooking accessories.

You can even stick a St. George ribbon, it will be in the subject here.

I saw even coins are glued. It's up to you, fantasize to get a masterpiece that would conquer everyone. Do not forget to make the desired inscription with wishes on the back.
The next option is a very stylish and cool little thing, take a look. It is made, or rather its second part is in the form of a ladder and decorated in this theme. It made an amazing souvenir.

Or you can make another card with flowers. By the way, I’m talking about this kind of craft, because on this day you can give not only, but also roses and tulips. In this image, you see two symbols of this holiday at once, or rather, even three, these are a red star, a ribbon and tulips.

How to make such flowers, and use the origami technique for this. Look here.

And the star too, print the template and bend along the dotted lines, it will turn out to be voluminous and very beautiful.

But you can do it not only from paper, but also from other improvised means, such as fabric, such as felt or beads. Remember in the last article by May 9, I showed you
Keep a small instruction on foamiran, this will be a carnation that was created, according to the author, in 15 minutes.

It will take only 8 petals.
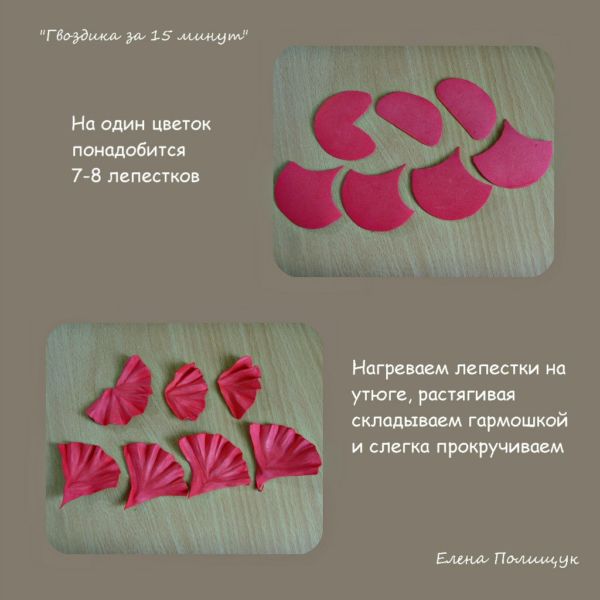
With the help of an iron, the edges of the petals are slightly bent.

Just get the desired effect.

Fix with glue.

This flower looks like a real one.

Take a look at this miracle from the video.
Now let's focus on a more voluminous version. After all, the symbol of victory is still a white dove. It can also be made from white paper, or rather napkins or corrugated paper by trimming.

Take a napkin and make small squares out of it, I would say small squares, then circle and draw the bird yourself, attach it to a postcard and draw an outline.

Crumple each square of the workpiece onto a rod, drop PVA glue on the tip and attach to the sheet. And in order to create a red flower, then fold the napkin several times and clamp the center with a stapler, then cut out the circle.
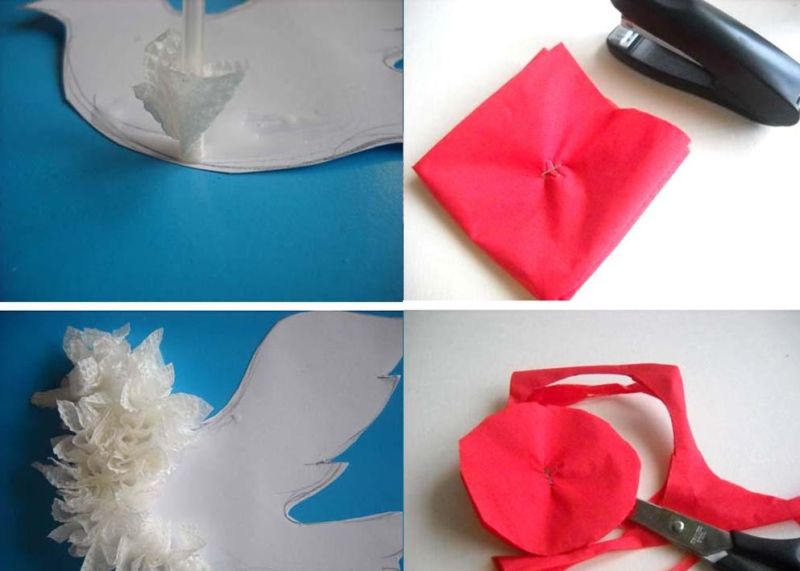
Fluff, while making cuts along the entire diameter of the carnation. A little petals can be lifted for volume.

It remains now to create the stem and leaves.

Well, after finishing this beautiful work. Look just wonderful and spring-like.

Now I propose to make an antique version. To do this, take a red sheet of paper, and make it square.

And roll it up as shown in this picture. You end up with a five-pointed star.

That's how lovely she is.

Then copy this blank from your computer and print it on a printer.

Arrange as you like. And the ribbon with stripes can be picked up.

And glue it somehow interesting with an accordion or ladder.

And also, if you have decorative staplers and all sorts of things for decoration, then you can easily apply them here. It would be desirable).

And the last such gentle idea from corrugated cardboard.

Cool ideas from paper and cardboard
I want to show the product using the quilling technique, because they really look cool and at the same time unusual, damn cool. Take a look, it seems to be nothing special, but it is so solemn and festive.


This technique is not very complicated, the main thing is to understand its principle. Those who have previously encountered it at least once know that everything is quite simple. The main thing is to want and everything will work out.

Put on blanks, and then they are applied and glued together.

This is how you put it in an envelope.

And here, in general, the tank was depicted, and flowers, and even the sun with clouds. The mood immediately lifted, a fun idea turned out.

Another creation, modest and charming.

As you may have noticed, most of them use cloves.

Original postcards for veterans on Victory Day
I think that everyone at least once thought and would like to present something so unexpectedly attractive, especially since these are our grandfathers and great-grandfathers, as well as great-grandmothers. Purchase chenille and ornamental figurines from a sewing or craft store.

From the wire, lay out the symbolism of the holiday on a sheet of paper, glue it on a special glue like PVA or Moment.

To make it bright and reminiscent of all this real fireworks or salute, apply rhinestones, or the so-called scrapbooking devices, they are sold in sets.

Well, in the end, some more little things that will add a little mystery and mystery to this postcard.

Then, from corrugated paper, or rather cardboard, make such an antique rim and glue it onto the base of the text.

It will also be necessary to make the necessary symbols and attributes of this significant event - a number, an eternal flame.

Here's what might happen. Quite interesting and unusual.

You can also make a thing and display military equipment of those times on it, for this you will need sheets and a printed sample, or rather printed one.

This is how the template will look like, for example, you can take absolutely anyone, with an airplane and even with a gun.

Make a frame and decorate with an orange-black ribbon and a star.

It looks cool and healthy, thanks for the ideas to the masters.

Now take a paraffin candle and rub a sheet of paper with it.

And then paint with watercolors.

Let the work dry, attach the child's hand and circle, cut with scissors.

Cut out squares from colored paper or multi-colored office paper.

Glue the hand-palm to a suitable background.

And crumple the squares. What do you think this is for?

Yes, it will be fireworks or such a torch of victory.


Here's what happened. Write down the years of the Great Patriotic War.

Best Flowers Greeting Card Ideas
On this day, of course, in most cases, one of the gifts will be flowers, they will be live or in peas. And you can also decorate them with your wishes. How to do it? See the next master class and repeat all the steps in this instruction.
We will need:
- colored napkins
- cardboard
- scissors
- pencil

Stages of work:
1. Start with the fact that you first have to decide on the background of the work. And then close the sheet of cardboard in half and glue a white sheet on one part.

2. Cut small squares from a red paper napkin.

3. Twist them into koloboks, this is how it will look like crumbs.

4. On the card itself, draw an image of victory - this is a star, salute and the right words.

5. Notice it turns out quickly, easily, and most importantly so colorful that you can’t even take your eyes off.


7. Lay out letters from them.

8. From napkins of a different color, make a snail.

9. Flowers will be obtained from such snails.

10. Lay out the St. George ribbon in the same way.

11. A wonderful story, and most importantly, a very cool gift came out! Bravo to the author, well done!

In my last article, I promised to give even more detailed instructions for this amazing creation.

Well, cut out circles from corrugated paper, the diameter of which is about 5 cm.

Then make a triangle out of the circle, first fold in half, then in half again. Pinch a sharp corner with a stapler.

Do not forget to cut along, make petals. Then glue the green stems on the sheet.

And then the bud heads themselves.

Leaves can also be done in an unusual way, cut like this, as shown, due to this, the craft will look more voluminous.

We finish with a ribbon in the desired style.

By the way, you can tie a bow from such a ribbon.

Also, if you wish, you can use this scheme and build a three-dimensional view.


Here's another masterpiece I found on the Internet.

It's not bad, if you decorate it with appropriate inscriptions and words, you can put a verse here too, do you agree?

Pictures and postcards for free download
Friends, you and I have crept up, I would say that it is not a laborious option, namely, take ready-made templates and ask your printer to print them). And voila, for this purpose, you can also do coloring pages, all this will deserve admiration and approval from adults.
The proposed illustrations will help you congratulate friends and relatives on this day, as well as your old and beloved veterans who defended our Motherland through social networks such as classmates or VKontakte.


Step-by-step master classes for kindergarten and school children
Perhaps I will start with the simplest and most uncomplicated product, it turns out to be bright and solemn. First of all, cut out all the details from colored paper, these are the leaves, the flower heads themselves, there will be lilies of the valley and, of course, the number 9.


It came out delicious!

Here is another application to help you.


From children's palms, here's what else came out.

Here is another caught a charming masterpiece.

Found a little description.

This was done, as it turned out, in the origami technique.


Maybe someone else will need a sample of how military letters used to be folded in the shape of a triangle.


Or maybe the very idea of such a postcard in the form of a field letter is needed. Hold. This is the background, print it out.

Then fold as shown here.

Then do the same with the star, wrinkle along the dotted lines. Or draw an asterisk or other paraphernalia on a sheet of colored paper.


Or the second option.

Ha, I forgot about plasticine. After all, with the help of it you can also lay out something cool.


Also, plasticine is easy to replace with special dough for modeling.


A gift in the shape of a three-dimensional star with a template and instructions
On the YouTube channel there is always what you are looking for, for example, I liked this story, it will definitely fit someone.
I suggest you create a quick version, according to a ready-made model. To do this, print this sample here, and then glue it to a sheet of paper and decorate it with rhinestones at your discretion, you can even use cereals and any other items.
By the way, you can glue these two options together and you get volumetric beauty, it will be stylish and spectacular.

I also saw another idea, maybe you will like this view more.


Here's another great idea. Repeat with the blogger all the necessary actions.
How to make a postcard by May 9 so that it is not difficult?
You know the answer to this question, I didn’t know, and then I saw a super craft, and you will need colored pencils and a couple of blanks.

Here you apply and draw with vertical lines, as if painting over, cool.

But, when you remove the template, it will look even and clear.

Wow, you look cool.

This is the trick, it is easy and accessible, especially for children of kindergarten age or elementary grades.

You can arrange it differently, or recreate it inside.

The next view, not that vytynanki, but something in between.

With a sharp cutter or a special knife, cut out the letters and numbers along the contour.

Do the same with the pigeons.


You can decorate with something else, for example, a twig or an eternal flame.


Fold the sheet into a triangle to make a letter-message. Glue the blanks on the corner.

And to the bottom of the St. George satin ribbon.

Draw a seal with a helium pen.

Superb and original at the same time.

It was performed by a child of a very young talent, look how this girl does everything carefully and slowly.
Children's drawings in the military theme with the symbols of the holiday
Well, how can you not do without drawings on this day, young artists take paints and embody your ideas on the theme of Victory, War and the like. Here's what you can portray, if there are no thoughts on this at all, take a look.


Or if you don’t know how to draw at all, then you can take a coloring book and use a brush or felt-tip pens to give it brightness and color. Choose.


On this, dear friends and guests of the blog. I say goodbye and say to everyone until we meet again. Create, do wonders and make old people happy, win prizes at exhibitions, and most importantly, do not forget about the most important thing, congratulate all those who defended our Motherland! Good luck to all! Bye!
Sincerely, Ekaterina Mantsurova