Creative Christmas trees made of paper. Volumetric Christmas tree made of paper - diagrams and stencils for creating a Christmas tree with your own hands. Master class on making a New Year's tree from napkins
We will send the material to you by e-mail
Not everyone is born to be a great artist, and sometimes people are simply afraid to try their hand at handicrafts, and for good reason. If you follow the tips and instructions from the editors of the site, it will not be difficult at all to make beautiful and elegant Christmas trees out of paper and cardboard (volumetric) for the New Year!
Paper is always in demand, and especially on New Year's Eve, because it is such a wonderful material for applied art! With careful handling and storage, paper products can last more than one holiday, and modern material is bright and colorful, which allows you to fully use such decorative crafts in the interior.

We offer you to learn how paper Christmas trees are made and make the same beauty yourself.
We create a volumetric Christmas tree
For those who do not remember how to work with paper, we will remind you of a few simple rules:
- We do not allow any errors in paper sizes. If you need a square - it will be a figure with equal sides, you need a rectangle - let it be a rectangle, even and beautiful;
- all fold lines are usually carefully ironed with a fingernail - the accuracy of the folds allows you to assemble full-fledged high-quality products;
- paper should not be of poor quality and tear at the slightest attempt to bend or cut it.


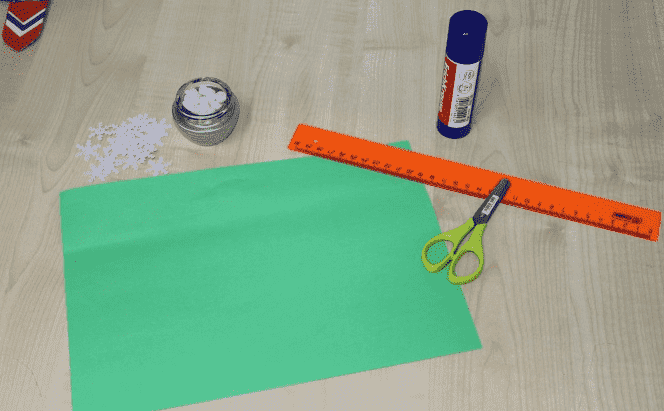
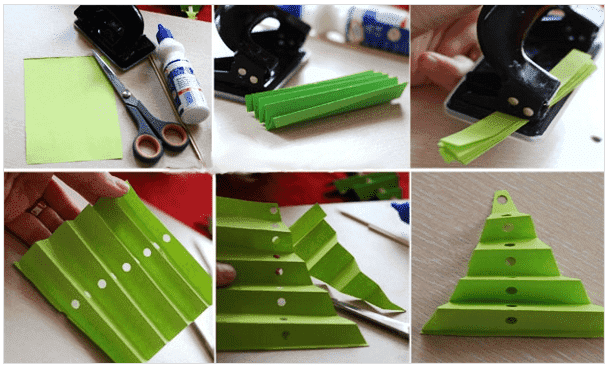
To assemble a voluminous fluffy Christmas tree, you need scissors, colored paper and a little glue.
| Illustration | Action Description |
|---|---|
 | We use green paper. We turn the sheet into a square, bending one corner so that the edges coincide with each other. Cut off the remaining strip and discard. |
 | We need fold lines, so we fold the sheet and iron the resulting folds, first along one diagonal of the square, then along the other. Then fold the paper in half. |
 | Unfold the product incompletely, leaving one corner folded. |
 | We bend a free corner to the folded part, as in the photo. |
 | Now the resulting trapezoid needs to be turned into a square by pulling it by the middle of the base and bending it to the right corner. |
 | It turns out such a figure in a spread. |
 | We bend sequentially each of the corners to the center. We turn the product over and do the same on the other side. Unfold one corner and bend it inward. |
 | So we do with every corner. |
 | Cut off the lower part of the resulting tie. |
 | It is necessary to make cuts on the sides of the product. |
 | At each side of the Christmas tree, we bend the upper part from the notch to the base. |
 | We straighten the branches of the fluffy beauty! |
Funny prickly Christmas tree made of paper tubes
Everyone has heard about weaving from newspapers, but not everyone is ready to master it. But trying to make tubes out of paper and sticking them on the base of the Christmas tree is a simple and interesting task.

Those who wish to master weaving from newspaper tubes should be patient: first you need to prepare a considerable number of tubes. To do this, the newspaper is cut into strips 5 cm wide. Each strip is wound on a thin knitting needle at an acute angle, gluing the free tip with a PVA tube at the end. After that, they decide how they will paint the product: immediately the tubes or the finished craft. Staining is done in any convenient way. Someone dips the blanks in paint, in stain, someone paints them with a brush on the grid. The finished Christmas tree can be painted from a spray gun.


Video: beautiful wicker tree
Cute fluffy Christmas tree for drop-down cards
Paper Christmas trees for the New Year can be made by a child under the guidance of an adult. For crafts, you need colored paper, a base for a postcard, PVA glue, a simple pencil and scissors.


How to make a Christmas tree box out of cardboard or thick paper: great gift wrapping
Sometimes you puzzle over what to pack a New Year's souvenir or a delicious gift. Handmade packaging will always touch the heart of the donee, so let's spend some time in creative work.


Advice! It is better to decorate the box with beads, snowflakes, sequins.
Let's make a voluminous Christmas tree out of paper and cardboard with our own hands and decorate the interior
There are many simple and chic ideas for using a paper Christmas tree to decorate your Christmas room. A voluminous beauty, even if not brought from a store and not grown in the forest, will serve wonderfully to lift the mood for the holiday.
Volumetric Christmas trees: conical base
First of all, we are wondering how best to make a cone for a Christmas tree out of cardboard. A dense, durable cone is a guarantee that the product will last all the New Year holidays without deformation.

Cardboard, thick paper and the remains of wallpaper are suitable for the cone.
How beautiful to decorate a cone base
It is easy to turn a cardboard cone into a fabulous Christmas tree with the help of various decorations. The simplest solution available to everyone is braiding a cone with paper fringe. It is better to make a fringe from corrugated paper. But if it is missing, then ordinary colored paper will do: we cut the strips of the desired width, glue them into one long strip. If they are carefully folded several times without crushing the edges, then you can immediately cut a beautiful fringe along the entire length.

Christmas trees made of cardboard from the blades
Following the principle of creating a product from the blades, it is easy to make a Christmas tree of any size. The essence of the work is the preparation of two, three or four identical patterns of the silhouette of a New Year's tree with slots at the top and bottom. No glue is needed for assembly, the craft will stand without problems.


From two templates, a four-blade Christmas tree is obtained.
Volumetric Christmas trees: carved art of vytynanka
Many are familiar with the paper cutting technique called vytynanka. We suggest creating a Christmas tree of magical beauty using paper, a pencil (or a printed template), scissors and a cutter knife.
Christmas tree paper templates
It is worth taking a look at the idea of a Christmas tree in such a wonderful technique:


Article
Few people can resist the temptation to decorate their workplace with a small Christmas tree - artificial or paper. We will now figure out how to make such New Year's crafts.
How to make a Christmas tree out of paper with your own hands?
An origami paper Christmas tree looks the most elegant, but not everyone can do such a masterpiece. Therefore, we will make the Christmas tree simpler, you can also involve children in the process. You will need a compass, green paper, a ruler, scissors, glue and a pencil (cocktail straw).

How else can you make a Christmas tree out of paper?
This version of a voluminous Christmas tree made of paper is a little more difficult to make than the previous one, but the Christmas tree turns out to be charming. You will need green paper, a pencil, scissors, glue, a ruler and compasses.

How to make a Christmas tree out of paper using quilling technique?
An openwork Christmas tree using the quilling technique will require even more diligence, but those who have heard about quilling only out of the corner of their ear will also cope with it. You will need green paper strips 5 mm wide and 4 strips of 1 cm each, yellow and red strips 3-5 mm wide, glue (PVA and instant) and toothpicks.
- We take 4 green strips 30 cm, 20 cm, 15 cm and 10 cm long. We twist them with a toothpick. We remove the part from it and let it bloom a little. We fix the end of the strip with PVA glue. We give all spirals the shape of a drop by holding and slightly pulling up one of the ends of the spiral.
- We wrap wide green stripes tightly around a toothpick and glue the tip, preventing it from blooming. We will make a tree trunk out of them.
- We make a drop for the top of the spruce from a green strip 30 cm long.
- Now we begin to assemble the Christmas tree with instant glue. We glue the parts of the trunk, let the glue dry.
- We insert a toothpick inside the trunk and glue our droplets-twigs. Starting with the smallest, gluing them at the top of the Christmas tree.
- From pink and yellow stripes we make toys by twisting paper without a toothpick. You can fasten the ends until the paper unwinds, or you can make the toys a little looser and give them the shape of small droplets. We glue the balls to the branches we like.
- Do not forget to glue the top drop, and decoration on it.
- If desired, you can make a stand. For her, you need to make nine curls from white paper stripes. We glue the curls tightly together. Now we fix the Christmas tree on the snow stand with glue.

A do-it-yourself Christmas tree made of paper is a very good and, most importantly, timeless idea when the question arises: what can be done and presented for the New Year. A good gift combines sophistication of style, originality of ideas and warmth of the soul.
Of course, all these features are especially noticeable during big holidays. When the magical New Year's days come, we have much more free time, and it can be spent not only with benefit, but also with pleasure.
Here, for example, you can make New Year's crafts with children in kindergarten or school. And you can make a Christmas tree - an original decoration for the office, make such an unusual gift to your friends and colleagues.
We have prepared for you interesting ideas for paper Christmas trees that you can do with your own hands, including with children. Consider a few simple and at the same time original models - both for a gift and for decorating a home or workplace.
Let's start, of course, with crafts for the little ones. These green beauties are not the most difficult, but they are definitely made, as they say, with soul. You can give them to mom and dad. And most importantly, such a decoration can be put under a real Christmas tree next to a gift for a baby.
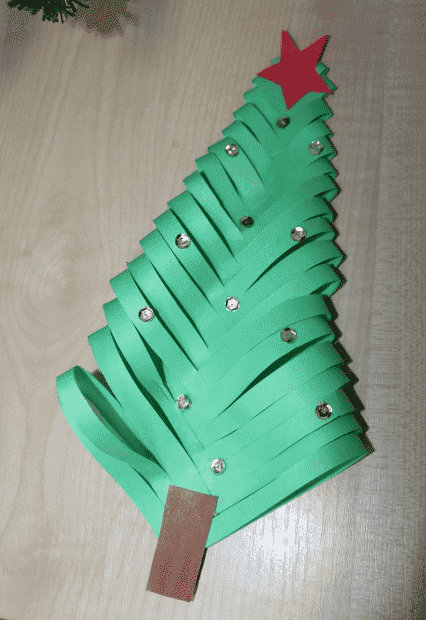
Christmas tree with rhinestones
Here, for example, is a universal model that can be made in almost any kindergarten group. The only condition is that for the smallest it is better to limit yourself to paper and glue, but in the older group you can also use beads for decoration.
We will need:
- sheets of colored paper in green, brown and red;
- glue;
- scissors;
- ruler;
- beads or beads for decoration (you can also take sparkles, artificial snow and much more).
How will we do:
Step 1. First we need to make a square blank. To do this, we bend the triangle on sheet A4, and carefully cut off the rest.
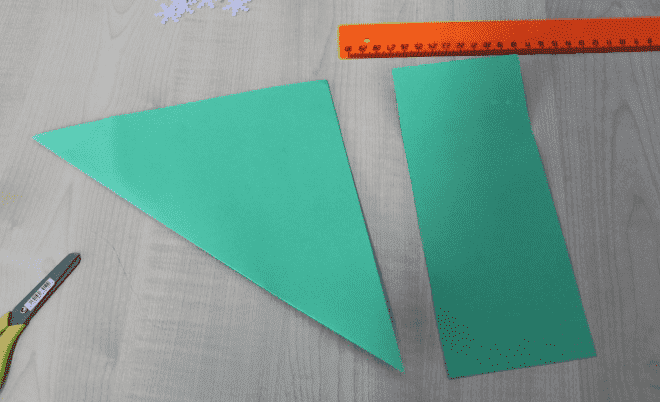
Step 2. Turn the triangle over and draw strips of 1 cm.
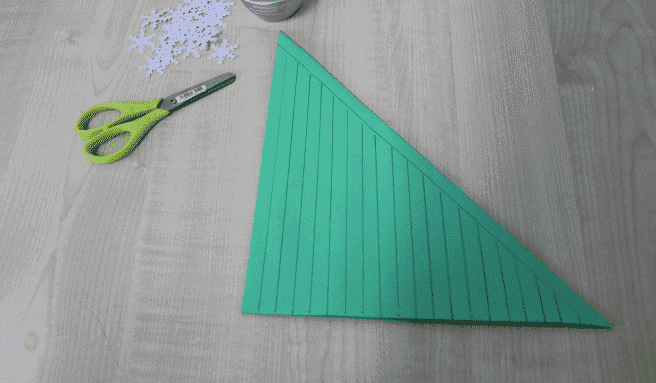
Step 3. We cut them from the bottom up, but literally 1 cm does not reach the top edge.
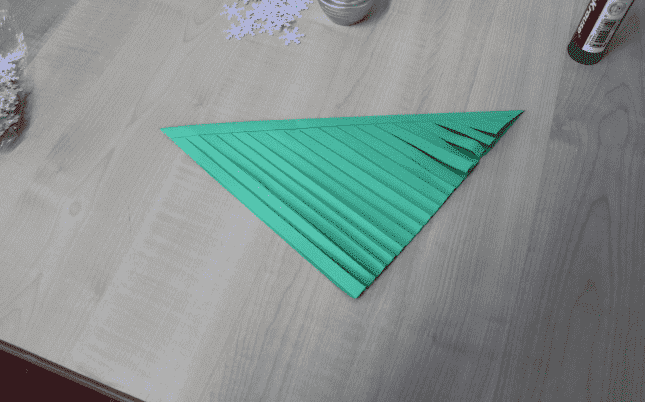
Step 4. We unfold the workpiece and glue each strip to the center in turn.

Step 5. After all the strips are glued, let the workpiece lie down a bit and dry. In the meantime, cut out the star on top.
By the way, you can also cut a lot of decorations from colored paper - balls, cones and other figures. Rhinestones, beads, beads also look impressive - in a word, everything that glitters and creates a festive mood. We glue the trunk from below - and you're done.
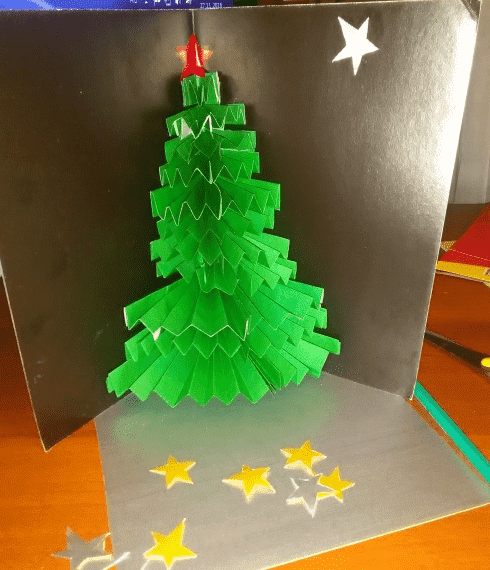
Original postcard with Christmas tree
It is customary to give cards for almost every holiday, and this good tradition is well suited for the New Year. And the best gift is one that is made by hand. Therefore, with the kids, you can make another interesting figure - a three-dimensional postcard, which easily folds between two pieces of paper and becomes flat.
We will need:
- sheets of colored paper;
- a thick sheet of cardboard for the base;
- scissors;
- glue.
We will act like this:
Step 1. First you need to take a sheet of cardboard and bend it exactly in half so that the colored part remains outside. It can be any color leaf, but it is preferable to choose shades that contrast with green - for example, dark blue, chocolate, blue colors.
It is important that not only the Christmas tree looks good against their background, but also other decorations - for example, stars, which also need to be glued to the card so that it does not seem empty.
Of these, you need to fold an accordion with the same folds (about 1 cm each). In the middle, the craft is bent so that the result is a bow.
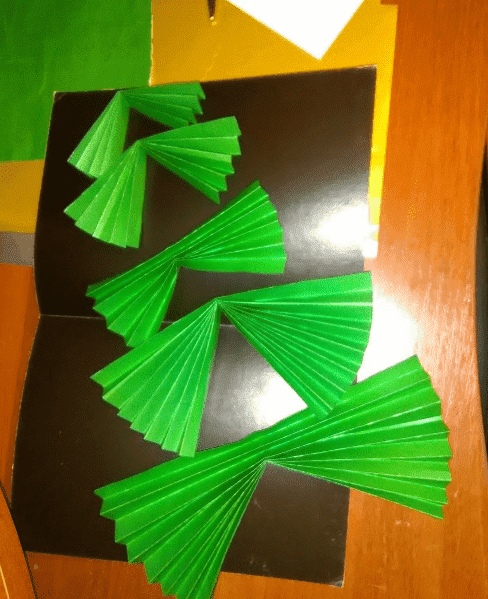
Step 3 . All these accordions must be glued in sequence to the center of the future postcard. They should fit snugly enough to each other so that the tree looks like a holistic, single composition.
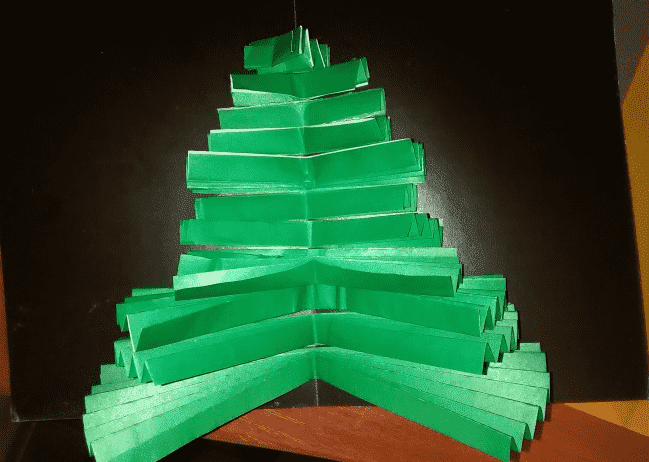
Step 4. Now we carefully straighten each strip so that the Christmas tree takes on a three-dimensional look.
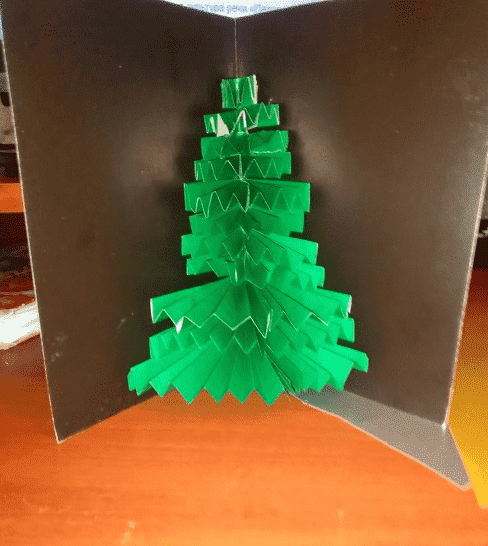
Step 5. It remains only to glue the crown, stars and other decorations on the background of the card. On the reverse side, you can stick a beautiful inscription made in advance, as well as snowflakes, cones, artificial snow and other elements of festive decor.
Velvety Christmas tree - an unusual photo stand
And now let's move on to more complex models that can be presented to colleagues, relatives and friends, and just please yourself with an original decoration for your favorite holiday.
Each person has, perhaps, hundreds and thousands of photos in stock, but among them there will surely be that very favorite photo, which in itself creates a festive mood. Why not make a special stand for such a picture?
For the manufacture we need:
- green cardboard - 1 sheet;
- a skein of thick threads of green or blue-green color;
- white boucle threads or cotton balls;
- glue;
- pencil;
- scissors;
- beads;
- glue gun.

To make a Christmas tree out of cardboard with your own hands, we will act in stages:
Step 1. First of all, we fold a sheet of green cardboard in half with the wrong side outward, after which we depict a half of the Christmas tree on it. To do this, you can simply print the template or draw from the sample.

Step 2. Cut out the workpiece along the contour (when folded).

Step 3. Now let's take up the threads. They need to be folded in layers several times and cut into small pieces (1-2 cm each), putting them in a previously prepared container.

Step 4. Now comes the rather painstaking stage of work. Lubricate the surface of the Christmas tree (each branch separately) with a glue stick and stick the skeins on it. It is better to do this in stages so that dust does not accumulate on the sheet.
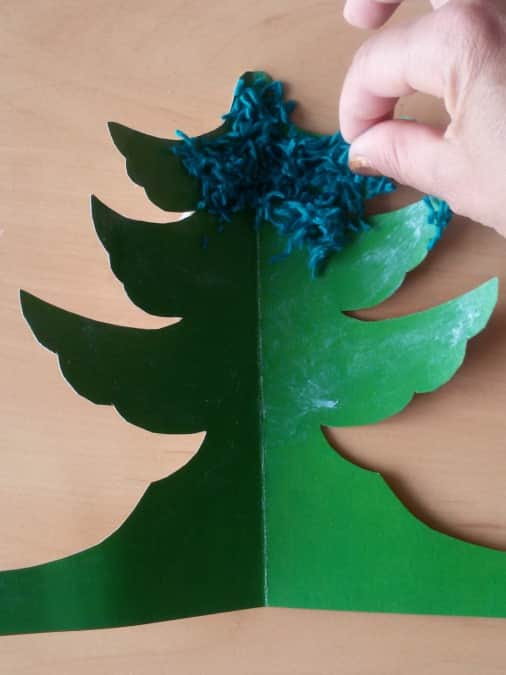
Step 5. In this way, you need to decorate only the top 3 sections, since we will decorate the bottom one differently.
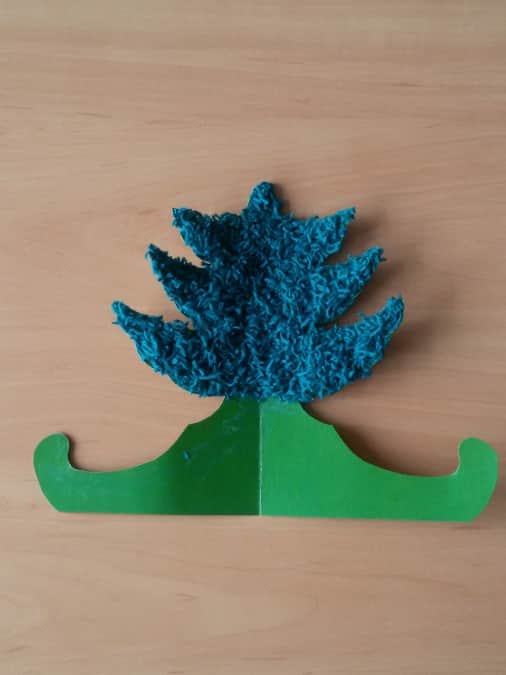
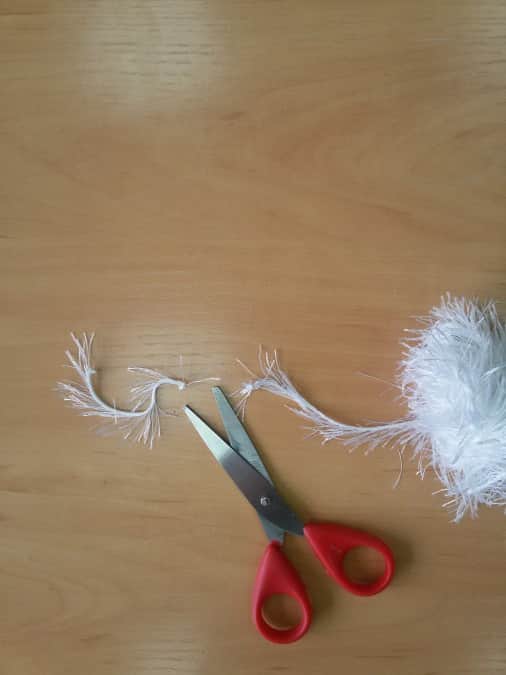
Step 6. Let our tree lie down for a few minutes, and the glue will dry a little. In the meantime, take a boucle thread or just roll up a few small lumps of snow-white cotton wool.

Step 7. These lumps can be glued with a gun or glue stick. The work must be done carefully enough so that no glue stains remain on the surface.

Step 8. And now you need to make tinsel for decoration. For this, a thread-grass or other similar material is used.
Step 9. Glue tinsel and other decorations - we get such a festive photo stand. The original New Year's gift is ready!

origami trees
Origami is a classic style of craft making. Anything can be made from paper in this way: from flowers and animals to houses, airplanes and even submarines. But today we are waiting for the New Year, so let's look at some simple and at the same time interesting models of origami Christmas trees.
One tree and a garland
By itself, one craft may not look so impressive. But if we made 10 or even more models at once and strung them in a garland - this is truly festive! Moreover, they should be as simple as possible and produced quickly.
So, let's make one tree, and then a lot of such trees will create a real New Year's fairy tale. Here's how to make such a Christmas tree (see diagram):


Well, then everything is very simple. Such Christmas trees can be put on a New Year's shelf or picked up on threads and hung over a false fireplace or in the corridor, next to a real fluffy beauty, etc. - it all depends only on the imagination and the possibilities of space.

And here is how the instructions for making a Christmas tree out of paper without glue on the video look - simply and clearly.
Modular tree
But a variant of a more complex craft, resulting in a real masterpiece. It can be kept as a keepsake until the next holiday. Moreover, it is not at all difficult to assemble such a charm, since all the modules add up the same way: you just need to sit a little and try.
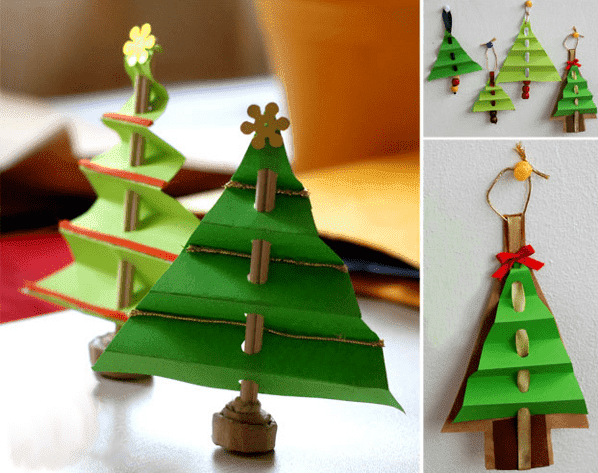
Christmas tree for a corporate party in the office: simple and fast
And what about a friendly team that is preparing for the holiday, as they say, in an accelerated mode? Do you need to buy gifts, think over the scenario of the event, and perhaps put something on the table? To decorate the workplace and conduct fun contests, you can make such a model in haste.
For its manufacture, you will need a minimum of materials that are likely to be found in every office:
- green cardboard;
- hole puncher;
- skewer or wooden stick;
- scissors;
- glue;
- decorations (figurines made of colored paper, cotton balls, ribbons, and in general everything that is at hand).
A Christmas tree can be made in just a few minutes. We will act like this:
Step 1. First, fold a sheet of cardboard in the form of an accordion with a side of each fold 1.5-2 cm.
Step 2. Then we carefully make a hole exactly in the middle - if there is no hole punch, this can be done with a thick needle or awl.
Step 3. Cut off the side parts in the form of triangles on both sides to get the shape of the Christmas tree.
Step 4. We insert a skewer or a wooden stick into the holes (in extreme cases, a pencil is also suitable), after which we decorate our crafts.
Here's what the step-by-step instructions look like in the photo.
And here is what the finished crafts look like. They can be hung and put - solid advantages.
Corrugated paper Christmas tree: options for a gift
Paper is simply an inexhaustible source of creativity. Even from a regular sheet, you can make dozens of different models of Christmas trees. What about corrugated paper? It is indispensable for such crafts, because it imitates needles very well and also looks very attractive.
To make such a New Year's gift, we need:
- white cardboard;
- corrugated paper green and red;
- scissors;
- glue;
- cotton wool and other decorative elements for decoration;
- toothpicks or wooden sticks;
- compass;
- pencil;
- ruler;
- bow.
We will act like this:
Step 1. First you need to make a cardboard cone - this is the basis of the future Christmas tree. To do this, we draw a longitudinal line 30 cm long on the surface of the cardboard, divide it in half (15 cm each), and in the center draw a circle with a diameter of 15 cm (i.e., a radius of 7.5 cm) using a compass. We cut out this circle and make a cone from it with the same height of 15 cm. You can fasten it with a stapler or glue.

Step 2. Now you need to paste over the surface of this cone with green corrugated paper.

Step 3. While the workpiece dries, let's proceed to the main stage - the creation of needles. To do this, from corrugated green paper, you need to cut 120-130 strips 1 cm wide and 15 cm long.
Then we put several pieces one on top of the other and make cuts 0.5 cm wide, as shown in the photo. After that, roll them up with a toothpick or stick. Glue the ends of the strip to make a fluffy pompom.

Step 4. We fluff each of these lumps and glue them onto a cone - that's all.

Step 5. It remains only to decorate as your creative imagination tells you - with bows, beads, sparkles. It turns out a model of a real Kremlin Christmas tree - very impressive and at the same time simple.

Here is a visual video instruction that will help you figure out in detail how to make a Christmas tree out of corrugated paper with your own hands for the New Year or Christmas. Here is another model, which, by the way, is made even easier, but it definitely looks no worse.
Christmas trees in quilling technique
Quilling is one of the modern trends in decorative art, which, however, has already become widespread among amateurs and professionals. Without exaggeration, we can say that any beautiful model can be made from twisted paper (namely, this is what is called quilling).
Here, for example, are several options for Christmas trees for New Year's cards.


And here are three-dimensional figures, which consist of several modules glued together.


To understand how to make such masterpieces with your own hands, you just need to master the technique of twisting paper strips. From them, you can make almost any model of a Christmas tree from paper.
Step-by-step instructions on the video will help with this:
Christmas tree from old magazines - for lovers of nostalgia
Old glossy magazines or even ordinary newspapers can probably be littered in the house. To “breathe” a second life into these things, you can simply use them for New Year crafts, including making a Christmas tree.
Do not think that the model will turn out to be some kind of “not like that”. In fact, it will give odds to even the most beautiful figures made in other ways. Of course, it is best to use colored glossy pages - then the Christmas tree will turn out to be truly festive.

Here is an example of creating one of the most simple crafts.
Happy New Year!
It is difficult to imagine New Year's fun without a forest beauty. However, not everyone has a place or opportunity to put up a real Christmas tree. Artificial, on the other hand, looks unnatural, as a result of which the surroundings and individuality are lost. To make this New Year the most beautiful and original, needlewomen come up with interesting design solutions to replace the symbol of the holiday.
There are many implementation options. The most common question is: "How to make a Christmas tree out of paper with your own hands at no extra cost?". The answer is simple - use improvised materials and what you can find at home. Turn on your imagination, think about what you want to do and evaluate the items in the bins. Surely there will be found old magazines, newspapers or even colored paper. Colors, felt-tip pens, buttons, bells and everything that your ingenuity tells will be useful.
It is up to you to decide how to make it, but try to follow the general rules for creating such toys:
- Decide on the form you want to receive. Most often, Christmas trees look like a traditional triangle and cone. But if you want to create a unique design item, then pick up interesting models. For example, with a slope, with an unusual tip, in several tiers, round, etc.
- The color scheme does not have to be standard. Few people can be surprised with a green Christmas tree, but yellow, blue, white or blue - please.
- After you have outlined what the toy will look like, think over the technique. How to make New Year's Eve so that it survives all the holidays and does not fall apart under its own weight? There are many mounting options: on the frame, on adhesive tape, on glue, monolith.
- The final chord is the decoration of the top. Today it is fashionable to attach symbolic things to the dome. So, a family expecting a baby puts an angel there, who want to expand their housing - a house, etc.
Creating the basis for the Christmas tree
As a basis, you can use a purchased folded part of the bottle and a paper sheet. Here we will look at which will be the basis for almost all masterpieces.
To do this, you will need thick cardboard, adhesive tape or glue, scissors and compasses. Measure the height of the future beauty on the compass and draw a quarter circle on the prepared cardboard. For ease of attachment, leave a small allowance. Now connect two straight lines and secure with glue or tape. This will become the foundation. How to make a Christmas tree out of paper. The photo below will tell you where to start.
One or more glued wooden skewers can be used as a tree leg. Now you can start decorating the cone. The easiest way is to wrap it with tinsel with a slight slope and fix it with glue.
toilet paper tree
Today, few people are surprised that a Christmas tree is made of paper. Few people know how to make such unique things. Imagine the surprise of the guests when they see the toilet paper beauty!
Creation instructions:
- Cut off a piece of toilet paper.
- Cut out four semicircles so that the radius of the next one is 0.5 cm smaller than the previous one.
- Form four cones from them.
- To give the Christmas trees splendor, cut the bottom of each of them with a fringe.
- Place one on top of the other, starting with the largest.
- Place them on a suitable size leg.
A simple and affordable way will allow you to create an original and funny decoration that will surprise guests.
Herringbone with paws in the form of cones
Draw a circle with a compass and divide it into 12 identical sectors. Cut them along the marked lines so that you can easily form cones from them. Fasten them with a drop of glue or a small piece of thin tape. Such parts will need at least 10 pieces for the smallest Christmas tree. For big beauties, they need much more. Start your creativity with a small copy, and only then aim at the masterpieces of the "global scale". Each next circle should be slightly smaller than the previous one. Keep decreasing until the job becomes impossible.

To fasten them together, use a thick wire or skewer. The great advantage of wire is that it can be used to create a small base that will give the tree stability. Many are interested in how to make Christmas tree toys out of paper, because it is not able to withstand massive decorations. Consider gluing rhinestones and sequins, in some cases it can be plastic buttons. The surest option, suitable for any beauty, is decorating with paper toys or which can be purchased in shops with hand made goods.

Herringbone with sharp ends
To create such a design version, you will need thick colored paper. It is necessary to cut out even circles from it, which will differ in radius by about 0.5-1 cm. After that, fold each of them in half. The workpiece must be folded in half as long as possible. Carefully iron any wrinkles with your fingernails or scissors. It is important to achieve rigidity and understand the principle of how to make a Christmas tree out of colored paper. Now gently straighten the tier without straightening the resulting accordion. As a result, you should get a cone that looks like a wavy skirt. Do this with all circles.

You can collect the resulting tiers on a skewer installed in a cork and fixed there with a solution of alabaster or ordinary plasticine. Attach beads, rain or other light decor to the paws. As a star, you can use a large shiny bead that will hide the tip of the wire or skewer.
Christmas tree that even a child can handle
Crafts with children are the best pastime in a quiet family circle. A modern 2D Christmas tree made from children's handprints is very easy to make, even schoolchildren can handle how to make a Christmas tree out of paper. Give your child colored paper and let him circle his pens. The more prints you get, the more magnificent the Christmas tree will be. You can do this with the whole family: circle the palm of a child, mom, dad. Get your grandparents involved in this. Think of the activity not as decoration, but as a family reunion.
Cut out the resulting prints and place either on a large piece of whatman paper, or by clinging with glue one to one in the form of a cone with your fingers down. A Christmas tree made of paper looks very beautiful on the wall. How to do, figured out, now let's talk how to decorate it. To make it a masterpiece, use multi-colored paper, buttons, bows, hairpins, and more.
Christmas tree from a magazine
Surely everyone has a stack of magazines hidden somewhere, which you are unlikely to use for their intended purpose. Fold all the pages into triangles, then turn the magazine inside out and glue the two outermost pages together. A big plus in such a Christmas tree is that it does not need any decor. Aesthetic appeal is achieved by the beautiful drawings that were on the pages.

The second option is also made from an old magazine. Instead of folding the pages, cut them into patterns in the same pattern, such as several traditional triangles.
Herringbone in quilling technique
Thanks to the quilling technique, a unique carved paper Christmas tree is obtained. How to make lovely curls, they will tell in master classes on this art. You can comprehend the secret in a few hours, a specialist will help you create a unique designer beauty.
Get creative with your kids. After that, they will be able to take it to school and participate in the winter crafts competition.
How to make New Year's with your own hands: voluminous, in origami style, made of corrugated paper and cardboard, as well as stencils and patterns for this craft on, read in our material.
Every day the New Year is getting closer and closer! Many have already begun preparations for this holiday: they are preparing to buy a Christmas tree, choose, look after outfits, decide how they will decorate the apartment, where and with whom they will celebrate, what they will give to relatives.
Today we offer to decorate the table and make crafts from colored paper for the New Year. You can make wonderful paper Christmas trees. And, of course, children will help you create these!
Christmas tree made of paper
Origami Christmas tree: in order to, you will need a square sheet of colored paper, scissors and a diagram. Fold a sheet of paper as shown in the diagram, make cuts, wrap the corners and that's it, the paper Christmas tree is ready.


.jpg)

Christmas tree made of paper: crafts for the New Year
A simple Christmas craft that even children can handle. We print out the scheme of the Christmas tree, fold the sheet with the pattern in half, cut out the Christmas tree and make cuts from the center to the periphery.


Christmas craft: colored paper tree
An openwork Christmas tree made of paper will be great. It is very easy to make it. You will need a Christmas tree diagram, two sheets of paper, a stationery knife and a thread with a needle. To get started, print out a paper Christmas tree template in duplicate, cut out patterns with a utility knife, then fold both Christmas trees together and sew them in the center from top to bottom. Then straighten the Christmas tree that you have.


Christmas tree made of paper: a simple craft
To make such a New Year's craft that can be used as a Christmas tree decoration, you will need cut out circles from paper of different diameters, a thread with a needle and a bead. Cut out four circles of paper of different diameters (the difference will fluctuate depending on the size of the Christmas tree), fold them as shown in the diagram. String all the details one by one on a needle and thread: from largest to smallest. Attach a bead on top of the paper Christmas tree.


Craft: corrugated paper Christmas tree
First, for a corrugated paper Christmas tree, you need to make a cardboard cone. Then cut ribbons from corrugated paper and fold one end of the ribbon as shown in the diagram. Then stick the tape around the cardboard cone from bottom to top with double-sided tape or glue.

Christmas tree made of paper: scheme
In order to make such a Christmas tree with your own hands, you first need to cut out circles from paper of different diameters. Then bend them as shown in the diagram. Bent parts - string on a wooden stick and fix with a glue gun.

Paper Christmas tree: master class
First of all, roll up a cone from cardboard or whatman paper, and also decide what details you want to use to decorate your paper Christmas tree. It can be stars, circles, petals. Then cut out these parts in sufficient quantity and glue with a glue gun from top to bottom, as shown in the photo.


Volumetric Christmas tree made of paper for the New Year
To make a voluminous Christmas tree out of paper, print out the template. Then cut out the parts, fold the ends as shown in the diagram, and then place all the parts on the thick wire base: from largest to smallest.


Christmas tree made of paper and cardboard
This is a very simple tutorial. Even the smallest of children can make such a Christmas tree with their own hands. First, cut out a triangle from cardboard. Skhadi to it with glue or adhesive tape we glue a children's stick. We cut out strips from colored paper and stick them on the front side of our future Christmas tree. When the glue dries a little, cut off the excess along the contour of the cardboard triangle.

How to make a Christmas tree out of paper: video
Now you have diagrams and templates on how to make Christmas trees for the New Year with your own hands from colored and corrugated paper, cardboard and whatman paper. With the help of these paper Christmas trees, you can decorate not only an apartment, but also a kindergarten or a school classroom. And also use them as Christmas crafts for children.