How to make beautiful flowers for a postcard. DIY paper flowers: schemes and templates. From thin paper
Greetings, dear readers and visitors! I have repeatedly written that I love decorating gifts in the most unexpected ways. And today I suggest you make paper flowers with your own hands. Already twenty-odd methods, by the way.
Now, unfortunately, I rarely get to mass gift wrapping. Moreover, every year there are more and more acquaintances and friends who should be congratulated along with relatives. It's very joyful! I love giving presents. But if I choose them very carefully, then lately I pack them in organza bags, since I decide on detailed packaging only for single holidays (like birthdays).
However, my passion for various kinds of packaging beauty is difficult to overcome, so today I will train with you to make beautiful flowers according to step-by-step schemes.
DIY paper flowers: simple and with a twist
There will be a lot of master classes, get ready. Good news for all rose lovers: there will be 4 of them.
Aster
Guys, honestly, I'm not very strong in the names of colors. So if you see a clear discrepancy for you - write in the comments.
So, the first in line is the aster. For her, cut out five circles: two large, two medium and one very small. Fold each circle in half three times, then draw the edge as in the 4th photo. After unfolding the design, squeeze each petal to add volume. Fold all the circles into each other and decorate the middle.
Almost calendula
This flower is much more like a packing bow. Prepare for it a square of paper of the desired length and cut the edges according to step 2. You will need several such blanks. Lay them one on top of the other and squeeze in the center, tightening with wire or thread.
Now the most important thing is to straighten the petals so that you get a beautiful likeness of a flower. Accordingly, the more layers, the more petals and the more magnificent the flower in the end.
Tip: make several of these flowers of different sizes and glue them on the packaging next to each other, then you get a beautiful likeness of a bouquet.

Calla
To create calla lilies, you can use both ordinary double-sided paper and foamed rubber (here I wrote what it is - in the section about the minion).
For calla lilies, take a stamen (you can crumple it out of paper or make it out of polymer clay) and a petal made in the shape of a heart. Insert the stamen into the petal, fold the edges of the petal over the stamen, gluing together. It remains only to unscrew the edges to get the maximum resemblance to calla lilies.
Such flowers are well suited for postcards, packaging, and as an independent gift in the form of a bouquet.

Bell
The master class for the bell is quite simple and understandable. Cut out the blank according to the first photo. Glue the edges of it, and gently straighten the ends. To make everything look natural, make the middle of several oblong stamens that will need to be glued inside the flower.
Of these bells, by the way, it will be great to decorate the packaging for March 8 or just a spring birthday.

lilies of the valley
Well, or something similar. For one flower, take a long rectangle and bend the edge of it, as in the photo. Cut the wide part so that you get a lot of small strips. Using scissors, twist the strips (to do this, you just need to run the sharp side of the scissors along these strips, slightly pressing the blade against them).
To prevent the flower from falling apart, take a rod on which you wind a green strip. Then, from above, begin to gently twist the “flower” part, previously smeared with glue. Apply layers tightly so that greenery does not show through from under them.
But it’s not at all difficult to make green leaves - for them, just fold a rectangle of green paper with an accordion and cut the edges with a “triangle”. When unfolded, you will get a lot of green leaves ready to be glued to the base.

Poppy
Now let's use corrugated paper. Cut out about ten teardrop-shaped petals from it. Stretch the wide part so that the blanks resemble mushrooms.
Take a thin wire and wind some paper around it - this will be the core. Wind the petals onto this core so that each slightly overlaps the previous one. When everything is ready, the structure can be pulled down below so that it does not fall apart.
The master class shows how this flower can be attached to a festive cap, but believe me, a poppy will look great on a gift box.
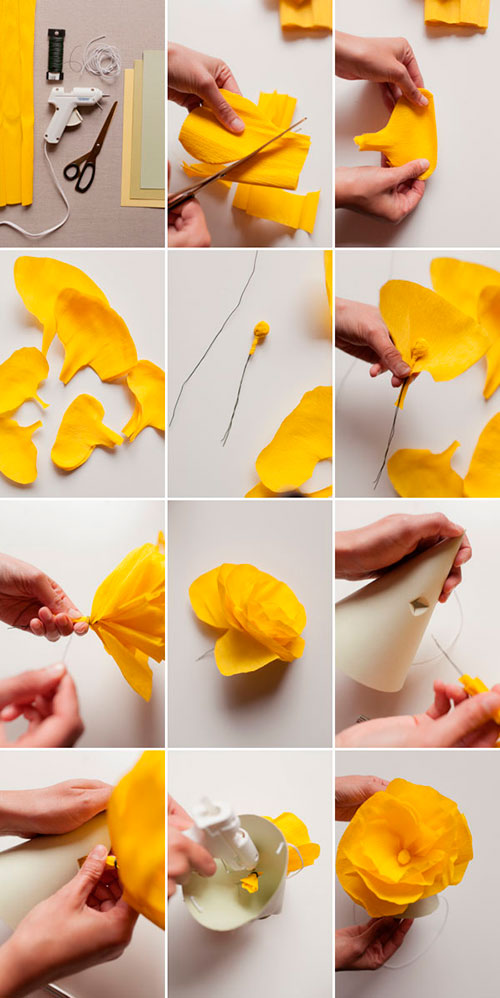
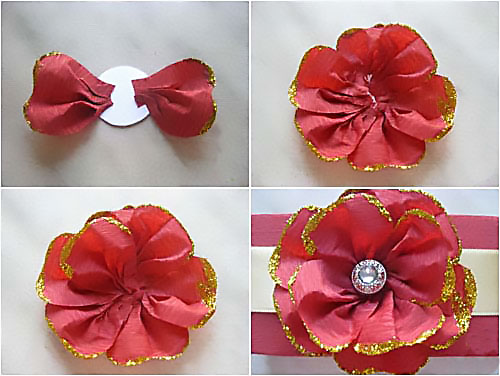
Red flower
What kind of species does he have? No associations came to mind. But this is not the point - to create it, you will need about ten petals (corrugated paper is used, by the way). Their shape is almost drop-shaped. but with a cut end.
Cut out a base circle from thick cardboard. Glue all the petals in layers to this circle, slightly crumpling (doubting? God, how right: _D) the bases, thus forming folds - then the flower will be more voluminous and “fluffy”. Decorate the center with some button or bead.
Such a flower, by the way, will look great from soft felt - so it will gain durability. And if you attach the base for the brooch at the back, you get two in one - a gift decoration and a gift itself.
Extravaganza of color
There are only two flowers, but due to the bright combinations, a very unusual effect is obtained. Take the crepe paper again, cut out a circle and fold it into a chrysalis shape. Cut a “skirt” to it, which you wrap around the chrysalis. Attach the petals on top, gluing them in a circle. Glue two wide leaves at the base.
The second flower is quite simple - cut the fringe and twist it into several layers. Flowers are very simple, they can make a very interesting gift arrangement.
Unseen flower
To prepare the basis for this flower, I advise you to look here - here the basis for the second Christmas tree is created in the same way. But then the differences begin - each of the corners must be wrapped with a thick wire or knitting needle so that a spiral is obtained.
You can leave this design alone, but I suggest you connect several (say, three) pieces using the existing spirals - the wow effect is provided. Then you can also experiment - combine elements with spirals into unprecedented designs.
Tip: going to a Japanese-style party? Then make such a flower of a very large size and take it with you - it will serve as an excellent decoration for the chandelier.

Peony
“Pio-, pio-, peonies are given by a new acquaintance ...” - the words from the song of the underground group “My Michelle” (I often listen to it lately, inspired). We will make crafts from corrugated paper. You will need five sizes of petals, approximately five copies of each (appearance as in the photo).
Stretch the petals so that you get a semblance of a wave (for both large and small ones). Then form a stamen from the same corrugated paper by folding the paper with further compaction. You can do this on a wire skewer, or you can do it without it.
Glue the petals onto the finished stamen, overlapping each subsequent previous one. Do not tighten the petal too much. At the end, it remains only to cut the green leaves and stick them around the peony.

4 in 1: dandelion, carnation, aster, chamomile
All these wonderful creations of nature are made according to the same principle - cutting the edge of the strip from which the flower will be made. The final shape of the flower also depends on the shape of the cut. Keep in mind that some require a core, while others do not.
Please note: despite the very simple design, the flowers are very realistic. If there is very little time for production, then this is an ideal option.
Experiment and discover your unprecedented plants - be sure to tell us what happened.

paper roses
Magic roses are one of my favorite flowers.
Rose with twisted edge
The main difficulty here is to carefully twist the edge of the corrugated paper, straightening the folds. Then make sure that the folds are even. Now twist the strip so that the layers fit snugly together. At the end, fasten with a thread, cut off the excess.

simple rosette
Need to make a plant in five minutes? Then this rose is for you! Just cut out a circle in which draw a spiral. Cut out a spiral like in the photo and twist the rose starting from the longest link of the spiral (the central part will serve as the base).

big rose
Even gigantic, if you follow just such dimensions. Heart petals are stretched and superimposed on each other in a circle with fixing with glue. Green petals are attached at the end. Of course, the flower does not have to be as big as in the photo - start from your preferences.
Twisted paper rose
Once I already described this way of creating a rose (here is the second one). The principle is exactly the same, but the dimensions of the triangles resulting from twisting must be the same along the entire length of the tape, otherwise there will be a not very neat flower.
Once she even made a Rosemary doll, which took part in the city exhibition. Her whole body was covered with roses, made just in this way (the roses were from ribbons, really).

Clover
I will only show you how to make the base for a four leaf clover. To do this, take a square of paper and fold it in half lengthwise and in half again. Bend the ends to the center. Cut out a heart from the resulting design. The result will be exactly what we wanted - a happy flower.

Nameless
As much as I puffed up, I could not give an intelligible name. As a result, Tovariz remained just a beautiful flower, reminiscent of kanzashi motifs (Japanese art of making jewelry from satin ribbons).
The beginning here is the same as in clover. But after bending the edges, it will be necessary to bend the ends so that the length of the bent part is equal to the length of the visible side in the middle. Then these parts are straightened and their edges are already bent so that the sides are even. They are again bent and glued so that three stamens are obtained. There should be three such petals.
Most of all, such a flower is suitable for decorating a gift in the Japanese style.

And again aster
This time, you already need to glue the petals around the edge until you reach the desired volume. Decorate the center as you wish, or simply fill it with as many petals as possible.

On this large flower review, I declare it closed. I hope you have found exactly the option that will help you decorate the best gift. See you soon, subscribe and share with your friends!
Sincerely, Anastasia Skoreva
Volumetric paper flowers are used to decorate interiors, furniture, ready-made accessories, gift wrapping, postcards. It is not difficult to make them: the process does not require special skills, it captures and gives pleasure. Combine business with pleasure: try making flowers in different ways.
Making paper flowers is a simple process. The material is affordable and inexpensive, it is easy and convenient to work with it, so even beginners who have not previously been engaged in needlework will master the process. Studying detailed master classes will provide an opportunity to find good options and get exclusive jewelry. By the way, popular in 2017-2018.
For manufacturing, you may need:
- Material. It can be plain white paper for printing, colored or corrugated paper, drawing paper, tracing paper, old newspapers or magazines. It is convenient to make small elements from soft materials, and large ones from dense ones, which must retain their shape.
- Scissors are used to cut parts. Choose quality ones that will cut cardboard.
- Glue: universal, silicone, PVA. The choice depends on the type of paper: the denser and thicker it is, the more securely it should be fixed. For convenience, protection from contamination and good bonding, you can use a glue gun.
- Schemes, templates. If the master class with instructions left questions, a visual demonstration will give answers to them. You can make perfect blanks according to the template, and a detailed diagram will help you figure out how and in what sequence to act.
- Frame materials. If flowers are made from paper with stems and leaves, you will need a wire that performs the functions of reinforcing and fixing the composition.
- Good mood and calmness. Start making if you are calm and determined to succeed. Nervous, angry and worried, you will not achieve a good result and will not get pleasant emotions from the process.
Volume flowers from corrugated paper
 Corrugated paper flowers look attractive. To make them, stock up on materials and tools. Need:
- wire;
- scissors;
- corrugated paper (green, red, white, yellow);
- glue;
- ribbon.
 Process :
- Cut off a strip of wire to prepare the stem.
- From green corrugated paper, cut a strip 1.5-2 cm thick.
- Coat the wire with glue, wrap it with a green strip along the entire length (fix the edges with glue).
- Cut out a strip of red (or other) paper: do not touch the bottom, but cut out semicircles or ellipses on the top. Wrap the edge of the stem with this blank, after coating it with glue.
- Cut out the rest of the petals and glue one by one to the bud. Fluff up the flower.
- Cut out green leaves, fix on the stem.
- The first flower is ready, make the rest, making them multi-colored.
- Collect flowers in a bouquet, tie it with a ribbon.
Advice! You can make large flowers in the same way, increasing the size of all the details several times. It will be an original interior decor or a photo zone at a holiday.
 There is another way: by combining many flowers, you will get a beautiful garland. You will need multi-colored corrugated paper, fishing line or strong thread, scissors, a needle, glue or a stapler.
Description of actions:
- Cut out rectangles from paper: the same size or 1-2 cm different.
- Stack the blanks in stacks of five. For solid colors, combine elements of the same tone, and for making bright jewelry, combine different shades.
- Fold each stack with an accordion. Fix the centers with a stapler or tie with a thread. Round the edges with scissors to make the flowers look gentle and cute.
- Straighten and fluff the edges of paper elements.
- String the resulting buds on a fishing line or thread, piercing them with a needle in the central parts.
Volumetric flowers on the wall
 Large voluminous flowers will become a non-standard wall decor of any room: living room, nursery, bedroom, hallway. Prepare:
- cardboard for the base;
- scissors;
- colored double-sided paper (can be replaced with stickers - small sticky notes glued into a block);
- glue.
 Master Class:
- Cut out a round base from cardboard. Diameter - 13-14 centimeters.
- Prepare paper squares. It is more convenient to use ready-made stickers, as there is no need to prepare details. If there are none, cut out squares of approximately 7.4x7.5 cm from double-sided colored paper. Quantity for a circle with a diameter of 13-14 centimeters: 24 pieces for the first layer, 22 for the second, 17 for the third, 14 for the 4th and 15 for the core.
- From all the squares, form small bags (like for seeds). A sharp cone should form at the bottom, and a circle with one triangular petal at the top. Connect the edges with glue.
- Take the base, grease the edge with glue and fix the bags with the back sides (parts with protruding triangular petals).
- Glue the second, third and fourth rows in the same way.
- When making the core, glue the central bags to the neighboring ones so that the center turns out to be voluminous and neat.
- A beautiful voluminous flower is ready. You can attach it to the wall with double-sided tape or with a carnation and a loop of thread glued to the base.
Card with three-dimensional flowers inside
To please a loved one or friend with a card with a bouquet of paper flowers inside, try making such a gift with your own hands. Make beautiful voluminous chrysanthemums. You will need:
- colored paper of lilac, pink, yellow, white, green (light green) colors;
- a sheet of cardboard for the base;
- thread;
- scissors;
- glue.
Master Class:
- For one flower, you will need five circles of paper: two of the largest, two medium and one small. Fold the first circle three times in half, cut out two oblong petals from the edge (slightly deepen the cutout towards the center).
- Expand the circle, fold the petals in half to give the composition volume.
- Place two medium circles on the large circle, then a small one. Connect the parts with thread or glue. The center can be decorated with a thread tassel or left as is.
- Make some chrysanthemum buds.
- Prepare the base of the postcard by folding a sheet of cardboard in half.
- Glue the resulting flowers, for example, one in the center on the fold of the cardboard and several on two sides.
- Cut out strips - stems of flowers. Fix them under the buds.
- Cut out the leaves, fold in half and fix near the stems.
- The do-it-yourself postcard is ready, and the flowers seen inside will definitely please the recipient!


There is another option for those who love roses. Need to prepare:
- double-sided colored paper (red, pink or white);
- felt-tip pen or pencil;
- scissors;
- cardboard;
- glue.
 Manufacturing instructions:
- Draw a spiral on paper and cut the workpiece along the line.
- Twist or bend the edges of a long coil of a spiral - this is the center of the future flower.
- Wind the remaining turns of the spiral around the central part, periodically fixing them with glue for the reliability of the composition.
- The edges of the petals can be slightly bent, then the flowers will look more realistic and voluminous.
- Make some more flowers.
- Fold the cardboard sheet in half to form the base of the card.
- Glue the buds inside the card.
If the recipient prefers delicate calla flowers, make this paper card for them. You need:
- double-sided colored paper (corrugated is suitable);
- modeling dough or polymer clay;
- universal glue (glue gun);
- scissors.
 Description:
- Make a stamen - blind from dough or clay. But you can crumple the paper and roll it into a tube.
- Cut out a heart from paper.
- Place a stamen between the rounded parts of the heart, fix it.
- Wrap the stamen in the petal, leaving most of the part out. Glue the joined sides of the heart, carefully turn the edges outward.
- Make a few buds, glue the flowers into a card and give a gift.
Patterns and schemes of volumetric colors
You can make paper flowers using templates or patterns. Having studied the diagram, you will understand the sequence of steps and make the product described by the author identical. For beginners, it is better to use simple and understandable options.
The template will simplify the process as much as possible. You just need to open and download the image, transfer it to a Word document or other file and print the image on paper. But it will not be possible to make large flowers using templates, since the size of the picture is limited by the sheet format. 


Volumetric flowers video
Handmade flowers will become an original interior decoration or an exclusive gift for any occasion. Consider all the methods proposed in the article, choose the one you like, study the instructions and start manufacturing.
Elizaveta Sklyarova
Beautiful and original card 3-D will be a great gift for the upcoming March 8 holiday. Such postcard will be useful to do with children over 6 years old. Of course, children will need the help of an adult, but they can do all the preparation of the details on their own. The manufacturing process is postcards develops fine motor skills of hands, spatial thinking, logic, and also teaches children perseverance and accuracy.
Do 3D postcard incredibly interesting, because in the process of its manufacture, real miracles happen with paper.
Required materials:
- colored printer paper
Glue stick, PVA or double-sided tape
Scissors
- felt-tip pens or markers
bird pattern
Openwork napkin
Printed congratulations for mom

move work:
1. On sheets of paper of any colors we measure squares 10 * 10. There are 7 such squares.


2. Fold our squares into triangles three times.

3. Cut out the petals.


4. Expand the petals and get flowers.

5. One segment we cut off the flower.

6. Let's start coloring our colors(I have a black marker)

7. Leave one petal unpainted, glue tape on it or apply glue and glue it to the adjacent petal, creating volume.

8. Add up flowers in half and begin to collect the bouquet. To the first flower glue blanks on the right and left sides, leaving the central petal free.

9. We put one blank on the three central petals.

10. Again we impose two petals on the left and right sides.

11. Glue the last blank onto the three central petals.

Important: glue only the edges of the petals!
12. I decided to make leaflets.


13. Getting Started postcards.

We fold a sheet of thick paper in half, glue the leaves and attach the bouquet to postcard as shown in the photo.


14. We draw up the title page at our discretion. I glued an openwork napkin, a bird made of cardboard on top, a wing and a congratulation to mommy in the right corner.


At first glance, it seems that postcard very difficult to do, but it is not. Worth a try and everything becomes clear. My seven year old son squealed with delight as he helped me glue and saw the magical result. All creative success!
Related publications:
Educator of the second group of early age: Neklyudova Darina Sergeevna The purpose of the master class: Formation of the skills of teachers to create a product.
Here he enters the clearing Directly to the sea-okiyanu; Across it lies, Chudo-yudo Fish whale Did you learn from which fairy tale these lines? Correctly from a fairy tale.
Master class "Volumetric snowflake" The New Year is coming! And this means that it's time to think about decoration, without which few people can do.
Master class "Volumetric snowflake". After the autumn slush, dampness and rains, winter has come - the most fabulous time of all seasons. AND.
Soon, very soon, the long-awaited and beloved holiday, the New Year! The time of the New Year holidays, the time of a beautiful, kind fairy tale, which.
Volumetric paper snowflake. New Year is a time of magic and fairy tales, when each of us hopes for a small miracle. Therefore, preparation for
An ordinary postcard does not surprise anyone. Therefore, I had the idea to make a 3D postcard with flowers. It is not difficult to make it, but it looks unusual and interesting. This card will be remembered for a long time.
To make a postcard, we need:
- a sheet of double-sided colored cardboard (postcard base) of any color;
- double-sided colored paper (for flowers) of any color;
- pencil glue;
- scissors;
- pencil;
- markers.
Step 1. Cut out 7 squares of 10x10 cm from double-sided colored paper.

Step 2. Fold the square 3 times to make a triangle.

Step 3. Draw a petal.

Step 4. Cut and open.


Step 5. Thus we make all 7 flowers.

Step 7. With a blue and blue felt-tip pen, draw small strokes from the middle, also along the edges of the flower. Set aside two petals unpainted!

Step 8. We also color the rest of all 7 flowers.

Step 9. Cut out one of the unpainted petals. We do the same with the rest of the colors.

Step 10. Coat the remaining unpainted petal with glue and connect it to the adjacent petal. It should be voluminous. We do the same for all other flowers.


Step 11. Take 3 flowers. Each flower is folded in half. On one of the flowers we mark crosses. We coat those places that are marked with a cross with glue and glue the other 2 flowers bent in half there.


Step 12. We coat those places that are marked with a cross with glue and glue another flower bent in half.

Step 13. We put crosses again, glue these places with glue and glue 2 more flowers bent in half.

Step 14. Again we put crosses, coat with glue and glue one flower bent in half.
