How to make a pencil holder with your own hands. How to make a pencil holder using the cardboard technique. Can holder for pencils and pens
September 1 is not far off, the time when all children will go to school, and students to technical schools and higher educational institutions, it will be time to gain knowledge. Students spend most of their time in educational institutions, but they spend just as much time at home preparing and doing homework.
 In order for the material received in the educational institution to be better consolidated, a comfortable and beautiful workplace at home is necessary. Of course, a desk, a comfortable chair are important, and it is also very important that everything you need is always at hand. A desktop stationery set should cope with this task - a keeper of pens, pencils, erasers, paper clips and other such important little things.
 In this article, the Site news portal has prepared especially for you the best selection of the most original stands for pens and pencils, which you can easily make yourself from improvised materials. You can use a homemade stand for pencils and pens on your own, or you can present it as a gift to your girlfriends or friends, brothers or sisters.
Stand for pencils and pens do it yourself

Necessary materials:

- threads;
- scissors;
- plastic jar;
- wooden popsicle ice cream sticks;
- brush and glue.
Manufacturing:
We cut off the top of the plastic jar so that the bottom remains and a few more centimeters up. Using glue, glue wooden sticks to a plastic jar (see photo).
 Now we twist wooden sticks with multi-colored threads, filling the voids with threads.
 Use threads of different colors, then the pencil case will turn out to be especially bright and unusual.
 You can decorate the finished pencil holder with rhinestones, interesting stripes or buttons.
Do-it-yourself tin can pencil stand
Do-it-yourself stand for pencils and pens from newspaper tubes

Necessary materials:
- newspapers or magazines;
- toilet paper roll;
- glue;
- cardboard;
- double sided tape;
- threads;
- acrylic paints.
Manufacturing:
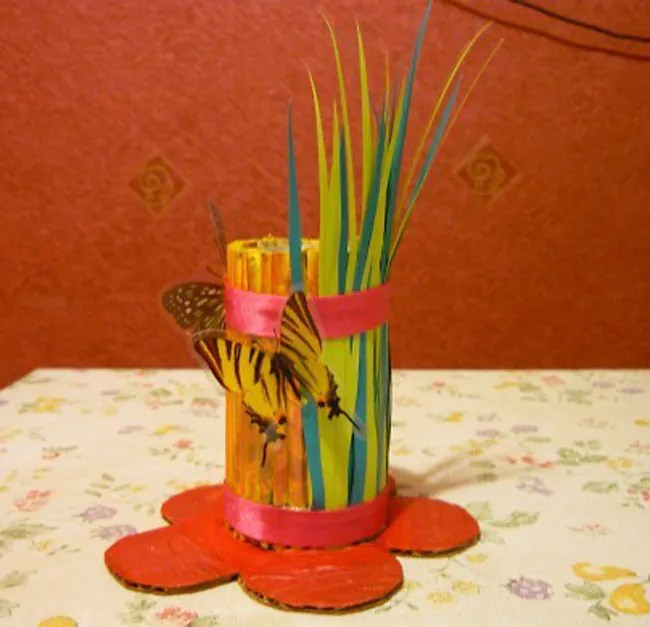
From a newspaper or magazines, wind the tubes, grease the ends of which with glue so that they do not bloom.
 Glue newspaper tubes vertically onto a cardboard roller with glue. For more reliability, tie them with threads.
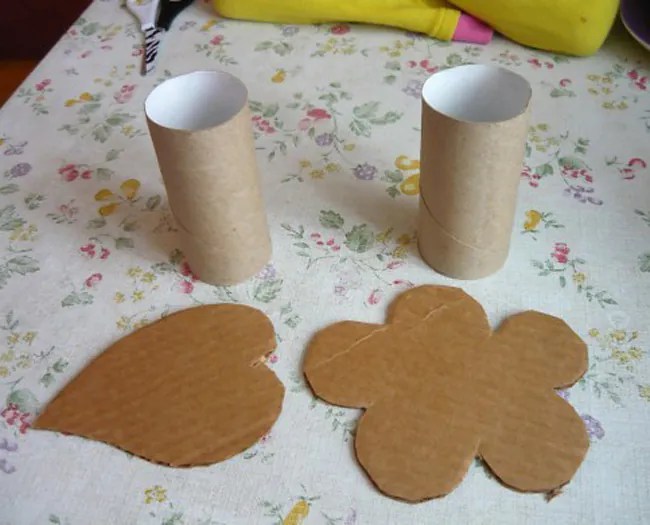 Make the bottom for the pencil case curly from a sheet of thick cardboard (it can be a flower, a leaf) and glue the bottom on double-sided tape.
 Now you can decorate the pencil holder and the bottom.
 You can decorate a ready-made stand for pencils and pens with the help of various elements - grass cut out of paper, leaves, flowers, etc.
Stand for pencils and pens from the telephone directory

Necessary materials:
- thick book (telephone directory);
- glue;
- acrylic paints;
- toilet paper rolls;
- cardboard;
- scissors or utility knife.
Manufacturing:
We cut the telephone directory and wrap the pages of cardboard rollers, fix everything with glue. Cut out a figured bottom from a sheet of thick cardboard and glue it to the finished structure. Now you can decorate everything with acrylic paints.
 If you cut the telephone directory into pages of different heights (see photo), then you can end up with an original and unusual pencil case, different in height.


DIY gold pencil holder
Can holder for pencils and pens

Necessary materials:
- tin can;
- the cloth,
- glue;
- decorative braid and ribbons.
Manufacturing:
We measure the tin can and sew a cover for it from the piece of fabric you like. Sheaths the fabric with beautiful ribbons and braid. We put on a cover on the jar.
We fill the edges of the cover inside and glue them on the glue.
Mosaic pencil and pen holder

Necessary materials:
- can;
- a piece of foam;
- primer;
- stationery knife;
- acrylic paints;
- glue
- cement mortar, sealant, or putty.
Manufacturing:
First of all, a layer of primer must be applied to a previously cleaned tin from contamination.
 Using a sharp knife, cut out the squares from the foam sheet that need to be decorated with colored acrylic paints.
 We glue the painted foam pieces with glue to the tin, not forgetting to leave gaps between them.
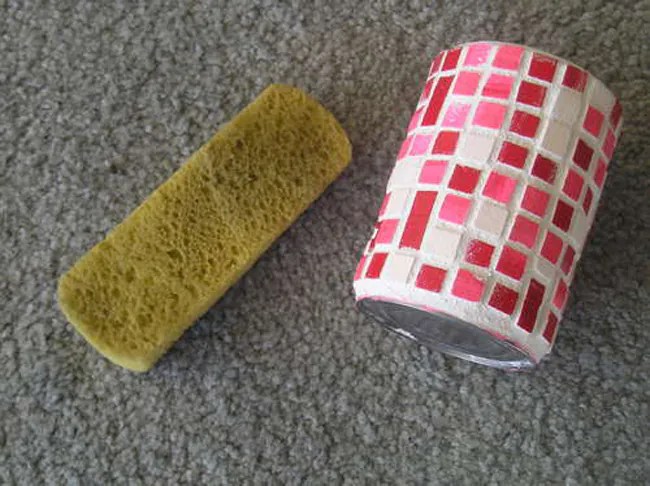 Now fill the gaps with a primer using a regular sponge. Wipe all the excess and the pencil box is ready.

Do-it-yourself tumbler stand for pencils
Stand for pencils and pens made of thread

Necessary materials:

- can;
- threads;
- glue;
- buttons, ribbons, ribbons and bows for decoration
Manufacturing:
A tin can must be carefully wrapped with multi-colored threads, periodically smearing them with glue so that they do not unwind afterwards.
Now you can start decorating. Decorate the pencil holder with buttons, beads, decorative ribbon and rhinestones.
Organizer, pencil holder, stationery stand - different names for the same item. A simple yet important subject. Thanks to the pencil holder, the desktop is kept in order, the necessary items are always at hand. Vintage, stylish or bright - it can become an interior decoration!
You can buy a stand at a stationery store or order an author's model. But if you like to create or you have children, then this article is for you! In it, we will discuss how to make a pencil holder with your own hands.

paper pencil holder
Paper is a great budget craft material! The art of origami wonderfully develops the children's brain - this is a real puzzle. There are quite a few options for paper pencil holders - from a simple quadrangular box to complex modular (consisting of several elements) variations.

Reference! Modular origami, unlike the classic one, involves folding figures from several sheets of paper. Each sheet is folded into a separate element (module), then the parts are connected by gluing or inserting one into the other.


Step-by-step process of creating a modular pencil holder of a simple design:
- You will need 6 sheets of thick, shiny, bright, double-sided square-shaped colored paper (you can use different colors), scissors, glue.
- Take one square of colored paper. Fold it in half.
- Unfold the sheet and fold in half on the other side. Expand the sheet again.
- Lay the edges of the sheet to the center line, press the folds. Expand sheet.
- Opposite edges also lay to the second center line, press the folds. Expand sheet. It turned out a kind of markup for 16 equal squares.
- Bend all four corners, laying the corner to the nearest point of intersection of the folds.
- Lay two strips with folded corners to the center line.
- Flip the rectangular shape upside down.
- Bend the short sides up, laying them to the center line. The result is a square with a diamond-shaped figure in the center.
- Insert the left strip into the triangular pockets of the right until it stops to make a three-dimensional triangle.
- Once again, press all three folds of the triangle. The first module is ready!
- Follow the same pattern for the other five elements.
- If desired, you can insert a piece of colored paper of a different color into the diamond-shaped window of each three-dimensional triangle.
- Glue six modules together. Pencil with six compartments is ready!

Cardboard pencil case
There are quite a few models of cardboard pencil holders - from simple to real works of art.

Template option. The easiest option is to find an origami box template of the shape you like on the Internet, download, print and cut it out. Transfer the contours of the template and fold lines to cardboard, cut along the contour. Bend the template along the fold lines. The shaded parts (the so-called allowances) are smeared with glue and glued to the base.


Vintage masterpiece from cardboard tubes from paper towels
- You will need 3-4 pieces of cardboard tubes, strong glue, scissors, a lot of decor.
- Make tubes different in height. Cut cardboard circles of the desired diameter for the bottoms, glue the bottoms to the tubes.
- Paste the tubes on the outside with vintage wallpaper or fabric, you can do decoupage. Decorate with roses, lace, ribbons, pearl beads.
- Prepare a round or fantasy-shaped solid base from self-adhesive foam board. Remove the adhesive backing from the foam board. Lay the base with the adhesive side on the satin material, cut off the excess fabric along the contour, melt. Glue a thin knitted lace along the contour.
- Stick the tubes bottoms on the base in different places.
- Complement the composition with a vintage bird, a miniature in a frame, a scattering of artificial pearls!


Jar pencil holder
With regard to do-it-yourself pencil holder models from a jar, there are innumerable options!

For girls
You will need a pineapple tin, scissors, glue, decoration materials.

Paste over a tin can with pink corrugated paper or cloth. Girdle the top, bottom and center of the jar with beautiful lace or ribbons, gluing them.

Glue tracks of rhinestones or pearl beads over lace and ribbons. In the center, on the front side, stick a mini-composition of cut-out lace elements, satin ribbon roses and beads!

For boys
Paste over the jar with a shirting fabric with a pinstripe or small check print. On the front side, in the direction from top to bottom, stick a row of shirt buttons.

Cut a solid rectangle out of felt with a length equal to the circumference of the tin can - this is the collar. Glue the collar along the inner edge of the can, bend it outward. You can complement the composition with a mini-tie!

The above examples of organizers from improvised materials are just the beginning of a long list of possible models. Ice cream sticks, expired felt-tip pens, floppy disks, toilet paper tubes, shampoo bottles, plastic bottles - photos of various pencil holders show that the list of improvised materials is endless. Create, move from simple to complex, and who knows what masterpiece you can create one day!

DIY pencil holder photo


Pencils, that is, coasters, or simply cups for pencils and felt-tip pens, for creative people, of course, should be unusual, creative, stylized for something.
In this section, we are ready to offer you a lot of examples of such wonderful crafts. Salt dough or gypsum can serve as a material for original pencil coasters; plastic bottles or toilet paper tubes, corrugated cardboard or toothpaste boxes. Here you will find master classes of original pencil holders in the form of a rocket, a ladybug, a flowering meadow, a man in a folk costume, various animals, cartoon characters, and others, and others ...
Pencils that please the eye and carefully store pencils.
Contained in sections:Showing publications 1-10 of 146 .
All sections | Pencil. DIY pencil holders
We were born on a wonderful planet - Earth. Such planets no longer exist in the solar system, and perhaps in the entire galaxy. Our planet has given us blue skies, clear water, green forests, bright flowers, rich and diverse wildlife. A person is accustomed to this luxurious...
 Target: to introduce children to the technique of making pencil holders from a shampoo jar. Tasks: Educational: to form the initial ideas of children about ecology, its role in people's lives, to teach the correct behavior in nature. Educational: develop creative...
Pencil. Do-it-yourself pencil holders - MK "Pencil organizer made of waste material and jute cord"
Publication "MK" Pencil organizer made of waste material and jute ... "  Master class "Pencil - organizer "from waste material" Group No. 12 "Beads" GBDOU No. 59 St. Petersburg Frunzensky district Developed by: Gorytsina Olga Borisovna Purpose: to introduce the non-traditional technique of decorating from waste material. Tasks: - Teach...
 MAAM Pictures Library
 master class for educators and parents “Pencil or napkin holder” The purpose of the master class: to teach educators (parents) how to make crafts from waste material (old designer). Tasks: 1) to teach how to make crafts from waste material; 2) develop interest...
 The pencil box looks very beautiful, which was made by the pupils of the Altn Oddud preparatory group for the school of the MKDOU Kindergarten 7 of the city of Elista, who attend my Samodelkin circle. In order to do this work, I brought a coffee can and with the help of plasticine and ...
 Material description: The relevance of this master class is due to its practical significance: - it is the acquisition of certain experience, abilities in the manufacture and design of souvenirs and handicrafts from foamiran. The master class will be useful for kindergarten teachers, teachers ...
Pencil. Do-it-yourself pencil holders - Didactic aids from a stand for pens and tubes
 Replenishment of the developing environment in the group does not always happen as often as we would like. Is it true? we have a new...
 Pencil "Flower meadow" Hello dear colleagues. I want to provide you with a craft made of felt, bushings from a roll of toilet paper. With this pencil case, you can teach basic colors with children. Use as a didactic sensory development game (2-3 years. For example...
Making pencil holders "My pets". Master class with step by step photos.
The master class "Making pencil cases from plastic bottles" My Pets "is recommended for participation in the Living World competition by a methodological association of teachers of additional education in a scientific and technical orientation. The head of the association is Rassushina T.V.
Erygina Natalya Nikolaevna, teacher of additional education of the first qualification category, MBU DO SYUT, Angarsk
Description: This material will be useful to teachers of additional education, technology teachers, kindergarten teachers, children of primary and secondary school age and creative people.
Application: Children can use their crafts to organize their workplace, use as a gift.
Target: Introducing students to the independent production of a souvenir, the formation of skills in making crafts from plastic bottles.
Tasks:
educational:
- teach how to make pencil holders using the action algorithm and step-by-step photos;
- expand knowledge about the possibility of using non-traditional materials;
developing:
- to promote the development of attention, fine motor skills of hands, aesthetic taste, creative abilities;
- awaken the desire to engage in applied art;
educational:
- to cultivate accuracy, the ability to achieve the successful achievement of the goal.
Interesting facts from the life of cats and dogs.
It would seem that you can not know about your pets, but interesting facts about animals, such as dogs and cats, usually surprise the most - because it turns out that the amazing is nearby, but we don’t even know about it.

How many people, for example, know that the pattern on a cat's nose is as unique as a human fingerprint? It turns out that cats and cats never meow for each other: these sounds are dedicated exclusively to people. The fact that cats have excellent hearing is due to their physiological characteristics - the cat's ear has the ability to turn 180 degrees, for which more than 10 muscles are responsible. Domestic cats usually live up to 15 years, and the average lifespan of untamed animals does not exceed five years. Many interesting facts about cats relate to Guinness World Records. For example, a cat from South Africa gave birth to 14 kittens in one litter, and a cat from Australia, weighing 21 kilograms, is considered the largest representative of its kind.

It is not difficult to give a lot of interesting facts about dogs. According to one of the most common and well-known versions, among all animals, dogs were tamed by man before anyone else. The first domestic dogs appeared ten thousand years ago. The most ancient dog breeds are Siberian Husky, Shar Pei and Pekingese. The fact that all dogs are color blind is not a myth. They really do not know how to distinguish colors, even guide dogs, moving their owners across the road, are guided not by a traffic light signal, but by the behavior of surrounding pedestrians. Everyone knows about the excellent canine sense of smell, but not everyone knows that dogs can distinguish up to 500 thousand different smells. You can not do without some record indicators. The heaviest dog was an English mastiff named Zorba (weight - 155 kg), the tallest - Great Dane Gibson - his height in an upright position was 2 meters and 10 cm. The rarest dog breed is the Chinook, the number of such individuals in the world has never exceeded three hundreds.

Rules for safe work with scissors.
1. Before work, check the serviceability of the tools.
2. Do not work with loose scissors.
3. Work with scissors only at your workplace.
4. Follow the movement of the blades during operation.
5. Put the scissors with the rings towards you.
6. Give the scissors rings forward.
7. Do not leave scissors open.
8. Store the scissors in the sheath with the blades down.
9. Do not play with scissors, do not bring scissors to your face.
10. Use scissors for their intended purpose.
Safety precautions when working with glue.
1. Work carefully, trying not to drip glue.
2. Try not to get the glue on clothes, face and especially in the eyes.
3. If the glue gets into your eyes, rinse them well with water.
4.After work, close the glue tightly and put it away.
5. Wash your hands after work.
Rules for safe knife handling.
1. Use a stand to protect your work surface.
2. Do not work with the knife towards your body.
3. Hold the knife handle firmly.
4. Keep your hands and knife handle dry.
5. Do not leave the knife in the position with the cutting edge up.
6. Don't try to catch a falling knife.
To make a pencil holder "Cat" you need:
1. Transparent plastic bottle.
2. Knife.
3. Scissors.
4. A set of colored cardboard.
5. Beige and pink note paper.
6. PVA glue or glue stick, glue "Master";
7. Templates.
8. A simple pencil, felt-tip pens.
9. Ruler.
10. Acrylic paints and a brush.


manufacturing algorithm.

2. We paint the workpiece with acrylic paints (at first everything is orange, let it dry, then we apply brown paint on the paws and draw stripes).

3. Trace the head and tail templates on the back of the orange cardboard.

Muzzle and eye on beige note paper.

Tongue on writing paper in pink or red.

Ear, pupil, nose on the reverse side of black cardboard. We draw a strip measuring 6 * 1.2 cm, the width of each antennae is approximately 2 mm.

4. Cut out the blanks for the head and tail.

5. We glue together to make a two-sided part, leaving 0.5 cm at the base of the tail not glued, for gluing to the body.

6. Cut out the blanks of the muzzle and eyes (when cutting out the eyes, we fold the paper in half)

7. Glue the muzzle and eyes onto the cat's head.

8. Cut out the ears, pupils, nose and mustache (when cutting pupils and ears, fold the paper in half).

9. Cut out the tongue.

10. Glue the cut out parts to the cat's head. We put dots with a felt-tip pen in the place where the mustache grows.

11. With a gray felt-tip pen, draw a wide line along the contour of the tail, draw it out by cutting out small triangles.

12. Glue the tail and head to the body with the help of glue "Master".


Pencil is ready! We can use as intended.


To make a pencil holder "Dog" you need:
1. Brown plastic bottle.
2. Knife.
3. Scissors.
4. A set of colored cardboard.
5. PVA glue or glue stick, glue "Master";
6. Templates.
7. A simple pencil, felt-tip pens.
8. Ruler.
9. Acrylic paints and a brush.


manufacturing algorithm.
1. Cut the bottle at a distance of 10 cm from the bottom of the bottle.

2. We paint the workpiece with acrylic paints.

3. Outline the head templates on the back of the orange cardboard.

Tail, ears, nose and eyes on the back of brown cardboard.

4. Cut out the blanks of the head and glue them together to make a two-sided part.


5. Cut out the blanks of the tail, ears, eyes and nose.
Color a regular bottle with permanent markers for something quick and easy. If you don't want to use paper towels, you can simply draw something on the bottle with permanent markers. The pencil will turn translucent, and the plastic will look like colored glass.
- If you make a mistake, erase the line with a cotton swab dipped in alcohol. Wipe the area you erased dry and continue painting.
Color the bottle with acrylics or spray paint (available at art stores) to make the pencil holder look bright. To make the paint fit better on the bottle, try sanding it with fine-grained sandpaper. First, paint the whole bottle with one color, wait for the paint to dry, and draw something, like flowers.
Decorate a clear or painted bottle with stickers if you want to make something easy. If you don't have a lot of creative materials on hand, you can always stick stickers on the bottle. For example, you can paint a bottle navy blue or black, wait for the paint to dry, and cover it with silver or gold star stickers.
Wrap the bottle with plain, colored, or decorative tape to create a continuous pattern. Separate the end of the tape about 2.5 centimeters long from the roll and press it against the bottle, as close to the bottom as possible. Hold the tape close to the bottle and gently wrap it around the bottle to form a circle of tape. When you get back to where you started, stick about an inch of tape over the beginning of the strip and cut it off. Start the next circle directly above the previous one, or make it overlap the previous one a little.
- If the tape has gone beyond the cut line of the bottle, bend it so that it is inside the bottle and stick it.
Make your pencil holder even more beautiful by gluing buttons or large glitter onto it with a hot glue gun. You can cover the whole bottle with them or just small parts of it. However, it is better to glue buttons and sequins at the bottom of the pencil case. If there are many such decorations closer to the cut line of the bottle, the stand will turn out to be unstable.
- To make the pencil holder more colorful, paint it or cover it with paper towels using papier-mâché technique before gluing on the buttons or sequins.
Wrap the bottle with yarn or twine. Pass a strip of glue around the cut line and press the thread against it. Start winding the thread around the bottle, adding a bead of glue every few inches. When you reach the bottom of the bottle, pass another bead of glue and press the end of the thread against it.
Poke holes near the cut line of the bottle and thread multi-colored yarn through them. Using a hole punch, make holes around the cut line at a distance of about 1.5 centimeters from each other. Thread some yarn into a suitable needle and use the needle to pull the yarn through the holes. So the top of your stand will become more beautiful.
If your bottle is made of PET or PETE plastic, use an iron to straighten the cut line. This should be done after you cut the bottle, but before you start decorating it. To find out what plastic your bottle is made of, turn it over and look at the bottom and around the bottom. If there is a recycling sign with a number inside, then the bottle is made of PET/PETE plastic. Sometimes this sign is hard to see, so look carefully.
- Turn on the iron and check that the steam is turned off. Wrap the heating surface of the iron with a cloth or aluminum foil to keep it clean.
- Press the cut side of the bottle against the bottom of the iron.
- Lift the bottle every few seconds to check the condition of the cut line. As the plastic heats up, it will begin to melt, making the cut line even.
- Turn off the iron and let the bottle cool before you start decorating it.