Lightweight beaded bracelets. How to weave beaded bracelets: weaving patterns for beginners. Its weaving on the loom is very simple
Many people are interested in how to weave stylish beaded bracelets for every day, because for beginners this is a complex art that requires patience and painstaking work. But in fact, there are many simple schemes, thanks to which a person who previously did not hold a needle and beads in his hand at all will be able to make himself a wonderful piece of jewelry. This activity does not take a huge amount of time and, moreover, will not reduce the wallet.
How to weave the easiest beaded bracelet for beginners
Such a simple bracelet is woven according to the "cross" pattern. In weaving, you can use either one color or two.
For work you will need:
- beads of one or two colors;
- fishing line;
- needle.
First you need to take a fishing line with two needles and string 4 beads on its middle. With one end of the fishing line, pass through the extreme bead towards its other end, tighten so that the cross comes out. Next, you need to dial one bead at each end of the fishing line, skip the third bead through both ends and tighten.
The end result will be a chain, as shown below in the photo.
You can also make a simple, but very original bracelet, if you collect 2 more beads each, go through both ends through the first bead of the chain, then tighten and fasten the fishing line, cut it off.

Bright flowers do it yourself with a description
A master class on making this bracelet will be another good lesson for those who have begun to learn the beading technique.
For manufacturing you will need:
- beads of two colors (for example, let it be red and yellow);
- fishing line;
- needle;
- padlock.
Tie a knot, fasten the end of the fishing line and leave a small tip to secure the ends of the bracelet. Dial 5 red beads and one yellow. Pass the needle through the first bead. Then dial 3 more red beads, insert the needle into the nearest red bead and tighten.

As a result of weaving, a beautiful flower should turn out. In order for the bracelet to come out, you should make the required number of such flowers, fasten the ends of the thread and cut it off.
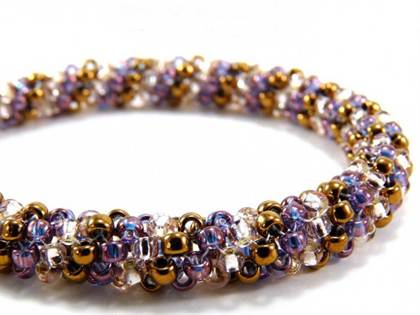
Weaving a beaded harness bracelet
For those who have already mastered the technique of simple weaving with beads, this MK will be very interesting.
To make a harness bracelet, you will need a large amount of beads, as it is woven in a circle.
First you need to fix the end of the thread and leave a small piece. Dial 7 beads and close into a ring, threading the thread through the first. String a bead and thread the thread through the third bead. Take one bead again, draw the thread through the fifth bead. Then continue weaving, putting on one bead and passing the thread through the bead, located through one from it. Weaving will have to go in a spiral.

When the tourniquet becomes the desired length, it is necessary to tie the ends together. Or you can sew a lock to one end and a clasp to the other.
"Zigzag" from small material
To make a bracelet made using the zigzag weaving technique, you must do the following steps.
First you need to put 3 beads on the fishing line. In the first two, it is necessary to stretch the end of the fishing line and tighten the resulting chain link. Next, string 2 more beads onto the fishing line. After that, pass the end of the fishing line through the last bead of the previous link and the first bead of the new link in the chain. Continue until the bracelet reaches the desired length. The product can be both monophonic and multi-colored.

We make our own nominal charm
A bracelet with a name will be a wonderful present for a loved one or friend. The product is woven according to the "brick" pattern and for its preparation you will need beads of several colors.
First you need to draw a diagram of the future bracelet on a sheet of paper in a cage, paint over the beads, which will be letters. To make a bracelet 10 beads wide, you need to: fasten the end of the thread, put 10 beads on it. From the last bead they will return to the previous one through the top, so that the fishing line looks down. Thread the thread back into the last bead through the bottom. Continue weaving in this way: take a bead, thread the line into the tenth through the top, and into the eleventh (extreme) through the bottom. And so on.

You need to follow the pattern and weave in the beads of the right color to get the right name.
For bracelet #1
- beads size 11/0;
- fishing line for working with beads;
- bead needle.
For bracelet #2
- beads 11/0 and 15/0 of different colors;
- needle;
- fishing line for work with beads.
Beaded bracelet for beginners #1
This weaving technique can be used to create not only various bracelets, necklaces and rings, complementing them with inserts of bright beads or larger beads.
Step-by-step master class with a photo and a weaving pattern for beginners No. 1. Go!
Step 1: make a beaded ring
On a piece of thread or fishing line of a length convenient for work, we string 9 beads. Next, we pass with a needle through the first three beads, and then through the second, closing the low in a circle.


We add 6 more beads, and pass the needle through the triple of beads of the previous row (we did not use it to form the first circle). Again we pass through the triple of beads, just added row.


Step 2: form the petals
Thus we form 5 petals. For the sixth last petal, the thread should come out of the triple of beads of the last petal as shown in the photo. We string three more beads on it and send the beads of the next petal into the top three (we made it first).


Step 3: Gaining Length
For the next row, the thread should come out of the triple of beads of the outer circle. We string 6 beads on it and get the basis for the formation of the next circle of triangles. So we weave until the product is the length you need.


Step 4: weave several tiers
The second tier is performed in the same way, only the thread should not come out of the side lobe of the circle, but from the top one. Row after row, you can create a product of any height, including a phone case, a small handbag or an elegant beaded napkin.


Step 5: add bright beads
Inside the circle, you can place various beads or larger beads, this will add brightness and originality to the product. In this way, you can make a bracelet, and a ring, or even a pendant, using only one motif as a basis. In the same way, you can make earrings to get a set of jewelry, where each element is combined with another not only in color, but also in execution.
Beaded bracelet for beginners №2
Step-by-step master class with a photo and a pattern for weaving a beaded bracelet for beginners No. 2. Go!

Step 1: weave a strip for the base
First we need to make a strip that will be the base of the bracelet. The width of the strip depends on the width of the bracelet, since further weaving will go up. Therefore, already at this stage, you should at least approximately imagine what you want to get in the end.
We string 4 beads on a piece of fishing line, and close them in a square. Weaving goes in one thread, which we go through these beads several times.


For the second step, the beads should come out of the last pair of beads. we string two more beads on it and send it back to the previous pair, moving from the back side. we pass through the newly added pair, and form the next one.


Step 2: form the second row
Thus, we form a strip of the length we need, and are taken to form the second row. To do this, we string two beads 11/0, one 15/0 and 2 more 11/0 on the thread. We send the needle to the next pair of beads of the first row along the way, pass through it, and go to the next pair to form the next row.


How to make a beaded bracelet? Weaving all kinds of beautiful jewelry is a fascinating, interesting activity that has won many craftswomen due to the unique opportunity to realize their creative potential. Using the master classes and video tutorials for beginners in this article, you will learn several options for creating original, stylish, bright jewelry for the wrist.
Step-by-step instructions and patterns for weaving a beaded bracelet
The bracelet is one of the most popular women's jewelry, with which the fair sex is happy to experiment. Despite the fashion and current trends that glossy publications dictate to us, hand-made products have always been highly valued. Beaded bracelets are inexpensive accessories, but they are not inferior in beauty to modern jewelry. Do not mistakenly believe that such jewelry is only suitable for children and adolescents. Real needlewomen are able to create such masterpieces that at first glance it is difficult to understand what material was used.
If you want to learn the art of creating beaded bracelets, then the master classes and video tutorials below will help you. With their help, you will master the basic weaving techniques that will allow you to create a masterpiece: it may even be the lightest version of intertwined lows with beads, but it looks gentle, weightless, suitable for any occasion, even for an evening out.

Before starting work, you should stock up on a sufficient amount of materials so as not to be distracted from the process. Choose high-quality Czech or Japanese beads, where each bead has the same size, because the final look of the product depends on it. Chinese material is uneven, so the bracelet will look ugly, untidy. If you have no weaving experience at all, you can practice on cheap beads, making a draft version of the jewelry, and for the final one, purchase good material.
It is better to choose immediately different colors, shapes and sizes of beads, glass beads. This is necessary if in the process you need to supplement the product with any elements, you want to modify the scheme, bring your own developments, which will give the product an author's style. In addition, you need to stock up on smooth, strong, carefully twisted threads, slightly slippery to the touch (nylon, lavsan, polyester). Do not forget about fishing line, special thin needles, clasps, carabiners for thin and thick bracelets.
Weaving a simple bracelet for beginners

For beginners, weaving bracelets with beads may seem like a difficult, time-consuming task. However, do not rush to conclusions, because you need to start with the easiest schemes, as in this master class. Gradually, you will master this skill and will be able to share your experience with like-minded people. The presented pattern is called a monastery or a cross, which anyone can easily master. Prepare a needle, multi-colored or solid beads, fishing line, thread or monofilament. Step-by-step instructions on how to weave baubles from threads and beads.

- We collect four beads, close them in a ring, inserting the needle into the first, second and third. A cross has formed.
- We string three more, insert the needle into the fourth of the previous link. This forms the next cross.

- We bring the needle to the top of the link.
- Weave until we get the right size.

- It turns out a chain of crosses, but it looks uneven. To fix this, we return along the chain to the beginning.

- Next, insert the needle into the side bead of the first link.

- We dial three, insert the needle into the side of the first link, forming a cross.
- We bring the needle into the upper bead of the last cross.
- We collect two, we enter into the side of the second link and the top of the previous one, as in the photo.

- We bring the needle through the side and top of the newly formed cross, the side of the third link.
- We continue to weave to the required length. We return along the second row to its beginning in order to align the weaving. We fasten the clasp.

How to weave a bracelet with a name

This method of weaving bracelets is very popular due to its simplicity, the ability to create a canvas with different inscriptions, pictures. Multi-sized beads are not used here, but the flat classical texture is compensated by the ability to create unique patterns. Such a beaded dense ribbon emphasizes the elegance of the wrist, suitable for women. In addition to the name, the product may contain animal figures, floral or ethnic ornaments, signs. You can purchase a loom or make your own. Step by step instructions:


- We wind threads on the machine, which should be more than one than in the scheme.
- We fill the needle with a thread, tie it to the first one on the loom.

- We string the required number of beads.
- We put the needle under the threads so that each bead falls between the threads of the loom.

- We stretch the needle over the threads of the loom from the bead, tighten it. It was the second row.
- We continue to weave according to the scheme with your name.
Weave an openwork bracelet made of beads and beads

Do not dwell on the basic schemes for lovers of beading. There are many interesting, more complex patterns that you can use to make an openwork bracelet. In the above lesson, large beads are braided with small beads, and here you can also play with a variety of options: choose pearls, smooth large, faceted, on which rays of light will play beautifully. The main thing is to harmoniously choose colors: contrasting or two similar shades. For work, you may need a lock, pearl beads, beads, bicones, a needle, a nylon thread. Instruction step by step:
- We will work with a thread in two additions for reliability, so that the product does not break. First we fasten the lock with a sewing knot to the loop. We string two large ones as a base. We collect 6 beads, bicone, again 6 beads.
- We pass with a needle through two large ones, tighten.

- We do the same on the other side.
- We collect one large, six small, bicone, six small. We pass the needle through the previous and again strung large.

- We do the same on the other side.
- We continue to weave to the desired size, at the end we fasten the second part of the lock.

Volumetric beaded bracelet

Looking at the exquisite jewelry for the female wrist, it is sometimes difficult to guess that this product is made by hand. A voluminous bracelet looks complicated only at first glance, but in fact the manufacturing technique is very simple, as you will see for yourself. An accessory with a harmonious transition of colors is suitable for an evening out. For work you will need: round nose pliers, pliers, beads, jewelry cable, bead caps, limit switches, crimps. Instruction step by step:
- We cut off 20 cm of the cable. We string a small crimp, step back from the edge of 6 cm. We clamp it with pliers. We string the blue color along the length that is needed for the bracelet. We string a small crimp on the second edge, clamp it.
- In a similar way, we string 4 more segments of other shades.

Video tutorials on weaving a beaded bracelet
For all the time of popularity, many girls, girls, women have joined the beadwork, and some have achieved great success in this matter. Skillfully made, complex, original beaded jewelry is equal in beauty to jewelry, and for craftswomen this needlework brings income and satisfaction from the realization of their creative abilities.
There are many techniques, weaving patterns, which are described in the YouTube videos below. Thanks to an accessible explanation and visibility of the process, even a novice needlewoman will be able to create her first unforgettable bauble. In addition, in these lessons an experienced master will be able to find ideas for himself. Weaving beaded bracelets is a fascinating, interesting, soothing activity that will help diversify your wardrobe with interesting jewelry. Start by mastering simple techniques, and then move on to more complex ones, honing your beading skills.
Weaving lesson from beads and floss threads
How to weave a wide bracelet on a loom
How to make a bracelet from beads and fishing line
Weaving a bracelet with memory wire and beads
Bracelet made of beads and pins
You can buy a bracelet in a store, but you can make it yourself even from waste material. How to make a bracelet from threads, rubber bands, zippers, beads?
How to make hand jewelry from lightning?

Indeed, broken, well-worn items or those that you have not used for a long time can easily turn into women's accessories. For example, such a bracelet can be sewn from an old zipper.

If you periodically free the closet from old things, do not rush to throw them away, repel the lightning and put it to work.
Here is a complete list of everything you need for needlework:
- metal zipper;
- pliers or tweezers;
- scissors;
- 2 skin clips;
- tone-on-tone clasp.
Fold 3 of these blanks, secure one of their edges with a leather clip. Weave a pigtail, on the reverse side, fix the three edges in the same way.

Fix the clasp in the ears of the clips, after which the beautiful accessory is ready.

And here's how to make a bracelet with your own hands from a denim or other zipper with a beautiful fabric. Attach it to your wrist, measure according to its size, adding a little. Cut off the excess.

Attach clips and fasteners to both ends of the workpiece in the same way as described in the example above, and another stylish thing is done.

If you want to decorate your entire wrist in this style, then take 2 long zippers with iron teeth. Trim the fabric as close to them as possible. On one side, leave the sliders that close and open these snakes. Connect them with a small ring, on which a plate with two holes is put on.

On the other side, cut the clips, connect both zippers in this place with a leather clip. It remains to wind the accessory around your hand, fasten the clasp and you can show off in a stylish new thing.

Beautiful bracelets are obtained if you not only make them from lightning, but also decorate them with such snakes.

For this accessory you will need:
- long zipper, plus a few more for decoration;
- Velcro;
- Super glue;
- scissors.

Cut the fabric off the secondary zippers. Twisting, glue them to the bracelet. After that, you can put the jewelry on your hand.

Thread bracelets
There are a lot of ideas for creating such sleeve jewelry. Check out the original Peruvian weaving. It's called a broomstick. Such needlework allows you to get openwork bracelets from threads.

Having mastered this technique, you can knit a hat, belt and even a jacket.
For Peruvian broomstick weaving, a plastic stick is needed, but you can replace it with the same one from ice cream or take a ruler, a thick knitting needle. The greater the width of these items, the longer the loops on the openwork sections will be.
In order to make such bracelets with your own hands, you will need:
- threads;
- hook;
- knitting needle, narrow ruler or stick.
Now stretch the last loop so that it becomes large, throw it over the selected auxiliary item. Pass the tip of the hook into the penultimate loop of the chain, knit, stretching the resulting loop, also put it on this item. In the same way, arrange all the other loops. It clearly shows how to make a bracelet out of threads, a collage of photos.

Knit the first loop, then remove the next five, knit them as one loop, secure with another loop. Then knit 5 single crochets. If you have one broomstick for 4 loops, then you will need to make 4 single crochets at this stage. If the broomstick consists of 6 loops, then it is 6 single crochets that you will knit here.
The last loop became the first loop of the next row. Pull it out, put it on a stick or ruler. Grabbing the thread by the back wall of the next loop, pull it out and also put it on an auxiliary object. When all the elongated loops of the second row are ready, design them again as it was just described.
When the bracelet of the desired width is knitted, knit the last loop, pull up the thread, fasten it and cut it. Here's how to make a decoration on your hand. If you're looking for bracelets for beginners, then this next simple idea is sure to please. Such baubles are made of threads and nuts.

Here is a list of what is needed:
- thread or waxed rope;
- nuts;
- scotch;
- scissors.
You will have enough threads if you fold them so that as a result the 2 extreme ones become longer than the two central ones. After all, the main weaving is carried out precisely by external ropes.
Put the left thread on the others perpendicularly, wind the right thread to the left so that it braids the 2 central threads behind and exits through the loop of the left rope. Tighten. Now make the same knot, but starting from the right thread.

So, alternating these extreme cords, make some beautiful knots. Then begin to weave the hooks, pushing the outer threads through their holes. Pass the ropes through the first loop, sew in this place. If you wish, you can sew a button on one side of the bracelet and fasten it.

Beaded baubles
The presented schemes for weaving beaded bracelets are suitable even for beginners.

Focusing on them, you can easily create one of the three bracelets or even all the presented models. Let's start with the first one, the diagram of which is at the top.
For this bracelet you need:
- beads;
- beads in the form of hearts - 5 pcs., 2 brown and 2 blue;
- clasp;
- fishing line;
- scissors.
Spread the edges of the fishing line to the sides, first put on one, and then on the other, 9 beads each. Then connect the ends of the fishing line again and string a heart-shaped bead on them. After that, again put 9 beads on the right and left halves of the fishing line and continue to weave the bracelet as well until it becomes the desired length.
You can increase or decrease the number of beads in one section as you wish. Their color also depends on your preferences.
Finish the work in the same way as you started it, putting on both ends of the fishing line, first a brown and then a blue bead, complete the work by attaching a clasp. Tie the fishing line into 2 knots, put the ends back into the blue and brown bead, cut off the excess.
The second bauble is woven almost according to the same principle. Such bracelets for beginners should not cause difficulties for them. For the second decoration, in addition to beads and beads, you will need an oblong bugle. First, put on a clasp on a fishing line folded in half, then a blue bead, then spread the ends of the fishing line, string 2 beads on each, then one bugle.
Take the beads again, string 3 pieces on each side of the thin wire. Finish this stage of work by stringing a large bead on both ends of the fishing line. Repeat the steps, finish the job by fastening the clasp.
The last, third sample is a little more difficult to perform than the first two. But the presented schemes for weaving beaded bracelets will make your work easier. Prepare for her:
- beads of three colors;
- fastener;
- scissors;
- fishing line.
So, alternating the left and right sides of the fishing line, based on the diagram, weave the entire bracelet. At the end of the work, do not forget to attach the clasp and you can put on a bauble made with your own hands or give it as a gift.
How to make a rubber band bracelet?
There are so many different types of art out there right now. Amazing things are created from multi-colored rubber bands. They are sold in needlework stores, haberdashery.
Before you make a bracelet out of rubber bands, you need to purchase a weaving slingshot or a special machine for this type of needlework - “monster tail”.

In addition to equipment, you will need:
- 14 elastic bands of yellow, orange, light green, lemon color;
- hook;
- clip clasp.

Take the orange rubber band, throw it on the left half of the slingshot, twist it with a figure eight, putting the second semicircle on the right side of the tool.

Now put on alternately 2 more orange elastic bands on both horns, without twisting.

Next, crochet the left side of the first elastic band, remove it from this left horn to the center. In the same way, remove the right side of this first elastic band, pointing it towards the center.

Put the next elastic band on top of the structure. Peel off the right and left edges of the elastic that is currently at the bottom, as you did just now, so that its edges are in the center.

In the same way, braid the remaining orange elastic bands from the pile where there are 7 of them. Then insert the hook into the center of the structure, pull the loop of the lower elastic band up.

Here is how such bracelets are woven from rubber bands on a slingshot further. Without lowering the elongated tip, put a yellow elastic band on top of the slingshot, remove the lower orange one as you did before.

Move the weave down a little, put on the second yellow elastic band, decorate it in the same way - by removing the edges to the center. Then finish this step of weaving. Your bauble so far consists of seven orange and as many yellow rubber bands.

Now lemon-colored blanks are used, weave 7 pieces from this batch in the same way. If you want, throw 2-3 elastic bands at once on the bracelet blank, and then put them on the slingshot in turn. Hold the main weave with the fingers of your free hand.
It remains to string and weave 7 light green elastic bands to make half of the baubles.

We do the second half of the bracelet as follows: first we put on and weave alternately 7 light green elastic bands, then 7 lemon-colored, the same number of yellow ones and finish the work with orange elements.
To complete the process, throw the last upper elastic band over the left horn, hook it with a clasp clip. Pull out the loop of this first upper elastic band, consisting of two elements, put on it the second half of the clip-fastener.

All work completed. You can put on the original man-made thing. If you like new interesting ideas, do not rush to leave this page, at the bottom of it you will find useful stories that will help answer those questions that remain unclear.
This video clearly shows how to make a bracelet out of threads using the Peruvian technique:
If you want to see how beaded bracelets are woven, the video will help you with this:
You can visually familiarize yourself with how to weave a bracelet from rubber bands by seeing the following plot.
Beads are small beads with a slightly flattened shape at their holes. It comes in various diameters - from one to five millimeters. It can be elongated, with several faces, these beads are called glass beads and their diameter is also different - from two to eight millimeters. Bugles with beads come in a variety of shades and colors, with a matte and glossy surface. The appearance of your product will depend on these elements if you are going to make beaded bracelets with your own hands.
Where did the beads come from
Many historians claim that glassmaking appeared and successfully developed six thousand years ago. The birthplace of beads is Phenicia, where glass beads were made. At first they were large, but as the production developed, they became smaller and smaller and finally turned into beads. In our area, the flourishing of beading and the direct appearance of beads fell on the second half of the 18th century. In those days, many different useful items were made from it: wallets, jewelry, cases for household items, decorations for churches. Already in those days, beauties knew how to weave beaded bracelets, and it was also used to embroider large beautiful paintings and clothes.
In the last century, the most popular beaded jewelry was among the hippies. It is worth noting that it was they who began to string beads not on a fishing line, but on a thread.
What beads are needed to make a bracelet
Like any other activity, weaving beaded bracelets requires a little preparation. First of all, buy a few bags of beads.
You can choose beads:
- large or small;
- round, square or any other shape.
It is not at all necessary to use one color of beads during work, patterns for weaving bracelets from beads will come to the aid of your imagination, and there you can pick up different patterns, sayings or weave your name. You can make a thin bracelet or a large and massive one.
The form of weaving is also different:
- openwork;
- solid;
- with different inclusions and much more.
For each bracelet, it is better to buy beads separately, so it will be easier for you to understand what beads are required and how many to buy. It is better for beginner craftswomen to take beads with a margin.
An example of a bead weaving machine
What to cook besides beads
If you are going to weave beaded bracelets, you can find patterns for such products on the Internet or in various magazines. Also, such schemes can be bought in those stores where beads are sold. Get ready for the fact that for such an activity you will need a lot of free time and perseverance.
You need the following materials and tools:
- the thinnest line you can find. Very often, bead bracelet patterns involve stringing beads on a strong thread. Of course, it’s up to you what will be more convenient to work with, but the thread may rot or break in the future and your product will be damaged. Therefore, it is best to find a fishing line;
- convenient capacity. You will pour beads into it and take them from there. You can use a plastic jar lid or something similar. The most important thing is that the beads do not spill out of the vessel;
- short and very thin needle. Some craftswomen do not use a needle, since the fishing line itself is quite tough. But if you are new to this business and are interested in how to make a bracelet out of beads, prepare a needle;
- scissors;
- locks. They are needed only for those bracelets for which the presence of a lock is necessary as planned.
Rules for weaving bracelets
To make your work satisfying and comfortable, and to make beautiful beaded bracelets, try to follow these simple rules:
- do not take a very long initial thread or fishing line. You can easily get confused in it and all the previously completed work will go down the drain;
- while stringing beads on a fishing line, look at how they lay down. The beads should not cling strongly to each other, but the beads should not hang too much either. In this case, the shape of the product will not come out clear, or vice versa - it will wrinkle and twist from high tension. Therefore, you should find the best option;
- we do not advise beginners in this business to immediately take on complex patterns of weaving beaded bracelets. It will be beyond their power and nothing sensible will come of it. First you need to practice on simple products, and only then do something more complicated. By the way, not always the most difficult will be beautiful. Many simple beaded bracelets turn out to be much more original and beautiful than those products that were made according to complex patterns.
Simple models of beaded bracelets
If you use the main beading techniques, you can make openwork, patterned, one-color or multi-colored jewelry and their technology does not seem too abstruse. But first you need to learn how to make simple models, fill your hand with this, and over time you will learn how to make more unique and complex bracelets. Therefore, first we will tell you how to make beaded bracelets for beginners.
Bracelet "Flower"
This is a very easy product to make. Take beads of two contrasting colors. A very good combination - black and white, such bracelets are always relevant. Take more white beads, it is needed for flower petals, and we will make its core from black beads. And if you are interested in how to make a bracelet out of beads, your actions are as follows:

The finished bracelet can be fixed with a lock, you can simply tie the ends of the fishing line. As you can see, there are very simple patterns for beaded bracelets; making such a product is very easy and fast.
Bracelet-harness
This beadwork is also very easy to make. The bracelet you make will have good stretch and feel like it's made with an elastic band. But for it you need to buy a lot of beads, since the beadwork of the bracelet of this model is carried out in a circle.
First, we take the beads of the same color and get to work:
- fix the tip of the fishing line and leave the tail;
- collect seven beads;
- now you need to make a ring, thread the needle into the first seed beads;
- hold the future bracelet and put one bead on the needle, then thread the fishing line through one bead into the bead that was the third. Of course, this requires a lot of patience, but you want to know how to make a bracelet out of beads;
- take another bead and thread this bead through one into the one that was fifth in a row;
- it remains only to tie the ends of the bracelet together.

The scheme of weaving the bracelet "harness"
You can make such a beaded bracelet for beginners and from beads of different colors. In general, all your imagination.
Multi-strand bracelet

Bracelet "Gift"
Take a fishing line and string four beads in a row on it. Pass the end of the fishing line through the first bead, and a ring should form. Then you need to dial two more beads on the fishing line and pass its end through the previously dialed second bead. It will be lateral in the dialed beaded ring. Next, put two more beads on the fishing line and thread it through the sixth bead. Repeat these simple steps until you have a thread of the required length.
Complex patterns of beaded bracelets
We figured out simple products and now we will try to make bracelets according to more complex patterns. But do not worry, and you will certainly succeed in these products too. Everything is not as difficult as it seems. Patterns for products can be invented independently. It is best to first put the invented drawing on paper and paint the beads there with the desired color, and you will see if the selected colors are combined correctly. Such a pattern of a beaded bracelet will help you not to get confused while working and do everything right.
Personalized bracelet
Your loved one will like such a gift, because everyone is pleased to receive something made by the donor himself. For a bracelet with a name, you will need beads of two different colors. The weaving scheme is called "Mosaic" or "Brick". You can use this type to make a decoration of any thickness and any pattern, and not just with a name. The bracelet will be thick, like a good strap. And if you are still interested in how to weave a beaded bracelet with a name, then the course of your actions is as follows:
Do you want something interesting?
- make a diagram of the product on paper. Paint over the beads with the name, the width of the product is ten beads;
- fasten the tip of the fishing line. String ten beads on it;
- from the last bead, return to the ninth in a row through the top and now the fishing line should look down;
- through the bottom, thread the end back through the last bead. You have made the first row of the bracelet;
- continue to weave the product to the end in this technique: take the first bead, thread the fishing line through the top into the eighth bead, into 11 (last) through the bottom and so on.
Do not forget to weave beads of a different color that you have chosen for the name into the product according to the scheme. You will get a very beautiful beaded bracelet, which will surely please your loved one or girlfriend.
Bracelet "Lace"
This product is a very wide woven strip, which we will decorate with a complex ornament in the form of interesting cross-flowers and multi-colored oblique stripes. On a similar arrangement of parts and according to the same scheme, you can make other types of bracelets, but we will figure out how to make lace bracelets from beads.
Use the following action plan:
- put 11 beads on a working thread or fishing line. Take 9 pink and 2 red beads;
- pass the needle through the hole in the 5th bead and tighten the loop;
- type 3 lilac beads on the needle and pass the fishing line through the first bead;
- to form the second link of the bracelet, put 4 beads on the working thread: 3 red and one purple;
- then pass the needle through the middle bead in the top row;
- now you need to put on a thread 2 red beads and one purple one and thread it into hole 10 of the bead.
If you are interested in how to weave a bracelet from beads further, then follow all further steps in a similar way, starting from the very first paragraph, and change the selected colors of the beads.
Bracelet "Crystal drops"
To make this bracelet model, you will need, in addition to small beads, larger faceted beads - 4-8 mm in diameter. This jewelry looks very original if you take faceted beads of various colors, and small beads should be solid. You also need to prepare a thin needle, fishing line or nylon thread, scissors and a clasp for the future bracelet. And if you are interested in how to weave a bracelet with the romantic name "Crystal Drops" from beads, your actions are as follows:
- cut off a thread about a meter long with scissors;
- at the end of the thread, fix one bead by pulling the thread through it twice, and then tighten it;
- string 6 beads and 1 large bead. Now we stretch the thread again through six beads. Ultimately, they will go around the faceted bead on one side;
- we will collect three more beads and 1 bead and now we need to pull the thread through 4.5 and 6 beads;
- then pull the thread through the beads that you typed last, and tighten everything.
Continue weaving the links of the decoration in the same way until you get the required size. At the end of the work, fasten the thread, attach fasteners on both sides of the product, and cut off the excess ends.
Now you know how to make bracelets from beads. There is nothing complicated here, you yourself saw this, the most important thing is patience and passion for this business, and then you will get original and beautiful beaded bracelets that you are not ashamed to give to friends and relatives.