DIY paper box. How to make a square cardboard box with your own hands
We all love gifts. Sometimes you want to make handmade gifts. Or we need to make a package for a purchased gift, and such a package that reflects our feelings in it. Most often, a gift is packed in a box. So let's look at what boxes you can make. Consider rectangular and square boxes.
The simplest box
This box is without any special tweaks. Without cover. Here is its diagram:

I must say that boxes of different sizes can be made according to the same scheme. Therefore, the diagram indicated in centimeters can be increased. If there is a diagram, you can make both a small and a large box using it. Depending on what size you need the box. Looking at the diagram, we can see what we need to first draw a scaled view of the box to the desired size.
If you need a tight box, then it is better to do it made of cardboard... It will be stronger. You can even choose cardboard with colors. You can take white cardboard. The diagram shows the creation of a square box. Instead of a square one, you can make a rectangular one. To do this, you need to make changes in the proportions of length and width, in the proportion of the sides.
After careful drawing, carefully cut out the outer side of the drawing along the contour. Then we bend along the folds. We glue the edges for gluing. Consistently. Note that the top of the box has folds on all sides. This is so that the top is aesthetic and comfortable. We bend these folds. We glue. Everything. The box is ready.
Boxes with finished lids
Here is the simplest diagram of such a box:

If you need a small box, then it is better to make it out of paper, with a density of 80 or 120. If you need a larger container for a gift, then the material should be chosen denser. When drawing, pay attention to the proportions. If you need a square at the bottom and at the top, and a rectangle on the sides of the box, do the proportions as in this diagram. Drawn. Cut out. Bent. Glued.
If you need a box with a finished cube-shaped lid, then this diagram is suitable:

A minimum of material is needed here. Everything is simple and functional. Drawn. Cut out. Bent. Glued. You can stick additional design pictures on the box.
There is a sketch of a rectangular box, already with some tweaks.

Here, the edges for gluing are beautifully chamfered, and the outer sides and the top with the lid have eyelets for securing. Such gift containers can also be modified at your discretion. The same schema can have many changes within its implementation.
Another diagram of a rectangular gift box:

The creation of such a craft is a little more complicated than the previous ones. There are additional side slots. Due to this, the strength of the container is increased. The lid has additional wings - sidewalls that are inserted inside the box. The wings are made with roundness, aesthetically pleasing. Naturally, the proportions of the box in width, height, length can be changed. Do what you need to do.

Habits That Will Make You Happy

What happens if you look a person in the eye for a long time

How to find your soul mate: tips for women and men
Boxes with tops and inserts
If we want to make a rectangular box with a top and inserts, then this one is best suited:

Such a box is good in that, thanks to the additional wings on the sides (when assembled, inserted inward), it becomes stronger when glued. A lid with side fenders and a front lock with a side overlap enhances the effect of the box's strength (in the diagram, the lid with the front lock is drawn on the right side).
There is also a box with a top and with inserts along the bottom of the box. Everyone has seen these boxes. Here's a diagram:

Immediately, we denote that everything that is at the bottom of the diagram refers to the assembly of the bottom of the box. All the curly lines along which the cut should be made are made for a reason. The four halves of the four sides of the bottom, joining in the desired configuration, form a tight hitching of the bottom without any glue. The glue is applied to the box in only one place.
This place is indicated at the very left edge of the diagram - the side strip for gluing. No more glue is needed for such a box. The upper side fenders are needed to stiffen the top-down cover. And the lid itself has an additional valve that fits inside the box.
Boxes with separate lids
The easiest way to create such a box is shown in this diagram:

The sides that are wider are slightly larger. So that they can be folded at the top, and glued inward too, for rigidity and aesthetics. The lid for such a box is easy to make. Take the main dimension of a millimeter 3 more. The rest: the width of the sidewalls is at your discretion. Glue the inserts on the sidewalls. Dry finished products.
Another way to make a box with a separate lid. More aesthetic. Moreover, the box turns out to be not only beautiful. It also acquires a fortress. Here is a drawing of it:

It is also convenient to make such a box because it is easy to maintain the proportions, no matter what size you adhere to. Easy to draw based on a square. The side fenders are also easy to make at any scale, making the cut angle to the middle of the sidewall of the virtual outer square. By folding this already cut material, you get a product where the wings for gluing converge at the top on both sides. This gives the product not only aesthetics, but also strength. The sketch shows a way to create a product, both cubic and rectangular.
The diagram does not show how to create a lid for such a box. And you don’t need to paint. And so it is understandable. To create the cover, you need to use the same scheme. True, draw a square 2 - 3 mm more.
Since the sidewalls of the cover will have much less base, then the wings for gluing need to be made simply beveled at a certain angle in order to connect the sidewalls. When creating a lid, it is not necessary to make the wings for gluing to the very middle, towards each other. It is enough to make the wings for gluing just at an angle.
For those who want to learn how to make boxes, I have two links to the video, where you can see how this is done:
A simple paper box version. This is my first instruction here and I tried to make it as clear and understandable as possible. It was difficult for me to explain some of the steps so that it was clear, but I think that everything will be clear from the photographs. If you have any problems, write in the comments and I will try to explain better.
I know that there are several versions of A4 paper boxes, but here I have not seen my way, so I hope it will be useful to you. Enjoy!
Stage 1: Materials

You will need:
- 2 sheets of plain office paper (box + lid)
- Scissors
- Pencil
- Ruler
You may also need some glue.
Stage 2

Fold a sheet of paper as shown in the photo.
Stage 3

With a pencil, draw a line, tracing one of the sides of the resulting triangle.
Stage 4

We cut a sheet of paper along the line.
Stage 5

Now you have a square (you can throw out the extra piece of paper).
Stage 6


Now you have to fold the square on the other diagonal and unfold it again.
Stage 7


Then fold all 4 corners of the square towards the center.
Stage 8


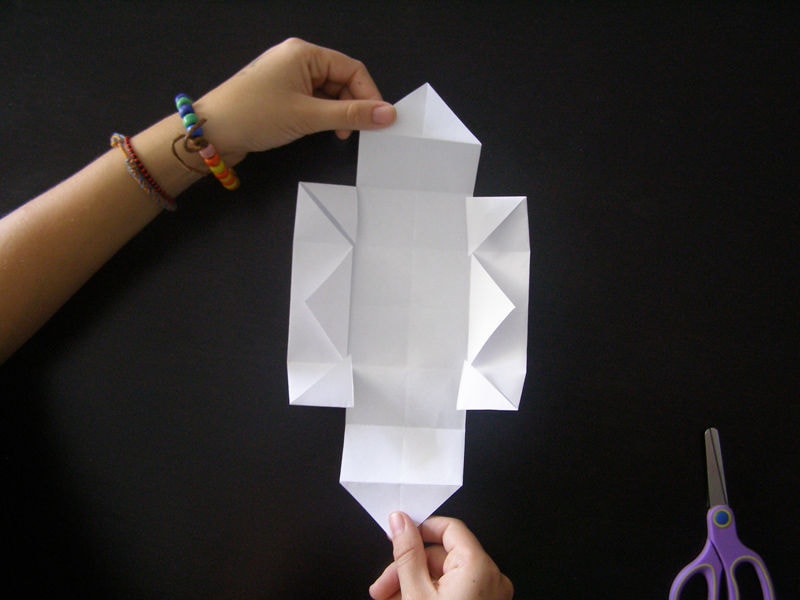
Fold one side of the square towards the center (as shown in the photo), then fold the opposite side in the same way.
Stage 9


Now bend the sides of the square that have just been bent. We rotate it 90 degrees and bend the other two sides of the square in the same way.
Stage 10


Make cuts as shown in the photo. The cuts should only be at the top and bottom, they should not be too deep or too short.
Stage 11

Expand the top and bottom as shown in the photo. Fold the other two sides so that you get a box.
Stage 12


The final stage of assembling the box. We bend the remaining two sides. Ready!
Stage 13


Now, if you have a desire, you can make the bottom for our box, i.e. the box we made in the previous steps will become a lid (it will be difficult to insert one box into another if they are the same size). In order for the lid to fit easily onto the box, we need a ruler.
It's pretty straightforward. First follow steps 1 through 5, then measure and draw a line 5 mm from the top and right edges of the square with a pencil. Then cut off these thin strips. The bottom and lid will now fit perfectly together.
It remains to repeat steps 6 to 12 and the box with a paper lid is ready!
Stage 14


If the inner triangles bend down at the top, then they can be fixed with glue.
Stage 15


All that's left to do is connect the boxes together.
After analyzing several MK for packaging, I found an option that suits me so far. So you can make a box of any size and color for a box, plate, etc. There is nothing new in the box scheme itself. The main thing that I "invented" for myself is the production of my "design" paper. It is difficult to find beautiful paper in a small town, and this is what I propose to do.
1. Materials:
- Whatman paper or cardboard,
- napkin or corrugated paper
- tracing paper sheet
- PVA glue
- scissors
- ruler
- pencil
2. Determine the size of the box, then draw a diagram.
The size of the bottom of the lower part: add 1 cm to the size of the product itself.
The size of the side parts is equal to the height of the product or slightly higher.
The size of the folds for the bottom part: 1 cm less than the size of the side part.
Lid size: 0.5 or 1 cm larger than the bottom.
I make the size of the side parts of the lid 3 cm.
The size of the folds for the lid is 2.5 cm. (For a simple box, you can also without them)
For example: the size of the box is 5X5X4. Box dimensions: bottom 6x6 cm; sidewalls 5cm .; bend 4 cm. Cover 7x7cm, sides 3 cm, bend 2.5cm.
Now we determine the size of the square, which will be the basis of our scheme. Add 4 + 5 + 6 + 5 + 4 = 24cm. This is the length of the square, which we will draw on whatman paper.
In fact, making all the calculations is not as difficult as it seems))) If you do it once and understand the principle, then you will easily make them in the head without any papers and notes.
3. Draw a square on a Whatman paper, in our case, the long side = 24 cm. Cut it out.
4. Now we mark a square on each side according to the scheme: 4cm - 5cm - 6cm - 5cm - 4cm. We connect all the points, we get such a scheme.
Here are the shaded parts that we then cut off.
5. Now, in fact, we start making paper. To do this, you can use an ordinary napkin of a suitable pattern and size. Or corrugated paper, then the box will be solid. The square that we cut out of whatman paper. grease with PVA. Here it is important to smear the entire surface well, especially the edges, but there should not be too much glue so that the napkin does not get wet.
While the glue dries slightly, iron the napkin with a hot iron so that there are no folds. The corrugated paper does not need to be ironed. Then we put a napkin on whatman paper, cover with a sheet of tracing paper and gently iron it with an iron. I did not succeed neatly the first time, some skill is needed here))) This is what happens.
6. Now we cut off the extra parts of our square. We get such a figure.
7. Make cuts along the red lines.
8. Gently bend everything with a ruler
9. We wrap the valves and folds inward and get a nice box. More precisely, its lower part.
10. For the box lid, we repeat all the operations, only the dimensions of the square will be different. In our example, 2.5cm + 3cm + 7cm + 3cm. + 2.5cm = 13cm
As a result of all the described manipulations, such a box appears
Everything is done quickly enough, in about an hour I did 6 such things
And this is how a finished product may look like in a beautiful package.
Probably, many will agree that not only children, but also adults love to receive gifts, and if it is hidden in an original box, it will leave an unforgettable impression of a surprise. And we are sure that the time spent creating it will pass quickly and imperceptibly, because the result will definitely please you. Here you can find the most original and interesting ideas on how to make a do-it-yourself paper box with a lid. A step-by-step written instruction will help you arrange it without any particular difficulties in a matter of minutes.
Important! Before you start creating a gift box, we advise you to practice on simpler paper, because then you can take into account all the errors and inaccuracies that may arise.
Choosing a material
So how to make a beautiful DIY gift box? To do this, you need the following materials:
- Corrugated cardboard;
- Laces, ribbons, ribbons;
- Buttons, beads;
- Ready-made labels;
- Scissors, stationery knife;
- Double-sided tape, glue stick;
- Super glue or glue "Moment" universal (transparent gel) for fixing beads and other things;
- Pencil, ruler;
- Hole puncher;
- Compass.
Now there are many ideas for creating original gift boxes, we have selected the most interesting and affordable options for you.
Round base box:
- You need to cut out 4 circles: with the help of a compass, draw circles (you choose the diameter yourself) from thick packaging cardboard, it is also possible from porous. Two large mugs and two small ones.
- From tinted cardboard or any other that you have, we cut out two stripes so that they match the size of the circles, with a margin for overlap, one of them is wide, the other is narrow.
- We glue two large circles together using Moment glue or double-sided tape. After - separately glue the remaining two circles.
- We need small circles for the base of the box. We apply transparent glue "Moment" to the sides of the mug, gluing a strip of cardboard, for reliability, you can also stick another strip on top of this.
- We do the same with the lid for the box: glue a narrow cardboard strip along the edges of a large circle.
Important! To make your box look more festive, you can create a beautiful bow from a colored or printed ribbon. To do this, cut the tape in half, glue its ends to the inside of the lid, and tie the remaining long ends into a bow on top.
Classic gift box
And for lovers of the classics there is such an option: a small box for a small gift. We will need the following materials:
- Ruler;
- Scissors;
- Thick colored paper or cardboard (soft).
Let's take a step-by-step look at the whole process of how to make such a box out of paper with your own hands. For blanks, you need two squares - a large and a small one. The difference in size is 1 cm, for example 15:15 and 14:14. Let's arrange them:
- Select the lines of the squares diagonally, then bend the corners to the center.
- Further, the corners bent towards the center must be bent to the opposite fold line, and then to the near fold line. A square should form in the center, which will later become our future bottom.
- After that, on both sides of the formed diagonals along the first deflections, we cut to the designated square in the center.
- The edges that we cut are folded along the bends, so we get the walls of the box.
- We bend the sharp ends of the walls inward, towards the center of the square.
- With the remaining unbent tongues of paper, grab the bent ends, thereby wrapping them inward.
We have a box-lid. 
We do the same manipulations with the second square, and due to the fact that this square differed in size by one centimeter, the box comes out smaller and fits freely under the previously made lid.
In order to fix the gift inside, put a napkin or light paper in a crumpled state on the bottom. As you may have noticed, making a do-it-yourself gift box is quite simple. Colored braid will help to give originality and an interesting accent, with which we will tie up our box.
Secret box
And now for your attention we offer to make small gift boxes with a surprise. The so-called blende box: when the lid is removed, it swings open at the same time. How to make a lid - you can look in the second option described above.
So, let's get down to making a gift box with a secret.
Materials for work
For her we need:
- Scissors, glue, thick paper;
- Old postcards, beads, ribbon;
- Decorations, decorative ribbons.
Important! If you decide to make the bottom 18x18 cm, then for the lid you need 1 cm more, that is, 19x19 cm.
Step-by-step master class:
- The box itself is performed in this way: we divide the sheet into nine equal squares, we do not need the corner ones, they need to be cut out. Bend the remaining squares inward, forming a box.
- We decorate the inside as your imagination wishes (with pleasant wishes or verses), glue beads, rhinestones, buttons, drawings from postcards, a small bouquet.
Important! Do not overdo it with decor so that the gift still remains the main accent in your surprise.
- Now you can put the gift in the middle, put the sides of the box together and cover it with a lid, you can also tie it with a ribbon.
Felt box
Felt is a miracle material from which you can create not only handbags, jewelry, toys, but also beautiful gift wrapping.
Materials (edit)
To create it, we need:
- Colored felt - its density is different, depending on the thickness of the sheet, choose the most convenient and flexible so that it is convenient to sew;
- Thread with a needle;
- Ruler;
- Glue (super or hot glue),
- Scissors;
Master class in stages:
- Line the canvas with a pencil to leave fewer marks and not smudge the fabric, 9 squares. You can also rectangles, cut out the corners.
- Decorate the outside with colored appliques, if you wish, you can embroider simple patterns, decorate with beads or beads.
- Bend the walls carefully and sew together. Seams with contrasting threads will give a more interesting and unusual look. In general, there are no restrictions, so feel free to experiment.
Important! Felt boxes can later also serve as a box for various little things or jewelry. It is also possible to use them during contests for children and all kinds of holidays.
Beautiful box in the form of a flower
If you need a minimum of costs and wasted time, then for you there is an option for a simple box without glue:
- We print or you can redraw the template on colored paper.
- We cut out the workpiece, create bends along the lines, while using a ruler.
- If your paper is white, then turn the blank over with the front side, while toning it over the entire surface or just the edges with a sponge and stamping pads (you can also use pastels or watercolors).
- We hide our present in the middle, and we can collect the “petals” from above.
Box with a heart
For special events, we can make just such a delicate and romantic paper box with our own hands.
Materials (edit)
For her you need to take:

We make a box of paper - a master class in stages:
- Print and cut out the template, walk along the indicated lines with a blunt knife or scissors to make neat grooves in the right places.
- Transfer the heart template to the cover detail and cut with a clerical knife.
- We make folds along the lines and fold the box, then fix it with glue.
- From the seamy side, carefully close the window with foil.
- We decorate the lid with paper or fabric flowers, stripes with beads.
- We make the bottom the same way.
- At the end of the work, we supplement the composition with a tape.
Gift packaging made of cardboard
To make packaging for presentations from cardboard, we need:
- Cardboard sheet;
- Scissors or compasses;
- Scheme;
- Double-sided tape or glue.
Getting started:
- Cut out a rectangular box template from a solid sheet, as shown in the diagram.
- Draw along the fold lines with scissors or the tip of a compass to evenly fold the sides of the box.
- After - glue the pieces of double-sided tape as shown in the picture.
- We decorate with colored pictures or inscriptions - it depends on the event for which you are preparing.
Cardboard carrots
It sounds intriguing - it will become a wonderful and unexpected surprise, where you can hide a small gift, for example, jewelry, sweets, small toys.
Important! If you are thinking about what to put in such a package, here are some ideas:
- A friend or sister can pack in this way nail polish, lipstick.
- A spouse or girlfriend can put a bracelet, earrings or chain in the “carrot”.
- For a father or brother, gifts such as cufflinks, tie clips or money clips are suitable.
Materials for work:
- Orange thick paper;
- Green dense threads;
- Scissors;
- Transparent moment;
- Green fabric (felt will do);
- Box template;
- Hole puncher.
Progress
So, the stages of creating a carrot box:
- Print the template on thick orange paper.
- Cut out the workpiece. We fold our product along the dotted lines.
- We collect and glue the workpiece. Create a hole in the upper parts of the workpiece with a hole punch.
- Cut out the leaves from the green fabric, tying green strings to them. Five of these leaves will be enough.
- We tie the leaves to the holes that we previously cut out with a hole punch.
Important! On green paper or a finished cardboard tag, you can create an additional leaf on which you can leave a congratulatory inscription.