How to make a bow with an elastic band from ribbons. DIY beautiful two-tone satin ribbon bow. How to tie a bow from a rep ribbon
Hair bows can make even the most ordinary hairstyle bright and festive. To make your bow the most original and unusual, you can easily make it at home with your own hands. In fact, making bows is a very entertaining entertainment, as a result of which you are left with amazing elegant accessories for any occasion. It doesn't take much effort to create a conventional model. Even a child can do that. But to make more complex hair jewelry, you need patience, perseverance and a little knowledge.
QUICK NAVIGATION BY ARTICLE
Multi-layered ribbon bow
A ready-made multi-layer bow, made by hand, is no different from its store counterpart. But, creating it at home, you can not limit yourself in the choice color, ornament and the material itself.
To create such a bow variation, you will need:
- trimming the tape of your choice, namely 5 pieces, as shown in the photo;
- a hairpin or elastic that will attach the product to your hair;
- thread with a needle;
- glue.

At the first stage, it is necessary do blanks... You need to bend each of the three ribbons of the same length, which were prepared earlier, so that their edges converge in the center, and sew, as shown in the photo.

Two of the three finished petals are tied together by squeezing their centers with a thread. This creates a simple four-leaf bow.

The longest ribbon should be wrapped in such a way that a bow with two loops and two tails is formed. It should be tightly fastened with threads in the middle.

As a result, you should have three blanks: from two loops, from four petals and a bow with tails.

All of them are fastened together in the listed sequence using threads and glue for reliability.

The last and shortest patch is used to hide the center sewn with thread. They simply wrap the middle of the bow around, and behind the ends of the ribbon sit on the glue.

It remains only to attach a hair clip with glue to the back of the product, let it dry and wear it with pleasure.

The technology of creation is shown in the video:
Spectacular two-tone bow
To create such hair bows you will need:
- satin ribbon of medium thickness of one color;
- thin satin ribbon of a different color;
- very thin scraps of tape of any of two colors;
- threads.
When creating bows, it is not necessary to stick to the colors and materials described here. After all, you create a masterpiece with your own hands, therefore, you will also choose a style.
The widest ribbon should make three-layer bow base... To do this, you need to decide on its diameter and start winding the tape evenly to get three full turns. Then fasten the middle with a thread. More clearly presented below.


Then you need to move on to creating top bow... It will consist, as it were, of two layers on top of each other. We fasten the ends of the ribbons in the middle and tie the two tiers together so that they do not fall apart.

DIY crafts made from various materials are a simple and inexpensive way to realize yourself creatively and usefully spend time. This also applies to mothers who want to improve or improve their relationship with their children. After all, joint creativity brings you very close, and your beloved daughters and sons develop creative thinking, small and the habit of working, and this is so important in upbringing. You can learn to knit together, sculpt from clay or plasticine, sew and embroider, do scrapbooking, quilling, carve figurines from wood, and much more. Some of the simplest products that can be made during joint creativity with your daughter are hairpins made of rep ribbons or satin, which she can wear herself or give to her friends.
Preparation
First you need to collect all the materials. It is also better to choose them with your child in a store of sewing accessories or materials for creativity. To do this, we take our favorite rapeseed ribbons and satin, beautiful buttons and beads, ready-made flowers. In terms of color and pattern, it is better to choose those that can be combined together. In addition, we need a base: small metal hairpins, preferably empty. But for the future, you can take empty headbands and elastic bands.
You also need to stock up on glue, threads of suitable colors for future use, put scissors and a ruler, a needle bar and a trash box on a table covered with oilcloth for creativity. It should be remembered that from a very young age, a child must be taught to be clean and tidy. To do this, you need to set an example for him by the fact that in the process of creativity, all the garbage is immediately thrown into the prepared box, and not scattered around the table. The result of the work will be much more accurate if the work surface is not littered with foreign objects. Now we are ready for joint creativity, and we will learn how to make hairpins from ribbons further. Let's get started!
Option one: for a celebration

This simple solution is suitable for women of all ages, from youngest to mature. So, our do-it-yourself ribbon hairpin will be made with a large flower bought in a store for creativity. To begin with, we will make a base, which we will use in other products. To do this, we take a simple small crocodile hairpin and a rep tape suitable in width, open the "teeth" with one hand and begin to glue the ribbon, first from the inside, and then from the two outside, as shown in the picture. Glue should not be spared, but it does not need to fill all the space with it, otherwise the material will be saturated and become too hard, and you will be smeared. We erase its excess with an unnecessary cloth or a piece of newspaper. Leave to dry.

During this time, you need to pick up an artificial leaf and a flower to each other. They should match in size and look natural. Now we just have to glue them to the base made earlier, and our simple but elegant hair clip is made of ribbon with our own hands!
Option number 2: small jewelry for babies
As in the previous example, we need to make the basics with the rep ribbons. It is better to make several pieces of different colors at once so that you can match them to your princess's outfits. It will look very nice from satin ribbons, while you can make the flower both small and large.

It will consist of two levels of 5 and 4 petals, and we will decorate the center with a shiny bead. So, to make a flower, take 9 identical squares from the ribbon, fold them first diagonally, and then in half. It is better to work with tweezers, because the details are quite small. So, first we cut off the corner, then the base, and singe it. From the corner side, it is better to hem with a thin needle for strength. Now we string 5 petals on a thread first and sew them into the first level of the flower, and then 4 - for the second. Our do-it-yourself ribbon hairpin using the kanzashi technique is almost made, it remains only to sew both levels to each other, decorate the center with a bead and glue the finished flower onto the base. Ready!
Option 3: an idea with a twist

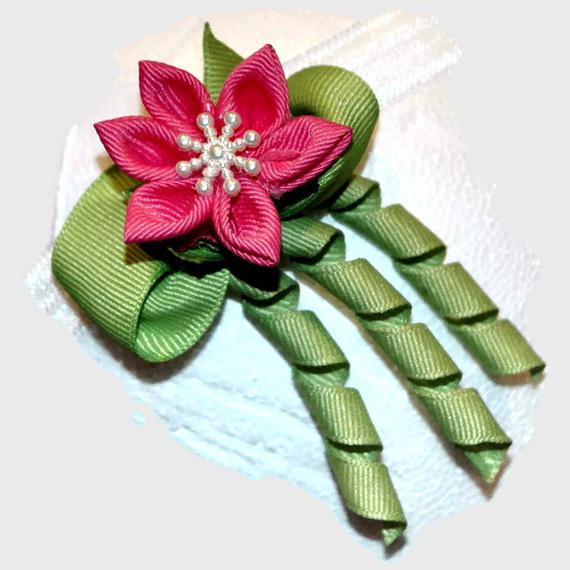
In the previous paragraph, we made using the technique of satin ribbons. Hairpins from them, no doubt, turn out to be very cute, but you can make them even more interesting. For this we need a wide and thin green and wide pink rep ribbons. From the latter, we use the previously described technique or a simpler one to make a flower. It will consist of six simple, sharp-edged petals held together in the center. To decorate the seams, you can make a snowflake from white beads or pick up a beautiful bead, then your imagination is up to you. So, the first part is ready.
Stage two

Now we fold the figure eight out of a wide green ribbon, carefully singe the edges with a lighted match and sew in the center, tighten it quite a bit so that the bow turns out to be larger than the flower, but not much. In general, when making any jewelry from ribbons or fabrics, you need to learn how to combine colors, patterns and sizes of blanks. To do this, you can use special charts and tables, look for ideas in stores. So, then from a thin green rep ribbon we cut off 3 short pieces, 8-10 cm long.Using scissors or a metal ruler, we make curls on them, preferably the same. This will be the highlight of our future hair clip.
Stage three
So, we sew these curls on the bottom of the green bow, and on top we attach with glue (since we can no longer hide the seams with the decor) a pink kanzashi flower. In the end, we just have to glue this charm to the base, which we will also pre-wrap with a green rep ribbon, like on curls. This must be done very carefully so that the workpieces do not get dirty with glue, because the jewelry should look like one bought in a store, only even better. That's it, so we learned how to make a hair clip from ribbons using the kanzashi technique with a small but very cute twist.
Option number 4: bow
The best jewelry for girls' garments or accessories isn't just ruffles, lace, and flowers. A bow is also an obligatory attribute, in the shape of which our next hairpin from a ribbon, made with our own hands, will be. It is suitable for both casual and festive attire - it will depend on the color combination we choose. For our hair clip, you will need three types of rep ribbons: wide white and pink and thin with small polka dots of similar shades. Both bows will be made from the first ones and will be two crossed eights in structure. Therefore, we make 4 segments 20 cm long, mark on each center and fold the side edges to it. Now we singe the edges, sew in the middle and tighten. So, our bows are almost ready.
Completion of the process

Next, we superimpose two previously prepared "eights" of identical colors on top of each other and again sew the centers with a neat seam. So that our seams are not visible later, we need a short piece of thin pink ribbon, with it we will decorate the center of the hairpin at the very end. So, now we add up what happened: we put white and pink bows on top of each other, sew or glue (the first option is more preferable, since such a product will be stronger). Now we cut out two strips of 5 cm from a thin ribbon with polka dots, remove small triangles at their edges and singe them with a lighter or a match so that they do not crumble. Everything, it remains only to assemble the product. We put the last blank on the double bow with a cross, stitch it, and wrap the center with a thin pink ribbon and tie it behind. Now we glue everything onto the finished base, and our wonderful hair clip for the girl is ready!
Satin ribbons- this is a cheap material that, in the hands of a skilled person, can turn into an original decoration, an elegant bow for a girl or a beautiful decoration of a gift. Let's talk about satin ribbon bows. How to do it? Where to apply? How to tie? We will give answers and give step-by-step master classes with detailed instructions and diagrams .
The main thing in the article
How to make beautiful 2.5 cm wide bows from satin ribbons?
Ribbons are a versatile material from which you can make an unusual original bow. We offer options for tying bows made of satin ribbons 2.5 cm wide.
Taking any of the types of bows as a basis, you can effortlessly create original hairpins, jewelry or decorative elements.
Making unusual bows from colored satin ribbons: photo
Making an original ribbon bow is as easy as shelling pears. Don't believe me? Then see the photo below and experiment. Following the step-by-step photo instructions, you will certainly make exclusive bows from colored satin ribbons. 


Kanzashi-style satin ribbon bows: master class
Before you get started, get these ribbons and tools:
- The main tape is 2.5 cm. In our version, it is a blue tape.
- For decoration, you need a contrasting tape of the same width as the main one. We have it white.
- Decorations for decoration: beads, rhinestones, etc.
- Tools for work: ruler, scissors, tweezers, glue.
- For singing a lighter, candle or matches.
Now we start the main work on the decorative bow in:

You will get such an original decoration that can be used in a carnival costume, decorate a gift with it, or even use it to discharge a newborn. 
How to tie bows on your head
Most often, moms use satin ribbons for. Below we will share exclusive models of hair jewelry, which are quite simple to make, but there will be no limit to the delight of a little fashionista.
Small satin ribbon bows on the rim
It's easier than ever to make a bow in one of the techniques described in the first paragraph of our article and attach it to the rim. It will be beautiful and original. 
Well, if you show a little imagination and present your beauty with an original decoration with such a bat?  To work on the rim you will need:
- simple bezel;
- ribbons, they must be of different colors. For example, black and lilac;
- eyes for a bat and a small bright cut for a bow;
- transparent glue for all manipulations.
The work on the rim is carried out as follows: 

This is how interesting it is to decorate the head of your child.
Bows from thin satin ribbons on the bandage

It is as easy as shelling pears to create a headband with a bow with your own hands. To do this, you need a ready-made bandage or a wide soft elastic band, from which you yourself will make the base of the bandage. Then, following the example in the photo below, tie a satin ribbon bow of the desired color. 
Then, just attach the resulting bow to the base band.
Ribbon bows made of narrow satin ribbons
Small bows made of narrow ribbons are suitable for decorating elastic bands. We propose to consider two methods of making such bows.
1) Variegated flower.  Preparing the necessary material for the flower:
- ribbons, you will need 8 pieces, from 3 to 5 cm. Half are plain, the other half with a pattern;
- thin ribbon for central girth.
- Scissors and a lighter for singing.
Now about the stages of work: 
- Cut triangles on the tape segments and singe the edges.
- Collect ribbons into a variegated flower and sew in the middle.
- Hide the stitching place under a narrow ribbon. The same ribbon can be used to attach the bow to the elastic band.
2) Bright bow.
For work you will need:
- ribbons of bright colors, different in width;
- needle and thread.
- The wider tape should be assembled with a needle and thread in a bow.
- Perform the same actions with a narrower tape.
- Gather these two elements together and hide the stitching place with a thin ribbon.
- This decoration is suitable for any elastic band.
Volumetric bows made of satin ribbons 5 cm wide per bundle
 Needlewoman mothers come up with all kinds of original jewelry for their daughters. Even such a simple hairstyle as a bun, after the "magic" with satin ribbons, turns into.
The work is performed using the kazanshi technique, so you will need not only a ribbon and a needle and thread, but also tweezers.  Make 5 roses from a satin ribbon. Below in the video you can find a detailed description of how this decorative element is made. After collecting roses on the main ribbon, leaving long parts at the edges. Cut a triangle at the bottom of each part of the tape. Long edges are for tying a bow on a bundle.
Unusual handmade bows-hairpins from satin ribbons as a gift
Even the smallest girls love new hairpins. Therefore, such a gift is always relevant, while a piece of the soul is invested in it and such a present does not hit hard on the budget. We propose to consider how you can please the little princess.
1) Flower hairpins. 
To make them you will need the following tools and materials:
- Ribbons of the same color:
- 5 cm wide;
- 2.5 cm wide. - Thin metallized ribbon.
- For sewing with a needle and thread.
- Barrette.
- Scissors.
- Firing device (candle, matches, lighter).
- Decorative elements for the central part of the flower.
We perform the following steps to make an original gift: 
- Make strips from ribbons:
- wide - 6 pieces of 14 cm;
- narrow - 6 pieces of 10 cm;
- metallized - 12 pieces, six 15 cm and six 8 cm. - Make a flower from a wide and narrow ribbon. To do this, fold each strip and, after sewing the bottom, collect all the leaves in a circle, as in the photo.
- Make petals in the form of droplets from metallized segments, gluing the edges with glue or soldering with fire.
- Apply all blanks from large to small and secure the entire structure with glue.
- Glue a decorative element in the center, and at the bottom of the flower, using a cut-out circle (felt is great for these purposes), attach the flower to the hairpin.
2) Original Minnie Mouse hairpins.

To please a little beauty with original hairpins, you need to prepare:
- A piece of black tulle.
- Satin ribbon with polka dots (pink or red) 2.5 cm wide.
- Hairpins.
- Glue and scissors.
Now about working on hairpins: 

Such original hair clips will be appreciated by every mini fashionista.
How to tie the simplest satin ribbon bows on your fingers


Original Christmas bows from satin ribbons on the Christmas tree: video tutorials
Chic bows made of satin ribbons with lace: step by step instructions
The creation of a bow with lace is based on the execution of a two-color bow. And to complete it you will need:
- Satin ribbon.
- Lace ribbon.
- Decor at your discretion.
Getting started:

American satin ribbon bows: patterns
The American bow differs from our "domestic" one in construction, since it is based on loops and eights. 

Interesting bow-ties made of satin ribbons: photo


Original ideas for bows of marshmallows, flowers and stars: photo


Fashionable bows from satin ribbons in polka dots
Fashion for large and small peas is back again, so accessories for decorating hair and clothes with polka dots are very popular. Take note of photo examples and experiment with satin ribbons with polka dots. 


Photo of bows made of satin ribbons for discharge for a newborn


Satin ribbon bows with a pattern: photo ideas


How to tie satin ribbon bows with a fork: video
Is it difficult to imagine a solemn moment without decoration or decoration with elegant bows? Lush and austere, elegant and frivolous - they create a special mood for the holiday. Making a hair clip or a bow tie for an evening dress from satin ribbons is easy if you follow the instructions.
How to make satin ribbon bows
Jewelry assembly technology requires ribbons of different colors, special widths according to your idea. A minimum set of tools and materials for manufacturing is required. In the case of passing the master class, you will not have a question how to make a bow from a satin ribbon. The suggested step-by-step instructions will make the process of work pleasant and understandable. You will need:
- lighter;
- scissors;
- threads;
- needle;
- ruler;
- glue or heat gun.
Depending on the purpose of the bow, there are various options for manufacturing technologies. He might be:
- small, made using a fork - suitable for decorating a postcard;
- lush, elegant - in the style of kanzashi - for a holiday in kindergarten;
- a strict bow tie - for an important banquet;
- double - for decorating hair, fixed on a headband or hair clip,
- solemn - on a gift box.
Satin bows can be made in the form of an original flower. If you choose the right color and shape, they will become unique decorations:
- elegant evening dress;
- frivolous sundress;
- styled hair;
- in the form of a wrist bracelet;
- stylish handbag;
- bridesmaid dresses;
- elegant blouses;
- as a neck pendant;
- furniture in the interior;
- stylish prom dress;
- curtains in the apartment.
How to make a classic satin ribbon bow
The most popular and simple, this bow is used to decorate clothes and interiors. Even a modest gift, decorated in this way, becomes elegant, solemn and attractive. To tie a bow you will need:
- take a workpiece 20 cm long;
- burn the edges;
- fold in half with the smooth side inward;
- bend the edges outward again;
- take it in your hands, so that each has a loop at the top, and the bend between them at the bottom;
- cross the folded parts in front, forming a ring under them;
- pass one loop through it, tie.

Strict beautiful do-it-yourself satin ribbon bow
You can tie a strict stylish bow for a special occasion. It will become a decoration for a handbag, dress or gift. It is important to choose the right colors for the craft so that it looks elegant. How to make a satin ribbon bow, for example, such as in the photo. Prepare scissors for work, glue, material in three colors. You should:
- take a workpiece 30 mm wide with a length of 18 cm;
- roll up a ring;
- connect the edges with glue.
The next steps to collect the decoration are:
- fold the ring so that the seam remains at the bottom in the middle;
- iron;
- take a tape of a different color of the same width, with a length of 7 cm;
- wrap a ring around the workpiece across;
- fix with glue;
- prepare a tape of a contrasting color of the same length, but thin;
- wrap around, in the middle of the previous ring;
- glue;
- iron.

Diy two-color beautiful satin ribbon bow
Stylish and very elegant jewelry can be assembled from blanks of two colors. The simplicity of manufacture does not mean that it will look modest. Elegant and effective, it will adorn your hair and original dress. You will need a wide and narrow piece. To make jewelry:
- measure 2 pieces 15 cm long - one narrow, the other wide, cut off;
- lay one on top of the other;
- roll up into a ring;
- fix the joint with glue;
- iron;
- tie a bow in the middle with a narrow ribbon, closing the joint, forming a knot;
- cut off the ends;
- glue.

DIY satin ribbon gift bows
A box with a gift on the occasion of an anniversary or birthday will look much more impressive if you decorate it with a bow. It can be, depending on the situation, small, elegant or voluminous and lush, for example, this. Tying it is very simple - you can quickly learn, even without a master class, by following the instructions:
- take a workpiece two meters long;
- wind it around the open palm of your left hand;
- remove carefully;
- leave the end free.
- on a workpiece folded in several layers, cut off both corners on one side, by about 5 mm;
- burn, so as not to bloom;
- repeat operations on the other side;
- fold the workpiece so that the cut parts are aligned in the middle;
- tie the free end of the ribbon;
- straighten each petal for volume.

A lush bow, made by yourself, can please a young beauty if it is woven into a hairdo or becomes a decoration of a gift box. To make it, you will need 6 blanks 12 cm long, 5 cm wide, the same amount 11 cm long and 30 mm wide. They must first be burned around the edges. You will also need an elegant thin braid, small beads and a piece of felt. Next, you need to do this:
- take wide blanks;
- fold in half;
- sequentially collect on one thread;
- pull off, fasten;
- repeat the process for narrow ribbons;
- cut a circle with a diameter of 40 mm from felt;
- stick a large blank on it;
- take pieces of thin braid 12 cm long - 6 pieces;
- fold each into a ring;
- glue on the front side by placing it on the petals;
- fix the workpiece from a narrow ribbon on top;
- pour glue, about 10 mm in diameter, onto a piece of cloth;
- put the beads on it tightly in a circle;
- cut in a circle;
- glue the decor in the middle of the decoration.

If you want to decorate your holiday card with a tiny bow, try using a fork. The process will go like this:
- take a fork in your left hand;
- loop a ribbon over it so that the edges remain to the right;
- throw the far end behind the plug over the lower one in front;
- insert it in the middle between the teeth and bring it back;
- enter the end of the ribbon on the right in the same gap, but on top;
- turn the plug over and tie both ends with two knots;
- remove the bow;
- trim the ends, singe.
DIY lace satin bow
Do you want to learn how to wrap gifts like in the Dior company? The technology will not cause difficulties, and the view will be unusual and original. For making, you need satin blanks 25, 20, 16 and 10 cm long.To make such a decoration:
- burn the edges of the ribbons;
- roll the longest into a ring;
- glue the ends;
- repeat operations with other workpieces;
- fold all the rings on top of each other, starting with the larger one, place the glued sections below;
- pass an additional ribbon on top of the rings (as an option, it can go inside the small element);
- fix on the back.

Video: how to make a beautiful satin ribbon bow
If the process of making jewelry according to the attached instructions seems difficult to you, watch the video master classes. You will understand how to make a bow-flower with your own hands without special devices, learn how to assemble decorations for gift boxes, learn how to tie a voluminous two-color accessory for hairpins for a holiday, you will understand that making bows yourself is a simple and exciting process. Needlework will help you look original and unique, make your look attractive and stylish.
How to make a beautiful flower-shaped satin ribbon bow
Ribbon gift bow
How to tie a beautiful satin ribbon bow
Satin ribbon bows. Master class with step by step photos
Shabanova Marina Gennadievna, primary school teacher, MBOU Sarasinskaya secondary school, Sarasa village, Altai region, Altai TerritoryMaterial description: this material will be useful for teachers, teachers of additional education, and parents. The work can be done with children of middle and senior school age. Handmade jewelry is exclusive and very popular. Bows in the modeling technique with the addition of a flower in the tsumami kanzashi technique are easy to perform, the product can be made in one lesson.
Target: improving the skills of working in the tsumami kanzashi technique.
Tasks:
Educational: to form skills and abilities in making jewelry using the kanzashi technique.
Developing: develop attention, creativity and aesthetic taste, fine motor skills and eyes.
Educational: to educate a respectful attitude to work.
For work we need the following materials and tools:
- white satin ribbon 2.5cm wide - 70cm;
- satin ribbon 1cm wide with polka dots / any color - 40cm;
- white satin ribbon 1cm wide - 9cm;
(The length of the tape is based on one bow!)
- elastic bands - 2 pieces;
- acrylic half beads - 2 pieces (can be replaced with a button, beads, bead);
- sewing threads;
- sewing needle;
- lighter (candle);
- ruler;
- scissors;
- tweezers, clamp;
- thermal gun.

Labor protection rules when working with scissors:
1. Scissors should have blunt, rounded ends.
2. Work with well-adjusted and sharpened tools
3. Place the scissors with the rings towards you, and with the closed blades away from you.
4. Do not leave cutting tools open.
5. Observe the movement of the blades while cutting.
6. Pass the scissors rings forward, holding the closed ends.
7. Do not play with cutting tools, do not bring it to your face.
8. When working with scissors, do not walk around the office. Work at your desk.
9. Use these tools only for their intended purpose.
Safety rules when working with a needle:
1. Store the needles in a specific place (special box, pillow). Do not leave them on the work place (table), in no case leave them in the fabric, do not take needles, pins in your mouth.
2. Collect the pieces of the broken needle and hand over to the teacher. If the needle breaks at home, then the fragments must be wrapped in paper and thrown into a safe place.
3. Pass the needle in the needle bar and with the thread.
4. Do not stick the needle into clothing, soft objects, walls, curtains.
5. At home, do not sew on upholstered furniture (armchairs, sofas, etc.). Do not leave a needle in the product.
6. Do not get distracted while working with the needle.
7. Know the number of needles, pins, taken for work. At the end of the work, check their number, be sure to find a lost needle, pin.
8. After finishing work, the product is carefully folded and stored in a specially designated place.
Labor protection rules when working with a candle and matches, a lighter:
1. Remove loose hair.
2. Do not lean low over a candle or match flame.
3. The candle should be in a glass or tin container.
4. Do not throw burnt matches into the trash can, but put them in glass, tin dishes.
Labor protection rules when working with a thermal gun:
1. Do not leave unattended.
2. When working, place the thermo-gun on a support, not on its side.
3. Work only with serviceable tools.
4. Do not touch the gun tip or touch hot glue.
5. Switch off after finishing work.
Prepare pieces of satin ribbon in the following sizes:
- white satin ribbon 2.5 cm wide - 2 pieces 20 cm long,
- satin ribbon 1 cm wide with polka dots / any other color - 2 pieces of 20 cm long;
- satin ribbon 2.5 cm wide - 6 pieces of 5 cm long.

Bow.
Place the polka dot ribbon on a 20 cm long white satin ribbon. Focusing on the middle. We process the edges of the tape over the fire of a lighter or candle, soldering the tapes together.

We do two details.

There are many ways to make a bow. In order to make the work move faster, I connected the elements of several.
We put the edges of the tape on top of each other with a slight odor and sew with a basting stitch. The thread is bi-fold.

Without cutting the thread, we also sew the second part. Both details of the bow on the same thread. We do not cut the thread!

By bending the ribbons in half, mark the middle of each.

We connect the fold line and the seam line. With a basting stitch, we go through both tapes in the reverse order.

We pull the thread, make two or three turns along the seam line and fasten with several stitches. Cut the thread with scissors. It turns out such a bow.

Flower.
For a flower, you will need 6 pieces of a satin white ribbon 2.5 cm wide. We fold the segment at a right angle, trying to keep the sides of the corner equal.

We fold the workpiece by connecting points AA and BB. I solder the petal blank in the corners to facilitate further work.


We fold the petal in half along the length with the satin side inward.

Bend each side lengthwise outward. We solder the edge with a lighter or over a candle fire.

It turns out this petal.

We make 5 more petals. There are 6 petals in total.

Apply hot glue to the base of one of the petals, attach the second one, fix the tweezers.

We glue the rest of the petals in sequence. The first and the last are fastened together with hot melt glue.
The flower is ready. We supplement with the middle.

Assembly.
On the reverse side of the bows, we fix the elastic band with hot glue.

A piece of white satin ribbon 1 cm wide and 9 cm long is fixed with hot glue to the middle of the bow on the front side.

We make a double turn and fix the edge of the tape with hot melt glue.

We fix the flower in the middle of the bow with hot melt glue. Our bow is ready!

We make a pair for him. Now you can dress up!