How to make very light snowflakes. # 7 Snowflake made of stripes. Materials for making snowflakes
Everyone wants to create an atmosphere of joy and magic before the New Year in their home. The Christmas tree and garlands have become integral attributes of the holiday, just like do-it-yourself paper cut snowflakes. It is not only beautiful, but also interesting, not only children, but also adults can be involved in this activity, so that everyone contributes to creating a New Year's mood.
There is nothing difficult to cut a snowflake out of paper with your own hands, even small children can learn.
Tools and supplies for beautiful paper snowflakes can be found in every home.
We will need:
- Paper.
- Scissors.
- Round plate.
- Colored paper (optional).
- Pencils (plain and colored).
Carving snowflakes
There are several easy, step-by-step ways to cut paper Christmas decorations. Consider first The easiest way.
You need to take a sheet of white or colored paper, put a round plate on top of it and circle it with a simple pencil. Carefully cut a circle along the contour. Then the resulting circle must be folded in half, then in half again. There is a blank. Now it's the turn of the scissors. You need to cut off all unnecessary from the finished template. Previously, you can draw a conceived drawing on paper or fantasize already in the process. We unfold the finished snowflake and hang it wherever you want, or insert it into a beautiful frame.
Paper decorations can be pasted over windows, but only without the use of glue! To easily remove the snowflakes from the windows after the holidays, you can prepare soapy water. To do this, rub a little toilet or laundry soap into warm water and dissolve. Quickly lower the snowflake into this solution and glue it to the glass. After drying, the decoration will be securely held on the window.
Gallery: paper snowflakes (25 photos)


Hexagonal and octagonal paper snowflakes
To create a snowflake in this way, you only need scissors, paper and, if necessary, simple pencil.
We cut out the decoration step by step:

Thus, we got octagonal snowflake.
To get it in the end hexagonal snowflake you also need to prepare a square. We fold a triangle out of it and unfold it with its base towards us. With a pencil, we make marks on paper: we need to mark 3 equal sharp corners at the base of the triangle. After you have noted, fold the paper along the resulting lines towards the center. We also cut out patterns from the resulting base. After we unfold the paper, we get a regular hexagon.
To create simple, bulky paper decorations you can use templates from the Internet... Now amateurs conduct a huge number of master classes on creating home decorations with their own hands, and it is easy and quick to learn how to do this.
Paper snowflakes: photo


Cut out voluminous snowflakes from paper
If you are already bored with cutting flat products every year and you want something new and interesting, then you can start creating volumetric snowflakes... Cutting them out is as easy as cutting them out. Let's figure out how to do it step by step.
For this you will need: paper, glue, scissors, pencil and stapler.
 You need to take A4 sheets and make blanks in the form of squares as shown in the previous examples. We need 6 such blanks for one product. We add each resulting square diagonally to form a triangle. We unfold the triangle with the base towards us and make 3 cuts on it with scissors to the center symmetrically on both sides. You need to cut it carefully so as not to cut through the middle, leaving about a couple of centimeters in the middle.
 We unfold the resulting workpiece so that it lies towards us with an edge turned horizontally. We roll up two corners in the middle into a tube, connecting them. We turn over the paper. Take the next two corners and connect in the same way. You need to fix them with glue. We do the same with all corners to the edge.
Having prepared 6 identical parts, we connect them. You need to alternately connect them with a stapler on one side, so that you end up with a correct circle. Our snowflake is ready.
You can attach a loop or thread to one corner of it and hang it in the room.
Snowflake made of stripes

To make such a snowflake you need to prepare the same paper strips in advance about 10 to 20 cm long and 0.5 to 1 cm wide.We also need glue for paper and cardboard and sharp scissors.
We fold the strips of paper on top of each other crosswise (3 vertically and 3 horizontally), as if intertwining them together. Then we glue the extreme strips (vertical and horizontal). We get half of the finished product. We do the same with the remaining six strips and glue the finished halves in such a way that they intersect with each other, forming a regular octagon.
Out of paper, but nothing came of this idea? This is not a problem; most likely, you simply chose the wrong procedure for folding the paper. We will show you how to make a snowflake out of paper, which you will not be ashamed to glue on a window or hang on a Christmas tree. First, note that there are several types of paper folding that are most commonly used. They are similar to each other, but, nevertheless, they are quite different and unique.
So, the first way to fold the snowflake paper:
The next way to make a snowflake out of paper is "square":
- You will need a square sheet of paper again by cutting off the excess from the rectangular sheet. Use sharp scissors - this will be more convenient;
- Fold the square in half, but not diagonally;
- You get a rectangle that needs to be folded in half again to make a small square;
- The small square needs to be folded diagonally to make a triangle - done!
This option is the easiest and is suitable for children's creativity. Teach your child this method, and by the New Year you will have a lot of ready-made snowflakes!
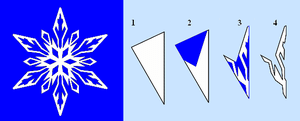
The third method of folding paper is used by adults most often, but at the same time it is least liked by a beginner, since there is a great risk of "curling" the design of a future snowflake. So, follow the instructions:
- Cut a square out of a simple sheet of paper, as described in the first case;
- Fold the square in half diagonally to make an isosceles triangle;
- Fold the triangle so that its equal sides touch each other;
- Now the most difficult thing is the triple folding of the paper. Bend one part of the triangle by a third so that it reaches only 2/3 of the figure. Do the same with the opposite part of the triangle.
- You will get a figure that looks like a paper airplane. So the "ponytails" will need to be removed by cutting them off with scissors so that you get an elongated square.

Choose the method most for you, start with an easy one, gradually move on to complex options.
Materials for making snowflakes
Many people think that paper is very simple, but this is so until you start the process itself. Often, many are lost already at the stage of folding a paper stencil - the basis for a snowflake. To prevent this from happening, start making snowflakes correctly, and therefore prepare all the necessary tools in advance. If you want with a child, then you should limit yourself to a simple set:
- Colored paper;
- Scissors;
- Pencil;
- A simple way to fold paper.
You will cope with such a task within 10-15 minutes, depending on the age of the child and his experience in this matter. Try to choose scissors that cut well, but not sharp, so as not to injure delicate hands.
If you want to decorate the house yourself and therefore deal with the issue of snow decor yourself, then you will need a larger set of materials:
- Correct paper for snowflakes;
- Sharp scissors, awl and stationery knife;
- Pen or pencil, ruler;
- PVA paper glue;
- Decor items - sequins, foil, beads, etc .;
- The method of folding the paper is the first or the third.

For an "adult" snowflake, it is important that it be extraordinary, and for this, use various options for decorating the craft. To do this, glue is applied to the already finished snowflake, on top of which decorative elements are randomly or symmetrically attached. You can make sequins yourself from foil.
Since it is quite simple to make a snowflake out of paper, it is worth noting that the simpler the paper addition, the simpler the figure will turn out, it will have less repetition of the pattern and patterns. To fold paper in the third way, a stencil is sometimes used - it's easier this way. To make a stencil, arm yourself with a pencil and a ruler with a protractor. Then draw a straight line parallel to either side of the sheet, draw a vertical line perpendicular to it. Now measure and draw two lines in each corner formed so that angles of 60 degrees are obtained from the horizontal line, and 30 degrees from the vertical. Thus, you will have a new angle at the intersection of the perpendicular lines of 60 degrees. Folding the paper for the snowflake in the last step is now very simple - attach the triangle to the shape and fold it along the elongated lines so that the paper triangle forms a 60-degree angle.
In addition to the stencil, it is very important for you to prepare the paper itself for the snowflake. It seems that it is simple, but you are wrong, because plain office paper is not suitable. You will only be able to use it if you are making small shapes using the simplest method of addition. So what kind of paper can be used for creativity?
- Thin paper, transparent;
- Foil for food;
- Colored paper for children's creativity;
- Parchment paper, for example, for baking
- Paper napkins, etc.

The main period has come, which everyone is waiting for - cutting out a snowflake. What to do in this case? You can cut a drawing at random, using your imagination, or you can borrow a ready-made stencil for creativity on the Internet. You can try any option to decide what suits you the most. But one way or another, you need:
- Pen or pencil;
- Eraser or putty;
- Scissors, awl, stationery knife;
- A ruler with figures or a small mold.
Not all of these tools need to be prepared at once, but they will help to make the most attractive figure later. As a minimum, you should have high-quality office scissors among your tools.
To make a paper snowflake with a lot of patterns and twists, you cannot do without additional tools. Some small details can only be obtained with the sharp tip of a clerical knife, but scissors will make such a pattern coarse and too large. An awl is necessary for a convenient approach to cutting shapes, as well as for creating round holes according to the design idea. It is worth starting preparation for cutting a snowflake by applying a cutting stencil to the blank. A pen will help to apply a stencil to the paper, but it is better to take a pencil to hide defects with a simple eraser, and a ruler. With the help of curly rulers and patterns, you can make the most different and even curls of the picture. Use the tools listed to draw the drawing onto the paper, and then you can paint over it. Thus, you will have a clear silhouette of the future snowflake.
Along the contour of the picture, carefully cut out the shape from paper using scissors and additional tools. If necessary, adjust the twists and turns of the pencil so that everything is harmonious and beautiful. You should hide all the areas painted over with a pencil or pen on the paper. If there are small marks left, just erase them with an eraser. The next procedure is very simple:
- Expand the snowflake - you will see its entire drawing;
- Considering the process of folding the paper and the difficulty of cutting, the snowflake will be wrinkled, therefore it must be ironed. To do this, use a warm iron (not hot!);
- After ironing a paper snowflake, you can decorate it with paints, felt-tip pens, sparkles, rhinestones or quilling elements;
- Determine what place this decor will take in the house. It can be a frame under glass, like the first beautiful hand-made craft; a spruce branch on a Christmas tree decorated for the New Year in the house; window glass;
- Place the decor where you want it and enjoy. A snow figurine can be hung on a tree if you thread it with a thread and create a special loop. Use scotch tape or soapy water to hang the figure from the window.
To make a beautiful snowflake out of paper, you should stock up on ready-made templates in advance to create a pattern. Of course, you can cut paper without using special schemes, but this method is only suitable for those who already have a certain experience and artistic taste. The process of making openwork snowflakes is quite simple; for this, a sheet of paper must be folded in half so that a triangle is formed. We fold the resulting triangle two more times, after which we cut out the pattern using a prepared template. This one can be used to create traditional hexagonal snowflakes.
To make a snowflake with eight corners, first fold a sheet of paper twice in half with a triangle, and then one more time obliquely. Octagonal snowflakes look more elegant, but they are harder to cut due to the more layers of paper. 
Schemes for cutting paper snowflakes


Instead of plain white paper, you can use tissue paper, tissue paper, foil, or old magazines. Beautiful openwork snowflakes on the walls and windows of the room will perfectly complement the festive decor. From light paper snowflakes, you can make a great garland or stretch with threads hanging down. You can also decorate a New Year's card or gift wrap with a homemade snowflake. Snowflakes made of a denser material will be the perfect decoration for a children's New Year's costume.

Volumetric paper snowflake

Necessary materials:
- thick paper of any color;
- pencil;
- ruler;
- scissors;
- stapler (glue or tape).
Manufacturing:

Beautiful pasta snowflake

Necessary materials:
- pasta of various shapes;
- brushes of different sizes;
- glue Moment;
- acrylic paints;
- decorative elements (beads, rhinestones, sequins, artificial snow, stickers, etc.).
Manufacturing:

Openwork snowflake using quilling technique
Quilling(paper rolling) - is the name of the direction in art associated with the manufacture of flat or volumetric figures from strips of paper twisted into spirals. Using the quilling technique, you can create incredibly beautiful openwork snowflakes.

Necessary materials:
- paper;
- ruler;
- pencil;
- scissors;
- brush;
- glue;
- awl.
Openwork paper snowflakes are the best way to decorate your home for the New Year, create an atmosphere of a winter fairy tale and just have fun with your children, cutting out fancy ornaments from paper. But not everyone knows how and knows, and many simply forgot how to make a snowflake out of paper. No problem! Forgot - we will remind! If they didn’t know how, we will teach! Each snowflake is always unique and special. So we suggest that you make many, many snowflakes for the New Year's holiday, and all are different! Well, if ordinary paper snowflakes seem too banal to you, try making chic volumetric snowflakes using origami or kirigami techniques.
New Year's "beauty" in quilling technique
to the table of contents
How to cut a snowflake out of paper
Turning a humble piece of paper into a luxurious snowflake is surprisingly easy. All we need for New Year's magic is paper, scissors, beautiful diagrams, a pencil, some free time and inspiration!
First, we fold the blank for the future snowflake from a square sheet of paper, as shown in the picture below. Using different patterns, hundreds, if not thousands, of snowflakes of the most unpredictable shapes and patterns can be cut from such a triangular base.

With a simple pencil, transfer the drawings to the base according to the schemes and cut out the snowflakes from paper.

Look for additional schemes for cutting snowflakes at the end of the article.
to the table of contentsHow to make a volumetric snowflake out of paper
 Making a voluminous snowflake out of paper is not much more difficult than an ordinary paper one, but it looks much more spectacular. You can decorate a Christmas tree with such amazing 3D snowflakes or simply hang them in the room to create a New Year's atmosphere. Six square sheets of paper, scissors, glue, a stapler, 15 minutes of free time and a little inspiration - that's probably all we need to assemble a beautiful 3D snowflake for the New Year. If desired, the snowflake can be made multi-colored by making individual elements of colored paper. Until you fill your hand, practice on plain white paper, especially since the snow-white classics are always relevant in New Year's decor.
1. First of all, we make six of these blank squares for the future snowflake. To do this, you can download and print blanks for a small or large snowflake on a printer. To keep the large snowflake in shape, it is advisable to use high density paper. We fold each square in half diagonally and make cuts with scissors, moving from the fold to the center line.

Open the diagonally folded square with notches and place it in front of us as shown in the picture on the left. We twist the first row of strips with a tube and fasten them with glue.

Turn the snowflake over to the other side and take on the next two strips: connect and fasten with glue. We continue in the same spirit: turn over the snowflake and fasten the remaining strips. As a result of the manipulations done, we should get such a whimsically twisted element.

This is one of the rays of our future snowflake, and we need exactly six of these! Therefore, we do the same with the remaining five square blanks. We connect three rays of the snowflake in the middle with a stapler. We connect the remaining three rays in the same way. Now we connect the two large parts together.

Our beauty is almost ready! It remains only to connect the snowflake with glue in those places where the rays are in contact with each other so that the snowflake keeps its shape well.

There is! Fuuuh, we did it! Well, aren't we good fellows ?! Now I would like to make a multi-colored one ...

How to make a voluminous snowflake using origami technique
Dennis Walker's iconic snowflake has won more than one heart with its sophistication and beauty, and has brought more than one origamist-amateur into a stupor. What do you say, let's not let a sheet of paper intimidate us? Or weak ?! If you decide to test your strength, pictures, step-by-step instructions and video master classes from Sarah Adams will help you. You will not be lost! You will probably have to spend at least an hour on your first snowflake. Once you understand how snowflakes are made, things will go faster. And one more nuance: the thinner the paper is, the more graceful the snowflakes will be. Translucent snowflakes that transmit light will look great on the window. Well, you can train on ordinary office paper.

Before proceeding directly to creating the snowflake, we need to turn a square or rectangular sheet of paper into a hexagon. This is one of the most crucial moments on which the success of the whole venture depends.

1. Fold the paper in half twice to create crisp fold lines.

2. We fold one corner with the top towards the center. Bend the upper flap to the edge. We now have two additional fold lines.

3. Fold the paper in half again as shown in the left picture. To get the figure from the right image, use two X marks as reference points and bend valve A along the dotted line.

4. Combining the red and blue lines, we bend valve B. The result of the manipulation done should be a shape that looks like a heart.

5. With scissors, cut off a part of the workpiece along the blue line, focusing on two points X as the reference centers. For further work, we only need part A - a hexagon.

If you have difficulties with the hexagon or have questions, look for answers and tips in the video:
6. Bend one side of the hexagon to the center to form a fold line. We do the same with all six sides. Now inside our hexagon there are many fold lines forming small triangles.

7. Bend the edge of the hexagon to the center again. Using the fold lines that we made in the previous step, we fold valve A to valve B, as in the left image. In the same way, add the other sides of the hexagon until you get a figure that resembles a spinner in shape. The last flap can be a little confusing for you as it will be hidden under the fold. We take it out so that we have 6 valves sticking outward, as in the image on the right.

8. Lightly press with your finger on the fold of each pocket to get something similar to the image in the center. Which of the valves is on top does not matter.

9. To make fold lines for the next step, on each folded pocket, bend two blue corners to the center of the dotted line. The resulting shape should look like the picture on the right.

10. To reveal the fold lines, carefully unfold the folds that we made in step 8. In each pocket, we combine the blue point X with the red point X. The fold lines obtained in the ninth step will help us with this. When we do this operation with all six pockets, our blank will look like the picture on the right.

11. Turn the workpiece over and bend each corner of the hexagon to the center. Each adjacent fold should form a small flap. Keep it on top; don't hide it under the fold. If you have a shape that looks like the picture on the right, then you did everything right.

12. Press the fold line of each of the small flaps to create the new fold lines needed for the next step.

13. Unscrew the folds that we made in step 11, hiding the flaps at the bottom.

14. Turn the workpiece over, turn out every corner as far from the center as possible and bend it. We should have 12 valves - 6 small and 6 large.

15. Turning the workpiece over, you will see small valves between the two large valves. We push each small valve forward. We should now have six diamonds.

16. For each half of the rhombus, pull the blue edge to the center of the rhombus and press the fold to the edge. As a result, we will get a shape like in the picture on the right. It remains to repeat this action 12 times and our snowflake is ready!


Origami snowflake folding video tutorial
to the table of contents
How to make a kirigami snowflake out of paper
Kirigami is one of the types of origami, the main distinguishing feature of which is that in the process of making a model it is allowed to use scissors and cut paper. The method of cutting unusual kirigami snowflakes does not differ much from making ordinary paper snowflakes, but they look much more creative and interesting. A small master class from the author of the blog "Share your smile" Nataliya k will help us learn to create this beauty with our own hands.

First of all, we make such a template, with the help of which even a child can make the correct six-rayed snowflake. To do this, build an angle of 60 degrees on a sheet of paper using a protractor. Having folded a square sheet of paper diagonally in half, we put the blank on the template as follows:

We bend the corners of the triangle as shown in the photo:

The lines of future cuts can be applied to the workpiece with a simple pencil, and then erased with an eraser, or attach a previously prepared or printed template and cut along it. If the blank at this stage is folded in half again, you can use ordinary nail scissors instead of a clerical knife to cut the snowflake. In this case, the work can even be entrusted to a child.

Schemes for cutting out kirigami snowflakes from paper

To make snowflakes made using the kirigami technique even more original and fancy, they can be painted with felt-tip pens, decorated with sparkles, rhinestones or cute pompoms and woolen balls.

House decoration with vytynanki
Remember, as a child, we pasted snowflakes and other paper pictures on glass? In kindergarten and at home, together with our parents, we tried to carve Christmas trees and Santa Claus so that from the street you could see how beautifully our window was decorated! Sometimes it turned out beautifully, and sometimes crookedly. It's much easier now. Vytynanki or paper cut pictures for decorating windows and furniture can be downloaded, printed and cut out with a breadboard knife on a special board.

How beautiful the windows look in the evening, decorated with vytynanki! Fairy-tale characters come to life on them in the illumination of home lamps.

If you are still new to making pins, then start with simple pictures.

And if you are confident that you will get more complex drawings, then you can cut out whole plots!


 You just need to print and cut the picture!
Home Decorating Paper Ballerinas
Another interesting technique for cutting paper jewelry is ballerinas in snowflake skirts.

Ordinary snowflakes will no longer surprise anyone, and paper girls who dance with any movement of the air will appeal to your loved ones and guests. The mysterious dance is mesmerizing, and it is very easy to make such ballerinas. You need to print and cut templates from your photo!

Or these ones.


And you can cut out the ballerinas easier.

Dress them up in snowflake skirts and hang them around the house. This is a very unusual piece of jewelry.

Well, our paper masterpieces are ready and now ...
Make a guess and wish!
And the New Year that is about to come
Will fulfill your dream in an instant ...
If the snowflake doesn't melt
(It won't melt in your palm)
While the clock strikes twelve!
Our snowflakes will certainly not melt! So now you can wish big!
to the table of contentsPaper snowflakes: schemes for printing
Did you know that in nature there are simply no two identical snowflakes? So that your New Year's decor also does not have twin snowflakes, and each one is unique and not like other openwork sisters, do not get hung up on one template! Experiment! Try as many circuits as possible! How do you like these options?


During the New Year holidays, we all want miracles and magic. Even if there is slush on the street at the end of December and does not even smell like a fairy tale, you can create a unique winter extravaganza without leaving your home. To do this, it is necessary not only to decorate the Christmas tree, but also to decorate the apartment with paper snowflakes. There are many ways to create these light and airy beauties.
We do not change traditions!
It is difficult to find a person who, as a child, would not know how to cut a snowflake out of paper. It will not be difficult for you to remember this manufacturing technology or learn it from scratch.
So, to create an openwork decoration you will need:
Paper (this can be either ordinary white or colored A4, as well as napkins, foil and any other suitable material that you want to use);
Scissors (regular or manicure - it doesn't matter, since they are equally convenient for cutting patterns);
A simple pencil (it is advisable to sharpen it well before starting work so that the lines are more accurate);
Now let's get down to business

1. First, fold the sheet at the corner so that the narrow side overlaps the nearby wide side.
2. Now carefully cut off the excess piece of paper. If you did everything right, you will end up with a square folded in half diagonally (that is, a triangle with two identical edges and one longer).
3. How to fold the paper for snowflakes - see the picture above.
4. Draw a pattern on the resulting shape.
5. Walk along the drawn lines with scissors.
6. Unfold the sheet - and that's it, one beauty is ready to go out!

How to fold and cut snowflakes, we figured it out. Now we can proceed to the second, third ... and cut them out as much as the heart desires!
Since there are no two identical crystal princesses in nature, they should also be very diverse in your home.
Come up with your own patterns or use templates to cut snowflakes - the choice is entirely up to you. In any case, your creativity will give very interesting and beautiful results.
We create 3D in your home!
Now let's figure out how to fold paper for snowflakes not ordinary, but voluminous. To make a 3D decoration for a window, chandelier, Christmas tree and any corner of the apartment, you will need:
6 sheets of paper in the form of a square (white or colored - it doesn't matter; you can make both a classic snowflake and with colorful rays);
Scissors;
The most common PVA or glue stick;
Stapler.
So that the paper beauty does not break when you hang it on a thread, it is better to use thick paper for its manufacture (or at least make a beam out of it, to which you are going to attach the thread). In order not to bother with measuring and drawing the sides of a square, you can bend a regular A4 sheet in the same way as when you first created a regular snowflake, and just cut off the excess.
So, all the materials have been collected and are in front of you. Now you can start. Now let's figure out how to make volumetric snowflakes with our own hands.
So, let's work!

Step one. Bend the sheet in half diagonally once. We have formed a triangle.
Step two. On the wide side, carefully make cuts with a herringbone, as shown in the photo.
Step three. Expand the sheet.
Step five. Lift the ends of the corners cut out in the center and glue them together.
Step six. Repeat the previous operation for all parts of the square in pairs, starting with those that are closer to the middle and ending with the extreme ones. When all the pieces are glued together, you will have the first ray of the future snowflake.
Step seven. Repeat exactly all of the above steps for the remaining five sheets of paper.
Step seven. Connect the resulting rays with a stapler (fasten them first three at a time, and then the resulting two halves of the future decoration).
Step eight. We give the product its final shape. In the places where the pieces of paper touch, fix them with glue.
Another voluminous option
If you want to make several types of 3D snowflakes, you can use the origami technique. The world-famous work of Dennis Walker, over which more than one connoisseur of paper art is puzzled, is hardly suitable for everyone. This, as they say, is aerobatics. It will take a lot of time to fold it, reinforced concrete nerves, as well as a certain skill in how to fold snowflakes.
For those who are not good at origami, but still want to please the family and surprise guests with handmade jewelry, we offer a simpler version of how to make snowflakes. Their manufacture is based on a principle similar to the one we described in the previous paragraph.
As easy as pie!
How to fold snowflake paper? Let's figure it out now.

1) Cut a square of any size out of paper.
2) Bend it diagonally. The adjacent edges should clearly overlap each other, and the sheet should take on the shape of a triangle.
3) Now fold it in the middle so that the shorter sides of the figure touch, and the long one divides into two equal halves.
4) Draw a barely noticeable line with a pencil that does not completely intersect the triangle. It should go from the fold line and not extend slightly to the opposite side.
5) Gently go over the marked spot with scissors.
6) Unfold the paper completely. There should be a square in front of you again.
7) Glue together the ends of the corners in the center.
8) And now connect the outer parts in the same way, but at the same time turn them in the opposite direction. That is, they should be like a mirror image of the first fragment. The first ray is ready.
9) Make six more pieces in the same way and connect them in the center with a stapler.
10) Fix the adjoining elements with glue.
That's it, a beautiful spinner snowflake is ready! You can make it white or make each ray of paper a different color. And decorating the product with paints or felt-tip pens will be great fun for children.
We continue to create New Year's 3D!
Colored paper is a great material for creativity. A variety of applications and volumetric products are created from it. Even a small child can understand how to fold snowflakes. Most often they are easy to implement and do not take a lot of time. Such crafts look bright, festive, airy. We present to your attention one of the most simple and beautiful options.
To make beautiful 3D paper snowflakes, we need the following materials and tools:
Double-sided colored paper of light and dark shades in the same color scheme (in our example, purple and lilac are used, you can take any other combined options: blue and cyan, green and light green, red and pink, yellow and orange, etc. );
White list;
Any scissors;
Long ruler;
Simple pencil;
PVA glue.
Step-by-step manufacturing instructions
How to make snowflakes in stages?
Step 1. Preparing materials. Find the right shade of colored paper. You can use whatever colors you like. Ideally, they should be similar to each other, but if you want to use any other combination, do not hold back your inspiration and do as you like best.
Step 2. Preparatory work. Before folding the snowflakes, cut from

paper identical strips (their width should be 1-2 centimeters, and the edge of the sheet will become the guideline for length). How many of these lines do you need? Remember:
Dark shade (we have - purple) - 4;
White and light (in the example lilac) - 8 pieces each.
Step 3. We collect the first element.
Glue the purple paper strips crosswise. Then, along the edges near each of them, attach the lighter part as shown in the figure.
Step 4. Add a new color.
Fix the 4 white pieces in the same way. Thread each strip between those that run parallel to it. If you do everything right, the lines will intertwine like twigs on a basket.
Step 5. We start making rays. Bend and glue the ends of the white stripes that are next to each other in pairs.
Step 6. We work with the lilac parts.
Pass the ends of the light colored stripes inside the formed white loops, fasten them together and fix them on the "walls" of the ray. How to fold the paper for snowflakes correctly - see the picture.
Step 7. Make another similar element separately according to this scheme.
Step 8. Collect the snowflake. Combine the two resulting pieces of decoration together. Fix the purple stripes of one part inside the loops of the other, and vice versa.
That's it, one more 3D snowflake is ready! It will be a great addition to the festive decoration of your home or workplace. And now you know another way to make snowflakes.
Openwork magic from threads
What could be more beautiful and more sophisticated than a Christmas tree decorated in white? Air angels, curly lambs, shining silver lights of garlands ... and how can you do without light, delicate snowflakes? The color of purity, a fresh start, winter and the main holiday of the season. It is impossible to imagine the New Year without white decorations! And if they are also made by hand, such products become more dear to your heart.

If paper beauties live only one season, and until the next holidays we often make new ones, then knitted snowflakes will serve you for more than one holiday. You can hang them on the tree among other decorations or separately assemble a stylized festive tree on the wall from them - in any case, the result will delight both you and your loved ones.
We decorate everything and everywhere!
You can also use your creations to decorate windows. Knitted snowflakes are not only glued to glass like their paper cousins. Hang these beautiful pieces of jewelry on strings of varying lengths along the curtain, or even sew to it. Stretch them inside the embroidery hoop and use them to decorate any corner of your apartment.
And if you cover Christmas balls with such snowflakes, then you will definitely get exclusive decorations that none of your friends have. This delicate beauty will make your tree delicate, delicate and unforgettably beautiful!
And what is the New Year without gifts? On December 31, we tell loved ones how much we love them, wish them a lot of good things, give them a lot of good emotions and little surprises that will remind them of this wonderful night for a long time. To really surprise your loved ones and make the holiday atmosphere even more wintry and fabulous, you can decorate both the packaging of your gift and a postcard to it with knitted lace snowflakes. A present in such a wrapper will truly become a New Year's miracle!
We memorize the basic techniques!
You don't have to be a knitting master when crocheting your own snowflakes. The scheme for any of them consists of air loops, double crochet and without it. Combining these simple techniques with each other, you can create as many wonderful jewelry as you want!