Papier mache from the toilet. How to make a papier-mache figurine with your own hands. papier mache masks
Translated from French, papier-mâché means "torn paper". And in needlework it is the creation of voluminous toys and objects by gluing small pieces of paper with a paste. This is an original and exciting activity that requires perseverance and patience. The technique of making such crafts opens up a huge scope for creativity and allows you to make unusual toys, masks and other items from old newspapers.
Excursus into the history of papier-mâché
More than a thousand years old. Things made in this way were found in Egypt, Persia and China. The Egyptians made death masks from papyrus and adhesive. In Persia, various decorative paper items were made, including dishes and interior items, and thin metal plates were applied on top.
In China, paper was used to create armor and shields that protected the warrior from arrows and even withstand a blow from a sword. In addition, home decor items were created from it - caskets, vases and even buttons. And also these items were covered with several layers of varnish to give them greater strength.
Since the 17th century in England and France, paper has been used to create dolls. This material had its advantages - the toys were stronger than porcelain and lighter than wood.
 In the 18th century, architectural stucco and carved wood began to be replaced by cheaper counterparts made from multilayer paper. Such items could replace elements of furniture or church utensils.
Only under Peter I, the technology for making paper crafts began to be used in Russia, and industrial use began in the 19th century. To this day, this technology is used to create props in cinema and theater. Models of dishes, weapons and interior items, as well as landscape reliefs and architectural structures are made from it. Paper masks and headgear are also popular in theater. Even when creating the details of theatrical make-up (false noses and chins), this technique was not without use.
Preparing for DIY
To make an original souvenir, gift or other interesting thing, it is not necessary to be a great master. Even a child can make papier-mâché toys with their own hands. For the manufacture of crafts, a minimum of materials is required - thin pieces of paper and an adhesive. Glue can be replaced with a paste that can be made at home.
Paste recipe at home
A paste is a good substitute for regular glue, especially if a child will be doing the crafts. It has its pros and cons to use. The main plus when creating a sticky mass for children is that it is easy to wash it off the table and hands. But the paste dries longer and is not subject to long-term storage. It is recommended to prepare a new portion of such glue before each work.
To make an adhesive mass you need:
- Dilute starch or flour in warm water and mix well so that it becomes thick like sour cream.
- We continue to mix and carefully add boiling water until the solution becomes transparent and looks like jelly.
- Let the paste cool down.
Now the paste can be used for work.
There are several methods for creating paper crafts:

Having chosen the manufacturing method, you can start doing crafts.
 Here are a few DIY papier-mâché tutorials for beginners that show you how to do it:
- Matryoshka.
- Reindeer.
- House of Baba Yaga.
- Candy cat.
Matryoshka toy
The craft "Matryoshka" will help to develop a child's interest in Russian folk art. It can be done in a classic style, or you can make it in the style of your favorite cartoon characters.
For work you will need:
- Plasticine.
- Paper pieces.
- Glue or paste.
- Paints and brush.
- Simple pencil.
- Paper knife.
 We begin to do crafts with modeling plasticine figures in the form of a nesting doll. The first three paper layers are laid out without the use of glue, pieces of paper soaked in warm water. This is necessary so that it is then easy to separate the matryoshka from the plasticine.
Then lay out five layers of paper coated with glue, and leave the toy to dry. After that, using a paper knife, cut the figure into two halves along the body and take out the plasticine. We connect the parts with pieces of paper and glue. Then we apply the final layer.
As soon as the product is completely dry, it can be painted with paints. To do this, we outline the contours with a simple pencil and then begin to decorate the figure with gouache.
Reindeer
On New Year's Eve you can do original souvenir in the form of a deer. It will require the following materials:

From the wire we make the frame of the figurine, on which we form the body and antlers of the deer from foil. Then you need to smear the entire figure with glue and wrap it with gauze, or simply wrap all the details with paper tape.
We take a pre-prepared paper pulp and coat the deer with it, giving the figure a finished look, and also make ears and a tail. We leave the craft to dry, after which it needs to be painted.
Baba Yaga's house
The papier-mache house of Baba Yaga is an unusual craft that you can make for yourself or as a gift. But it will take several days to complete it.
For work you will need:

The craft is done in several stages.
Stage 1. First of all, glue the bottle with napkins using PVA glue in one layer. Further, when the first layer dries, we mark the outlines of the future house with a simple pencil: we draw windows, doors and logs.
We form logs of the hut from paper gruel and lay them out in rows on the bottle, starting from the bottom.
We work on two walls of the house at the same time, making circles in the form of slices of logs at the corners.
And also lay out the doors and windows of the house. On the windows we make shutters and a window frame, and on the doors we form a handle and door hinges. With the help of the stack, it is necessary to make the texture of the tree, drawing small strips of it along the logs and other elements of the hut.
 After the lower part of the craft is completely laid out, the product must be left to dry for a day.
Stage 2. We make the roof of the house. We begin the work with the formation of a triangular attic (in the photo it has a pink tint) and insert a colored stone into its middle.
Next, lay out the roof elements in rows, starting from the bottom, and after each let the product dry. After the third row, we begin to sculpt the pipe, pasting the neck of the bottle with a small layer of paper pulp. Using the stack, mark the bricks on the pipe and give the elements a small circle.
Stage 3. We lay out the last row of roofing and let the product dry. Our hut is almost ready, it remains only to paint all the details with paints and decorate the cork for the bottle.
Such a hut can become a real decoration of the festive table and surprise guests!
An original craft in the form of a cat will not only be a beautiful interior decoration, but will also serve as a candy bowl for children. The product is hollow inside and therefore can serve as a designer vase or jewelry box.
To work, you will need the following materials:

First you need to prepare the work surface by covering it with oilcloth or placing a plastic tray on the table. The candy bowl is made in a layered technique using paper gruel, so it is better to prepare materials for work in advance. Pieces of newspaper should be no more than 6 centimeters in length, and pour the paste into a bowl, from which it will be convenient to take it.
Let's get to work:

Candy box is ready! It remains to fill it with sweets and put on the table to please the guests.
In the likeness of this master class, you can make a piggy bank cat. To do this, you only need to cut a hole on the crown, and only draw the mouth.
Making figurines from papier-mâché with your own hands for children you can create your own puppet theater and play small performances for guests in it. In addition, not only toys can be made from this material, but also models of fruits, such as apples, bananas and others.
Attention, only TODAY!
A cheap and durable material from which you can create any three-dimensional compositions at home is papier-mâché. Papier means “paper” in French, and mache means “ground, chewed, compressed”. The literal translation accurately conveys the technology of creating the material.
Sculpture is created in two ways: increasing volume or cutting off volume. To increase the volume, you need to sequentially add layers of paper impregnated with glue. To cut off the volume, you first need to form a shape from a viscous and plastic mass, into which paper turns when mixed with water and glue.
What kind of paper is suitable for making papier-mâché with your own hands:
- Soft multi-layer or single-layer paper. Napkins, toilet paper, paper towels. The softer the cellulose fibers, the faster they absorb water with glue.
- Plain printer paper. It absorbs water for a long time, but if there is no other option, this one will do.
- Notebook sheets, writing paper, notebooks, watercolor paper. Any cellulose-based material can be used, even cardboard. Thick and glossy sheets are poorly saturated with water, so you first need to compress the paper so that it becomes softer.
- Newspaper. This is ideal, as the newspaper sheet is strong enough, and at the same time soft. How many layers of newspaper you need to apply depends on the size of the product.
Before starting the process, you need to decide in what technique the product will be created.:
- mashing. The technique consists in gluing a rigid frame form. For the form, you can use: foil, bottle, jar, wooden block, any product that acts as a support for the final composition.
- modeling. Volumetric figures can be formed from papier-mache in the same way as from clay or sculptural plasticine. An important point is drying, it will not work to dry such a product quickly. It is more profitable to first create a frame and dry it, and then add volume with additional layers of paper. For modeling, a viscous mixture of cellulose and glue is created, which, when solidified, becomes solid. After sculpting, hands should be washed immediately with warm water and soap, then the glue will be washed off.

Before realizing your plan, you need to make a sketch and decide how to make papier-mâché: sculpting or mashing. The sketch will help to avoid mistakes, determine the technique and work out the image in detail.
The sketch may be approximate, not detailed. It is important to indicate the proportions and approximate dimensions of the product.
Machining: master class
Mashing is such a meditative activity that takes place in stages and sequentially. Haste can ruin the product, so you should tune in to measured work.
Master class on working with papier-mâché (video)
Mk on this papier-mâché technique:
- Prepare pre-cut paper. Some crafters claim that torn paper is better than cut paper, but it's really a matter of personal preference. To strengthen, you can use a bandage, it also needs to be cut. It is convenient when the paper is of different colors. For example, if a newspaper is taken, then layers with text will alternate with layers on which bright announcements are printed. The difference in color will help you figure out where you need to add the next layer, and where it already exists.
- Prepare a sufficient amount of PVA glue. Glue can be diluted with tap water, then it penetrates the paper faster. The maximum dilution ratio is 3 parts of glue to 1 part of water, the more water is used, the more friable the product becomes. Too much water will cause the sculpture to "float" and lose its shape. Undiluted glue is better for detailed and thin products. In addition to PVA, you can use glue for paper wallpaper or homemade paste. The instructions for the glue contain information about its toxicity, you need to choose an environmentally friendly glue without a strong odor, because it will take a long time to glue.
- For paste you need starch and boiling water. Pour starch into a cup, pour boiling water and mix until a uniform consistency. The density of the paste should resemble sour cream. After finishing work, the paste must be immediately washed off the cup, after hardening, it will be problematic.
- If the frame form then needs to be removed from the finished product, it is necessary to lubricate its surface with vegetable oil, petroleum jelly or any greasy substance so that the mass of paper does not stick to the frame.
- If the form is not planned to be removed, it can be covered with PVA or paste. After the preparation of consumables is over, you can begin to create a sculpture.
The technique of doing the work is very simple, it is easy to do it yourself with patience. The paper is applied layer by layer, the glue is spread with a large brush. Dry the layers to either dry or semi-dry state.
How to quickly dry papier-mâché: options
After the end of the increase in volume, the product must be left for 2 days. It won't dry quickly at room temperature.

How can you speed up the process:
- Put the product in the oven at 50-100 degrees;
- Use a heater, battery or heat gun.
Some craftsmen claim that the product may crack when heated. This is not true. To check on personal experience how the sculpture reacts to temperature, you can mold a very small product and place it in the oven. If the composition of the glue tolerates heat well, then dry in the oven. If any defects occur, dry most of the work already at room temperature.
How to make papier mache smooth after drying:
- Align the bumps with sandpaper or sandpaper;
- Sand the surface with a fine sandpaper;
- Cover with an acrylic artistic or construction primer;
- Apply paint, varnish, mosaics or decorations.

If a large and simple figure is made from papier-mache with your own hands, for example, a stump for a summer residence, coarse sandpaper is used to speed up the process.
If the figure is small and detailed, for example, flowers or fruits, you should immediately use fine sandpaper.
How to remove papier-mâché from the form
If the sculpture needs to be separated from the frame form, it is necessary to lubricate the form with petroleum jelly or any fat cream before pasting. For mold processing, ordinary cling film is also used. It is tightly wrapped around the frame so that there is no air gap left. Then they remove the papier-mâché along with the film.

Scotch tape resists glue well, the smooth texture of the tape will prevent the form from sticking to papier-mâché. Pasting with adhesive tape is done in pieces, without gaps.
Papier-mâché: how to make by modeling
The technique of mashing makes it possible to create thin and durable things. If the work is more solid, without small details, it is more profitable to use modeling.
To prepare the mixture for modeling, you will need:
- Basin, cup, bucket, any suitable container that is at home;
- Mixer or drill with a nozzle for mixing paint;
- Sieve or mosquito net.

To make the mixture strong, wallpaper glue or PVA glue is added to it. To make the mixture plastic, you need to prepare a paste.
For paste:
- Pour boiling water over flour, 1 part flour to 3 parts water;
- Bring to a boil, stirring;
- Break the lumps, give a homogeneous consistency;
- Cool and add to mixture.
You can use starch paste.
Making a sculpture from a sculpting mix:
- Pour small pieces of paper into the basin;
- Add warm water and paste;
- Add glue and beat until smooth with a mixer or drill with a nozzle for stirring paint;
- Let it brew for 2-3 hours;
- Stir again;
- Let it brew for 2-3 hours;
- Squeeze out the water, if there is excess, pass the remaining mass through a sieve or through a mosquito net to separate large pieces;
- Sculpt.

The mass must be plastic enough to keep its shape. You can dry at room temperature, and if it does not crack, then in the oven at 50-100 degrees.
Working with papier-mâché at home
High-quality drying and compliance with proportions is a necessary condition in order to get a beautiful and neat work. During drying, the product must not be moved, touched or poked with sharp objects to check readiness. Wet papier-mâché must not be dropped or squeezed. Drying should be in those rooms where children and pets do not run, which can accidentally spoil the product.

In order to be able to transfer the sculpture from the desktop to where it will dry, you need to immediately create it on glass, a tray or a board.
If, by an unfortunate accident, some part of the papier-mâché has separated or the product has broken, you should dry everything until cooked, then glue and grind the defects at the junction. You can increase the volume and restore the sculpture, which was injured.
What can be made from papier-mâché
The material has a wide scope, it is used to create any round or flat sculpture, high relief or bas-relief, moldings.

The use of papier-mâché:
- Wall decor with stucco;
- Costumes for children's holidays, helmets, swords;
- Masks on the walls;
- Round vases, three-dimensional flowers, figures of people and animals;
- Interior decorations, decorative plates, bottles.
Papier-mâché flowerpots (video)
After the product has dried, it is sanded, primed, and then coated with acrylic. Acrylic is the best paint for papier-mâché, which creates a protective film.
You can finish the work by applying a glossy or matte acrylic varnish, brush or spray can.
Papier-mâché technique (photo)


.3_%D0%BC%D0%B0%D1%88%D0%B8%D1%80_.jpg)


The production of papier-mâché products is usually carried out according to special samples - models. Various factory-made items can be used as such samples: teaching aids, models, toys, masks, household equipment, etc. In most cases, special models are used to make papier-mâché crafts, molded from clay,% plasticine , paraffin and other plastic materials. Most often, for the manufacture of models in works with papier-mâché, clay is used, a very common and cheap material. Stacks used in modeling clay models.
From clay, according to a pre-prepared sketch or sample, a model is molded - the original, the shape of which they want to accurately reproduce from papier-mâché. To make a model, it is necessary to take a solid lump of well-mixed clay that is quite sufficient in size in order to mold the entire model out of it. In cases where the model must be large, and also when sculpting models that have separate, far protruding parts, a wire or wooden frame is embedded in a lump of clay taken for modeling.
1 It should be noted that papier-mâché is often misunderstood as all kinds of paper plastics, in which the paper is preliminarily crushed mechanically or boiled into individual fibers and mixed in a powdery or mushy state with adhesives and other fillers into a homogeneous plastic mass. This mass is used to fill molds and after drying becomes hard and durable.
Usually, the original is first molded from clay by hand, and only after the general shape and the relative position of the individual parts of the model have been more or less accurately outlined, the details are worked out using stacks. Stacks are narrow spatulas of various shapes made of dense wood or metal.
With long breaks in sculpting a clay model, it must be wrapped in a wet rag, which must be kept moist all the time.
It is very convenient to sculpt small models in the conditions of the "Skillful Hands" circle from plasticine - a special wax plastic mass. Before work, the plasticine must be well kneaded by hands, and when sculpting models from it, use metal stacks, which are slightly heated from time to time.
For the manufacture of small models, paraffin is also used, from which each time a blank is first cast, roughly resembling the future model in its contours, then the model is finished with a knife and heated metal stacks.
Production of products according to models-forms.
Depending on the purpose, size and circulation of the product, and often depending on the availability of the necessary materials, the technology of its manufacture from papier-mâché is chosen. If single copies are needed, and their dimensions are relatively large, then in many cases it makes no sense to spend time and materials on the manufacture of special forms: the product can be pasted directly on the clay model - the original. The model serves as a form at the same time.
The model-form is covered entirely in one or two layers with pieces of moistened paper, which are pressed with a rag or a piece of rubber sponge to the surface of the form to ensure a snug fit 1* to eliminate all air bubbles. Then the entire surface of the model is laid out layer by layer with small pieces of damp loose paper, coated on one side with a paste.
So that the clay from which the model-form is made does not get wet when pasted with paper, the surface of the model must be impregnated with drying oil, any vegetable oil, or covered with a thin layer of a special paste, which is a solution of stearin in kerosene. The manufacture of stearin-kerosene paste is described below.
it is convenient to use purchased plastic baths as model-forms. Clay flower pots can serve as molds for making papier-mâché decorative flower pots. Old papier-mâché toys are often used as molds for making the same homemade toys.
In order to avoid gluing the listed models-forms with papier-mâché, and also so that these models do not deteriorate from the moisture contained in the clay, their surfaces are pre-coated with varnish, a thin layer of stearin-kerosene paste, vegetable oil or melted wax, paraffin or stearin . The first layer of moistened paper is laid out on the surface of the model-form without lubrication with paste. After the layer of papier-mâché applied to the model-form dries so much that the product can be separated from the mold without fear of its deformation, it is removed and dried well in a warm, but not hot place.
With the method of manufacturing products described above, the papier-mâché layer is adjacent to the model, which serves as a form, with its wrong side. Therefore, the front surface of the product only approximately reproduces the original. In order for this reproduction to be as accurate as possible, in the process of gluing the individual layers of papier-mâché, it is necessary to strictly ensure that their total thickness is the same everywhere.
Manufacture of products on skeletons, frames and blanks
In terms of technological methods, the above-described method of making papier-mâché products according to model-forms is very similar to the method often used in “Skillful Hands” circles, which boils down to pasting a special cardboard core with ten to twelve layers of paper. So, for example, when making a papier-mâché box, you can make a cardboard box of the right size and paste over it, layer by layer, with paper. After drying, with the help of priming, puttying and grinding, the box is given the correct geometric shape, and it is painted or painted with oil paints, enamels or nitro paints.
Cardboard cores are also used in the manufacture of many three-dimensional layouts in geography; this technique speeds up work and helps to save materials and significantly lighten the weight of the finished product. Figure 138 shows a model of a volcano made on a cardboard frame.
In cases where the product is large and has a complex configuration, papier-mâché can be glued on a frame made of any material suitable for this purpose: wooden bars and slats, plywood, wire, cardboard, etc. * Such frames are usually made on special shields or boxes with low walls.
The manufacture of various papier-mâché crafts with a strict geometric shape is carried out, as a rule, using blanks of the appropriate shape. Such blanks are made from dry, not knotty wood. Their surface is well cut and painted with waterproof paint, nitro-lacquer or oil varnish.
When making a product from a blank, the latter is lubricated with oil or stearin-kerosene paste and wrapped with one or two layers of paper. Then, layer by layer, the blank is pasted over with paper and, having brought the layer of papier-mâché to the desired thickness, left to dry. The dried blank is removed from the blank, its surface is cleaned with a rasp and sandpaper, and further finishing is carried out. To make it easier to remove the workpiece from the blank, it is useful to cut the latter slightly “on a cone”, and to remove small chamfers along the edges of the blank.
mold making
If according to the existing original - a model made of clay, plasticine, paraffin, etc. - it is necessary to make several identical copies of papier-mâché and these copies must accurately reproduce the model, then molds are made from this model.
Forms are imprints of models in gypsum, wax, paraffin, stearin and other materials, which for this are either melted by heating or closed with water. Hardening as a result of cooling or chemical interaction with water, these substances reproduce with sufficient accuracy in reverse the overall shape and all elements of the surface of the model.
For the manufacture of molds, finely ground burnt gypsum of good quality is usually used. Good gypsum is elastic and oily to the touch, does not contain foreign inclusions and grains, and does not stick to the fingers. Being closed with water until a solution of sour cream density is obtained, gypsum forms a solution that well fills all the smallest details of the model surface. This mortar quickly thickens, sets and hardens, forming a shape that is relatively easy to separate from the model.
The advantages of gypsum as a material for molds also include the fact that after hardening it is quite strong, well processed and glued.
The mold casting for each papier-mâché product should be made in accordance with its size and configuration. For planar products, such as, in particular, many geographical layouts, various bas-reliefs, cartouches, etc., molds are made that are open on one side. They are usually called simple, or single-leaf forms. Such forms are slabs of one size or another made of gypsum, alabaster or other materials. On one side of each plate there is an exact imprint of the model - a form for making a papier-mâché product.
Casting single-leaf molds from plaster or alabaster, if the models do not contain figured parts that could prevent the removal of the finished cast mold from them, is relatively simple.
After the model is prepared for mold casting, i.e., lubricated with vegetable oil or a solution of stearin in kerosene, a gypsum mortar is prepared. To do this, gypsum powder is poured into a cup or bowl of water, distributing it evenly over the entire surface of the latter. With the help of a wooden spatula, without lifting it from the solution and avoiding shaking, which leads to the formation of air bubbles in it, quickly mix the solution.
Freshly prepared gypsum mortar should resemble cream in density. If the solution turns out to be too thin, a little dry gypsum should be added without delay, with continuous stirring.
The prepared solution quickly thickens, and as soon as it looks like thick sour cream, it must be immediately used for mold casting.
First, a thin continuous layer of gypsum mortar is applied to the model, carefully observing that bubbles and voids do not form on the surface of the future form. Then quickly cover the entire surface of the model with a layer of mortar at least 2.5-3 cm thick in the thinnest places. It is highly desirable that the underside of the finished form is a plane: the next time you use the form for work, it is more convenient to put it on the table in this case.
The cast plaster mold is left to harden. The utensils used for mixing gypsum must be immediately thoroughly cleaned and washed, since the gypsum in which the hardening process has begun is hardly removed from the surface of the utensils and tools. The solution prepared for molding should be completely consumed each time, because the remaining gypsum still has to be thrown away. For the same reason, it is necessary to prepare a gypsum solution for each form separately. Finished gypsum molds dry well and are completely covered with oil varnish or liquid wood glue - sizing. After re-drying and each time before using the forms for gluing papier-mâché products, the working surface of each form must be covered with a thin layer of stearin-kerosene lubricant, vegetable oil, and even better - a mixture of vegetable oil with a solution of laundry soap.
Compound forms
In the manufacture of papier-mâché of some bulky products, composite, or, as they are also called, collapsible, folding or lumpy forms are often used. Depending on the complexity of the configuration of the models, such forms consist of two or more parts - flaps or pieces. When using composite forms, each sash is glued with a layer of papier-mâché separately, and after drying, all parts of the product are glued together.
In the manufacture of each sash form, it is necessary, in accordance with the nature of the model and product, to outline the smallest number of sashes. At the same time, the borders of the latter should pass on the model so that each leaf can be easily removed from the model, and individual parts of the product, after drying the papier-mâché layer, are easily separated from the corresponding mold doors. It is advisable to mark the boundaries of the sashes so that the seams between the individual parts of the product can be made invisible during finishing. In the manufacture of composite forms, it is necessary to take measures to accurately match each other with individual valves.
The wings of the composite form are cast sequentially, one after the other, and the gypsum mortar is prepared each time in a volume sufficient for the manufacture of the next leaf. At the time of casting, each sash must be limited along the entire contour outlined on the model, either by the side surfaces of already cast sashes, or by special temporary partitions made of tin, thin oiled cardboard and other materials.
If the model, according to which the sash mold is to be made, is made of solid material, then temporary partitions for casting individual sashes can be made of stucco clay. To do this, a long sausage is prepared from clay dough by rolling on a board, and then a tape 10-12 mm thick is formed from it. Having cut off one side of this tape with a knife and slightly wetting the cut plane with water, they encircle the model along the marked line with a clay wall. Thus, for the casting of each leaf, a closed contour is obtained.
Before casting the next sash, the surface of the corresponding section of the mold and the side surfaces of the adjacent sashes and partitions already cast are lubricated with grease.
As the simplest case for the manufacture of a composite mold, one can point to the casting of a double-leaf gypsum mold according to a small and relatively uncomplicated model made of some hard and durable material. The greased model is simply pressed into a thick layer of well-kneaded clay dough. The clay near the model is leveled with a knife and around the entire model, at some distance from it, a roller is made - a wall of clay. The upper half of the model prepared in this way is poured with gypsum mortar.
When the plaster hardens, the model, together with the cast leaf of the mold, is turned over and thoroughly cleaned of clay. The half of the model to be filled with plaster and the surface of the seam along which both mold doors will be connected are covered with a thin layer of grease, after which the second leaf is cast^
After the plaster mold is completely cast, it is given the correct shape from the outside, if possible, by removing the excess plaster on the wings with a knife. When the gypsum hardens well, the leaves of the gypsum mold are opened by inserting a knife blade into the gap between them.
Pasting forms with paper
Depending on the size and configuration of the product, strips and pieces of paper of various sizes can be used to glue the forms. The more complex the relief and the smaller the product, the smaller pieces of paper have to be used to glue it. Pasting large cylindrical and prismatic blanks in the manufacture of home-made spyglasses, periscopes, kaleidoscopes, pencil cases and other crafts is carried out with whole sheets of paper, the width of which corresponds to the length of the blanks.
It is most convenient to pre-cut paper for papier-mâché into strips 3-4 cm wide and 20-30 cm long. The strips are poured for several minutes with hot water and stacked. When the excess water drains and the paper wilts a little, it is used for layering papier-mâché, and, depending on the shape of the object, the strips are glued in their entirety or torn when sticking into separate pieces. The first layer of moistened paper is laid out without smearing with glue.
Forms are glued either from the middle to the edges, or from one edge to the other. The gluing of products is usually carried out in no less than 5-6 layers, and most often in 10-12 or more layers. In order for the work to go faster and the final thickness of the papier-mâché layer in the finished product to be uniform, it is recommended to use paper for gluing each successive layer, which would differ in color or texture from the paper used for gluing the previous layer. For example, having glued the first layer of newsprint, you should use colored or smooth white paper for the next one, for the third layer you can again use newsprint or paper of a different color, etc. This simple technique allows the worker to avoid gaps and achieve a uniform thickness of the glued layer papier mache.
If the product has small bulges, then when gluing the mold, the cavities corresponding to these bulges are glued separately with several layers of paper and filled with small lumps of paper smeared with glue, after which the gluing of the mold is continued in the usual way.
When gluing individual sashes of a composite shape, a small excess layer of papier-mâché is created along the edges. At the end of gluing, this excess is folded inside the mold flush with the edges of the sash and glued to the inner surface of the papier-mâché layer. In this case, shoulders are formed,.
After each of the parts of the product dries, a seam line is transferred to its edges along the entire contour with a pencil or a knife. The part is carefully removed from the mold sash and finally dried. Then the edges of the manufactured part are leveled and cleaned with a rasp to the seam line outlined by the above method. If a higher accuracy of fitting to each other of the individual parts of the papier-mâché product is required, then the planes of the seams are ground with glass paper.
If the seam between the individual parts of the product lies in the same plane, then it is convenient to smooth its surface on a sheet of glass paper laid face up on the table. In this case, the removed and dried part of the product is laid with the entire surface of the seam on sanding paper and rubbed until a good fit to neighboring parts is ensured.
Drying of the molded parts of papier-mâché products is carried out in a warm, dry room. Each product is dried first in the form, then they are carefully removed from the forms and dried, hanging on ropes or laying them out on boards.
Drying papier-mâché pieces too quickly at high temperatures usually results in warping, which makes the piece difficult to assemble and spoils its overall appearance.
Dried and fitted parts of papier-mâché products are glued together with hot wood glue.
Finishing papier-mâché products
When the product is dried and its individual parts are glued together, all seams and flaws on its surface are puttied with a special wooden or steel spatula - a spatula or a simple knife with glue or oil-glue putty. The puttied product is again well dried, the seams and unnecessary protrusions are cleaned with a knife or rasp, after which its entire surface is completely polished with glass paper or a piece of pumice stone.
For continuous coatings, a thicker putty is prepared than for sealing individual flaws and seams.
For puttying papier-mâché products, putties of the following composition can be used:
1. Adhesive putty
Chalk ground sifted, preferably elutriated ................ . . ... 20 pieces
Joiner's glue ................ 5 »
Desiccant ................... 1 part
The chalk is kneaded with water until a thick dough is obtained, a thick adhesive solution is added and, without ceasing to interfere, is heated. After a completely homogeneous slurry is obtained, a desiccant is added and, thoroughly stirring, is heated again.
It is advisable to use this putty while it has not cooled down.
Prepare this putty in the same way as described above. Good results are obtained by adding a small amount of grated oil paint to these putties.
Oil varnish - until the putty of the desired density is obtained.
This putty dries quickly and is highly durable.
In order for the surface of papier-mâché products to be stronger, and their color to be juicier and brighter, as well as to reduce the consumption of paint and varnish during the final finishing of products, the latter are preliminarily primed, that is, covered with a thin layer of primer.
2. Oil-adhesive putty
Chalk ground sifted
Joiner's glue.....
Drying oils. . .......
8 parts 3 parts 1 part
3. Lacquer putty
Chalk ground sifted White zinc grated.
3 parts 1 part
The simplest and most accessible primer for papier-mâché when working with children is a very thick starch paste, which is brewed in the usual way and consists of two parts of potato starch and five to six parts of water. If, due to lack of water, the paste does not brew, it is heated in a boiling water bath until the solution becomes thick, transparent and homogeneous. Starch primer is usually applied by hand.
Easy-to-make putty is obtained according to the recipe:
glue joiner's tile ........... 8 parts
water.................. "25"
ground sifted chalk - until the density of sour cream is obtained.
For greater strength of this primer, you can add to it:
drying oils .............. 1 part
oil varnish ................ 1 »
grated zinc white .............. 1 "
If the primer is so liquid that its layer applied to the surface of the product is translucent, then chalk should be added to the primer. Glue water is added to a primer that is too thick.
Under the working conditions of the “Skillful Hands” circle, a strong and waterproof casein primer of the following composition can be used. Ordinary cottage cheese made from skimmed milk is poured over with boiling water, squeezed in a clean rag and dried in the oven. The resulting mass is ground in a mortar into powder, to which two to five percent ammonia is added. To give the primer greater elasticity, 1-2% glycerin is added to the mass, after which everything is diluted with drying oil to the density of sour cream and mixed well. It is useful to add a little grated zinc white to the resulting primer.
After the primer applied to the surface of the products dries well, it is lightly sanded with fine-grained glass paper and painted.
For dyeing and coloring papier-mâché products made by children, oil paints are most often used, usually applied in two or even three layers. For painting masks, theatrical props, models and other papier-mâché products, purified turpentine is added to oil paints. An increase in the strength of the coating when finishing with oil paints can be achieved by adding to the paint (when applying the last
him her layer) a small amount of light oil varnish.
Good, after which the clay dough is kneaded until it stops sticking to the hands and retains its shape well. When carrying out small-sized and responsible work, it is recommended to add raw vegetable oil to the clay.
Plasticine for making small models can be purchased at stationery stores, but it is not difficult to make it on your own according to the following simple recipe:
natural wax .............. 60 parts
melted pork fat. 40 »
turpentine........ . . 100 "
dry mineral paint, finely ground ............. 30 "
potato starch .............. 125 *
Wax, lard and turpentine are carefully melted over low heat in an enamel bowl. Little by little, with continuous
See what papier-mâché dolls can be made using toilet paper. From the same material you will make a piggy bank, toys, New Year's crafts.
How to make a papier-mâché piggy bank with your own hands?
You will make such a funny tiger cub if you take:
- two sheets of white paper;
- newspapers;
- plasticine;
- a small polyurethane jar;
- PVA glue;
- scissors;
- paste;
- gouache;
- stationery knife;
- thin and thick brush;
- acrylic pistachio varnish.

Prepare the paste. To do this, take a glass of cold water, pour it into a saucepan, pour 2 tsp here. starch, stir well. Put the container on the fire, stirring often, bring the liquid to a boil, remove from the stove. When the paste has cooled down, it is ready to use.
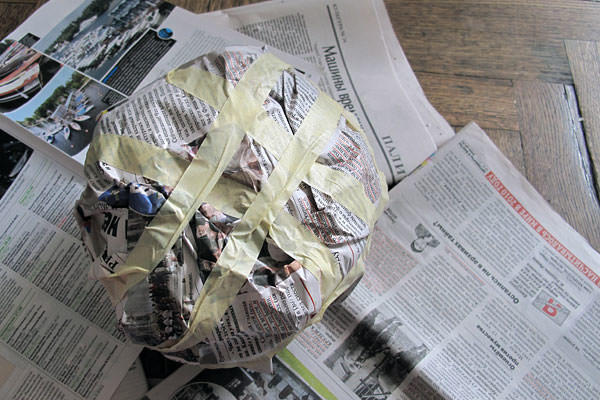
Remove the lid from the jar, turn the container over, put it on the table. Sticking around the jar with plasticine, immediately form the ears, eyes, paws, facial features of the tiger cub. Here's how to make the piggy bank go further.

Tear the newspapers into small pieces, start pasting them over the blank. Attach the first layer with water. The remaining 10 layers must be fixed by lubricating each piece of newspaper with a paste.

Leave the workpiece overnight to dry. In the morning, glue it with pieces of white paper, which must be attached with PVA glue, which will give the product strength.

Let the toy dry completely, then cut it into two halves with a clerical knife.
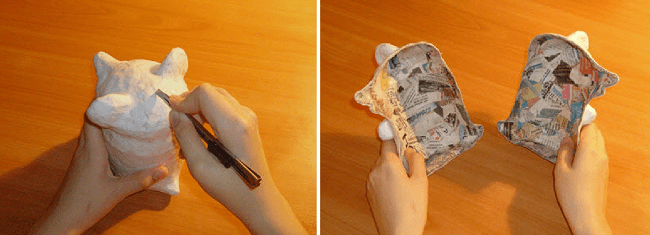
Remove these parts from the jar, connect them again, gluing them at the cut site with white pieces of paper smeared with PVA.

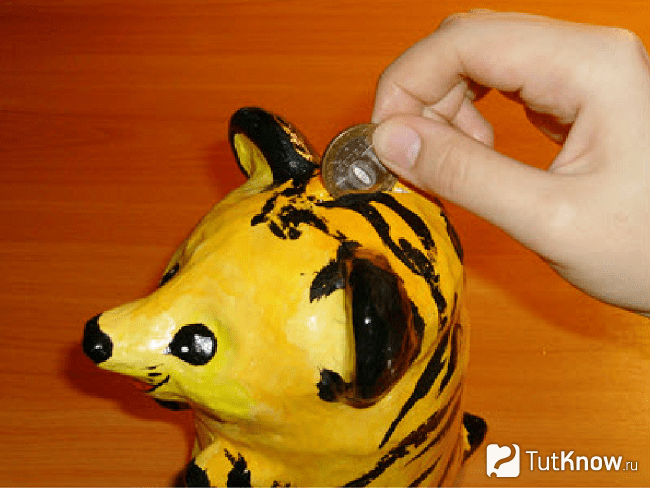
At the top, with a clerical knife, make a cut of such a size that coins of the desired denomination can be lowered into the piggy bank through this hole.

Now walk along the outer surface of the product with white gouache to prime it. When it dries, paint the product in the desired color.

Here's how to make a piggy bank out of paper and newspapers. If you want to see how to make a funny pig that is also designed to store and multiply small things, then check out the second master class.
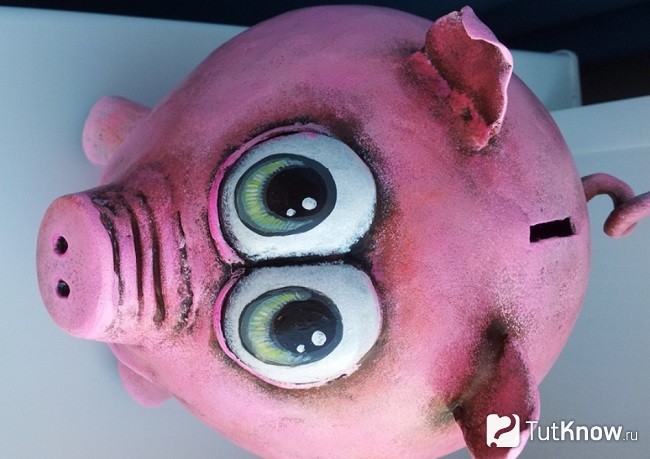
This is how touching and at the same time funny the piglet will turn out. To make it, use:
- inflatable ball;
- toilet paper;
- acrylic paints;
- building PVA;
- foil;
- newspapers;
- toothpicks;
- acrylic putty.
You can first moisten pieces of newspaper in water, then dip them in PVA, forming the surface of the ball, and glue torn pieces of paper here.
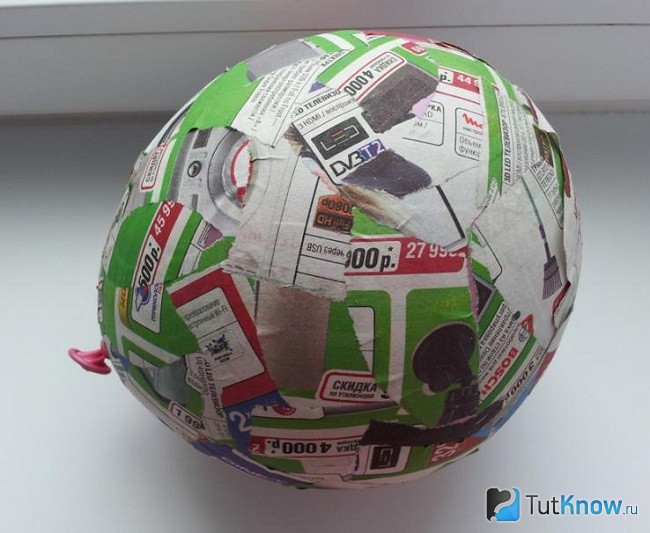
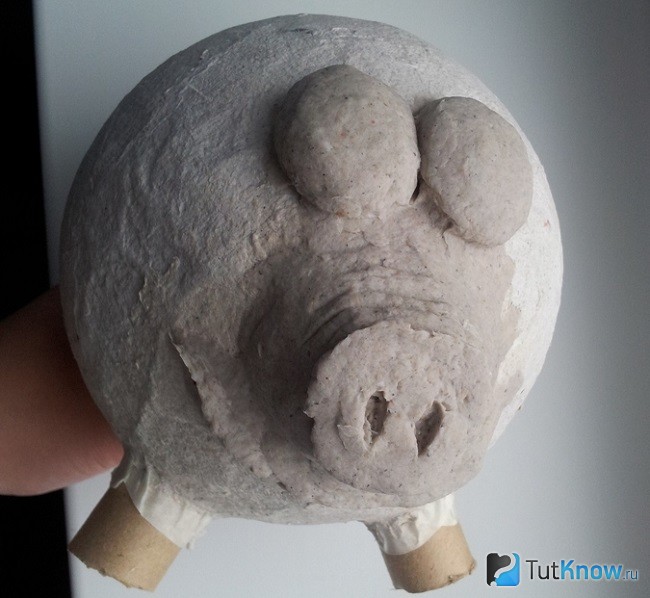
We make mass for papier mache, for this, rather large pieces are torn off toilet paper. Put them in a container in which you want to add PVA. After that, it remains to mix the contents well. Now, using a sponge or rubber-gloved hands, apply this mass to a ball covered with newspapers.
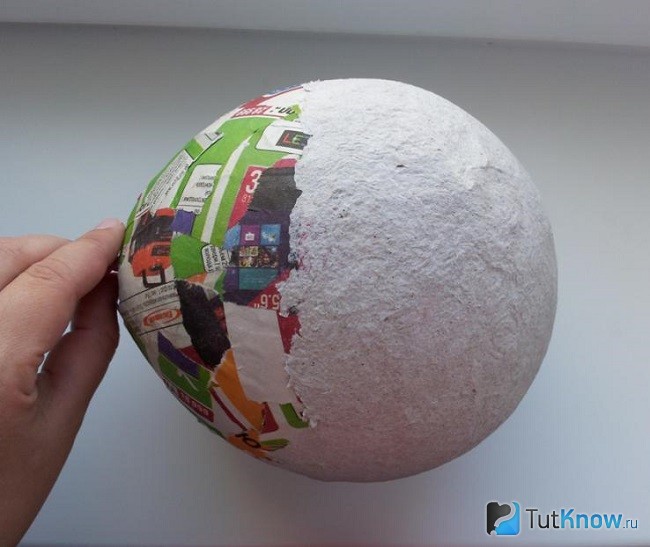
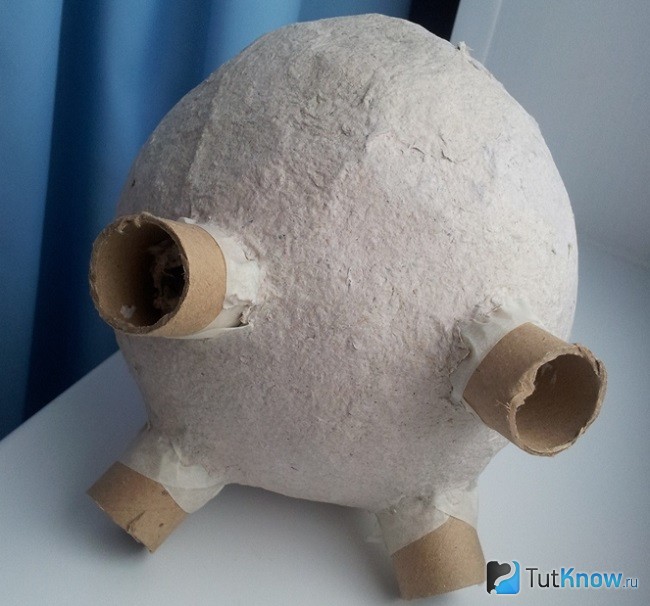
When it dries well, make a puncture with a needle. Remove the burst ball through the bottom hole. Cover the slot with two strips of masking tape that are attached crosswise. Piggy bank legs can be made from a reel left over from foil or stretch film. These cardboard tubes need to be cut with a knife into 4 parts. You can use toilet paper rolls if you like.
These blanks must be attached to the base with masking tape, and a papier-mâché mass should also be applied on top.
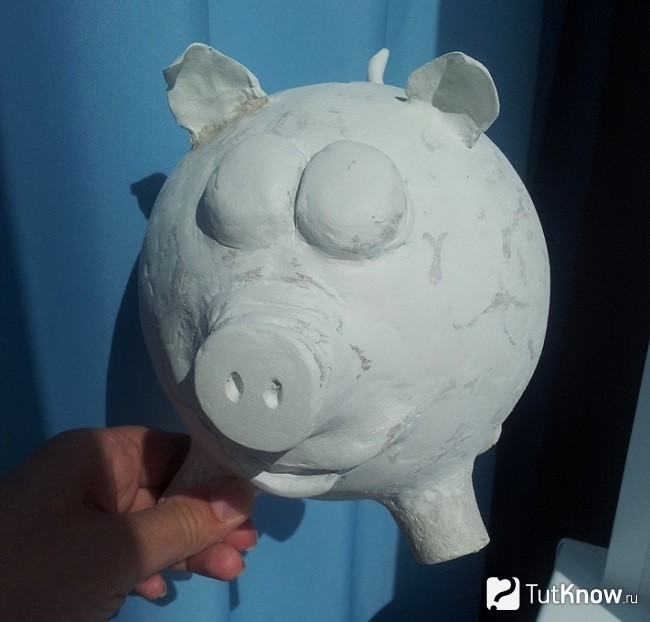
Make a piglet from a piece of foil, attaching it with toothpicks and tape. Paste it with toilet paper soaked in glue, form a nose.
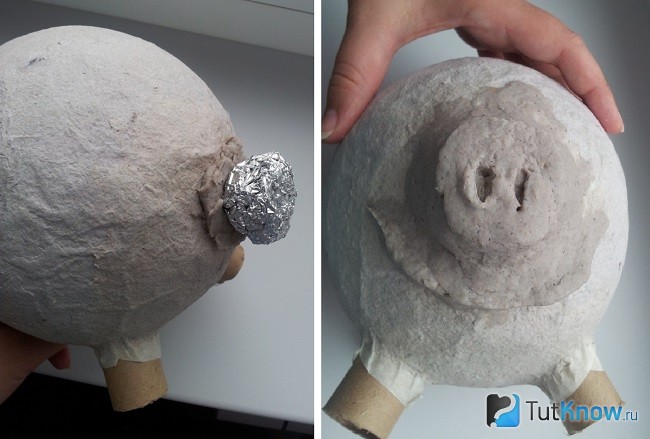
From it you will need to fashion eyes, attach them in place with glue. Ears can be made from papier-mâché or clay
Now we need to leave the piggy bank so that the papier-mâché will dry well. Then we grind the workpiece with sandpaper, after which we apply acrylic putty on it. We are waiting for it to dry, then wipe the piggy bank with a damp cloth to level the product. We apply putty in several layers until the surface becomes even.
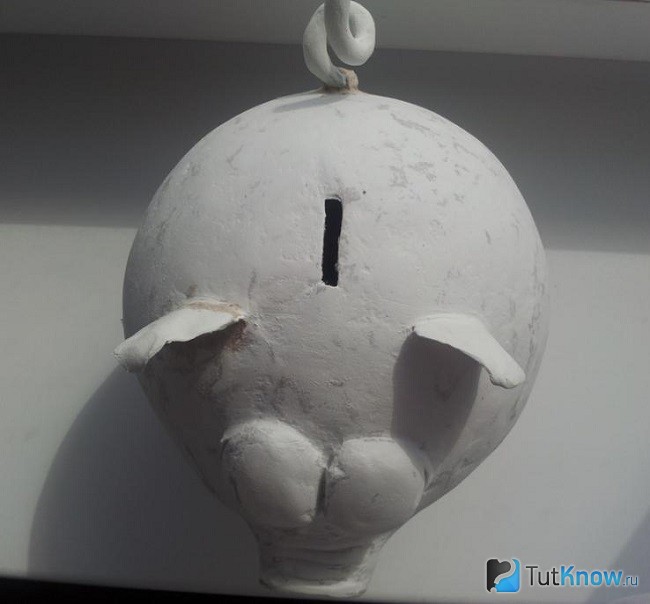
Use a utility knife to make a hole for the coins. We attach the tail, which must be made in advance from wire and papier-mâché.
We begin to paint the product. First, apply any dark paint, then, with a sponge, cover with red.
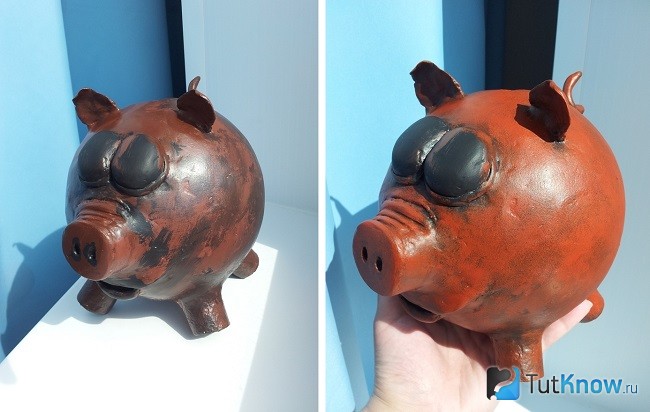
Next, comes the pink color, after it - a mixture of white and pink. The next coat of white paint, but it needs very little.

It remains to paint the eyes, after which the papier-mâché piggy bank is ready.
How to make a mass for modeling paper with your own hands?
The base is not always simply pasted over with torn newspapers; there are very interesting recipes for making mass for papier mache. Get to know one of them.
From such a mass you can mold an animal figurine, for example, a bear. Take:
- 2 rolls of the cheapest gray toilet paper;
- 3 art. l. linseed oil;
- 500 ml of universal or building PVA glue of a liquid consistency;
- 1.5 liters of water;
- gauze;
- large bowls;
- sandpaper of medium and fine fraction;
- colander;
- PVA glue.
Now you need to wring out the paper. To do this, lay gauze folded in several layers on a colander, put a little mass here, some of the water will drain. Remove the rest by lifting the edges of the gauze, squeezing out the paper. Also squeeze out the rest, but do not overdry, leave some water.
Put all this paper in a large bowl, then add construction glue to it. Stir the mass. This will be easier to do if you mix the paper and glue in small batches.
Add linseed oil, stir. It will allow the mass to become more plastic. Now you can sculpt from papier-mâché or put this mass into molds to make toy parts. You will glue with the help of PVA, which is called "Moment joiner".
When papier-mâché blanks are completely dry for several days, they will need to be sanded with medium, then fine sandpaper.

The finished product is primed and then painted.
Master class: do-it-yourself Baba Yaga's hut
It can also be made from the mass, the recipe of which you just learned or use another. This is how the house of this fairy-tale character will turn out.

But for this you need to work hard, but first prepare:
- a bottle of suitable size and shape;
- napkins;
- stack;
- PVA glue;
- ruler;
- pencil;
- mass for papier-mâché.

Starting from the bottom, the mass for papier-mâché is glued in strips. Decorate two sides at once, forming circles in the form of slices of logs.

With the help of a stack, make stripes on the door, logs, so that they convey the texture of the tree.

Make smaller details of the door.

Let the house dry for a day.
Blind from the mass for papier-mâché a window, shutters. Using a stack, decorate them with carvings. We begin to make an attic, in the photo it is pink.

Such elements need to be made above the window and above the door, then we make out the roof.

Having made a row on one side and on the other, leave to dry, only after that make one more tier.

Then work the third row and pipe.

Use the stack to make a brick pattern here, then give these elements a roundness.

There will be another row at the top of the pipe. Then we decorate the wall with fly agarics made of polymer clay.

Leave the house to dry completely. After that, you need to paint it.

Baba Yaga's hut is ready.
DIY papier-mâché dolls
I can’t even believe that such wonderful works of art can be created from toilet paper.

To make such a Snow Maiden, take:
- an empty glass bottle in the shape of a trapezoid;
- copper wire;
- pliers;
- mass for papier mache from toilet paper;
- rubber glue;
- polymer clay;
- cotton wool;
- elastic bandage or well-stretched fabric;
- scissors;
- paints;
- fabric for clothes;
- satin ribbon for hair;
- rhinestones for decoration.

Cut a piece from the wire with pliers, wrap it around the neck to make papier-mâché doll handles.

Wetting the elastic bandage with rubber glue, wrap the workpiece with it.

Now grease this bandage on top with PVA glue, attach papier-mâché here, forming the chest and back of the doll.

From the same mass, make a head for her.
To use less papier-mâché, first you can wrap the top wire with foil, then cover it with this mass, forming facial features, ears.
Leave the workpiece to dry completely, then sand it, apply putty. After the one dries, it also needs to be processed with sandpaper.

To make hands, moisten cotton wool with an aqueous solution of PVA glue, apply it to the wire. Wrap the moistened glue with an elastic bandage or a strip of cloth. Make brushes from polymer clay. Paint the doll using skin color, mark the eyes, eyebrows, lips with the appropriate shades.

Sew a petticoat and dress for the doll, made of cardboard. By loosening the brown satin ribbon, you will get such luxurious shiny hair. It will take a lot of time to make such a papier-mâché doll, but the materials will cost a little, and what a luxurious result awaits you!

If you want to get acquainted with another sample, then watch the second master class in this section.

Here is such a wonderful doll on a horse you will succeed. To make this duet you will need:
- toilet paper;
- wire;
- cardboard;
- Styrofoam;
- strong thick thread;
- newspapers;
- foil;
- acrylic paints;
- foam ball.

Give the doll the desired shape by overlaying with a mass of papier-mâché.

We make a horse. Bend the wire, as in the photo, wrap it with foil.

Coat this blank with papier-mâché paste.

When it dries well, stick two pieces of wire into it to make the legs of the animal.

Cover the top of the workpiece with wet papier-mâché. Let the horse dry well. Now we need to add volume to both blanks, for this we also use papier mache, including to make the ears and nose of the prince. And we make the ears of the horse from cardboard, cutting out the details of the appropriate shape. Sand the blanks.

Cut off excess wire on the legs of the animal, add a mane, tail, and muscles to the prince. Cut out a strip with zigzag edges from cardboard, glue it with newspapers, fold it into a crown. Coat papier-mâché.

After finishing grouting with sandpaper, the doll will look like this.

Glue the crown using papier mache. With the same mass we connect two heroes.

For the platform, a piece of foam is used, which must be pasted over with newspapers.

Cut out the wheels from cardboard using coins as a template. Also cover them with newspapers and papier mache.

Apply the same mass on top in 4 places of the cart to attach the horse.

Sand the blanks, then paint them.
Let's create them using the same papier-mâché technique. If you want such funny hedgehogs to flaunt on the Christmas tree, then start creative work right now.

To create them, you will also need such materials that you do not need to buy - the savings are obvious. Take:
- two toilet paper rolls;
- cones;
- mass for papier mache;
- cotton pads;
- paints;
- plasticine;
- glue Titanium;
- two wooden skewers;
- brush;
- sequins.

Disassemble the cones into scales, glue them on one side of the roll, as well as on the sides. Form the rows, starting from the bottom, placing the elements of subsequent rows in a checkerboard pattern. Use titanium glue for this.

At the beginning of the article, you read how to make papier mache mass from toilet paper. You can use other similar materials, such as paper towels. In this master class, yellow napkins were taken for this, their color does not matter. Form the body and nose of a hedgehog from such a mass.

Let it dry, make the front legs, attach them to the tummy, using the same mass. Here are some interesting crafts for the New Year 2017. But for now, we need to let our hedgehogs dry well, then cover the arms and tummy with beige, and then also with brown. We paint the spines of animals in the reverse order - first we use a brown tone, then beige or white. Then the hedgehog's coat will be as if powdered with snow.

Make eyes, eyebrows, mouth, nose out of plasticine, fashion a mushroom, attach it between the handles of the animal.

If you want, you can make lower paws for an animal from plasticine or plastic, placing them at the ends of the laces, the middle of which is threaded through the upper hole. You can attach a bell so that when the hedgehog moves, it makes interesting sounds.

These are the most wonderful crafts for the New Year you will get.

Make them with your kids. If it’s difficult for kids to do this, then tell them an interesting idea for creating papier-mâché cakes, which they will be happy to bring to life. Let the child make such dolls and toys as a New Year's treat.
To do this, put next to it:
- foil;
- cardboard;
- two bowls;
- not a food spoon;
- newspapers;
- paper towels or a rag to dry your hands.
Cover the table with newspapers in advance, cover it with plastic wrap. Then the child will not stain the work surface.
Let him tear or cut the newspapers into small pieces, put them in a separate container. In another, you need to pour a paste. It is prepared as follows: pour a glass of water into the pan, add 2 tsp. flour or starch, mix. Put on fire, bring to a boil with vigorous stirring. Let the paste cool, pour it into a bowl.
Have your child roll the foil into balls.

From a sheet of cardboard you need to make a box. Look at the diagram on how to cut its sidewalls, fold them, gluing them.

Everything is ready, it's time to start making crafts for the New Year with your own hands, the photo will show how to make it.

Everything you need is on the table. Let the child dip the lumps in foil in a paste, then attach pieces of paper here.

Then you need to leave the craft for a few days so that the glue dries well. If this is not done, the work may begin to mold.
When the cakes dry well, let the child give free rein to imagination. Using paints, small red pompoms, finely chopped colored pieces of paper, he will make such a festive treat for dolls.

When the paint dries, it's time to arrange these cakes to decorate the table of toys.
In the same technique, you can make other children's crafts for the New Year. With their own hands, they will build blanks from foil, which must be pasted over with pieces of newspaper. This process has just been described. To attach the toy to the Christmas tree, at this stage you need to tie a carpet ring with a cord or rope, as is done in the photo tip.

This is followed by another 2–3 layers of papier mache from newspapers, after which the Christmas decorations need to be painted.

Now you can make dolls from papier-mache, New Year's toys from the same material, a piggy bank. We offer you to get acquainted with the process of making an apple. It turns out so realistic that you should immediately warn both guests and family that the fruit is not edible.
If you want to see how to make mass for papier mache, then watch the second plot.
Papier-mâché products have been familiar to many since childhood. How often babies fall prey to "fake" fruits made from this material and carefully placed in vases in canteens, hotels, boarding houses. It can be very difficult for parents to explain to their child that this beautiful apple is completely tasteless and serves as a kind of decoration. And this is just one particular example of the use of such accessible material.
How to make papier-mâché with your own hands?
This material consists of a paste, wallpaper or other) and paper (absolutely any, from newsprint to toilet paper). And there are two ways to create homemade masterpieces from papier-mâché. The first involves obtaining a homogeneous mass by crumpling the paper and immersing it in glue. The second is pasting strips of newspaper (wallpaper, etc.) on the finished product (figurines, plates, cups, vases) to further create a unique design. Both the first and second methods provide for the subsequent coating of the resulting object with paint. In most cases, acrylic is used, but there may be other options, such as gouache.
Papier-mâché technology

How to make a homogeneous mass of glue and paper, many remember from childhood (in Soviet art, and sometimes even general education schools, they taught this art). Paper (for example, a newspaper) should be torn into small pieces with your hands and filled with water. If possible, boil it for half an hour over low heat. Otherwise, leave to swell for an hour and a half. Then the mass is kneaded with hands, trying to achieve maximum uniformity. It is advisable to use medical gloves made of thin rubber, since both newspaper and glue have a negative effect on the skin. The resulting paper mass is squeezed out. This can be done by hand or use a strainer. And then glue is gradually added to it, getting something that looks like dough. As soon as the mass becomes obedient, it can be considered ready-made raw material for papier-mâché.
How to fashion a bracelet or beads?

Having received the material, you can begin to create the simplest product. Beginners who encounter this technology for the first time are advised to start with something simple. It can be papier-mâché Christmas decorations (it is easiest to make a ball), a bracelet or beads. In all these cases, a papier-mâché ball of the required size is first rolled up. Then, when a sufficient number of them are made, through holes are made with a needle for the fishing line and left to dry. The final, most interesting stage of creating an ornament is its coloring. You can simply cover the beads with one color, or use a thin brush to draw flowers, stars, some interesting ornament on them. It all depends on the skill and imagination of the author. After the paint dries, they are strung on a fishing line and, depending on its length, you will get beads or a papier-mâché bracelet.
How to make a plate?

Usually, a different technology is used in the manufacture of dishes. The ingredients will need the same: glue, paper (newspaper and thin white, for example, tracing paper, in approximately equal amounts), as well as paints, but you will need to act in a different way. Additionally, you will need a ceramic plate, sticking around which, you get the same one from papier-mâché. How to do things like this? Very simple. First, the newspaper is torn into small squares (2x2 or 3x3 cm). It is not recommended to use scissors, as uneven edges provide an imperceptible border between fragments. Then do the same with white paper. Glue is poured into a saucer or other dish so that it is convenient to dip the pieces into it. The plate must be greased with something greasy to make it easier to separate the finished product from it. And then a layer of newspaper pieces is glued onto it, dipping each of them in glue. This should be done so that they fit snugly against each other, forming a uniform surface. As soon as the entire plate is pasted over, white paper is applied on top according to the same principle. Thus, alternating layers, they are applied from 8 to 10. After that, the plate should dry. As a rule, this takes about a day.
Another 4-5 layers of white paper are glued onto the dried surface so that the newspaper is no longer visible through it. After another day, the ceramic plate is removed, and the finished product is pasted over on the underside with several more layers of white paper. After 24 hours, you can start coloring, after which the craft is considered complete. If desired, the plate can be coated with a transparent varnish, which will make it stronger and the pattern more resistant.
papier mache masks

There is another popular souvenir from this material. Masks are usually created from pieces of paper, but can also be molded from a pre-prepared mass. Their manufacture is considered more complex than the creation of beads or plates. So it’s not worth starting work without any experience. If it is planned to sculpt the mask from papier-mâché (how to make the substance itself is described above), then, apart from it and paints, nothing else will be needed. In this case, you just need to give it the necessary shape with your hands. To make this easier, you can use a mannequin or apply papier-mâché directly to someone's creamed face. The finished mask is dried and painted with acrylic paints as desired. Particular attention should be paid to the eye holes. If necessary, you can finally correct them with a clerical knife after drying.
If you plan to use pieces of paper, then it is advisable to pre-sculpt the base, for example, from plasticine. It should be pasted over with pieces of paper, similar to a plate. It is better to remove the plasticine base after the mask has dried. So that it can be used for its intended purpose, and not just as a souvenir, small holes are made on both sides, into which you can later insert a ribbon or elastic band.
Papier-mâché figurines

Similar souvenir products are often found in specialized stores. But if desired, figures of animals, mythical characters, dolls, flowers or fruits can be created independently. If we are talking about small souvenirs, then they are usually molded from paper-glue mass. In the case of larger objects, a mock-up is pre-made, which is covered with pieces of paper on top. Animal figurines based on the symbol of the coming year are especially popular for the Christmas holidays. This is a papier-mâché dragon, snake or horse. Undoubtedly, to create such a creation, one needs both talent and certain skills. After all, these are not ordinary balls or plates. But sometimes one desire is enough to build a funny (albeit not very similar to a real one) little animal and give it to a loved one. To make it more stable and strong, you can first make a wire frame. And only then stick it with paper pulp and decorate it.
How to store papier-mâché products?
It is well known that paper is a capricious material. It is easily destroyed by moisture, can change its properties from high or low temperatures and direct sunlight, and is easily ignited. Knowing how to make papier-mâché (from pieces of paper or a mass prepared mixed with glue), one should also understand how to properly store products. Undoubtedly, the glue itself, and the paints, and all kinds of frames used in the work make it somewhat stronger. But, papier-mâché, like ordinary paper, is afraid of dampness. Therefore, products should only be stored in a dry place. At the same time, it is desirable to prevent ultra-low and too high temperatures and open flames nearby. With proper storage, figurines, dishes and other figurines can please the owner for many years.
How to make the material more durable?
Professionals who make figurines for sale try to make them as strong and resistant to external factors as possible. To do this, pre-create a rigid frame of wire or other material. You can also add a little cement or gypsum to the mass. As a result, it will turn out not quite papier-mâché, but rather durable and easy-to-use material. That's just to work with him, you will definitely have to wear gloves.
Using technology for children's creativity

Toddlers of preschool age and older children are very fond of making things with their hands. It develops creativity and develops finger motor skills. As a rule, plasticine or clay is used as the material. But papier-mâché is just as good. After all, this is an absolutely natural safe material (especially if it is made on the basis of a paste), which children of any age will work with pleasure. Of course, the mass itself is better to cook for one of the adults. But you can sculpt from it all together: from the smallest to high school students.
Those who have never worked in this technique, but want to try themselves in this direction, need to understand some of the nuances. First, regarding materials. The paper from which papier-mâché is made can be any, but it is highly desirable that it soak well. It is best to use natural glue (paste or PVA), so that both the mass itself and the product from it are not toxic. It is best to cover the finished product with acrylic paints, since they are the most durable. If we are talking about children's creativity, it is better to take gouache. In order for the figurine or other structure to be stronger, a wire frame should be used. I fix gouache on the surface with varnish.
And you should never be upset if complex figures do not work out the first time. It’s better to start with something simpler, and with time and experience everything will come out: dolls, animals, and other figures.