Craft ideas for March 8 with children. Candy bouquet handmade for mom. Paper shoes
The Spring Festival is a wonderful occasion to pay attention to your loved ones and please them with surprises. Mothers whose children visit the kindergarten will be doubly pleased if they receive a handmade gift. What could be the best surprise for mom, made by loving, tiny hands!
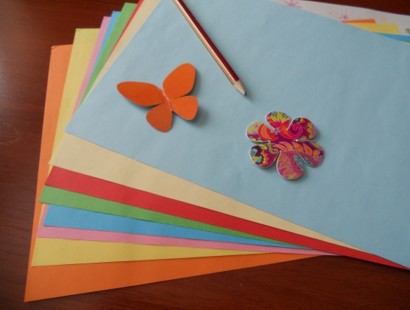
It is customary to give flowers on a spring women's holiday. Therefore, flower arrangements are often used in the design of many crafts. These are postcards, bouquets, collages made of colored paper, applications, paper compositions.
In the process of working on gifts, remind the children how important it is to maintain order on the table - it is more convenient to find the necessary things this way. Kids go to kindergarten to learn and gain new knowledge, so let their stay there be safe and pleasant.
In the younger groups of the kindergarten, pupils can prepare wonderful crafts for March 8. Children are happy to do needlework, because they know how nice it will be for mothers and grandmothers to receive such a surprise.
The younger group in the kindergarten is very small children, so the educators help them make crafts by their example. If one of the children shows imagination, wants to add something of their own - this is only welcome.

The craft is simple. It takes a little time to complete the presentation with your own hands, so the children will not get tired. How to craft:
- colored sheets of paper, scissors, glue;
- the child traces his palm on a beige leaf, cuts out the resulting silhouette;
- separately, on a colored sheet, the kid draws flowers, cuts them out
along the contour. For the stems, green paper, red or purple flowers will go, the centers are yellow;
- postcard - the palm must be folded and glued so that the fingers are adjacent to the back;
- we put the cut flowers in a paper palm.
On the stalks of flowers, you can sign - Mom. Another option for this craft is to glue the palm with a bouquet on a sheet of colored cardboard. A touching gift is ready. Mothers are especially pleased that the kids do everything with their own hands.
Video.
Postcard - hug.

Before the spring holiday, the kids enthusiastically go to kindergarten . They know that they will prepare a present for their mother.
Crafts for March 8 with silhouettes of children's pens look original. A wonderful DIY postcard, a little unusual.
Performance:
- on a beige or pink sheet of paper, help the baby to outline the arms to the elbows;
- cut along the contour;
- glue the silhouettes of the handles to the colored cardboard in such a way as to make a hug;
- help the kid sign the card.
The surprise is over.
Video.

With the help of adults, younger children can make various crafts on March 8th. It can be a simple gift in the form of a paper bouquet. A pre-prepared lesson will take about 25 minutes.
What you need:
- colored sheets of paper for flowers;
- glue or glue stick;
- narrow ribbon for gift wrapping;
- napkin.
To make the lesson take less time and the kids do not get tired, it is necessary to make templates for flowers in advance. For a bunch, 9 flowers and circles for the middle are enough.
Performance:
- fold the green leaf in half;
- make cuts (fringe) on the fold of the sheet, at intervals of 4 mm;
- open the sheet and apply a layer of glue to the upper, horizontal edge;
- attach the blurred edge to the bottom, making indents of 1.5 cm. You should get a waveform;
- We take the product from the left edge and begin to twist the sheet around our finger. We fix the resulting spiral shape with glue so that it does not disintegrate;
- fix the flowers on the resulting green bush - pre-prepared circles for the middle and inflorescence;
- We wrap the bouquet from below in a napkin, tie it with a gift ribbon.
Wonderful handmade present , ready.
Video.

Toddlers love to prepare for the holidays in kindergarten. And when they know that they will be making crafts on March 8, they look forward to this day.
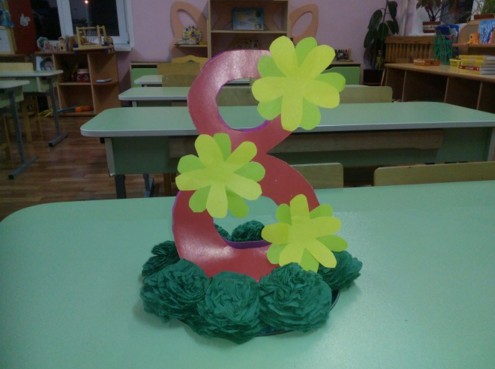
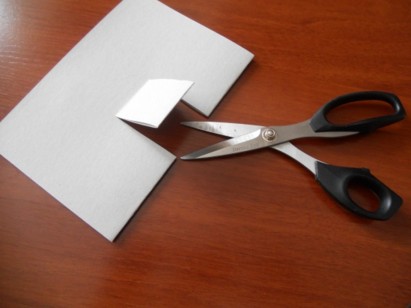
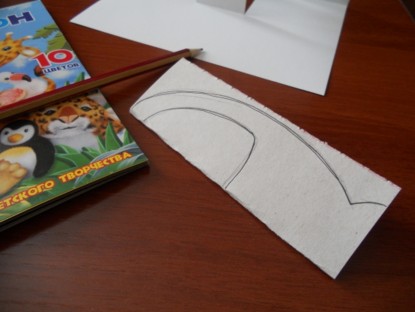
A good gift for a spring holiday will be an eight made of paper, decorated with flowers. You will need scissors when doing this, so adults should help the children.
What do you need:
- cardboard sheet;
- colored sheets of paper;
- scissors;
- glue stick;
- pencil.
Prepare blanks for the kids - cut out eights. Performance:
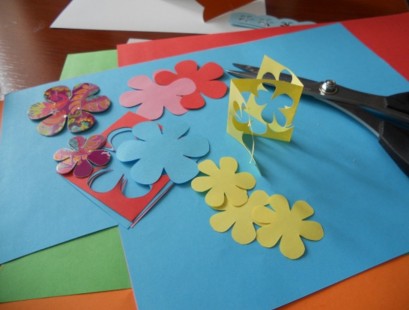
- each child chooses the color of the paper;
- on a sheet with a simple pencil, children draw petals and centers for flowers;
- help kids to cut flower blanks;
- an eight is glued to the cardboard, and flowers (petals with a core) are glued to the side.
A simple do-it-yourself application is ready.
Video.
Craft video:
Plasticine surprise.
The younger group in the kindergarten is still very young children. Preparing for a holiday with the participation of babies should not take much time. At this age, it is not easy for children to sit in one position, they quickly get tired. Coming to kindergarten, kids get used to the daily routine, they develop the necessary skills.
Plasticine is a wonderful material for children's creativity. From 2 years old, kids can sculpt simple figures - balls, cylinders. From plasticine dough, you can create charming crafts for March 8.
Try making an applique using plasticine dough. Of the materials, you only need soft plasticine and a small sheet of cardboard.
How to do:
- take a sheet of cardboard;
- children sculpt circles and sticks of different colors;
- explain to the kids that a bouquet, a sprig of mimosa or a tree will turn out from plasticine blanks;
- sticks and circles are molded onto a cardboard sheet to make a bouquet or a tree.
Kids will be happy to give a plasticine gift to their mothers and grandmothers, because it is completely handmade.
Video.
Gift from blanks.
At the very youngest, kindergarten age, it is difficult for children to concentrate on one lesson, it is too tiring for them. When parents send a child to kindergarten, they must be sure that the child will receive the necessary attention, acquire knowledge, and learn to communicate with peers.
The younger group is the age at which the abilities for drawing, modeling, and various creativity begin to develop. Try to prepare a surprise for mom with the kids using watercolors. A good option for a surprise for the holiday will be work made from ready-made parts.
- silhouettes of flowers cut out of white paper;
- silhouette of an eight on a white sheet;
- paints;
- glue or glue stick.
How to do it:
- distribute to the children ready-made silhouettes of flowers and eights;
- offer to paint the blanks in your favorite colors;
- when the paint dries, stick the painted flowers on the figure eight.
As you work, do not forget that babies need to rest. After all, when bringing a child to kindergarten, parents know that their kids are playing, making something and must have a rest. While the paint is drying, let the children run, play hide and seek, and sing a song.
Postcard - vase.
Making holiday gifts with their own hands teaches children to develop creative skills, work in a team, use various objects and materials (glue, scissors).
The younger group of the kindergarten teaches children to various types of activities. Babies develop skills and abilities necessary for their age. When the teacher informs the children that everyone will be preparing for the holiday, they will make crafts on March 8, the kids are waiting for the day when they come to kindergarten and get down to business.
Going to kindergarten, the kids are looking forward to the moment when they begin to create gifts with their own hands.
The next postcard should be voluminous. To complete, you will need very few materials and ready-made blanks:
- help the kids or do it yourself, colored, paper blanks of circles of various diameters, green twigs for stems;
- you will need cut out colored rectangles. We will make a vase of them;
- glue;
- sheet of cardboard.
It is not difficult to make a voluminous postcard - even the younger group will cope with the task.
Sequential actions:
- we bend the cardboard in half to put the card on the table;
- glue a rectangle on a cardboard - a vase so that the upper part remains free;
- we collect flowers from circles and twigs (smaller ones are superimposed on circles of larger diameter), glue them into a bouquet;
- put the finished bunch in the upper part of the vase.
The finished present can be signed. The inscription is applied to a vase or cardboard.
Video.

When registering a child in kindergarten, parents know that the child will be taught accuracy, independence, patience and perseverance. All these qualities will come in handy for creating a festive surprise with your own hands.
In a preschool institution, children gradually develop creative skills, teach them to work together among their peers. The younger group is the first step towards the baby's entry into an independent life.
To make a delicate flower from finished parts, you need the following materials:
- pink, red and yellow sheets of paper;
- glue;
- scissors;
- stalk skewer.
Educators prepare details in advance (draw and cut flower petals of different sizes).
What the kids are doing:
- impose smaller flower petals on a larger one, bend it in half;
- glue the petals (apply glue only to the lower part);
- glue the middle of the flower between the petals;
- turn the flower over, glue another circle on the back side - the middle, glue a skewer to it;
- leave the glued flower to dry under a press;
- at the finished flower, wrap the leg with colored paper, fasten it with glue.
Such a wonderful, voluminous flower, created by their own hands, children will be happy to give to mothers.
Video.

At the age of 4-6, children move to the next level of the kindergarten. The older group is already completely independent children. During the preparation for the festive events, the older children help the teachers to decorate the hall for the guests, and, of course, make crafts for March 8.
Children can work with various materials and objects (plasticine, paper, paints, scissors, knitting threads, fabric), perform more complex tasks. Therefore, crafts for March 8 are very diverse.
When performing activities using sharp objects (scissors, skewers), do not forget to tell the children about safe work. Pay the attention of the children that they come to kindergarten to gain new knowledge and skills, so they must follow the recommendations of the educators.
Delicate postcard for March 8.
It is not difficult to prepare a delicate bouquet with your own hands. What you need:
- colored sheet of cardboard - the base;
- multi-colored paper;
- napkins with lace;
- scissors;
- glue;
- stapler.
How to craft:
- cut out silhouettes of flowers from colored paper;
- fold the resulting blanks in half;
- the flower consists of five blanks. On the fifth, we fix four blanks with a stapler. Spread the petals;
- fold the napkin in the form of a bag;
- cut the stem and leaves from green paper (fold in half).
Now, assembling the flower from the finished parts. Many crafts for March 8 are interesting in that they consist of parts that need to be assembled at the end of the work.
- glue a folded napkin on the cardboard (do not fold the edges);
- glue the leaves around the edges of the napkin, in the center - a stem and a flower.
The finished flower can be decorated with a paper spring (twisted on a pencil). Fix the edges of the napkin with glue. The gift for mom is ready.
Video.
Flowers from unusual materials.
The older group of the kindergarten is almost independent children. At this age, children can be taught the basics of sewing. The skill is useful for making an unusual surprise. When crafts are being prepared for March 8, older children can be entrusted with more complex materials. But, you still can't do without the help of adults.
For the next gift you will need:
- multi-colored buttons of various diameters;
- scissors;
- wire;
- a pot of soft soil.
The buttons should make a magical, spring bouquet.
How to do:
- put buttons of a smaller size on a larger one (a flower consists of three buttons), fasten it with a wire;
- the wire stretched through the holes of the buttons acts as a stalk;
- we fasten the resulting flowers into a bouquet, put them in a pot with wire legs.
An unusual, spring bouquet is ready.
DIY corrugated paper bouquet.

Festive, spring bouquets can be made from different materials. Ask your parents to bring corrugated paper to kindergarten, which will make wonderful crafts for March 8th.
Invite the children to make delicate daffodils with their own hands. What you need:
- green and yellow corrugated paper;
- green cocktail tubes;
- pencil;
- scissors;
- glue;
- marker.
Presentation work:
- we create flower leaves from corrugated paper. You need to cut out two rectangles 5 by 5 cm;
- cut 2 cm on the rectangles on the side;
- screw opposite petals onto the marker, then the next ones;
- make a similar workpiece, connect it with glue to the first one (in the center). The petals should not cover each other;
- cut out circles from yellow paper (diameter 5 cm);
- insert a pencil in the middle of the yellow circle, then wrap the bottom edge of the paper. Remove the pencil, glue the resulting middle in a flower;
- the wire will be the stalk. Take a strip of green paper, apply glue, wrap the wire;
- cut flower leaves from green paper, attach to the stem;
- make a hole in the middle of the collected flower, attach a stalk. Bend the wire at the end so that the flower does not disintegrate.
Thus, make the rest of the flowers. The older group of the kindergarten is the third in age. Children who will soon go to school are recruited into it. They conduct creative classes, prepare for various events, make crafts for March 8 and other wonderful holidays.
Video.
Composition with dandelions on March 8 do it yourself.
Older children will perform an interesting composition for the spring holiday with special pleasure, because a variety of materials will be needed for work.
The task will require the children to have sewing and knitting skills. It is necessary to show the children in advance how simple, overcast seams are performed, loops are crocheted. The older group must cope with a more difficult task.
Necessary materials:
- yellow knitting thread;
- corrugated paper;
- skewers;
- glue;
- bright fabric;
- threads;
- hook;
- jar.
First, we will make dandelions from yarn:
- cut the knitted thread (20 cm), bend it in half;
- the thread should be wrapped around a thick marker. The more loops, the fluffier the flower cap will be (wrap 45 times);
- Tighten the attached thread, tie it in a knot, remove it from the marker and cut in the middle;
- cut off another thread (20 cm). Collect all the threads in a tassel, even those with which the knot was tightened;
- pull off the brush, straighten it. Remove protruding threads.
You will get cute hats of yellow dandelions.
For the base of the stems, take the skewers. Bamboo skewers are also good. What makes crafts for March 8 and other festive events so good is that children are taught the necessary skills. The guys learn to work together, perseverance, concentration, patience. Moreover, the older group of the kindergarten prepares children for school.
Glue the stems to the flowers. Try to find a quick-drying glue.
Corrugated paper is needed to make leaves. Cut the leaves taller than the flowers.
Fasten the leaves with a thread near the base of the flower cap.
To make fluffy dandelions look natural, cut a piece of paper, spread with glue, form a flower base out of it. Roll the paper around the skewer. Twist the leaves from below.
We make the leaves from corrugated paper, then glue them to the stem. Each stage of the work is important for the guys, they like to do everything with their own hands.
The bouquet is ready - you need a vase:
- a jar of baby food is suitable for a vase (a bouquet is low);
- we cut out a circle from the material, as high as a jar;
- we sew the circle with threads;
- in the loops from the overcasting seams, crochet No. 2, single crochet;
- the second row is knitted: 4 air loops, a single crochet, skip one;
- knit the third row in the same way as the second, in the missing columns of the first row;
- insert a needle into a knitted thread and sew in a circle so that it is easy to tighten;
- tighten, straighten, tie a knot. Cut off excess threads.
In order not to burden children, you can not tie the fabric circle, or prepare a ready-made one in advance. Although, the older group teaches children perseverance and more difficult activities.
The details for the bouquet in a vase are ready. It remains to collect the entire composition.
To keep the flowers firmly in the jar, you can put them in plasticine or foam rubber. Cover with paper on top and put flowers through it. Place a ladybug or a bee on the cap of one dandelion.
The composition is quite time consuming, so take a few days to complete it. Such a handmade gift will be surely appreciated by the mothers of older children.
Video.
Spring tulips.

The guys are happy to make crafts for March 8th. How nice it is when mothers and grandmothers come to kindergarten for morning activities, and children delight them with surprises.
Spring is the time of flowers. Therefore, a flower collage will be a wonderful congratulation to mom. Invite the children to create a voluminous work - a bouquet of multi-colored tulips.
The proposed composition is good because it can be used at an exhibition of children's works, as an interior decoration for a playroom. Some parents bring their kids' crafts to kindergarten, and such homework will look great.
What you need to work:
- colored sheets of paper;
- background sheets (A3 size);
- glue stick;
- scissors;
- corrugated paper or tangerine netting.
Tulips can be made from red, yellow, purple sheets of paper - who likes what color. Crafts for March 8 are the freedom of creativity and imagination.
Presentation creation:
- cut out the stems and leaves (fold in half);
- cut out 3 red ribbons for the bow;
- cut out a square from the sheet (fold diagonally), cut along the folded lines, do not touch the middle;
- round the corners of the square;
- bend the corners of the triangles to the middle several times, glue;
- connect and glue the resulting folded and glued parts into a tulip;
- stick the stems with leaves on the background paper;
- glue flowers;
- fix the tangerine net with glue over the bouquet, decorate with a festive ribbon.
The composition is ready.
Video.
Every year on March 8, children try to please their beloved mother with a handmade gift. The crafts offered by us can be created not only for International Women's Day, but also for any other holiday. If you work as a teacher, you can invite the children to make one of our crafts. Mothers will love the original masterpieces. They are made from simple materials. The child can do many elements on his own, and you only need to help him. If you are a mother, you can offer the teacher an idea for creating DIY crafts for March 8 in kindergarten.
In addition, if a child likes to create original things, then he can do our crafts and give them to mom at least every day.
Flower bouquet
All women love flowers. Try this craft. To make it you need:
- reaper paper;
- wire;
- tape tape.
Pay attention to the flower pattern.
Twist the wire and wrap it with tape. Roll the paper over the wire as shown in the picture. The bud is made in the same way.
We offer a master class on making crafts for mothers on March 8 in kindergarten. If you follow the instructions, then everything will work out for you.
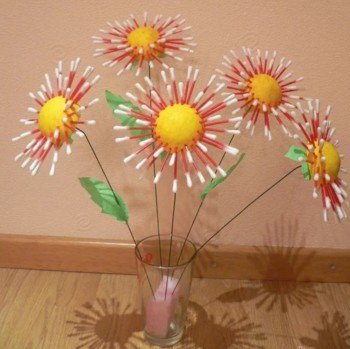
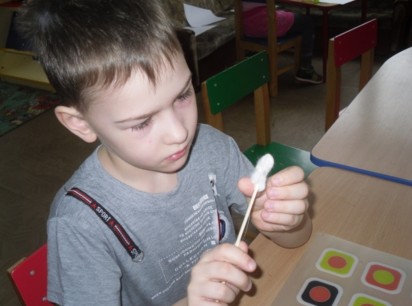
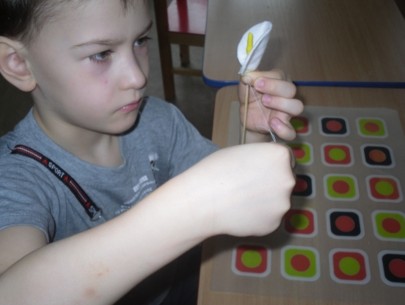
Flowers for your beloved mother can be made from cotton swabs. This ingenious solution has opened up tremendous opportunities for many people. Using cotton pads, many of us did not even know that beautiful compositions can be created from them.
See what kind of crafts for mom on March 8 with your own hands in kindergarten you can make from such a simple material.

For work, you will need the following materials:
- tape tape;
- glue;
- thin wire;
- cotton pads;
- water;
- gouache;
- brush;
- starch.
So let's get started.
Step 1. Cook the paste. Pour some cool water into a container and add a spoonful of starch there. Mix everything thoroughly, then pour a glass of boiling water in a thin stream. Do not forget to stir constantly while doing this.
Step 2. Soak cotton pads in the paste.
Step 3. Dry the material.
Step 4. Paint the discs with paints.
Step 5. Cut out petal-shaped details from them.
Step 6. Glue all the elements together, highlighting the middle with yellow and white paint.
Step 7. Place some cotton wool in the core and then paint it white.
Step 8. Make a stem by wrapping tape around the wire. The petals are performed in a similar way.
Step 9. Connect the parts together.
The result is a beautiful flower. Would you like to present a bouquet? Then make a few of these flowers.
And here is how origami is done. Any child can fold such a flower.
Any mother has jewelry and other small things at home. An original gift will be a box made by the hands of a child. It is not difficult to execute it. To make it you need:
- toothpicks;
- thick cardboard;
- yarn.
Step 1. Cut a heart out of cardboard the size of the box.
Step 2. Stick toothpicks at the same distance from each other around the entire perimeter of the heart.
Step 3. Roll the yarn through all the toothpicks in a zag-zag pattern.
Step 4. Do it all the way to the top.
Step 5. Decorate the box with beads, rhinestones, ribbons or any other decoration.
Simple materials make a very beautiful box. Every mom will love her.
Apron
Mom is the mistress of the house. If an adult helps the child, then you can make a cute apron with the image of a cast of the child's hand. We offer step-by-step manufacturing instructions.
And working on such a photo frame, the child will receive a lot of emotions. Multi-colored buttons are glued around the entire perimeter of the frame. The result is such a masterpiece.
Candle for memory
For such work, you will need the following materials:
- parchment paper;
- candle;
- paints.
Step 1. Draw the desired pattern on parchment paper.
Step 2. Place the patterned paper on the candle and hold it well.
Step 3. Spray the surface with warm air. This is necessary in order for the drawing to be well fixed. In this case, a hairdryer will help.
As a result, you will get such beautiful candles.
Card for mom
A child from 4 to 6 years old can make such a card. Paper crafts for March 8 in kindergarten are often made of paper. This work includes cutting to a specific template and without it. This kind of arts and crafts is called applique. Invite your child to make a beautiful shiny postcard.

Prepare the following materials:
- plasticine;
- scissors;
- colored cardboard;
- glue;
- Double-sided tape;
- ready-made eyes;
- metallized colored paper.
Step 1. Make the base. Fold a piece of cardboard in half. Cut along the fold, then fold again.
Step 2. Glue the white square onto the double-sided tape.
Step 3. Take a metallized colored paper and draw a flower on the back of it. Cut it out.
Step 4. Glue the circle cut from colored paper on top.
Step 5. Cut out the eyes from the blue paper, the mouth from the red one and glue the details on the circle.
That's all. You have got an original postcard. It should be noted that the mouth can be molded from plasticine, and paper eyes can be replaced with the eyes of any toy. Then the postcard will come to life.
There are many variations of postcards, check out one of them.
Many original handicrafts and do-it-yourself cards for mothers and grandmothers by March 8 can be found in this section, where fellow educators share their ideas and clearly show the results. Make sure that other handmade gifts for moms can be very colorful, original and varied.
Contained in sections:
Includes sections:
Showing publications 1-10 of 2298.
All sections | Crafts for March 8. Gifts for moms
Target: teach how to make a product (postcards with flowers) from paper. Tasks: - improve the ability to work with paper; - to form the ability to work independently in accordance with the plan; - develop hand motor skills, thinking, memory, the ability to bring work to the end; -...
 This under the tree made together with children 6-7 years old. Any mom is happy a gift, which will make her beloved baby. And for kids it is a great pleasure to make present for mom with their own hands. These are such beautiful bouquets we decided to make with the guys for mothers for a holiday 8 Martha....
Crafts for March 8. Gifts for mothers - Master class "Postcard for mom by March 8"
Publication "Master class" Postcard for mom to 8 ... "  Master - class: "Postcard for mom by March 8". Description: this master class is intended for children of preschool and primary school age, teachers, parents. Appointment: a gift for mom for International Women's Day on March 8. Purpose: to make a postcard with your own hands. Tasks:...
 Library of images "MAAM-pictures"
 Abstract of a lesson on manual labor Construction from paper. "Flowers for Mommy" preparatory group. Technology: collective (CSR) Purpose: To teach children how to make flowers from paper. Objectives: To continue teaching children to fold paper in different directions Teach to compose ...
 Master class gift for mom "Basket with tulips" for senior preschool children. Purpose: Making a gift for mom with your own hands for the holiday. Objectives: To improve the ability of children to work with scissors. Develop the ability of children to follow the teacher's verbal instructions ...
 Good afternoon, dear readers. In our kindergarten, a handicraft contest was announced for March 8 "A Gift for Mom". I wanted to do something unusual. I began to remember what they always give women on this day: flowers, sweets. Or maybe a cake? For work we need: empty ...
Crafts for March 8. Gifts for mothers - Application as a gift for mother "Tulips"
 Dear Colleagues! Always in February, the question arises before educators - what gifts can be made with the children for their mother's holiday? This year I also browsed the Internet in search of a new, interesting idea. I found such flowers, slightly altered the design, taking for ...
Summary of a lesson on application in the second junior group "Postcards as a gift to mom, grandmother" Software content: Teach children to compose an image from parts. To foster the desire to make a beautiful thing (a gift. To develop aesthetic perception, to form imaginative representations. Tasks: 1. To form in children the ability to stick flower details from colored paper, ...
 These are the invitation cards for the matinee we made for our mothers. They will help our mothers not to forget the date and time of the matinee, as well as plan this day in advance so as not to miss it, especially since each of them will have a surprise at the end of the holiday. The...
 “Panel for March 8. Heart for Mom "Purpose: to create a volumetric applique" Panel for March 8. Heart for Mom "from colored paper Tasks: Educational (Visual): - to teach the techniques and methods of making a flower using the technique of volumetric applique Developing: - to improve ...
It is pleasant for a woman to receive flowers. However, most often this happens on a birthday and on March 8th. Particularly lucky women have luck on their wedding anniversary. Moreover, the lucky woman must remind herself of the surprise in advance and in advance, write the place of purchase and the exact cost of the bouquet, then there will definitely be an unexpected gift.
With children, everything is easier. The function of reminding and making a gift is taken over by caring teachers. There is no need to invent anything. For example, mimosas and napkin roses look alive and look very cute and tender. In addition, so that the next souvenir for your beloved mom does not gather dust on a shelf or in a drawer, you can make a photo frame from salt dough. The material for manufacturing is absolutely safe, and the resulting result is very useful for home use.
A great idea for making postcards in the younger group is a flower made of handprints. Surely every mother painstakingly traced the pen of her child in notebooks and signed the date. And here there are as many as three sketches - the red palm at the top of the leaf is the bud, and the other two on the sides are the original petals. The postcard turns out to be very touching and original.
Hello everyone who came to my blog today! How is your mood? I hope it's fun and you're doing well. After all, another season will soon come, and with it will come the spring holiday International Women's Day. And we will be happy to congratulate all women on this day.
Let's present to mothers and grandmothers beautiful and original crafts that will be done with care and love.
Of course, you can make a bunch and shower them on your favorite girls and sisters. And you can make chic bouquets of flowers or make original postcards and souvenirs. You will learn all this from this article, so let's go ...
What can you make crafts from? Of course, from the materials at hand that you always have at hand, let it be paper, cotton pads and a bunch of napkins. After all, the main thing is to come up with, and then realize the idea in reality.
I really liked this kind of craft that you can give your mom - this is a flower. Moreover, it is made of paper, but look how magical it looks in this pea.
You will need corrugated paper, and it will need to be cut into small squares, they should all be the same.

And then glue it to the base using the facing method. You can also make the base from a long strip of paper, twist it into a tube and glue it. After that, twist each piece of paper prepared for this case on a rod and glue it to the base.

Make petals and take any flower pot, you can fill it with plaster or come up with something else.

Be creative and you will succeed.

Using this technique, you can make a different look.

If you want to find a more delicate option, then make the number 8 out of satin ribbons and you can even hang it on the wall. Here, of course, certain skills are needed to perform such beauty in the style of a kazanshi.

Using the quilling technique, you can also build a real spring masterpiece, see for yourself.

Such a work looks awesome and very original, even your teacher will be delighted to receive such a gift.

The most common children's souvenir is a postcard in the form of tulip flowers or some other.

I also liked this basket-magnet on the fridge, cool, don't you think?
Or a small multi-colored meadow like this.


Of course, it was not done without vytynanki, my favorite type, who needs a template, write, I will send it for free. So gorgeous and not at all difficult, literally five minutes and your masterpiece in the form of an openwork figure eight will stand on the table and you will not take your eyes off it.

There is an even easier option, from ordinary strips you can make such a wonderful bunch, both a kindergarten child and a schoolboy can do it.

You can use an applique, make a vase or basket template, decorate it with leaves and flowers.

Dads, remember they gave them when they were preparing for February 23, you can overpay this idea here. How do you look at it?

For the next great idea, you will need material, namely felt, a needle and thread, and scissors. You can create such a magical and bright bouquet.

First, make a base like this, you can also use a satin ribbon for fixing.

Cut the flowers out of felt, and the center will be a bead.

In principle, instead of a bead, you can use something else, multi-colored pebbles or sparkles.

I was also captivated by such a soft pink charm, and why go to the store when you can make a miracle yourself. It looks like an orchid, well, just cool!

Volumetric postcards made of paper and cardboard
On this day, all daughters and sons delight their mothers and grandmothers with glorious gifts, present them with postcards that they made themselves in labor lessons or in kindergarten. These can be done quickly and at the same time beautifully.
I suggest you make such a nice greeting card out of corrugated paper with the children, it will also look voluminous, take a note. You can use this step-by-step master class in the senior, preparatory group or primary grades. You will get a bunch of roses or wildflowers.

We need:
- cardboard
- corrugated paper
- satin tape
- openwork baking napkins

Stages of work:
1. Take cardboard, preferably blue, blue or green. Then glue a napkin to it below the center.

2. Cut strips out of corrugated paper and place it on a pencil or pen and start curling, as shown in this photo.

3. And then pull it out, pull it off the pencil like an accordion.

4. Spiral to make something that looks like an open bud.

5. Unscrew the product with your fingers, fluff it up.

6. Glue your colorful creations onto a napkin.

7. Cut the leaves out of green corrugated paper.

8. And decorate them with a craft.

9. Make a satin ribbon bow and tie the bouquet.

10. Pretty good and I would say it looks charming. Creative success! Do not forget to learn a poem on this topic.

You can also make such a creative product.

With preparations, you can make just such a beauty from an openwork napkin and cardboard - chamomile.

If you are looking for a simpler option, for example, for the smallest from 3-5 years old, for example, for the middle group of the kindergarten, then this hint will probably push you to the right thought.

For the younger group, make a common huge plasticine craft, literally 10 minutes and you're done. See how great you can make from balls.

Or a violet.

For schoolchildren, you can make a product from threads, such as embroidery. In the product itself, no glue is used, the threads pass through the holes.

The idea of making a number 8 and using a music disk as a stand seemed quite interesting to me.

And here is what can be obtained from these materials.
The most beautiful souvenir ideas
First of all, I want to offer you this video for viewing, how do you like that idea? Be sure to write your opinion at the bottom of this note after viewing.
With the arrival of spring, you can see not only flowers, but also the arrival of birds and insects. Therefore, let's make a clearing with a bee, wow, and it all looks well, just great and very beautiful.
We need:
- toilet roll
- double-sided tape
- kinder surprise mold

Stages of work:
1. Take the sleeve and double-sided tape, wrap it around the entire diameter.

2. Then glue the sheet of paper onto the double-sided tape.

3. Wrap the unwanted remnants of paper inside.

4. Take sheets of green paper of different tones, fold them in half, and then cut them into strips, as if you were making a bookmark.

5. Using a stapler, wind the blanks onto the prepared base and secure.

6. Get tempting leaves or weed. The base of the sleeve must be wrapped with paper again to hide everything you do not need.

7. Or do it like this.

8. Then in the store buy figures for decoration or make such yourself, butterflies, bugs, spiders, etc. Give free rein to imagination and in an original and scattered manner apply them to the grass.

9. After that, make a blank of wings for the butterfly, which will be made from a case from a kinder surprise.

10. Do not forget about the eyes and possibly a mouth that you can draw with a marker. Here are the tones of spring beauty that will decorate any house or apartment.


Use the materials at hand, lids, cocktail straws and you will surely have an insight.

There are a great many options, I never cease to admire and be amazed at times.

See, even an egg carton was used here. And of course they used ordinary pasta to make another masterpiece.

As they say, who is good at what, and what did you come up with? Or are you still searching and don't know what to accomplish?

Well, then you might be interested in making such a souvenir using ordinary disposable spoons, and tulips really came out, only unusual ones.

Undoubtedly, a basket or pot will emphasize the originality of this simple idea.

At school I saw this kind of work the other day.

By the way, even dandelions or chamomile can be made from cotton swabs and plasticine, to whom does this work resemble which flower?

Well, this is definitely a dandelion here.

And here most likely asters.

Or chamomile.

Using paints and brushes, you can draw a plot and congratulations.

Skillful craftswomen can make a product from beads, it is certainly difficult, but for those who are fond of this it will not be difficult.

For most, the palm remains the most beloved card. How simple, but you can even take it to a competition or an exhibition.

We make crafts for kindergarten with children
With the children, first of all, you can make all kinds of drawings for this international day. Use something unusual, like drawing with a crumpled piece of paper or a cotton ball.

Well, for joint activities, you can make such a gift to mothers and grandmothers and place it near the group on booths with congratulations.

We need:
- paper napkins red
- corrugated paper
- scissors
- stapler
- tassel
- cardboard

Stages of work:
1. Take an ordinary paper napkin, see the diagrams from left to right. Fold it in half, then again, connect in the center with a stapler. Then cut out a shape that resembles a circle. Make small cuts along the entire diameter, and then fluff the product.

2. Cut out the shape of the bouquet from cardboard and wrap it with corrugated paper, tie a bow.

3. Make leaves and let the children stick the resulting flowers in any order.

4. Here is such a weird and magical creation turned out, well, it just looks amazing, as if a real bunch of roses.

We give flowers to mothers on March 8
In this article, I will not go deep into this topic, at the very beginning you have already seen some ideas, now I will show you the simplest ones, and in the next issue there will be new items and very cool options for flowers for this women's day. So, do not miss a new note, add this to your bookmarks so as not to lose.
From pieces of paper for notes, you can make small bags, look and then glue them in a circle, that's what happens.
By the way, you can give such a charm to your beloved teacher).

Nothing special, but it looks cool.

Or you can use this video:
Also use coloring pages, because children love this business very much. Any mother will be pleased to receive such a drawing.

You can use pictures with animals, you can just use some colors.


Or at the same time even arrange them in the form of messages and wishes.

Choose any template you like, print it out and congratulate!

We need:
- cotton pads
- scissors
- threads
- tassel
- gouache paint
- skewer or stick
- corrugated paper

Stages of work:
1. Put a cotton swab on the stick, you can stick it with glue.
2. Then paint it yellow, and then wrap a cotton pad around the entire circumference of the stick, while using a thread so that it does not fall.
3. Decorate the stick with corrugated green paper, you get a stem, cut out the leaf and also wind it on the stem.

4. These are the flowers that will turn out to be white and at the same time elegant, quite beautiful and cute, super!

Master class for primary school students
I want to offer you an unusual craft that will be made of yarn. You will also need a vase and your good mood, because you will get bright yellow and everyone's favorite flowers, called mimosa.
Next time in another post, you will find instructions in this paper mimosa.

Well, now let's make just such a twig from yarn threads. Here all the steps are shown at once, you just have to repeat.
Now let's create a box, or such a miracle can serve as a candy bowl or a vase, 3 in 1, and this can be done from cardboard, toothpicks and woolen threads.
1. Cut a heart out of cardboard and stick toothpicks into it. But first of all, first make holes on the cardboard with a needle and drip glue into them, and then stick in the toothpicks.


3. Here's what happens over time, you can add beads or seed beads.

4. And of course you can play with the shapes, make them round or square.

Well, how do you like this idea? If you don't like it, then go to the next type of a greeting volumetric postcard, so to speak 3d.
We need:
- cardboard - 1 pc.
- colored paper
- PVA glue
- scissors
- punch design
- rhinestones or scrapbooking kit

Stages of work:
1. Take a white piece of cardboard and fold it in half, make two cuts in the center, 5 cm wide, as shown in this photo.
2. Now bend with your hands to make it look like a ladder, this will be the base on which you will glue the craft.

3. Draw a basket out of colored paper and cut it out.
5. Determine the number of products yourself.
6. Now, using a special hole punch, make a decoration, for this take a strip 2-3 cm thick.

7. Glue this decor on the sides, and the basket in the center.

8. Then decorate with flowers and butterflies, as well as rhinestones or sparkles. In general, the fact that you have at hand of jewelry.

You can use this pattern and make extremely expressive and cute gerberas.
To do this, print the flowers, and then glue them one by one to make it look quite lush and voluminous.

I also liked the work in the form of a fan with tulips on it.

Or such a postcard.

Also, such a cute wire product can be an excellent option for schoolchildren.

Or fold such a souvenir from paper strips.

That's all for me. I wish you succeed in everything conceived. I wish you creative success, inspiration and all the kindest and most positive! Bye bye everyone!
Best regards, Ekaterina Mantsurova
It is impossible to imagine a wonderful holiday on March 8 without beautiful flowers, warm congratulations and cute ones, including those made with your own hands. Especially touching are children's crafts for March 8 with their own hands, which kids prepare for mothers and grandmothers in kindergartens and elementary schools. What materials do they not use to create these lovely souvenirs for International Women's Day! With a light hand, ordinary cotton pads, corrugated paper, napkins, water tubes, scraps of fabric turn into flowers of amazing beauty, vases, jewelry and other gifts. Such DIY crafts delight mothers and grandmothers for many years, reminding them of the sincere and kind moments of the holiday. Our today's article contains simple master classes with step-by-step photos and instructions for creating original crafts on March 8, which any child can master. Read more about how to make a beautiful DIY gift for International Women's Day below.
DIY craft option for March 8 from cotton pads for the senior group of kindergarten, a master class with a photo
Let's start with a do-it-yourself craft option for March 8 for the older group of kindergarten - refined calla lilies from cotton pads. This master class can also be used for children of the middle group of the kindergarten. For more details on how to make this version of the craft for March 8 from cotton pads with your own hands in the senior group of the kindergarten, further.

Required materials for crafts for March 8 from cotton pads for the older group
cotton pads
- cotton swabs for ears
- yellow felt-tip pen
- straws for drinks

Instructions for the DIY option from cotton pads on March 8 for kindergarten
- As mentioned above, in this version of the craft, it is proposed to make an original bouquet of cotton pads, consisting of calla flowers. First you need to make stamens for this amazing flower. To do this, paint one side of the cotton swab with a yellow felt-tip pen.

- Then the finished stamen should be glued to a cotton pad, as shown in the photo below.

- The edges of the disc must be wrapped inward, forming the base for the bud, and secured with glue.

- The free end of the stick should be inserted into the green beverage tube, which will become the stem for the flower.

- Then you need to make another petal from a cotton pad and fix it on the stem with glue. Ready!

How to make a crafts "Tulip" on March 8 with your own hands for mom, grandmother, step by step
The tulip can be called a flower-symbol of International Women's Day, so it is not surprising that it is often chosen for presentations on March 8th. Making a do-it-yourself craft in the form of a tulip on March 8 for a mother or grandmother is not difficult at all. For example, you can create a stunning bouquet of corrugated paper tulips that will delight its owner for many years. Learn how to make a do-it-yourself "Tulip" craft on March 8 for mom or grandmother from the next master class.

Necessary materials for DIY crafts in the form of a tulip on March 8
- corrugated paper of different colors
- pliers
- cardboard
- simple pencil
- green adhesive tape
- thin wire
- hot glue
- scissors
Instructions on how to make a tulip with your own hands on March 8 for mom, grandmother

An original do-it-yourself postcard for March 8 for kindergarten, step by step
An original and good version of DIY do-it-yourself cards for March 8 for kindergarten is waiting for you further. In this master class, there will be no traditional figure eight, which usually adorns the front side of any children's postcard on March 8. How to make an original craft card for March 8 with your own hands for kindergarten, read on.

Necessary materials for craft cards for March 8 in kindergarten
- colored paper
- scissors
- white cardboard
- double sided tape
Instructions on how to make a do-it-yourself card for March 8 for kindergarten
- Fold a sheet of cardboard in half.

- Cut out hearts of the same size from pink and red paper.


- We take 2 hearts of pink and red and put one blank on top of another. By the same principle, we will fix hearts on postcards, forming a voluminous beautiful flower from them.

- We fix double-sided tape on the back of the blanks. We spread the petals-hearts on cardboard, forming a flower that looks like a peony. In this case, the red and pink hearts should also be connected to each other on one side with tape.


- Gently move clockwise to form a flower. Ready!

Beautiful crafts for March 8 with your own hands from satin ribbons, a step-by-step master class
Incredibly beautiful crafts for March 8 with your own hands can be made from satin ribbons. Ribbons make lovely jewelry, such as brooches, for mothers and grandmothers. Learn how to make beautiful crafts for March 8 with your own hands from satin ribbons in the form of brooches from the next step-by-step master class with a photo.

Necessary materials for crafts on March 8 from satin ribbons with your own hands
- satin ribbons 2-3 shades
- lace
- large beads / pearls / beads
- thread and needle
- scissors
- pin
Step-by-step instructions on how to make a craft from satin ribbons on March 8 with your own hands
- First you need to make blanks for the brooch. To do this, the wide tape must be cut into 8 pieces of 6 cm in length. Fold each segment in half. The two segments need to be folded in the form of a heart, as shown in the photo below, and sewn with threads.

- Of the four ready-made blanks, two must be made. To do this, 2 blanks must be folded together crosswise and stitched with threads.

- The workpieces should then be folded back together crosswise and sewn with a few stitches.

- A thinner tape of a different color must be cut into 5 pieces of 3-4 cm in length. Each piece must be folded together and sewn from below.

- Small blanks should be laid out on top of the main part of the brooch and secured with threads. Then cut off a small piece of lace ribbon and use a thread to form a blank out of it, as in the photo below.

- The lace part should also be sewn onto the main part of the brooch. Then the middle of the jewelry must be decorated with beads or pearls. On the back of the brooch, you need to fix a large pin with glue. Ready.

DIY children's crafts for March 8 from napkins for elementary school, a master class with a photo
The next master class for children's crafts on March 8 with their own hands from napkins is perfect for elementary school. It tells how you can use the origami technique to turn an ordinary paper napkin into a useful vase in which you can store small jewelry, sweets and other trifles. Read more about how to make a children's craft for March 8 with your own hands from napkins for elementary school in the master class below.

Necessary materials for DIY craft on March 8 from napkins for school
- paper napkins of different colors
- small jar or glass

Instructions for children's crafts for March 8 from napkins for elementary school
- We take a napkin and straighten it carefully.

- Now we bend each corner of the napkin inward to its middle.


- We repeat the same thing, but with the corners of the resulting square.


- We repeat all the same again - we bend each corner inward to the middle of the napkin. Press with your finger for a few seconds so that the workpiece holds its shape better.


- Now we turn the workpiece over. Bend each corner to the middle again and press it lightly with your finger so that the workpiece does not fall apart.


- Then we turn the workpiece over again and put it on the opening of the can or glass.

- Now, holding the middle of the workpiece with your index finger, carefully straighten each fold of the napkin, as shown in the photo below.


- After the first four "petals" are straightened, move on to the next row of corners. We continue to straighten each corner, one at a time, until all the "petals" are dissolved.


- Now it remains to carefully remove the finished vase from the jar and turn it over. It's just the perfect storage solution for your little things that you need to keep close at hand.

Do-it-yourself paper craft option for March 8 for mom, a master class with a photo
This version of do-it-yourself paper crafts on March 8 will appeal to any mother. After all, he is a huge peony flower, which is not inferior in beauty to its living counterpart. Find out how to make this version of paper crafts for March 8 with your own hands for mom from the next step-by-step master class.

Do-it-yourself materials for paper crafts for mom on March 8
- pink, green corrugated paper
- wooden skewers
- green paper tape
- scissors

Instructions on how to make a do-it-yourself paper craft for mom in honor of March 8
- The first step is to draw a large heart pattern, which will become the basis for the correct shape of our peony's petals. The finished template should be attached to the corrugated paper and cut 8-10 blanks.


- We put two wooden skewers or sticks together and wrap them with green paper tape - this will be the basis for the peony stem.

- Now you need to give the petals the correct shape. To do this, each heart blank must be properly stretched in the middle. Then the edges of the petal need to be lightly wound around the pencil in the opposite direction, as shown in the photo below.


- In the next step, you can proceed to assembling the flower. To do this, each petal must be wrapped around the stem and secured with glue and tape.

- From green corrugated paper, you need to cut out a blank for a leaf, and then fix it on the stem with paper tape.

- It remains to cut the sepal base out of green paper and secure it on top with tape.

DIY master class for a child on March 8, video with instructions
You will find another simple do-it-yourself master class of an original craft on March 8 for a child with step-by-step instructions in the video below. In this DIY workshop for a child on March 8, it is shown how you can make a very interesting present for a mother or grandmother from colored paper. Details in the video below.