How to make a voluminous New Year's wreath. How to hang a decorative element. Fir Christmas wreath with cones
- A bit of history
- What do we need
- Subsequence
- Stage 1: preparing the base
- Stage 2: fixing the branches
- Stage 3: decoration
- More ideas
Christmas and New Year's wreaths, along with a decorated Christmas tree, are symbols of the upcoming holidays. The custom to create such compositions came to us from Europe, today in our country such decoration does not surprise at all, but, on the contrary, disposes to the New Year mood. How to make a New Year's wreath with your own hands - we will tell you in a detailed master class with beautiful photos of the process, throw in a few ideas and give practical recommendations.
A bit of history
Christmas wreaths originate in Hamburg in the Middle Ages of the last millennium. The Lutheran theologian Johann Hinrich Wiecher, who took up several children from very poor families, came up with a kind of "waiting calendar" for Christmas. It was an old wheel, which the priest decorated with coniferous branches, and put candles to it: 19 small red ones and 4 white ones. Their number showed which day before the holiday is now and how much is left. Every day Johann and his children lit one red candle, and on Sundays - one white. This way the guys could easily endure the anticipation of the holiday.
Today, a wreath of coniferous branches in Russia is associated only with the New Year, the symbol of Christmas is still characteristic of the Catholic Church.
Wreath symbolism:
- The circle with candles is associated with the Earth and the four cardinal points.
- The circle itself is the infinity of life.
- The green color of evergreen needles is a symbol of all living things.
Candles in Christmas wreaths fill the house with light, much like the world is illuminated at Christmas time.
You can buy a traditional New Year's wreath made of cones and branches in the store, but will it be so symbolic and attractive? Oddly enough, such a souvenir rarely has a pre-holiday magic, such are purchased for offices and places far from home. Even in an age of high pace of life, most people find a couple of hours to make a Christmas wreath with their own hands. It is not difficult at all, it is fascinating and it means that such decoration is much more than just a symbol.
Wreaths of cones and needles are traditionally placed on:
- At the front door;
- Over fireplaces;
- On the table as a table decoration.

Accordingly, the design and method of attaching toys, jewelry and accessories will differ.
To clearly show that making a Christmas wreath with your own hands is not difficult at all, the designers made a fascinating master class with a photo so that everyone could try to create their own New Year's decoration, while enjoying the process and the result. So, the New Year's wreath: mk with step-by-step instructions.
Master class from creative designers
How many variations of decor come up with bright heads of designers, and the basis always remains traditional - green branches of conifers. You can decorate a spruce wreath with anything:
- Christmas balls;
- Tinsel;
- Cones;
- Felt toys;
- Beads;
- Feathers;
- Beads and so on, just not to list.
Our artists came up with a few ideas:
- Christmas wreath of cones and oranges;
- A wreath with cotton cobs, feathers and New Year's toys;
- And there are many more interesting combinations that you will see below.
What do we need
So, what we needed to create Christmas and New Year's wreaths:
- Spruce, pine, fir branches. They can be collected in a forest belt or in a park. Choose beautiful young branches with good uniform needles, it should withstand a month and a half in excellent condition. Of course, you can use artificial needles, but the effect will not be the same, and there will be no smell from this, and this is an almost obligatory wish;
- Spruce cones. You can take cedar, pine, or whatever you like. Try to choose fresh ones - old ones quickly crumble in a dry and warm room;
- Multi-colored Christmas balls. Take those that you do not plan to hang on the tree, so you can also save money. Choose small toys to be placed on the branches themselves; you can take a larger ball for suspension;

- Colored bird feathers are sold in decorative and hand-made stores, we have taken several varieties;

- Satin ribbons for bows;
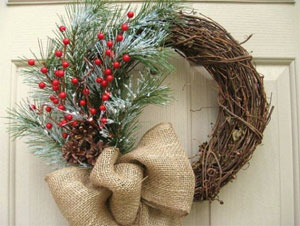
- Rowan twigs with berries are an unusual solution, but organically fit into the theme of a real winter tree.
Do not be afraid to use food for work - gingerbread, candy, fruits. The main thing is not to take perishable ones and keep track of their expiration date.

- The highlight of the program is orange rings. They will add brightness and scent to the finished jewelry. The smell of citrus and pine needles in the aggregate is associated with any person with the winter holidays.
- Tools: scissors, pruning shears, ropes, hot glue with a gun.

- The basis for the New Year's wreath is a cut out circle made of thick cardboard. You can use newspapers, a hoop, a piece of a wide pipe - any round product.
Subsequence
Now we will tell you how to make a wreath on the door with your own hands in stages, because one of the components of successful work is the correct organization of the work process.
Stage 1: preparing the base
This is the most crucial step, on the implementation of which the quality of the finished wreath and its strength depend. We took thick cardboard, cut out round blanks from it with a diameter of 30 cm from the outside and 25 cm from the inside. The width of the wheel turned out to be 5 cm. We wrapped the workpiece with a wide ribbon of gold color - this solution will allow you to conveniently attach the branches and decor, and random gaps through the needles will not be striking as something unfinished.

Instead of cardboard, a wreath of newspaper tubes at the base also holds its shape well. Creative minds even manage to create an independent composition by twisting the sheets of the old press into cones and tubes, securing them to the base. But this is not our case.
Stage 2: fixing the branches
It's easy to attach twigs on your own:
- Insert them into the tape pockets at the base of the workpiece and tie them with a thread;

- Interlace with other twigs;
- Staple brackets or wire are suitable for fastening.

Prepare the branches in advance: cut off excess shoots and shorten the main one to the desired length. Work through the entire perimeter of the ring.

Let some branches be with their own cones, this will facilitate the decorating process.

Stage 3: decoration
This stage is the most creative and interesting. Here we turn on all our imagination and create.

We used cotton cobs for decoration - the natural theme is always relevant, and such an unusual solution will definitely transform a hand-made wreath.

Imagine the look of your product in advance and choose matching items for decor. Let them be unexpected, then there should not be many of them.

Until the branches are covered with decor, reinforce them with a thin thread: it will pull the greenery to the base and visually decorate the product.
If your hand reaches for rowan branches - do not deny yourself... Fortunately, they can be collected before deep frosts.
Cut the harvested branches with pruning shears to the desired length, remove the ugly and spoiled berries. Insert the branches into the pockets of the workpiece and tie them up like spruce.


Now we attach delicious material - orange slices. It is better to fix them to the composition using ordinary threads - the staples will tear the delicate structure, and the glue simply will not grab with the liquid juice. A fragrant reminder for the new year and a simultaneous memory of a sunny summer.


The feathers are best fixed with hot glue. Why hot? - it instantly grasps and you don't have to wait long for drying. In addition, it is colorless and will not make itself felt.


Decorating a wreath with your own hands with Christmas balls is as exciting as decorating a Christmas tree. We placed small balls in the same scale on the branches. It is better to fasten them with threads using a crochet hook through the branches.

Well, what about without various trinkets and toys?

A Christmas wreath on the door may contain a reminder of winter and snow. For this we use "liquid snow" in the form of an aerosol. With its help, we apply frost to the tips of the needles.

Making a New Year's wreath cannot be put into one framework - there are as many solutions as there are hands to make this symbolic accessory.

One of the examples of what we got.

More ideas
It is not at all necessary to make a Christmas and New Year's wreath from living branches, you can make a composition from any materials for needlework:
- Felt wreath;

- Beaded wreath;


- Paper wreath;

- New Year's wreath from tinsel.

The choice of material is limited only by the scope of imagination.
The video reflects the process of work, which is very easy to repeat.
The most fabulous and favorite holiday of children is approaching - New Year. On pre-holiday days, streets and houses turn into a fairy tale, everything shines and shimmers around, and on the shelves of shops there is an abundance of New Year's decorative elements, which delights not only children, even adults do not remain indifferent.
The whole family prepares for this holiday in advance. To create a festive atmosphere in the apartment-house, we try to decorate our home with New Year's attributes. Nowadays, Christmas wreaths are very popular.
The tradition of decorating a house with a Christmas wreath came to us from Western countries, our citizens also liked this New Year's decor, and we began to adopt the tradition of decorating the door with such an elegant festive wreath.
Naturally, there are a great many options for a Christmas wreath on sale, as they say, for every taste and color. But a handmade wreath made together with a child is not just a New Year's attribute, it is a kind of amulet for your family hearth.


It is not difficult to make such a wreath, the most important thing is your desire, good mood and materials that you have at your fingertips. Also, materials for such a product can be purchased in specialized hand-made stores. In such shops you can buy a ready-made base for a wreath. It is worth such a pleasure from 80 UAH and higher - it all depends on the size of the base and the materials from which this base is made. And what a variety of decorations there is, in general, be patient, and most importantly - prepare financially for such a campaign.

.jpg)
The base for the wreath


A Christmas wreath consists of decorations and a base to which they are attached. Hanging wreaths are usually made of lightweight material. The basis for the wreath can be twigs, grapevine, a rim from a baby wheel, straw. A piece of hose, thick cardboard, or, say, a piece of wire will also work. Twigs, vines can be painted in any color, or they can be left natural. A piece of hose can be wrapped with a cloth or thread and dyed too. In general, your imagination will be useful to you. If there is no desire to puzzle over what and how, then the Internet will help you: find a suitable master class there and create.
Party Wreath Decorating Ideas
When the base is ready, you can start decorating the wreath. There are a lot of ideas for this action, as they say, there would be a desire.
A traditional wreath should include three colors: green (symbolizes hope), red (love), white (light spiritual qualities).
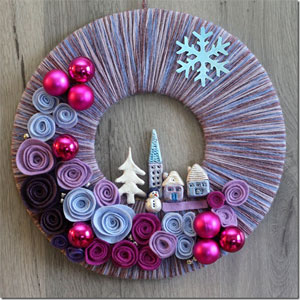
If you and your baby prefer blue or pale purple, feel free to experiment: tradition is good, but you should like the product.


On the base you have prepared, you can attach cones, pine branches, thuja with a glue gun, but it is better not to use a spruce in the manufacture of such a product, because the spruce quickly crumbles. You can also add walnuts here. To make your wreath shine, you can pre-paint cones, nuts or acorns with gold or silver spray paint - and a mysterious flicker will be provided.


New Year's wreaths made of citruses, cones, nuts, cinnamon sticks and rowan twigs look very original and even have a very pleasant smell.
You can decorate such a wreath with whatever your imagination tells you: tangerines, apples, dried flowers, decorative braid, etc.
If you haven't stocked up on natural materials, it doesn't matter, you can make a New Year's wreath from Atlas or packing ribbons. To do this, it is necessary to cut the tapes into equal lengths, for example, 6 cm in length, fold in half, and alternately glue to the prepared base with an overlap in relation to each other. You will get a very elegant and original wreath, and a drop of citrus aromatic mala on a fabric festive wreath will fill your home with New Year's mood.


Very delicate and airy, like snow, you get a tulle wreath. And those with a sweet tooth will love the New Year's wreath of sweets.


You can also make a wreath that will become a decoration for more than one holiday. To do this, you need artificial spruce branches, which can also be purchased in specialized stores, the prices, however, for such products are rather big - one branch from UAH 30 and higher. The branches need to be decorated with New Year's balls, which, by the way, can be changed for the next New Year for other decorations. And if we weave an electric garland into the wreath, it will be especially effective.
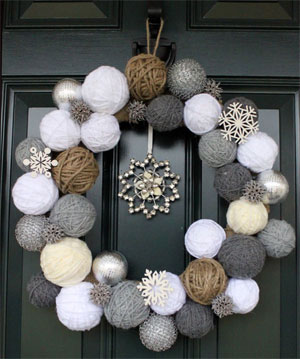
Festive wreaths look great only from Christmas balls. The balls must be glued to the base and to each other with a glue gun. At the end, the product can be complemented with a beautiful bow.

On the Web, you can find a master class on how to make a wreath from threads. So, you will need thick woolen threads. It is necessary to wrap the base of the wreath with them very tightly, thread to thread, in several layers. Such a festive wreath can be decorated with Christmas-tree felt flowers or felt figures - whatever your imagination tells you.

By the same principle as a simple wreath, you can make a snowman. Only you will need to make base rings of different diameters (head, middle and lower parts of the snowman). These rings can be stapled together with a glue gun or joined with a string. And you can decorate the snowman at your discretion, for example, with a knitted hat, scarf or just a hat. Such a snowman will look great on the front door of your house or decorate the wall of a children's room - the child certainly will not mind such a New Year's decoration.


Of course, you can buy a ready-made Christmas wreath, but a wreath made with your child carries the warmth of your hands, you put your soul into a handmade product, so such a Christmas wreath will have a special New Year's magic. We all, both children and adults, believe and hope for a miracle.
Wish you creative success and magical inspiration!
Master class with step-by-step photos on making a New Year's wreath
Gaponova Natalya Mikhailovna, teacher of technology, MCOU "Secondary School No. 29" of the city of Revda, Sverdlovsk regionWork description: The master class is intended for technology teachers, teachers of additional education, children 13-18 years old and their parents who want to try themselves in working with various materials and decorate the interior of the apartment with interesting New Year's works.
Purpose: The product can be used as a gift for the New Year's celebration, as well as as an interior decoration for an apartment, classroom, any room.
The purpose of the teacher: Develop creative thinking, perception, accuracy. Observe the rules of safe work.
So, let's start creating!
Christmas wreaths are an interesting and versatile decorative element. It can be used to decorate almost any room and object, since the wreath can be hung or simply laid on a flat surface.
We owe the Christmas wreath to a Lutheran theologian Johann Hinrich Wihern... As the story goes, in the early 19th century he mentored several orphans. The theology expert in every possible way expanded the knowledge of children in the field of theology, and to make religious dogmas easier for them to perceive, he invented various "visual aids". To count the days of fasting before Christmas, he invented a wreath, or rather, it was an ordinary wheel on which candles were placed (a certain prototype of the future Christmas wreath), which served as calendar days - small candles were lit on weekdays, and large candles on weekends.

So, once the Christmas wreath replaced the calendar, and after a considerable amount of time, it turned into a symbolic and beautiful attribute of the New Year holidays.
They began to decorate the Christmas wreath in every possible way - with fir branches, New Year's toys, ribbons, etc. And also, he changed the location - now not only tables are decorated with wreaths, but they are also hung on doors and windows. So, while retaining the status of a symbol of winter holidays, the Christmas wreath has completely lost its original purpose and meaning.
There are no restrictions in creating Christmas wreaths, and wreaths made in different techniques and from completely different materials can well get along within the same apartment.

To make our New Year's wreath, we need:
1. Thick cardboard for making a circle.

2. Old unnecessary magazines, newspapers to create the volume of the wreath.

3. Artificial fir twigs, Christmas balls of different diameters, satin ribbons, Christmas beads, fir cones, a glue gun and glue sticks for it, masking tape, green corrugated paper and various New Year's elements.

Stages of work:
1. Harvesting cones. We select by size (it depends on the radius of the wreath), if the radius is large (25-30 cm), then the cones are larger, if the small radius (18-23 cm), then the cones are smaller. We paint the cones with acrylic paint (spray can).

2. Determine the radius of the wreath. Cut out a circle from thick cardboard, as shown in the photo above. From old magazines or newspapers, we fold the accordion and glue it tightly to the circle.

3. Thus, we fill the whole circle.

4. This blank is tightly wrapped with masking tape.

5. Then wrap the blank with green corrugated paper.

6. Strengthening the rake. It could be a decorative buttonhole or satin ribbon. In my case, it was a satin ribbon.

7. Begin to fill the circle with spruce branches. Glue the twig so that part of the twig looks to the side, and the other part is tightly glued to the circle. We glue with a glue gun.

8. Gradually fill in the outer and inner circle of the wreath.


9. Fill the circle with spruce branches so that there is room in the center for decorative elements.

10. We begin to design a wreath. We glue cones, Christmas balls of different diameters.

11. It is important not to overload the wreath with various elements, but this is a matter of taste ...

12. Wreaths made for gifts to all my family and friends, that's what I did!


13. If the wreath is not made of spruce branches, then the color of the corrugated paper may not be green, but the color of your wreath, as in my case the paper was pink.

14. All successful and fruitful creativity! Happy New Year and Merry Christmas!
,
however, I found a very detailed master class on the net ..
1. The first thing we do is take the base, which we need to make three-dimensional. Cut out a stencil - a ring from cardboard. To make our wreath look harmonious, let's recall the rule of the golden ratio - to calculate the outer diameter of a cardboard ring, you need to multiply the size of the inner diameter by 1.6.


We take twine or wire (floristic) and scissors. Create a frame from a stencil and paper. Squeeze the paper tightly. We cut off the excess. With the second layer of twine, we level and compact the frame even more. You should try to pull the paper in one direction. We level out the shortcomings with our hands. We get a semblance of a donut.


3. The next step can be done in several ways. With special staples, hot glue gun or twine (dense, green). We need 2 good branches of nobles (spruce variety). This variety is good because a wreath from such a spruce will stand until spring without crumbling.

4. So, we take spruce branches and begin to work with a pruner. Put the cut off branch on the inner surface of the frame, fix it with staples, twine or glue.


We must make sure that the spruce is well fixed. The thickness must be placed in different places so that it is natural. Cover all visible gaps to create a sense of integrity and uniformity. If there are holes in the wreath, the flaws can be glued directly to the gun.


5. The next step is decorating. We chose the red and white color scheme. White always goes well with red. In the design of our Christmas wreath, we will use: filler for gifts (to imitate ilyx twigs), Christmas balls, snowflakes from a Christmas tree garland, nuts, cones and Christmas ribbons.
First, we take ordinary Christmas balls and break off everything that is superfluous. We place them on the wreath primarily as the largest elements of the composition. Further from the garland, we separate the details we like - stars or snowflakes - and attach them.


6. Let's make ilyx twigs with our own hands using a filler for gifts and thin sticks. We coat the stick with glue and lower it into the filler, carefully adjust it, if necessary. We attach the finished branches of ilyx to the wreath.


7. Walnuts and hazelnuts are painted with white matte water-based paint. Use a coarse brush without painting over some areas on purpose to achieve the effect of the dropped frost. The paint dries very quickly and practically does not smell. It is better to paint the hazelnut twice.


The next thing we will take is the rose hip. As well as from hazelnuts, it is better to make bunches of it. We are waiting for the glue to dry and start decorating. We try to fix it naturally, so that the impression is created that the berries grow from spruce branches. For such a decoration, everything will suit us: ordinary pine cones or alder, everything that grows in the forest - birch catkins, cones, pieces of bark, seed pods.


8. The final stage remains. We take a beautiful New Year's ribbon and finish decorating our wreath. The ribbon can also be made by hand. The final touch is to choose a whitewashed candle, the whiter the better. Place the candle in the middle of the wreath and decorate the Christmas table.