Cornflower pattern for cutting. Do-it-yourself paper cornflower: a technique for making a cornflower flower from corrugated paper using the example of a step-by-step master class. Cornflower with candy
Many people associate summer with a variety of flowers, especially wild flowers. Cornflowers are one of these plants. However, what if you want to give such a flower, but there is no way to pick or buy? We suggest you make a paper cornflower with your own hands. The article will offer options using different materials.
Simple manufacture
It is the best fit for joint creativity with children. For the master class we need:
- colored paper in blue, green shades;
- compass;
- scissors;
- glue.
We take blue paper and cut out three circles, the diameter of which is 8 cm, and seven - Ø 6 cm. You choose the combination of colors for large and small circles yourself. We fold each circle three times in half and using the template below we cut out the petal, and at the base we do not cut it to the end.

Naturally, we make our own templates for each size of the circle. Expand the resulting flowers. Using scissors, slightly curl the petals inward. We glue the large to the small in the middle.

Make different options for assembling flowers. Also cut out a stem 10-12 cm long from green paper, and leaves 5-6 cm long. Glue all blanks to the base.
It could be a picture or a postcard, for example.
Second way

Prepare corrugated paper of blue, dark blue and green colors, wire 0.3 mm and about 1 mm, PVA glue, semolina and scissors.

We cut out a strip of paper of a dark blue shade, the width of which is 1.5-2 cm.Cut teeth on one of its edges, which we twist with our fingers. Now we drip glue onto one end and attach a thick wire, it will act as a stem.

Let's put the workpiece aside for now. From corrugated paper of a blue shade, cut a strip 6-7 cm wide and fold it in half lengthwise; to make it more natural, it can be folded so that one edge is slightly higher than the other. We also cut out the edge in the form of triangles.

You can wrap the entire strip around the finished base. And you can cut into sections and attach one by one.

Cut out long leaves from green paper, glue a thinner wire to their base and attach it to the stem. We glue the stem itself with a strip of green corrugated paper.


As a finishing touch, dip the ends of the core into glue and semolina.


The third option


To begin with, we take black threads and wind them on four folded fingers at 50-60 turns. Then we remove from the hand and bandage in the middle.

Cut the side folds, making it look like a brush. This will be our middle ground.

Cooking the peduncle. To do this, cut out a strip of about one centimeter wide from green corrugated paper and wrap a piece of wire with it.

Drop glue onto the center of the middle blank and attach it to the top of the stem. Better to use a hot glue gun.

Dip the ends of the stamens first in PVA glue, then in semolina.

Let's start making petals. For the first row, cut out a strip 25-30 cm long from blue corrugated paper and fold it three to four times, having previously smoothed the folds of the paper with your fingers. We cut the top edge, making a fringe.

Having expanded the strip, we twist the ends of the fringe into flagella.

Now we start to prepare the outer row of petals. For it, cut out a strip of blue paper 35-40 cm long and wider than the previous one. Smooth and fold six times.

Cut the edge into small triangles.

We start directly assembling the flower. To do this, we wrap the bases of the stamens, first with a strip of the inner row, then the outer one. For greater splendor, the strip of outer petals can be folded into an accordion. We use glue, PVA can be used. For greater reliability, we wrap the finished flower with a thread.


Now you need to refine the base of the flower. We simply wrap the bottom of the flower with a strip of green corrugated paper and glue, smoothly moving onto the stem. Cut out long leaves from the same paper and attach them just below the bud.


We make another such flower and one, only with inner petals. We make a bunch.

Cornflower with candy

We will need:
- blue corrugated paper;
- candy;
- foil;
- scissors.
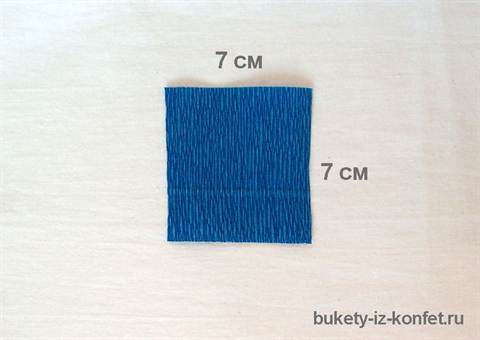
Cut out a square with sides of 7 cm. Cut out small triangles along the upper edge.


We make three such blanks. Then, on each from the toothed edge inward, but not to the end, we make incisions.

Each resulting petal in the middle, we make more cuts of 0.8 cm. We give each a rounded shape, stretching from the middle with our thumbs.

Now let's get to the candy. To do this, cut out a segment from the wire and wrap a loop at one end. Then we wrap the candy with a square of foil with sides of 10 cm.At the same time, we attach the wire.


We attach the first row of three blanks of petals to the base of the candy using a thread. With the second row, we attach the same number of blanks, but fasten them in a checkerboard pattern with respect to the previous ones. And one more row.


The stem can be closed with green thread. We make as many flowers as you need.
It will turn out to be a beautiful and sweet gift.
Below will be a selection of videos on making cornflower flowers from paper.
Related videos
Cornflowers are a rather complex paper applique for children from 7 years old and older. The main difficulty for the guys is to carefully cut through the sides of the flowers without touching the middle. But all the work will pay off in that the result is a gentle and airy work. For children of 7 years old, it is better to simplify the application somewhat - to make not five, but three cornflowers. In this case, the squares from which the flowers will be cut must be enlarged. Then it will be much easier for the guys to cut.
To make the "Cornflowers" applique out of paper, we need:
Colored cardboard sheet;
Blue or light blue paper in two shades;
Green and orange colored paper
Glue
Scissors
Pencil
How to make an applique from paper "Cornflower"
Step 1
Let's cut squares of blue paper in two shades and two sizes. Large square - 6x6 cm; small square - 5x5 cm. For each cornflower we need one large and one small square.
Step 2
Fold the square in half diagonally, then in half more, and then in half.

Step 3
Now we take the scissors and start cutting. First, round off the wider part of our triangle. If you immediately take not squares, but circles, then this operation will not be needed. Then we cut out the cloves at the edge of the flower. And lastly, we need to cut out the sidewalls. Look closely at how the line goes.

We unfold the paper - here is the cornflower flower! Let's cut out such flowers from all the prepared squares.
We glue together small and large flowers.


Step 4
Take a sheet of yellow cardboard. Cut an oval of any size out of orange paper and glue the applique on the cardboard base.
Step 5
We will apply ready-made cornflowers to the base of the applique. Then, taking pictures of the flowers one by one, sketch out their location with a pencil.

Step 6
Let's cut thin (about 0.5 cm) strips-stalks. We will glue them to the applique. It is necessary to glue only in two places - at the intended point, where the flower will later be, and below. Cut off the excess length of the stems after gluing.

Step 7
We will glue the cornflowers onto the base of the applique.

Step 8
Let's make the leaves. Take a 12x4 cm rectangle and fold it in half. Let's draw an outline of the future leaf with a pencil.

Cut out the leaf along the marked line. Let's unfold the piece of paper. Let's make 4-5 of these leaves.
Making flowers out of paper is a very exciting creative process that brings benefits and pleasure not only to adults, but also to children. For adults, this activity allows them to escape from everyday worries and plunge into the world of creativity and fantasy, and it helps children to develop creative abilities. Today we will talk about how to make a cornflower out of paper, because this is not a simple hand-made craft, but a piece of summer that you so want to take with you in the long and cold winter.
Currently, needlework is experiencing a real flourishing - craftsmen and craftswomen of handicrafts are able to create works of art out of nothing. Moreover, paper is the most popular material for various crafts. All types of paper products are used - from newspapers and magazines, which are in every home, to paper towel rolls. In addition, the paper is well cut, glued, crumpled, bent, which gives a huge scope for imagination and imagination.
In order to familiarize yourself with the technique of making this wildflower in more detail, we bring to your attention a step-by-step master class "Corrugated paper cornflower flower".
DIY workshop on creating a cornflower from corrugated paper
Required materials and tools:
- Corrugated paper in green, blue and dark blue colors;
- Wire;
- PVA glue;
- Semolina;
- Scissors.
Cut out a strip 2 cm wide from dark blue corrugated paper, cut one side of it in the form of a "fence" and twist its sharp ends into thin tubes with our fingers.
We take a wire about 1 mm thick, from which we will make a stem, drip PVA glue onto one edge and twist a strip with thin tubes around it.

The core of the flower is ready. We put it aside so that it dries out, and we ourselves proceed to the manufacture of the remaining parts.
We take a sheet of blue corrugated paper, fold it in half, cut out a 3 cm strip and again cut one edge of it in the form of a “fence”.
These will be the outer petals of our flower. Cut them into pieces of three wedges and twist them around a thin wire. At the same time, we do not leave the wire inside each petal - it only serves as a support for more reliable paper curling.
You can also use templates of different sizes for the outer petals - they will make the flower more realistic.

Let's start forming a flower. To do this, we take the blank of its central part and begin to glue the petals evenly in a circle, while forming the base of the flower, additionally securing the petals with a thread.
While the flower with the base dries, we make the leaves. To do this, we glue a sheet of green corrugated paper in two layers, then glue this sheet again by inserting a thin wire inside, which will serve as a vein of the leaf (we leave a small tail outside to fix the leaf on the stem).
Cut out the leaves for the flower in such a way that the vein wire is located approximately in the middle of the leaf.
We screw the finished leaves onto the stem as you like best - you can arrange the leaves opposite each other, or you can also staggered. After that, we cut out a long strip of about 1 cm wide from green paper, coat it with glue on one side and wrap it on the wire, starting from the bottom and paying special attention to the places where the leaves connect to the stem.

Now we need to shape the base of the flower. To do this, take a glued sheet of green paper (from which the leaves were cut out), cut out a strip about 1 cm wide from it, turn it into a "fence" and wind it on the base of the flower.

The last step in making a paper cornflower will be the formation of pollen on the stamens, from which the central part of the flower is formed. To do this, pour a little PVA into a container, carefully dip the core of the flower, first in PVA, and then in semolina. The cornflower flower has become with pollen on the stamens.
In such a simple way, you can make whole bouquets of various flowers for your home, which will perfectly fit into any interior and fill the house with summer warmth and sunlight. In addition, even small children can be involved in the manufacture of such flowers - such work perfectly develops the creative abilities and fine motor skills of the child, and joint creativity has a good effect on further relationships between children and parents.
Related videos
In conclusion, we suggest that you watch a few videos on how else you can make cornflowers from the most ordinary paper quickly and step by step with your own hands to please your loved ones with original summer presents in a cold winter, or just to get away from everyday affairs and give free rein to imagination.
The development of fine motor skills is of the utmost importance. The projection of the hand, located near the speech zone, accounts for about a third of the area of the motor projection of the cerebral cortex. The development of speech is in direct proportion to the development of fine motor skills. Paper crafts are great training. We offer a master class on the creation of cornflowers - quite difficult to manufacture. Make them together with your child - a fascinating creative process and the result will delight children.
To make cornflowers with your own hands, you will need tools and materials:
- deep blue and green corrugated paper
- small scissors
- semolina
- PVA glue
- thermo-glue
- cardboard
- tape tape
- pencil
- wire
If there is no tape, replace it with glue and paper. If there is no thermo-glue, we replace it with another resistant and bonding metal (PVA will not glue reliably to the wire, but "Moment" is completely).

1. Draw a pattern of large cornflower petals on a piece of cardboard.

2. Cut out the template.

3. Prepare a strip of blue corrugated paper. We cut it into pieces 3-4 cm wide.

4. We apply a template to the leaves and cut out the blanks of the petals.

5. Create small stamens - they will be in the middle of the flower. We make many cuts on the strips of blue paper.


Paper cornflowers
Paper cornflowers
6. Twist the ends of the fringe with your fingers.

7. Wrap the prepared piece of wire with tape or a strip of green corrugated paper.


Paper cornflowers
Paper cornflowers
8. Glue a strip with thin stamens to the tip of the stem.

9. Apply a small amount of PVA glue to the tips of the sticks.

10. Sprinkle the stamens with artificial pollen or semolina.

11. While the glue dries, give the large petals the desired shape. To do this, we stretch the petals to the sides to get a convex shape.

12. Twist the base of the petals.

13. Glue the cone-shaped petals to the bottom of the stamens. We gently straighten them.

Many people associate summer with a variety of flowers, especially wild flowers. Cornflowers are one of these plants. However, what if you want to give such a flower, but there is no way to pick or buy? We suggest you make a paper cornflower with your own hands. The article will offer options using different materials.
Simple manufacture
It is the best fit for joint creativity with children. For the master class we need:
- colored paper in blue, green shades;
- compass;
- scissors;
- glue.
We take blue paper and cut out three circles, the diameter of which is 8 cm, and seven - Ø 6 cm. You choose the combination of colors for large and small circles yourself. We fold each circle three times in half and using the template below we cut out the petal, and at the base we do not cut it to the end.

Naturally, we make our own templates for each size of the circle. Expand the resulting flowers. Using scissors, slightly curl the petals inward. We glue the large to the small in the middle.

Make different options for assembling flowers. Also cut out a stem 10-12 cm long from green paper, and leaves 5-6 cm long. Glue all blanks to the base.
It could be a picture or a postcard, for example.
Second way

Prepare corrugated paper of blue, dark blue and green colors, wire 0.3 mm and about 1 mm, PVA glue, semolina and scissors.

We cut out a strip of paper of a dark blue shade, the width of which is 1.5-2 cm.Cut teeth on one of its edges, which we twist with our fingers. Now we drip glue onto one end and attach a thick wire, it will act as a stem.

Let's put the workpiece aside for now. From corrugated paper of a blue shade, cut a strip 6-7 cm wide and fold it in half lengthwise; to make it more natural, it can be folded so that one edge is slightly higher than the other. We also cut out the edge in the form of triangles.

You can wrap the entire strip around the finished base. And you can cut into sections and attach one by one.

Cut out long leaves from green paper, glue a thinner wire to their base and attach it to the stem. We glue the stem itself with a strip of green corrugated paper.


As a finishing touch, dip the ends of the core into glue and semolina.


The third option


To begin with, we take black threads and wind them on four folded fingers at 50-60 turns. Then we remove from the hand and bandage in the middle.

Cut the side folds, making it look like a brush. This will be our middle ground.

Cooking the peduncle. To do this, cut out a strip of about one centimeter wide from green corrugated paper and wrap a piece of wire with it.

Drop glue onto the center of the middle blank and attach it to the top of the stem. Better to use a hot glue gun.

Dip the ends of the stamens first in PVA glue, then in semolina.

Let's start making petals. For the first row, cut out a strip 25-30 cm long from blue corrugated paper and fold it three to four times, having previously smoothed the folds of the paper with your fingers. We cut the top edge, making a fringe.

Having expanded the strip, we twist the ends of the fringe into flagella.

Now we start to prepare the outer row of petals. For it, cut out a strip of blue paper 35-40 cm long and wider than the previous one. Smooth and fold six times.

Cut the edge into small triangles.

We start directly assembling the flower. To do this, we wrap the bases of the stamens, first with a strip of the inner row, then the outer one. For greater splendor, the strip of outer petals can be folded into an accordion. We use glue, PVA can be used. For greater reliability, we wrap the finished flower with a thread.


Now you need to refine the base of the flower. We simply wrap the bottom of the flower with a strip of green corrugated paper and glue, smoothly moving onto the stem. Cut out long leaves from the same paper and attach them just below the bud.


We make another such flower and one, only with inner petals. We make a bunch.

Cornflower with candy

We will need:
- blue corrugated paper;
- candy;
- foil;
- scissors.
Cut out a square with sides of 7 cm. Cut out small triangles along the upper edge.

We make three such blanks. Then, on each from the toothed edge inward, but not to the end, we make incisions.

Each resulting petal in the middle, we make more cuts of 0.8 cm. We give each a rounded shape, stretching from the middle with our thumbs.

Now let's get to the candy. To do this, cut out a segment from the wire and wrap a loop at one end. Then we wrap the candy with a square of foil with sides of 10 cm.At the same time, we attach the wire.


We attach the first row of three blanks of petals to the base of the candy using a thread. With the second row, we attach the same number of blanks, but fasten them in a checkerboard pattern with respect to the previous ones. And one more row.


The stem can be closed with green thread. We make as many flowers as you need.
It will turn out to be a beautiful and sweet gift.
Below will be a selection of videos on making cornflower flowers from paper.
Related videos