Rosette from a ribbon. Steps to make such a rose. For work, craftswomen will need
Do-it-yourself roses from satin ribbons
Modern needlewomen have long liked to do everything with their own hands, they especially liked satin ribbons and flowers from them. This is understandable, because these miniature flowers, namely ribbon roses, will delight everyone. They can be made with your own hands, but at the same time, without spending a lot of time and money. Roses from satin ribbons adorn everything that is surrounded by them. It can be both clothes and hairpins, as well as festive gift wrapping. In general, satin ribbon roses are a versatile decoration that will dilute your life.
In order to make such a cute little thing, you do not have to be an experienced craftsman, even a beginner lover of needlework can do it with your own hands.
Our master class (mk) for beginners will tell you how to make beautiful roses from satin ribbons. And photos and videos will help consolidate the lessons of the mastery. Let's start learning how to make roses from satin ribbons with our own hands.
Required inventory
Our lessons will be almost the same, so the material you will need is basically the same. A distinctive feature will only be the color scheme. To conduct a master class, we need the following fittings:
- pink ribbon, preferably satin;
- sharp scissors;
- needle and thread;
- a lighter or matches, with their help, we will burn the flower so that it does not begin to bloom;
- pencil, ruler and paper, they will help us in creating a sketch;
- glue;
- felt.
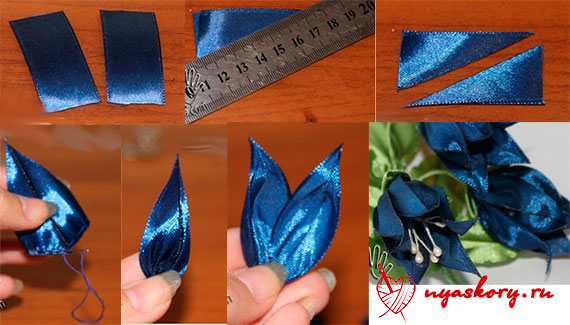
Kanzashi rose
To create a kanzashi rose, we need a pink ribbon, ninety centimeters long and 6.5 cm wide.Let's start kanzashi lessons:
- a pink ribbon is needed, which we fold lengthwise into two halves, the seamy side should be inside;
- make a basting on one side of the tape, it is desirable to do this all at some angle of 45 degrees;
- do not cut off the thread, but continue basting until the very end;
- pull the thread so that you have a pink ribbon coming out like an accordion;
- in order for a rosebud to form, wrap the corner, stitching it several times;
- now, it remains only to twist our assembled satin kanzashi ribbon around the bud. While performing such manipulations, be extremely careful, correct the central part of our work, and fix its turns. Only then will the kanzashi rose and its assembly look beautiful and attractive.
Remember to make the seam as close to the center as possible.
After your satin ribbon rose is almost ready, secure it again with small stitches. Now you are convinced that the kanzashi rose is also suitable for novice craftsmen who can easily make it with their own hands.
Our first master class, successfully completed, move on to the next. If you have not figured out enough in this matter, you can view current photos and videos in order to consolidate these lessons.
At thrifty craftswomen, you can always find remnants of unused ribbons, beads and threads in the bins. This is a good habit and will play into your hands. Since, even from the remnants of material and ribbons, you can make wonderful kanzashi things with your own hands. Let's, step by step, try to repeat our lessons.
Making a rose from the remaining ribbons
Before you start a master class (mk), decide how many and what scraps you have left. Since a piece of tape should not be less than ten centimeters. If it is less, then the rose will not turn out lush. The shade of a rose from ribbons, of course, is best done in a delicate color, and a pink ribbon is best suited.
Let's move on to repeat this master class, so:
- we start by taking a pink ribbon and forming a bud. We do it this way, bend the end of the tape and pin it with a pin, sew it with a thread;
- we do the other end, step by step, in the same way as the first;
- we start making petals. The rules for their formation are exactly the same as in the bud. Only in this case, we do not sew with a thread, but we sew stitches along the entire length;
- pull off the ribbon and wrap it around the rosebud, we have the first tier of petals;
- in the same way, we make the rest of the petals, fixing them at the base.
And we have overcome this stage. And for those who have not fully understood our lessons, we recommend that you view photos and videos on our portal.
And finally, our final master class, in which we will learn how to make satin roses for a bouquet.
Roses for a wedding bouquet
First, we need to do the main part. For this, we need felt. On it, we will draw a circle of 6-10 cm. Cut out a circle with scissors, and in it we delete another small piece.
We begin by laying out the satin ribbon. Fold it, wrong side inward, to form a square. It is necessary to sew in the central part with a thread. Hold the cone with one hand, and with the other hold the end of the tape and place it on the base, bending it 90 degrees. You should have a square, and a triangle on it. Hold the triangle with your hand, and do the same manipulations. Depending on which diameter you choose, the number of such movements will continue.
After you can make several of these flowers, we proceed to the formation of the bouquet, and it is done in this way:
- for the handle of the bouquet, we need a few pencils tied together with a satin ribbon;
- to them, with the help of glue, we attach a foam ball or a lump of paper wrapped with tape. On it, we attach our roses, decorating them with pearls;
- we have got a wonderful wedding bouquet that will look great in the hands of the bride, as in the photo.
Our tutorials for beginners are not as difficult as they seem. We hope that you will like the master class offered by us. We invite you to watch an interesting video, and the photo can be seen on our website.
Video: Kanzashi Flowers
Master class "DIY artificial rose from silk ribbons"
Karaeva Tatyana Aleksandrovna, teacher of additional education MBOU DOD "CDOD" s / p "Rovesnik" Prokopyevsk, Kemerovo region.Description: this master class is intended for children of middle and senior school age, teachers of additional education, educators, and simply creative people who love to create something special with their own hands.
Purpose: a gift for any holiday
Target: making artificial rose flowers with your own hands.
Tasks:
to acquaint with the technique of making roses on a wire;
to consolidate the skills and abilities of working with scissors, a needle and a burner;
to teach how to use a soldering iron for buns, a mold;
develop artistic and aesthetic taste;
develop creativity, fantasy, imagination.
Preface to work
Browsing the Internet for making roses from silk ribbons, I came across a job where the master Elena offered to make roses from satin ribbons for a boutonniere or as a decoration in a hairdo.
I really wanted to make life-size roses on a long stem with foliage, so that the rose would be like living. Having made a test copy, I showed it to the children. The children liked the rose, they immediately offered to make artificial flowers and give it to the veterans for Victory Day on May 9. Every year we go to the veterans' house with our children to congratulate grandparents on the Victory Day. Together with the children we made flowers and on the eve of the Victory Day we went to congratulate the veterans. Having made flowers in the classroom of the circle, the children presented not only the veterans, but also their relatives and friends for various holidays: the anniversary of their parents, the birthday of their grandmother, the birth of their brother, someone made roses just for beauty in a vase. Children's works turned out to be bright, colorful, ribbons were of different colors and textures, I simply could not help leaving such beauty for myself, I took pictures. At the end of the outgoing 2014, I decided to make a generalizing master class, maybe it will come in handy for someone at work. After all, roses leave no one indifferent, and a do-it-yourself bouquet of artificial roses made in winter will remind you of summer, revive the interior of your living room and will delight you with its beauty for many years. No wonder the rose is considered the most beautiful flower, the queen of all flowers. This reputation, earned by the flower in ancient times, has not lost its relevance today.
When did the first roses appear?
“According to archaeologists, a rose has existed on Earth for about 25 million years, but it has been grown in culture for more than five thousand years, and for a longer period of this time the rose was considered a real sacred symbol, the aroma of which has always been associated with something divine.
The first mention of growing roses in Russia dates back to the beginning of the 16th century. It is assumed that they came to Russia through the Balkan Slavic tribes. They became widespread only under Catherine II. By the end of the 19th century, roses began to be grown throughout the European part of Russia "
Internet. Wikipedia.
We pass to the master class, for work we need
Tools and materials:
It is very important that materials are given per rose.
Silk ribbons (5 centimeters wide) in four colors for rose petals:
light pink - 48 centimeters long;
pink - 48 centimeters long;
dark pink, 36 centimeters long;
dark green 5 centimeters wide and 40 centimeters long, for rose leaves;
Burner for cutting ribbons so that the edges of silk ribbons do not unravel;
Soldering iron for buns (buns are devices for making artificial flowers) for heating the mold.
A mold for giving a textured surface to rose leaves by heating.
Corrugated Wire Wrap Paper (0.7 centimeters from the entire paper roll)
Pink threads and a needle for stitching rose petals
Thick aluminum wire for a peduncle (stem) of a rose 40 centimeters
Thin wire for leaflets 90 centimeters
Large scissors for cutting corrugated paper
Sintepon for the formation of the ovary of a rose bud
Metal ruler for cutting tapes with an electric burner
PVA glue for lubricating rose stalks
Instant crystal glue for gluing leaves to the base and the sepals to the rosebud.

Before starting work, let's repeat the structure of the flower.

1 - stamen, 2 - petal, 3 - pistil, 4 - sepals, 5 - receptacle, 6 - peduncle, 7 - anther, 8 - filament, 9 - stigma, 10 - column, 11 - ovary.
Well, don't forget about safety precautions:
Safety when working with hand needles and pins
1. Make sure there are no rusty or bent needles and pins
2. Sew with a thimble.
3. Do not put needles and pins in your mouth, do not stick into clothes
4. Do not leave needles and pins on the work surface of the table
5. At the end of the work, remove all needles and pins in special boxes and pads
Safety when working with scissors
1. The scissors should be well adjusted and sharpened.
2. Store the scissors in a specific place (box or stand).
3. When using scissors, be as careful and disciplined as possible.
4. When passing the scissors, hold them by the closed blades.
5 Place the scissors on the right with closed blades pointing away from you.
6. When cutting, the narrow blade of the scissors should be down.
Safety precautions when working with an electric burner.
1. The electric burner can only be connected to the network when it is in good working order.
2. When working, do not press the needle strongly.
3. Do not lean close to the place of burning.
4. Keep hands, clothing and wires away from the hot needle.
5. Do not leave the burner unattended when plugged in, as the needle is hot, this could cause a fire.
6. It is impossible to determine the degree of heating of the device by touch.
7. When working with the electric burner, periodically disconnect it from the mains to cool it down (30 minutes operation; 15 minutes break).
8. Do not overheat the needle of the electric burner.
9. After finishing work, the electric burner must be disconnected from the electrical network.
Safety precautions when working with a soldering iron for buns.
1. Prepare and check the operation of the soldering iron. Take accessories (mold). Especially make sure the soldering iron handle and wires are secure.
2. When working, use a soldering iron carefully, do not drop or use it as a hammer.
3. Do not touch the heated surface of the mold and the soldering iron with your hands.
4. Use tweezers to remove the leaves from the mold.
5. Place the hot soldering iron on a non-flammable surface when you are not working. Do not pull the plug from the socket by the wire. Turn off the soldering iron if you need to leave your work area.
6. After finishing work, carefully switch off the soldering iron. Clean up the place of work. Let the soldering iron and mold cool down and put back the tools you used.
Work sequence
1. Mark on a sheet of A4 paper a 4-inch segment of 12 centimeters, outline the marking boundaries with a marker for better visibility and place it under the glass on which we will work.

2. We cut pieces of ribbons of three colors using an electric burner and a metal ruler on the glass according to the marked sheet, this saves time and does not allow the silk ribbons to crumble.

3. The ribbons are cut. Light pink -4 pieces; pink - 4 segments; dark pink - 3 segments; in total - 11 segments of 12 centimeters. The ribbons were chosen in three shades of pink to make the rose look more natural.

4. We begin to sew the petals. We take one piece of light pink tape and bend it lengthwise by 1 centimeter, pin it with a pin.

5. Then we wrap the right corner of the tape down, pin it with a pin.

6. Wrap the left corner down, pin it with a pin.

7. Sew the folded corners with a small basting stitch with a needle and thread.

8. We tighten with a thread and fasten. The first petal is ready.

9. Perform the remaining 9 petals in the same way, leaving one piece of ribbon for the rose set. All 10 petals are ready.

10. Now we carry out the ovary of the bud. We wind a piece of padding polyester onto a thick aluminum wire, tighten the lower part tightly, and fasten it with a thread.

11. Take a piece of light pink ribbon and wrap it on top of a padding polyester in the form of a bud ovary. First fold the tape across, insert the wire with padding polyester and tuck the edges. We tighten the tape with a thread and a needle around the wire, sewing to the tightly tightened lower part of the padding polyester.

12. With the remaining end of the thread, tightly wrap the edges of the tape. The rosebud ovary is ready.

13. We begin to sew the rose petals, first all light pink, then pink and finally dark pink, sewing each petal in a circular (around the wire) to the bottom of the bud's ovary with a padding polyester inside.
Sew on the first light pink petal, positioning it opposite the fold of the rosebud ovary.

14. Sew on the second light pink petal, placing it opposite the first petal.

15. Sew on the third light pink petal, positioning it opposite the second petal. And we continue to sew the rest of the petals in the same order.

16. Sew on the fourth and fifth rose petals

17. Sew on the sixth and seventh rose petals

18. Sew on the eighth and ninth dark pink petals

19. And the last we sew on the tenth dark pink petal. The rosebud is ready.

20. We proceed to the execution of two complex rose leaves, each of which consists of three separate leaves glued to a wire base. Using large scissors, cut a strip 0.7 cm wide from a roll of corrugated paper

21. Cut off three pieces of 15 centimeters from a thin wire and twist the so-called base of a complex sheet for three leaves, leaving the length of the middle wire to twist 6 centimeters, the other two 4 centimeters each, twist the ends of the wire together into a bundle. We wrap the base of three twisted pieces of wire with a strip of corrugated paper, starting with the middle one, moving to the left wire, reaching the end of the wire, glue the edge of the paper with PVA glue. Then we begin to wrap the right wire with corrugated paper and go down, reaching the end of the wire, glue the edge of the paper with PVA glue.

22. The base for a complex sheet, consisting of three leaves is ready. In the same way, we make another wire base for three leaves.

23. We make sheets for the base using a burner with a thin needle on the glass. Along the green ribbon we put a template of a rose leaf measuring 3 centimeters wide and 4 centimeters long. We burn all six leaves along the contour and from the scraps of the ribbon we burn out small leaves 2.5 - 3 centimeters long, arbitrarily for the sepals of the rose.

24. Blanks of leaflets are ready.

25. We take a soldering iron for buns (buns are devices for making artificial flowers), insert a mold into it, plug it in and heat it up.

26. On the lower part of the mold we put the blank of the leaf and press it down with the upper heated part of the mold.

27. After processing the leaves in a mold, they acquire a textured surface with veins, like real rose leaves. The leaves are ready.

28. We turn the leaves over to the wrong side, in the middle of the leaves there are depressions for gluing the wire base. We squeeze out the glue "moment crystal" with a thin strip directly into the formed recesses (in the middle) of the leaves.

29. We wait for a while until the glue dries, then glue the leaves to the wire base.

30. Seamy side of leaves on a wire base.

31. In the same way, we perform the next complex sheet, consisting of three leaves. Two complex rose leaves are ready.

32. We begin to make out the receptacle of our rose. We wrap the stalk of the rose with a strip of corrugated paper. Having retreated from the rosebud down by 7 centimeters, we begin to wrap the pedicel from bottom to top and from top to bottom, winding the paper on the wire until we get a receptacle, expanded near the rosebud.

33. The receptacle is ready.

34. We continue to wrap the stalk with corrugated paper 10 centimeters downward from the rosebud. Take a complex rose leaf and thread it tightly to the rose stalk.

35. We wrap the pedicel with a strip of corrugated paper, going down another 5 centimeters, we wind another complex sheet with thread.

36. Wrap the rest of the rose stalk in corrugated paper.
A universal selection of gift ideas for any occasion and occasion. Surprise your friends and loved ones! ;)
DIY satin ribbon flowers
Here are 15 cool (and easy) ways to create wonderful flowers. You can take each of the photo master classes with you by copying the corresponding image.
Let's start with the most romantic and popular plants among girls - roses.
Roses from ribbons
Stop buying expensive store roses! Let's learn how to make them ourselves and save the lion's share of the budget.
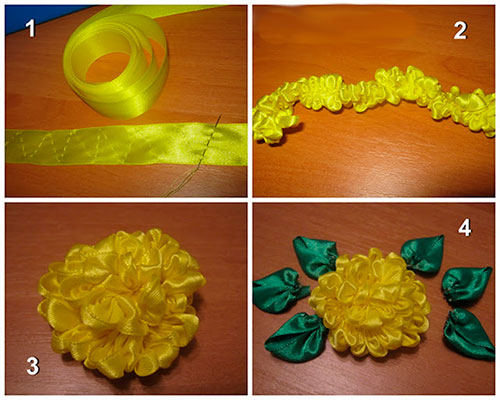
We'll have a few roses today. The first of these is a rose, obtained by folding triangles as you go. To make it, prepare a piece of ribbon at least 2 cm wide and at least 50 cm long.
Unreported
Form the center by bending one end as shown. Twist, secure.
Twisted rose
Distantly, in the way of creation, it resembles the previous one (at least the beginning). After forming the center, rotate the ribbon one by one, twisting it and applying layer by layer. Secure at the end.

Kanzashi
The peculiarity of this rose is that all its petals are processed separately.

From braid
Finally, a rose, which is obtained by interweaving two wavy ribbons. After weaving, they need to be swept along the edge so that they do not disintegrate. And then just roll up.

Flowers from kanzashi ribbons
In general, kanzashi is originally a "hair ornament" from Japanese. It went back to the days of geisha, which, among other things, were distinguished by their skill in handicraft.
There are two petal shapes in kanzashi - round and sharp. The rest is already subspecies. So all flowers to some extent can be attributed to this type of art.
Hibiscus
An exotic guest for whom you will need a wide ribbon (about 5 cm wide), base and stamens.

Just a flower with 5 petals
Sew the center to make pointed pieces. Fold the future petal in half and hem from the inside. Prepare 5 pieces, then string. Decorate the middle.

Bell
For the bell, prepare the petals according to the photo. To fold them, fold the petals with high, straight edges towards each other and sew the edge (glue the top a little). Pull the thread, collect the resulting parts, decorating with stamens or beads.
Seven-flower
For it, you need to prepare 7-9 petals using the classic method used in kanzashi. Then all the petals are collected on a thread, if necessary, glued together on the sides.

Aster
Just a dream, not a flower in terms of ease of execution. To make an aster, take the tape and zig-zag the basting stitch across the entire width. Pull up, roll up. Everything
Pion
For the peony, take three ribbons: two for the petals, one for the green leaf.
Please note that the peony has two parts - a more closed bud and opening petals.

Color workshops in video format
Not everyone likes to learn photography, so I have prepared some flower-making tutorials for you in video format.
chamomile
To create chamomile, you will need many, many burnt petals (pieces of tape 0.6 cm wide and 3.5 cm long), as well as a base - a circle of cardboard.
Callas
One of the easiest plants in this article. Lighter, perhaps, only the aster.
Sunflower
By the principle of creation, it is very similar to a chamomile, but here you have to tinker a little more with the petals.
Star
An elegant flower consisting of 5 elements and a center.
Snow tale
Flower of extraordinary beauty, made of a wide ribbon. It was difficult to attribute it to any species, so let it be called so
A wonderful effect will be obtained if you combine several types of ribbons from one series. This is easy to do with modern sets of up to several dozen ribbons in the same style.
On this I say goodbye to you. See you soon! Be sure to tell me if you know any other ways to create flowers.
P.S. Subscribe and learn to give cool gifts
Best regards, Anastasia Skoreeva
Making roses from satin ribbons is not as difficult as it might seem to a beginner. Similar beauty can be used to decorate lambrequins, curtains, sofa cushions. Yes, anything! Well, it looks very gentle and elegant.

Roses can be used as brooches, to show off on a headband, hair tie, even beads. In a word, the scope of application of these satin roses is very wide.

Consider several master classes for making roses from satin ribbons.
Gorgeous rose from a wide ribbon

To work on this little masterpiece, we need:
- Long pink satin ribbon
- Sharp needle
- Pink threads
- Scissors

We take our satin ribbon by the edge. We bend it at an angle of 45 degrees so that a small tail remains. We sew the fold over the edge.

We bend the tape towards ourselves again and also sew over the place of the fold with threads. At this point, we should have a trimmed triangle.

Bend the ribbon again and the shape begins to resemble a square. We sew this inflection too.

Finally, bend one last time to get a square. Most of the tape remains loose on top.

We turn the square over so that the free end of the tape is at the bottom. On the right side of the square, you can see the tail, which we made at the beginning of our work.

We turn the square over so that the free tape falls on our fingers.

And again we begin to bend the tape at an angle of 45 degrees, but no longer trimming the edge, as before, but simply holding it with our fingers.

After 4 turns of the tape over the first square-base, we will get another, already three-dimensional square.

We do this path several more times until we get several volumetric squares - future petals.


Fold up a "stack" of squares until the tape runs out. Twist the remaining small tip into a flagellum.

We fill the edge of the flagellum into the core of the "stack" of squares.

The flagellum should come out from the back of all squares.


Now the squares need to be tucked a little so as to simulate the arrangement of the petals in the rose.

We twist, scroll, straighten them with our hands until we achieve the maximum resemblance to a rose.

Turn the rose over to the other side. Sew the remaining tail of the ribbon more tightly to the flower. You should get such a slightly convex circle. As soon as it came, cut off the rest of the ribbon.


Our beautiful flower is ready!

Yes, you can get a little confused at first, but after your debut attempt at creating a satin rose, you will make flowers like this very quickly.
Rosette with elastic
The rosette can also become a hair ornament. A rose with an elastic band looks especially impressive. Let's try to make a rose from a satin ribbon, and then attach it to an elastic band.

We also need a medium width satin ribbon. The color is at your discretion.
We put the tape on the table. We throw 5-6 centimeters from the left edge inward.

Then we bend the tape towards ourselves at an angle of 45 degrees and fix the bend with a pin so that the edge of the ribbon looks down.

Bend the tape up and repeat the same steps until a square is formed. Fasten the folds with pins.


If we turn the square over, we get four small squares looking at each other.

We take a needle and sew all sides of our square. At the same time, we do not take out the pins yet.

Now you need to carefully pull off the thread so that the base becomes rounded, that is, the original workpiece will turn into such a small round bag with a hole in the bottom.

We turn the rose over to the other side. We straighten it, we got a neat, round bud.

Take the next tape. We put the ends of it crosswise so that a circle-loop forms at the top. We fix the intersection of the ends with a pin.

As a result, we will get a shape that looks like a trapezoid. Its sides also need to be sheathed.

Again we pull the thread, again we get a voluminous bag. But already there is no hole.

So we got two buds: a large one and a small one.

We insert a small bud into a large one, closing the hole.

The rosette is almost ready, it remains only to make a leaf. For this we take a green satin ribbon. We bend the edge so that a cone is formed.


Use a pin to fix the place at the base of the two cones. So we got the leaves for the rose. Sew them to the finished bud.

It remains only to fasten the rosette with an elastic band. Take a small piece of felt in the color of the elastic so that it covers the place where the rose is fixed to the elastic.

Braid a braid or naughty ponytail and secure it with your new homemade rubber band. Very gentle, feminine and original. Hardly anyone would guess that such a rose from a satin ribbon was made with your own hands, and not bought in a store.

Bouquet of roses
And one more original way of making roses from satin ribbons. In order to make a dazzling bouquet of these roses, you need to make each flower separately.

To twist one such rose, we need a round base. It can be cut out of thick burlap or folded in several layers of gauze (to make it denser, starch it), as well as from felt. Here's what we do next:
Cut out a circle with a radius of 3-5 cm (at your discretion).

In the circle we mark a dart segment, it needs to be cut and sewn, as a result we get a small cone.

If the dart is made large, the cone will turn out to be high, which makes the flower from ribbons more voluminous.
We put a satin ribbon on the cone so that its edge with a square covers the top of the cone.

Sew the tape to the cone.

In a familiar way, we begin to bend the tape in a circle so that the result is a square.

Fix the folds with your fingers.

A flower bud begins to emerge from these three-dimensional squares. The more squares, the more voluminous it turns out.

Carefully spread the petals with your hands and then the rose will be incredibly beautiful!

To create a bouquet from such roses, you must first make a base for it. It is easy to make a handle for a bouquet from old felt-tip pens, folded together, pasted over with tape and rewound with satin ribbon. Fix the foam ball on the base of the handle with hot glue. If there is none, you can make a papier-mâché ball or simply crumple the paper so that a ball is formed and glue it over with tape. It remains to stick our beautiful roses on the ball. Such a bouquet can be given as a birthday present, used as a handmade wedding bouquet, or fixed in a pot - make a topiary - and put on the windowsill.
There are really many ways to use such roses. They can be combined into bouquets, or you can make incredibly beautiful head jewelry out of them.

Recently, wreaths made of artificial flowers have gained incredible popularity. Most often, they are a satin headband with an elastic band, the top of which is decorated with a floral volumetric applique. It is really very fashionable, stylish, and for long-haired girls it is just a godsend! You will immediately become like a beautiful fairy who, by some miracle, wandered onto the ground. Such wreaths are not so cheap, so making them with your own hands is not only pleasant, but also economically profitable.


You will need to sew the satin headband itself, matching the color of the flowers that will be on it. And then sew to it roses from satin ribbons, which we have already learned how to make. At the same time, you yourself regulate the size of the rose, the number of them on the bandage and the location. And if you can make a rose from a satin ribbon, then it will not be difficult for you to design such a delicate wreath.

Surely you have girlfriends who would be happy to see such a piece of jewelry on one of their wardrobe items. And you can safely call yourself a designer - after all, you have created such beauty with your own hands. Satin ribbons are cheap, beautiful and very affordable material.

We continue our acquaintance with different ways of making roses from ribbons. In this ribbon embroidery lesson, we will get acquainted with another version of a rose based on assembly along basting stitches. And if in the “Lady” rose the basting was done along the U-shaped lines, then in this rose we will make the basting in a straight line.
Necessary materials:
- tapes of different widths (for example, 10, 20, 30 and 50-60 mm)
- thin needle (for example, beaded)
- thread to match the ribbon
- scissors
- lighter
- possibly sewing pins

Option one: tender of tender
This option for creating a rose from satin ribbons is the simplest of those presented in this master class, but this does not detract from the beauty of a rose!

We take a tape 25-30 mm wide and 70-90 cm long, cut the corners at an angle of 45 °, burn the edges with fire.

On a thread to match the ribbon, we tie a reliable knot and lay a basting seam along the edge of the ribbon, starting from the corner and ending at the corner.


We make the assembly according to the outline, evenly distributing it, and fasten it to the corner with several stitches. We do not cut the thread.


We begin to twist the tape, remembering to fasten with several stitches at the base.
You need to twist so that the front side of the tape is inside the tube.


At this stage, the workpiece can be sewn to the fabric and further shape the rose, fixing each petal directly to the fabric.

Here's a rose we got.

It can be used for decoration or sewn to fabric in embroidered work.

As an experiment, you can make the same rose from a wide ribbon (6 cm or more). Fold it in half along the edge, lay a basting seam, remembering to make the corners at an angle of 45 °. Further, the manufacturing process is the same as for the 30 mm tape. Such a rose will be even more magnificent.

Option two: extraordinary two-tone rose
Using two ribbons, one of which is narrower in width and in a contrasting color, you can make a two-tone rose, with an emphasis on its middle.

I have an orange tape 12 mm wide and a red tape 20 mm wide, 70 cm long.

Now you need to overlap the ribbons with a basting seam across the face with a thread to match the ribbon that will be on top. I have an orange ribbon on top, sweep it off with an orange thread.


This is how it happened on the seamy side.

Now you can lay a basting seam for assembly and then twist the rose. I want to show you how you can make a flower even more natural.
We wind the sewn ribbons on a ruler (or any other device) or just fold them, the fold width is 4-5 cm.

Carefully remove from the ruler, align the edges and cut off the corners of all layers of the tape. Singe the cuts along the entire length of the tape.

You can cut not only the corners, but also the edge to form a beautiful petal.

We twist it tightly at either edge of the ribbon, forming the center of the flower, and fix it with several stitches.

Place a basting stitch along the edge of the orange tape. At the end of the tape, we make a basting at an angle of 45 °.

We do the assembly along the basting seam.

And we collect the rose as in the first version.
The rose is ready. Sew, if necessary, to the fabric.

For clarity, a video from Evgesha Ryzhkova.
Option three: luxurious blooming rose
This rose is also made on the basis of a basting seam, but before laying a basting, the ribbon must be folded in a special way.
The manufacturing process is somewhat more complicated than the previous two options, but the beauty of this rose exceeds all expectations and you will not regret the time spent.
For work, it is better for us to prepare a soft tape 25-60 mm wide (I have a 50 mm tape), it is difficult to determine the exact length, it is better not to cut off the tape from the skein right away.
The narrower the tape, the smaller the piece of tape we need. Roughly, the length of the tape should be 20 times its width. For example, if the tape is 5 cm wide, then for work you need to take a tape about 1 meter long.
We bend the corner as in the photo.

We fasten it with several stitches.

Form the center of the flower by twisting the ribbon. Fasten with several stitches with thread to match the ribbon.

Now we need to bend the tape so that the edges connect. We bend the BC edge to the AB edge.


And along the edge line (DE) we fold so that the edges and fold are outside.


Sew all three layers with a basting seam: edge, fold and edge.

We continue to work, connecting the edges, folding the tape and stitching with a basting seam.


You can secure all three layers with a sewing pin before sewing.

The photo below is an intermediate stage of work. The workpiece must be wrapped in a circle.

Two such circles are enough to complete this rose. This is the kind of blank you should get.

Now you need to twist it. You can twist it right now, fixing the loops, and get a half-opened bud. This is how it will look approximately.


And you can make a blooming rose. To do this, you need to gather the workpiece along the basting seam.


And twist it, fixing the turns. This is how it will be on the wrong side.

Here we have such a blooming beauty!

The video from Anastasia Kulikova shows the whole process of making this rose.
Such ribbon roses will undoubtedly become an adornment of your works, whether it be a craft or an embroidered picture!
And finally, beautiful roses made in this way from the ribbon embroidery masters.


