Means for bathing newborns softening water. Water softener for bathing children with atopic dermatitis. Video: how to deal with hard water
To make the design of the garden original and unusual, garden figures are placed in it. Garden gnomes are some of the most popular models for these figures. The purchase of which is a rather expensive undertaking, therefore it is much cheaper to make them yourself. We will consider how to make a gnome for the garden further.
The installation of nymphs, gnomes, foresters in the garden is becoming more and more popular, not only from an aesthetic point of view, but also from a mythological one. It is believed that the gnome is able to protect the garden and all the courtyard from evil spirits, in addition, he has a positive effect on plants, improving their condition.
In addition, the garden gnome will become a real decoration of any garden. In summer, it scares away birds that like to feast on the harvest of fruit trees, and in winter it stands out against the general background with brightness and contrast.
It is believed that installing a small gnome in the garden can bring happiness and a rich harvest, in addition, its owners will become healthier and more successful.
When installing a garden gnome in the garden, you should remember that it must have its own place, which will look harmonious. Therefore, both before buying and before making a garden gnome, it is necessary to study the recommendations that will help determine its location among the garden composition:
1. Draw a plan.
Before you develop a sketch of a garden gnome, try to draw it first. After that, imagine it in the place where you want to place it. Think about how it will look there at different times of the year, in different climates, if a strong gust of wind blows it away. When buying or building multiple garden gnomes, try to make them blend harmoniously in different corners of the garden.
2. Match the background landscape.
Another important element of setting up a garden gnome is combining it with the plants in the garden. Since, if a garden gnome is established in the fall or early spring, then the trees still do not have leaves, and the flowers do not grow yet, so in the summer it may not be visible at all, among a large amount of greenery. The place where the garden gnome is installed should be open on all sides. A decorative fence, flower bed, path, front garden or area near the bench will be an excellent place to install a gnome.

3. General stylistics.
The general style of the garden should be consistent with the style in which the gnomes are made. For a classic style, a standard version is suitable, possibly monochromatic, or made in several color shades. For a romantic garden, a composition of several gnomes, made in soft pink, lilac tones, is suitable. Wooden gnomes for the garden, set in a country-style garden. For the Art Nouveau style, a garden gnome made of metal, marble, concrete or clay is suitable.
Each figure in the garden composition should have its own place. A few figures placed in the wrong garden can spoil even the most exquisite color arrangement. It is advisable to choose garden figures made of the same type of materials, for example, if the fountain is made of marble, then the garden gnome should be the same.
With the right selection of garden figures and their harmonious combination, the garden will become the most favorite resting place for all family members and guests.
Outdoor garden gnome
Buying or making garden figures is becoming more and more popular in the process of decorating both a private house and a summer cottage. The shapes make the territory more attractive. Gnomes, for example, are able to guard peace in the house, and birds or animals complement the overall composition and make the interior fabulous.
Garden gnomes photo:


We propose to consider the main features of the use of garden gnomes in the exterior:
- The easiest way to decorate your garden is to buy finished products. They are based on artificial stone, gypsum or acrylic resin. But, the option of making figures with your own hands is more interesting, since they will be unique in their kind.
- The appointment of gnomes can be primary and secondary. In the first case, gnomes occupy all visual attention, in the second they are an addition to an already existing picture.
- German gnomes come in handy for decorating a rustic garden. Their main function was to scare away birds from trees and fruits of the garden.
- When choosing a garden figure or composition of several elements, first of all focus on the area on which they will be installed and on your own financial situation.
- Garden gnomes will perfectly fit into the children's play area in the garden. They are also often installed near ponds, fountains, flower beds, flower beds, stumps, etc.
- Gnomes in the country - will make its exterior unique and give a sea of emotions to its visitors.

Varieties of garden gnomes
- Gnomes made from natural wood.
The figures made of wood fit very harmoniously into the overall design of the garden. They bring warmth, comfort and joy. To make such figurines, it is recommended to use raw material in the form of logs, branches or driftwood. When constructing such a gnome, a hat made of leaves or moss will perfectly complement the picture.
- Figurine of a gnome made of natural stone.
It will take a lot of effort to independently build such a figure, since here you will have to work with a chisel and a hacksaw. But the result will surprise everyone. After all, gnomes made in this style are distinguished by their eccentricity and exquisite appearance. They look good in a classic modern garden. To complement the overall picture, use the pebbles brought from the lake, they can be painted for a change.
- Polystone gnome garden figure.
This material for making gnomes is new, so it is rarely used when doing this kind of work. Although the products made with it are realistic and attractive in appearance. This material is based on aluminum hydroxide, acrylic resins and additional pigments that make it stone. Gnomes made of polystone are durable, abrasion resistant, resistant to deformation and temperature changes. The only drawback is the too high cost, which is fully justified by the quality of the product.
- Garden gnomes made of plaster.
Plaster figures have always been very popular due to the cheapness of the material and the ease of working with it. The disadvantages of gypsum include its fragility, so such a gnome should not be on the playground. To make a gnome from plaster, you will need a lot of experience in the field of modeling, since it will be very difficult to shape it without experience. Therefore, it is better to make simpler figures from plaster in the form of additional decorations, such as caterpillars, mushrooms, flowers, etc.

- Concrete garden gnomes.
Garden gnomes made of cement mortar are distinguished primarily by their durability. But this will require the presence of a special form into which the finished mixture is poured, waiting for it to dry. Another option is to cover the finished frame with cement mortar. For its manufacture, ordinary wire will be enough. In this case, in order to achieve the plasticity of the solution and a high level of adhesion to the wire surface, it is recommended to add a plasticizer or PVA glue to the finished mixture.
- Garden gnomes based on hay or straw.
Even with the help of ordinary hay, it will turn out to build figurines for the garden. To do this, the material is twisted very tightly in the form of individual parts of the character, which must be made.
- Gnomes from the available means.
As a material for making a garden gnome, ordinary unnecessary garbage, such as old flower pots, basins, a barrel, plastic bottles, tires, etc. will serve. If you draw the body of a gnome on a large barrel and add a car tire on top, in the form of his head, you get a funny garden figurine.
- Use of polyurethane foam.

It is quite possible to make a garden gnome from polyurethane foam, especially since it is resistant to temperature extremes, frost, precipitation and ultraviolet light. To create a garden gnome using this method, first prepare the shape in the form of its skeleton, for this it is recommended to use materials such as wire, unnecessary garbage in the form of plastic bottles, plates, buckets, sticks, etc. The foam is applied in several stages, while each layer must dry well. A utility knife will help remove excess foam. The finished product is painted and varnished.
Master class - plaster garden gnome
The easiest way to make a garden gnome yourself is plaster. This material is resistant to precipitation, cold, ultraviolet radiation. Such a figure will not withstand only mechanical influences, so install it in a place from which it will never fall.

To carry out work on the manufacture of a garden gnome, you will need:
- sculptural plaster;
- PVA construction glue;
- acrylic paints and brushes for working with them;
- varnish;
- compass;
- pencil;
- office knife;
- decorative elements in the form of beads, flowers, leaves;
- forms for working with plaster;
- water resistant glue;
- sunflower oil;
- water.
Instructions for making a garden gnome with your own hands:
- The first step is to take care of buying plaster. Dissolve the gypsum with water according to the instructions. Attention, it is very important to observe the indicated proportions, since an incorrectly diluted solution can affect the strength of the structure.

- Use a rubber or plastic reservoir to dilute the plaster. Mix water and gypsum thoroughly, and then add PVA glue to the solution to increase its elasticity and plasticity. The amount of glue for the solution is one percent of its total mass. For example, in a plaster solution weighing 4 kg, you need to add 40 grams of glue.
- If the gnome will be up to 50 cm in size, then the preliminary construction of a structure in the form of a skeleton is not required, the gypsum is poured directly into the figured form. The most convenient are silicone molds; they are sold in any hardware store or on the market.
- It is possible to make an independent form for a gnome, it will be appropriate when you need to make several identical gnomes. Otherwise, it is better to use a purchased form, since its construction will take more than one day.
- Making a large sculpture requires the construction of a metal frame. It is made from reinforcing rods, which increase the stability of the figure. To fix the product on the ground, you need to build a protruding element from the bottom of the gnome.
- Start pouring the plaster of paris solution. First, half-fill the head start, wait for the solution to set, tap on the mold to prevent air bubbles from forming, then pour in the rest. Knock on the mold again, level the surface with a spatula and wait until the gnome is completely dry.
- After that, take the shape out of the mold. To do this, you need to put a piece of a board or lid of a suitable size on the mold. Press it into shape, and flip the shape over.
- This is followed by the process of dyeing the gnome, for this it is recommended to use acrylic-based paints, since they are highly resistant and are able to function normally on the street. In addition, plaster figures are painted with gouache paints, but since they are in the garden, the gouache will quickly wash off in the rain. This paint is appropriate if the figure is under cover.

- Before you start painting, cover the gnome with a primer, after that, to increase the adhesion between the figure and the paint, it is recommended to cover it with PVA glue.
- Use a mosaic for decoration; for its manufacture you will need glass, stone, shells or other objects.
DIY workshop on making a garden gnome
To make a small garden gnome, you need:
- several plastic bottles;
- cellophane;
- scotch tape;
- knife and scissors;
- newspapers;
- egg trays;
- wire.
Take two bottles with a capacity of two and one and a half liters. Connect them together to form a frame. Newspapers will help build your torso, arms and legs. Make a gnome hat, glue the eyes and nose.

Make papier-mâché, for this you need to dissolve paper newspapers in PVA glue and plaster. Next, treat the surface of the gnome with this mixture. Air dry the finished product for five days. Paint and open with varnish.
Such a gnome will decorate any corner of not only the garden, but also at home. In addition, whole pictures or fairy-tale scenes are made in this way.
Have you already noticed that many summer residents use their plots as a place to implement ideas for decorating a garden? Decorative homemade figurines have become widely popular for this purpose.
Let's figure out how to beautifully make a figurine for the garden with our own hands.

What are garden figures made of?
What are garden figures? Often these are cute little creatures made from any materials, such as gnomes, squirrels, frogs or kids.

You choose which one is best for your garden. The main thing is to follow the rule: if your site is small, then the figure should be small.

Making garden sculptures on your own is much more interesting and enjoyable than just buying a ready-made figure in a store. A hand-made product is more pleasing to the eye.

You can make figurines for the garden from any materials. Suitable: stones, wood, metal, plastic, plaster, polystyrene, polyurethane foam, unnecessary dishes or other things.

Now let's take a closer look at what figures are made from these materials.

How to make a garden gnome with your own hands?
The first thing people imagine when they hear about garden figurines is gnomes. This character is popular in our and other countries.

And not in vain - a bright gnome will improve the look of any suburban area. We are talking about two ways to make a little man.

Creation of a gnome from wood. If you have already done wood carving, then you can easily carve a wooden man.

If not, be sure to try it. After that, treat your gnome with an antiseptic - he will delight you longer. Then feel free to apply bright acrylic paints. The gnome is ready!

Creation of a gnome from plaster. The method is a little more complicated than the previous one, but also interesting. First of all, draw your little man on paper, and then make a frame from metal rods according to the drawing. After that, the most important part begins - modeling on the frame.


Give the future gnome the necessary shape using plaster. Then leave the figure for a few days to dry, and then apply paint.


It is worth noting that not only gnomes are made in this way, but also any other creatures.

Making a Styrofoam Duck in 10 Steps
It's easy enough to make Styrofoam garden figurines. It is convenient to work with this material with improvised means, and it is moisture resistant. Consider how to make a simple duck out of it.

Mark with a marker on the foam the outlines of the head, neck, body, wings and legs of the future duck.

- Cut out the blanks. Do this with a quality utility knife, but slowly and carefully so that the foam doesn't break.
- Glue the body parts together in at least five places. Use polyurethane foam or liquid nails as glue.
- Use a knife to remove excess material that comes out.
- Glue it with foam and glue a small tube or bar to the body - this is the future neck.
- Attach the head to it.
- Glue the legs and wings to the resulting shape.
- Cover the duck with putty and leave to dry.
- Sand the resulting sculpture.
- Color the duck.


Other animals are also made from foam. The duck is one of the easiest options.

How to make a garden figurine from scrap materials?
It is very easy to create small sculptures from natural materials such as stones. You only need to paint them with bright colors. So you can create a hedgehog, ladybugs, snake, kitten and other animals.

A wonderful figure for the garden is made from logs, as well as from old things. For example, unnecessary tires or an extra kettle. Funds for such a sculpture will be spent minimal, but it looks attractive.

Advice - garden figures will transform your summer cottage, and making them with your own hands is entertaining and interesting.

The simple tips above will help you craft a figurine, even if you haven't done it before. Unleash your imagination!


Residents of all cities and towns are surrounded by a huge number of concrete sculptures. Probably, most of all the figures were made by V.I. Lenin. Of course, we are interested in something more fun and simpler. Let's get acquainted with the figures for the garden that people made with their own hands and choose the right one for ourselves.
"Grandfather and grandmother are singing this song next to us."Features and properties of concrete crafts for the garden
The main characteristic of concrete sculptures is strength. Moreover, art concrete is not afraid of frost, sun, or moisture.
This is what predetermined the popularity of using the material to create figures on city streets. Crafts from it can be painted, but even without painting, many creations look decent.
With your own hands, from a mixture of sand and cement, often in a 2: 1 ratio, you can make funny figurines for the garden, flower pots, decor for a pond, and more. We devoted another separate material to concrete paths.
During operation, concrete dries for a long time, it can spread. Too thin a solution may crack during drying. But there is time to form the desired surface shape from the material. As a plasticizer, PVA glue or tile glue is added to the solution.
To create a figurine from artistic concrete, the easiest way is to pour the solution into the finished form. Another option is to sculpt the sculpture on a pre-prepared frame. The original way is to impregnate a cord or fabric with concrete and form a craft. A textured surface can be obtained by covering the casting mold with a corrugated material that will not stick to the workpiece.
Options for figurines from cement mortar
 The planter is cast in concrete and the hair is arranged by the plants
 Artistic concrete is best suited for making flower pots, since the finished product is not afraid of moisture. The easiest way is to mold a container for flowers using a plastic planter as a mold, inside which a plastic bottle is placed to form a void. A true masterpiece is a flower pot in the shape of a woman's head, in which flowers that imitate a hairstyle grow.
The simplest option is to pour some mortar into an old rubber ball. You will get a ladybug, which remains to be painted. A dwarf mushroom head can be crafted using a plate as a mold. The leg can be molded from a solution on a plastic bottle frame.
 Everything from cement: from simple to complex
 It is much more difficult to make sculptures of people, we will talk about them below. Fawns are a wonderful role model. For their manufacture, a plastic film is lined on a flat surface. It is convenient to lay out the contours of the figurine from a flexible plastic border tape. Outside the mold, sand and stone are used to fix the tape. It is convenient to fix the tape inside by sticking pieces of wire into the ground. Immediately after pouring the solution, the wire is pulled out.
 Concrete crafts sleep constantly
 Complex shapes are made by pouring cement mortar into special molds, or molded onto a frame. The description of the manufacture of the following figures follows in the text.
 Masha and the bear are always together
  The wolf and the hare stay away
  Jack has ordinary sand in his chest
  Finally, Shrek used the donkey for its intended purpose
 Universal rules for creativity from cement mortar
To ensure the strength of any product made on the basis of cement, it is necessary to provide heat and moisture when the latter solidifies. Thus, it is necessary to follow the general rule: after making the figure, it should be covered with plastic wrap.
Old rags, tights and cord turn into pots and gnomes
It is a good idea to saturate the fabric with a mixture of cement and sand. What will happen is eloquently told in the film "Gentlemen of Fortune".
To ensure a solid structure, pieces of fabric soaked in solution are hung on a stand and covered with polyethylene. After the cement hardens, a flowerpot is obtained. It can be dyed.
 Old tights are just as functional. Take a tighter copy and cut off one stocking. Cement mortar is poured inside. To organize the legs and nose of the gnome, parts of the fabric are tied with a cord. The top of the stocking without cement can be tied as shown.
The second part of the tights, impregnated in cement, is tied around the workpiece, forming the bottom of the cap. The tails of the knot form the gnome's mustache. The structure is hung on a rope. After the concrete has set, the figures can be colored to taste.
 From the twine impregnated with cement mortar, it is possible to compose many compositions. The simplest thing is to wrap a regular balloon with it. After the cement has set, remove the excess concrete with a sharp object. The structure can be painted. The result is a decorative ball for the garden.
 Burdock leaf and balloon form the shape of a fountain and lamp
Using a balloon as a shape, you can make DIY garden lights, balloon-shaped pots, or decorative concrete balls.
 A large burdock leaf is a wonderful form for DIY concrete crafts. Leaves made of concrete are suitable for creating a path, a decorative waterfall or just a decoration of a plot.
Master class for making a decorative fountain from concrete leaves:

From the example of crafts using a leaf of a plant, it is obvious that the surface of art concrete can be very different. In the photo below you can see an example of the work of the crumpled film when filling the head of the fungus, thanks to which the figure has acquired a more natural look. In the manufacture of pots, plastic or rubber inserts were used to form stars. The surface of the ladybug can be laid out with pieces of ceramic tiles. The walls of the plant pots are covered with gravel chips. Thus, your craft can be decorated in a variety of ways.
 Surface texture of cement crafts for every taste
 We sculpt from cement mortar any figure on a frame made of wire, plastic containers and an old toy
In this section, we will learn how to sculpt garden figurines from artistic concrete using a frame. In construction, it is believed that a new layer of material should not be laid on dried concrete. However, sculptors cannot sculpt a whole figure in a short time, and even the material that hardens for a long time will not allow this. For this reason, during sculpting from a cement mortar, a new layer is applied to an incompletely dried previous one. At the same time, they try to ensure sufficient thickness and continuity of the new layer of material.
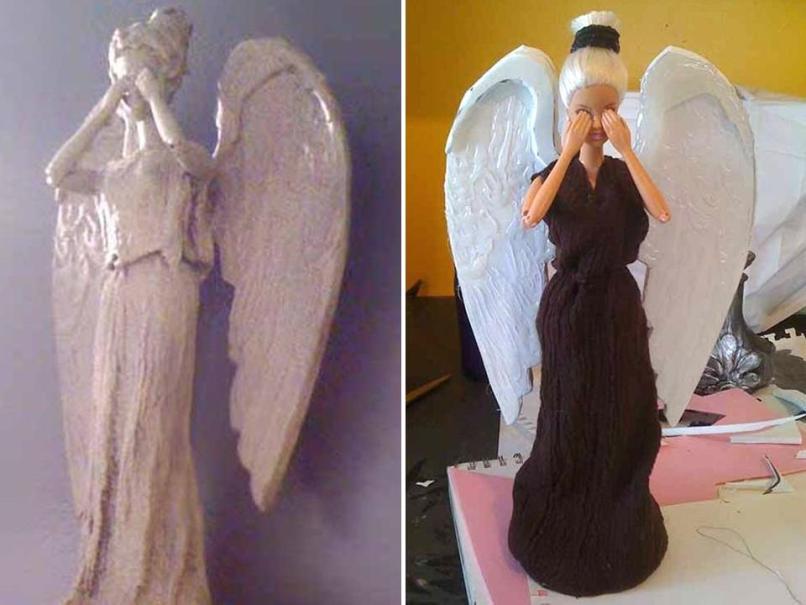
An old doll can be used as a frame for a garden sculpture. To ensure the adhesion of the solution to the workpiece, it must be primed, for example, with PVA glue. Then a thick solution is gradually applied. Work is carried out with gloves. To speed up the setting of the solution, add a little gypsum to each portion that you take in your hand and mix right in the palm of your hand. After the solution has completely solidified, the sculpture is primed and painted.

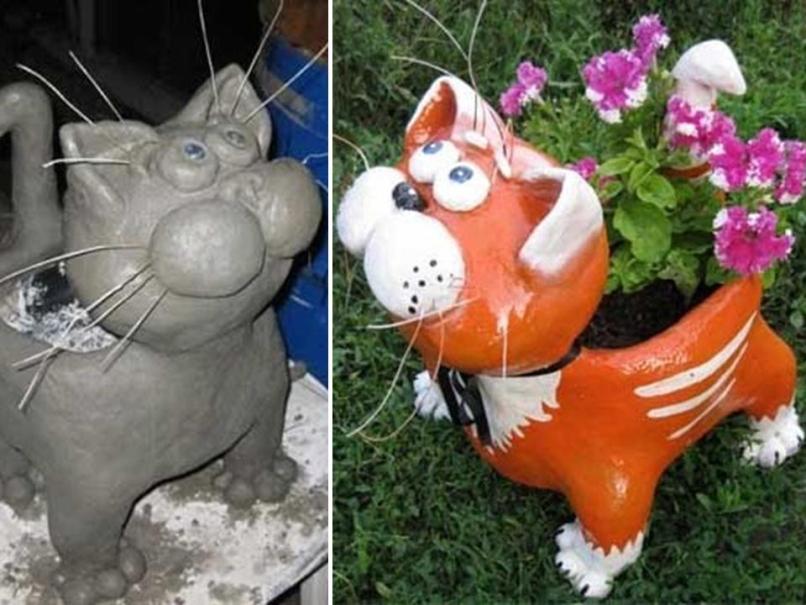
 In approximately the same way, you can make flower pots in the shape of a cat from cement and plaster. Consider making a figurine step by step:

 Here is a step-by-step photo of making complex garden sculptures. The scheme for making stucco figures on the frame is still the same:
- first, a frame is made of reinforcement and metal mesh;
- then the cement mortar is applied in several stages;
- when drying, the figure is covered with polyethylene to ensure the necessary moisture;
- dried sculpture is decorated.
 At the first stage, you can't guess that it will be Masha and the bear
  The mortar and paints are applied in several stages
  Shrek and Donkey also started with rebar and mesh
  The example of a pair of wolf and hare shows several stages of decoration
  The scarecrow from a rebar with a bucket inevitably turned into Jack Sparrow
 Of course, to make complex artistic sculptures you need to be a sculptor at least a little. The very process of making crafts from cement mortar does not present any difficulty. Start simple - and be amazed by the end result.
Garden gnomes are considered to be the keepers of the garden. They are mentioned in many legends. Gnomes bring good luck to the house, help to get and keep a rich harvest.
It is best to place a garden gnome where he can keep an eye on most of the site - place it on an alpine slide, or plant it under a currant bush. The garden gnome can also be placed near the path where he will meet guests. Another good idea is to hide the garden gnome in a hollow, from where he can observe everything that happens in the area.

Origin
Garden gnomes are small figurines in the shape of gnomes in red caps in various poses, popular in Europe (especially in Germany), as decorations for gardens. In German fairy tales, gnomes living next to a person helped him at night in gardening. They were often seen as a talisman that brings good luck to gardeners and protects the garden from evil spirits. This is how the tradition arose of placing figures of gnomes at work on the garden plots.
Gnomes are legendary creatures and have been a part of Western culture for centuries. In Austria, Germany, the Scandinavian countries, gnome figurines are very popular; they can be seen in almost any garden. The countries mentioned even argue about which of them is the birthplace of these fabulous creatures.
According to European legends and legends, the gnome had the appearance of an old man with a long white beard who lives underground. Gnomes also appear as characters in fairy tales, including the magical stories of the Brothers Grimm. The Germans presented gnomes as dwarfs and were often depicted as underground inhabitants in pointed red hats. It was the German gnomes who became the prototypes of the famous Disney gnomes from the cartoon "Snow White and the Seven Dwarfs".
The traditional image of gnomes for the garden is associated with this prototype - in a red pointed hat, with a beard, with a pipe and gardening tools. Modern gnomes have attractive facial features and are depicted in a variety of pursuits such as gardening, fishing, and playing musical instruments. According to popular belief, when the owners go to bed, the gnomes come to life and take on the work of caring for the garden or lawn on which they live. They have magical powers that can cause flowers to bloom, foliage to change color, and streams to saturate the ground under plants with moisture. By the way, gnomes are often portrayed not only at work, but also lying down to take a nap - obviously tired after the night's troubles.


Garden gnome fashion
The tradition of placing small figures of gnomes in the garden dates back to the 19th century. It was believed that the gnome in the garden would definitely bring good luck to the house. The city of Grevenroda in the German state of Thuringia was especially successful in their production. Since then, garden gnomes have become an integral part of the history of garden design, in which they have known periods of popularity, caused controversy, fell into decay and re-emerged.
From Germany, the fashion for garden gnomes quickly spread to Britain and France, known for their love of gardening. The first garden gnomes were introduced to England by Sir Charles Ishem in the middle of the 19th century. By the way, he believed in their protective powers.


Traditional garden gnomes are made by molding liquid terracotta clay into molds and then firing them. The burnt gnome is painted with paints. Nowadays, garden gnomes are also cast from polymer resins, made from artificial stone and similar materials.
"Gnomophobes" against "gnomophobes"
In recent decades, garden gnomes have been a topic of heated debate among professional gardeners and hobby gardeners about their decorative merit. Some consider them a manifestation of kitsch and bad taste, a symbol of blatant vulgarity and ignorant superstition.
Despite the criticism of the "gnomophobes", garden gnomes remain popular, and their patronage continues to bring good luck to gardeners around the world. Kind and cheerful gnomes - musicians and gardeners, dreamers and hard workers - in constant pointed hats continue to delight both children and adults. Even the organizers of the English garden exhibition in Chelsea, which celebrates its centenary in 2013 (05/21/2013 - 05/25/2013 Chelsea Flower Show), retreated under the pressure of the "gnome-lovers" and not only lifted the long-term ban on the appearance of gnomes in their gardens, but also for the first time included in the program a parade of 150 garden figurines, which will be inspected by the Queen of England herself!


Bathing a baby is a procedure that should bring joy and pleasure. Upon contact with water, tactile stimulation occurs, and physical performance improves.
But a prerequisite, of course, are hygienic manipulations and temperature conditions: both water and ambient air.
During intrauterine life, the baby was surrounded by amniotic fluid. After birth, he leaves this environment, goes through the processes of adaptation to new conditions. Therefore, swimming in the water is for him a reminder of the "past" life in his mother's tummy.
If we talk about the temperature regime, then it is about 37 degrees. When this temperature level rises, the child may overheat or get burned. Conversely, swimming in cold water can even frighten an infant and discourage swimming for a long time.
The baby's first bath lasts about 10 minutes, so you shouldn't worry that the water will have time to cool down.
Methods for measuring water temperature:
- thermometer;
- "Elbow way".
Pharmacies sell a variety of fish-shaped water thermometers that are immersed in a bath. You can also use your own hands. Submerge your elbow in water and estimate roughly whether the water is hot or cool.
It should be remembered that the umbilical wound in very small crumbs has not yet healed and for bathing newborns in the first days of life, it is necessary to boil water. This should be done within the first two weeks. To do this, we first collect cold water in the bath, then add boiling water to the temperature we need - 36-37 degrees. Be sure to stir the water.
When the baby overheats, you will notice redness of the skin, lethargy. And, conversely, if the baby is frozen, he will clench his fists, cry, and his lips and limbs will turn blue.
If the child cries while bathing, then the procedure should be stopped. Review again what you are doing wrong.
The air temperature in the bathroom should be around 23 degrees.
What needs to be prepared for swimming?
For water procedures, you will need the following items:
- bath;
- a slide for swimming;
- thermometer;
- diaper;
- soft terry towel;
- means for children for bathing.
Baby bath products
In modern stores, you can find a variety of all kinds of baby shampoos, gels and bath foams. The most widely used line is Johnson's Baby.
Bathing foam, especially with lavender oil, is hypoallergenic and soothing.
- Hypoallergenic - the absence of harmful dyes and fragrances that can cause an allergic reaction.
- Security. After all, any child can taste the foam "by the tooth".
Of course, if it was not a drop of gel, but a whole sip or two, you need to call an ambulance.
Daria, Moscow, 25 years old:“Foam for bathing" Johnsons Baby "for us, or rather, for my six-month-old happiness, perfectly suited. Available in a large 500 ml pink bottle. The price is very democratic, and will last for a long time - about 4 months. But, depending on how much you pour into the bath. For excitable children, also eat with lavender. "
![]() Baby soap "Eared nanny", Hipp is also popular among young mothers. Convenient and the form of its use is liquid.
Baby soap "Eared nanny", Hipp is also popular among young mothers. Convenient and the form of its use is liquid.
This soap should be fragrance-free. An essential ingredient is glycerin to soften delicate skin. Always a big plus for soap is the presence of substances of plant origin and a special dispenser for convenient use.
You can still bathe children in herbal preparations with thyme, chamomile, lemon balm. They have good anti-inflammatory and soothing properties. They will provide all possible help with diaper rash and hyperexcitability of the baby.
Natalia, 28 years old:“I bought a hair wash“ Eared Nanny ”, I thought it would be suitable as foam for a bath, but it was not. Foams mediocre. Great for babies, softens the skin well. No allergic reactions were found. There is, however, grape flavor, so I would not recommend it for newborns. "
PERSONAL EXPERIENCE. For my son I use the Eared Nanny liquid soap. Foams very well, so to speak "2 in 1" - both foam and soap. The smell is pleasant, it washes off quickly. I have never noticed allergies, it softens and soothes the skin very well with diaper rash, if any.
The line of bathing products of the German company "Bubchen" is also in high demand on the market. But they are expensive.
Nowadays, you can find many shampoos, bath foams, gels for bathing babies. But even with such a variety, an individual approach is required and the mandatory consideration of possible allergic reactions. What to bathe the baby, it is up to the parents to decide.
The first bath of the newborn
Here is the long-awaited moment of discharge from the hospital. You have come home, and after a certain amount of time the question arises of how to bathe this small and very fragile ball of happiness.
 Bathing the child after the hospital should be carried out the next day to allow the newborn to adapt to his new room and crib.
The child should be bathed in his own bath. The bath should be chosen in children's stores, since the goods are certified there, and the plastic and other substances from which the bath is made will not harm the baby's health when bathing.
For this procedure, a slide can be used for convenience. There are plastic slides, fabric hammocks, slides with a metal frame covered with fabric. Special trays with already built-in slides are also sold.
PERSONAL EXPERIENCE. My husband and I liked to bathe our baby on a fabric slide with a metal frame. The husband even built it himself. The child is more comfortable and softer to lie on the fabric than on the plastic backing.
Baby bathing rules
- We are preparing a place in the bathroom where it is most convenient to place the bath. You can put it on a stool or in a large bathtub.
- Preparing water. If the umbilical wound has not healed, then the water should be boiled.
- We check for a mug or small ladle to rinse the baby.
- We collect water, about a quarter of the bath. We check the temperature with a thermometer or elbow. Add foam or herbal decoction if desired.
- We put the slide.
- We close the bathroom.
- Cooking the child.
- We undress the baby on the changing table. If the room is warm, you can take an air bath for a few minutes. Then we swaddle with the head, but not tight.
- We carefully place the baby on the slide, monitor the child's well-being, the color of his skin, and a large fontanel.
- First, gently wash the arms, legs, body, then the child's head, trying to protect the eyes from water. At the end, rinse the baby with clean water. Bathing a newborn should begin at five minutes, gradually increasing the amount of time to 15 minutes.
For more information about and up to what age a child should be wrapped in a diaper, read the article of the children's doctor.
How to wash a newborn?
You can wash your child simply by hand, or with a special washcloth-mitten, which you can buy in a children's store. When choosing a mitten, evaluate the material from which it is made and the smell, so as not to cause allergies in the child.
 After the child has bathed, he should be wrapped in a dry terry towel and patted dry. Dress in a vest, sliders, or swaddle.
The baby should be bathed for the first 4-5 months daily, but the hair should be washed no more than 2 times a week. In the second half of life, you can bathe every other day.
Bathing a baby is not an easy task. While still pregnant, it will be useful to study the necessary materials on how to properly bathe a newborn baby. Try to involve your husband in this process.
Assistants will never be superfluous. The baby will feel the care of both parents.