How to make a children's paper spinner. Paper spinner: a simple do-it-yourself toy
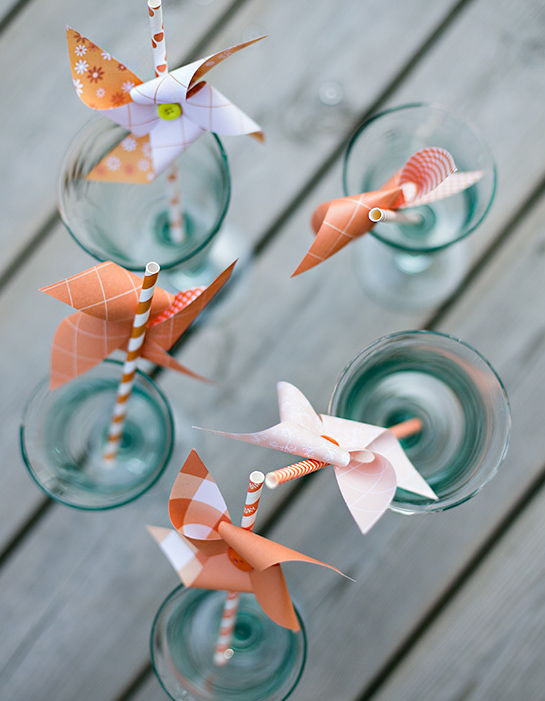
A paper spinner is a simple and original thing, which is not at all difficult to create, but it will bring a lot of joy. Toddlers just love these bright propellers. They are ready to run around the lawn for hours, watching their rotation. Turning on the fantasy, we can find many non-trivial uses for turntables made from colored paper. In addition to using it as an interesting children's toy, this wonderful and very simple movable structure can be used in decorating rooms. In addition, paper pinwheels will be a wonderful and unusual decoration for cocktail tubes at a themed party. They will set the tone for a children's holiday and help keep the kids busy, becoming a wonderful souvenir.
So, let's figure out how to make a beautiful pinwheel out of pieces of paper and what we need to work.
It’s not at all difficult to make a funny decoration for cocktail tubes with your own hands. Children can be involved in the work. A festive mood is created in the process of preparing for the celebration.
There are few materials for making turntables and they are simple. We only need:
- cocktail tubes
- squares of colored paper. They will need as many as we plan to make turntables.
- scissors,
- Double-sided tape,
- small buttons
- glue gun for attaching them.
And if you want to make movable turntables, then we will also need wire or pin - accessories for jewelry.
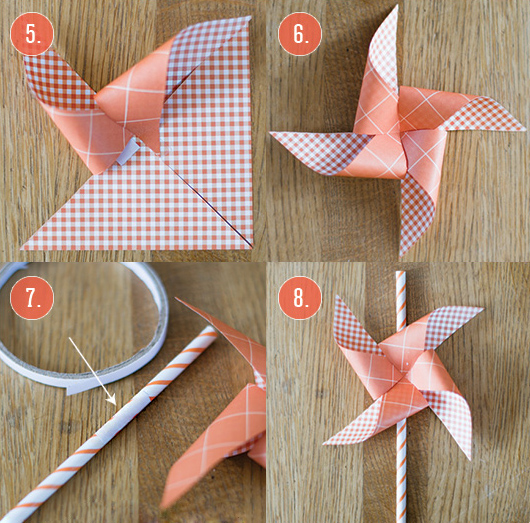
First, we cut the squares diagonally from the corners to the center with scissors. We do not cut 1.5 - 2 cm to the center.
Glue pieces of double-sided tape on the inside of the turntable to each quarter.
Then, we bend the incised petals and glue them to the adhesive tape on the adjacent triangle, as shown in the figure.

We bend and glue all four corners. We glue the turntable to the tube with a glue gun. And decorate with a button in the center of the finished turntable. And if you want to make a rotating turntable, you need to pierce the center of the turntable with a piece of wire or a pin. Then bend the ends of the wire on one side and on the other so that the piece of wire is free enough to rotate. The ends should be bent so that you can then glue the tube to one side with a glue gun, so as not to stain the turntable itself. And decorate the other end of the bent wire with a button.
In the second case, you will get a functional turntable on a straw from which you can drink drinks. In the first case, you get such a pretty decorative spinner made of bright colored paper.

How to make a paper spinner. After studying the issue on the Internet, and after conducting field tests, we realized that of all the variety of designs and shapes, the best turntable is the classic four-bladed one. A good result was shown by models with eight blades and in the form of a circle with folding valves. All the rest: from a triangle, from a hexagon, from stripes, in the form of flowers with folding petals - everything spins badly. Therefore, we have focused on a selection of three models.
Here's what we got:
Four-bladed turntable.
We will need: a square sheet of paper (we took two sheets of 14 × 14 cm and glued them together so that the pinwheel was multi-colored, but there is also special paper for origami - it is already double-sided), a stick (I used a bamboo skewer), a piece of wire, a few beads or scraps of a cocktail tube.
Working time - 5-10 minutes. 
The scheme of work is as follows:


And now
We draw a square along the diagonals. 
We cut along the marked lines without reaching the middle (about 6 centimeters).
With an awl we make holes in the middle (at the intersection of the diagonals) and at one of the corners.  It should turn out like this:
Now we are preparing the stick - we wind several turns of wire on it, and we string a bead or any other limiter on it. This is necessary so that the spinner does not touch the stick during rotation. 
Now we put on our square. 
After that, we string several beads again so that the blades do not press against the base and the middle of the turntable is more voluminous - so it will spin better. 
And now, in turn, we put corners with holes on the wire. 
It should turn out like this. 
We fix the blades by stringing more beads on the wire and fixing the tip. Do not overtighten the turntable; it should turn freely. 
Time to blow! 
You can experiment with patterned edges, with the size of the turntable. We made three small ones from thin packaging foil and attached them to one stick. Here they are spinning the most fun of all. Probably due to the fact that the lightest.
Eight-blade pinwheel
This turntable is "assembled" from two four-bladed ones. We need two square blanks. But they will need to be cut a little differently. 
Now the stores are filled with a variety of trinkets for children of all ages. In addition, kids learn to manage gadgets while still sitting in a stroller. So, maybe they should be interested in something that they will create with their own hands? For example, a paper spinner.
The classic version of the "breeze"
The spinner is otherwise called a “breeze” or a mini-weather vane, because it spins under the influence of the wind. To make it, you will need the simplest things:
- scissors,
- simple pencil,
- cardboard,
- ruler,
- PVA glue,
- little carnation,
- wooden stick,
- hammer.
First you need to cut an even square. If it does not come out as such, then the weather vane will not spin. What do they do next?
- Bend diagonally to one side and the other to mark the places of the future incision.
- From the intersection of these lines, it is necessary to measure 1-2 cm with a ruler, depending on the size of the product, make a note with a pencil.
- Cut along the folds with scissors to a note.
- It turned out 4 interconnected triangles.
- Glue the upper left edge of each triangle to the center.
When all the corners are in the center, you need to pierce the product with a carnation in the middle and nail the carnation to the edge of the piece of wood (you can take a tree branch, long pencils, even a sushi stick). Just not close, otherwise the mini-weather vane will not spin.
This is the easiest way to make a paper spinner. To make it bright on both sides, you can glue two different colors together: on the one hand - plain, and on the other - with a pattern. So the "breeze" will look more voluminous.
round fan
The classic "four-blade" mini-weather vane is easy to make. However, there is a more complex option, when the material for the weather vane is folded like an accordion. For the fan you will need:
- thick paper (but not cardboard),
- glue gun,
- scissors,
- carnation with a decorative hat,
- hammer,
- stick.
Several of these fans of different colors and sizes look especially beautiful at once, so you can color the finished products by adding decor, for example, in the form of sparkles:
- Bend 4 rectangles into an accordion along the long side.
- Bend the accordions in half.
- Glue the edges so that each accordion becomes a quarter of a circle.
- Glue the quarters together to end up with a circle.
- Insert a nail into the center of the circle and nail it to what the “fan” will hold on to.
It is important that the head of the carnation is larger than the hole that will remain in the middle of the circle. It is not necessary to nail the nail to the end so that the fan can spin. Do-it-yourself paper spinner is ready, you can decorate the fence of a suburban area or the interior of a house with it.

Without scissors
Surprisingly, the "breeze" can be made without using scissors. This, of course, will be more difficult, and a little more time will be spent:
- Take whatman paper, cut out a square (paint it in the desired color).
- Fold it in half, connecting the corners.
- Expand - in the middle there will be a trace of the fold.
- To this trace, tuck the edges again on both sides - you get an elongated figure in the form of a “door” fold.
- This rectangle is folded in half so that the edges of the "door" are inside.
- Expand back. Fold the edges of the figure to the fold line formed in the middle - you get a square in the form of a “door” fold.
- Expand again - you can see that 2 small squares have formed at the ends.
- Each bend diagonally corners to the crease "door". Expand again.
- According to the already existing fold, fold the workpiece in half into a square, divided by the traces of bending into four parts.
- Open the workpiece and take the inner corner, pull it outward - the “breeze” blade will come out, as a result, all the corners should be directed in one direction.
A paper spinner created using the origami technique is attached to a wooden stick in exactly the same way as any other.

Rainbow
The rainbow pinwheel is made using 7 different colors, which is why it has such a name. To make it, you need to stock up on such shades:
- red,
- orange,
- yellow,
- green,
- blue,
- blue
- purple.
You will also need scissors, a needle, a hammer, paper clips, glue, a stick and a nail with a decorative hat. The principle of attachment for the "rainbow" is the same as for other "breezes", but the blades are made according to a different principle:
- Cut out triangles of all available shades.
- Triangles must be exactly the same: obtuse, isosceles.
- Place the triangle base up.
- Attach the left corner to the top, which is below, fix with a paper clip.
- Do this for all triangles.
- The places where the paper clips are located, connect, glue and pierce with a nail.
- Nail to stick.
While this multi-colored "breeze" will spin, it will become like a rainbow.
When a kid makes a paper spinner for the first time with his own hands, a photo of it should definitely be saved. After all, this is not the most durable material, and, most likely, after a while the toy will break. But if the child has a picture, he will be able to repeat the product and even improve it.
The art of origami has long been in vogue. Unusually folded leaves make unique decorations for festive events. Turntables can serve as an example of such decorations. They make origami fun. Making a paper spinner with your own hands is quite simple. Adults can give a master class to their children when they themselves learn this art.
Preparation for work
At any city holiday, cute and light turntables made of multi-colored and shiny material are sold in huge quantities. Children periodically reach out to them and require adults to buy at least one toy. And what if you do not wait for events and please the child right now?
A beautiful origami spinner, the scheme of which is quite simple, is perfectly made independently. And it takes a small amount of effort to do so.

The pinwheel is an excellent wind catcher. Kids have always loved this item. What to make a product from is a simple question. From paper, of course. For beginners and kids, colorful paper is a delightful material that is easy to create with. List of materials that will be required for work:
- Square sheet.
- Sharp scissors.
- A small nail and two beads (a simple pin, a button on a rounded leg, and so on).
- A skewer (or pencil, straw, wooden stick, etc.).
Making a turntable
Now we will learn how to make a paper pinwheel.
First step. First you need to lay out a completely ordinary piece of paper that you have selected on a hard surface in front of you. Then bend it straight diagonally in half. Next, you need to unbend it. Bend again on the second side and straighten the square. Two lines crossed in the central part, created by folding, should appear on the paper. Next, you need to create 4 cuts along the crease from each corner to the central part. But do not reach the intersection area, and you will have to leave 1.5 cm to the "meeting point" of the two lines.

Second step. With a nail, you need to create the usual punctures: in the central part (just where the lines will intersect) and one hole in each corner on the left of the triangle.
Third step. Put the bead on the nail. Fourth step. Next, you need to go to the last stage of work called "how to create a paper spinner." Connect all 4 ends with holes in the central part and thread the nail through each of them, and also through the middle. On the second side, where the point is now visible, put the second bead on it.
Fourth step. Attach the "inflorescence" of the product to a wooden stick. The craft is done! After that, even your baby can explain how to make a toy. Insert a stick into a pot of flowers, and it will not only seem to bloom next to the plants, but also in the form of a stand will become an excellent assistant watchman for a breath of light wind.
Second creation option
Now let's move on to creating the second version of the turntable. Paper weather vanes with a huge number of blades look much more interesting.
The edges are also wrapped towards the central part and fixed with a metal base.
 To make the toy brighter, you should take a material with a metallic tint. For an 8-piece craft, you will need to make 2 pieces with four edges. First, they need to be laid out together, but slightly moved so that the corners of the figures do not lie on top of each other. Then you have to take turns wrapping them with the front part in the middle. Each edge is fixed together. That's all, it turned out a wonderful thing.
Creating different products with your own hands is a rather interesting activity, especially if you create with your child. You can make a beautiful spinner yourself, but you need to follow the shown master class and then, perhaps, your products will become a unique toy for children! Here is the topic of how to make paper turntables with your own hands, but below you can still learn how to make a plastic product.
Weather vane from a plastic bottle
First you need to collect improvised material. Purchase plastic water bottles from the store or ask loved ones to help collect the right amount. Then you need to decide what you want to do. And then you can brag about how to make a turntable from a bottle for a little kid so that he has fun with it. The step by step looks like this:

Such a toy will undoubtedly please little boys and girls, and will make adults remember their childhood when they ran along the path, and the wind waved their little funny spinner.
Attention, only TODAY!
How to kick?
Everywhere in the world, a person tried to build a system of self-defense that would involve all the organs of the body. The human hand played the role of holding the weapon, and the legs were used to move in space. The most effective warriors have come to realize that a man's legs have more killing power than his arms. It was only necessary to understand how to kick from the foot correctly and create a training system for fighters, since kicking requires special flexibility and joint mobility. The most popular martial arts techniques in the world today, such as karate, kickboxing, muay thai, capoeira or kung fu, with some difference, use the same strike vectors, contact points of the opponent’s leg and body, as well as the return of the shock leg to the original position. Using the example of the above martial arts, we will analyze how to learn to kick.
Direct forward kick

"Maya-geri" in karate, "front kick" in kickboxing is carried out with a full foot or heel in the stomach, chest or face of the opponent. The body can be moved slightly forward, connecting the mass, to implement a pushing effect. Capoeira, due to the constant mobility of the fighter, more often uses biting direct blows “bensu” to the body or “chapa” to the head, giving the body a little back to maintain balance and quickly return the shock leg to its original position.
Side kick

This blow is applied from a position sideways to the opponent with either a full foot or its outer part. In this case, the “side-kick” or “eko-geri” is performed by sharply pulling the knee of the shock leg to the chest and “twisting” towards the opponent with full extension. Capoeira practically does not use this technique due to the fact that it requires the maximum investment of strength and mass in a blow, which negatively affects the high mobility of the fighter.
Side kick
This is one of the most common kicks. "Mawashi-geri" in karate - blow with  a small turn of the body inward is carried out by the front part of the ankle or by the lower leg to the head, body or legs of the opponent (the so-called “low kick” - a lower kick in kickboxing). The punch requires high flexibility and good stretch to maximize knee extension of the kicking leg, especially when hitting the head. In capoeira, the toe of the foot is sometimes used when practicing a blow to the head from above with a stand on one hand. The so-called “ura mawashi-geri” is a kick from the side with the body turning from the inside out. This one of the technically difficult punches requires good stretching and mobile hip joints. In this case, the impact point of the leg is directly the foot.
Downward slashing kick

The so-called "X-kick" in kickboxing is one of the most insidious and spectacular blows in kickboxing. It is carried out by a sharp raising of the leg above the level of the head, followed by a lightning-fast lowering down. In this case, the target can be both the head and the clavicular part of the body, as well as the forearm and hand. By developing this jump kick, we can set a good initial explosive speed.
Circle kick and "pinwheel"
One of the most beautiful kicks in all styles is the round kick or roundhouse kick. It is carried out on the supporting leg, breaking the block of the arm, on the body or in the head  feet directly. The blow can be either fast and biting with a straight leg, or a power knockout with a half-bent leg. In capoeira, its variant is elegantly called "mi lua di compass" - a crescent with an emphasis on the hands in different variations with a heel strike, both in the horizontal and vertical plane. Due to the high speed, the fighter develops colossal centrifugal force, spinning like a spring in a watch. The execution of this jumping strike with the correct execution technique practically does not make it possible to block it due to the fact that the fighter puts not only strength into the strike, but also all his weight. One of the versions of the “turntable” is familiar to us in the performance of Zh-K. Van Damme in the form of a perfect transverse twine.
Knee strikes
These strikes in all martial arts help to effectively hit the enemy in close combat. Muay Thai fighters at the same time actively use their hands to grab the head,  pulling the opponent towards the knee. Knowing about the insidiousness of knee strikes, the Thais first of all “incapacitate” the legs, inflicting hard blows to the knees and lower legs at the very beginning of the battle with the so-called “low kicks”.
At the heart of each technique is an understanding of the dynamics of impact, excellent stretching and the ability to "read" the enemy, finding vulnerable points for kicking. Having mastered the basic techniques and developing practice, we will understand how to kick in a critical situation for self-defense. To make your training productive, do not forget to develop leg strength, do running and power squats, train with a partner using kicking bags.