Make theatrical makeup at home. Light simple makeup for Halloween. The subtleties of applying make-up
Sometimes a person finds himself in a rather unusual situation when it is necessary to do makeup at home. Is it possible to create an unusual image on your own and save time and money on visiting specialized salons? Of course, this is possible. You just need to follow the instructions correctly.
Skin preparation
Before you start applying makeup at home, you need to properly prepare your workspace. As with the classic application, the skin must be thoroughly cleansed. Otherwise, the created image will not last for a long time and will let you down at the most unpredictable moment.
Wash your face with the right cleanser for your skin. After that, wipe your face with tonic or lotion. This will help tone the skin. Next, apply your daily moisturizer. Let the cream fully absorb and start creating makeup.

wrinkled face
This makeup at home is quite easy to create. You will need gelatin, pharmacy glycerin, some plain water and foundation. This look would be perfect for Halloween or Carnival.
To begin, mix gelatin with glycerin and water. Put the mixture in a water bath or heat in the microwave. When the gelatin is completely dissolved, add foundation to the mixture. In this case, you should give preference to inexpensive products. Mix the solution thoroughly. After that, you can apply makeup.

At home, you can use a brush or your own fingers. Spread the mixture over the skin of the face, creating folds and wrinkles in the right places. Deep dents can be made with ordinary hand tools. After the image is ready, let the makeup dry well. At the end, you can apply foundation powder with a special brush and, if necessary, use face painting pencils.
white face
This makeup at home is created using potato starch, flour, pharmacy glycerin and plain water. Mix all the ingredients and mix the solution thoroughly. You should get a thick creamy mass.
Apply makeup to your face with a sponge or brush. Spread the layer evenly over the skin and let it dry. When you get a snow-white skin tone, you can begin to complete the image. To do this, use ordinary decorative cosmetics or special felt-tip pens for drawings on the skin.

Creation of skin defects
Makeup at home can be done with the help of additional tools. This look is perfect for Halloween or Christmas.
Choose the right accessories. It can be a gouged eye, false nose, warts or other skin defects. Usually such things are sold in specialized stores. Glue is always attached to them. But if you just stick an artificial body to your face, it will be noticeable. Therefore, it is so important to create the right makeup at home. A photo of the finished model can be viewed in this article.
Prepare a mixture of gelatin, water and regular fat cream. Thoroughly dissolve the bulk substance and heat the mixture. Glue the artificial body part to the face and treat the border area evenly with the natural skin. If necessary, apply the resulting mixture all over the face and create additional imperfections. You can also apply the finishing touches with After that, let the makeup dry. The image is ready!
Good luck in this interesting work and have a good time!
Since we are talking about imitation of blood, bullet and other wounds and cuts, today's topic will be devoted to makeup. How it can be made from improvised means, as well as how to apply it correctly.
Stage make-up is only an auxiliary art, through which, however, the artist can transform, according to the type of role played, the features of his face, applying various special colors to it, putting on a wig, changing certain parts of his face with plasters and stickers, and so on.
The secret of make-up is not to turn a young face into that of an old man, to make a short upturned nose long, to make small eyes large, etc.; its secret lies in the fact that the artist, feeling that he is a character being portrayed, transforms his own face and makes it, depending on the need, either youthfully enthusiastic, or senile or feeble-minded.
About the number of colors on the face
On the face you need to put as few colors as possible: that make-up is better, on which less colors have been spent. The less paint is put on the face, the less facial expressions are constrained and the more freely mimic movements can manifest themselves; when, in addition to paints, one has to resort to all sorts of plasters and stickers, then it goes without saying that they terribly interfere with facial expressions. Fortunately, they are most often used in small episodic roles, in which you can sacrifice a variety of facial expressions in favor of a sharp impression made by one external appearance.In old makeupit is also important to change the skull: in old age, the relief of the face intensifies, the skull is more noticeable, it looks through the skin; here a knowledge of anatomy should come to the rescue. It is necessary to show the cranial cavities and bulges with shadow, brown or gray-blue paint; deepen the temporal, eye or zygomatic depressions, also emphasize the retraction of the upper lip, characteristic of the old make-up, resulting from a lack of teeth. Although there are teeth, the lip will still appear hollow, due to the deepening of the space between the mouth and nose, and also due to the sagging of the lower lip.
It is reproduced in makeup simply: the upper lip, together with the supra-labial space, is darkened with gray-blue or brown paint, and the lower one is highlighted with light, and sometimes white. The lower lip, in turn, is outlined for a larger relief with dark paint, if one highlight is not enough.
The corners of the mouth are deepened to a greater or lesser extent (shadow paint); the chin is intensified. Superciliary arches, zygomatic bulges, bags under the eyes, nose and chin are highlighted.A few makeup tips:
Instead of "inexpensive powder" it is better to use talc or baby powder. You can also use starch.
You can easily and quickly remove makeup (including from the eyes) with any vegetable oil and cotton wool. Make-up recipes are time-tested and have hygienic certificates for a long time.
The main thing is not to use the old spoiled makeup. In this case, no protective cream will help you, and even more so Vaseline. Vaseline should be banned altogether by law: it dries the skin, gives makeup an unnecessary shine, and does not allow the skin to breathe. Do not use Vaseline as a base for makeup! Make-up should be applied to washed skin. If the skin is dry, soften it with a light nourishing cream.
To depict a victim of hunger or fever, you don’t need to emphasize every hollow so much and draw wrinkles where there is not even a hint of them! Most often, it is enough to choose the right complexion to achieve an excellent effect, and slightly emphasize the eye sockets with a darker tone. Use a regular foundation with the addition of gouache of the desired color - it is absolutely safe and looks very good.
Painted wounds
We will train on the wrist of the free hand and draw a dried incised wound on it.
With brown paint, draw a line 2 mm thick and lightly grease its edges.
With paint 2-3 tones lighter than the main one, draw 2 lines parallel to the brown one and blend their edges outward. Do not blend the white lines into the wound, but only soften the edges.
With the same paint, but with an admixture of blue, emphasize or draw veins. Do this with light strokes, trying not to put a thick layer of paint.
Where there is a glare, there should be a shadow nearby: with paint 2-3 tones darker than the main one, slightly shade the drawn veins and folds in the wrist area.
Next, mix the burgundy paint with scarlet and draw a thin line in the middle of the brown with it. The short black strokes located at the “bottom” of the drawn cut will give great depth to the wound.
scars
To draw a decent scar, we need: dark red, dark brown and light tonal makeup (you can use pencils of the same shades). Stage one: the contour of the future scar is laid with red make-up - try to do it in one movement, as it would be in battle. Then a slightly wider strip of tonal makeup is laid along the lower edge of the "scar" (the tone should be lighter than your natural skin tone. Draw a dark brown strip along the upper edge of the red stripe (creates a feeling of relief and depth of the scar). Finally, the edges are shaded with shading or a finger the scar is usually wider where the scar runs "on the bone" and less where the pattern runs on soft tissues, for example, on the cheek.Where the scar should be deeper, you can add more dark makeup and lighten the tonal.
Attention!
Use vegetables and fruits for coloring the skin should be extremely careful - tomatoes, for example, cause terrible diathesis and inflammation (if there is nothing else at hand, it is better to use diluted tomato paste rather than fresh tomatoes), and some other fruits can provoke unwanted reaction (if you know the weaknesses of your body, you should not sacrifice it for a five-minute effect). Coal and ash tend to clog the pores of the skin deeply - therefore, after use, wash with warm soapy water and cleanse the skin with lotion or even cologne.Should not be used
on the face: poster paints, gel and ballpoint pens, felt-tip pens, chemical pencils. When applying "tattoos" to your arms and body, make sure that the paint you use can be washed off - otherwise, the appearance of a person at work after a stormy weekend spent in the game can lead to some ... inconvenience.We wish you good luck with your disguise! ;)
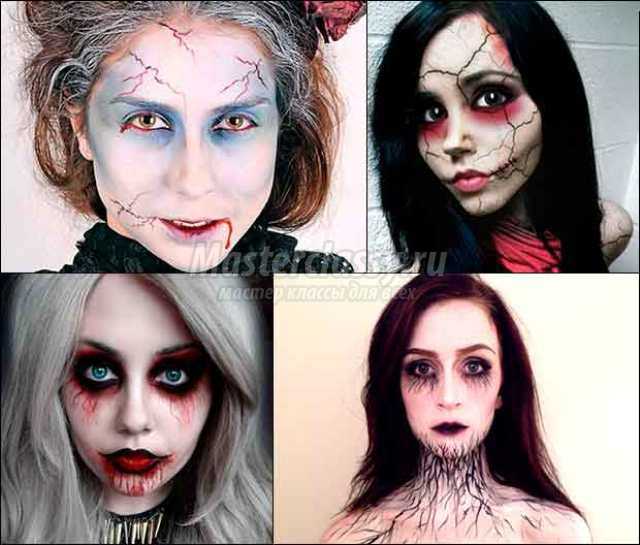
In recent years, Halloween has been celebrated on a large scale in our country, of course, American holiday traditions, such as “begging” for sweets, have not taken root in our country, but schoolchildren and adults take part in costumed parades and parties with pleasure, so on the eve of the holiday they are worried about several moments - and Halloween makeup which must be unique. With your own hands, you can create a unique image, complementing it with eccentric accessories and jewelry.
Women want to be beautiful every day, so every day they apply natural makeup, hiding small facial skin imperfections, but there is only one day when the rule applies - the scarier the better, and this happens on the eve of All Saints Day. For those who do not want to spend money on going to a professional, a simple Halloween makeup at home. The right make-up is a must to complete your outfit, so the first step is to tailor a costume or buy it in a store that has a wide selection of different characters. You can transform into any terrible monster - become a zombie, a vampire, Dracula, a skeleton.

Halloween makeup
Even those women who know how to perform beautiful everyday makeup may encounter certain difficulties when they decide to make themselves Halloween makeup at home conditions. If you have never applied special makeup to your face before, then it is advisable to first test the reaction of the skin, otherwise, instead of a terrifying makeup, you can get a terrible allergy, and your whole face will be covered with red spots and itchy. A small amount of cosmetics must first be applied to the wrist, and after an hour to look at the reaction, if the skin remains unchanged, then you can begin to perform festive makeup.DIY Halloween makeup you should start doing it only when you are already wearing a suit, especially if your dress has a narrow neck, otherwise you can then wipe off some of the makeup with the material and you have to start all over again, but already in conditions of time pressure.
First, the face must be thoroughly washed and dried with a towel. The next step is to attach those objects to the face that should change its shape, you can attach warts or make a false nose, recently false scars have been a particularly popular technique.
Next, the entire face must be covered with base paint, the color of which must be chosen depending on your character. Usually the face is made pale, for the image of a skeleton or a vampire, so they cover it with white paint. If you are a dead bride - apply blue, and if the devil - red.

When applying foundation, use a sponge, but a brush will help you add texture to makeup in the right places. To highlight the eyes, you need to take dark shadows, you can buy the most inexpensive dark shadows in the store, and they will do the job. You will also use dark shadows if you need to highlight some areas on the face, for example, sunken cheekbones or eyes. You can apply shadows with a thin brush or a special sponge.
The eyeliner will help you draw thematic drawings, such as a web on the cheek or a spider.
When you apply the paint on your face, you need to apply the final layer - baby powder, for which we will use a large blush brush. Thanks to the powder, the paint will not be smeared.

Halloween makeup at home
We have covered the main points how to do makeup for halloween, however, each stage has its own characteristics, which should not be forgotten that the make-up turned out not only bright and thematic, but also durable and lasted throughout the party. Applying each layer, the next one should be started only after the paint has completely dried. To speed up this process, you can use a hair dryer by setting it to "cold air".The most popular version of the image for the holiday is a vampire, it is chosen by both girls and guys. In order for the image to be complete, do makeup for halloween at home, and for this you should properly whiten your face.
You can apply white paint to large areas with a sponge, and to treat narrow areas you need to use a thin brush. You can get by with improvised means to create a white mass, for this, mix flour with starch in equal amounts and add a little water. Stir the mixture until it becomes a paste. Add three drops of glycerin to the finished mixture and mix again. If your cream turned out to be very thick and dense, you can add a couple more drops.
To choose Halloween makeup, photo you can look on the Internet, but first you need to decide on a costume, and only then choose the appropriate makeup. If your appearance is intimidating, then your face should also be sinister, but there are also cute, good-natured characters that you can dress up on the eve of All Saints Day, for example, if you chose an angel or fairy costume, then the makeup should be natural, made in pastel colors. Such images are especially suitable for schoolchildren. Various fantastic characters with a bright, catchy face are also popular, for example, elves. But the Witch always has a white face and black, as if drowned, eyes.
Halloween makeup: photo
Not only girls are puzzled, how to do makeup for halloween at home, but also guys, because they also want to stand out at a holiday party. Of course, guys are unlikely to cope even with the simplest make-up on their own, and they will definitely ask their friends for help. Men's makeup should be very simple so that they can handle it on their own. Most often, men stop at simple characters with a white face and dark eyes. You can also easily complete the image of the Joker, but for this you need to carefully draw a sinister smile.We agree that not everyone has the opportunity to buy a special make-up kit, which creates Halloween makeup video there are a lot of master classes with various options on the Internet, for example, you can perform.
Blush and foundation can be made independently from improvised products, for example, to make a bronzer, cornstarch is used, which is mixed with cocoa and ground cinnamon. Add additional ingredients little by little and mix thoroughly, the amount of ingredients is at your discretion until the desired shade is achieved. You need to add a couple of drops of essential base oil to the mixture, you can add a couple of drops of vodka, thanks to these additives, the bronzer will hold on better.
Dark shadows can be created using activated charcoal, the powder is easily applied to the eyelids with a damp brush. You can also make your own eyeliner: mix equal amounts of coconut and cocoa butter and add half a spoonful of activated charcoal powder.

light makeup for halloween
Children can do light makeup for halloween, for example, schoolchildren will love the image of a zombie, which is very easy to make. It is necessary to apply concealer around the eyes, also apply it around the lips, which will create the effect of pallor. The upper and lower eyelids should be covered with matte dark shadows, and they should also be applied with a large brush on the cheekbones.Using a soft black pencil, draw vertical lines on the lips that would resemble seams. Girls can turn into a bright cat: their eyes should be decorated with luminous shadows or multi-colored pencils, and a small circle should be drawn on the tip of the nose with a black pencil. Moving from the nose, you need to draw a mustache on both sides. The tips of the antennae should be decorated with sparkles, it is convenient to apply them with a cotton swab.
You can create with the whole family, even preschoolers can do a light make-up, because they will watch the whole process with great interest and also want to become part of this colorful holiday.
The image of a vampire is simple Halloween makeup for a girl and for a guy, so you can come with your couple in similar themed costumes, like the main characters of the popular movie "Twilight".

First, with a black pencil, you need to draw two lines that will go from the outer corner of the eye. Then you need to fill in the space between the lines: apply a white base to the face to remove the shine from the face and whiten it. To create a pale, sickly look, you can make a mixture of gray, brown and pink shadows and apply it on the chin, cheekbones, outline around the eyes and nose. An ominous look can be given to the appearance if you draw eyebrows with a black pencil.
Complete the image with artificial fangs, from which there will be a bloody smudge in the corner of the mouth.
When preparing for the party, be sure to prepare souvenirs for your friends, for example, a stylish present will be with an ominous poem inside.

Halloween face makeup
Of great importance in your festive look are individual elements and accessories, even a boring costume can be supplemented by making a bright face makeup for halloween. For example, a simple bright dress can be complemented with “candy sponges”, for the creation of which you will need colorful sprinkles for Easter. First you need to apply a foundation to the sponges, and then sprinkle with multi-colored crumbs.Eyes in this image can be made up with bright shadows: make a transition from raspberry to yellow.
When the makeup is thought out and the elements for its creation are prepared, you should think about home decor or additional accessories for your look. To keep the hairstyle from looking boring, you can wear a bright wig or dye the strands with a tonic that will wash off immediately after the party.

It can complement your hat, you can fix it on a hoop using additional decorative elements, make bows from satin ribbons or a bright tulle base. A simple hat can be made from cardboard, and then decorated with material of any color.
Remember that after the party, after returning home, you need to wash your face thoroughly, wash off the paint with a regular makeup remover. Make sure that cosmetics do not get into your eyes, so you need to wash it off from separate areas using a cotton pad.
Recently, more and more often people have a desire to create spectacular images for holidays, masquerades and carnivals. The main element in creating such an image is high-quality makeup, but not in every city you can find specialized theater stores that sell special paints. In this case, you can resort to making makeup with your own hands at home. The main color in this art is white, as it is the basis for further drawing. In this article, we will consider the basic principles of applying and making white makeup without special equipment and hard-to-reach components.
Necessary materials for creating white makeup
White makeup is the basis for modeling simple and complex images. Using white theatrical makeup, you can accurately draw the following characters: mime, skeleton, mask, etc.

To create high-quality makeup, you will need the following tools:
- actually white theatrical makeup or powder;
- a set of brushes for cosmetics;
- cotton pads, sponges, as well as napkins;
- You will need makeup remover. If professional make-up is used, then children's cream or petroleum jelly should be prepared.
Do-it-yourself white face makeup step by step
The correct application of makeup largely depends on how good the image will look as a whole. White is the base, so it should lie flat and neat so as not to spoil what is applied on top of it. So, no matter what makeup is used - professional, or made by yourself - the face needs to be prepared. Excess oil can be removed by simply washing with a mild facial soap, or using a cleansing milk. It is better to lubricate the skin with a moisturizer or apply a makeup base. Dry makeup is applied with a slightly damp sponge, liquid makeup with a dry sponge.

The first step is to cover the entire desired surface with a thin first coat. Then you can apply several more layers, depending on the effect you want to achieve. Careful shading of the borders is of great importance in the process. When creating makeup on a child's face, you should not create a dense base, so as not to overload the delicate and sensitive skin.

Depending on what image you need to create, the further process depends. To give the face realism, even on a white base, it is recommended to apply blackout areas in the area of \u200b\u200bthe natural curves of the face - this helps to “revive” the look, but this is not always necessary.
Make-up should be removed with makeup remover. You can also get rid of homemade options without adding fat by simply washing with warm water. After removing, be sure to take care of the skin - apply a soothing mask, moisturize with cream.
How to replace white makeup or what to make it from?
There are situations when there is an urgent need for white makeup, but there is nowhere to get it. In such conditions, one has to be sophisticated and go for tricks. Sometimes a white corrector helps out - dense pigmentation gives an even layer of coverage, and you can create a fairly bright face. However, good cosmetics cost a lot and it may be necessary to create a clean, unnatural white color for a human face, which will be quite difficult with ordinary non-theatrical means. Oddly enough, but making the base at home is real and not so difficult. There are several common recipes, you can use any you like.
How to make flour with your own hands
To prepare the composition of flour, you will need the following ingredients:
- 2 tablespoons of flour;
- a spoonful of corn starch;
- some clean water;
- 2-3 drops of glycerin.
First of all, dry ingredients are mixed, then water is gradually added to them, a thick paste should be obtained, it should not spread. At the end, glycerin is added to the composition and mixed thoroughly. The resulting creamy mass can be used for application on the face.
We make the basis for makeup from chalk
 The chalk composition must be handled with care, as it can greatly dry the face. Do not apply it to people who already have dry skin with pronounced areas of peeling. To create a white coating, it will be enough to take a face cream and mix it until you get a paste with crushed white chalk. It is most convenient to apply such a composition with a makeup brush.
Alternatively, you can use a mixture of chalk and melted pork fat, but this method is quite laborious and the resulting mixture is difficult for the skin.
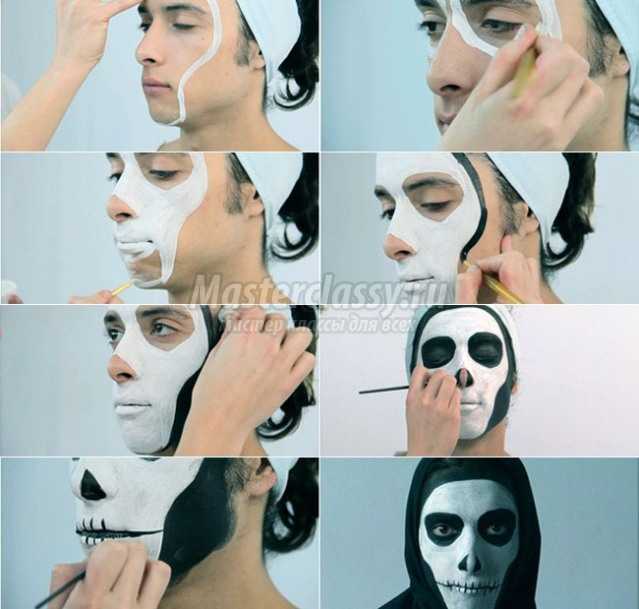
Video: how to make black and white makeup for Halloween
Within the framework of this video, the specifics of applying makeup on the face to create the image of a skeleton are considered. The video is filled with explanatory comments that allow you to clearly understand each step of applying a festive make-up. The author shares his experience and reveals the secrets to make the image more realistic.
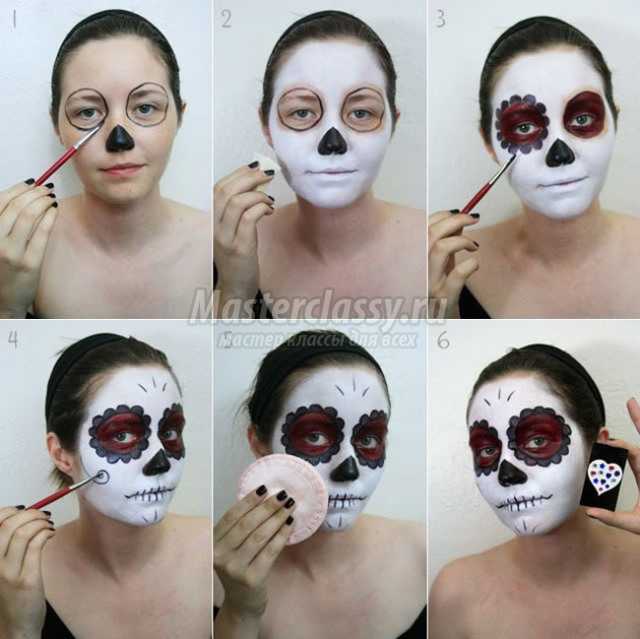
Video: performing white makeup with powder
The video is an instruction for creating a simple and effective image for Halloween. The master class is dedicated to drawing a mask on the face using white powder. Thanks to a clear presentation, high-quality explanation and description of each stage of applying makeup, the process of creating a similar image at home becomes easy to implement.
1 Killer Doll

You will need: light foundation, gray or brown shadows, false eyelashes, liquid eyeliner, eyebrow pencil and red lipstick. To complete the image, work out the knees and elbows, tracing the joints with a pencil.
2. Angel or demon

Popular

Halloween makeup option for advanced users! First, tint the background for the future drawing with a white tonal agent, then use a wet brush and black shadows to paint over the eyelids and eyebrows, and with dry gray shadows or a pencil, draw strokes on the chin and lips.
3. Let's play decadence

Maybe not as impressive as in the previous version, but it’s also much simpler in execution: a white base, a black liner - nothing else is needed!
4. Spiderman

For Halloween makeup in this style, completely fill the eyelid with liquid eyeliner and start applying neat strokes. The secret to success is to let each line dry before crossing it with the next. And be sure to have a good persistent foundation, otherwise everything will float.
5. Alien

Nude lipstick, two shades of foundation - tan and very light, and classic smoky eyes makeup as a base. The usual "reversal" - the use of a light tone where dark is usually recommended, and vice versa - gives an amazing effect of an unearthly face.
6. Infernal gypsy

First draw the contours with a dark green liner and red lip liner, and then shade. Long, but in principle, not very difficult.
7. Bambi

A great option for a light party or celebration in the house with the older generation. In order not to shock the audience too much, make bright eye makeup, blacken the tip of the nose, and use white shadows to place white spots on your face. Mimimi!
8 Catwoman

The complex color transition of the shadows on the eyelids is, of course, the defining feature of this look, but if you make traditional smoky eyes, the image does not lose much. But do not save on false eyelashes: they are fundamentally important in this Halloween makeup for girls.
9. Hellraiser

To make the division of makeup into "heavenly" and "hellish" sides clear, use masking paper tape. Toned half of the face with white makeup, draw the contours of the teeth and eye sockets with an eyeliner, then paint over the eye socket with black shadows. And only when you are satisfied with the result, proceed to the classic make-up on the second half of the face.
10. Vampire

Neutral matte lipstick and glossy lip gloss in the right shade: this look is easy to repeat!
11. Bride of Chucky

Apply blush in circular motions, as if trying to portray Marfushenka-darling, but take the color soft pink, not peach or red. Line your eyes carefully with the liner. From the corners of the mouth down, draw lines with a white, neutral and dark pencil (you can use a ruler). Brrr beauty!
12. Zombies

We draw a contour with a gray eyeliner, do not regret green shadows, use a darker shade on the neck folds and under the cheekbone. Stick the pins to the skin with adhesive tape, apply lipstick on top, and no one will guess. False eyelashes - and the image is ready!
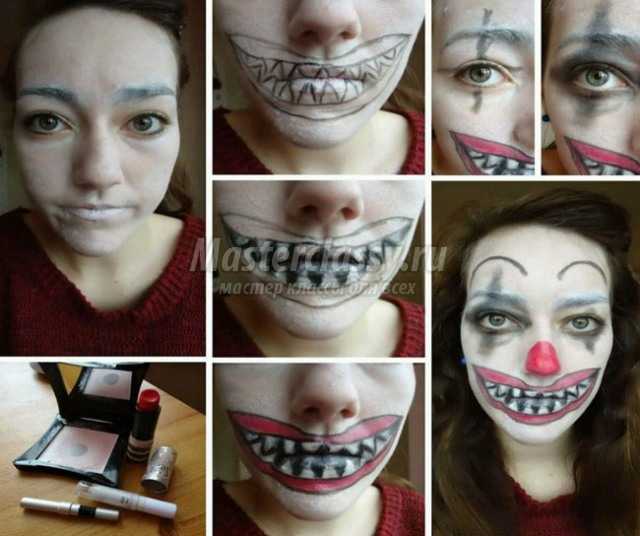
13. Creepy clown

The most theatrical option: be sure to wind this strand on your forehead like a forelock. And the rest is easy: a white even tone and a black eyeliner pattern. Heart, but draw the nose with the same lipstick as on the lips, and go to the kids. Sweet, sweet kids.
14. Tiger cub, not pussy

A very cute and not at all scary option for blondes: a bright liner around the eyes and a cat's "muzzle" depicted with a light foundation and black eyeliner. Moore.
15. Cheshire cat

An option for those who have a firm hand: over a white base, you need to draw a smile clearly and without the right to make a mistake. But, if it works out, you will definitely be the most memorable at the party!