Knitting thread bracelet. Thread bracelets are very stylish, modern and fashionable (100 photos of new products). Classic thread bracelet
The idea of creating baubles has its roots in North America. These wonderful jewelry in the form of bracelets were invented by the Indians, who, creating a bauble, gave it a special meaning and endowed it with the powers of a talisman of friendship. Subsequently, all the traditions associated with weaving bracelets of friendship and love were adopted by hippies and brought their own adjustments to them.
Nowadays, baubles have become a fairly common decoration that can even be purchased in stores. But nevertheless, for many, weaving such a bracelet for themselves remains a much more interesting activity than buying it ready-made. Since in this case it can be made individually for yourself according to your tastes and preferences, in addition, such a product can be an excellent gift, since it is always more pleasant to receive things made with your own hands. Fenichki can be weaved using various materials, but one of the most common are floss threads. It is not so difficult to do it yourself, even for beginners, the main thing is to choose the most suitable and easier way for yourself.
Tips and instructions on how to start weaving floss baubles for beginners
First of all, in order to start learning and weave baubles from floss, for beginners you need to purchase the following materials for work:
Floss threads of various colors (The length of the thread for the future product is always taken 4 times longer than the future decoration itself).
A pin, tape, clip, or tablet as a thread attachment.
Then choose the most convenient way of attaching the threads necessary for the upcoming work. Let's take a closer look at a few of them:
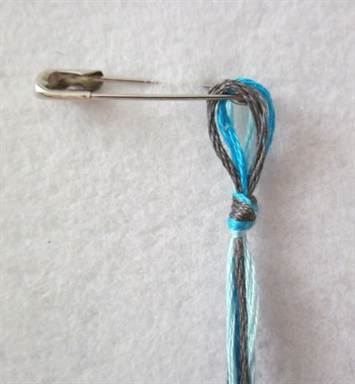
1 way... Each individually taken thread is tied with one end with a knot to a pin. And the pin itself is attached to the fabric or the back of the chair, for example. 
Method 2. The threads are fixed using a tablet - a special plate with a clip.

Method 3. For this method, a clamp is taken, and floss threads are placed between it and a book or dense notebook. Then the clamp is fixed.

Method 4. The prepared threads, collected in a bundle, are fixed with their ends to any surface, which will be convenient to work with, using a wide adhesive tape.
In each of the methods, the threads must be correctly distributed in advance according to the color scheme according to the chosen pattern of weaving of the floss baubles.

Knots are the basis for weaving each fenichka, that is, the ability to make them. Having memorized the basic techniques for making knots, as well as their symbols, it will be quite easy for any beginner to understand all the patterns for weaving baubles. The most common are the following nodes:
 The main knot. This knot has this name because all the weaving of baubles is based on it. It is performed using two threads, as follows. One of the threads, in this case yellow, is slipped under the other, so that a loop is formed into which the same yellow thread is threaded. After that, the loop is pulled to the base of the weave and tightened tightly. It is very important that all knots are the same size.

 Half knot. This knot is already done with four strands. To tie it, the two middle threads must be pulled and secured, for example, with tape. After that, the thread on the left side moves over the fixed ones and pushes under the rightmost thread. Then the rightmost thread is passed under the fixed ones, from below it is threaded through the loop formed by the leftmost thread and both threads are tightened until a loop is formed.

 Flat knot. This knot is done very simply, for this, the left extreme thread is thrown over the middle ones, and the right extreme thread is threaded from below into the formed loop. After that, the right extreme thread must be thrown over the middle ones and pushed under the left one, and the extreme left thread must be passed through the middle ones and thrown over the right one. Then the tips are pulled out until a knot is obtained.
The most simple knots and instructions for them were presented to your attention, having learned how to make which every beginner can weave baubles from a floss with a simple pattern, and then start learning to do something more difficult by choosing one of the methods he likes.
Methods for weaving baubles
The most common and popular weaving methods are straight and oblique weaving. With the help of direct weaving, more complex patterns are made that form various patterns, and the method of oblique weaving of baubles from a floss is quite suitable and this fascinating lesson is just for beginners, therefore, first of all, we will consider it.
Baubles made of floss oblique weaving
Quite often, the beginning of a bauble is done precisely with the help of oblique weaving, which is done using 12 threads. According to this method, the colors in a bundle of threads should be arranged as follows:

The threads are arranged in pairs in color relative to each other, starting from the middle of the product and ending with its edge. After the threads are distributed correctly, their beginning is fixed in the chosen way and the following steps are performed:
We make a fastening knot, about 10 cm from the beginning of the product.
We take two threads from the left edge. We put the first thread on the index finger, pulling it slightly, and hold the second thread with our thumb and middle finger, as a result, a figure similar to the number four should be obtained. We slip the last thread under the elongated second and thread it from top to bottom through the formed figure and pull the threads, carefully forming the first knot. Then a similar second knot is made on the same threads.

In the next step, take two threads from the right edge and, just like on the left, weave two knots.
Then we take the second and third threads from the left edge and weave the same knots, we do the same on the right side. The action is repeated towards the middle, until all the threads are twisted in pairs with each other and the threads that were originally extreme become middle ones.

The second and subsequent rows are woven in the same way as the first. At the end of the weaving, a securing knot is made. As a result of all weaving, a bauble with a pattern very similar to a multi-colored herringbone is obtained.

Straight floss baubles
When weaving baubles from a floss in a direct way, the working bundle of threads is, as it were, divided into two groups, into monophonic threads, which are the base of the baubles and multi-colored for the background and pattern, and the length of the thread for the pattern increases depending on how large it will be. The essence of weaving the product in this way is that the threads of the pattern intertwine the threads of the base according to the pattern. The threads selected for the creation of baubles made of floss by direct weaving are attached in the following sequence, first those that will intertwine the base, that is, knit the pattern, and then the main threads and threads of the background, that is, those with which the drawing begins. Let us consider in more detail the process of making a bauble with direct weaving in the following example.
How to weave baubles from a floss with a "Bringing" pattern:

1. For the drawing, we take threads of five colors: gray for the background and black, red, white and blue for the image itself. The length of the threads for the pattern should be approximately 100-110 cm.
2. First we attach the threads, which will not be used in the first place, namely white, red and blue. Then those, with which the products will begin: the main black and gray. Moreover, the gray thread should be the longest of all, since it will be used most often when weaving a pattern.

3. We begin weaving the product with a gray thread. To do this, we take a thread of this color and first we throw it over the left extreme thread of black color, and then we wind it under it and again over the base thread, bringing it out under its own beginning. After these manipulations, a loop is formed into which from top to bottom and thread a gray thread, then carefully pull it to the beginning of weaving and tighten the resulting knot. Then we repeat the knot on the same thread a second time. In the same way, all 19 black threads of the base are intertwined with a gray thread, and then the next 4 rows.

4. Then the colors of the knots are selected according to the scheme. According to which we first weave 8 black threads (with two knots) with a gray thread, after which we make 5 black knots. To do this, we intertwine the gray thread with a black thread, making two knots in the same way as in paragraph three and taking into account the fact that the gray thread should remain motionless. Then again, according to the drawing, we make gray knots to the end of the row.

5. In the next row, black knots are knitted under black knots, gray ones under gray ones.
6. In the sixth row, white is included in the weaving. The introduction of a new color is carried out as follows: a gray thread is laid behind the weaving, and instead of it, white is taken and the work continues further according to the scheme, that is, the black threads will be braided with a white thread.

7. After the required number of knots has been made with a white thread and two black squares are braided on a thread of the same color, you can return the gray thread, finishing the pattern to the end.
8. We continue to weave according to the pattern until we reach the input of the blue thread.
9. Draw the thread in the same way as white, replacing white with blue and making a knot with the new color. And then we weave the drawing again according to the scheme.

10. In order for the blue thread to leave the weaving imperceptibly, it must be withdrawn gradually. To do this, just as in the case with white, the thread is braided with two black squares and only after that we return the main thread of the background, that is, gray. Then we again continue weaving according to the pattern.

11. The red thread is introduced in the same way as the previous new colors of the picture, after which the rest of the image is added together with it. In order for the drawing to work, it is very important to carefully weave the knots without departing from the scheme.

12. After the weaving has been completed, we tie the remaining ends of the thread together, so that in the end we get four neat and identical knots.
13. The upper threads of white, blue, red and gray colors are fastened with knots and cut off, and the black threads are fastened with knots using a pin.

14. In order to hide errors on the seamy side, cut a rectangle of thin fabric of the required size and carefully sew it with a bauble.

As a result, we get just such a bauble:

How to weave floss baubles with names

Floss baubles with names are woven using two types of knots, shown in the following diagram:

The easiest way to weave baubles from floss for beginners with the inscription will be if you use only two colors. Let us consider in more detail how this is done using the example of weaving the letter A.
Baubles, or, as they are also called, friendship bracelets came into the world at the suggestion of hippies. Children of flowers put a global meaning in their baubles - in addition to the idea “all people are brothers” and its confirmation with these bracelets, by the color of the baubles, one could learn about a person, if not everything, then a lot. For example, the combination of yellow, orange and blue colors told that a person is keen on esotericism and spiritual development. However, gradually the sacred meaning of the baubles disappeared, and they became a simple decoration for the "free in spirit" people.
Weaving baubles is not only fun, but also useful: working with your hands, plus the ability to create and create, plus repetitive actions - all this not only improves mood, but also helps to relax and move away from everyday activities. For beginners, this effect is possible when weaving simple baubles with repeated repetition of actions. To weave your first bauble you will need:
- 7 threads (floss or iris, 100-120cm each);
- scissors;
- duct tape, tape or safety pin.

- Arrange the threads in the order in which the colors will go. It is best to take contrasting bright threads - all the knots will be clearly visible on them. Tie an ordinary knot and secure the bauble with duct tape (on hard surfaces), tape (keep in mind that it can stick to and tear threads), or safety pins (good for outdoor conditions).

- Take the two leftmost strands and place the leftmost red thread on the right light thread from left to right.

- Pass the end of the thread from bottom to top into the loop formed. Tighten the knot by pulling the red thread up.

- The knot should be double, that is, you need to tie it on the same threads twice. The red thread after tying should be on the right.

- Tie the second red thread with a red thread in the same way as in the first paragraphs. In a row, these will be the second and third threads from the left. In the same way, continue to tie this thread around the entire row - in the end, it will be on the far right.

- So, the red thread turned out to be on the right, we go back to the left edge. Take the two strands on the far left again. Now there is a light thread on the left - and she needs to tie the second row. Put the light thread on top of the red thread from left to right, and thread it through the loop from bottom to top.

- Tighten the knot by pulling on the light-colored thread. In the first photo - a regular knot, in the second - a double one. Feel the difference: after tying the second knot, the thread is automatically on the right.

- Braid the row with a light thread and leave it to the right.

- By analogy, continue to weave the bauble until its length is equal to the length of the wrist, or about 17-20 cm.

- When the bracelet reaches the desired length, braid the remaining braids from the bottom and secure with a knot. Do the same on the other side, having previously untied the fixing knot.

- Trim off excess ends. You can admire your creation!

Such kind of needlework as weaving of baubles has gained extraordinary popularity today. The history of the creation of such a bracelet begins in South and Central America, the Indian tribes did not think how to weave baubles, they made them, weaving feathers, blades of grass and even twigs into them, they quickly torn and were lost, but in this case, it was necessary to make a wish, which was obligatory came true, and now it is very easy to make them from floss threads.
Since bracelets were woven not only for their own wearing, but also as a gift, baubles were considered an object with meaning, and not just an adornment, later for this reason the hippie community borrowed a bauble as a symbol of belonging to them. In Russia, they also wove multi-colored bracelets, in the weaving technique of which there were various openwork and embossed knots. Today, weaving baubles is more considered the creation of a decorative accessory, but sometimes these decorations are presented as a sign of friendship.
Bracelets are weaved from threads (woolen, cotton and floss), beads, woven and leather laces, leather and satin ribbons. Such a bracelet can be weaved in several ways: oblique, straight and using the macrame technique, with the addition of beads, beads or chains. But for beginners, the simplest way to weave your first baubles will be a bauble of 2 threads of different colors.
The first method of weaving baubles from floss threads
You will need threads of two different, contrasting, colors with a length equal to the girth of the wrist, plus an increase in freedom of fitting, ties and knots along the edges of the baubles that will hold the two threads together, approximately 30-40 cm each will turn out.
Tie two threads together at one end with a knot, stretch the threads in different directions so that the knot is in the middle, then you can ask someone to help twist the baubles. One bang holds one end of the common thread, and the other holds the other end of the thread, and each begins to twist the thread in one direction and in the opposite direction, i.e. one person twists the thread on himself, and the other - from himself. The threads must be kept tight so that they are then correctly and evenly entangled together. The next step is to take the knot with one hand, and the other ends of the thread together in the other hand and release. The ends of the threads will begin to twist together, only then you will need to correct them a little and at the end tie a knot at the free ends. So a simple two-strand bauble is ready!
The video material will add clarity to the creation of such a bauble:
The second method of weaving a bracelet
According to this weaving pattern, you can knit a voluminous bauble of two threads (in the photo, instead of threads, satin ribbons), the thread should be taken not very thin, the pattern will be more visible if the thread is thicker.

And the video will tell you about the crossover pattern and the final result:
We weave a product from two threads according to the scheme and description
Requires 2 skeins of floss of different colors, scissors, a pin and a pillow to which the product will be attached.
Weaving pattern instructions
This simple bracelet with simple ornamentation for making baubles. More complex schemes should be started after learning simple ones. The strands should be about 1 m long, about five times the length of the finished bracelet.
1) Axial (nodular) thread - knots from the working thread will be tied on it. Tying the bracelet is done in a simple way - a knot is tied at a distance of 7-10 cm from the ends of the threads. The resulting knot is pinned to the pillow. Working and knotted threads are spaced apart from each other.

2) The left thread is now defined as the axial thread, i.e. the right thread will be imposed on it, it must be held with tension, and the right thread is the working thread, the axial (nodular) thread is wrapped around it, making a movement from left to right. The tip of the right working thread is pulled out of the formed loop, after which the finished knot is tightened - this is the right loop knot. Further, in the same manner, the second knot is made, not tightening too much, it is closely shifted to the first knot. The result is a double knot. Now the threads change their position and role, i.e. the axial thread becomes the working thread, and the working thread becomes the axial (base).


3) The next left buttonhole knot is performed in a similar way, only the direction of the working thread of the double knot is vice versa, from right to left.
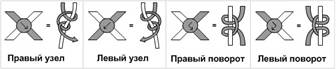
4) The next knot that will be needed in weaving baubles is a right and left turn. For the right turn: on the axial thread, make the right loop knot with the working thread, then the left loop knot. For a left turn: the working thread will weave the left buttonhole and then the right buttonhole.
When a bracelet of two threads is woven of the required length, it is necessary to fasten the threads, i.e. tie the ends of the threads in a knot, at the end of the work it is necessary to bring the product into a neat look - cut off the excess ponytails with scissors.
When weaving a bauble from two threads has been tried, then you can try to work with three, four, and then with a large number of threads.
Weaving from 3 threads of a beautiful bauble
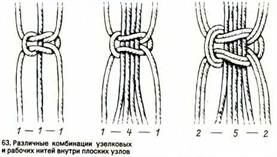
Below are the types of knots that can be selected or alternated in weaving baubles:

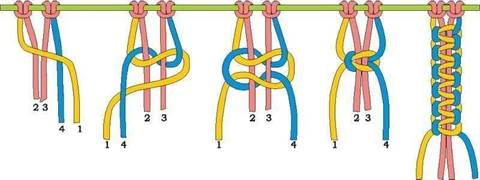
1) The first knot on the left in the photo is a double flat knot.

You need to tie it like this: first, a left single flat knot is woven, followed by a right single flat knot under it, this is how a double flat knot is obtained, with such a knot you can weave the whole bauble, but to make the knots look even and neat, you need a thread that goes inside the knot, so say base, pull up regularly. The threads that tie the warp (in Fig. 1 and 3) should be four times longer than the thread on which these knots are tied.
A double flat knot can be woven from 4 threads, from five, from six, as many as you like. The photo shows the variations of this knot, due only to the number of working and knotted threads.


Instructions
Take floss threads for the bracelet. You should have 4 strands of the same color (eg white) and 4 strands of a different color (eg blue). The length of each strand should be 100 cm.
Thus, on the left you will have a diagonal line pointing in one direction, and on the right - in the other. The lines form a corner in the center of the bauble. Tie the center threads in a knot.
Related Videos
Sources:
- bracelet of threads baubles in 2018
A bracelet from thread also called "bauble", and in the West - a bracelet of friendship (Friendship Bracelets). The traditions of weaving friendship bracelets originated with the North American Indians. Then she was taken over by hippies and rastamans. Today, baubles have become a stylish adornment for which gender, age and status are not an obstacle.

You will need
- 1) Thread floss
- 2) Weaving pattern
- 3) scissors
Instructions
To get started, practice weaving the simplest of the eight bracelets. thread oblique and straight weaving. Take threads of different colors to quickly understand and remember the essence of weaving.
Secure the ends before weaving. thread knot, braid, or make a loop with braid. After the bracelet is ready, process the other end in the same way. The bracelet can be made in the form of a fastening strap, as on. This is - as your fantasy tells you. In the process, secure the end of the bracelet so that it does not twist (you can pin it with a tailor's pin to something soft).
Start weaving. Even if it seems to you that nothing is clear in the diagram, try it! And you will definitely learn.
Related Videos
Helpful advice
Fenichka can be an unusual gift. When making it for loved ones, put your love into it.
Sources:
- Fenichka or friendship bracelet
- weave a bauble from thread
For the first time, the explosion of fashion on bracelets from thread, so called bracelets friendship, originated in the days of the hippies. And now, in the new millennium, the relevance of these simple but beautiful jewelry does not fade away. Baubles can be weaved by anyone. You just have to sit down and start. And after some time, you will effortlessly get amazing and complex patterns. And your friends and family will be happy with such an original gift. And most importantly, do-it-yourself things.

You will need
- multicolored threads, scissors, safety pins
Instructions
First, decide on the color from which you will make. Their number must be even. Usually they take a meter thread, since the length should be four times the size of the finished one. To start the bracelet neatly, you can make a loop. Fold the threads in half and tie the running thread where you will start. Begin to braid the folded threads in knots until you have a loop. Next, start weaving the main pattern. Remember that it is very important to maintain a strict sequence of knots.
In order for the weaving process to be convenient, the threads should be fastened, pinned to a hard pillow, sofa, or even to. Lay out the threads in the color sequence that you need. A simple knot in is the main type of weaving. To do this, take a running thread and circle around the adjacent thread - draw it first down, then up, thread it into the resulting loop and tighten. Tie knots with each thread alternately from left to right. Try to make the knots even. If the thread is twisted and the color is not the one you need, there are two of the situation. Either redo the knot or loosen it slightly, and then, while holding the vertical thread, pull the other up and away from you. If you run out of thread, thread it onto the wrong side of the bracelet so that the thread does not get in the way. Take a new thread and attach it to the place where the old one ended. Tuck it inside out and tie with two knots. Turn inside out and tie a knot from the ends of the new and the old thread.
Floss bracelets or so-called baubles became popular in the 60s thanks to the hippie movement. "Children of flowers" gave each other homemade jewelry made from natural materials, including threads, as a sign of friendship or love. It is not customary to take off the presented bauble until it breaks by itself or until the feelings come to an end. By the way, it is rather difficult to break a floss bracelet, so such bracelets are worn for a long time.

You will need
- You will need:
- - floss threads;
- - pin.
Instructions
You can even weave it yourself. The pattern is woven in knots tied in different ways and in a certain sequence. To begin with, you should master the simplest and most understandable of the floss. For example, weaving in an oblique fashion. Take 6 threads of floss about 4 times the required length of the finished product (also take into account the stock for strings). For example, let it be threads of three colors, two of each color. Tie the threads into a knot and secure them to the work surface - for example, pin them with a pin to the back of the sofa. Weave the threads into a pigtail a few centimeters long, this will be one of the strings of the future bracelet.
Next, proceed to weaving the baubles itself: spread the threads along the working surface according to the colors. Take the first strand and tie two knots with it around the second strand. Similarly, tie the third, fourth, etc. with the first thread. After you go through the row, separate the first thread from the left again and begin to weave the second row. Thus, from left to right, you will weave row by row, lengthening the bauble. When the bracelet has reached the length you want, braid the threads to make a second tie and knot at the end. The bracelet is ready.
Straight weaving is a little more difficult than oblique, therefore, to master it, you will have to show perseverance and patience. But in this way you can make more interesting and complex ones, weave names on them or. You should start weaving such a bracelet in the same way as in the previous case: fasten the threads and weave a pigtail. Take the first left thread - it will be the leading thread throughout the entire weaving (it is better to make it longer than the others in advance). Weave the first row with thread, and then weave the main threads in the opposite direction with it, forming the second row. Also weave the rest of the rows without changing the leading thread.
When you get to the point of weaving the pattern or, instead of braiding the main thread with the leading thread, braid the leading main thread, thereby changing the color of the knot. It is important to knit these knots in the opposite direction so that the leading thread can continue weaving further.
Helpful advice
Try to make the knots the same and even, tighten them if necessary.
Sources:
- floss bracelet
Probably, many who saw and held beadwork in their hands would like to have them at home. Of course, the most rational option is to learn how to weave from beads on your own. This is not as difficult as it might seem at first glance. At the initial stage, it is enough to learn how to weave only the lightest bracelets available to every beginner.

You will need
- - beads;
- - threads;
- - fishing line;
- - needles;
- - tapes.
Instructions
First, take a fishing line or nylon thread. Please note that if you are dealing with a thread, then you will need two needles, which should be located on both ends of the nylon thread. So, prepare nine warp threads. You have to learn how to weave a bracelet - a pigtail. To do this, you need to make nine blanks. If you do not want to get a too colorful bracelet, then you should divide the blanks into three types: three beaded threads of one color, three others and three third ones.
First, you need to create nine beaded strands. Suppose that yellow and green colors will participate in the future bracelet. In this case, you need to string yellow beads into three strands, three green beads and three beads. At the same time, do not forget to fasten the ends of the threads so that the beads do not slide off.
Create nine bead strands. To do this, string the small beads one at a time so that the resulting thread is 1.5 times the circumference of your wrist. After the blanks are ready, start weaving. To do this, arrange the threads by color, that is, divide the nine threads by three, into three parts. Now start weaving a regular braid. This technique is familiar to everyone. Do not forget to carefully secure the beginning of the weave, otherwise your bracelet will twist. After you reach the required length, connect the resulting bracelet, or attach a suitable clasp.
You can weave a more original bracelet using the same technique. To do this, take thick threads or even ribbons. You will need three things. On one of them, put on the required length of beads. Do not choose beads that are too small. On the contrary, rather large specimens that resemble pearls or turquoise will come in handy. Now begin to braid the braid so that the side elements bend around the bead, creating a frame.
Related Videos
Helpful advice
For the greatest effect, leather can be used instead of ribbons or threads. Such bracelets are simply unique, any fashionista will envy if you use a simple technique in combination with actual materials.
Sources:
- How to braid a bracelet

You will need
- Threads, beads, scissors, button or large bead.
Instructions
Take strong thread, fold it in half several times.

Tie a knot, cut off the excess thread with scissors. As a result, there should be three strands.

Weave a small piece of braid using three threads. Next, start stringing the beads.
Today we offer you to make fashionable bracelets with your own hands.
Thread bracelets have become mega popular today. Such a bracelet is worn not one by one, but in whole rows in several copies. On the hands, such bracelets look very stylish and fashionable. Well, today we propose to make such a bracelet with our own hands. Look at the photo and video, choose the bracelet you like and start learning. Everything you may need (depending on the type): floss threads, beads, chain, button, golden nuts, ring, scissors and duct tape. Good luck!
Weaving bracelets
How to make a bracelet from threads
You will need: floss threads or lacing, large beads, scissors and a button.

Measure the required number of threads so that we get a cut that folded in half will be equal to: 1st side 66 cm, 2nd 48 cm.Then, we fold it in half (see photo). You should have 3 identical strands and 1 short strand.

At the very top, retreating about 1.5 cm, we make a knot. Cut off the short 4th thread.

Start braiding. Weave 2.5 cm and thread the beads into the left strand.


Again, left-blank-right. Here's what you should get.

Weave it on our wrist. At the end, we also just weave about 2.5 cm (as at the beginning). We make a knot.

We thread a button at one end, two threads into each hole. We tie a knot.

Cut off the excess threads. We made such a beautiful bracelet made of threads and beads with our own hands.

Oh, here's how they look in different colors.

And on the hand. Very stylish. Is not it?

Macrame bracelet

To weave a macrame bracelet, you need: 3.5 m of fine colored lacing, a flat ring, an embroidery needle, scissors, tape.

Cut the lacing into sections: 2 x 70 cm, 2 x 50 cm and one 25 cm. Fold the 50 cm section in half and remove the loop on the ring. Also repeat on the other side of the ring (see photo).

We take a 70 cm cut, fold it in half and make an air loop, wrapping it around our 50 cm cut. We throw the left side of the 70 cm cut onto the right side and thread it inward as shown in the figure on the right.

Pull out all the way and slide the resulting knot tight, all the way to the top.

Now we make an air loop on the other side. This time we throw in the right side from above.

Make a tight knot again. Continue weaving macrame: left, right, left, right, etc., until you need the length of your wrist.

At the end of weaving, insert the needle in turn from one side and the other and pull through 2-3 knots as shown in the photo.


Cut off excess threads.

Now take the remaining piece of 25 cm and pass it through the extreme strands on both sides, tie as shown in the photo.

We begin to weave macrame as in the beginning: left, right, left, etc.

Having made 5-6 rows, we also sew them with a needle.

We make knots on both sides and cut off. If the last steps seem difficult for you, you can simply weave macrame around the entire perimeter of the bracelet.

Your original macrame bracelet is ready.

DIY beaded bracelet

For such a bracelet with beads, you need: leather cord, colored lacing, beads connected together, a nut.

Fold the leather cord in half to make a loop that fits the nut as it will be the fastener. Start wrapping the leather cord with colored lacing (6-7 times).

Place the beads along the string and continue to wrap the lacing around each bead.

Continue wrapping while measuring the length along your wrist.

At the end, make 5-6 more loops and tie a knot with leather lacing, grabbing the loops with it.

Thread the nut and make the knot again, securing it.

Cut off excess threads.

You can make a whole bunch of such simple bracelets.

On the hands, they look very nice and modern.

How to make a friendship bracelet
Another mega popular bracelet is a friendship bracelet, which is woven from colored floss threads.

They are exactly what you need.

Take a pair of 6 colored threads. We tie them into a knot, leaving an extra 5 cm. For the convenience of weaving the bracelet, fix its upper part with tape.

As in the picture: we tie together 2 extreme threads: red and orange.

Pull up and to the right to tighten securely. Important: we make double knots! Now do the same with each color (i.e. red with all colors until it is at the extreme on the other side).

Repeat the same with opposite threads.

When both red threads are in the middle, tie them and pull them to the base (also twice).

We repeat the weaving to the end. Receive a charming rainbow friendship bracelet. You can braid it at the end.

Here, they are our beautiful)))

Isn't it lovely?

Weaving bracelets from threads and chains

All you need is colored threads, a thick bracelet chain, scissors, invisible ones.

Divide the threads by color into two thick strands. We grab them with the help of invisible ones and begin to carry them through the links of the chain.

We carry out the first strand and let it go under the other. We also draw the second strand and, again, let it go down.

We repeat the steps to the end and get a chic braided bracelet.

Oh-oh-very stylish)))

DIY bracelets video
Related entries:
No related records found.