Master class “Postcard for Santa Claus. Soviet New Year cards
Good day! On November 18, Russian Santa Claus celebrates his birthday. Santa Claus always knows what each of the children wants to receive from him as a gift, and we propose to show imagination and think about what Santa Claus himself would like to receive as a gift from you. We invite you to surprise Santa Claus and make him a great gift with your own hands.
It will be even better if, and you can attach it to a postcard made with your own hands and to a beautiful postcard from the Internet, by the way, you already have a large selection, just click on the selected text and choose.
Postcard "Happy birthday, Santa Claus!"
What is the birthday of Santa Claus without a postcard? Doing it yourself is not difficult. To do this, you will need:
- Paper;
- Glue;
- Scissors;
- Ruler;
- Pencil;
- Cotton wool;
- Markers;
- Paints;
- Brushes;
- Sequins;
- Wax crayons.
Offer your child your help in creating a card for Santa Claus and tell him about the tricks that you yourself did in childhood when making cards. For example, if you draw snowflakes with wax crayons, and paint over it all with a layer of watercolor paint, you will get just a magical plot. Or - to make voluminous snow on a postcard, you just need to glue cotton wool with ordinary PVA glue. And to make the snow seem more real - sprinkle the cotton with glitter, while the glue is still dry - the snow will begin to sparkle.

The options for creating a postcard are endless. It all depends on the child's imagination. Dedicate the evening to such a pleasant activity, and in the morning, together with your baby, go in search of a magic mailbox that will deliver a letter straight to Santa Claus. I propose to make this option:

We glue sheets of white and red paper.

Bend the red sheet with a corner

We bend it again, make a sharp tail of the cap

Now we make a beard, cut it into strips without cutting to the end and twist it with scissors

Cut out the oval of the future face of Santa Claus from pink paper and glue it. We make a mustache from a strip of white paper - wrap the edges with scissors and glue. On the edge of the cap, we also glue a white strip slightly larger than the width of the beard. We make a pompom on the corner of the cap - cut out a circle from paper and cut it on all sides. Finally, draw the eyes, nose and mouth.

Greeting card for Santa Claus with children's hands
I found such a postcard on the Internet on a homemade craft site.
Materials:
- colored paper (pink, red, white),
- glossy green cardboard (for the Christmas tree),
- PVA glue.
To begin with, we take colored paper in white, pink, red and green.

We cut out the elements of the future postcard from it - the details of Santa Claus (nose, mustache, beard, eyes and cap) and the Christmas tree.

The resulting elements are:

We glue the details on the red rectangle in the following sequence: face, eyes, beard, mustache, nose, cap. And, of course, a decorated herringbone.

Such a handmade Santa Claus will accompany your gift and deliver it safe and sound.

Postcard with Santa Claus from the palm
And here is such a cool master class for which we need:
- colored cardboard,
- colored paper,
- paints,
- glue,
- brush,
- toothpick,
- scissors.

On the front side, we will make a herringbone. To do this, we need to cut the colored paper (green) into strips.

Along the entire length of the strip, you need to make cuts and use a toothpick to twist the strip, glue the tip.


In this way, we make 9 more pieces.

We glue it on a herringbone-shaped postcard. For decoration, you can glue beads on top.

Let's make a funny Santa Claus inside the postcard. My daughter helped me, we make a drawing on the palm, as shown in the photo.


We put a palm print on the card and touch up the unpainted places with paints. Draw the eyes, nose, mouth.

The card with Santa Claus is ready, it remains only to write a Happy New Year!

DIY greeting card to Santa Claus - ready-made templates


You can invite the children to make an elegant postcard themselves from scrap materials, or you can print a ready-made template so that the child can write his innermost desires into it. Indeed, on such an elegant postcard, desires come brighter and more colorful, kind and fulfilling!
Postcard - through letters

A simple yet original postcard can be made by drawing large, wide letters of congratulation and cutting through them. The child himself, of course, cannot cope, so help him if he wants to make such beauty. The main thing here is to play on the contrast between the cover and the inside of the postcard. For example, the top is white and monochromatic, while the inside of the card is red or motley.
Postcard to Santa Claus using quilling technique

An inexhaustible flight of imagination can be shown if you make a postcard using the quilling technique. Even a white snowflake on a light background looks very gentle and airy if it is made with soul and thoughts about the fulfillment of a children's New Year's dream. The technique itself is quite simple, the point is twisting a strip of paper on a stack or a toothpick.
DIY greeting card with simple embroidery for Santa Claus

A postcard can not only be drawn or cut out of paper, but also embroidered with a cross, decorated with beads, sparkles and bows. Even a simple little embroidered Christmas tree inscribed in a postcard is pleasing to the eye and will definitely please the good Grandfather Frost. For beauty, it is better to take scrapbooking paper or any other textured paper, and print or write the inscription on a strip of paper by hand and glue it.
Ideas of beautiful cards for the Birthday of Santa Claus


That's all for me. Such a holiday, of course, cannot be ignored. Create with your children and make each other happy. Good luck to you!
Learn how to sew Santa Claus, make Santa Claus. See how to make a New Year's card by following two master classes.
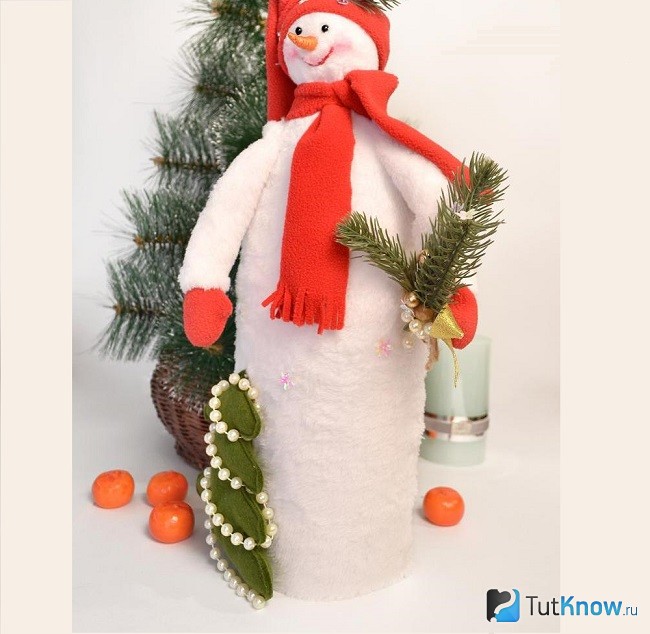
How to sew Santa Claus?
One of the presentations can be a Santa Claus figurine, which is worn over champagne. When you master this simple technique for creating a New Year's character, you can sew a Snow Maiden, a snowman.

To craft Santa Claus, use:
- artificial fur;
- fleece in three colors - white, flesh, blue;
- foam ball with a diameter of 6 cm;
- holofiber;
- blue crepe satin;
- sequins;
- oblique inlay;
- for the eyes - a plastic hemisphere;
- scissors;
- textile glue.

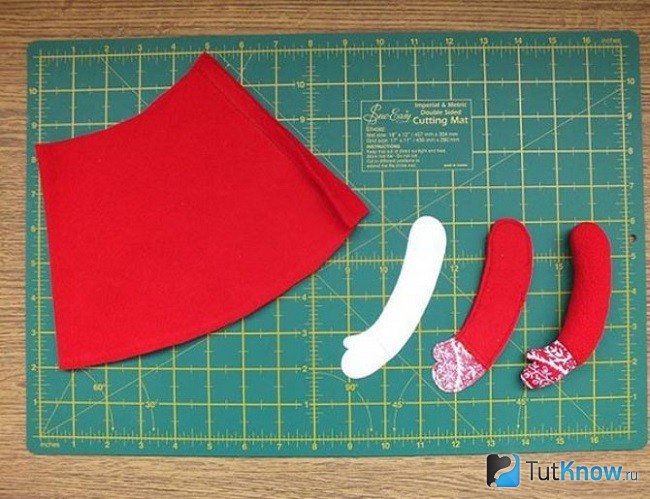
For a Santa Claus fur coat, you will need to cut out two triangular blanks rounded at the top, with small cutouts for the head at the top. Treat large side cuts with a bias tape.

From the same fabric, cut 2 pieces for each hand, stitch them. Sweep the back and shelf of the fur coat together.

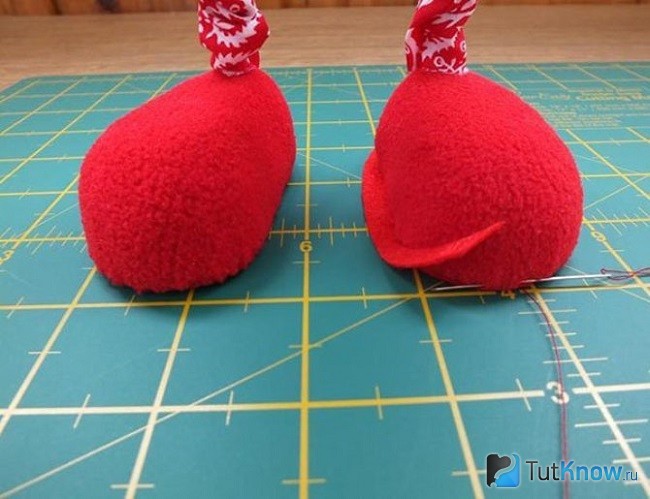
Place the ball on the fleece square, lift the edges of the fabric. Wind them over the ball with thread to form a neck, cut off the excess. Use a small piece of the same fabric to make a nose by stuffing it with holofiber or cotton wool. Sew these parts in place, as well as hemispheres instead of eyes. You can replace them with buttons.

Put your head back in place, sew it on.

Measure the volume of the head, cut out a rectangle according to this size, the side of which is equal to this figure. Sew it on the side, gather on top with a thread with a needle, tighten.

Cut the edge out of the fur for the hat, sew it to it.

Stuff your hands with holofiber, helping yourself to push it through with a pencil or wooden skewer. Sew fur strips to the bottom of the sleeves.

Sew your hands to Santa Claus's fur coat.

Cut out several rectangles from white fleece - their difference in length is 1.5 cm. Cut the blanks into strips 5 mm wide, leaving a little solid cloth on top.
The fleece needs to be cut so that the strips go along the transverse. Then they will stretch along the long side of the rectangle.
We start sewing on the beard from the longest workpiece. Stitch shorter and shorter ones on top.

Now you need to gently pull on each strip so that they take on a curled shape. Then the beard will turn out curly.

Attach snowflake sequins to your fur coat. Wrap the wand with silver tape to make a staff.
Here's how to sew Santa Claus to make him look so cute. If you don't have blue felt, use red.
Then you can make such a nice snowman too.
And here's how to sew Santa Claus using another idea.

Prepare for the workshop by taking:
- fleece in red and white;
- cotton fabric;
- holofiber or synthetic winterizer;
- felt;
- foam rubber;
- buttons;
- beads;
- beige cotton;
- wool;
- felting needle;
- thick and thin wire;
- floss threads;
- cardboard;
- pliers;
- stationery knife;
- acrylic paints;
- glue gun;
- brush.
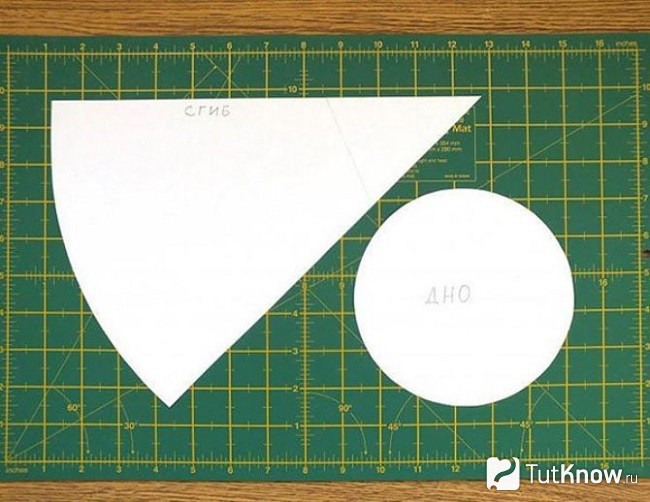
Using this template, cut out a triangular and round cardboard blank. Attach a round one to the foam rubber, cut out a part of the same shape from it. You also need a fabric element, we also make it round, but a little larger so that the curved edges go onto the cardboard.
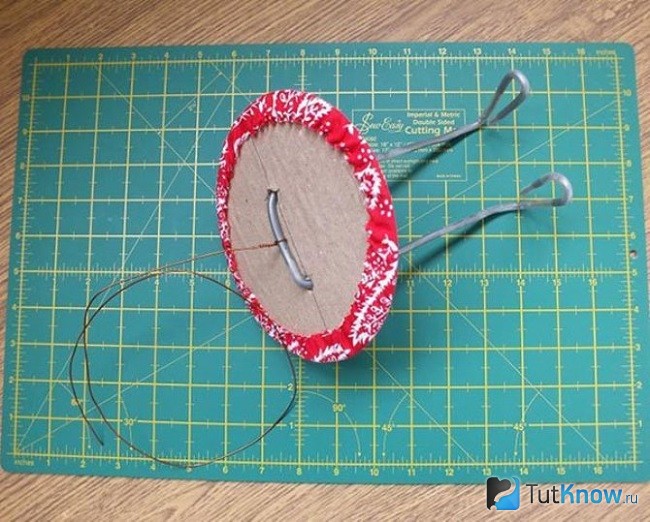
When folding the edges of the fabric, you need to sew along the contour with a basting stitch, pull the workpiece over a circle of cardboard. Pierce this part with one and the second ends of a thick wire, thread them here, twist to make the character's feet. Screw a thinner wire onto the metal wire bracket from above.
Sew a belt from the same fabric, cut it in half, put it over the feet on the legs of Santa Claus.

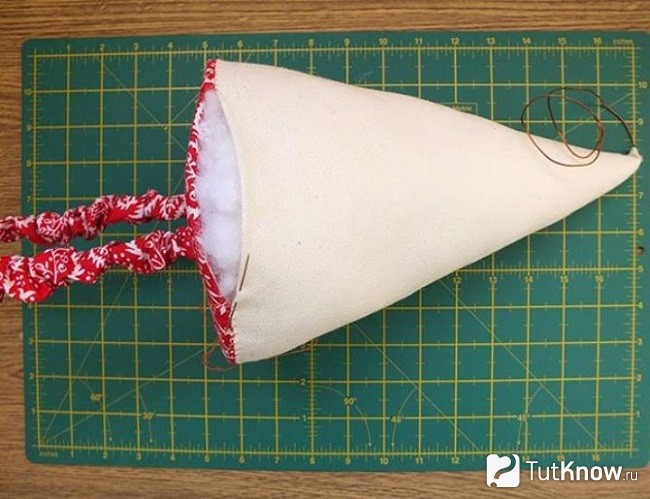
Now, attaching the cardboard template to the beige fabric, cut a triangle out of it, sweep the sides of this figure to make a cone. Slide it over a piece of fabric and cardboard, stuffing it inside with filler. In this case, the small wire must be pulled out through the upper hole made in the cone. Stitch this Santa Claus fur coat with a cardboard bottom.
We cut out the feet of our character from cardboard, attach them to the wire loops with a glue gun. We cut out the shape for the shoes from the foam rubber, we also glue them to the lower part of the legs.

Feet should be sheathed with fleece, cut in the shape of an oval. From the bottom, pull this blank with a thread using a needle. Cut a piece of felt to fit the sole and glue it on.
Mark where the face, the cap will be, using a simple pencil. Draw with acrylic paints the eyes, mouth, eyebrows of Santa Claus. Fold the nose out of pieces of wool, sew it onto your face.

Cut out a canvas of such a size from red felt to be sewn to the body of Santa Claus in the form of a fur coat. Cut out your hands, gloves of our hero, put filler in these blanks.
We decorate the hem of the fur coat with pieces of felt of different colors. Sew on them to make houses, mushrooms, Christmas trees. Sew the handles into place.

Use white felt to cuff the boots and cuffs for the sleeves. These details should be wavy on one side. Sew them into the designated places, like the collar on a fur coat.
To sew on white felt cuffs and collar, place the edges of each of these blanks right-side up against the surface to be sewn. After stitching, fold the lapel back to the inside of the seam.

Decorate the edge of the fur coat with a piece of felt of the same white color. In order to sew Santa Claus further, you need to make a beard out of wool for felting with your own hands. To do this, cut a piece 10 centimeters long from it, glue it just above the line of the beard, for the mustache we separate the strand from the wool, sew it as a mustache. Use scissors to shape these elements into the desired shape.
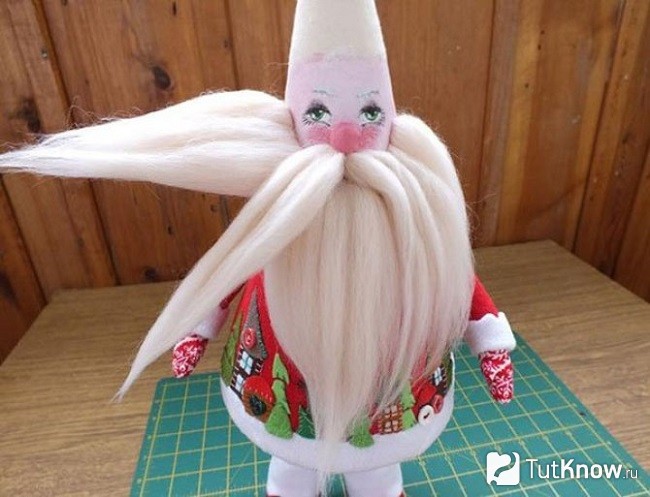
Cut a triangle out of the fabric with an elongated, sharp top corner. Sew its sides to make a cap. Sew a strip of felt wavy to it on one side, this will be a frill of the headdress. Attach a white pom-pom to the tip of the hat.

It remains to make small pom-poms from green fabric, sew them to the boots of the winter wizard, cut a Christmas tree out of felt, decorate it with buttons, and sew hats on the side.

Here's how to sew Santa Claus, make a lush beard and mustache for him, beautiful clothes with your own hands.
New Year's Santa Claus from improvised means
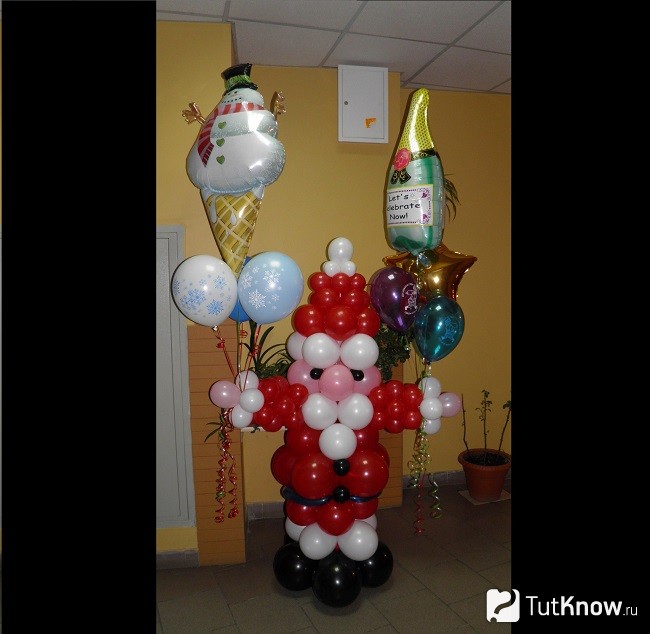
If someone wants to create an image of this foreign brother of our Santa Claus, they can use the most unusual objects, for example, a plastic bottle or balloons. This can be placed at the entrance to an office, store, institution to create a festive mood for everyone. And at home this New Year's wizard will come in handy.

For work, prepare:
- long balls, as well as round balls of different sizes - pink, red, black;
- beads;
- threads;
- water;
- glasses;
- glue;
- rope;
- pump for balls.

First, use the pump to inflate 4 black balls of the same size. We tie each of them after filling with air with a thread. Then all four balls are tied together with a rope.
To prevent Santa Claus from being blown away by a gust of wind, fill the red ball with a little water, tie it to the center of the structure of 4 black balls.
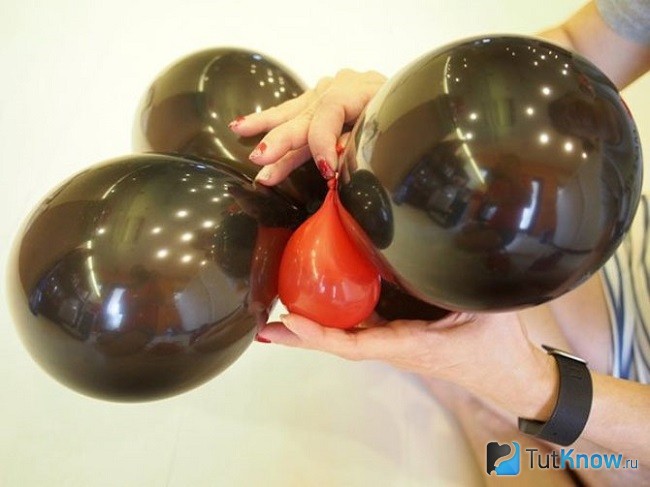
Take another red ball, put a bead in it, fix it with an elastic rope.
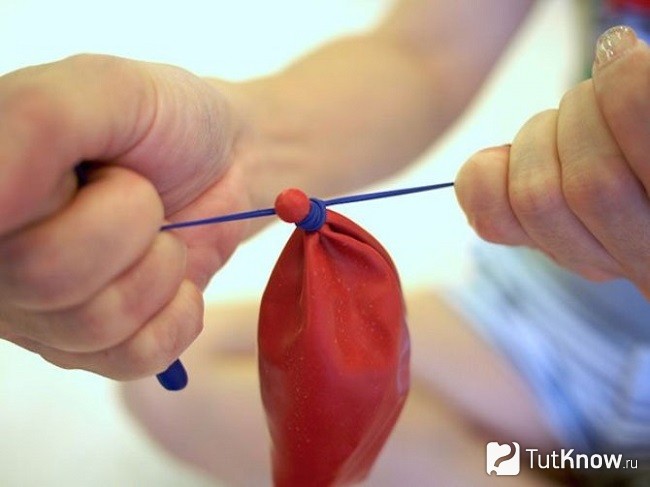
Now inflate it, tie it with a thread, it needs to be fixed in the center of the blank of 4 black balls. In this case, the tail of this red will be at the bottom.

We make the head of Santa Claus from a pink balloon that needs to be inflated, tie it under a red bead. Pump one pink and one black balloon with air. The dark one will become a belt, this piece needs to be glued to the belly of Santa Claus, as well as the buckle, which will become a twisted pink ball. You can make the edging of the fur coat and the clasp from two long white balls.

Inflate a white long ball, tie it around the winter wizard's neck so that he has a scarf. The arms will become two long red balls, and the cuffs will be two white ones.
Make your hair from the same materials, or use a sheet synthetic winterizer by cutting and gluing it on your face. You can make these parts, the Santa Claus cap at your discretion.

If you like, on New Year's, Christmas Santa Claus will be made of many balls. They also need to be fastened together with rope and glue.
If the child before going to bed remembered that in the morning you need to bring Santa Claus or Santa Claus to school or kindergarten, do not despair. You will make a winter wizard figurine in just 20 minutes.
The main thing is to take:
- transparent plastic bottle;
- scissors;
- cotton wool;
- colored paper;
- black plasticine;
- Super glue;
- plastic packaging for tablets;
- red napkin.

Put a red napkin in a clean transparent bottle.

Use scissors to cut out the plastic dispensers from the pack of pills that will become the eyes. Place a small piece of black plasticine in them so that the pupils appear. Glue these blanks to the top of the plastic bottle.

Roll up a piece of cotton wool, glue the resulting nose to your face. This is how Santa Claus looks at this stage, the photo clearly shows.

Cut a triangle out of red paper, grease its side with glue, glue it to the opposite side to make a Santa Claus hat. A cotton wool fringe, a tassel of the same material is attached to this cap.
Fold a sheet of cardboard in half, glue down a felt rectangle.

Place a thinner strip of black felt on it. To make a buckle, draw it, cut it out, glue it in place on a piece of felt or yellow cardboard.

At the top of the postcard, glue two toy eyes, and just below the red felt circle that will become the nose. To make a beard and hair, roll up some small cotton balls and attach them with a glue gun.

Using the small pliers, help yourself to roll up the wire to make glasses out of it. Cut a cap out of red felt, glue it on Santa's head.

That's it, you can write congratulations and give such a wonderful postcard. If you want to make a voluminous one, then make a fluffy Christmas tree. It is not difficult to make a postcard of this type for the New Year. It is interesting to create its details with your own hands. Here's what you need:
- light-colored cardboard;
- green and red colored paper;
- scissors;
- glue.

Fold a piece of cardboard in half. Cut 3-5 strips of different lengths from green paper, their widths being the same. At the top, you will glue the shorter ones, gradually attaching the longer elements to the bottom.
The strips of colored herringbone paper should be three times longer than the blanks that will result from folding them.
Fold the elements for the Christmas tree with an accordion, glue one of their sidewalls to the right, and the second to the left postcard. Cut a herringbone out of red paper, attach at the top. With the help of white acrylic paint, you can apply a pattern to the Christmas tree; all kinds of glitter are also used for this.
We hope that the presented master classes will give you new ideas for inspiration, you will make gifts for the New Year with your own hands in advance, so as not to be distracted by this in the last days of the upcoming holiday.
For you - an interesting plot that shows how to sew Santa Claus.
Check out how to make a New Year's card using 3D technique.
Master class "Postcard for Santa Claus"
Target: to develop artistic and creative abilities of children and imagination.
Tasks:
teach how to make a postcard;
promote the development of attention, fine motor skills of hands and imagination;
cultivate perseverance, accuracy and dedication;
Build a commitment to caring for others.
Master class progress
Guys, I am glad to welcome you to today's master class.
Do you like holidays? Which?
The most favorite holidays for most people are Birthday and New Year. Guess the riddle:
Who comes to us in winter
Visit everyone's home
With a beard and a side,
And a gift bag?
Above the mustache is a red nose.
Who is this? .. (Santa Claus) (Note: the riddle is taken from the Internet. Access mode: http://mirdetstva5.ru/zagadki-pro-deda-moroza)
Santa Claus is a character famous not only for his kindness, but also for his fabulous congratulations. And everyone is used to the fact that he brings us gifts. But you can congratulate Santa Claus himself. After all, he has his own birthday. 18 November is considered to be the official birthday of Santa Claus. This date is associated with the onset of frost in the homeland of Santa Claus, in Veliky Ustyug, and was chosen by the children themselves back in 2005. On this day, the celebration of the birthday of the famous birthday man is held in Veliky Ustyug. Do you want to congratulate Santa Claus?
All of you can write a letter to Santa Claus and attach a postcard with congratulations to the letter. Today we will make this postcard.
- For work we need the following materials and tools: thick album sheet, colored paper, buttons of different sizes, for decorating sequins or rhinestones, ribbons, ribbons, double-sided tape, scissors, glue, hole punch, ruler, pencil, black marker or black felt-tip pen or black gel pen.

So everything is ready. Let's start making the postcard.
Take an album sheet, put it in front of you. Fold the right and left sides as follows:

Please note that we are not bending the left and right parts evenly, so the card will turn out more interesting.
The base of the postcard is ready. Set it aside for now. Let's start decorating it.
I have prepared Christmas tree and snowman templates in advance.

Take colored paper. Better to take soft colors. Circle the templates on colored paper. The resulting shapes must be cut out. Remember to follow safety precautions when working with scissors.

Now take the base of the postcard and glue (using a glue stick) the resulting colored Christmas tree and snowman on different parts of the postcard as follows:

To make our snowman and Christmas tree come to life, become voluminous, we use buttons. You can use buttons in different sizes and colors. It all depends on your imagination!
I'll start with the snowman. I'll take 2 white buttons of different sizes. First, I'll attach them to the colored paper snowman on a postcard, check if they fit me, and then I'll stick them with double-sided tape.


Note: Most grade 2 children still struggle with some types of double-sided tape (it doesn't cut well and sticks to scissors). Therefore, it is best if one of the adults will cut off the pieces of scotch tape. If the child can cope with this work, then he performs all the actions on his own.
Now let's turn our attention to the Christmas tree. Take buttons of different colors and sizes, attach them to the Christmas tree made of colored paper on the postcard. I took different sized green buttons and small colored buttons. If everything suits you, you can glue the buttons with double-sided tape.


With the help of buttons, we will depict colorful balls hanging from above. Let's attach everything to the postcard first, check if everything suits us. Buttons can be glued with double-sided tape.
There are free spaces left on the top and bottom of the postcard. They can be decorated with ribbons or ribbons. I chose a red bindweed ribbon. In order to glue it evenly, use a ruler and a simple pencil to draw straight lines.

We also draw lines-strings with a pencil to the balls-buttons at the top of the postcard. You can use a ruler if necessary. Using a pencil, draw pens and a hat for a snowman. Once we have finished working with a pencil, we can trace the lines with a marker, black felt-tip pen or black gel pen (except for technical lines for braid). I'll use the pen.

Then we measure out pieces of tape of the required length and cut off with scissors. Then, using a glue-pencil, glue the braid exactly on the lines.

Now we will decorate our card with sequins or rhinestones. You can also make confetti. I use sequins in the shape of snowflakes. First, I'll attach them to the postcard. I like everything. You can glue the sequins with double-sided tape.

It remains only to make the strings. With the help of a hole punch we make holes.

And we insert a ribbon (I have a red color) into the holes, tie a bow.
Our postcard is ready.

Now you just have to write a congratulation to Santa Claus inside the postcard and send or personally present the birthday person with a hand-made postcard.
The master class was held for grade 2 students. The guys got such cards.


DIY New Year's gift. Master class with step by step photos.
Postcard "Santa Claus".
Kozlova Natalya Andreevna, teacher-psychologist and educator, MBDOU d / s No. 7 "Kolosok", Petrovsk, Saratov region.
Description: the master class will describe how to make a New Year's card “Santa Claus.” The work is intended for children from 5 years old, educators, teachers of additional education and parents.
Purpose: DIY gift.
Target: to teach pupils to make crafts from colored paper and scrap materials.
Tasks:
Learn to use junk material (cotton pads, eyes) to make interesting crafts.
Develop fine motor skills of hands and eyes.
To cultivate artistic taste, accuracy.
Foster interest in creativity.
Materials required for work:
1. Colored cardboard.
2. Colored paper, landscape sheet, corrugated paper.
3. Cotton pads.
4. Plastic eyes for toys.
5. Glue, pencil, brush, scissors, ruler.

WHO IS FATHER FROST? This is a kind Grandfather with a long beard and felt boots. He brings gifts to everyone in his magic bag. Our good Grandfather used to be called Grandfather Treskun. He was a stern little old man with a long beard. The wife of Santa Claus was the wicked old woman Zima. And he also had a wonderful granddaughter - Snegurochka. Father Frost lives in his own residence, which is located in Veliky Ustyug (Vologda region). If you write a letter and send it to the address: "Vologda region, Veliky Ustyug, the residence of Father Frost", it will certainly reach the addressee. You can meet Santa Claus only in winter. But do not think that he is just resting all year. No, he works at home. What is the job. In the House of Santa Claus there is a workshop where he creates original New Year's gifts: he carves wood, solders, blows, paints, varnishes, polishes ...
Santa Claus is a genius glass artist. On long winter nights, he paints pictures without paints and brushes, but with his own icy breath. And then he arranges exhibitions on the windows of our houses and cars. Loves Santa Claus and scientific experiments. He constantly comes up with new forms of snowflakes. Place your palm under the falling snow and bring it to your eyes. You will see that every snowflake created by Santa Claus is perfect and unique! Santa Claus is a great sorcerer. He has a magic mirror in which he looks every morning and therefore does not age. But my grandfather was over 2000 years old! Father Frost celebrates his birthday on November 18 - this date was invented for him by the children themselves, since it is on November 18 on his estate - in Veliky Ustyug - that real winter comes into its own, and frosts hit. And of course, one of the main concerns of Santa Claus is to have time to read all the letters before the New Year. Every year up to five hundred thousand letters come to Santa Claus, a whole snow-white mountain! Santa Claus carefully reads each letter in order to bring the children the gifts they wanted.
Modern Santa Claus is a very cheerful and kind old man. You can recognize him by his long white beard, red hat, magic staff and a large bag of gifts.
Stages of the craft:
1. Take a sheet of red cardboard and bend it in half, cut off the upper corners in a semicircle.

2. We take corrugated white paper from under the box of chocolates and make a template for the edge of the cap - 2 pcs.

3. We take beige tinted paper, cut out a rectangle measuring 13.5 cm by 6 cm.

4. We take an album sheet, make templates: eyebrows, mustache, beard. Cut out the nose and mouth from red colored paper.

5. Make incisions at one distance, without reaching the other side (imitation of hairs).

6. We take green cardboard, divide it into 3 parts, make a Christmas tree pattern.

7. Cut out all the details of the craft with scissors.

9. We glue the rectangle, the edge of the cap, the beard.

10. We glue the mustache, mouth, nose, eyebrows, plastic eyes for toys, a cotton pad.

11. Open the postcard, draw stripes for congratulations, glue the Christmas tree.

12. We invite children to write a Happy New Year greeting and draw snowflakes on the right side with colored felt-tip pens, and stick the symbol of the year on the left side.

13. Congratulatory New Year card is ready!

Thank you for the attention!