Crafts to school on the topic of traffic. Crafts of traffic rules from plasticine
Marina Schevelkova
"Traffic Laws". Application lesson in the senior group
Application lesson in the senior group « Traffic rules and I"
Continue to teach children to compose a composition from colored paper;
Strengthen the ability to cut out of paper;
To consolidate the skills of working with scissors, glue;
Develop attention and creativity.
Course of the lesson
Today we will talk about traffic rules... You travel with moms and dads on the bus, go to kindergarten, to shops and you often have to cross the road... You are the participants road traffic, which means they should know Traffic Laws.
Guys, how cross the road correctly?
Children: At the traffic light.
And if there is no traffic light nearby?
Children: Going over the road on a pedestrian crossing.
The teacher demonstrates the layout of the traffic light.
Educator: Guys, what do you think the traffic light is for?
Educator: Well done! Right, traffic light helps to regulate traffic and
Educator: How many signals does a traffic light have?
Educator: What color are they?
Children: Red, yellow, green
Well done boys. Now we will do applique"A car at a traffic light."
Within the framework of the thematic week on traffic rules, applique "A car at a traffic light"... A preliminary Work: viewing illustrations, conversations, reading art. literature, movable and didactic games ( "Red, yellow, green" "Traffic lights", learning songs, poems, solving riddles.

Long-term planning of lessons on activity (application) in the senior group SEPTEMBER. 1. "Magic flowers". Objectives: to consolidate cutting skills; to acquaint with the various ways of drawing up flowers in a general composition.
Natalia Efremova
Application for traffic rules "Traffic light" (second junior group)
Application for traffic rules « Traffic lights"in second youngest group
Continue introducing children to work traffic light, about signals for people and machines; learn to distinguish signals traffic light;
Develop logical thinking, children's attention.
Activate in the speech of children the words: traffic lights, pedestrian crossing, carriageway, sidewalk.
compose an object from several parts, observing a certain sequence.
To cultivate attention, skills of the conscious use of knowledge traffic rules in everyday life.
Material and equipment: Layout traffic light, layout roads, model cars, illustrations of street movement, audio recording, applique « Traffic lights", Details for traffic light(rectangle, three circles of the same size / red-yellow-green /, glue, brushes, napkins.
A conversation was made with the children about traffic rules... Children took an active part in applications.


An outdoor game according to traffic rules "Traffic light" Purpose: to continue to reinforce the knowledge of traffic rules in children, to continue to teach how to act at a traffic light. Develop attention. Material:.
Conversation on the rules of the road "All children need to know how to walk down the street" (second junior group) Topic: "All children need to know how to walk down the street" Purpose: - to give elementary ideas about traffic; - to consolidate knowledge of the meaning.
Synopsis of direct educational activities on traffic rules "Traffic light" (second junior group) Lesson on traffic rules "Traffic light" in the second junior group Program content: To form knowledge of the rules for crossing the street.
Summary of a lesson on teaching traffic rules "Our friend traffic light" (middle group) Objectives: Educational: to acquaint children with the rules of behavior on the road, with the concepts of "pedestrian crossing", "traffic light". Clarify views.
Summary of a lesson on traffic rules in the preparatory group "Traffic light" Summary of a lesson on traffic rules in the preparatory group "Traffic light" Objectives: To repeat and consolidate the rules of the road among preschool children.
Model according to the rules of the road "Senior Traffic Light" It is very important from early childhood to lay the foundations of safe behavior in children, in our case it is on the road. This work must be done.
Master class on the rules of the road "Merry traffic light!" Master class on the rules of the road "Merry traffic light!" "Cheerful traffic light" For the manufacture of this craft "Cheerful traffic light" will be required.
Open lesson on traffic rules "Traffic light is our best assistant" Dear colleagues, I present to your attention an open lesson on traffic rules. Purpose: To give a definition of the concept of "traffic light"; to understand.
Fun according to the rules of the road "We will go, we will rush" (junior group) Objectives: to organize the activities of children at the holiday, to bring them joy, good mood; to develop musical and rhythmic ear, auditory.
Quiz on traffic rules "Traffic light" Quiz on traffic rules "SVETOFOR" Completed by educator Shishatskaya Larisa Viktorovna Course of the event 1. Organizational.
Application on the topic "Traffic rules"
Lyubov Fedosova
Application on the topic "Traffic rules"

In our kindergarten, a competition was held for the best application for traffic rules... My children and I decided to do a collective work too.
Preliminary work done educator:
We selected black-and-white blanks of pictures of houses, animals, nature, cars, which were subsequently painted.
- a crossroads with pedestrians was drawn on the Whatman paper.


The children were given a lesson on the rules of the road, on the rules of behavior on the road for pedestrians and drivers, and again they repeated what a traffic light and a zebra are for.
To work with children, we it took:
Paper napkins in order to remove excess glue when gluing


Children worked with passion, each pasted his favorite picture. When the poster was ready and displayed in the group, the guys came up and gladly showed their pasted picture. This work was very instructive for our children, since in the course of this kind of game we discussed the rules of the road more than once.
Collective applique made of natural material on the theme “Falling leaves” (middle group) Collective applique made of natural material. Theme "Falling leaves" (middle group) Purpose: to teach children to create a collective composition from.
Application using cotton pads on the theme "Winter" Application using cotton pads on the theme "Winter" Hello, dear colleagues! I would like to bring to your attention an application with.
Application in the preparatory group on the theme "Rooster-symbol of 2017". Good winter evening to all colleagues. The outgoing year - the year of the monkey comes to an end and is replaced by a mischievous, loud, bright and perky.
Photo report "Application in the second junior group on the theme" Bus "Topic of the week" Transport ". Age of children: 2.3 years IMG] / Objectives: To teach to distinguish in appearance and name a truck and a passenger car.
Collective application of paper napkins on the theme: "Mimosa" Goals and objectives: To teach children to crumple little lumps with their fingers - flowers from pieces of napkin. Learn to compose a composition from lumps. Develop.
Collective application on the theme "Fish in the aquarium" in the senior group. Software content: develop artistic imagination, aesthetic taste. Develop a sense of composition. Consolidate what you learned earlier.
Collective application in the preparatory group on the topic "Knowledge Day" Educational areas: cognitive development, social and communicative development, artistic and aesthetic development, Preliminary.
Abstract of the OOD for artistic creation (application) on the theme "Flower for Mom" (postcard) Purpose: To make a postcard for mom for the holiday on March 8. Objectives: 1. Learn to create images using the paper-plastic technique. 2. Teach in advance.
Summary of the lesson “Healthier. Application "Vitamin plate" Summary of the lesson in the second junior group on the topic "Healthier" Application "Vitamin plate" Purpose: To form children's ability to work.
Mosaic application in a group of different ages on the theme “Transport. Ship »TOPIC: Transport. Ship. OBJECTIVES: to repeat knowledge about modes of transport; learn to create an image of a boat based on ideas about the outside.
Crafts for children on the topic of traffic rules

The children went to school and they are taught what will be useful in later life - to read, write, count, draw, exercise, and also know the basic rules. In order for the child to better understand the rules of the road, it is necessary not only to talk about them, but also to show them by an illustrative example. In this article, we will look at how to make crafts on the topic of traffic rules with our own hands.
Visual Aid Of Traffic Rules For Kids
You will need: cardboard boxes, colored paper and cardboard, scissors, glue, felt-tip pens, pencil, ruler, toy cars, traffic cop.
Master Class
Traffic light in the form of a road policeman

You will need: plumbing pipe, wooden stick, acrylic varnish and paints, whistle, cap, shoulder straps, traffic cop's baton, jigsaw, drill, simple pencil, glue. If some of the materials are missing, don't despair! Make a rod, a cap, shoulder straps out of cardboard by cutting out the cardboard of the desired shape.

Do crafts with your child, trust him with the work, prompt and help. Thus, you will spend your leisure time useful and fun with your own hands.
svoimirukamy.com
A selection of crafts on the topic: Traffic rules

Unfortunately, children quite often become participants in various road accidents. And all this happens because many of them do not know the basic rules. It is not difficult to memorize the rules of road behavior on the roads and streets of the city. In this matter, the child should be helped by parents and employees of educational institutions. Traffic lessons are often conducted in educational institutions. And these lessons end with the children making various crafts on them. Therefore, in this article, we decided to bring you crafts on the topic of traffic rules for children. Children can easily make these crafts with their own hands if they look at the photo.
What crafts to make on the topic: Traffic rules
A traffic light is a simple craft. Several variants.
The easiest craft option is a traffic light. Indeed, even a child who attends a kindergarten can do such a craft. In the process of creating such a product, do not forget to remind your child of what the colors of the traffic light mean.

The basis for the craft will be an album sheet. It needs to be painted black. You can also draw a rectangle on the sheet and color it accordingly. Cut out circles from colored paper and glue them to your traffic light.
The traffic light can be made out of the box.

In addition, old CDs can be used to create traffic lights. A kind traffic light that expresses his emotions will clearly be able to explain the rules of behavior at a traffic light.

The traffic light, which has the head of a policeman, looks very interesting. Attach the handles and legs to the traffic light.

An old bottle is a great craft option. You just paint it in a base color, draw traffic light circles on it. Also, do not forget to attach the legs to the bottle. Cut out the pens from paper and insert the main attributes of the policeman into them.

Applications on the topic of traffic rules.
The next simple crafts are appliques. Preschool kids can also cope with this task. Applications can be made of colored paper and cardboard.

You can also make applications from plasticine. At the beginning, it is worth applying a drawing on thick paper, after which it should be decorated with plasticine.

Another plasticine painting. It looks very unusual and bright.

Paper figures.
Making a traffic law for children should be interesting. You can make a variety of different crafts on this topic from paper. And they will all be interesting in their own way.

Complex applications.
It is worth saying that crafts about traffic rules for children can be not only simple. And if the children use the help of their parents, then they will be able to make more complex applications together with them, which will clearly explain the rules of behavior on the roads.


Finally
As you can see, making crafts on the topic of traffic rules is very simple. In this case, the child fantasizes and remembers important rules that will help him to preserve his health and life in the future.
It is known that habitual patterns of behavior formed in early childhood accompany a person throughout his life, which is why it is so important to teach kids traffic rules, as well as safe behavior on the streets and roads. The task of adults is to give the child the elementary necessary knowledge that will form a responsible attitude towards their own health and life. The solution of the above tasks will be helped by the creation of crafts devoted to the topic of traffic rules.
The value of activities to create crafts on the topic of traffic rules in kindergarten
Making crafts on the subject of traffic rules is simple and fun. The child fantasizes, develops fine motor skills, spatial thinking, imagination, mental and creative abilities, and at the same time learns and remembers the most important information. A colorful and attractive do-it-yourself layout will help explain, show and beat the rules of behavior on the streets and roads of the city in an intelligible and interesting form for the child: how and where you can cross the road, how to get on and off the bus correctly, how to read the symbols depicted on road signs, etc.
A colorful and attractive do-it-yourself model will help explain, show and beat traffic rules in an intelligible and interesting form for a child.
It is advisable to teach children the rules of behavior on the road in a playful way, because the game is the leading activity of preschoolers.
Tasks
Tasks of creating crafts on the topic of traffic rules in kindergarten:
- to expand the range of original creative techniques, various forms and methods of pedagogical work in order to increase the effectiveness of teaching students the rules of the road;
- to form knowledge about the symbolic meaning of traffic light colors;
- introduce you to the basics of game modeling;
- to consolidate and systematize knowledge about road signs and rules of safe behavior on the roads of a city or village, to form a culture of behavior on the street;
- improve fine motor skills, manual skills;
- develop sensory perception, spatial and imaginative thinking, intellectual and creative abilities;
- enrich the dictionary with new concepts: roadway, transport, intersection, inspector, pedestrians, etc .;
- foster independence, organization, accuracy and work culture.
Forms and techniques for making crafts
Craft on the topic of traffic rules can be framed as:
- object - a single volumetric toy or flat application (traffic light, traffic controller, etc.);
- collective plot composition ("Crossroads", "City Streets", "Safe Traffic", etc.) - children work in subgroups, combining various techniques and methods of work, compose and tell their own plot stories, make a single composition from separate toys and play with it, "animating" the created characters with the help of role-based dubbing.
Techniques used to make crafts:
- a drawing made with colored pencils and paints;
- application, subject composition of colored paper, for example, various "Traffic lights", road signs;
- collage - a combined technique of paper and natural material application with elements of drawing, origami, modeling, plasticineography;
- design of flat and volumetric crafts from cardboard, paper, waste material;
- layout in the technique of design and paper-plastic ("Safe road to kindergarten", "Roads of our city").
Kids 2–3 years old will enthusiastically engage in simple step-by-step construction from paper or sticking the parts prepared by the teacher on the base using the overhead applique technique. Making crafts with your own hands will form the basic skills of building a simple composition in children of younger preschool age, will help to consolidate the knowledge of geometric shapes, and will improve the ability to distinguish between basic colors.

In addition to studying traffic rules, in the process of making crafts, babies develop fine motor skills.
Pupils of the middle group will be interested in independently cutting out simple silhouettes of parts for an overhead applique using a template, choosing natural material for a collage, making an original craft from a plastic bottle or used CDs based on step-by-step instructions. Children of this age can be offered more complex application techniques, for example, modular or breakaway. Filling a schematic drawing with multi-colored pieces of torn paper, creating mosaic applications from a variety of geometric blanks is perceived by children as an entertaining game.

Pupils of the middle group can be offered more complex application techniques, for example, modular or break
Older preschoolers are able to independently create crafts based on their own ideas, since they have already mastered the basic techniques of drawing, design and application. The guys are happy to take part in educational creative projects, creating individual works and amazing large collective models in the form of plot compositions. Unusual work is obtained by combining a variety of techniques, for example, volumetric construction from cylinders and cones and drawing, applications from twisted elements (quilling) and origami.
New techniques may seem complicated, but if you follow the step-by-step instructions and the competent participation of the teacher, you can get high-quality creative work.
Photo gallery: examples of teamwork
The finished crafts of the pupils can be arranged in the form of an exhibition or a play layout. The use of various materials in their work allows children to choose the most attractive for them. Performing collective work, preschoolers learn to cooperate. The finished layout can be used as a teaching aid. Bulk application technique requires special care. can distribute responsibilities: who draws, cuts, glues
Photo gallery: crafts made in various techniques
The plasticine technique requires patience and thoroughness. All kinds of boxes are perfect as a basis for models of traffic lights, houses or cars. Old CDs can be used as a basis for crafts. In some cases, parents help children to work on crafts. Creating a collage in various techniques, children develop creative abilities The application technique is suitable for the smallest pupils. For crafts using the bulk application technique, you will need to cut or tear the paper into small pieces. Girls will be happy to master the decorative application technique. New techniques and approaches will help to diversify the usual crafts. "Emotional traffic light" will help kids remember its signals
Pedagogical techniques
Teaching methods are traditionally built on an imitative basis and gradually become more complex:
- At the first stage, a detailed analysis of a sample of the future product is carried out:
- in the younger group, an article made by the teacher in advance is used as a sample;
- in the middle group, children can be asked to look at a picture or a drawn image;
- children 6–7 years old are already able to analyze the circuit or model of the toy.
- Stage two - children are taught planning and thinking about step-by-step progress towards the goal, they are taught a holistic perception of the entire process of work. It is specified in what sequence the parts are cut or made, from what material, which tool will be preferable. The choice of teaching methods is carried out taking into account the age of the pupils:
- in younger groups, the teacher demonstrates in detail all stages of the craft creation process, accompanying it with clear and detailed comments;
- in the middle group, the teacher gradually shortens the process of full demonstration and detailed explanation, involving active work with diagrams and basic plans in the form of schematic sketches independently drawn by children.
- Stage three - the stages of drawing, gluing applique elements, methods of fastening parts and parts of a volumetric structure are thought out.
- The fourth stage provides that children independently carry out the selection of the necessary material and tools for work.
- At the fifth stage, preschoolers independently cope with the entire process of making crafts - from the inception of a mental prototype of a toy to the substantive embodiment of a creative idea. At this stage, it is important to encourage the manifestation of creative imagination and the child's desire for independence in the process of practical implementation.
- At the final stage, there is a summing up, analysis and evaluation of finished products. It is important to find positive moments in the work of each child, to support and inspire. An exciting role-playing game using toys made by children will be an excellent technique at this stage, this will help them feel the significance of their work.
In addition to traditional pedagogical forms and methods of work, play methods that are popular in modern preschool pedagogy can be used. For example, within the framework of a week on road safety, you can organize and conduct a lesson in the form of a quest game based on traffic rules and signs with construction elements. Such a game with the participation of parents will give children a lot of new impressions, help them master the wisdom of correct behavior on the road in a relaxed manner, and cause positive emotions.

An activity in the form of a quest game for studying traffic rules and signs will help strengthen parent-child relationships
Another interesting and original way of working is animation. Toddlers can draw decorations, construct buildings for city streets, sculpt cars and human figures, and during filming move these figures and sound the film. Older guys can try their hand at being a director, artist and designer, author of dialogues, actor and even cameraman.
Video: cartoon "ABC of traffic rules", filmed with the participation of preschoolers
Lesson on making crafts on the topic of traffic rules in a preschool educational institution
Making crafts on the topic of traffic rules by kindergarten pupils is included in the design cycle.
Motivating class start
It is important to conduct the introductory part of the lesson in an interesting, exciting and creative way. An entertaining, original beginning will create a favorable emotional mood, liberate children and awaken creative inspiration. To activate cognitive interest, search activity and attract the attention of his young pupils, the teacher in the organizational part of the lesson usually uses rich and varied motivating material in combination with pedagogical techniques:

The further course of the lesson largely depends on the emotional mood of the pupils at the beginning of the lesson.
Table: Examples of Motivating Beginnings in Different Groups
| Age group | Lesson name | Example of starting a lesson |
| The youngest | "Travel to the country of Traffic lights" | The teacher invites kids to the magical land of Traffic Lights. Before embarking on an interesting and useful journey, children will have to think and tell who rules this amazing country and lives in it. Colorful pictures, clues, riddles and poems will help them in this. Children will guess that the King of the Traffic Light himself invited them to the fairyland, and they are already well acquainted with the inhabitants of the magic kingdom, because these are bicycles, cars and trucks, buses and trams, in a word, city transport. The teacher offers to make an application-portrait of the Traffic Light in memory of an interesting journey. |
| Average | "Young pedestrian" | The guys hear a knock on the door, on the threshold they are greeted by the alarmed Piggy and Stepashka. The unexpected guests greeted, apologized for the unexpected visit and told the children their story. It turns out that they walked the streets, wanted to get acquainted with the sights of the city, go on an excursion to the museum, but they saw a three-eyed monster and were very scared. It blinked so terribly with its three eyes that our heroes did not dare to cross the road. Piggy and Stepashka asked the children to help them and tell them how to stop being afraid and walk the streets confidently and calmly, and also draw a pretty portrait of their new friend. |
| Older | "School of traffic" | The group, limping, enters Baba Yaga, looks around, groans, gasps and outrages loudly: “These crazy cars almost ran over the poor little grandmother! I was in a hurry to your class, crossed the road, stumbled and dropped my broom, stopped to pick it up, then a stray car almost hit me! " The teacher invites Babu Yaga to a lesson at the traffic school and invites, together with the children, to repeat and consolidate useful knowledge while making crafts on the topic of traffic rules. |
Photo gallery: presentation on traffic rules
Demonstration of the presentation at the beginning of the lesson will attract the attention of preschoolers Children are happy to guess riddles Riddles on traffic rules help preschoolers to remember important information In a playful way, pupils learn the rules of behavior at a pedestrian crossing Depending on the age of the pupils, you can offer them various road signs to study It is important to convey to preschoolers that Traffic rules must be observed in any case Children learn the rules of behavior on the tram with the help of riddles and poems Preschoolers must clearly learn that the bus should be bypassed from the back, and the tram must be bypassed in front. When crossing the road, you need to be careful and careful
Outdoor games
Outdoor games contribute to the development of ingenuity, flexibility and dexterity, help relieve emotional stress and cheer up. Examples of games for preschoolers:

Table: educational poems on the topic of traffic rules
| Poem title | Text |
| Traffic lights | We got up at the crossing Before us is a traffic light. And with all honest people He looks at us point-blank. His red eye opened So he wants to say: No matter how you hurry You have to stand now! Here's a blinking yellow eye. Get ready, he says! How to close this one - at once The third eye will be open. The third eye glows green All the cars were lined up. We can go, Alena, - Mom and Dad are talking. |
| Malyshkin traffic light | The traffic light is waiting for us Illuminates the transition. The red eye lit up: He wants to detain us. If it is red, there is no way. Red light - you can't go. Yellow light - not very strict: Wait, we have no road yet. The bright yellow eye is burning: The whole movement is worth it! Finally, the green eye Opens the way for us. Striped transition Young pedestrians await! |
| Naughty pedestrian | A road runs through the forest The traffic light blinks strictly. Everyone is in a hurry to go: From moose to mice. Sometimes across the street There are a lot of pedestrians Jumps, walks, flies, Runs, crawls. Mom taught a hedgehog Mom threatened with a finger: - Remember the rules, kid! If the light is red, you are standing! If yellow, just wait On green - come in! Naughty pedestrian Did the opposite! The hedgehog was in a hurry And rolled in a ball Straight to the red light! Is it okay? Of course not! The brakes screeched And he closed his eyes. Old fat dump truck He sounded, growled: - I barely stopped, I almost fell off the road! What, you don’t know the rules ?! Well, quickly march into the bushes! I'll give you, hedgehog, advice: Don't go to the red light! The hedgehog quietly puffed out: - Sorry, I didn't want to. Traffic light told us: The hedgehog has improved since then. Order knows best of all Doesn't break anything! |
| Traffic Laws | Red eye traffic light He looked at me point-blank. I stood and waited in silence Because he knew for sure: If the red light is on, The pedestrian is always standing. If you see a red light This means there is no move! Cars drove by And the tires rustled softly. The tractor rode, rattled, The dump truck ran after him, Long-long timber truck On the way I carried the logs. Yellow light is on under red: It's dangerous to go anyway! Transport started to slow down To clear the way. The yellow light came on - Nobody cares. Pedestrians don't walk And the cars are waiting too! The traffic light blinked and - again! He lit a green eye! Striped transition Different pedestrians are waiting for: Mom comes with a stroller, There is a lady with a dog, Carries a baby toy The old man leads the old woman Two girls are walking The machines are waiting quietly. The green light is on As if saying: Please go But don't run! And if on the track The ambulance will call You will miss her And only then go! Green is safe But red is dangerous. Green - we go And yellow and red - we are waiting! |
| Road up | There's a sign on the road He says in a stern tone: - Cars can't drive up here, It is forbidden to drive! |
| Children | Hey driver be careful Impossible to drive fast! People know everything in the world: Children walk in this place. |
| Crosswalk | Familiar stripes Children know, an adult knows. Leads to the other side Crosswalk. |
| Underground crossing | Leads down from the sidewalk There is a long entrance under the road. There is no door or gate - That is an underground passage. |
| Living sector | Football is a good game. Let everyone exercise In stadiums, in yards, But not on the streets. |
| Cit. by: https://kids.to-var.com/sunduchok/stihi-i-pesni/293 | |
Video: Smesharikov's trip to the TV studio
https://youtube.com/watch?v=rohEFVgd5b8 Video can’t be loaded: Smeshariki. A trip to the TV studio (traffic rules) (https://youtube.com/watch?v=rohEFVgd5b8)
Table: card index of didactic games
| Name of the game | Description |
| "Fold down the traffic light" | Carrying out options:
|
| "Collect the picture" | Players collect a complete image of a road sign, traffic on the roads, a pedestrian crossing, a traffic light, etc. from the cards of the cut picture. |
| "Crossroads" (role-playing game using a layout) | Players simulate a situation at an intersection, one child drives toy cars, and the other controls the behavior of miniature figures of men on a pedestrian crossing. Cars stop at a red traffic light, pedestrians start moving along the “zebra crossing” at a green light, cross to the opposite side of the road and continue along the sidewalk. |
| "Catch the ball" | Children stand in a circle, the teacher throws a ball to each player in turn. asking questions. Children answer and return the ball to the presenter. Questions:
|

If you give preschoolers a choice of materials in the game "Fold Down the Traffic Light", the results will be very different.
Time plan of the lesson
A lesson in kindergarten has its own logical structure:
- Organizational stage - a motivating start in a playful way (up to 5 minutes).
- The main stage (from 10 minutes in the younger group to 25 minutes in the preparatory group) is the most active practical part of the lesson, which includes:
- showing the sample, explaining the step-by-step instructions by the teacher, parsing the card scheme;
- independent work of children according to a model, scheme or creative concept (children can work individually, in pairs or as part of a small subgroup);
- physical education, outdoor games, finger or breathing exercises, which will help to relax, and then return with fresh energy to creating crafts.
It is desirable that the physical education minutes correspond to the topic of the lesson, this will increase the interest of preschoolers in the topic.
- The final, final stage (up to 5 minutes) - reflection, cleaning of workplaces, organization of an exhibition of children's works. The analysis is carried out taking into account the following criteria:
- neatness, symmetry, integrity and attractive appearance of the craft;
- technical skills and abilities;
- the degree of independence of the work done;
- dedication, discipline, hard work, a sense of camaraderie and emotional responsiveness shown while working on a large collective project.
Table: an example of a summary of a lesson in the middle group (fragment)
| Authors | Antipina L.V., educator, Shikhova A.N., teacher-speech therapist |
| Lesson topic | Town. Street. Traffic Laws |
| Tasks |
|
| Equipment |
|
| Organizing time | Children play with the layout of the city. Speech therapist: Guys, what do you have? (Town). What is there in the city? (Road, cars, houses, fountains, traffic lights ...). Guys, I suggest you go to the parking lot in cars. Children take in the car and sit on high chairs.<…> |
| Main part | Speech therapist: How many interesting things in the city! Guys, I suggest you play Game "What is there in the city?" (with a ball):
Speech therapist: What material are the houses made of? (Answers of children).
The music "Sounds on the road" is playing. |
| The final part | Children demonstrate their crafts, repeat what a traffic light is for. Speak the order of the light signals. The inspector says goodbye to the children, the speech therapist and leaves. |
| Cit. by: http://logopedrunet.ru/konspekt-gorod-ulica-pdd/ | |
Video: collective work on traffic rules "Road to kindergarten"
https://youtube.com/watch?v=ECbeDAuuhWg Video can’t be loaded: Traffic Craft / Road to Kindergarten (https://youtube.com/watch?v=ECbeDAuuhWg)
Workshops on making crafts on the topic of traffic rules in kindergarten
In the classroom at the preschool educational institution, the children have the opportunity to design interesting crafts on the topic of traffic rules from various materials, it all depends on the imagination of the teacher and his wards.
"Traffic light" - a craft in the technique of overhead applique
Such a craft can be done with the children of the younger groups. Progress:

"Traffic light" - a guide for the development of sensory perception and fine motor skills
Each side of a traffic light is designed differently:

"Safe City" - collective application in the middle group
Progress:
- The guys work in subgroups, each subgroup creates its own version of the craft. The teacher shows the children the blanks and in the conversation clarifies what these silhouettes resemble and what is missing, how to complement and decorate the composition.

Preschoolers Discuss What These Silhouettes Are Like
- To decorate the roofs of houses, children cut strips and cut corners.

The guys cut strips of paper to decorate the roofs of houses
- Similarly, strips for windows and doors are cut into squares.

Preschoolers cut strips into squares for windows, doors
- Cut a rectangle made of white paper with markings into narrow strips for pedestrian crossings and road markings.

Narrow strips of white paper are prepared for the crosswalk
- Children glue the prepared parts and elements, creating a collective composition.

Added details and elements bring the workpiece to life
- Magazine images of people, cars, trees are cut out by the teacher and invites the children to stick them on the applique.

The teacher cuts images of people, cars, trees in advance by himself
- This is how the streets of the city come to life.

Images of cars and pedestrians complete the composition.
"Assistant-traffic controller" - a voluminous craft
This craft can be done with older preschoolers.
Materials and tools should be prepared:

Progress:
- Glue an empty oblong box with blue paper (leg).

An oblong box is pasted over with blue paper
- Prepare the second box in the same way.

Two oblong boxes will act as the legs of the future traffic controller
- Glue a larger box for the body of the craft with colored paper.

A large box will serve as the body of the craft
- Glue 2 boxes (legs) to a large box (body).

Using glue, the legs are attached to the body.
- Trace the template for the head detail with a simple pencil on a flesh-colored piece of cardboard, cut along the contour.

The head is made of flesh-colored paper
- Glue the ends of the part, bend the valves.

The ends of the part need to be glued together to get a kind of hoop
- Apply glue to the flaps and glue the head piece to the base of the craft.

With the help of special valves, the head is glued to the body
- On a sheet of blue paper, draw a rectangle with a simple pencil, the length of which is 14 cm, and the width is 8. Cut out the detail to decorate the hand.

Hands are cut from blue paper
- Fold the rectangle into a narrow strip.
- On a sheet of white paper, draw 2 oblong, narrow strips 5 cm wide, cut out.
- Stick the strips on the parts for the arms and legs.

Small white stripes of paper decorate the uniform of the regulator
- Cut out the silhouette of the palm, glue the hands to the part, and glue the part itself to the body of the toy.

Hands are glued to the torso
- Draw a silhouette of the vest detail on a sheet of colored paper and cut along the contour.

Details of the vest are cut out of colored paper
- Glue the silhouette of the vest to the body.

The vest is glued to the base of the craft
- Decorate the vest with vertical and horizontal stripes.

The vest is decorated with vertical and horizontal stripes
- Cut a strip for a cap out of cardboard and make transverse cuts.

A cap is made from a strip of white paper
- Glue the ends of the cap part.

A strip of paper is folded into a circle
- Using the template, draw 3 circles (2 blue on a piece of paper and 1 white on cardboard) of the same diameter and cut out.

For a cap, you need two blue circles and one white
- Glue the round piece onto the cardboard circle. Glue a blue circle.
- On the second round part, draw a circle with a smaller diameter.

A circle of a smaller diameter is drawn on the second round part
- Cut and glue to the cap, covering the bent ends of the valves.
- Cut a strip of red paper and stick it on your cap.

A strip of red paper is glued to the cap
- Cut out the silhouettes of boots from dark paper and glue to the legs.

Dark paper circles will act as boots
- Draw a face with a felt-tip pen. The craft is ready.

With the finished craft, you can study traffic rules in a playful way
"Traffic light" - colored paper applique
Older preschoolers perform all stages of the work independently.
Materials and tools:

Progress:
- Cut out a rectangle with sides of 16 and 26 cm from black paper, draw 3 circles with a diameter of 7 cm.

Black paper will serve as the basis for the applique
- Cut 3 circles of the same radius from red, yellow and green paper.

Cut three circles from colored paper for traffic signals
- Fold the rectangle with the drawn circles in half and mark the fold line with chalk or white marker.

The workpiece is folded in half
- Cut out the bottom of the circle to the middle, bend the cut half up.

The lower part of the circle is cut to the middle and folded up
- Cut out the halves of the remaining two circles in the same way.
- Glue a black blank with three circles to a white sheet of paper.

A black blank is glued to a sheet of white paper
- Glue the red circle into the upper circle of the traffic light, with the lower part to the white background, and the upper part to the black semicircle.

The red circle is pasted into the upper circle of the traffic light
- Glue 2 other circles in the same way.

Yellow and green circles are glued to the workpiece.
- Draw emoticons on the circles.

Smilies on traffic signals will revive the educational process on the topic of traffic rules
"Safe movement" - a play layout in the technique of construction from paper
Progress:
- Cover the boxes with colored paper.

Packing boxes are pasted over with colored paper
- Draw rectangles on a sheet of white paper and cut out the silhouettes of the windows using the tape technique. Glue window silhouettes to pasted boxes.

Silhouettes of windows are placed on pasted boxes
- Draw frames on the windows with black marker.

Draw frames on windows with black marker
- Cut strips of colored roof paper and glue to boxes.

Colored paper strips will act as rooftops
- Similarly, construct several more buildings: a store, a kindergarten, a school, a clinic, and residential buildings.
- Pedestrian crossing - glue strips 5 cm wide, cut out of white paper, on a sheet of black cardboard.

A pedestrian crossing is made of white and black paper.
- Carriageway - glue long and short white strips up to 1 cm wide on gray cardboard (dividing lines).

Gray cardboard will serve as the basis of the roadway
- Glue the road markings to the inner side of the lid from the large box, arrange buildings, place toy cars, put figures of little people.

The result is a bright and neat game layout
"Streets of the Autumn City" - an article made from waste and natural material
Materials and tools:
- 4 matchbox
- colored paper and cardboard,
- felt-tip pens,
- glue,
- scissors,
- brush,
- dry leaves,
- simple pencil,
- ruler.

For work, you will need matchboxes, colored paper and cardboard, glue and other materials at hand
Progress:
- Cut 4 identical blanks for pasting blue paper boxes.

Blanks are cut out of paper for pasting boxes
- Glue the boxes for buildings.

The boxes are carefully peeled with paper
- Cut from white paper 8 identical rectangles measuring 2 cm by 1 cm and 4 rectangles measuring 0.5 cm by 3 cm for decorating signs on buildings.

Small rectangles of paper will be required for the decoration of building facades.
- Glue signs and windows.

Signs and windows are glued to house models
- Cut 2 strips of black color 3 cm wide and equal to the width and length of the cardboard sheet.

To design an intersection, you will need two strips of black paper
- Glue the intersecting strips onto an orange sheet of cardboard.

The intersecting strips are glued to a sheet of cardboard
- Glue boxes-houses.
- Cut narrow strips 2 cm long from white paper for the pedestrian crossing.
- Decorate a pedestrian crossing, glue dry leaves.

Dry leaves will play the role of trees on the layout
- Finish the details with a felt-tip pen, sign the signs.
- Cut out silhouettes of cars and traffic lights.
- Glue the cars.

The craft is complemented with silhouettes of cars and traffic lights
"Roads of our city" - a project on construction lego
Progress:
- In the process of making road signs, children get acquainted with their symbolic meaning.

In the process of making road signs, the guys study them in a playful way
- Using step-by-step instructions, preschoolers construct a kindergarten building.

Step-by-step instructions will help children design a kindergarten building
- They start assembling the road.

The road is assembled from the search for parts of the designer
- The houses of the residential microdistrict are being constructed.

The houses of the residential neighborhood are designed by preschoolers collectively or individually.
- Intersections are modeled on a large plate.
- Place road signs and traffic lights.

The carriageway is made out with road markings
- Having finished work on the layout, the children proceed to the game stage of checking their knowledge of traffic rules.

Playing with such a layout is exciting and informative.
The finished model can be used not only for studying traffic rules, but also for the development of fine motor skills, visual perception, orientation in space.
Photo gallery: templates and blanks for crafts
The application will help the children remember the traffic light signals.In the course of the applications, the preschoolers study traffic rules and develop fine motor skills.Similar pictures can be used both for coloring and for making applications. green color can symbolize traffic light signals Children will be happy to play with ready-made crafts.
Video: examples of crafts on the topic of traffic rules in kindergarten
https://youtube.com/watch?v=sHHlWyfH5tg Video can’t be loaded: Traffic Rules Crafts (https://youtube.com/watch?v=sHHlWyfH5tg)
Creation of original crafts on the topic of traffic rules is an effective tool for the formation of a behavioral culture based on knowledge about safe behavior on the streets and roads, as well as the inventive interests of preschoolers. Artistic creativity stimulates the process of active knowledge of the surrounding world. In addition, such activities improve manual skills, develop imagination and creative imagination.
Share with your friends!In kindergarten and primary school, great attention is paid to teaching children the rules of the road. Classes and lessons on this topic are planned. In kindergarten, each group must have a road corner, where children in a playful way get to know traffic signals, road markings, the most common road signs and street crossing rules.
There are also events for children on this topic with the invitation of road service workers or artists. The competition "The Road through the Eyes of Children" is often organized. Crafts are done either in the garden with a teacher, or a homework assignment is given. Parents are also involved in joint activities. This article will help moms and dads find interesting ideas for such a competition.
Traffic light manufacturing
The very first thing children learn about traffic rules is the meaning and their correct location. Even in the younger group, kids consolidate their knowledge in the classroom for visual activity. By drawing circles of the desired color or making an applique on a black rectangle, children consolidate their knowledge. It would be a very good decision to start work for the competition "The Road through the Eyes of Children" with handicrafts of traffic lights.
Such work must be placed at the crossroads of the "road", so you need a leg and a stand. This can be done simply from cardboard, but it is more interesting to take an old felt-tip pen, remove the rod and insert it with one side into a matchbox, and glue the other to a square of thick cardboard with PVA glue.
All construction details need to be pasted over with colored paper, and circles of different ones should be placed in the correct order on the matchbox. At the same time, the child will repeat their arrangement. Red is always at the top, yellow is in the middle, green is at the bottom. Tell your toddler why the lights are positioned this way. After all, not all people distinguish colors. Some are guided only by spatial location. They know that once the overhead light comes on, then you need to stand still. Lower - you can go.
Paper typewriter
The next option for "The road through the eyes of children" - crafts and cardboard. The cardboard cylinder remaining after using toilet paper must be pasted over with colored paper. Cut 4 wheels out of black cardboard and attach two at the front and two at the back. Cut a hole in the middle of the car for the driver by making an "H" cut. Bending part of the cardboard back we get a chair for the driver, cut the curved part forward with scissors in the shape of a circle. By painting it or making an applique, we get a steering wheel.

Small car parts are made of colored paper. The photo shows a racing car, but you can just make a few cars of different colors and place them on different sections of the "Road through the eyes of children". Crafts cars could be different. If you are planning a large road, then you can make bigger cars. The description follows below.
Plastic cars
For the manufacture of machines, various polystyrene and wooden blocks, matchboxes and matches themselves, boxes from a kinder surprise and cardboard packaging for eggs are suitable. Now we will talk about the use of used plastic cans and bottles for work.

The photo shows cars for the competition "The road through the eyes of children". Crafts from plastic bottles are often used to make some kind of figurines. For the presented products, you need to take used plastic packaging from the gel for washing clothes. Only the jar must first be thoroughly washed so that no chemical remains.
With the help of an awl, holes are punched for wheels made of corks. You can simply put them on PVA glue. But then the car will not run. To make the car mobile, you will have to find either old wheels from another broken machine, or pick up a rod for the wheels from waste material. It can be wooden sticks, metal rods, felt-tip pen, pencil, etc. To decorate crafts in the form of such machines for the "The Road through the Eyes of Children" competition, you need to use self-adhesive of different colors or, in extreme cases, use colored paper and tape.
Small houses
All children understand that there are houses along every road. So, if a child wants to make a house, then such products are quite suitable for this topic.

Moreover, it is very easy to do handicrafts in the form of multi-storey buildings for "The Road through the Eyes of Children". You just need to have a milk carton, paste over it with colored paper and paint, making windows, a roof and a door.
After reviewing the material of the article, parents will be able to help the child find the necessary material for the competition "The Road through the Eyes of Children" (for handicrafts). How to do them is described in detail. You can come up with something of your own, based on the options you see.
In elementary grades, in fine arts lessons, children often make various crafts on certain topics. Very interesting is the idea of crafts on the theme "The road through the eyes of children", which is usually asked as homework. And as a rule, with the performance of this work, children ask their parents for help. At first glance, a simple job can turn into a sheer nightmare due to the lack of suitable ideas. Nevertheless, not everything is so scary, since there are a lot of options for crafts on the road theme.
Studying traffic rules with the help of fine arts
It is necessary to teach a child how to cross the street and look around from early childhood, since on the way to school and on returning home he is a pedestrian and, therefore, a participant in road traffic. Therefore, it is very important that the child learns the most important road signs, in which making thematic crafts with his own hands can help him.
If the kid has cars and loves to play with them, then you can make an imitation of a city from an ordinary cardboard box with buildings, roads, traffic lights and road signs, the meaning of which should be told to the kid. By simply playing with his favorite toys, the child will gradually remember their meaning.
Making a road
To create a city road, you need a black marker, which you need to draw two parallel lines on the bottom of the box and paint over the gap between them. Next, you need to cut out small white stripes from white paper and stick them in the center of our road, as a result of which you will get a road marking. To make the dummy of the city more attractive and more interesting to play with, the space on the sides of the road can be painted with green watercolors or you can create an imitation of a lawn from a regular washcloth, as well as arrange artificial trees in random order.
Making a traffic light
 To study traffic rules more effectively, you cannot do without a traffic light during the game. It will allow the child to remember the meaning of the signal of each color and use this knowledge in everyday life. You can make it from a regular shoe box, which should be pasted over with black paper. Next, on the front side we glue three identical circles of different colors - red, yellow and green. The final touch will be the manufacture of a stand for the traffic light, which can be used as a regular cardboard and a small piece of wood.
Do not be afraid to try something of your own and fantasize. For example, if you do not have an unnecessary box, then you can dazzle a traffic light from plasticine or bake delicious cookies and decorate it with multicolored glaze that imitates a traffic light. It will be not only interesting, but also tasty and informative. In a similar way, you can make a pedestrian traffic light, in which there are only two signals.
Study road signs as you play
Any training goes better if it is approached correctly. This also applies to road signs, which are much better remembered in games. For example, if you want to teach the rules of traffic rules to a five-year-old child, then make a small album or start a notebook in which you will paste the studied signs every day.
 You can also make a board game with your own hands, during which you will tell your baby about new signs and how to behave on the road. To do this, you need a piece of square carpet, with a size of 60x60 centimeters. Velcro is sewn onto the front side, imitating the road. Further, small squares are cut out of the carpet, on one side of which Velcro is sewn, and on the other - road signs, traffic lights, as well as pictures depicting vehicles and people. Thus, just by playing a game with your child, you can instill in him the rules of the road in childhood.
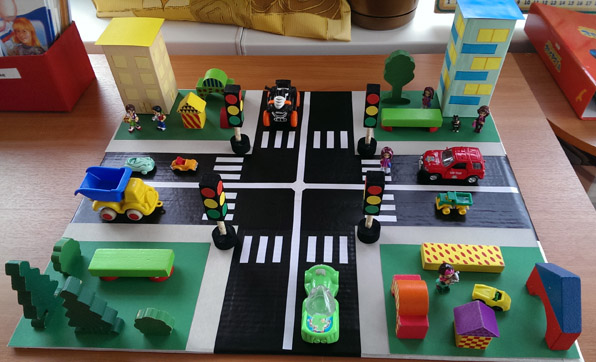
Master class for making a game model "City Street"
Norkina Oksana SergeevnaEducator MADOU kindergarten №21 "Rosinka" of the combined type of urban district, the city of Kumertau, Republic of Bashkortostan
The master class is designed for educators, but it can also be useful for parents.
Purpose: training in game modeling, the formation of safe behavior on the roadway.
Target: making a model for game modeling when working with older preschool children.
Tasks:
- to acquaint children with the rules of the road, the purpose and signals of traffic lights, with road signs, to expand knowledge about the rules of the safe behavior of children on the street;
- to activate children for independent activity in the traffic rules corner,
The game model can be used to develop fine motor skills, visual perception, social orientation, orientation in space.
Description:
Stage I - the basis for the layout To make the basis of the "City Street" game model, we will need: 2 pieces from the MDF panel (I have them 53 cm each), a piano hinge, screws and nuts for fastening.

With a drill we drill holes in the MDF panels in the selected places, fasten the piano hinge with screws and nuts.

So that our layout is at an angle of 90 degrees and does not fall back, on one side we screw a corner stop (I have this part of the fastening from the old curtain), paint over the lower part of our layout with black paint.

Now we will style the upper vertical part of the layout. To decorate it, we take 2 pictures with the images of houses (I put together these for myself).


We print the pictures in duplicate, laminate, if there is no laminator, then you can simply glue it over with tape. The picture becomes brighter and easier to care for the layout - dusting, for example.
We stick one copy of our laminated pictures, joining on the model, that's what we should get.

Now we will add volume to the map. To do this, from the second copies we cut out the buildings at our discretion, and glue them onto the pre-prepared blanks from the ceiling tiles - single background and double foreground, in my work I used the Master ceiling tile glue

Cutting out buildings with a clerical knife

We paste (I use the same "Master") on the layout, our street has a "depth".

Moving on to the design of the roadway. We take construction tape, select the pedestrian crossing, the dividing strip, that is, what we will paint over with white, we close everything else.

In my work I use ordinary spray paints in a can, they are sold in any hardware store, they dry quickly, and are easy to use. Highlighted all the lines in white - remove the tape. The carriageway and crossing are ready.

Stage II - Paper machines. Now it prints out templates of paper machines, there are a lot of them on the Internet, for example, let's take these.


The image is reduced. Click to see original.
We laminate the printed templates (1 sheet of laminated film - 2 sheets of templates with cars) fold the sheets with the white sides inward. We laminate in order to make the cars more rigid, bright and it becomes possible to wipe them. When the sheet is laminated, we cut it along the contour and we get 2 sheets laminated along the colored side, the second side remains not laminated (paper) - the paper sticks together better, and the laminated cars shine. This is how a laminated sheet with templates cut from 3 sides looks like.

Cut out car templates, glue them.

Stage III - road signs. Now let's move on to making road signs.
Materials: sheets of ordinary white office paper took me 2 pieces, ceiling tiles (better washable), stationery knife, toothpicks, glue master, mosaic of 3 colors (red, yellow, green), laminated sheet with blank signs, I used this.

The image is reduced. Click to see original.
We cut and glue 1 copy on the tile, cut out with a clerical knife along the contour, on the other hand we glue 2 copies (if you wish, you can not stick the second part of the sign. We make a stand for our signs. Birch a sheet of white paper and cut 4-5 mm strips along the long side For one sign, you need 5 strips .. Take one strip and wind it on a toothpick forming a tight "roll" - this is the upper part of the stand. Glue 4 strips into a long strip, twist into a "roll." We dip the edge of the toothpick into the glue, pierce our "rolls", pierce the blank with the road sign with the other edge of the toothpick.

To make the traffic light more voluminous, add a small mosaic of the corresponding colors to the lights, pierce the holes with an awl, insert the mosaic.

Our vehicle fleet

Our signs

Thank you all for your attention!