Maple leaves wreath. How to make a wreath of leaves? Simple weaving tails
Autumn leaves are just great material for creating wreaths. It is also a successful intake of their combination with dry grass, acorns, cones and chestnuts. Wreaths made of natural materials can decorate the walls or the door of the house. The best thing is that children who can help choose the color of the leaves can be attributed to the creation of this decor element and get into the wreath. And how to make a decorative wreath of pre-prepared autumn leaves quickly and easily with your own hands you will learn from this article. The decor from the autumn gifts makes the house cozy and fills it with a special charm. In this wonderful time of the year in the city park or forest with bright canvas, green, yellow and red leaves are spread. So time it was time to collect them and make your own hands to make various kinds of crafts and decor elements.
We make a beautiful wreath of autumn leaves do it yourself
The components of the wreath that must be prepared:
- The basis of the product on which all elements of the decor are attached;
- Special floristic wire;
- Maple, oak and other types of autumn sheets;
- Cones, acorns, nuts, chestnuts, autumn fruits and vegetables;
- Ribbons of different colors;
- Glue;
What you need to know, in order to make a decorative wreath of leaves selfishly:
- Fat, but at the same time a fairly flexible wire is the most optimal and at the same time a cheap basis for any wreath. It can be bought in a specialized store, or to make it yourself using a conventional metal hanger for clothes. Its shoulders need to fold the circle, leaving a hook, which will hang our product.
Also, for the base, natural materials can be used, for example, verbal or vine twitters woven in a circle. Another option is branches with berries, bumps or acorns. - The next point will be the choice of a wreath type:
- One-sided - decor elements are attached only from the front side.
- Two-sided - the front side is decorated, and the wrong one;
- Of course, the second way to make a wreath will look much better and presentable.
Then you can start the selection of decor elements. This is done in view of how durable the product should be. So that the wreath decorate the house for a long time, only artificial fruits and vegetables should be applied. It is important to know that before using the leaves you need to dry, but not to the end, so that they managed to preserve the form in the product. - Corses, acorns, apples and other decor elements Before starting use, it is necessary to secure on the wire or wand. Fix the grass, dry flowers and twigs need glue.
- If there is a desire to decorate the composition of a big bow, you need to decide in advance with the place of its attachment so that it does not get out of the total picture of the product.
- You can lead this beauty on the door behind the hook, but it will be better and more aesthetically made a loop from a beautiful satin ribbon.
- Natural materials should be performed first to check for bugs and dirt;
- It is necessary to comply with certain safety rules when working with young children;
- For the basics, it is best to use natural components;
- If the aircraft can be hanging on the street, it is best to choose the basis of the wire.
Create a simple wreath of autumn leaves like decor element
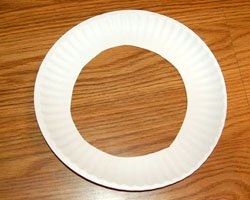
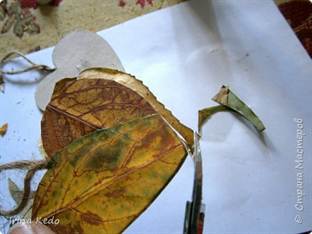
By making such a wreath along with the kids, it is not only great to spend time, but also to decorate your house with a bright cradle, which will warm the heart, and awaken warm memories even in the most severe frosts. Moreover, for the manufacture of such a craft, it is necessary to minimize the details. This is a disposable plate of paper, bright colorful leaves and glue. The first thing should be cut a circle from a paper ass, as shown in the photo.

Further, the child can start - to smear the circle of glue and sculpt the autumn leaves on it. This is a creative task, so you need to leave the baby field for creativity and do not insist on a certain sequence of craft.
At the very end, you can decorate the wreath of leaves beads, rhinestones, or tie a large bow of satin ribbons.

Create yourself, learn to think extraordinary and creatively our kids and then they will grow smart and intelligent.
Video on the topic
At the end of this article, a small thematic selection of video materials on the manufacture of wreaths from autumn leaves, which will help reveal all the nuances of working with natural materials.
Beautiful spring time, a lot of beautiful and bright leaves, many different crafts, can be made of leaves, and especially beautifully weave the wreath of maple leaves. This is a great occupation with a baby, weaving the autumn wreath from the leaves. And we can weave, it can also be colors. It is not difficult to weave such a wreath, it's not entirely difficult, the stem sheet of a can be very flexible and does not break. More detailed, you can see in the picture.

If you want to make your wreath in lush, you can with weaving, take not one leaf and three, you can additionally climb and thread that will keep the wreath longer and stronger. That's ready, our wreath, which can be used for wonderful photos.
To weigh the wreath of maple leaves, you will need high-quality raw materials, namely: beautiful large leaves and long cutters. As for the weaving, it does not differ from the usual flower: take 1 sheet for the petiole, impose on it the second and stuffing the second wrap around the first and connect the cutters together. Thus, continue to spill until the desired length of the pet is.

The wreath of a wreath of autumn maple leaves is no different from the usual weaving wreath, say, from dandelions.
Principle the same

As for the wreath of maple leaves, then for a wreath we will need maple leaves and our skillful hands. Since the leaves are not small, then the wreath will be wide, voluminous.
Here are examples of ready wreaths

Essay a wreath of maple leaves, very easy if you are generally selected wreaths from flowers. From the maple leaves, weaving will be exactly the same, the leaves have legs that are easy to braid in a beautiful magnificent wreath on the head.

There is another option to weave the wreath of leaves with wire or other solid base:
To do this, the copper wire is suitable. Or you can use dry grass. Twist it, and in the place of the joint is wrapped with scotch. Leaves insert on glue or tape between blades.
A wreath of maple leaves is a great decoration in the autumn time of the year.

Essay such a wreath is very simple. To do this, you need to master the braid weaving technique.

But searching on the Internet information about wreaths from maple leaves, I found this option of wreath weaving. Here is a link to the master class.

Wreath rushes from any materials according to the same scheme that a wreath of dandelions. The complexity causes short tails of maple leaves. On sticking cuttings of leaves should not be paid attention. You will carry out to the end, and then we disguise them, giving the basis, you can use threads and even super glue.

And get here such a wreath

Wreath of maple leaves - another joy of autumn 🙂
How to learn to determine the wreath of maple leaves yourself?

Weave wreath made of maple leaves very simple. Weaving technique is the same as a wreath of flowers (dandelions, daisies):

but to wreath of maple leaves It turned out beautiful, it is necessary to take away beautiful leaves and try to place them symmetrically.
You can also make a wreath of maple leaves just selling every leaf:

Get this wreath:

Detailed master Class Look in the video:
I wish you a joyful autumn mood!

In this question, you will help you video and pictures that I will throw off now, I will say that the autumn wreath is no different from the summer in the weaving clan, the materials are different weaving the same, you will now make sure
You can weigh the wreath of maple leaves in the same way as wreaths from dandelions weave. But only to take for weaving is not one leaf, but at least three things so that the wreath look more lush and beautiful. To begin with, take the pieces of six leaves with the longest twigs. Then starting from the side where the leaves are located, we begin to take the top of the leaves and turning the foundation torsion them in a wreath. The twigs that remain free after wrapping are laid along the base (they will be filled with the following three leaves). Leaf, naturally, for this is needed with a long sprig (the longer, the better). From this will depend the thickness and strength of the very base of the wreath. Thus, wept to the desired length and complete, connecting both ends of the wreath, tied them together either by several twigs from the leaves themselves, or something even more durable.
Wreath of leaves - an indispensable attribute of autumn photo shoots. The two most popular options are rowan and maple. We have prepared step-by-step master classes for you, of which you will learn how to weave such wreaths on your head. This process requires perfection, but not as folded as it may seem at first glance.
Instead of maple leaves, you can use any other, and rowan can easily replace viburnum or even artificial bright berries. The basis for a wreath can be prepared in advance or use the usual hair rim. However, you can do without anything at all. Someone uses this autumn craft and several times - it does not start, but a little bit will dry. And if you plan to make a wreath for photo shoots on a sufficiently long period, the basis should be durable.

Basis for wreath
First of all, it is necessary to determine the basic material. In this selection you will find several options: Choose the most convenient.

Option number 1: from the rod
To make the basis for the autumn wreath on the head, choose young branches. Willow, Birch, Pine and other trees and shrubs, which are easy to cut thin durable bars.

Clean the branches from the bark and make them smooth. To make a wreath of the leaves beautiful, it is necessary to perform the foundation correctly - it should not be too big or too small. Measure the scum of the head, but constantly pretend the size of the workpiece during operation.
Using a twine tighten the ring from the pntach. Then begin to wind up this frame of the bar. Build them gradually and constantly reinforce the jute.
Make a dense winding when you finish boning branches and achieve the desired bezel thickness for a wreath. Put the workpiece under the press overnight.
Option number 2: From Paper and Capron
This base for the autumn wreath will be made of light materials, but may not doubt the strength and reliability of the design.

Earlier, we have already told you how to work with newspaper tubes. Here the principle is the same. Cut on the strips logs and newspapers, roll them into dense tubes. Twist them with each other or just glue. You can also make the basis for a wreath with a scotch or to sew these strips at all.
In order to finally be finished with the design of each other, take the categories and tightly wrap themselves.
You can stick to such a workpiece or impose leaves, berries or other accessories, from which you want to make your autumn wreath.
Option number 3: Wire
The rim from the wire is good because it turns out thin. This means that you can make an autumn wreath on the head more elegant and easy. This is the perfect option for the assembly of small leaves in one or two layers.

The wire must be folded into one, two or three layers and intertwined with each other, spinning it in the harness. The degree of winding is chosen depending on the thickness of the material.
Wire ends twist together and hide. Top to wind up with twine or ribbon. It is necessary so that the caretaker turns out to be smoother and dodged hair.
Such a wreath can be mastered from above or glued the material directly to it.
To make a wreath on the head more convenient, on the ends of the wire you can form a kind of loop. Then we will give ribbons there and will tie it on the bow. You can make it a kind of decor element: for example, add a wide red ribbon and leave its ends loose.
Weaving scheme
As a rule, all wreaths on the head weave along the same scheme. It looks as follows.

As a basis, you can take flowers, autumn leaves, grass, dried flowers, rowan branches or any decorative material.
Additionally, the gaps between the two adjacent leaves can be fixed with a fishing, thread or twine. You can also use the satin tape so that the wreath is more bright.
Maple Leaf Wreath
The most popular autumn version is a wreath of maple leaves. You can make it with your own hands fast enough. Choose the foundation of those described above, or leafing without it.
First of all, you need to collect as much as possible maple leaves of different sizes. Sweep them a little if it is wet on the street.
Thickening near the leg must be cut off each leaflet.

We take the first sheet and bend the lower edge so that the parallel line with the "stem" is turned out.
The second sheet with a branch of the second sheet is neatly piercing the first as if we do stitch using a needle and thread.

We begin the second sheet in the same way as we added the first sheet before. We take the third maple leaf and repeat the procedure.
So we pass the whole circle. To finish a wreath, you must first try on his head, and then pierce the first and second sheet with the last one.

If you wish, you can make another or two rows.
Wreath of Ryabina
Ensure the autumn wreath of Ryabina with their own hands is also quite simple. So that it turns out perfect, we suggest you to see a visual step-by-step video instruction. With it, you will easily repeat the process of making this beautiful autumn accessory.

Such a wreath can additionally decorate with any autumn leaves so that it turns out even more elegant. You can also make it only from one rowan - large cliffs look very beautiful.
We hope that now you can weave the wreath on your head yourself, and your autumn photo shoots or contests will be even more beautiful. By the way, the leaves of colored paper or phoamiran are very often used for crafts to school. If you need to make something like this, use the proposed instructions and our selection of leaves stencils.
Views: 13 334
At the fashion shows of the recent seasons, you can often see the demonstration of dresses and sundresses in combination with wreaths that decorate the heads of the models. The dimensions of the compositions are the most diverse, as well as the color solutions. The trend on this accessory immediately appreciated the French representatives. Moreover, age does not matter. Everyone can pick up the perfect model, profitable emphasising natural beauty.
Who and for what cases will suit
Use a wreath for hair decoration can be almost all women. Another question in choosing a floristic composition and size of flowers. Teenagers and girls can safely try on themselves any form. The main criterion is the combination with the outfit. Women will suit the restrained compositions of small-sized buds. The color scheme should consist mainly of pastel and light tones.
Wear an accessory appropriate even in everyday life. It is a clear case, you can hardly wear such an accessory. But for meetings with friends, traveling to the weekend such a decor is quite suitable.
The main purpose of the wreath is considered solemn and holidays. In recent years, there has been popularity of the use of the accessory in the image of the bride. Little girls and adult ladies look equally well with gentle little buds on her head. It emphasizes femininity, gives the appearance of gentle notes and charm.
Folk festivities and holidays can also be a reason to transformed with the decoration of the hairstyle wreath. The current youth loves to celebrate Ivan Kupala. Girls with a floral composition on the head look mysterious and charming. This holiday is not required without a mandatory attribute - a wreath, woven of living colors.
When using a flower accessory, it is important to remember that it is relevant in the spring-summer period. Although some fashion guards manage to combine it with fur coats and high boots. To adapt the accessory to the time of the year can be using decorative elements that correspond to the flowering pore. Autumn decorations look beautiful and appropriate from yellowed leaves.
 Wedding hairstyle can be supplemented with gentle wreaths from beads or colors
  Wear an accessory appropriate even in everyday life
  Little girls and adult ladies equally look good with gentle little buds on her head
  Cute little ladies can wear a wreath on a photo session
 How to make it yourself
For manufacture, the following materials will be required:
- wire;
- flowers on branches or individual buds;
- ribbons.
So that the base is firmly fixed on the head, you can use the rim. To complement the flowers are recommended by beads and different greens. So the composition will look more beautiful and richer.
From the tools you will need only scissors. For the convenience of fastening the flowers, stylists advise to apply a glue gun. The hot method of fixation will quickly and reliably secure on the basis of the desired fragment. It will save a lot of time on drying the surface.
Elements for composition are used from different materials. On celebrations and state events, hair is decorated with a rim from living inflorescences. But more often used plastic and paper. Very spectacular composition of the composition made of fabric. The skill is honed for years, as a result of which buds are obtained, which immediately distinguish from living colors will not succeed.

From artificial flowers
Step-by-step instruction:
- Measure the girth of the head to create a wire frame. If there is no possibility to remove the measure, then a wire rim with an impected ends should be made to which the ribbons are fixed. With the tying on the head of the wreath, you can wear different sizes. In the case of the use of measure, it is necessary to cut 3-4 wire ponds, a length of the head of the head plus 4-5 cm for fixing the ring. Twist the basis of them, not closure ends.
- Take the sprigs of artificial colors and disassemble them on separate boutons and leaves. Short sprigs are suitable for the composition. Flowers need to cut close to the bottom, so that the stalks do not interfere with the mount.
- Pre-draw the workpiece from buds and leaves, settling on the table. Larger fragments are placed in the center, to the occipital part - small. Flowers should cross in tone and sizes, and the total composition is supplemented with greens of leaves and twigs.
- Felt cut the circles, Diameter less than flowering buds.
- Glue the felt blank to each fragment So that the center remains a free strip of 0.5-0.7 mm wide.
- Alternately drive all items, stretching the wire base into the empty space in the center of the felt.
- Distribute and adjust the composition.
- Twist the ends of the wire, Wrapped with each other several times.
- Cover the place of connection of the rim with flowers.


From living flowers
Step-by-step manufacture of wreath:
- Make a wire frame. To do this, you need to cut 3-4 pntures, the length of which will be equal to the size of the head of the head plus 3-4 cm on the fixation of the ends.
- Prepare plants by cutting their stems at 10-14 cm. In order for the flowers not to start quickly, they should be treated with floristic sprays. So the wreath will keep a presentable look for a long time.
- The resulting ring is wrapped with a floral ribbon 4-5 cm, after which it alternately lay the fragments of the wreath. Each stalk is tightly fixed with a ribbon, making 3-4 turns. Place the items need to be more densely to each other. Elements will serve the main flowers, field herbs, another greens. As a supplement, you can use beads and pebbles planted on the pieces of wire. In combination with alive colors, the decor will look exquisitely.
- The stalks of the last elements are hiding Under the fixed plants and are tightly fixed with ribbon.
Wreaths from living inflorescences can be mad without creating a frame. Cut the stems in this case is not necessary. Weave to start with the formation of a beam of 3-5 stems. Each new fragment turns around the long stems of the initial beam by two turns (up to the inflorescence and after it).
The end is connected to the beam and closes into the ring using a floral ribbon. To give the accessory of strength to the stems of the initial beam, put the ribbon from the atlas. It is subsequently use to connect the composition.


From autumn leaves
It looks very beautifully a wreath of autumn leaves. The most popular is Klyon. Its leaves are yellowing faster than the other trees, and the structure is durable, not losing the original type for a long time.
Step-by-step instruction:
- On the prepared from the wire, the rim mounting 4-6 leaves at the same time. Fixation is performed using a floral tape.
- After 3-4 beams of maple leaves, insert rowabine. We will not know the reminder of the summer. To do this, you can insert green leaflets every 5-7 rows.
- Stands of the last fragments need to hide Under fixed leaves, but cut off.


From paper
Paper flowers are very gentle and fragile. When wearing can lose the form, so the masters recommend to fix flower arrangements on a solid foundation. The usual hoop is best suited for this. It is better if its foundation is wide, then the accessory will be massive.
Instruction:
- Stay on the table a composition of paper buds and leaves. You can add plastic greenery and beads fixed on the wire. The massive part is located in the middle, and to place small elements to the edges.
- Alternately fasten fragments to the base of the hoopUsing hot glue or pva.
- Seal the composition of greens And another decor.
- Parts of the hoop concerning the ears You do not need to accumulate with floral elements.


From tapes
To create a wreath you will need to prepare the elements: Flowers 4-5 species, greens, stamens. All of them are performed from satin and organza ribbons. If, on the tonality of colors everything is clear (for a beautiful composition, they are performed from various bright colors), then the leaves are cut into the creation of the composition of the composition of several shades of the green ribbon. To add air product, you need to use billets from organza.
The form of greenery should repeat the outline of the leaves of several plants. For example: Poplar, Oak, Clean. All edges of the elements made from the tapes must be melted to prevent the strain of the threads. To this end, you can use a lighter. Of the colors are often selected: poppies, chamomile, cornflowers, roses, chrysanthemums, asters. They are well combined with each other or in addition to other inflorescences.
Step-by-step instruction:
- Wave up the rim with a green ribbon method "Snake". Fix the needle and thread ends of weaving. It will be the basis.
- Stick leafs along the contour of the rim on both sides. Stop the elements of the venge, applying different types of greenery. There should be a volumetric basis.
- Next, alternately consolidate on glue flowers.
- Lastly, a compaction of the composition with organza leaves is sealing. They need to be recorded at once 3-5 pieces. Then the wreath will be great.
- To the edges of the rim to sew a gum 10-15 cm (Depending on the circle of the head). It should be decorated with green organs.
- To sew a few freely saving tapes of 30-40 cm. It will look beautiful if you use satin strips of different thicknesses (1 and 2 cm). Their colors must elaborate with the colors used in the composition. On the edges of the ribbon to perform a beautiful triangular cutting.


- For long events, it is worth carefully using accessories from living inflorescences. They quickly lose sight and by the middle of the celebration will completely lose a presentable look if they pre-hold them in the refrigerator. It will help to prevent a quick fading a special spray bought in a floral store.
- If the active rest is provided, the reliability of the wreath attachment should be taken into account. It will help to better fix the rim on the head of the tape tied on the back of the head.
- A bright wreath of large colors should not be complemented with catching makeup. It turns out an overload image.
- The flower accessory on the loose and slightly curled hair looks spectacularly. The appearance acquires the traits of tenderness, romanticism and freshness.
- You can make a wreath from several twigs of artificial colors. To begin with, the branches on separate fragments should be disassembled. After that collect the composition by gluing the elements on the hoop.
- On the solemn events and weddings it is recommended to use accessories Of the small flowers of pastel tones. Thin satin ribbons will add conformity to the appointment.
- Before making a wreath for a bride from the living colors, you should consult with a florist. The specialist will prompt, from which plants it is better to make a decoration. Fast flower rim damage can spoil the holiday.
- The longer straight, the larger the elements of the composition in the wreath.
- The accessory must be comfortable to put on the head. Do not build too bulky rims. Wearing them uncomfortable, and in the photo the face will be constantly lost in buds and leaves.
- If the outfit of the bride suggests the addition to the wreath, Buds from the rim must cross the bouquet.
In the fall, so I want to bring the oakha of fallen leaves home, but what to do with them later? We offer you an article with master classes, how to make a wreath of autumn leaves with your own hands.
Simple option
We will need:
- rods;
- autumn leaves;
- wire;
- tape.
From the plates we form a circle, fasten wire. Then begin to adapt the leaves in a circle, they must be placed.
In order to hang a wreath, make a loop from the tape.

Royal flower
Let's make roses from leaves. To do this, they must be a little wet.
When a certain number of colors are ready, we prepare the basis from the thick wire, turning it into the ring.

Now we can connect roses in the troika and start these billets using a thread or a thinner wire secure.


Here is such a wreath in the end we turn out. For suspension also use tapes.

Crafts with children
Most often in the forest or park admire the leaf fall, we go with children. We offer you a master class, how to just make a beautiful wreath, introducing a child to the creative process.
Everything starts just from the collection. Choose multicolored leaves: red, yellow, green. Different types: maple, rowan, birch, etc.
From a disposable plate cut out the basis, how to make, shown below in the photo.

Now turn the pens of a child and his fantasy. Let the kid puts glue and places the leaves on the basis of the order that he tells him the imagination.


If the twigs are stitching, they must be trimmed.

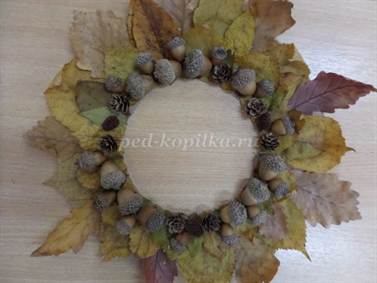
If you and the child have scored not only the leaves, but also a variety of cones, then do the following wreath.

For it, you can also use the base from a disposable plate, and you can cut out of cardboard. The leaves should be glued into several rows and in a checker order. For convenience, you can draw several circles.

When you get to the inner circle, start gluing the rest of the decor. To begin with, let it be a large acorder, but between them small lumps (for example, Olkhovy).

On top of the minor acorns into the space between the largest.
When all additional materials are glued or you will arrange an existing result, proceed to the manufacture of the loop. To do this, cut out two rectangles from the cardboard, and from a woolen thread, twine or ribbon, looping. It is placed between the cards and glue.


We glue the loop on the back side of the wreath and everything, it is ready.

From rowan leaves and berries

It will take:
- leaves, it is better to take birch or similar to them;
- rowan berries;
- drunks to choose from;
- thin twigs;
- cardboard;
- newspapers;
- twine or tape;
- malyary Scotch;
- glue.
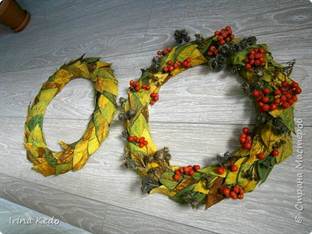
Cut the circle from the cardboard and take it with several layers of the newspaper using a greasy tape. We impose as much paper until we get the desired thickness.


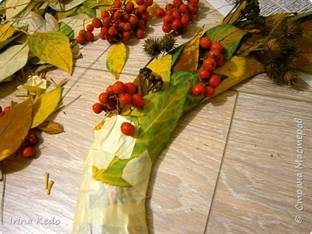
With the help of all the same tape, we begin to cover the surface of the base with the leaves of the mustache. You can use and glue.


In principle, already in itself such a wreath looks beautiful, but let's continue to decorate it. To do this, distribute sprigs with berries throughout the wreath, branches of dried flowers.

Now lay a wreath toward and cut four hearts from cardboard.
You can make them one size, and you can make one of the steam to make a little less than others like you decide.

We glue in pairs, not forgetting between them to put a loot from the twine (or tape).

Now each side of the hearts close with leaves. Excessly cut off.


On the edges of the hearts we apply glue and sprinkle these places with a crumb of twigs.

The central part is decorated with rowan berries.
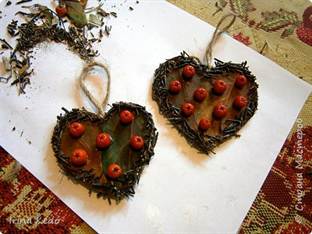
We attach hearts to a wreath, hiding the loops under the leaves.


Here is a wreath can be decorated with your home. And since he is made with his own hands and his work and spiritual warmth are invested in him, he will become a kind of faithful to your family.
Paper decoration
Well, what if, for example, the weather does not allow you to collect live leaves or do you live far from the park? What now, give up the idea of \u200b\u200bcreating an autumn wreath? Do not despair, color paper will come to the rescue. Here you too can use children, it will definitely develop not only from the imagination, but also a small motor. After all, we will make the leaves in the Origami technique.

Prepare:
- colored paper;
- scissors and stationery knife;
- glue;
- cardboard, preferably dense;
- stapler.
From the paper, cut the squares with the sides of 10 centimeters. For each sheet, we will leave 10 pieces. The number of leaves will depend on the size of the base.
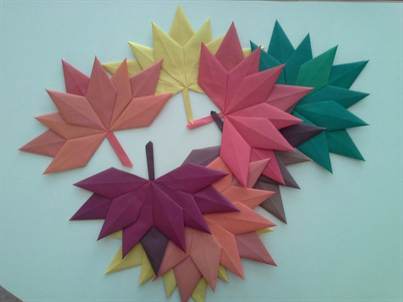
We take six squares and fold them diagonally. Next, both corners fold to the fold line. We have formed the corners below, they also bend them to the center. In three other squares, we will execute only the first stage of the addition of the right and left corner. But the tenth will serve to leaves with a stalk.


When all the details are preparing, we begin to glue them three, as shown below.

Then connect all the top three together. We have their bangs.


We stick on the reverse side the tenth square, cut it along the edge of the sheet, but not the end. This protruding part is folded in a stalk.


Now from the cardboard cut out the base and begin to place our leaves. We assign one on the other brackets in the inside.


Our autumn wreath is ready. Here are such a variety of wreaths can decorate your house in autumn.
Video on the topic