How to sew children's home slippers. How to sew leather men's slippers. Stage: Billing billets
Good afternoon friends!
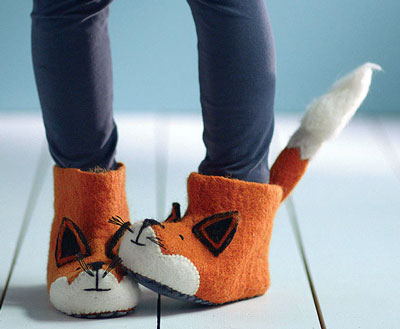
It turns out that slippers with their own hands quickly and simply can be created from the girlfriend, while even the pattern of the desired size does not need to be signed. This is about it the following competitive work and master class Evgenia.
Hello, friends. My name is Eugene. How much I remember myself, I always fond of something, something worked or soldered. I have favorite classes and hobbies, for example, fishing. But I also like to try new types of creativity and needlework or experiment in already familiar. My blog "" is devoted to different types of creativity.
I have long thought to make new room slippers, but everything somehow did not reach the hands. Therefore, the competition has become an incentive for me.
Make such slippers with our own hands, I will try to tell in detail and show in the photo.
Simple pattern slippers do it yourself
Patterns of domestic slippers with different sizes we will not need. We ourselves will construct the patterns for which the details on the size of your leg will be painted.
I began to be ready, I use them not the first year. Therefore, this process will describe.
Make them better on the cardboard, circling your leg - you get molded soles. You still need a lid for top slippers. Circuit the soles on the side of the fingers about the middle. Measure your legs and distribute this distance from the middle of the lid equally in both directions. Damage the corners of the lid to the extended mark.
Materials for the manufacture of household slippers
Slippers with their own hands can be made of a wide variety of materials: dense tissue, old jeans, felt, felt, fur, leather, even.
These materials will go to the top of slippers and insoles.
For slippers still need:
- linoleum or dense skin for soles
- porolon is a thickness of 10 mm.
- corrugated cardboard from the box
- scissors
- handle and marker
- hook and threads.
Cutting details
On a piece of linoleum on the lecturer sole. Here you need to position the milestone correctly, so that the sole does not work for one leg.
On the foam rubber it is also drawing the sole, the location does not matter. Draw on the foam rope is better than a marker.
The same sole of a cher on the cardboard. Gamel on the cardboard is better to have a corrugation along or scout, but not across. So the cardboard will not be closed during operation and socks slippers.
Now you need to make a insole that will cover the foam rubber. For it, any dense materials are suitable, such as a drape, soft felt, costume fabrics, jeans or leather. I have a tight knitwear. From the wrong side of the material I bury the melon, but so that between the patterns there was a distance of a centimeter two.
Getting Starting Cover Cut. Here you need to choose the materials so that the lid keeps the form well. I will use the same knitwear as for the stelek, I will make a pattern for the inside, which will come into contact with the leg.
The top of the cover will make from Dermantine based on.
The pattern for the vertex is not close to the edge of the material, and leaving along the edges of approximately 1 centimeter, I bury.
Having finished with drawing, turn to cutting out. Billets on linoleum, cardboard, foam rubber and the inner part of the lid cut out over the drawn contour.
And the insole for the sole and the upper part of the cover cut out with the allowance, that is, by retreating from the contour of about a centimeter.
How to make slippers do it yourself
1 Stage: Booting Billets
So that the workpieces do not climb into the piercing, I glue them. For this purpose, I use any existing glue, for example, "Titan" or "moment".
Porpaone sticks to the involving side of the insoles, and the bottom blank of the cover to the invalid side of the top.
It is not necessary to lubricate the glue very much, only slightly around the edge and in the middle.
After the details of the covers are glued, I cut the corner from her. I do it for convenience when tosing.
2 Stage: Piercing holes
Shell need to pierce holes on all the details, retreating from the edge of about 1 centimeter, can be slightly smaller. The distance between the holes is approximately 0.7-0.8 mm.
3 Stage: Soleside
I will bind the details I will be a kapron thread, such a use to mating fishing networks. But you can take any other synthetic thread.
At first, I bind the edge of the soles from linoleum. I do a loop on the thread, I enter a hook with the front side of the workpiece and pulling the loop.
Hanging the whole sole, cutting a thread and fix it.
In the same way, I bind foam rubber with the insole, the edge of the insoles weching inside. This will give a neat view of the finished product, as the foam rubbing will not stick through the threads.
It is more convenient to start the strapping from the center of the heel or sock, below I will explain why.
Having finished tidying the foam rubber, I don't cut the thread, but I leave the loop.
I apply the insole to the sole, that they would coincide. I enter a hook through the loop of the insoles and under the loop on the sole and combine both parts by connecting loops.
By connecting the lateral parts of the parts on the one hand, on the other hand there remains pockets between the items in which I insert the workpiece from the corrugated cardboard.
It is more convenient to insert it in such a side pocket, and the cardboard does not break. And he needs to give the sole of rigidity, and so that the heel does not pour.
By inserting cardboard, I continue to connect the details to the end, cutting off and fix.
The sole is completely ready, proceeding to tossing the edge of the lid.
4 Stage: Slipping Slides (Vertex)
The lid is tied up, like previous parts, holding the front side to yourself, and leading the edge inward. I start knitting from the right angle, it will allow, without breaking the thread, connect the lid with the sole.
5 Stage: Sole compound with lid
So, the lid is completely lined, I apply it to the sole so that the corners are on the same level. Connect the lid with the sole with the help of connecting loops.
In the same way, I bind and connect the details of the second slipper.
These slippers do it yourself - just and fast!

Decor slippers
I wanted to additionally decorate slippers, all the same for the competition will go.
For a colorful surface, it's not easy for a colorful surface. Having a lot of options, stopped on the bows that remain from the old bag.
Gently cut sticking edges.
She chose a place where I would be attached to, and I did the seaw hole. Inserted the legs of the bows in them, bent from the wrong side and tightly pressed.
I get to your court the resulting homemade soft slippers - slab, which I did with my own hands.

Zhenya, thanks for your participation in the competition and very beautiful slippers, we just lacked not knitted, as well as a separate thanks for the huge work on creating a master class! And slippers are suitable for guests, when someone comes home, always the problem, what to give them to shoes, and excellent
Hello, dear my shleyushki)) Today I will share experiences and pattern of children's slippers. As always, I catch myself thinking that I can't just go and buy a sneaker's child, because it is so easy ... But I can't do it inside)))), so you want them sew with your own handsIn addition, as a rule, this kind of things are sewn from applied materials, that is, from what remains in small cuts in the covers.
Can sew sneakers from old jeans, sucker, fur, fleece, etc.
I am for these children's sneakers Chose such materials:
- jeans - on the sole
- singrytegon - for insulation


- singry procession for insulation


The next step:

Then we flash on the typewriter:


This is what should happen:


So give joy to your kids and go so cute slippers with their own hands:

Below I decided to make a small selection of funny and cute face for children's slippers:


How to sew the sneakers for children. Pattern by 16-18-19.5 cmHello, dear my shleyushki)) Today I will share the experience and pattern of children's slippers. As I always catch myself thinking that I can't just go and buy a baby sneakers, because it's so simple ... But I can't do it inside)))), so I want to sew them with your own hands, besides, as a rule of this kind of things sews From applied materials, that is, from what remains in small cuts in the covers. You can sew sneakers from old jeans, coats, fur, fleece, etc. I chose such materials for these children's sneakers: jeans - on the sole On heat, these sneakers can be compared with slippers from sheep wool. But she did not fit me perfectly, so I made another pattern on the basis of this pattern, the sideline size I needed - 18.5 cm. And since I already checked it on my experience - I can put it out for mass use without excitement The pattern of sneakers will work perfectly. In order to understand what size of the samples you need - apply the child's leg on a sheet of paper, we supply, and the extreme points measure the ruler. Sneakers can be made by 0.5 - 1 cm more than a child's foot size. The soles of the sneakers also consists of three parts: from the old jeans cut out the part that will come into contact with the floor Then mentally "bundle" already finished sneakers for two sneakers: one external (from a blue fleece with syntheps) and the other - internal (from black fleece). First, the top sneakers are fuel. How to sew a skirt from old jeans? Therefore, we put a part from a synthet board to the wrong side of the blue fleece, and the soles from Ginov also apply a synthetic hyprofo: Then sew the part of the top on the seam on the back side of the heel: The next step: we rush around the perimeter of the soles from jeans and synthesis this top, dusting fabrics face to face Then we flash on the typewriter: And turn the finished top of the sideline. It is necessary to follow, so that the seam was high-quality on the front side, and there was no difference in the discrepancy of the layers, so as not to stick sintepon. By the same principle, we sew internal sneakers from a black fleece: To gently sew the sole to the upper part, it is necessary to work out or told on the entire perimeter with pins, since the upper part is cut out in such a way that it creates the required volume for the foot, but at the same time the upper part to the bottom is superimposed with a small freedom. You will feel it as you will sew at this stage. And so that the upper part does not bother relatively soles - it's easier to quarrel, so that then do not break (like me))))), I am not a lover of the notes)). Here .... so that you do not make my mistakes, .... Slip pins: Now it's time to sew both sneakers each other. To do this, fix them at the top point of the seam on the heel, and we put external sneakers in the inner face to face: This is what should happen: And now attention! Ideal it would be easy to see on this cut, just sew three layers of the fabric, but it was not there ... After all, then the sneakers do not turn out already ... Therefore, we sew an open slice, but not completely, leaving from any part place to turn out. Soak the sneakers on the front side, and the remaining cut with a manual or a typewriter. Here such a pleasant result turned out)))). My child was very happy with these slippers, it was especially fun to wait when he approached and asked constantly: "Well, what? Already ready slippers? " So give the joy to your kids and go such cute slippers with our own hands: If you wish, it was possible to draw acrylic paint on the tissue of some fruit, or the ears to sew to slippers, or make a semblance of my paws, I just did not have time, since my child immediately dressed and ran))). How to sew jeans to a child from old jeans. Pat for 2-4 years Below I decided to still make a small selection of funny and cute faces for children's slippers:
Fleece - on top and inside sneaker
Singrytegon - for insulation
Pattern sneakers on the leg 16.5; 18.5; 19.5 cm
On the Internet, I got such a good pattern:
How to sew sneakers with your own hands?
To begin with, we will understand what these sneakers consist? I need three layers of fabric on the top of the sneakers - it is an outer fabric, a filler of a sintepon, and an inner tissue. Cut from the fleece of the blue part of the upper part, from the black fleece - the detail of the inside, as well as the part of the synthetic procession. Total for two sneakers should be harvested 6 parts:
Singry procession for insulation
Detail of black fleece for the inside of the sneaker
You may also be interested:
You will also be interested:
Children's sweatshirt for growth 92-104. Pattern, Sham.
Fleeceman on Velcro. Pattern
Children's jacket with their own hands (on the height of 98cm). Pattern jacket
I do not know how you have, but we have not given the heating yet, so you have to warm up with the help of a heater. However, the cool floors suggest horror on my inner "yazhem", because I want to talk about how to sew home slippers with your own hands for the baby.
Cute slippers will not only warm the legs of the baby, but they will look pretty nice. The convenient pattern of home slippers for a child consists of several parts, which can be viewed in the picture. Sizes of slippers you pick up your child under the feet.

Cut out the basis of dense cardboard or better material of the type of drape, then we are wearing it from several sides. So do it with all the parts of the slippers to build the likeness of the sole.

The next stage is the filling of our billets, try to choose the right material that will not collect condensate from fast children's legs.

We flash ready-made details of future slippers, the colors of which are easy to choose the toddler. For example, this master class focuses on home slippers for boys, but just choose a different fabric and are ready to the sneakers for a cute girly.

We connect the items and begin to flash the future fencenotes of the child's legs, do not forget to depart on the opposite direction and gently flash from the inside.


Our slippers are almost ready, it remains only to decorate a little that the kid can gladly stretch them on his legs.

We make a small pattern for a cute animal and with the help of your fantasy and golden handles, we build a teddy bear face. It remains only to sew facets of bears on the front edge of the ready-made slippers for the baby.


In the kitchen, we usually spend a lot of personal time. So why not make our stay there more pleasant and comfortable? We found on the expanses Aliexpress useful things for the kitchenthat will definitely be interesting for everyone. And they all cost no more than 200 rubles, so in addition it will not be expensive for your budget.
Learn to make home shoes. It is very simple and easy. Once trying to draw in this exciting and useful occupation. Mostly shoes we need different for different life situations. One shoes we carry to work, and it usually corresponds to a certain dress code. The other thing is the shoes for sports, worn on vacation and of course homemade. And this shoes can be chosen at the venue of your imagination.
rod slippers
The most common home slippers are stitched with their own hands from the fabric.
The material for them can be found in any house and even the child will be able to carve out!
Fabric home shoes are the easiest weight.
glamorous leather slaps

Special delights are homemade slippers,
Stitched from skin pieces.
They are most durable compared to other versions of home shoes.
Cool looks with any home clothing and give it a special gloss
felt galoshes

Separately, it is necessary to note the useful properties of felt slippers. They are soft and warm, wearing and easy to sew due to the loose texture. It is also considered that they are therapeutic.
fur slippers of own production

This is a whole professional product. In each family there is an old fur coat or a hat from which you can construct homemade shoes. You can take worn slippers or comfortable moccasins comfortable in the past, their resurrection. The obtained parts will serve as lecturer for the pattern.
uggs best friends for our legs

Hurt the joints? Sust yourself home bumps. They are easy and very fast out of four details. You can use old sheepskin.
Call four details: sole, heel, front cuff, sock. Sust all the details of the thick stuffing thread of the seam top. Top will add
white fur boots

Home shoes-boots, also done with their own hands at home. It is very relevant for people who constantly frustrate or have problems with joints.
booties from the felt

They are very easy. Observe a children's leg with a 2,5-cm. Clean the top and accessories (butterfly, leaflets) from a different color of felt. Top to the sole on the sewing machine. On the inside of the fasteners to sew through the rectangle "Velcro".
children's home chuni

The top of the fur fabric inside on a knitted basis. Suitable for the smallest family members. Three details are cut: the whole part of the side of the vertex, the nose of the top with the tongue, the sole. Sole of dense tissue or skin. The remaining parts made of fur fabric. All parts are stitched together with a seam "Through the edge."
denim home shoes

Looks very stylish. Of course, it is loved first of all mods and fashionista. Suitable for all ages. And young, and old will feel stylish and comfortable in them. Pattern made on paper. It cuts parts on the fabric. For soles and gaskets are taken tight material. The insole is made of pleasant fabric. All parts are connected according to the scheme and ready.
fur Children's Slippers

For these slippers in the form of a beast's paws, the sole in two copies for each sole (one -proof, another-insole) is cut. Drows your feet with a pencil or handle, it happens right right on the back of the fur fabric. Separately cuts the strip 6-10 cm for the cuff. Top slippers lifted the whole detail. Shell is made on the heel. Cuffs folded in half. All parts are stitched.
Patterns with sizes of domestic master class
It is quite easy to sew ordinary home slippers on finished patterns. They are redrawn in size in the size of the paper on paper. Cut patterns and moor the contour on the fabric. Reconstruct the required number of details. Embed to assembly using a standard sewing scheme.
- Stick upper parts with insole, top blank
- Stitches or glue the elements of the sole, the blank bottom
- Printed blanks of bottom and top glue and stitched for strength
- Muffd up or clasp, lacing
sew home slippers on patterns
Use these patterns to quickly create simple slippers. It will take any material for top and dense for bottom. Durable threads and a thick needle.


bunny boots, master class
Cheerful and comfortable bunny boots warm and raise the mood. They are not difficult and can cope.

- Separate fabric. Material for manufacturing is used soft and dense, plush, velor or fleece. On the sole leather or substitute. To give a form of a Singrytepon (but not necessarily).
- Tools are selected. Paper sheet for pattern, pencil, bagging needles, scissors and sewing machine.

- There is a pattern of two / three, if with a synthetone, main parts plus ears and tail with letters. On the pattern, halves are drawn.
- Two / three layers of material are present in these slippers. Upper velor, medium synthetic and internal lining
- The sole is made new of the skin or cut out of the old path
- All parts of the main fabric are cut.

Product details.

Stitching of all parts of the layers occurs for each separately.

The ears are sewn in advance.

The ears are inserted. Finishing seam is made.

Such boots are obtained from the wrong side.

Spread on the front and make soft folds on the top of the boots.

Connects a shore with an insole.

So looks like one inner layer.

The outer layer is inserted and the inner with the inside is cleaned.

It is stitched along the edge, but a small hole is left not sewn. Through it turns on the front side.

After this hole is fed.

Pickles are made separately. Two circles are cut out, folded by the face inside and stitched, leaving the hole. Out to the "face" and stuffed with syntheps and the remaining hole is muted.

Pickles are located in the center of the rear seam.

Then these tails are attached to the top.

That's what happens in the end.

Slippers boosters-bunnies like all family members. More than others are delighted with children. They willingly take part in the manufacture of such shoes.
How to cut the slippers from fur with your own hands, step by step with a photo
Experienced needlewomen advise to start sewing slippers with simple slippers. They are open and closed from any handy material. Making such slippers, you can learn the basics of the pattern and tailoring of home shoes.
The technique is very simple. To begin with, the pattern is made. On the pattern, patterns are applied to the material of the contours of parts for sewing. For soles take the material dense and thick. Details are stitching and attached decorations on already ready slippers. For convenience, when wearing is glued with a low heel on the sole. It is convenient to make a glue gun.
they are removed its unique sizes, made patterns
It will take the following to remove the measurements from your foot. The circle of the foot along the outer edge, the length of the top slippers along the inner edge, at the outer edge, the heel.

Starts with the circumference of the foot. To do this, put its own feet on a blank sheet of paper. Used for this old unused wallpaper.

You can snatch the middle of the notebook to the cell. Observe your mark with a pencil or pen. Everything, the sole for slippers is ready! The heel part "heel" is 1/3 of the length of the foot.

Now other measurements are taken. All measurements are removed in the foot in accordance with the clamping soles already made. For this, the foot is put on the drawing of his foot. For top slippers. The measurement of the length of the top slippers is removed.

To do this, you will need a "centimeter". There is a "centimeter" from the edge of the thumb on the foot in a straight line to 2/3 of the foot length.

The next measure of the width of the foot is needed for the pattern of the vertex. This is the width of the inner edge along the lift line.

This measurement is measured to determine the distance from one side edge pumped the feet to another. The centimeter ribbon is located through the rise of the foot.

A bit attached shape patterns patterns, but in accordance with your sizes.

All are ready personal measurements for future shoes. And there are patterns patterns on sketches of drawings.
patterns are made of all parts from materials
First redraw the figures of the pattern "on the eye" with a photo on paper. Then adjusted taking into account the desired size. Cut paper pattern with small allowances. Applying to the leg and finally adjusted with scissors.

For example, work is performed for the male model. For women, another material is simply taken, sizes and decorations are added (optional).
To do this, you will need:
Top part:
- Artificial fur. The old fur coat or vest can come in handy here. For the top layer of the top of the slippers (on the left in the picture).
- Batting or a piece of fabric for floor washing (not used), for insulation (centered in the photo).
- Thin nice lining fabric (right in the picture).

Lower, sole.

- Something durable for soles. It can be a piece of felt, thick and coarse skin, rubber. The sole from the old shoe is a little larger, so that it can be cut from the desired form item (on the left in the figure).
- It is also used here for insulation, the laying is cut out of it slightly less than the sole (centered in the photo).
- It takes a dense, but soft fabric. Ready insoles that are sold in any economic store can be used. It is bought a little larger and already cut out of them on the pattern of patterns (right in the picture). The size of both insulated gasket.
Additional part of the elastic ribbon 3 cm wide or the same size strip of synthetics.
To make women's or children, you need to take the appropriate size, pick up the appropriate material and decorate with decorative elements.
Step-by-step instructions how to sew slippers from fur with their own hands
Details of furs slippers are sewn on a sewing machine or manual sewing. The typewriter will be faster, and the hands exclusive. The choice is yours.
For the assembly of parts you will need:
Needles for rocking parts To make all the vertex parts.

All three details are facing along with the wrong side.

The stitched parts are cut by 2-3 mm along the line. Hanging sticking fur and other threads along the edges of all layers. It turns out a single detail of the top slippers.

The elastic ribbon is superimposed by the face on the front straight of the details on the inner edge of the top and is attached.

The sewn tape is wedged on the wrong one and is once again attached to the "multiple zigzag". Special knitted line on a sewing machine.


On the involving side, the ribbon is cut very close to the line, at a distance of 2 mm.

Combined with the invalid side of the vertex detail with the front side of the insole from the bottom. The middle of the details must match.

Sidebags are also combined and fixed with needles.

For convenience and smooth crosslinking of parts, first extended them.

Sticks are stamped with top detail. Work with inside.
 Next, on the front part of the slipper places the belt and the edge of the strip is fear.

Ribbon fastened on the front side slipper throughout the circumference using a machine line

That's what happens in the end.

The tape on the wrong slipper turns out and is fixed with the line "Multiple Zigzag". The entire upper part of the slipper is made.

The heel-heel is glued with a glue gun to the sole.

If the item is not very well stuck, then it warms up the iron, the glue will be bought up and connect the parts tightly.

In the same way, gluits from the wrong side of the sole and insulation. For the connection fortress, the iron is stroked.

As I wrote above the warming gasket must be slightly smaller than the sole.

The nasal part of the soles with glue and joins the top of the vertex of the part of the slipper.

In the same way, the backs of the sole and the upper part of the slipper gluits.

The final action will glue the entire sole with the upper part of the slipper throughout the perimeter. It is recommended for greater reliability to try the place of gluing hot iron. If the slippers are from fur, then in these places it will inflict. But it is not scary. Hold a few minutes with the fur side over the ferry and everything is spread.

Here are sewn home slippers. As you can see it very simple and fast.

Fur obtained warm, soft and beautiful slippers. They are made easily and under power beginners. It is enough to understand the highlights in the sewing of slippers and can be moved to more complex materials, such as leather.
Children's slippers do it yourself, photo 3 options
Slippers are cut in the form of animals or cartoon characters. The form can be in the form of boots or sandals.
sandals from Velvet

For these sandals, there will be a dense velvet fabric with any pattern for the top of the sandals, a piece of thin suede for the treatment of edges by Crate and for fasteners, 4 buttons instead of locks.
The upper part consists of 2 integer different parts, places for Kant to and fasteners. At the edges of the fasteners slot for buttons. Buttons are sewn on the top of the sides.
The lower part is better made of the three identical details in shape. Two of which, the sole and the insole, the same sizes, and the average-gasket of 0.5 cm less across the entire circumference.

It is cut out for tops (on the left in the figure) Detail of Velveta. The second (in the center of the drawing) is made of soft, pleasant body fabric, this is for the inside (lining). Both parts are connected with a strip of suede. Fold the details face inside. Soak and move the iron.
The middle part of the "loop" is peeling into the sandals and hem. At the bottom of the resulting top from the outside, sew the face to face another beyk from suede throughout the circumference. Made on the wrong side of the top of the sandals the resulting side and laid.
For the fasteners, the rectangular item is cut out, stitched face inside and turn. The ends of the details are peeling inside and stroke. On the edges of the fasteners make rosters for buttons and coach the edges of the holes, so that the fabric does not appear.
Connect the upper blank sandals with the bottom of the sole stitch "through the edge" made by a dense kapron thread.
children's slippers in the form of a czech

Perform from felt or fine felt. Main details: Upper whole part, sole and insoles. The jumper in the fastener fastener knit from yarn crochet.
The mouse muzzle is made up of appliques cut from tissues of different textures and colors. Each detail is trimmed by "felt stitches".
Ears are made of two circles, more size and smaller color. Eyes - black buttons. The nose is cut out of black tissue and fastened with glue. Mustache from thick yarn of two colors.
glamorous booties

Sports model for young fashionists from felt in the form of a ked. They are quick and hands. It will take felt or felt, two colors. Five parts cut: back of the vertex, the nose of the top, the front of the top of the "tongue", the sole, the insole, the gasket of 0.5 cm is less insoles and soles. Lace and loop strip for decoration.
Need measurements from the feet of the child. Accordingly, the sizes are made patterns of all parts. The contours of the detail cutting on the fabric are transferred.
How to sew slippers shoes do it yourself, master class
Homemade shoes-boots favorite shoes of women. They are beautiful and comfortable. They are always warm and cozy. Making such boots each woman can express themselves, and it creates a good mood.

to sew slippers boots for home with their own hands you will need:
- Fragments of wool fabric or "artificial fur" for basic parts.
- Cotton fabric (any) for lining.
- Singyprc or batting for filling.
- Felt or other very dense and thick fabric for soles.
Patterns corresponding to the 38th leg size. To resize its footage, it is mapped to this sketch of the bottom of the lower part and are adjusted in this way under their size.

all the necessary details are cut
- Start with soles. Two parts of the sole (on the left in the figure) are cut, one of the felt, the other of thick cotton instead of the stlocks.
- Woolen or fur fabric is used for the main parts. The parts in 2 copies are arranged asmetrically (centered and right in the figure).
- In the same way, it is cuts out the details from the synthet board for filling and details of cotton for lining. There must be three sets from different fabrics.
the process of assembling the details of boots

Home slippers boots are ready and time for it takes 1.5-2 hours, no more.
Slippers of jeans with their own hands, photo 3 options
Slippers from jeans sew from old trousers, skirts and bags. At the beginning, make a pattern in your foot for the sole. For this, any dense fabric or material is suitable. Cut down the stop and ready. Everything is used as a material. It can be an old tourist rug, a thin rubber boat, a car tire chamber, etc. Well, they are classically taken for soles, felt, felt.
female Denim Flippers

Several flaps from old light blue jeans, a piece of felt, a pink-colored satin ribbon for lacing and decorations.
Details from foot from felt in 2 copies are cut on the pattern. One will be a gasket, another sole. This is a 1 cm gloss with a 2-cm for exhausting the insoles made of denim on "oblique".
Also lies the oblique beaking equal circumference of the foot. Two pieces of satin ribbon for bows are cut off. Everything, the pattern is made. Start by tailoring slippers from the top. Two details of the invalid side are folded and stitching "through the edge" along the lift line.
In the center and at a distance of 1 cm, the obtained element of the vertex is made of rosters with a ribbon wide and a distance of 5-7 cm. These holes are processed by the "grid seam". Tape is inserted into these holes and the bow tie.
When socking such slippers, denim material is quickly pulled out and the ribbon can adjust the density of adjacent to the leg.
Send the top to the front side of the insoles. Preparing the top is ready. It is processed by oblique bay edge throughout the circumference. The billet is glued to the gasket with the invalid side and the oblique beaker turns on the side of the gasket, is lined.
Top slippers ready. To complete the process, the top is glued to the outflow and all.
slippers from jeans in the style of "Czech"

Completed from jeans, felt, cotton. For a fastener a big button from the old coat. Members with legs are removed. Draws pattern in size.
Five items for one slipper are color: one-piece top of 2 pcs of jeans in a mirror reflection, clasp for a fastener 2 pieces of jeans, insole 1 pcs of cotton, laying 1 pcs from felt, sole from felt 1 pc.
Sew starting from the top. First, there are two strips of stleships together with an invalion and pull along the edge of an indent to 1 cm. From one edge, a slot is made for a button and coat.
Two vertex parts are covered with inside and put in the center of the hlystics. Flash on a typewriter or manually.
The front side of the insoles are stitched with an invalion of the top. They are glued with an inside to the gasket, the allowances wrapped on the side of the gasket and glue.
At the end of the work, attached to the resulting rush sole from the felt. Glue or flashes. Seed buttons on the sides of slippers for the fasteners.
stylish Slippers from Jeans

For this model, needlewomen use jeans dense and thin, foam, felt and thick coarse skin. Cut on the circuit circuit around the foot surface details: out of the skin sole
Insole from dense jeans with 1 cm allowances.
- Oblique bay of the length of the sole
- Gasket from felt
- Fanoon and fine jeans heel
- Top from thin jeans in the form of triangles four pcs
The upper triangles are sewn along two folded inside. Turn on the face. Selects part of the foam heel under fine jeans to the insole.
There are insoles with triangles and processed by oblique baking. A gasket with an invalid insoles and allowances on the seams with baking is turned away on her side.
Detail of the sole is sewn or glued to the entire structure. The second slippers is done as well.
The triangles are tied on the leg in the width of the foot.
Video: how to sew slippers do it yourself
Slippers do it yourself for 14.5 minutes
Having direct instructions and pattern home shoes sews in minutes. It is very practical and comes to many life moments. You need slippers for any purpose, please, took and did!
Video: Pattern of children's and adult slippers
slippers from old jeans on an ambulance hand
To be able to do homemade shoes is cool! May be useful in the most unexpected situations. For example, a pretty gift to make a close man. And nice, and comfortable, and beautiful.
slippers "Cookies" with their own hands
Creative thoughts are sometimes nice products. It is enough to look at the old things at home and must be necessary for the manufacture of home shoes. Let's say it can be comfortable slippers.
How to sew slippers from the skin with their own hands, step by step with a photo
The most spectacular home slippers are leather. They go longer and remain in excellent condition.
They are also just like the rest of the home shoes. The only thing here is a little other tools and materials. But, all these tools and materials can be safely found in every home.

What is needed for manufacture:
- Artificial and real leather. Priority for thick flaps. The entrance will go old women's bags, worn shoes, furniture, old jackets, caps and raincoats
- Not a thick piece of felt
- Little flap foam rubber
- Disposable slippers
- Glue-based phlizelin
- Shoe glue or "moment" or even super glue is suitable
- Special needle. Thick, the edge bent. If there is no such, then a knitting hook will fit
- Old Homemade Slippers for Pattern
- For holes in the skin, a blank. If it does not have trouble. A thick nail and pliers are suitable. Mounted nails on the gas stove, the desired number of holes are frightened to the passatatia.

Work begins with soles of disposable slippers. It is glued with glue all the slits and wait for their drying.
But, while glue dries the time without losing the old slippers, in order to make the pattern from them.
Cut from the sole of disposable slippers on the pattern made of new soles made from old sneakers.

4th details of the sole from the skin are required for a 2-cm allowance for the contour. For the top of the slippers, the 4th vertex parts are cut, also by pattern from old slippers with 1 cm allowances, on the sides in the connection places with the sole.

I cut out from Flizelin 2nd parts of the vertex 1 cm less throughout the contour. Fliseline parts are glued through the gauze hot iron on the front side of the vertex parts.

In the continuation of the manufacture of slippers from the skin, two together details of the vertex are glued together. Welcome along the edges at a distance of 1 cm glue and are connected. It is done on the weight, on the hands to give shape.

After drying the glue, parts are poured with scissors around the circle.

The next action by a disbuilder (or chopped on fire) g picked up holes from the edge retreating 0.5 cm and holding a distance between holes 1 cm. This is done along the line coinciding with the lifting of the leg and fingers.
A leather strip is also cut with a leather strip 7 mm, is in the needle and stitched through the edge passing each hole.

The tips of the leather ribbon are lined on the inside the details of the glue.

Now the insoles from felt or felt 2-pcs are cut. To do this, use the pattern of the back. Additionally cut two half-sequels.
Two parts "heel" are cut out of the foam rubber. All these details are glued as "Sandwich".
At first, the insole is rolled up with gluing abundantly, then the "heel" is applied under the heel and the latter is glued. It turns out the main billet bottom of leather slippers.

The leather soles are glued to this resulting billet on both sides. It is abundantly lubricated with glue along the contour of leather parts.

All the resulting design is well dry. Then the upper part is glued down from the lower side lines.

Actions are repeated with the breakdown of the holes with a piercer or burning nail. Distance is 5 mm from the edge of slippers throughout the circumference and 1 cm from each other.
An additionally carved leather tape is 7 mm thick for flashing the entire edge of slippers. The next leather tape is glued as follows and stitched in this place for the fortress.

Female slippers are decorated with appliqués from flowers.

These are such simple and not cunning actions are needed for sewing slippers from the skin with their own hands. Such home shoes for a long time serves as its owners. It is important in the bathroom, in the kitchen.
Slippers from felt with their own hands, photo 3 options
For greater comfort, comfort and heat being at home used as home shoes slippers from felt. Sew them independently does not matter much work and time spending.
Felt used for the manufacture of such shoes happens from dried camel wool, sheep or doggy. The benefit from such slippers is much, as it is natural.
Well, what is its main benefits, except for the convenience, strength and non-cunning techniques of manufacture?
The secret is simple. Felt creates a thermal effect. Thus, there is a spontaneous cure of the joints of the legs from rheumatism. Helps this shoes from lobs in the bones. Prevents abundant foot sweating.
Wearing felt slippers promotes foot massage. Bloodstock increases. This leads to acceleration of metabolism in the body. It is recommended to wear old men, children and tutting people at home only such shoes.
Easy and quickly sew slippers

Pattern made of thick felt. Separately, the sole of the skin with a smaller size of 1 cm around the perimeter.
Selects on a typewriter or glued with a glue out soles "direct seam" from the skin to the felt pattern at the location of the sole.
It turns out that one seam from the side of the foot is obtained. Pierced slots with knife or scissors and is inhabited in these holes of the tape or lace. The end of the lacing is fixed with a small bow.
Simple version of slippers from felt

It is done very easily from the point of view of sewing home felt swords. Four parts are performed: two halves of the top and two for the sole.
The soles are made according to the sketch created from the contour with the feet of your foot circled with a pencil. The top is cut on paper arbitrarily in the photo. Leaves to the leg and is adjusted already under your size.
Verch seam is performed by the "record stitch". Further, all the details are collected and flashing with manual stitches "Looping Sow" by a strong thread.
sandals from Felt

They look very beautiful and trendy. Not to mention the fact that it is still very convenient and useful! They sew from four main details: front top, back, insole and sole.
The pattern is made of all parts of the sandwichees. The insole and the sole glue glue. The remaining details are sewn to the bottom of the seam "Cross".
To secure the result, sandals are flashing again with a "looting". Additional element is the decoration of the applique from felt or felt fixed on top of the front of the vertex.
stylish sandals

Made from fine felt or felt Basic details, lining and soles. Drawing the pattern cut the upper parts from the main fabric. This is a single top of sandals, insole and sole. Additional is a jumper and a fastener hlychatic. Represent rectangular patchworks.
The lining is sewn on the sewing machine to the main part, folding their face. The allowance is cut very close to the seam, leaving 1-2 mm. Disposted to the wrong one and lay the line of "direct seam" along the edge, at a distance of 1-2 mm.
Rectangular patchworks for vibrations and jumpers are folded into face in a face and passion, leaving one edge not sewn. Soak and laid open edge. Then remove along the edges at a distance of 1-2 mm on both sides. One edge of the jumper is sewn with "cruciform seam" in the center to the edge of the nasal front part. From the free end, the loop is made and attached.
The fastener hlystics is also performed, but only instead of a loop makes a slot for a button and processed by the "marking" seam. On the sides sandals sew a button instead of a fastener.
The insole is attached to the top with a lining along the contour. Clean the allowances under the bottom of the insole and glue. It turns out the preparation of the top of the sandals.
The latter action is glued to the sole of the felt to the workpiece of sandals.
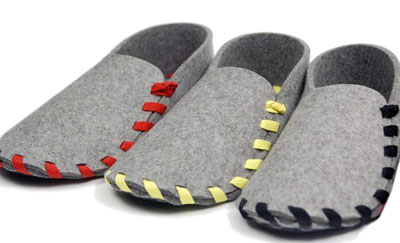
slippers for guests

Such slippers can be made on a whole company of guests in one evening. Made very quickly, easy. Material felt. Stitched on a typewriter or manually "tap stitch".
Pattern of two parts: basic and insole. The main part is folded and stitched. The insole is superimposed on the sole below and is sewn everything with the same seam.
Video: how to make unusual felt sneakers
As the life experience shows, handmade is not only a profitable lesson who gives the second life outdated and wear out things, well, a fairly exciting occupation. There are no special difficulties in this work. Tools and materials can be found in any dwelling.
Having learned the basics, you can make a lot of home shoes. Enough and households, and guests. Also, everyone's friends can be provided and in general to do their own small business. Handmade shoe products. Create, wear and give.
If you like to make original and unusual bags, covers, mittens and other products with your own hands, then make home slippers you will not be much difficult. Moreover, to sew homemade sneakers, warm children's boots, uggs can be from any hematic materials, such as the old sheepskin, or the top of the leather female boots.
Do not forget that old things, clothes, shoes are free material for sewing new clothes and needlework. See what can be sewed from the old one.
This article gives two types of patterns of household slippers, as well as the technology of their sewing. There are advice from what and how to make housekeeping slippers, warm baby boots.

To make the pattern of slipper slippers with an open sock or closed take a sheet of paper and circle the contour of your foot. You can take old slippers (without a heel) of the right size to put them on paper and outline the sole.
If you find your foot on paper, it is better if it is in a sock or a stuff and desirable to sit on the chair to reduce the load on the foot. Then on the pattern there will be no distortion of the size of future slippers.
Observe the foot contour, and then check it. To do this, you need to measure a centimeter ribbon or ruler the distance from the edge of the thumb to the heel. This value must comply with the size of your shoes, for example, for shoes 43 sizes, this distance will be equal to 28 cm with an error in a half-meter.
To build a pattern of slippers, you can use the calculations given by the calculations, to fit them under your sizes. If you have slippers you need a banner, and you would like to sew exactly the same with your own hands, then this pattern is not necessarily.
Tightly wrap the top of the slippers with paper or cloth, draw the contour of this part with a pencil or a felt-tip pen and allow the stamps to the seams. After that you can cut this item, once again attach it to the top of the slippers and check if it repeats its outline. If you need to apply.
2. From what can be done slippers
To sewing home slippers you need to use various materials. The right and left details of the bottom of the soles are linked from shoe leather, sprocket, leatherette. Insoles (the upper part of the soles of slippers) is made of sprocket, suede or cloth. There should be another gasket between the insole and the sole. It is usually cut out of cardboard and wattin (sintepon, thin foam rubber).
Details of the top of the slippers are lined with leather and lining, you can also duplicate them with soft pads, then set up.
If the top of the slippers consists of two halves, they steal them or join the braid. Glue with gasket and lining, sections erected or fluttered (in closed slippers, one, at the open - two). Then perform the decorative finish.
3. Threads and tools

In order to sew durable slippers, you need to use special especially strong threads. Cotton threads are suitable for sewing slippers at 6,9,12 additions No. 30, 40, 50. Cottopal auto threads No. 44 LH-1, 65 lh-1 or lavsanov № 22 l, 33 l, 55 liters, 90 L. for stealing parts The top of the slippers are best suited by the categorous threads No. 65 K, 95 K. For the feeding of the sole, you need more durable traversal threads No. 470 K, 565 K.

Details of the vertex, edging sections can be performed on a sewing machine, but you will have to be touched and kant to the sole. Therefore, get a special sequel in the store fittings. With it, you can sew strong and durable slippers from any materials.
After the pattern of the sole and the top of the slippers is ready, you can begin to crumble the parts. With a starting sole, let me allow for edge processing 0.5 cm.
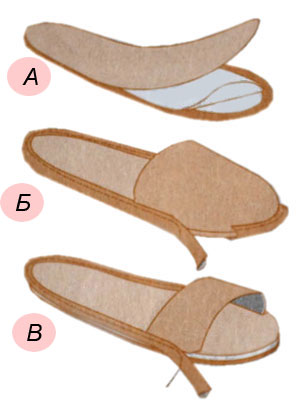
The pattern of laying is reduced by 0.7 cm all over the contour so that the gaskets are unnecessarily thicken. Bonded the soles, carved out of leather, cardboard, batting, spilock and smoothly cut the edges (Fig. A).
Bloom the sole along the edge with the top of the slippers with a seam outside (Fig. B), combining control tags. On the closed model, the excess length of the upper part of the weeding part is pre-covered. If with the top closed you can allow some freedom to foot, then in the model with an open toe, you need to adjust the length of the upper part so that it fits tightly.
Connect the top with the soles of the edge braid, edging, straight line. The rant can be performed as edging or overlays along the edge of the sole from a narrow leather strip (Fig. B). The seams can be closed with decorative pigtail woven from thin leather straps, cords, ribbons, etc. To secure the finishing elements, you can use a glue gun for needlework.
As in any work with pair products, operations are performed simultaneously on a single slipper.
5. How to make a pattern of warm home boots
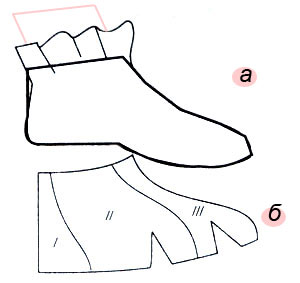 For those who have slippers with an open back, prefers warmer homemade boots to work harder. How to make the pattern of the soles you already know, it is enough to simply describe the leg and add an inlet to the seam. But to make the pattern of the top of such slippers (such as ugg), complex calculations are needed. Therefore, we will use it better by the "wrapping" method.
 Since home shoes do not require dense fit to the leg, and even on the contrary, the template for removing the pattern of the upper part and further modeling can be served boots or boots on a flat sole.
First you need to remember the paper so that it is better laid out on the convex surface of the shoe. Then wrap it around your chosen shoe or legs. It is not very convenient to wrap the leg, but the pattern turns out to be accurate. If you are satisfied with the loose and spacious boots, then use shoes for the template.
During the wrapping of the template, the folds can be laid, fixing them with glue or paper tape, pins. The line of compounds with the sole is described, the middle line on the front of the boot and the heel, the contour of the upper edge of the boots (Fig. A).
Remove paper (without splitting pin), if it does not lie flat. Make penetrations along the connection line with the sole in the sock region, adjust the lines of the pattern. The resulting patterns can be divided into several details depending on the model you have developed (Fig. B).
6. From what and how to make homemade boots
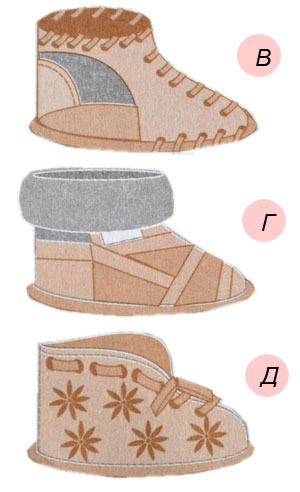
Details of the top of homemade boots from leather, sprocket, felt, dense cloth, leather set (from different skin slices). In the details of the vertex you can include pieces of tapestry, venels, cloth, fur. Do not forget about the allowances on the seams 0.5-0.7 cm.
According to the same patterns, the lining is cut off using spillation, cloth, bike, wool knitwear, fur.
Stop separate items and lining. For the backs, the leather groove is preached to the backs inside the booze. Along the edge of the boots, the lining with the upper part of the inner seam is connected, then turned on the front side, give the fixing line.
The edges of the cutter can be treated with a braid or edging strip of leather, leather braid, if the lining is made of sprocket, fur or knitted tanks (Fig. D).
Fix the upper part of the booze to the sole as well as slippers, the top of the top in the sock portion and a little in the heel area. Seam is paved from the sock to the heel in both directions. If you take off in a circle, because of the landing, the shape of a booze may be deformed, to twist in one strand.
If the circumference of the upper part of the booze turned out to be more than the soles, then the surplus is taken into the heel seam.
In order for children's homemade boots, they do not fall out from the child during active movements, drive to them or pull the strap, extended through the pierced in the upper part of the opening. If the lining is from the tissue, then put metal blocks into the holes.
It is easy to make it yourself such slippers from felt or coarse cloth, suede. To do this, only you need to remove the pattern of the top with any shoes and buy several meters of color tape. Holes can be pounding with a special flatbed or cut through the narrow and sharp knife blade. As a material, any materials can be used, insulation and strengthening them with gaskets, including the sheepskin fur, and for the protective gasket of the bottom of the soles - the skin from the top of women's boots.
A little more difficult to make such warm homemade boots, but they will not only look original and stylish, but also to warm your legs reliably. Sust first ordinary slippers, after you learn technology and techniques of work, you will easily sew with your own hands and other models of slippers.