Berries from beads - the most interesting in blogs. Bright beaded fruits - summer is near! How to make fruits from beads
Miniatures of vegetables, fruits and berries can remind you of spring and summer at any time. And the simplicity of the execution technique will help novice craftswomen learn beading with joy, because as a result you will get such bright and cheerful products. Used at work volumetric parallel weaving technique when, after completing each row, the product is rotated 180 °, so the rows are not located one after the other, but one under / above the other. It is carried out on a fishing line, however, it can also be replaced with wire, for this, use a copper size of 0.3 mm. To prevent items such as pear, raspberry and cherry from losing their shape, fill them with large beads of the right size and color. When stitching the product, do not forget to fill it with cotton, then it will also keep its shape.
If you add earring to such toys, then you will get cute earrings, if you attach them to a cord or chain - a charming pendant, you can hang them on a bracelet or decorate with beads. An excellent option would be to use it as a pendant for your mobile phone. This is a wonderful decoration for brave girls who are alien to stereotypes and complexes, or for very young girls.

The work uses beads 10 size. For pear you will need brown and green beads, for banana - yellow and 4 brown beads, for strawberries - red and green, and for pineapple - golden beads of size 6 and green beads of size 10.
The weaving technique of each toy is the same, only the execution of their “tops” is different. So, when weaving a pear, when you go through all the rows of green beads and string the last brown bead, string three brown beads on one end of the fishing line and go through them in reverse order, bypassing the third bead from the dialed ones. Tie the string in knots. When weaving the top of the banana, having reached the 35th row, type one yellow bead and two brown ones on the left end of the line, then go through the yellow bead in the opposite direction again and bring the end of the line through the bead in the 35th row. When weaving green pineapple leaves, dial 7 green beads on the left end of the fishing line, bypassing the last one, go in reverse order through the next two (6th and 5th), then dial three more beads and go through the first green bead from left to right. Do the same with this end of the fishing line two more times, and as a result, the left end will be on the right side of the weave, and with the right end, go through the three “main” beads of the leaves so that it becomes the left end. Then weave two more times two such leaves and at the end one leaf, tie the fishing line in knots. When weaving leaves strawberries, weaving is also carried out on the left end of the fishing line. Pass it into one green bead from left to right, then through another green bead from right to left and through the third green bead from left to right, pass through them again in reverse order. As a result, the thread will come out of the first green bead to the right of it, weave two more leaves, and go through the main beads of the leaves (the first of the three dialed) with the right end from right to left. Weave three more of these leaves and at the end another one, for it, string three beads on the thread and pass, bypassing the third bead, through the second, and then through the first from left to right, tie the fishing line in knots.

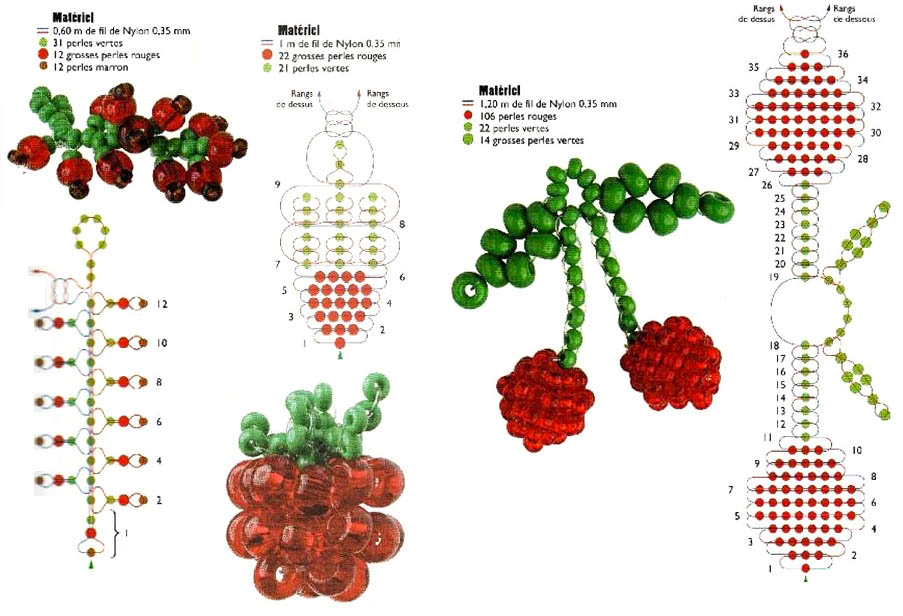
For weaving currants, you will need red beads No. 6, brown and green No. 10. For raspberries - red beads No. 6 and green No. 10. For cherries, green beads No. 6, red and green No. 10.
Currant is woven with two ends of the fishing line and a branch is woven alternately at each end. For it, dial a green, red and brown bead at one end. Passing the brown, go back through the red and green and enter the green bead of the base from the bottom up. Weaving currant leaves is carried out similarly to fruit leaves. While weaving cherries, weave 18 rows according to the pattern, then string 6 green beads on the right end, pass the line through the 5th in reverse order, string 2 green beads and go through the 2nd and 1st beads, the line comes out of the first bead from left to right. Dial 4 beads for the ring, then weave another leaf in the same way as the previous one. Insert the non-working end of the thread into bead 19 from left to right, and the working end from right to left and continue weaving.

The following beads will be used for weaving vegetables: onion - white, lettuce and golden beads No. 10, green No. 8. Carrots - orange and green No. 10. Radish - white, pink and green beads №10. Pepper - green and red beads №10. An explanation of the patterns of weaving fruits and berries will not cause you any difficulties when working with patterns of vegetables.
Beaded fruits in training workshops (diagrams and video)Beaded fruits in training workshops (diagrams and video)
Spring is here, and summer is just around the corner, which so swiftly pleases us with its warmth and bright colors. With the advent of warm bright colors, you want even more. So why not charge yourself with positive and mood right now, and our master class on making bright, cheerful beadwork will help you with this.
Beaded fruits will appeal to everyone: both adults and children.
Fruits and berries are woven from beads using the technique of volumetric parallel weaving. In creating your compositions, in addition to standard size beads, you can use large beads.
Finished products can also be used as jewelry, complementing them with earrings or a chain to wear as a pendant. They will be great accessories for your mobile phone and just a stylish little thing.
We suggest you make some summer products. So, according to convenient weaving patterns and video lessons, you can choose a lot of options for compositions of fruits and berries from beads, but these two examples are the most original and especially summer ones.
In our master class, we will tell you how to make currants from beads, strawberries or wild strawberries. For clarity, use our lesson, with which you will make fruit from beads. Available weaving patterns with interesting workshops with photo and video examples will help you make juicy fruits. 


Master class on weaving currants from beads
Currants can be made in two versions: red and black. 
Red currant beaded 
So to make such a beaded berry you will need:
- beads: red, brown, green, dark;
- large beads: red and green;
- small beads: pink and white.
- pin
- Well, and of course a thread and a needle.
According to the currant beading scheme (Fig. 1. 2), you need to start by fixing the needle at the end of the auxiliary bead. Add a large green bead, which you attach to the eye of the pin and guide the needle through the bead.
Then, also following the scheme, dial 7 green beads and one red and one dark. Move the beads to the pin. Thread the needle in the opposite direction: starting from a large bead and going into three green beads. In the same way, add five red beads and one pink. Then take 7 more green beads, a pink bead and dark beads, thread the needle again in the opposite direction (from the bead to the green bead). So you have already formed the central branch of the currant. Repeat the pattern a few more times and cut the thread.
Black currant 
In order to make a dark berry, take:
- just like for red, green beads;
- large green beads in the form of a leaf;
- several large dark beads.
Similarly, as for the first option, we fix the bead at the end of the thread, then add a bead in the form of a leaf and thread it in the opposite direction (through the leaf to the bead). We press the product to the pin.
Further, the beading scheme is completely repeated, as for the red berry, only with changes for the color scheme. Complete the composition with a set of 11 green beads, a small bead that you pass through a dark-colored bead. At the end, place a leaf-shaped bead - this is the center of the composition.
Beaded currant is ready.
In addition to currants, other berries will also look spectacular, such as cherries, raspberries, strawberries.
Do-it-yourself strawberries from beads
The material for creating this berry will be:
- beads of red, black, white, yellow and green;
- long beads (cutting) of green color;
- any material to create a voluminous berry;
- wire.
This weaving pattern is very simple and perfect for beginner craftswomen.
So, let's start the master class. Beaded strawberries consist of four red rhombuses, which are woven in a parallel weaving technique, sometimes black beads can be woven in random order. When all the rhombuses are ready, connect them together with wire.
In order for the berry to be voluminous, at the end of weaving we fill it with material. 
Guided by your imagination and idea of the finished look of your model, you can independently change its size (reduce or increase the size of the fragments). And also add flowers and leaves.
Making a flower is very simple, all you need to do is twist the loops on which you string white beads. Also make leaves and a cup for a flower from a green cabin. 
Bright red strawberry from beads is ready.
Handmade works are always a pleasure to give, and the process itself is unusually exciting.
Get even more ideas for inspiration from the videos that skillful craftsmen are happy to offer you, and also study beaded fruits, the weaving patterns of which are presented in our article.
On this master class of beading berries from beads is over, good luck in your endeavors and enjoy your work!
Patterns of weaving fruits and berries from beads


Video: Weave strawberries from beads
Comments
related posts:
 Lilies of the valley from beads and beads in training workshops (video)
 DIY beaded dragonfly in master classes (diagrams)
You can weave flowers and strawberries from beads yourself and put this juicy beauty in a pot to decorate a windowsill or other corner in the house. Recently, beaded products have become popular. Needlewomen weave everything, from clothes, haberdashery, jewelry, and ending with decor items.
The interior of the house is decorated with all sorts of beaded compositions, which become an integral part of the apartments. Such a composition of berries and strawberry flowers looks beautiful and original. Today we will learn how to create a wonderful strawberry work.
Preparatory stage
Before embarking on an exciting creative process, we will prepare the necessary material:
- Beads number 8 green, white, yellow, black and red.
- Wire, size 0.5 mm.
- Floral tape.
- Schematic images.
- Scissors.
- Decorative pot for composition.
Master class on creating flowers and strawberries from beads
Beaded strawberries are created using the parallel weaving technique.

- To do this, divide the piece of wire in half and string 3 red beads. We pass one of the ends of the wire through 2 beads in the opposite direction. Thus, the first two rows are formed.
- In the next row, we collect 3 beads on the right end of the wire, and with the left we pass through the holes of the collected beads. Carefully tighten the wire, making sure that it does not twist.

- At the next stage of weaving, we string 1 black and 3 red beads, passing through them with the free end.
- The fifth tier is formed from 5 red beads.
- The sixth row is formed by red, black, red, black beads and 2 red beads.
To better understand the process, refer to the photo below.

- We continue to weave with the chosen technique. We create the seventh tier from 6 red glass beads, the eighth from 5, the ninth from 3, the tenth from 1 red bead.
- We twist the ends of the wire well and continue to weave the next part of the strawberry in the same way. Only adjacent sides of the parts are connected in the course of the work with a side wire.
- After completing four shares of the berry, we form a ball from a red piece of paper and hide it inside the strawberry. We do this to create a round shape of the product.
- We weave the last part of the berry in the same way.
- In the next step, we will weave a strawberry flower. We will make the middle with yellow, and the flower with white beads.
- To create the middle, we collect 6 yellow pieces of glass and connect them into a ring. Perpendicularly execute the second row of six elements. Carefully twist the wire - the middle is ready.
- Next we create the petals. We collect 5 white glass pieces, and connect them into a ring. On the second row we collect 13 beads and stack them around the first row. We twist the wire carefully. There are 5 petals.

- Having finished weaving five petals, we twist them together so that the central part is free. In the empty space we place the prepared core of the flower. All ends of the wire are well twisted into a single whole.
- Next, we form green sepals for the flower and berry.
- To do this, we collect 9 green pieces of glass and twist them, again we collect the same number of green elements and twist them. We make 5 petals in total. Having finished weaving these motifs, we encircle the finished flower and berry with them. See photo illustration below. Thus, we have created another element.

- The next step is to form the large green leaves of the strawberry bush. These fragments are formed using the French weaving technique.
- To create a leaf, you need to cut a wire 20 centimeters in size and string green beads on it.
- We move 10 green beads - this will be the rod.
- We make a loop and form 3 pairs of arcs around the rod, twisting the wire after each turn at the top and bottom of the central axis.
- With the help of fingers, we create the desired shape of a green leaf. To create one branch, you need to weave three sheets and twist them together. For the composition we need three such branches.

- Having prepared three green branches of leaves, five strawberries and three flowers, we make up a composition.
- Before that, each stem is carefully wrapped with floral tape to hide the wire.
Composition assembly
- The bouquet is collected in this way:
- Berries and flowers are placed between the leaves.
- All elements of the bouquet are connected from below with a floral tape.
- We place the finished composition in a prepared decorative pot of the appropriate size. So the unique berry-flower composition is ready.
In the process of creative work, needlewomen can create a product in their own way: increase the number of leaves, flowers or reduce. You can weave the leaves in a different shape. It all depends on your inspiration and imagination.

With such a pot, you can decorate the interior of the house, or you can bring it as a gift to relatives and friends who will definitely appreciate your creative work.
We make strawberries from beads in the video mk
Miniatures of vegetables, fruits and berries can remind you of spring and summer at any time. And the simplicity of the execution technique will help novice craftswomen learn beading with joy, because as a result you will get such bright and cheerful products. When working, the technique of volumetric parallel weaving is used, when after each row the product is rotated by 180 °, so the rows are not arranged one after another, but one under / over the other. It is carried out on a fishing line, however, it can also be replaced with wire, for this, use a copper size of 0.3 mm. To prevent items such as pear, raspberry and cherry from losing their shape, fill them with large beads of the right size and color. When stitching the product, do not forget to fill it with cotton, then it will also keep its shape.
If you add earring to such toys, then you will get cute earrings, if you attach them to a cord or chain - a charming pendant, you can hang them on a bracelet or decorate with beads. An excellent option would be to use it as a pendant for your mobile phone. This is a wonderful decoration for brave girls who are alien to stereotypes and complexes, or for very young girls.

The work uses beads 10 size. For pear you will need brown and green beads, for banana - yellow and 4 brown beads, for strawberries - red and green, and for pineapple - golden beads of size 6 and green beads of size 10.
The weaving technique of each toy is the same, only the execution of their “tops” is different. So, when weaving a pear, when you go through all the rows of green beads and string the last brown bead, string three brown beads on one end of the fishing line and go through them in reverse order, bypassing the third bead from the dialed ones. Tie the string in knots. When weaving the top of the banana, having reached the 35th row, type one yellow bead and two brown ones on the left end of the line, then go through the yellow bead in the opposite direction again and bring the end of the line through the bead in the 35th row. When weaving green pineapple leaves, dial 7 green beads on the left end of the fishing line, bypassing the last one, go in reverse order through the next two (6th and 5th), then dial three more beads and go through the first green bead from left to right. Do the same with this end of the fishing line two more times, and as a result, the left end will be on the right side of the weave, and with the right end, go through the three “main” beads of the leaves so that it becomes the left end. Then weave two more times two such leaves and at the end one leaf, tie the fishing line in knots. When weaving strawberry leaves, weaving is also carried out on the left end of the fishing line. Pass it into one green bead from left to right, then through another green bead from right to left and through the third green bead from left to right, pass through them again in reverse order. As a result, the thread will come out of the first green bead to the right of it, weave two more leaves, and go through the main beads of the leaves (the first of the three dialed) with the right end from right to left. Weave three more of these leaves and at the end another one, for it, string three beads on the thread and pass, bypassing the third bead, through the second, and then through the first from left to right, tie the fishing line in knots.

For weaving currants, you will need red beads No. 6, brown and green No. 10. For raspberries - red beads No. 6 and green No. 10. For cherries, green beads No. 6, red and green No. 10.
Currant is woven with two ends of the fishing line and a branch is woven alternately at each end. For it, dial a green, red and brown bead at one end. Passing the brown, go back through the red and green and enter the green bead of the base from the bottom up. Weaving currant leaves is carried out similarly to fruit leaves. While weaving cherries, weave 18 rows according to the pattern, then string 6 green beads on the right end, pass the line through the 5th in reverse order, string 2 green beads and go through the 2nd and 1st beads, the line comes out of the first bead from left to right. Dial 4 beads for the ring, then weave another leaf in the same way as the previous one. Insert the non-working end of the thread into bead 19 from left to right, and the working end from right to left and continue weaving.

The following beads will be used for weaving vegetables: onion - white, lettuce and golden beads No. 10, green No. 8. Carrots - orange and green No. 10. Radish - white, pink and green beads №10. Pepper - green and red beads №10. An explanation of the patterns of weaving fruits and berries will not cause you any difficulties when working with patterns of vegetables.
On the topic of beadwork, we invite you to plunge into the world of exotic fruits, which are very easy to make with your own hands from bright and iridescent beads.

Be sure that you will be charged with positive and you will have the mood to create beautiful products that can be used for different purposes.
citrus slices
The first fruit that we will weave is a slice of lemon. To do this, we need two colors of beads, namely bright yellow and pale yellow, a thread with a needle and a pin, if you want the craft to become your keychain. 
Weaving will be carried out using the well-known mosaic technique, so you first need to make two strips of mosaic, as shown in diagrams A and B. The new row is woven with brick technique to the middle. After that, add 1 bead and pull the thread under the previous strip so that this glass is tilted. A new lane is performed in an arc, bypassing the edge of the 3rd river. According to this scheme, you need to continue to weave further.
Beads should not be tightly located in the river. and don't push each other. If you find at the end of the river. the remaining small place into which the bead will not squeeze, then do not even try to fill this place, as in this case the lemon fruit slice may turn out to be not quite flat.
When you finish the strip, take a needle and thread and start stringing a new row. Place very light beads among bright glass pieces so that you get perfect veins. Continue to weave according to the pattern. Thanks to the fact that the article shows step-by-step drawings, you can easily perform such a simple job. When the lemon slice is almost done, secure the thread, but don't cut it off. Pull it through the beads to the place indicated in figure No. 2. Only after the pin is attached, you can cut the thread.
 Orange is woven in the same way, only transparent orange beads, yellow and just orange are used in the work to make this fruit look like its real original.
Watermelon beaded slip
Now let's move on to the next piece. This is everyone's favorite watermelon, which we wait almost all summer to enjoy its taste and aroma. Although this is considered a berry, nevertheless, we could not help but offer you to weave it. So, prepare a transparent red material, pink and green, as well as some dark to make bones.

First of all, weave a mosaic ridge of transparent beads as shown in Figs A and B. The new row is made with red glass brick technique, which also needs to be diluted and dark. 4th p. weave only to the middle, and then get 1 bead and fix the thread for the previous row. New strips should be strung in an arcuate manner. Beads-bones are inserted as follows: string dark glass and red at once, fasten them in the same way as described earlier. The black bead should stand vertically between two scarlet ones. Thus, you should arrange the rest of the glass in the watermelon.
 The last strip of the slice should be green. You need to fasten the thread by passing it through the beads to the center of the craft. Make a few stitches with a needle and attach the pin. Cut off the extra tip, and twist the pin in the form of a hook so that you can place the product, for example, on a vase of fruit, thus decorating it.
A selection of patterns for weaving fruits from beads


