How to crochet a regular square. Crochet openwork square: knitting patterns. Solid square motif
Very often, when knitting products with motives, a knitted square is used. If you want to knit a blanket, rug, potholder, bedspread, cape or other product, you need to know basic methods of knitting a square .
The square is knitted very simply.
The first way to knit- This is knitting a square from the corner. The knitting of such a square turns out to be dense, and only two sides of the square will need to be knitted. In this case, the knitting will need to be turned.
 The next way- This is knitting a square from the center to the edges. We knit five air loops, we connect in a ring. Now we knit three single crochets in a ring, then we knit three air loops, then again three single crochets, and so on until the end of the row. Next, a connecting post, then two lifting loops. Three single crochets in the previous row, then a single crochet, three air loops, then again a single crochet, then single crochet, and so on until the end of the row.
 The easiest way knitting a square is tying the length of air loops. To do this, you need to knit a chain of air loops, as long as it will be on one side of the square, then make one loop for lifting and tie the row with single crochets or single crochets. Then we turn the knitting and again knit a row according to the pattern and so knit the whole square. It turns out an even and neat square. When knitting a square in this way, you can apply any pattern.
One of the main elements used to create openwork blankets, soft and warm bedspreads, original tablecloths, stoles, snoods and shawls is the "grandmother's square". This pattern is crocheted quite simply, so any needlewoman can easily perform it.
There are many different modifications of the square motif, all of them are beautiful in their own way. Having learned to knit at least the simplest "grandmother's square" crochet, you can make a variety of textile things easily and easily. Products created using this technique are very bright, colorful and elegant. In this article we will tell you how to make an interesting pattern - crochet grandma's square. For novice craftsmen, we will present a simple master class on making an openwork and soft blanket of bright colors. We will also share the secrets of creating cozy home slippers and an original pillow cover.
Learning to crochet "grandmother's square": the necessary tools and materials
So, in order to complete this basic element, you need knitting threads. We used green, turquoise and white yarn for hand knitting Pekhorka "Children's novelty", with a density of 50 g / 200 m. In principle, any remnants of knitting threads that you can find in the house are suitable for acquaintance with the motif. You will also need hook # 3. This figure shows how the "grandmother's square" is crocheted, a description of the work technology is presented below.

The motive is an interesting "floral" variation. In the center of the square, a magnificent inflorescence is obtained, with convex petals.
Crochet square motif
We will begin our work by performing four air loops with threads.Connect them into a ring and perform one VP of lifting. Next, we will knit the first row with single crochet (RLS). There should be 8 of them. We will perform the second row with arches of air loops. To create the third row, take a thread in a contrasting white color. We knit according to the scheme: connecting loop, three air loops, 2 And then again three VP, connecting half-column. After that, we perform 1 air loop. We repeat this element to the end of the row. As a result, you should have 8 beautiful white petals.

We continue the execution of the "grandmother's square" with a floral ornament
We will make the fourth row in a contrasting bright green color. Let's start with one stitch and single crochet as shown in the diagram. Then we will make a chain of four VPs and knit another 1CH. Thus, we will arrange the entire fourth row. Finish knitting with a connecting half-column. Let's start the fifth row with three VP lifting. Next, we will perform two CHs in the same base loop. We knit two VPs and complete the element with three CHs in the next loop of the base. Then we will perform three. We repeat the scheme "3СН + 2ВП + 3СН". You will already have two "corners" of the square. Do the rest by analogy. As a result, the "flower" will have a square base.

We finish knitting a square motif
Making the sixth and seventh rows should be straightforward for you. They are knitted by analogy with the fifth, while using only double crochet and air loops. The only important point is that we make the sixth row from turquoise yarn, and the seventh from white. Agree, this square motif turns out to be very delicate and beautiful. This motif is perfect for making a charming summer handbag.

Let's make a warm and beautiful crochet blanket
If you want to knit an excellent one, pay attention to this uncomplicated master class. It describes in detail the method of making the bedspread from multi-colored square motifs. To create a blanket, you need a hook No. 3.5 and 400 g of variegated yarn, with a density of 50 g / 133 g of lilac yarn. You can choose the color of knitting yarn you like. The product can be made of variegated, bright yarn or, conversely, more delicate and light. If you intend to make the squares multi-colored and want to use several different threads, make sure they all have the same composition. Remember that cotton yarns cannot be paired with acrylic yarns.
We will tell you how to crochet the "grandmother's square". Master class "Bright plaid"
The size of the finished product will be 120 * 96 cm. So, we begin our knitting. We will perform "Grandma's square" (crochet) according to the following scheme, presented in the figure. It's very simple. The main elements are the air loop and double crochets.
We will begin to crochet the "grandmother's square" by creating six VPs and connecting them into a ring. Next, we will perform all the elements according to the scheme, repeating each row one time. In total, you need to make 5 rows and complete the knitting. In this case, the threads should be alternated. The first row needs to be done with variegated yarn, the second with lilac, the third with variegated yarn, and so on. One square should be 12 * 12 cm in size. In order to make a blanket, you will need to knit 80 such variegated purple motifs. After their manufacture, it is necessary to collect all the elements, forming a canvas of 10 * 8 squares.
We complete the design of the blanket
In order to connect square motifs, it is necessary to perform 1 row on the front side with single crochets (purple threads). In this case, a hook should be inserted into each loop. After connecting all the elements, you need to tie the product around the perimeter with two rows of single crochet posts. We advise in the corners of the blanket to perform three single crochet in one loop of the base in order to give the desired shape to the product. Here we have such a charming blanket made of multi-colored squares.

Bright and elegant accessory - pillow cover
Be sure to tie a "couple" to such an elegant bedspread - a beautiful pillow cover. For work, you will need yarn of different colors (400 g, density 50 g / 133 m), hook No. 3.5 and a pillow 40 * 40. We will knit according to this understandable and uncomplicated pattern the motive "grandmother's square". For novice needlewomen, we will further present a detailed description of the work.

To begin with, we will tie a chain of four VPs and close it with a connecting half-column in a ring. Next, we will work in circular rows using double crochets and air loops. In this case, the threads should be alternated, knitting strips of the same color, in two rows. In total, it is necessary to knit eight rows, making increments according to the meaning. This will create a bright, multi-colored square. A sufficient number of such elements must be completed in order to arrange the pillow. After that, you should connect them with single crochet columns, forming a cover, and then put a pillow inside. Here we have such a beautiful interior item.

Original crochet slippers
In addition to a blanket and a pillow cover, charming house slippers can be made from "grandmother's squares". Such soft and warm products are sure to warm your legs. To make slippers you will need hook # 4 and yarn in two contrasting shades. We suggest taking soft blue and blue knitting threads. The product in this color scheme will look very delicate and pleasant. The knitting pattern of the "grandmother's square" is as follows:

It's very simple. In order to complete it, the needlewoman needs to be able to perform the basic elements - a double crochet and an air loop. We begin to knit "grandmother's square" as follows. First, we make a chain of six VP, and then we connect it into a ring with a connecting half-column. We knit three lifting loops and two CH. Next, we perform a series according to the scheme: 2VP + 3СН. For the second row, we take another yarn, we start it with three VP and 2CH. We knit a pattern of air loops and double crochets. We perform the third row according to the scheme, in the same color as the first. The fourth and fifth are performed by analogy, making the necessary additions. As a result, you end up with one square motif. To make two slippers, you need to complete 12 of these elements. After they are all ready, you can start bonding them. Take 4 squares for the sole. We will arrange them as shown in the figure. We connect the squares with single crochet.

After that, we move on to the design of the upper part. Place two more motives on the two blue squares on top. We bend two "blue" ones in half, forming the "sides" of the slippers. We connect the product at the seams with single crochet posts. By analogy, we perform the second sneaker. You should have such beautiful home shoes.

We hope our article was helpful and you liked the square motifs presented in it. Good luck with your creative experiments.
If you have already mastered the basics of knitting, but do not know where to start your creative path, we suggest that you familiarize yourself with crochet patterns of openwork squares. Square motives are the most common, because they are quite simple to perform. And by combining such details, you can create a real masterpiece.
The origin of handicrafts
If the ancient Romans knew about knitting, the hook as a tool for creativity began to appear in the 19th century.
This type of handicraft originated in Europe, during industrialization. Needlewomen, wielding knitting needles and crocheting, know that the second type of knitting requires a much larger amount of thread. The more delicate the pattern, the greater the consumption of material. This is what hindered the development of crocheting. The industrial revolution made it possible to mechanize the processing of cotton and significantly reduce the cost of thread.

Crochet has become very popular. Needlewomen complicated the patterns, borrowing them from other types of creativity - weaving and embroidery. The finest laces took a lot of time to make, therefore they were highly valued. This type of needlework has won great love, because learning to crochet is much easier. A large number of patterns and motives allows you to create unique items and handicrafts.

Grandmother's square
One of the simplest and most common square motifs is grandmother's square.

It received its unusual name due to the fact that mainly elderly peasant women were engaged in home improvement. They could no longer do hard work, and such painstaking work was quite within their reach. The "multicolored" motive is explained by the fact that during the war years it was difficult to get material for knitting and it was taken from old things. Each piece of thread went into action, creating a unique canvas.

Used grandmother's squares for the arrangement of everyday life. They were combined into a large canvas to create capes, blankets, pillowcases, and garments.


In modern fashion, he also fits perfectly, he was chosen by fashion designers and fashion designers. They create unique things that say that the grandmother's square is unlikely to ever go out of style.

Step by step execution
We offer you a detailed master class on creating a grandmother's square motif. It is so simple to execute that even a novice master can handle it.
To work you will need:
- Multi-colored woolen or cotton threads of the same thickness;
- The hook of the corresponding number.
Most yarn manufacturers indicate which knitting needle or crochet number to use for the job.
Knitting the motif should start with a ring of four air loops.

To complete the second row, you need to tie three lifting air loops. Next, in the center of the ring, knit: two double crochets, one air loop, three double crochets, an air loop. Work 3 stitches and stitch twice more. You will get a detail that can hardly be called a square.

Secure the thread and change the color of the yarn. Perform a three-chain lift. This row is knitted into arches from the air loop of the previous row. In the first arch, knit 2 double crochets and an air loop, then three columns and an air loop. We pass to the second arch. In it, knit 3 columns and an air loop twice. Repeat filling the arches to the end of the row.


The third row is knitted in the same way. The only difference is that 3 double crochets, an air loop and three double crochets are knitted into the corner arches. And only three double crochets are knitted into the central arches. The step-by-step process of filling the arches can be seen in the photo.


As a result, you get the following motive:

The number of rows may vary. They are done in the same way: two bundles of three columns are knitted into the corners, between which there is an air loop (or several loops), one bundle of three double crochets is knitted into the remaining arches. More can be seen in the diagram of the multi-row grandmother's square.

You can create various things from it:


Combining motives
You can connect the squares together by simply stitching them together. Or use a hook connection. There are variations here.
You can make a connection using half-columns. To do this, align the two squares and insert the hook behind the outer sides of the loops as shown in the diagram.

Another option involves not just combining motives, but also expanding the canvas. Prepare the required number of squares.

Secure the thread at the corner of the first motif, make 3 lifting chain loops.

Add 3 stitches, 2 double crochets to the corner of the second square.

Let's move on to the first motive. Work three double crochets into the arch.

Continue knitting to the end of both squares.

First, connect the motifs into stripes.

Then, in the same way, collect the strips into a single canvas of the size you need.

All that remains is to neatly trim the edge and the chic blanket is ready!

The square is one of the main motives in crochet needlework. Knitting with squares is actively used in the manufacture of clothing and interior decor items. The huge advantage of knitting with square motifs in their relative ease of execution - most types of crocheted squares are mastered from the first time even by beginning needlewomen. However, not all square motifs are so easy to knit, for example, openwork or squares with the addition of floral motifs will only be possible for craftswomen who masterfully own a crochet.
The collection of square crochet motifs is truly diverse, which is why they are used in all kinds of knitting techniques (Irish, Tunisian knitting, ribbon lace, etc.). On the basis of squares, you can knit men's jumpers and women's dresses, children's clothing and accessories (shawls, scarves, bags), as well as colorful interior items (bedspreads, blankets, chair covers, decorative pillowcases).
We tried to collect in one material various types of square motifs of varying degrees of complexity that can captivate not only novice craftswomen, but also surprise experienced knitters.
Abbreviations that will be found later in the text:
- air loop - VP;
- double crochet - st. s / n;
- single crochet - st. b / n;
- connection column - SS;
- a column with two crochets - st. s 2 / n;
- previous row - OL.
Knitting techniques for square motifs
In the practice of crochet needlework, there are 4 methods of knitting squares:
Knitting from the bottom edge is the simplest, most commonly used option for knitting square motifs, as clear as possible even for those who are just getting acquainted with crocheting. Schematically, the knitting of such a square looks like this: 
The square is knitted in straight rows back and forth, which are located strictly below each other, gradually forming a square shape. Knitting of such a square can be plain or colored, the main requirement that the motive must meet is strict adherence to the square shape, i.e. equality of the parties.
Step-by-step knitting instructions:
We collect the base-chain from the VP - this will be one side of the square.
We knit 3 VP of lifting and knit a row with columns of s / n or b / n (depending on the desired knitting density) into each VP of the chain to the end of the row.
We turn the knitting, we knit 3 more VP lifting and knit in the same way as in the first row.
We repeat the above steps for the required number of rows until the canvas forms a square shape.

Knitting a square from the corner with the addition of columns in the center is also a fairly easy-to-follow version of the motive, which allows you to vary the size of the square along the course of knitting, as well as get a dense fabric without gaps. The principle of knitting is adding in the center of the row by knitting 3 tbsp. b / n.
Schematically, its knitting looks like this:

Step-by-step instructions for knitting a square from a corner:
Row number 1: in the 2nd loop from the hook we knit 3 tbsp. b / n. We turn the work.
Row number 2: we knit 1 VP lift, 1 tbsp. b / n, on the central loop we knit 3 tbsp. b / n, then - 1 tbsp. b / n. We turn the work.
Row number 3 and all subsequent rows: we carry out with columns b / n to the central loop, on which we knit 3 tbsp. b / n, then - we carry out according to Art. b / n in each loop to the end of the row.

3) Knitting a square with the addition of loops from the corner on the sides is a more complex method of knitting a square, the implementation of which consists in adding loops on the sides (initially we get a triangle), and then narrowing the fabric by dropping the loops (we get a square). Schematically, this process looks like this: 
Step-by-step execution of a square with addition:
We collect the base-chain from 2 VP.
Row number 1: we knit 1 VP of lifting, in the 2nd VP from the hook, knit 3 tbsp. b / n. We turn the work.
Row number 2: we knit 1 VP of the rise, from the extreme loop we knit 2 tbsp. b / n, then - 1 tbsp. b / n and 2 st. b / n in the edge loop. We turn knitting.
Row number 3: we knit 1 VP lift, 2 tbsp. b / n in the edge loop, 3 tbsp. b / n and 2 st. b / n in the edge loop. We turn.
Row number 4: we perform in the same way as row number 2.

After half of the square is knitted, i.e. triangle, we begin to narrow, making a gradual decrease in the number of columns.
4) Knitting of the "grandmother's" square from the center to the edges is one of the most relevant knits with the widest range of applications. Rows of such squares can be knitted with different colors of yarn, thereby obtaining bright color combinations of finished products. With the help of the "grandmother's" square, you can create original models of clothes, as well as colorful interior items - potholders in the kitchen, overlays for chairs, blankets and even women's handbags!

The basic principle is knitting from the middle with the addition of columns in 4 corners. In one corner, 3 columns are knitted from one loop, which can be of different heights, but must be the same throughout the row. They can be knitted on top of each other, and in a checkerboard pattern. Schematically, knitting a square looks like this: 
The procedure for knitting a motive:
The grandmother's square is knitted in a circular manner.
Row number 1: we knit a chain-base of 6 VP, we close it in a circle with the help of the SS. These loops in the next rows will be central, of which 3 expansion columns will be knitted.

Row number 1: we knit 6 more VPs (including 3 VP lifting). 
Then - 3 columns s / n in the original ring. 
Hence - 3 columns s / n + 3 VP + 3 columns s / n + 3 VP. 
Then we knit 2 more s / n columns. 
We finish a series of SS. 
To proceed to row number 2, go to the arch with the help of another SS. 
Row number 2: we knit 3 VP lifting. 
Then - 3 VP and 3 columns s / n in the same arch. 
Add another VI.

We knit into the next arch from VP PR:

We repeat the rapport twice: 1 VP + 3 columns s / n + 3 VP + 3 columns s / n.

Next - we knit 1 VP, we finish the SS row. 
Row number 3: 4 VP (3 VP lifting + 1 VP).

In the arch from the VP PR we knit 3 columns s / n + 3 VP + 3 columns s / n.

We repeat the following rapport three times: 1 VP + 3 columns s / n into the next arch from VP PR + 1 VP + 3 columns s / n + 3 VP + 3 columns s / n into the corner arch from VP PR.

We knit 1 VP + 2 s / n columns in the next arch. 
We finish a series of SS. 
We knit the required number of rows by analogy with the previous row.
To visually familiarize yourself with the technique of knitting "grandmother's square", we suggest watching a detailed master class:
Elegant circle-to-square motif
Many knitters fell in love with the relatively easy motif "from a circle to a square", and all because, along with the simplicity of knitting, the result is very interesting. You can use such a motive for any purpose - it looks good both in clothes and in decorative things.
Schematically, the motive looks like this:

Step-by-step knitting instructions:
We knit an initial loop, from it - 5 VP, we close it in a ring with the help of SS.
Row number 1: 2 VP lifting (mark the 2nd loop with a marker for the pattern). Next, in the center of the ring, we knit the following rapport 11 times: 1 tbsp. s / n. + 1 VP, in total it should turn out 11 tbsp. s / n. We close the row of SS, which we knit in the VP with a marker.
Row number 2: 2 VP lifting + 2 unfinished st. s / n in the same loop, we connect with a common "top" (mark it with a marker). We knit 3 VP from the top. In Art. s / n PR we knit 3 next. unfinished art. s / n, united by one "top". Next - we knit 7 VP and again 3 unfinished sts. s / n in one vertex in a column of PR (we get the 1st corner of the square).
The next step is to repeat the rapport twice: 3 VP and 3 unfinished art. s / n with one top in st. s / n PR. Then we knit 7 VP (corner of the motive) + 3 unfinished st. s / n with one top in a column s / n PR. We get the 2nd corner of the square. By analogy, we complete the entire row. We close the CC row into the loop marked with a marker. And here's the finished result:

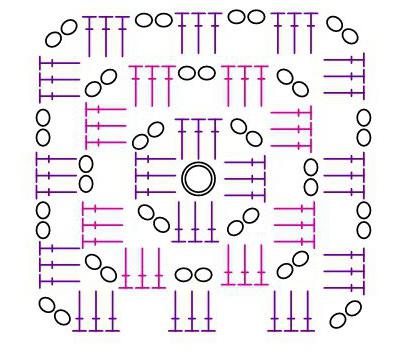
Openwork square - a godsend for needlewomen
If simple methods of knitting square motifs can be performed by beginner knitters literally on the first try, then it takes much longer to work over openwork. However, playing with openwork knitting is definitely worth the candle, because with it you can create truly exclusive things - from clothes to interior decor items.
Schematically, knitting an openwork square looks like this:

Scheme designations:
- Art. s / n.
- Art. from 2 / n.
- cluster of 3 st. s / n., united by one vertex.
Knitting steps:
Row number 1: we knit a sliding knot: 6 VP (we count one item with 2 / n + 2 VP), then repeat the rapport 10 times: 1 tbsp. with 2 / n in the ring + 2 VP. We knit a middle loop in the 4th VP. In the ring we get 12 columns with 2 / n.
Row number 2: we knit an initial cluster of 3 VP and 2 tbsp. s / n, then we knit 11 times a rapport from 5 VP + 3 tbsp. s / n., united by one vertex, we end with 2 VP + SS in the 1st cluster.
Row number 3: 1 VP + 1 st. b / n under SS PR. Next, we knit with rapports: * 2 VP + 5 times in the 3rd VP of the arch from 5 VP, then - 2 VP + 1 tbsp. b / n in the 3rd VP from 5 VP of the PR arch, then (2 tbsp. s / n, picot from 4 VP, 2 tbsp. s / n - to the PR cluster), and 1 tbsp. b / n under the trace. arch of 5 VP. We repeat the above steps to the end of the row. We finish the SS.
In order to consider in more detail the principle of knitting such an openwork square, we suggest that you familiarize yourself with the video master class on its creation:
We can talk about squares and knitting techniques for a very long time, because the craftswomen do not stop there, constantly improving their knitting skills, and, as a result, offering us more and more new ways to crochet square motifs. In the photo and video selection below, you can get acquainted with only a small part of how you can crochet squares:
Single crochet square:
Flower square in the center
Square spiral motif
Square decorated with pico
Solid square motif


Grandma's and openwork, dense and lace, Afghan and African crochet squares, the schemes and descriptions of which are given below, are ideal for any occasion. Even if you are a beginner craftswoman, thanks to our lesson you can cope with any of the patterns! Ideal for any occasion.
Dense African crochet square: a master class for beginners
To knit an "African" pattern, we need:
yarn (100% cotton) in five harmonious colors;
cr. No. 3. 
African flower: scheme

Size: 12 × 12 cm.
African pattern: knitting description
1st color
Sliding p., 8 c. p. in the ring with ss., 3 c. n. lifting.
In the first p. with n. (2 outputs), v. p., in the second p. 2 p. with n. (2 outputs), v. p. and so in each p., ss.
2nd color
In the arch 3 c. p., p. with n. (2 outputs), 2 c. n., 2 p. with n. (2 exits), into the next arch 2 s. s n (2 outputs), 2 v. n., 2 p. with n. (2 outputs), at the end of pp. + one more ss. into the arch.
3 c. n., 6 p. with n. (2 exits) into the arch, into the next arch 7 p. s n (2 outputs), at the end of the row ss.
3rd color
1 c. p., all p. we tie with. without n., where is the arch - we grab the bottom hole and get a strip, ss.
The African flower is ready! Now we tie it.
African square: harness
4th color
We begin to crochet the African motif with a strip of 3rd color.
2 c. p., p. with n., 3 p. without n., p. with n., we make a corner - in a strip 2 s. with two n. (3 outputs), 2 v. n., 2 p. with two n. (3 days), s. with n., 3 p. without n., p. with n., (striped with. with n.), with. with n., 3 p. without n., p. with n. Corner - striped 2 sec. with two n. (3 v.), 2 c. n., 2 p. with two n. (3 outputs), etc., we need 4 such corners, then ss.
2 c. p., p. with n. - in each p., At the corners 2 s. with n., 2 c. n., 2 p. with n., ss at the end of the row.
1 c. p., p. without n. - in each p., At the corners 2s. without n., 2 c. n., 2 p. without n., at the end of ss.
5th color
3 c. p., p. with n. (2 days) - in each p., at the corners 2 s. with n. (2 days), 3 century. n., 2 p. with n. (2 days)
at the end of ss.
1 V. p., P. without n. - in each p., At the corners 2 s. without n., 2 c. n., 2 p. without n., at the end of ss.
African motif for beginners is ready! This knit is perfect for a bedspread or blanket!
Dense grandmother's square: video master class
Crochet Afghan Square: a step-by-step master class for beginners 

We will need:
yarn of your choice in several colors;
cr. No. 2-4.
Size: 12-15 cm.
Afghan motive: master class
Sliding p., Then a chain of 6 V. p., In a ring, * we tie it for 3 s. with n. and close them with one p., 2 c. n. *, from * to *.
White thread with. without n., pico from 3 century. p., p. without n. 
With a gray thread, we make * 2 s from each picot. with n., with. with two n., pico from 3 century. p., p. with two n., 2 p. with n. *, from * to *.  We knit another row with the same thread * 2 s. with n., with. with two n., pico from 3 century. p., p. with two n., 2 p. with n. *, from * to *.
  We knit a contour with a contrasting thread: we tie the edge, start over the pico * we knit with. without n., pico from 3 century. p., p. without n., 3 p. without n., and contour long with. with three n., 3 p. without n. *, we knit from p. 2nd p., as shown in the photo, repeat until the end of the p.
  From each picot 5 times for 3 s. with n., closed one p., 2 c. p. We tie the edge with white thread.
  We make a contour, forming corners on 4 petals.
 The Afghan pattern is suitable for a bedspread or a cozy warm blanket.
Grandmother's square based on “April Dawn”: video master class
Simple crochet square: a step-by-step master class for beginners 
We will need:
Vita Brilliant yarn (380 meters per 100 grams) in two folds;
cr. No. 4.
Knitting pattern
Size: 13.5 × 13.5 cm.
Master Class

We crochet 5 in. etc., we connect them in a circle. 
1 p .: 3 c. p. rise, 15 p. with n. in a circle. 
We complete the river. p / s, cut the thread. 
2 p .: we introduce a thread of a different color. In each s. previous p. do with. with n., between them - 1 century. n. We knit 4 in. p. (3 instead of s. with n. + 1 c. p.). Then * s. with n., in. p. *, from * to * in each s. previous p. = 16 s. + 16 c. NS. 
We finish r. connecting p. 
3 p .: 2 s. with n. in each v. p. of the previous p. and 1 c. etc. between them.
We start r. from the 3rd century. n. rise, then s. with n., in. p., * 2 p. with n., in. n. *, from * to *. 
Connecting item, cut off the thread. 
4 p.: With a white thread we knit in each hole under V. p. of the previous p. (see diagram).
3 c. n. (one lifting), s. without n., 2 c. NS. 
S. with n., 5 century p. (corner), p. with n. 
2 c. n., * s. without n., 2 c. p., p. without n., 2 c. p., p. with n., 5th century p., p. with n., 2 c. p. *, from * to *, ss. 
5 p.: 3 s. with n. in each hole under V. n. pr. r.
3 c. p. rise, 2 p. with n., 3 s. with n. in sl. hole, etc. for 3 s. with n. into each hole, except for the corner ones. 
In the corners 3 p. s n, 3 v. n., 3 p. with. 
The row ends with a connecting loop. 
6 p.: 1 s. with n. in each s. previous R.
3 c. p. rise, s. with n. in each s. previous R. 
In each. corner hole 2 s. with n., 3 c. n., 2 p. with n. (see diagram). 
We complete the river. connecting item, cut the thread and hide the tail. 
Knitting is over!
Grandma's square "Pizzazz"
Crochet blanket from squares: a step-by-step master class for beginners

To knit the bedspread, we need:
Yarn Art "Begonia" yarn (100% cotton, 169 meters per 50 grams);
cr. No. 2.5.
Bedspread: knitting pattern

Blanket of squares: description
Motive
We collect 15 c. NS.
1 p .: 3 c. p. rise, 2 in. p., p. with n. in the 3rd p. ave. r.
2 p.: In the opposite direction (see arrows), 3 c. p. rise, 2 in. p., p. with n. above s. pr. r.
3 r .: 3 c. p. rise, 2 in. p., p. with n. above s. pr. r.
4 p .: 3 c. p. rise, 2 in. p., p. with n. above s. pr. r.
5 p.: 3 c. n. lifting, 2 in. p., p. with n. above s. pr. r.
6 p.: Tying a small square - 3 in. p. p., 4 p. with n. into the corner lintel with., after, in the lintels for 3 s. with n. In uglpkh - 9 s. with n.
7 p .: see diagram. In the corners of 10 s. without n., further 9 c. NS.
8 p.: We start from the corner, 3 in. n., then into the jumper from the 9th century. n. pr. r. - 11 p. with two n., between them 1 century. NS.
9 p.: Into a jumper from 3 century. n. pr. r. do 4 s. without n., 3 c. n. in each. a small arch from 1 century. n. between p. with two n. pr. r. = 11 chains.
Our beginner square is now complete. To connect them into a bedspread, you should connect them together during the knitting process, as shown above (see diagram) - A from 3 c. n. from each side. The bedspread can be knitted of any length and width - it all depends on your desire and patience.
Square "African flower": video master class
Crochet openwork square for beginners: master class

We will need:
thin yarn;
cr. No. 2.5.
Openwork pattern: knitting pattern

Master class for beginners
1 p .: in a ring from 5 century. n. knitted. 3 c. p. p., * 4 c. n., 4 p. with n. *, from * to * x 2, 4 in. n., 3 p. with n., 1 pp. in the 3rd p. p.
2 p.: 1 ss, 3 c. p. p. (in all other cases knitted * 1 s. s.) in the same, A knitted. (3 s. s. + 4 s. n. + 4 s. s.), 5 c. ... p. with a picot in the center *, from * to * more x 3, ss. in the 3rd p. under.
3 r .: 4 pp., 3 v. n., (in all other cases knitted * 1 s. with n.) in the same, A knitted. (3 s. s. + 4 s. n. + 4 s. n.), 2 c. p., in pico knitting. (1 s. with n. + 1 c. n. x 4 times + 1 s. with n.), 2 c. p. *, from * to * more x 3, ss. in the 3rd p. p.
4 p.: 4 pp., 3 c. n. (in all other cases knitted * 1 s. with n.) in the same, A wire (3 s. s. + 4 s. n. + 4 s. n.), 4 c. p., 3 A from 3 c. n., attached 1 s. without n. in 1 century. p., alternating with 1 s. without n., 4 c. p. *, from * to * more x 3, ss. in the 3rd p. p.
5 p.: 4 pp., 3 c. n. (in all other cases prov. * 1 s. with n.) in the same, A prov. (3 s. s. + 4 n. n, 2 A from 3 c. n, fixed by 1 s. without n. in the middle of the arches from the 3rd century. n. row below, 6 in. p. *, from * to * more x 3, ss. in the 3rd p. p.
6 p.: 4 pp., In, A from 4 in. n prov. (4 v. pp. (in subsequent cases * 1 s. with 2 n.), 7 s. with 2 n.), 2 c. n., 4 p. with n. in, A from 6 in. n., 5 c. p., 1 A out of 3 c. n., fixed with. without n. in 2 A rows below, 5 in. n., 4 p. with n. in, A from 6 in. n., 2 c. p. *, from * to * more x 3, ss. in the 4th p. p ...
7 p .: 4 c. p. p. (in subsequent cases * 1 s. with 2 n.), in each. with. from 2 n. prov. (1 s. with 2 n. + peak., 7 peaks in total), 3 n. n., 4 p. with n. in, A from 5 in. n., 5 c. n., 1 p. without n. in, A from 3 in. n., 5 c. n., 4 p. with n. in, A from 5 in. n., 2 c. p. *, from * to * more x 3, ss. in the 4th p. p.
8 p .: 3 c. p. p. (in subsequent cases * 1 s. s.), 1 s. with n., prov. similar to the previous row, alternating with. with n. and peak., 1 s. with n. in, A from 3 in. n., 5 c. n., 4 p. with n. in, A from 5 in. p. 2 c. n., 4 p. with n. in, A from 5 in. n., 5 c. p. *, from * to * more x 3, ss. in the 3rd p. p.
9 p .: 4 c. p. (in all other cases, replace with * 1 s. with 2 n.) and 1 s. from 2 n. with one vertex, 3 A from 5 in. n., fixed by 1 s. from 2 n. in 3 p. with n. rows below, 3 s. with n. with one peak and base, peak, 3 p. with n. with one apex and a base in the sl. 1 sec. from 2 n. 9th p., Stuck. from 1 p. with n. 8th p., 5th century n., 1 p. from 2 n. in sl. with. with n. R. below, 5 c. n., 1 p. from 2 n., 5 c. n., 2 p. from 2 n. with one peak, 7th century p., in, A from 2 in. n. prov. (2 s. s. + peak. + 2 s. s.), 7 c. p. *, from * to * more x 3, ss. in the 4th p. p.
Our openwork motif is connected with the neighboring crochet at the moment of knitting of the last p. at all points, or at peak. or arches from v. NS.
Squares for blankets: video master class