Do-it-yourself kokoshnik for the Snow Maiden: a lightweight children's model with and without a rim. Master class for making a kokoshnik for the Snow Maiden We sew a kokoshnik with a hat for the Snow Maiden
Russian women, which had the shape of a comb. The name comes from the Old Slavic word "kokosh", which translates as a rooster or a brood hen. The crest of the kokoshnik can be different: in the form of a rounded shield, a crescent, high pointed, wide cylindrical, low with a cap, in the shape of a crown.
Now this type of headdress is often used by girls and little girls, who wear national costumes for holidays, for folk dances, for matinees in kindergarten and school. This is a very beautiful product, which is traditionally worn on the New Year's holiday by the Snow Maiden, the granddaughter of Santa Claus. For a holiday, a child can make a kokoshnik according to a life-size pattern for the role of a snowflake, Snow Queen or Snow Maiden.
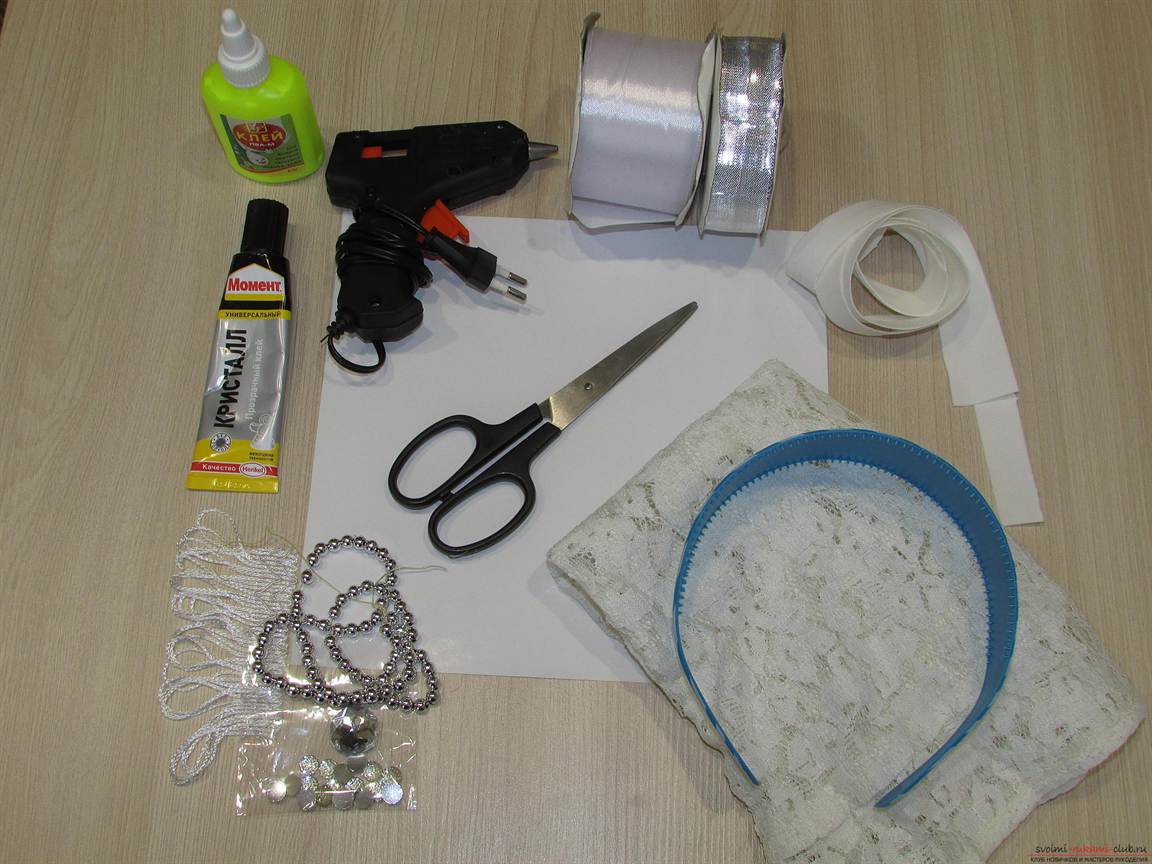
Necessary materials
To sew a kokoshnik, you need to have thick cardboard for the comb itself, material for pasting it, for example, brocade or satin. It must be bright and shiny so that the Snow Maiden does not sparkle in the light of the lights. Some craftswomen use a wire frame when sewing so that the kokoshnik does not fall down according to the pattern in full size, but keeps its shape. If the hat is not too tall, then only the cardboard construction will be enough.
You also need to take care of decorating the kokoshnik. It was always beautifully decorated with beads, embroidery, sewn piping, stones. Now in stores of sewing accessories, you can pick up a huge amount of modern materials so that a life-size kokoshnik sewn according to a pattern is the most beautiful and elegant.

After the headdress is ready, it needs to be fixed with something on the child's head. To do this, prepare either a wide elastic band or ribbons to match the main color of a kokoshnik or a dress of a fairy-tale character. For a pattern, you will need to draw a template on a piece of Whatman paper. You will need a compass, a simple pencil, an elastic band, patterns.
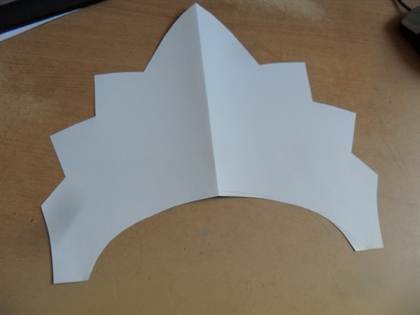
Drawing a pattern
A life-size kokoshnik should be drawn after the choice of the silhouette of the comb has been made and measurements have been made. To make the pattern even and symmetrical, it is better to fold the paper in half and make a pattern for one half of the headgear. The article presents the average size of the pattern. After the pattern is drawn, you need to draw decorative elements with a simple pencil and roughly think over their placement on the ridge. Then they are transferred along the cut on thick cardboard. Then cut with scissors.
Snow Maiden's crown
A life-size kokoshnik pattern for the Snow Maiden is drawn in the shape of a crown. This is a special shape of the comb with beautifully carved symmetrical elements. Here you will need a compass, or you will need to completely redraw the pattern given in the article. When the decoration is in progress, the crown tops are decorated with the same elements.

The symmetry of the rest of the ridge is also observed. You can lay out the pattern on the table and try on all the elements, beautifully arranging them over the entire surface. Then the pattern is transferred according to the cut out template onto thick cardboard, and each element is carefully cut out.
Cardboard blank
To keep the full-size Russian kokoshnik comb on the head according to the pattern, it is necessary to cut a support hoop for it. It can be placed both in front of the ridge and on the back of it. To draw support, you need to measure the distance from one ear to the other along the line of the forehead. According to these measurements, a crescent is drawn on cardboard. From the inner semicircular line, you need to step back two centimeters down and draw a semicircular line parallel to it. This is the strip and will be the support hoop.

You can simply sew cardboard with thick cotton threads, or you can make a frame out of wire, as in the photo above. Then the life-size pattern of a Russian kokoshnik made of paper will keep its shape well, and the Snow Maiden will be able to move freely and dance without fear that the comb of the kokoshnik will be deformed.
Different forms of kokoshniks
The article showed life-size patterns of a kokoshnik for a girl, namely a comb. Readers also figured out how to draw a support hoop. But there are still other types of kokoshniks, for which it is enough to cut out the long ends and sew satin ribbons to them, with the help of which the headpiece will be kept on the child's head. You can also accurately measure the head circumference and sew on a wide elastic band, then the kokoshnik will be put on quickly and easily.

There are also options for keeping the comb on the head. This is done with a hat, which is sewn around the circumference of the comb, and pulled together at the back with an elastic band. You can also imagine a support in the form of a scarf, preferably organza or plain thin fabric. It is also sewn on from the inside along the circumference of the kokoshnik and tied at the back under the hair with a knot.
Kokoshnik sewing
When a full-size kokoshnik pattern is made of cardboard according to the scheme, it is pasted over with cloth on both sides. A support or a hat is made, ribbons or an elastic band are sewn on. Fitting on the child's head. A kokoshnik should not be cramped and uncomfortable. After all, the holiday lasts a long time, and the child should feel comfortable throughout the entire action. The back side remains in its original form, and the front side of the product is decorated.

Decorating a kokoshnik
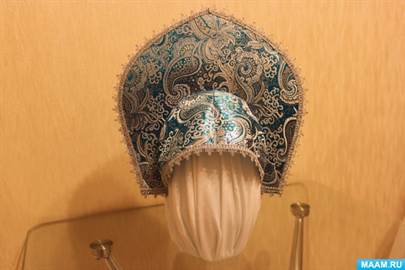
As you can see in the photo, in kokoshniks, the frontal part of the head is often closed with a mesh of beads. You can buy it separately in the store, and if you wish, weave it on a fishing line from beads of different sizes and colors. It is advisable to purchase oval and elongated elements so that the decoration is flatter. The side bevels from the bottom are also decorated. Long identical pendants made of threads with shiny beads or balls are sewn there. You can use silver or blue plastic pieces of Christmas tree garlands. On the kokoshnik itself, you first need to draw a pattern with a simple pencil, along which the drawing will subsequently be applied with pebbles, rhinestones or half-beads. You can trim the edges with piping.
Crown decoration
When making a kokoshnik according to a pattern for cutting and sewing in the shape of a crown, you will have to design all the elements of the tops in the same way. Only the central detail may differ. Also, there should be a separate strip around the forehead and support, if there is one on the frontal part of the head, in front of the ridge.
- In order to tightly glue the fabric to the cardboard, transparent glue "Crystal" is used. It does not stain the fabric and is very strong. Dries quickly enough.
- You can decorate a kokoshnik with an applique. To do this, you need to make elements on an adhesive non-woven for sealing. An artificial material is taken, usually satin or satin crepe. The elements are cut out with a burning device. The edges are frayed and the fabric does not fray.
- Individual elements are glued to the kokoshnik with an iron and glue tape.

- The braid and rhinestones are glued with a glue gun. Gold braid of different shapes looks beautiful. Along the edges of the kokoshnik, they glue the braid with coins (with round identical elements), and the frontal semicircle is pasted over with braid with tassels. They hang over the forehead, and then there will be no need to make a mesh of beads.
- On the back, instead of ribbons that need to be tied, you can sew a wide elastic band on which a large satin bow in the color of a kokoshnik is attached with long hanging ends cut at an angle.
The article gives patterns of different kokoshniks in full size, the types of different kokoshniks, both semicircular and in the form of a crown, are described in detail. Methods and secrets of original kokoshnik decorations are given. It is told the better to decorate it and what kind of glue it is desirable to use. We hope that after reading the recommendations and tips, a novice craftsman can easily make such a beautiful headdress as in the photos above. Happy work!
Irina Khursulova
For work we need:
4 sheets of white paper (A4 size, tape, simple pencil, scissors, plywood, small nails, hammer, pliers, wire, white fleece (mesh, white organza, sewing needles, large beads, beads, threads, silver braid, hot gun, various decoration materials crowns.
Getting Started:
1. Glue 4 sheets of white paper (A4 format) between themselves with scotch tape.
2. Fold the sheet in half and draw that shape crowns which you want to do (having previously measured the length of the headband adjacent to the head).

3. Cut along the contour.

4. Outline the resulting template on plywood.
5. Drive in small carnations along the contour at a distance of 1 cm. apart.

6. We put the wire along the contour of the hammered nails.
7. We make additional jumpers from the wire so that the frame does not bend.

8. In order to Crown lay comfortably on your head, you can make additional attachment.

9. We take two fabrics (in this case, white fleece and white matte organza, put them on top of each other, fasten both materials with sewing needles. Apply the finished frame to the fabric and circle around the frame with a margin of 1.5 cm for hem.

10. Cut along the contour.
11. We sew on the rim, pulling the fabric very tightly.

12. The additional fastening is also covered with fabric and sewn.

13. All edges of the frame are sheathed with a white bias tape.


14. We decorate the additional fastening with a braided net made of large beads and beads.


15. Cut off two meter canvases 40 cm wide from white fabric.

16. Finished canvases, folded three times in length, are hemmed from the back side crowns.

17. Close all edges of the frame with a wide silver tape on both sides using a hot gun.

18. It remains only to decorate crown.


19 The crown is ready.

 Do-it-yourself Snow Maiden's kokoshnik. Lots of kokoshnik decor ideas!
Kokoshnik - an old Russian headdress
- a symbol of Russian traditional costume!


The secret of sewing a "flat" kokoshnik is simple: it is sewn with a back, a kind of "hat" on which it is held. Large decorative bows are also sometimes planted on the backdrop.
First, a silhouette is cut out of dense or glued in several layers of cardboard, he is the front, part of the kokoshnik. Its inner arc is first cut out in a newspaper sketch, the optimal shape is found empirically.Then comes the turn of the patterns, the most painstaking part of the work.
ATTENTION! All dimensions are shown here for comparison purposes only! (and without seam allowances) - you still have to measure them again. A kokoshnik is a very individual thing, and when you try to put it on even on an outwardly similar head, you will not succeed. But it will sit like a glove!

The patterns consist of tracing paper of the front side, the “face” of the kokoshnik, a long panel of the top and the “back”. Everything in 2, at least, copies.
Measurements:

In the figure, the lines along which the measurements are taken are marked in red. The cross is the approximate "top", the corner point of the head. In practice, the distance up and down from it is approximately equal.
Open the heel top:

It is most convenient to first sew the backdrop separately according to the first measurements, and then, putting it on your head, adjust it, pinning it with pins along the way - this is the origin of a sharp cut, indicated on the cutting top by a dotted line. Fitted, it can be sewn immediately.
Open the back of the back:

On a tightly stretched, ready-made backdrop, put on a cardboard base and draw with chalk along the contour of the fabric to the cardboard. (This is easy to do in front of the mirror.) This will create an oval notch on the long top. It can be cut out and hidden in the seams, or it can be left with a "visor" covering part of the forehead (but then it will be a little more difficult to sew on the front part).
The backdrop is sewn in at least two layers (if the fabric is very dense, it is possible in one, but you have to hide the inside out), with thin fabric or very heavy top (for example, abundantly decorated with stones) - in several layers.
Open your faces:

The face of a kokoshnik can be of the most diverse forms and depends only on the imagination of the author.

2 parts are cut from the main fabric according to the finished cardboard silhouette (do not forget the seam allowances). It is not necessary to make a lining on the back part, but for the front part it is simply necessary. Whether the kokoshnik is decorated with embroidery and beads or rhinestones and stones - on the backing it will all look much better. As such, it is good, for example, to use flannel - it is thick and soft, besides, it can be lightly, so as not to puff up, quilting and dispensing with seams along the edges.
If the base fabric is thin and translucent, the backing should be in tone or white.
Then sew the backing to the main facial fabric along the contour (that is, without going into the territory of the seam allowances), and sew the first (inner) backing along the edge of the inner contour. You do the same operation with the second copies, with the only difference that here one layer is enough for the substrate - it's still worth making it, because all the seams will be displayed back. To prevent the edges of the material from puffing up, it is better not to hem it, but to sweep it in a “zigzag” pattern.
Now both parts of the "face", turned inside out, are sewn along the entire length of the kokoshnik arc: on the one hand, from the top (center) down to the lower corner, and on the other, in the same way, but bending around this corner and including the lower part, to the very beginning of the backdrop. Further, all the "extra" fabric of the seams is brought out to the back, where it is carefully straightened and masked behind the backing. This is the last moment to see if everything is done that way.
After that, you can insert the cardboard base inside and manually sew the lower part of the second arc. If the bottom is sewn on both sides at once, it will be difficult to insert, and you can even bend. Both heels are also stitched manually, but very carefully, along the inner arc of the kokoshnik. The bottom of the backdrops can also be sewn on a typewriter.


Who does not know the faithful companion of Santa Claus - Snegurochka? She came to us from folklore through the centuries. Her image symbolizes purity, lightness, tenderness, kindness. It is not for nothing that the Snow Maiden usually serves as an intermediary between children and her grandfather. Every girl at least once dreamed of attending a holiday in the costume of a snowy granddaughter. And, like any Russian beauty, the assistant to Santa Claus is often portrayed in a kokoshnik. We offer you several simple ways how to make a kokoshnik for the Snow Maiden with your own hands and please your daughter or fulfill your childhood dream.
Diversity on a common basis
The creation of an original kokoshnik does not require any special skills. All that is needed is a standard basis and the irrepressible imagination of a craftswoman.
For the template you will need:
- paper (regular newspaper will do);
- the simplest plastic hoop (best of all wide, so as not to crush during the holiday);
- tape from 2 cm;
- glue (PVA, Moment Crystal, glue gun. Choose any to your taste);
- cardboard. Its thickness depends on the materials with which you want to decorate the kokoshnik. Many perfectly fit a box for chocolates;
- blue fabric / guipure, it is possible with winter patterns (if you use non-colored cardboard);
- narrow tape (1 cm);
- scissors;
- pencil;
- materials for decoration (beads, rhinestones, tinsel, beads, etc.).
General steps
First of all, you need to decide on the shape and size of the kokoshnik. It can be flower petals, the edges of a snowflake, a classic dome - whatever your imagination tells you.
It is better not to make a workpiece that is too large, since then it will end up on the child's head or your own.


To make the product symmetrical, fold the paper in half and cut out the main part of the kokoshnik.
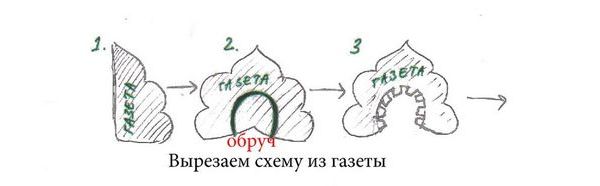
If it is more convenient for you to use the hoop, then attach it to the middle of the workpiece and circle it. Then step back from the drawn line by 2 cm and draw another one, parallel to the previous one. On it we cut out the core of the kokoshnik, and then cut the "teeth" by 2 cm. The result is a template for the headdress. It remains only to circle on cardboard and cut.
If you used colored cardboard, then you can go directly to the next step. Otherwise, the workpiece should be pasted over with a cloth. Cut out two pieces from it according to the shape of the template, while one piece should be 1 cm larger. Glue the craft on both sides, let it dry, bend the allowances of the part and glue it too. So the first part of the product is ready.

Headpiece with a hoop
Wrap the rim with a narrow tape (1 cm), securing it with glue in places.

Then bend the "teeth" of the craft and attach the kokoshnik to the inside of the rim.

Mark out the petals with a pencil, as in the picture, and cut them.
Starting from the center, glue the edges of the petals together, slightly tilting the entire structure back. It is more convenient to perform this procedure if the kokoshnik is worn on the owner's head.

Now the most enjoyable part is decorating the headdress. Here, let your imagination run wild. You can lay out snowflakes with rhinestones, run tinsel around the office, hang a fringe. The main thing is to be bright and festive. You can see examples in the photo.


At the end of the work, so that the piece does not sleep at a crucial moment, sew a tape from 2 cm and wider to tie it at the back of the head. That's it, the original kokoshnik for the girl is ready!
Ribbon option
You can do just fine without a hoop. Just right after the "general steps" go to the decoration. We assure you, it will turn out just as well! Such a kokoshnik will be more versatile and suitable for any head.
A little advice - take the ribbons for tying as wide as possible and, to keep the piece tight, use the invisible ones.

Kokoshnik with a scythe
We offer a master class on the improved version of the Snow Maiden's headdress. For it, we need additional materials:
- white satin;
- artificial hair braid;
- braid;
- elastic band.
After you have made the first piece of the product (see “general steps”), you need to cut out the head cap. To do this, measure the distance from the base of the kokoshnik to the middle of the forehead and the length of the rim. To make the forehead fit better, make a groove in the center. Decorate the outer edge with a patterned braid.

Glue the piece to the rim and edge of the kokoshnik.
Sew on the braid on a piece of fabric used before, and fasten to the back of the product.
On a note! Note that when wearing the headdress, the artificial hair should start at the base of the neck.

Cut a half-oval out of satin for the back of the head. To do this, measure the distance between the ears and from the base of the kokoshnik to the shoulders. Fold in the long edge of the piece and insert the elastic.

Kokoshnik - an old Russian headdress - a symbol of Russian traditional costume! The secret of sewing a "flat" kokoshnik is simple: it is sewn with a back, a kind of "hat" on which it is held. Large decorative bows are also sometimes planted on the backdrop.
1:983 1:988

3:4


First, a silhouette is cut out of dense or glued in several layers of cardboard, he is the front, part of the kokoshnik. Its inner arc is first cut out in a newspaper sketch, the optimal shape is found empirically.Then comes the turn of the patterns, the most painstaking part of the work.
5:15455:4
ATTENTION! All dimensions are shown here for comparison purposes only! (and without seam allowances) - you still have to measure them again. A kokoshnik is a very individual thing, and if you try to put it on even on an outwardly similar head, you will not succeed. But it will sit like a glove!
5:508 5:513
The patterns consist of tracing paper of the front side, the “face” of the kokoshnik, a long panel of the top and the “back”. Everything in 2, at least, copies.
6:1272 6:1277 6:1282Measurements:
6:1304 6:1309 
7:4
In the figure, the lines along which the measurements are taken are marked in red. The cross is the approximate "top", the corner point of the head. In practice, the distance up and down from it is approximately equal.
7:383 7:388 7:393Open the heel top:
7:443 7:448 
It is most convenient to first sew the backdrop separately according to the first measurements, and then, putting it on your head, adjust it, pinning it with pins along the way - this is the origin of a sharp cut, indicated on the cutting top by a dotted line. Fitted, it can be sewn immediately.
8:1439 8:1444 8:1449Open the back of the back:
8:1501 8:4 
On a tightly stretched, ready-made backdrop, put on a cardboard base and draw with chalk along the contour of the fabric to the cardboard. (This is easy to do in front of the mirror.) This will create an oval notch on the long top. It can be cut out and hidden in the seams, or it can be left with a "visor" covering part of the forehead (but then it will be a little more difficult to sew on the front part).
9:1204The backdrop is sewn in at least two layers (if the fabric is very dense, it is possible in one, but you have to hide the inside out), with thin fabric or very heavy top (for example, abundantly decorated with stones) - in several layers.
9:15979:4 9:9
Open your faces:
9:46 9:51 
The face of a kokoshnik can be of the most diverse forms and depends only on the imagination of the author.
10:734 10:739 
2 parts are cut from the main fabric according to the finished cardboard silhouette (do not forget the seam allowances). It is not necessary to make a lining on the back part, but for the front part it is simply necessary. Whether the kokoshnik is decorated with embroidery and beads or rhinestones and stones - on the backing it will all look much better. As such, it is good, for example, to use flannel - it is thick and soft, besides, it can be lightly, so as not to puff up, quilting and dispensing with seams along the edges.
11:213811:4
If the base fabric is thin and translucent, the backing should be in tone or white.
11:155Then sew the backing to the main facial fabric along the contour (that is, without going into the territory of the seam allowances), and sew the first (inner) backing along the edge of the inner contour. You do the same operation with the second copies, with the only difference that here one layer is enough for the substrate - it's still worth making it, because all the seams will be displayed back. To prevent the edges of the material from puffing up, it is better not to hem it, but to sweep it in a “zigzag” pattern.
11:983 11:988Now both parts of the "face", turned inside out, are sewn along the entire length of the kokoshnik arc: on the one hand, from the top (center) down to the lower corner, and on the other, in the same way, but bending around this corner and including the lower part, to the very beginning of the backdrop. Further, all the "extra" fabric of the seams is brought out to the back, where it is carefully straightened and masked behind the backing. This is the last moment to see if everything is done that way.
11:174911:4
After that, you can insert the cardboard base inside and manually sew the lower part of the second arc. If the bottom is sewn on both sides at once, it will be difficult to insert, and you can even bend. Both heels are also stitched manually, but very carefully, along the inner arc of the kokoshnik. The bottom of the backdrops can also be sewn on a typewriter.
11:575 11:580 


16:4


19:4


22:4


