Knitting for dogs schemes and description. Do-it-yourself patterns for making knitted clothes for a Chihuahua
Do you want to know, how to knit a dog sweater? Watch this master class with a detailed step-by-step description! I will show you how to knit a sweater for a dog using the example of a sweater for a Jack Russell Terrier and a Yorkshire Terrier, but this pattern can be knitted for a dog of any breed.
1. The first thing to do is. These are the sizes for me: back length - 34 cm chest girth - 42 cm , belly length-17 cm.
2. We knit a control sample from the threads with which we will knit a sweater and. For me it is 21 loops = 10 cm, therefore 2.1 loops fit in 1 cm.
3. We calculate the number of loops to be cast on.
The first step is to calculate how many loops should be in the widest part of the sweater (in the chest area). To do this, we take a measure of the girth of the chest and determine how many loops there will be in this value. For my sweater this will be 42 x 2.1 = 88 stitches.
Since we start knitting a sweater for a dog with a collar, we cast on the knitting needles the following number of loops: the value obtained above minus 20 loops for small dogs (Yorkshire or Chihuahua) or minus 30 loops for larger breeds (Jack Russell Terrier). I cast on 88 - 30 sts = 58 sts. Next, I will indicate the number of loops with which I knitted this sweater.
 4. Pick up the required number of loops on the needles and knit with an elastic band 1 x 1 for 4 cm (York) or 5 cm (Jack Russell).
5. Next, divide the number of loops cast on into 5 parts (58: 5 = 12 loops). The first fifth part (12 loops) knit with an elastic band 1 x 1, and the last fifth part of the loops (12 loops) also with an elastic band 1 x 1, the middle part, all remaining loops (58 - 12 - 12 \u003d 34 loops) knit with stocking stitch. On the loops The back is knitted on the front surface, and the tummy is knitted on the elastic loops. That is, we knit the next row like this: 12 loops of an elastic band 1 x 1, 34 loops of the front surface, 12 loops of an elastic band 1 x 1.
6. We continue to knit, distributing the loops of the pattern according to the above diagram, while in each second row we add loops to expand the sweater for the dog to the chest.
The loops are added as follows: elastic loops 1 x 1, add 1 loop, 1 front loop, add 1 loop, loops of the front surface, before the last loop of the front surface add 1 loop, 1 front, add 1 loop, elastic loops. The loops added from the front surface are also knitted with the front surface, and the loops added from the elastic side are included in the elastic pattern.
For the Yorkshire Terrier, we knit 10 rows in this way (adding 5 times 4 loops in each 2nd row), for the Jack Russell Terrier - 16 rows (adding 8 times 4 loops in each second row.
7. After 5 (7 cm) from the beginning of knitting faces. satin stitch make holes for the paws.
To do this, in the front row we knit as follows: 3 (5) loops of elastic band, close all loops of the elastic band and the next 3 (5) loops of the front surface, we knit all the loops of the front surface with the exception of the last 3 (5), we close them, then we close the loops of the elastic band , we knit the last 3 (5) loops of the elastic band according to the pattern. In the next, purl row, instead of closed loops, we collect with air loops the number of loops that we closed in the previous row. In the next front row, we knit the cast-on loops with an elastic band.
8. We knit a dog sweater from the holes for the paws to the end of the tummy. We knit, distributing the loops of the elastic band and the front surface as knitted above. At the same time, we make reductions, for a slight narrowing of the sweater. If they are not done, then after a while the sweater on the tummy will sag. To do this, in each 8th row, knit 2 loops together (adjacent loops of the elastic band and the front surface).
9. When you knit to the end of the length of the abdomen (15-17 cm for girls, shorter for boys), transfer the loops of the tummy (gum loops) to separate knitting needles and then knit only the loops of the front surface (back). You can also leave the elastic loops on the working knitting needle, just do not knit them further.
10. If you knit a sweater for a dog - girls, then knit as follows: on the loops of the front surface, close in each 2nd row 2 times 1 loop, 2 times 2 loops, 1 time 5 loops.
If you are knitting a sweater for a dog - a boy, then knit with the front stitch to the value of the back length minus 5 cm (measured from the beginning of knitting with the front stitch), then reduce the loops of the front surface in the same way as on the sweater for girls.
11. We tie the bottom of the parts with an elastic band 1 x 1. To do this, we knit 6 - 8 rows with an elastic band on the loops of the tummy and back, while in the first row of the elastic band, dial along the edge of the loop part from the previously closed loops.
12. After the sweater for the dog is knitted, it must be sewn along the edge loops. The seam should pass from below, in the center of the tummy.
To make the sweater more interesting, you can knit a melange or section-dyed yarn for knitting, or you can knit a sweater from yarn of 2 colors: knit a collar and a final trim with a contrasting thread.
Many questions have been asked in the comments and in the mail regarding how to properly knit the bottom of a sweater and its piping. In the knitting sweater online, I explained in detail and photographed all the knitting steps. Online can be viewed at
Recently, such a hobby as making clothes for small dogs (for example, for a chihuahua) with your own hands has become increasingly popular. Small dogs (toy terriers, chihuahuas and other breeds) are happy to wear knitted clothes that their owners knitted with their own hands (knitting or crocheting) according to a ready-made pattern or pattern. Small dogs are happy to wear blankets, knitted or crocheted, as well as overalls and other types of clothing.
Knitting clothes for small dachshunds, chihuahuas and other dogs is quite easy, the main thing is to choose the simplest pattern and pattern. And then crocheting or knitting turn into pleasure. It is very interesting to knit blankets and overalls for small dogs according to a ready-made pattern or pattern. A dachshund or a toy terrier will certainly be delighted with a new blanket or an elegant jumpsuit crocheted or knitted with their own hands. If you tie clothes such as overalls or blankets for a dog with your own hands, the dog will definitely not freeze on the street. Therefore, knitting on small dogs is undoubtedly worth it.
To knit clothes for small dogs, you need, first of all, to decide on the scheme and pattern. Most often, overalls or blankets are knitted for small dogs. Knitting technology for dachshunds and chihuahuas is simple, but you need to be able to crochet or knit at least a little. Knitting patterns for dogs can be found on the Internet and specialized knitting literature, for example, in magazines for those who knit. To knit clothes for a dachshund or a toy terrier, you need to prepare everything you need for knitting.
You also need to brush up on basic crocheting or knitting skills. Some people prefer knitting, while others prefer knitting. The main thing is to knit with the soul, then knitting elegant overalls will be quite simple. What to choose, knitting needles or a hook, does not matter. The one who is better at knitting, let him choose the spokes, and vice versa. For knitting you will need:

Gallery: knitted clothes for dogs (25 photos)


Stages of work
In order to knit beautiful clothes for decorative dogs, you need to start by choosing patterns and patterns. All materials can be found online, or you can borrow models of original overalls and blouses in magazines on the topic of children's clothing. The main thing is to adapt children's models to the physiological and anatomical features of the body of a small dog. Having decided on the pattern and scheme, you can get to work. The work consists of the following stages:

When making costumes, be sure to keep in mind that dog suits should be comfortable and not restrict the movements of the pet. In a suit, the dog should feel as comfortable as possible. If a smart jumpsuit prevents your baby from running, jumping, digging holes and other ways of having fun on a walk, it may be better to give up beautiful clothes in favor of a simpler but more comfortable option. Here you need to follow a simple rule: clothes for a dog, not a dog for clothes.
 Clothes for small dogs are not easy to knit but for protection from cold and wind. Therefore, it is better to knit it from warm wool. It is necessary to ensure that the knitting density is the same all the time, then the knitting will turn out beautiful. When a novice craftswoman knits clothes for a dog, she should focus on the pattern, then knitting will be easier.
When making clothes for dogs, attention should be paid primarily to comfort and warmth, and decorative functions may fade into the background. You can dress a small dog for a walk in such a way that it is convenient for her to show her dog joy: jump, run, have fun. In addition, it is impossible to overheat the dog in any case, because it can get heat stroke. It is necessary to dress the dog immediately before the walk, because if you dress it in advance, the animal will sweat and can easily catch a cold after going outside.
Clothes for a dog should be elegant and beautiful, and the animal should definitely like it. If the owner notices that the dog, after dressing, shows pronounced anxiety, whines, spins, as if something is squeezing it, perhaps the clothes do not fit or are made of the wrong material. This must be taken into account, because if the dog does not like the clothes, in no case should you force the animal to wear an inappropriate suit.
 To clothes for the dog it turned out beautiful, elegant, comfortable, it is recommended to look for models on specialized Internet sites dedicated to decorative small dogs. Also, before sewing clothes for your baby, it is recommended to take the dog to the veterinarian and ask what clothes the doctor will recommend for her. The veterinarian will certainly give recommendations on how to dress the animal during the cold period, and tell you how to prevent overheating or, conversely, hypothermia.
To knit was easy, comfortable, interesting, it is necessary to choose the appropriate scheme, in accordance with the level of training of the needlewoman. If something does not work out, it is better to choose a simpler scheme or pattern. In general, clothes for decorative dogs are not difficult to manufacture and are quite of the same type.
As a rule, for dogs they sew and knit overalls, horsecloths, blouses and hats. If you gain experience, sewing or knitting for dogs can become an excellent profession or a way to earn extra money, as lovers of lap dogs There are more and more children in the world, and all kids need warm, comfortable clothes for walking and going out into the world. Dog outfits are in high demand in specialized stores and on websites.
Suit for a decorative dog- this is not a luxury, but a necessity, because without warm clothes a dog can easily catch a cold in winter. They are as gentle and sensitive as small children, so you must make sure that your pet is always dressed in clothes appropriate for the occasion and the weather. Proper clothing is the key to the health and long life of a small animal, the well-being of which is entirely in the hands of the owner. This is the reason for the rise in popularity. elegant clothes for pets of small sizes.

Do you like dogs? Then this post is for you. Our favorites are so faithful, so obedient, so smart, let them be smart and beautiful too! Moreover, inyazat for your pets is a great, incomparable pleasure!
1:946 1:953
Owners of dogs of small breeds are especially close to the topic of clothing for their pet!
2:16102:4
Here is an example of a sleeveless jacket for a small dog
2:93

Vest with fringes
5:58You will need:
50 g of beige yarn, 20 g each of brown and terracotta (100% wool, 250 m / 100 g), straight or circular knitting needles No. 2.5, crochet hook.
Knitting density:
elastic band 2 × 2 30 p. \u003d 10 cm, front surface 25 p. \u003d 10 cm, 40 p. = 10 cm.
Loop calculation
Take measurements from the dog and calculate the number of loops.
neck girth- 21 cm (63 p. + 2 cr. p. \u003d 65 p., round up to 66 p., since their number must be a multiple of 3); 1/3 girth ~ 7 cm (21 p. + 1 p. for the symmetry of the gum 2 × 2 = 22 p.); 1/12 girth ~ 1.8 cm x 2 = 3.6 cm (11 p.) - armhole width at the beginning of knitting.
5:1020Bust- 35 cm + 2 cm for a loose fit = 37 cm (111 p.); 1/2 girth (width of the back and tummy) - 18.5 cm each (56 p.)
5:1233 5:1238R distance from the withers to the middle of the back- 11 cm.
5:1328 5:1333armhole height: distance from the base of the neck to the end of the front paw + 1 cm = 7 cm (28 p.)
5:1488Armhole depth: for small dogs 2 cm (6 p.). 1/2 chest circumference - 1/3 neck circumference - armhole depth = 18.5 cm - 7 cm - 4 cm (2 cm for each armhole) = 7.5 cm (18 p.); 18 p.: 2 = 9 p.; Therefore, when knitting armholes, add 9 sts from each edge of the tummy and back.
5:19635:4
To find out how many rows to add loops, divide the distance from the base of the neck to the end of the front paw + 1 cm by the number of loops added: 7 cm = 28 p.; 28 p.: 9 p. = 3 p. This means that yarn overs must be made along the edges of each 3rd p.
5:423 5:430Back/tummy
5:464Cast on 66 sts with a beige thread. With a 2 × 2 elastic band, tie a collar 12 cm high, making strips of the same width with dark brown and terracotta yarn. Bind off 11 sts, knit 22. (tummy), bind off 11 sts, knit 22 faces. (back).
5:869Flip knitting: knit 22 out. (back), then take the thread from the second ball and knit 22 out. (tummy). You can collect the loops of one part on a knitting pin and knit later.
5:1212 5:1217Next, knit the back and tummy 28 p. stitch, making yarn over the edges of each 3 p. (9 times). The volume of parts will increase by 18 sts. Knit the first and last 3 sts in garter stitch so that the edges do not wrap. Then, along the edges of each part, dial 7 air. p. (armhole depth = 6 p. + 1 cr. p.). Now in each part there are 54 sts (22 sts + 18 sts + (2 × 7 sts), but you need 56 sts (18.5 cm). Add the missing 2 sts when switching from knitting to elastic 2 ×2, yarn over evenly spaced 2. Rib 2×2 work another 4 cm, making colored stripes as on the collar.
5:2180 5:6Assembly
Sew the details of the sleeveless jacket and use a crochet hook to make a fringe on the collar from dark brown and terracotta yarn.


Clothes without seams

8:2


Clothes with a hood
10:1063 10:1066
11:2

It is knitted by adding and decreasing loops in the right places.
12:629Measuring the circumference of the neck
Bust
Waist
Leg circumference
The distance from the "collar" to the paws of the dog
Naturally, each dog has its own size.
12:928Calculate loops. The yarn is different.
We collect loops on knitting needles equal to the girth of the neck.
We knit a collar.
12:1125After the collar, we divide the knitting into three parts. It depends on where the fastener will be. If on the belly, then approximately 15 loops on the sides and everything else is the back.
12:1422The number of loops depends on the density of the yarn (threads)
We add in each 2nd row one loop to the center from the sidewalls.
So we knit to the paws. Before the start of the hole for the paws.
12:98 12:261Then these three parts are connected and knitted together. Approx 3 cm.
Then we begin to decrease the loops in the middle of the hole for the legs. Approximately two loops in every 4th row.
And so, until the end of knitting. I get 35-36 cm from the neck to the brace with an elastic band.
Well, the design, as a fantasy, will tell you!
It is tied with an elastic band with stocking knitting needles for armholes, straps.
You can make holes for tassels after knitting the collar and stretch the cord with tassels, etc.
For girls, I knit the belly to the end of the canvas, for boys it is better 8 cm from the armholes and close the loops. Continue the required distance only in the central part - the back. Everything is individual and needs to be measured. To sit nice!
12:1558 12:4Hood can be knitted as a heel to sock. Make it removable with buttons or ties.
12:175 12:182Knitted dog sweater
12:236 12:239


Here is the principle of knitting these sweaters and the basic pattern!
15:119We knit these sweaters from the collar. Calculate the number of loops for the gate. If it is high with a lapel, increase its length by 2 - 4 cm so that after stitching the product, the collar does not squeeze the neck. Also add loops for symmetry, for example, when sewing the edges of a collar knitted with an elastic band 1 × 1, 1 front and 1 wrong loop must be joined, otherwise the seam will be noticeable.
15:786 15:793So that the sweater can be worn over the collar and at the same time fasten the leash without any problems, make a hole in the collar for the collar ring. To do this, when knitting the penultimate row of the gate in the place where the middle of the back will be, close 3-5 loops in a row, and in the next row dial the same amount of air. When the collar is ready, divide the knitting into two unequal parts: 1/3 loops - the tummy, 2/3 loops - the back. They can be knitted at the same time from two balls or collect the loops of the tummy on a knitting pin and knit it later.
15:1773 15:6 
The depth of the armhole depends on the size of the dog.
16:670 16:675For small dogs(Yorkshire Terrier, Toy Terrier, Chihuahua) it is 1 - 1.5 cm,
16:833for medium(poodle, dachshund, jack russell terrier, white terrier) - 2 - 2.5 cm, for larger dogs- 3 cm or more.
16:1042 16:1047To find out the height of the armhole, measure the girth of the front leg, add 1 cm, calculate 1/2 of the girth and subtract from it twice the depth of the armhole. If you plan to trim the armholes with an elastic band, then increase their height and depth by 1 cm. After both parts of the sweater are ready, sew them: first, sew the shoulder seams (sewing the edges of the collar), and then the side seams.
16:1705For details on how to calculate loops for a sleeveless sweater, see the description of the sweater.
16:179 16:186Sleeveless dog sweater "Heart"
16:273There are two ways to reduce the width of the back:
1. Smoothly: knit 2 loops together along the edges of the back in every second front row;
2. Sharply: knit 2 loops together along the edges of the back of the fabric in each front row.
The edges of the back, knitted with front surface, wrap and spoil the appearance of the product. To prevent this from happening, by knitting the back to the length of the tummy, knit the first and last 3-4 loops with a garter stitch (that is, all rows of faces. p.).
16:1069With any pattern, the last 1.5 - 2 cm of the back is best knitted with an elastic band. Then the product will take on a finished look, and the back will not lift up. If there are voluminous braids in the pattern, then when switching to an elastic band, knit all braid loops 2 loops together
16:1511 16:6 
1 - 1/3 neck girth;
2 - 2/3 neck girth;
3 - the distance from the base of the neck to the front paw (this measurement is inaccurate and serves to calculate the approximate number of crochets along the edges of the parts);
4 - distance between the front paws + 2 cm (allowance for armholes);
5 - back width = (chest girth + 3 cm) - (distance between front legs + 2 cm);
6 - length of the tummy = distance from the base of the neck to the middle of the abdomen or to the hind leg);
7 - back length;
8 - the height of the armhole of the front paw girth increased by 1 cm (or by 2 cm if the girth is very small) - the depth of the armhole x 2;
9 - armhole depth = 1 - 3 cm (depending on the size of the dog). If you plan to trim the armhole with an elastic band, increase its height and depth by 1 cm.
If the distance from the base of the neck to the beginning of the front paw (measurement 3) is more than 3 cm, then the vertical distance from the collar to the beginning of the armhole (b) may not correspond to the value of measurement 3, since it goes along an oblique (a). That is, the actual number of rows will be less than the number that you get when calculating the loops on a regular sample of 10 × 10 cm. To make the correct calculation, knit the sample by knitting at the end of the front rows, or calculate the yarns approximately: if measure 3 is 3 cm, make 3 - 4 yarn overs, one from each edge of the front rows of the fabric, 4 cm - 5 yarn overs, 5 cm - 6 yarn overs, 6 cm - 7 yarn overs, 6.5 cm - 8 yarn overs.
17:1150 17:1157
Here is another version of knitted clothes for our kids!
the simplest thing you can think of.
18:168 
You will need:
100 g of brown melange yarn (50% wool, 50% acrylic, 280 m / 100 g), knitting needles No. 2.5, brown buttons (5 pcs.), Needle with a wide eye.
Knitting density:
gum 2 × 2 26 p. \u003d 10 cm, 28 p. = 10 cm,
garter stitch 25 p. = 10 cm.
Loop calculation
Take measurements from the dog and calculate the loops.
Length of the product- 25 cm.
Bust- 53 cm (137 p. - 1 p. for the symmetry of the gum 2 × 2 = 136 p.)
neck girth- 30 cm (78 p. + 2 cr. p. = 80 p.)
Distance from the base of the neck to the front paw- 7 cm (20 rubles)
Front leg circumference- 20 cm; 1/2 girth - 10 cm, 1/6 girth (armhole depth) = 3 cm (8 p.), Therefore, 136p. - (8 p. x 2) = 120 p.; 120 p. : 3 \u003d 40 p. (15 cm) the width of the tummy and each shelf
Armhole Height: 10 cm - 3 cm (armhole depth) = 7 cm (20 p.)
Plank (2 pcs.) - 25 cm = 62 p.


Work description
Cast on 136 sts and work 11 cm (30 p.) Rib 2x2. Then knit 40 sts (first shelf), close 8 sts (armhole), knit another 40 sts (tummy), close 8 sts again (armhole), knit the remaining 40 sts (second shelf).
Flip knitting and knit 40 p. of the second shelf, then take the thread from the second ball and knit the loops of the tummy, then with the thread from the third ball - the loops of the first shelf. Thus, knit 20 p. Then dial 8 air. n. over closed loops. Knit in a straight line 1 cm (3 p.). Then, in three steps, begin to decrease the loops: 136 p. - 80 p. = 56 p.; 56 p.: 3 \u003d 18 p. So, at a time you need to reduce 18 p.:
21:21611st row- with an elastic band 2 × 2, 2 p. Vm. every 7 p.;
2nd, 3rd, 4th rows- according to the drawing;
5th row- with an elastic band 2 × 2, 2 p. Vm. every 6 sts;
6th, 7th, 8th rows- according to the drawing;
9th row- with an elastic band 2 × 2, 2 p. Vm. every 5 sts
Knit the remaining 8 p. in a straight line and close the hinges. Cast on 62 sts for plank and work 2.5 cm in garter stitch. On the other bar, make five buttonholes at regular intervals. Sew the straps to the sweatshirt shelves. Sew buttons on one of the straps. Quilt the collar from the inside with rubber thread in 2-3 rows.
CHILDREN - DAX - a sweater for you!
21:1013(shortening the length of the back - we adjust to the size of your dog)
21:1134As a rule, it is difficult to calculate a sweater for a taxi. it has non-standard measurements….. the simplest calculation for you:


such a wonderful sweater - very comfortable to work with ... .. let's start.
23:650 23:655*So, to knit a dachshund sweater, we will need from 50 to 200 g of yarn (depending on the size of the dog), a set of stocking needles (5 pcs.) And circular knitting needles of 2 numbers, usually No. 3 and 3.5 or 4, depending on the thickness of the yarn.
23:1040* Measuring the circumference of the dog's neck in the place where a tightly worn collar is usually located and cast on the required number of loops on smaller needles. We close the knitting in a ring and knit the required number of rows around the neck (in this example, the neck is tied with a double elastic band)
23:1576 23:6
Next, we distribute the loops by trying on our neck on the dog. I took the same number of loops on the back and breast, 3 loops on the sleeves and 6 loops on the raglan lines (4 p. braids and 1 out. loop on the sides of it). I knit the sweater in stockinette stitch.
24:978 24:1239 24:1246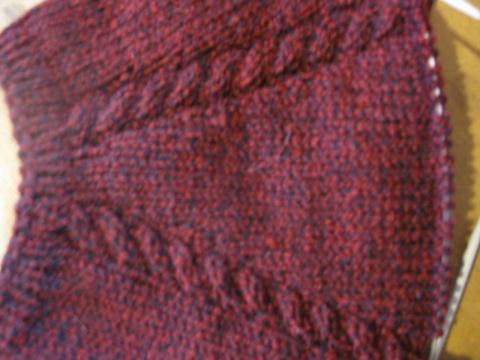
At the same time, we reduce the loops for the breast between the legs
25:121 25:128 
Then we remove the loops of the back and sleeves on knitting needles with a fishing line (you can use a strong thread) and knit the breast in straight and reverse rows
26:873 26:880
This is necessary for a good fit of the sweater, because the breast in taxi clothes should be much longer and more voluminous than the back, in the process of knitting the breast we add loops so that the breast and back come together around the elbows:
27:1784 27:6
We leave the loops of the sleeves on knitting needles with fishing line:
28:618 28:625
We combine the loops of the breast and back, knitting the extreme loops so that between the halves of the braid we get 1 out. loop and knit in a circle torso, if necessary, to the waist we reduce the extra loops of the tummy:
29:1513 29:6


something like that…….
32:36 32:43Romper for your baby
The model of the jumpsuit is very simple and knitted, one might say, by eye. Probably, this is even more justified, since each dog may have some of its own physique - the back is longer, the neck is shorter, etc. So just try on the finished product on your pet from time to time.
What do you need to work?
Initially, the jumpsuit was knitted for my small toy with a height of 24 cm, but in the end it sat well on dogs with a height of 22 cm and 26 cm.
Thread - mohair. I used the needles of the second number (No. 2), but you can also use the "five", then the product will turn out to be more airy. You should not be afraid that the holes will be too large, as they will be successfully closed with mohair fleece
.In addition, you will need a double hook, a centimeter, knitting pins to hold the loops, well, needles, scissors, and accessories for the finished product (lace, cord stops, buttons)
We take measurements.
The length of the product (CI), or the length of the overalls. Very easy to measure. with the collar on, the distance from the collar to the root of the dog's tail is measured.Neck volume (OS), here you don’t even have to torture your pet - just unfold and measure the collar that he usually uses.
Chest volume (OG) - measure the dog's chest starting immediately behind the front paws
It is better to look at the length of the sleeves after the main product is ready.
A little advice: it happens that it is very difficult to accurately measure the parameters of a pet, in this case you should not try to make additional centimeters - "so that it is not enough." The smartest thing in this case is to use an elastic band as the main knitting, it stretches and will allow you to smooth out inaccuracies in size.Main part
As always, we start by calculating the loops. We knit a sample with a width of 40-50 loops and calculate how many loops fit in 10 cm. In our case, thin mohair holds 36 loops in 10 cm. In this case, for a dog with a neck volume of 22 cm, we collect 79 loops to start knitting.
A little advice: after the start of wearing, any knitted product stretches slightly and starts to hang out, so you can cheat a little and dial 4-5 less loops for the main part.We scored loops - now we knit the neck. Do not pay too much attention to her - two or three centimeters is enough. of course, you can try to make a collar with a fold, but as a rule, it turns out to be very uncomfortable for the dog. After the neck is knitted, we add loops. It is better if they are paired - this will preserve the symmetry of the product.
The first row of additions
We make the first even row of addition in such a way as to get holes for pulling the future lace in it. To do this, before knitting the loop, we make a crochet under the thread, and after knitting the loop - over the thread. This business will be repeated approximately every 5 loops. It is only necessary to ensure that the number of holes obtained is even. It is important.
We knit the second odd row in accordance with the pattern - our usual elastic band.As for the second row of additions, it is done as follows: we make a crochet, and then we pull the thread from under the thread of the bottom row. For greater clarity, you can look at the photo, where the working thread is highlighted in red, and the thread forming the previous row is highlighted in blue. Then the next row again, as in the case of the first row of the addition, we knit in accordance with the pattern.
Calculating the number of loops to add is quite simple. See how many centimeters you have for the neck circumference, how many for the chest circumference - translate these parameters into loops and calculate the difference between them - get the number of loops that need to be added in two passes.
In order to ensure greater mobility of your dog, so that the jumpsuit does not pull in the chest area and it sits nicely, wedges should be knitted.
First, we divide the whole product into three parts and fasten the loops with pins.
We start with an even row, we knit it to the second pin and turning around, we knit the row in the opposite direction to the first pin, then we turn around again and knit the row to the end. We knit the odd row, as before - in accordance with the pattern. So you have to walk twice to get two wedges
The result of the work will be such a somewhat protruding partNow we take up knitting slots for the paws. As a central part, we leave a small section of the canvas in the amount of 10 + 2 loops (2 edge loops), and divide the remaining amount equally and leave it on the sides.
Now you need to know how long it will take to knit these three fabrics separately. To do this, we divide the desired length of the product by 3. For example, CI \u003d 24, and then 24: 3 \u003d 8 cm. That is, we need to knit 8 cm.
A little advice: to make the dog feel comfortable, it is better to add a couple more rows to the original 8 cm.
After the required number of rows is knitted, we connect all three strips again into one product.
After everything is connected - we knit again 8 cm, but now a single fabric - this part of the overalls will cover the dog's body to the hips. After these 8 cm are also knitted, we divide the entire fabric again into 3 parts, but now they should be equal to each other. We close the central part of the 3 available.
So, we knitted twice 8 cm each, we had one more segment of 8 cm left from the entire length of the body, equal to the 24th. So we knit two extreme open sidewalls for these 8 cm and also close the loops. But we do not cut the thread, we will need it.
Do not forget in the process of knitting from time to time to do a fitting, so as not to miscalculate. In our case, as you can see in the photo, the edges of the canvas do not converge slightly - this is not scary, on the contrary, it is better if the clothes sit slightly tight at first.
So, we knitted the main fabric and did not cut the thread. The thread is useful to us in order to tie the supporting loops to fix the overalls. The length of each row of air loops should be 8 cm and it is fixed at the opposite end of each individual sidewall. After they are still crocheted on top of this, they lengthen and become what we need them to be.
Here are the mini-braces we get in the end.
Now let's move on to the final step. If the edges of the canvas fit easily, without stretching, then you can leave them as they are, without crocheting them. If the torso of the jumpsuit is too narrow, you will have to build up the edge a little with crochet stitches.
Crocheting will also be required if the knitting is very loose - it will be difficult for us to sew fasteners-buttons on it.A little tip: to decorate a product for finishing and knitting sleeves, it is better to choose a contrasting color of threads - this way the product will stand out.
We knit sleeves from the cuts we have. The length of each slot is 8 cm, and the perimeter, respectively, is 16 cm. We collect the number of loops that will calmly lie in this perimeter and knit the required length of the sleeve (trying on the dog), gradually narrowing it down.
The length of the sleeve should not be large, as it will be difficult to put them on - it is enough to stop at 5 cm.If you wish, you can also knit sleeves for the hind legs - instead of fixation loops. In this case, they should be slightly longer than the front sleeves and the inner half should remain free!
Sew the sleeve to the finished jumpsuit
In the holes on the neck, which we had during the extra loops, you need to thread the lace. The lace should be 4-5 cm longer than the neck itself. First, melt the ends of the lace over the fire and fix one limiter.
Then we thread and fix the second limiter.
Now let's move on to the button mounts.
They are fairly easy to install and are a great option for dog clothing.
Well, our overalls are almost ready!
The only thing to remember is the reinforcement with an elastic band. Since mohair is easily stretched, this is highly desirable. A wide elastic band should be stretched along the neck and at the level of the dog's tummy so that the product does not stretch beyond measure.
Strengthened? and now we direct the marafet.Do you know what this torture instrument is? That's right, slicker. But to use this for growing hair on a living animal is not worth it. But for our experiment it will do - we comb the mohair to create the effect of increased fluffiness. It is better to do it from the wrong side.
Well, everything, you can dress our fashionista or fashionistas).
But there is another little secret, and it is the push-button mounts that help to create it. With their help, you can create a two-sided jumpsuit and you can wear it both with the fur side inward and with the fly side out.
Source: toychik.sitecity.ru

For such a dog sweater, you need to take 150g of the main color and 20g of additional colors, choose yarn with a yardage of 250m / 100g. Knit with circular and straight knitting needles No. 2.5, for stitching, take a special needle for knitwear.
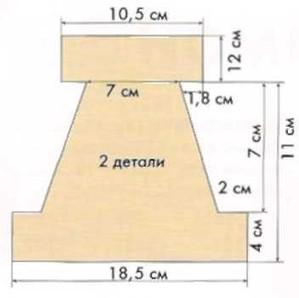
Loop calculation
The collar is tied with an elastic band 2x2, the tummy - with an elastic band 1x1, the back - with a facial surface with a pattern. Take your dog's measurements. According to the knitting pattern, calculate the loops.
Neck girth - 32 cm (102 p. + 2 cr. p. \u003d 104 p.)
Bust + 3 cm loose fit = 53 cm
Distance between front paws + 2 cm (allowance for armholes) = 17 cm (51 p.)
Back width: 53 cm - 17 cm = 36 cm (86 p.). Write down all the calculations on the diagram, then it will immediately become clear where and how many loops need to be added.
Write the number of gate loops in the center of the oval, the back loops at the top, and the tummy at the bottom.
The distance from the base of the neck to the front paw is 4 cm (12 p.). So, on this knitting interval, you can make 5 times one crochet from each edge of all faces. rr. back and abdomen. Put "+5" on the diagram. Now divide the number of gate loops by 3 (1/3 neck girth): 104 p.: 3 \u003d 34 p., 2 rest. n. add to the tummy; 34 p. x 2 (2/3 neck circumference) = 68 p. (back); 34 p. + 2 rest. p. \u003d 36 p. (tummy). Write these values in the diagram above and below the gate oval.
Make a calculation
Back - 68 p. + (5 yarns x 2) = 78 p., and you need 86 p. Therefore, 86 p. - 78 p. = 8 p. You need to add when knitting from the gate to the back (making yarn over at regular intervals ).
Tummy \u003d 36 p. + 5 yarn over x 2 \u003d 46 p., And you need 51 p.; 51 p. - 46 p. = 5 p. must be added when knitting from the collar to the tummy. Write these values on the diagram in brackets next to the previous numbers.
Front leg girth + 1 cm = 17 cm.
Armholes: depth for medium-sized dogs - 2 cm + 1 cm per edging = 3 cm (7 p.), Armhole height = 1/2 of the circumference of the front paw - armhole depth x 2, i.e. 17cm: 2 - 2cm x 2 - 4.5 cm + 1 cm for the edging = 5.5 cm (17 p.)
Back/tummy
Cast on 104 sts with yellow thread and work 11 cm in 2x2 rib. Then divide the knitting into two parts: tummy - 36 p., Back - 68 p. - and knit simultaneously from two balls:
1st row - tummy: 1 cr. p., 34 persons. yarn over every 6 sts (5 times), 1 cr. P.; back: 1 cr. p., 66 persons. yarn over every 8 sts (8 times), 1 cr. P.;
2nd row - back: 76 out; tummy: 1 cr. p., 39 p. with an elastic band 1x1, 1 cr. P.;
3rd row - tummy: 1 cr. n., nakid, 39 p. with an elastic band 1x1, nakid, 1 cr. P.; back: 1 cr. p., nakid, 74 persons., nakid, 1 cr. P.;
4, 6, 8, 10, 12th rows - according to the drawing;
5th, 7th, 9th, 11th rows - yarn over from each edge of the back and tummy.
Then make armholes:
13th row - tummy: close 7 p., 44 p. according to the figure; back: 7 p. close, 79 faces .;
14th row - back: close 7 p., 72 out.; tummy: close 7 p., 37 p. according to the drawing, that is, with an elastic band 1x1.
Knit 5.5 cm (17 rows) in a straight line, making a “Little Hearts” chain on the back with dark blue, white and red yarn and close the armholes. R.:
32nd row - back: 72 out., 7 air. P.; tummy: 37 p. with an elastic band 1x1, 7 air. P.;
33rd row - tummy: 44 sts with an elastic band 1x1.7 air. P.; back: 79 persons, 7 air. n. Next, knit both parts in a straight line. In the center of the back, with a red thread, make a Big Heart pattern.
Having knitted the tummy to a length of 18 cm from the collar, close the loops. Knit the back for another 2 cm, then reduce the loops, knitting 2 cm each. along the edges of every second person. R. Don't forget to repeat the "Little Hearts" chain. The first and last 3 - 4 p. of each p. knit faces. pp. When the back measures 36 cm, cast off all sts by working the last 1.5 cm in 1x1 ribbing. Fasten the ends of the colored threads from the inside and iron the back with an iron through a damp cloth. With a dark blue thread, embroider the outline of a large heart with a stalk stitch. Sew shoulder seams.
Sleeves
Dial pp. along the edge of the armhole and knit 5 p. rubber band 1x1. Since cr. sts are longer than usual, then every 2-3 sts dialed, double crochet. In the next r. knit yarn over with a crossed loop. Then the elastic will not tighten the fabric much. You can knit the edging separately in the form of a strip, along the length equal to the circumference of the armhole and 1-2 cm wide, and then sew it to the armhole with the edge along which the loops were closed.
Assembly
Sew the side seams. Quilt the collar from the inside with rubber thread.


Knitting clothes for dogs is not as difficult as you thought, right? Especially if you know how to take measurements correctly and make a pattern, although primitive, but still).
For this jumpsuit, stock up on half-woolen yarn, if you want to add decorativeness to the product, then take grass for tying yarn. Knit the product with knitting needles, tie it with a crochet.
taking measurements.
The first measurement is the length of the jumpsuit. You know how to take this measurement: you need to put a collar on the dog so that it is loose on it, and measure the length of the back from the collar to the root of the tail.
The second measure is the volume of the neck. You can measure by unfolding and measuring the collar that you usually put on your dog.
The third measure is the volume of the chest. Measured behind the elbows.
The fourth measurement is the length of the hood. The distance from the occiput to the withers is measured. You can add 1-2 cm in order to be freer and more beautiful.
As always, first we knit a sample of 22 loops and see how many centimeters the canvas turned out. We calculate by the second measure how many loops you need to dial. I took orange “grass” for one of the options, I got 46 loops plus two edge loops, i.e. 48 loops.
We knit these 48 loops according to the fourth measurement, so that we get a rectangle. Happened? So the hood is almost ready.
Now we make holes for the ribbon. You already know this, of course, but I'll repeat it anyway. We need to get an even number of holes, so we divide our 46 loops (I don’t take into account the edge ones) by the number of holes (8 pieces) and we get six loops. Now we will knit two loops from the edge and make a crochet, then knit two loops together. So, it turns out: yarn over, two loops together, four according to the yarn pattern, two together, four according to the pattern. And so on to the end of the row. In order for the holes to become holes, you need to knit the next row according to the pattern, and to make the result more pronounced, knit two more rows before you start dividing the fabric and adding loops to form the body.
There are holes, but we need to make wedges on both sides so that the jumpsuit sits on the dog most comfortably. We knit the wedges from the edge, as it suits you. I knitted 14 loops, returned to the edge, then 8 loops - returned to the edge, then 17 loops, returned to the edge, and knitted a full row. On the other hand, I repeated everything. Wedges are ready!
Here we come to the third measure. Using simple calculations, you will determine how many centimeters your dog's chest is larger than his neck. A couple more finger poke into the calculator - and you will find out how many loops you need to add to get the desired width of the canvas.
Since our jumpsuit is with a hood, we will fasten it not on the back, but on the dog's chest. therefore, we will need to divide the canvas into three parts, but not the same as in the "chameleon". First of all, we will form the chest strips, on which there will be a fastener. Before knitting, decide what type of fastener you will use: buttons, Velcro or plastic buttons on a knitted tape.
Buttons have many advantages: comfortable, familiar, easy enough to fasten, you can match the color of any thread, and if the buttons are beautiful and contrast with the color of the thread, they can decorate the product.
To knit that warm clothes for a dog, you need no more than 150g of yarn, and you can use multi-colored leftovers, which will allow you to form a beautiful striped pattern).
Patterns, unfortunately, no, but there is a very detailed description.Start knitting from the neck. Cast on 63 sts and work 3 cm in 1x1 ribbing (use thinner needles to keep the rib from stretching). Next, knit with front stitch, in each front row, evenly adding 6 sts - a total of 5 times. Then knit straight. After 12 cm from the start of work, start knitting panties for the front paws: knit 19 stitches and remove them on a pin.
Cast on 10 new sts from the new ball, work the next 19 sts and cast on 9 new sts. These 38 sts are the beginning of one leg, work in stockinette stitch for 6 cm. Then 3 rows in 1x1 rib. Close the loops. Put on the first 19 sts from the pin on the right knitting needle and cast on 19 new sts from the new ball - this is the base for the 1st leg. Then knit 17 sts from the left needle. From another ball, dial 10 new points and knit the second leg from these 38 points. Cast on 19 sts for the base of the 2nd leg from the ball, which knit the middle 17 sts, and knit the remaining 19 sts on the left needle. Knit 9 cm straight, then evenly decrease: in 1 - 3 rows - 4 sts each, in 4 and 5 - 5 p.
71 sts left. Knit straight for 24 cm, and in the next front row add 10 sts evenly. Then knit panties for the hind legs. For this in persons. rows, start knitting in short rows: knit 32 sts, 31, 30, 29 in sequence. From the new ball, knit the same loops from the other edge of the part. After that, knit all 81 sts for 4 rows. Next, knit 32 sts, close the next 17 sts and knit the remaining 32 sts. One side of the part: * knit in short rows - from 32 sts, knit 27, 26, 25, 24 in sequence. In the next row of 32 sts Knit the first 16 sts in rib 1x1 - 2.5 cm (the rest of the loops remain on the left needle) and close them.
For the trouser leg, cast on 13 sts from the new ball, knit 16 sts from the left needle with the same thread and cast on 13 more sts. With the resulting 42 sts, knit 7 cm, knit the last 3 rows with an elastic band 1x1 and close the loops. Knit the second leg in the same way, starting with the * sign).
Tie a bar 5 cm wide and 45 cm long. Sew this bar to one of the halves of the back - it will not allow the back to stretch. Sew 7 pieces of adhesive fastener tape to this bar in the appropriate places to the other half of the back. Sew the sides of the front legs and sew the loose parts into the armholes. Sew along the sides of the back legs and sew on the edge of the elastic that runs along the back edge of the overalls.
OVERALLS FOR GROUND GROUND
You will need: remnants of yarn of different colors - only about 150 g; knitting needles number 2.5.
Weave: facial surface; rubber band 2x2; rubber band 1x1.
BREAST. Type 35 sts on the needles. Knit 6 rows with a 1x1 elastic band, and do not knit the purl loops, but reshoot. Then knit 22 rows and start knitting the armhole. To do this, close 3 sts on each side, then 4 times 1 st. After knitting 23 rows, add 1 st on each side, knit 8 more rows, add 1 more st and knit 6 more rows.
Next, close on each side 1 p. In each 2nd row - a total of 5 times. Then cast off 6 sts for the neck and 2 sts on each side, 4 times 1 st, while closing the shoulder loops - 1 in each row.
BACK. Knit from the line AB, first the top, then the bottom. Cast on 35 sts and work in stockinette stitch. After knitting 22 rows, knit the armhole in the same way as on the breast. From the beginning of the armhole, knit 23 rows and start knitting the neck: close 6 sts, then on each side 2 times 2 sts and 8 times 1 st in each 2nd row. Close the shoulder loops in the same way as on the chest. On the AB line, again type loops on the knitting needles and knit down 22 rows. Then expand the bottom edge, adding 1 st on each side in each row - a total of 11 times. Having knitted 34 rows from the AB line, start knitting the legs for the hind legs. To do this, close 7 sts in the upper part of the back, and then close 1 st 10 times in each row. In addition, from the beginning of knitting the legs, knit in short rows. To do this, knit the first 11 sts in the upper part and go back, and knit the next row completely to the end. Thus, in total, from the beginning of knitting the leg, you will knit 25 full rows. Then work 35 rows in 2 x 2 Rib. Knit 3 sts from each st - this will be the beginning of the frill. After knitting 6 rows, close the loops with contrasting yarn. Knit the second leg in the same way.
ASSEMBLY. Sew shoulder and side seams. For the neckline, cast on 60 sts, work 6 rows in 2 x 2 Rib. Then work 3 sts from each st for frill and work 6 more rows. Loops close with contrasting yarn.
FRONT PANTS. Cast on 46 sts and work rib for 55 rows. Then knit the same frill as on the neckline and back legs. On the back, sew on the edges of the adhesive tape for fastening. The frill on the legs and neck can be collected on a hat elastic.


What size is this jumpsuit, you ask? But I won’t say, because I don’t know myself) Focus on a standard yacht terrier of medium height, I think ... about 40cm in height and the same length.
Don't worry if the sweater looks small when you're done, it will stretch after a couple of walks.
For knitting, you will need about 150g of yarn of your favorite color, stocking and circular knitting needles, and a hook.
Not all dogs tolerate cold and wet weather well, many of the pets are at risk of catching a cold and getting sick. Especially often owners of small dogs of decorative breeds face such problems. Therefore, it is very important to dress your pet according to the weather. In this material, we knit clothes for any breed and size of dogs with our own hands using master classes with diagrams and photos.
Clothes for pets can be crocheted and knitted. Things crocheted with tight knitting are warm enough and keep their shape perfectly. If you knit with knitting needles, the clothes will be more elastic, but also looser.
We knit clothes for dogs with our own hands in step-by-step lessons
Symbols in the diagrams:- in / p - air loop
- st / s / n - double crochet
- st / b / n - single crochet
- connection / st - connecting column (half-column without crochet)
- p. - loop
Such a sweater is very easy to knit with your own hands, it is easy to put on and fastens with a button on the neck of the strap on the stomach.
For work you will need:- Basic yarn: about 200-250 g for a small dog.
- A small amount of yarn in a contrasting shade for edging.
- Hook number 6 or 6.5.
- Large button approximately 2.5 cm in diameter.
If the dog is large, you can change the size of the sweater by adding rows (1 row of s/b/n is approximately equal to 8mm). You can also reduce the size. Be sure to try on the sweater as you go!
Knit sweater collar.We collect 23 in / p, 1st row we knit st / b / n from the 2nd loop from the hook. At the end of the row in / p and the transition to the 2nd row. Until the 50th row, inclusive, we continue to knit st / b / n. Then st / b / n behind the back wall, v / p, at the end the thread is not fixed.
Leaving the hook in the last loop, we combine the first and last rows with half columns. Thus we connect all the rows, closing the collar. At the end of 2 v / n, we do not fasten the thread.
We knit the main part of the sweater.We knit 48 st / s / n along the rim of the collar, leave the remaining columns of the collar free. We knit 2 v / p lifting and move on to the next row. Up to 22 rows, we continue to knit in the same way st / s / n. Here, if necessary, you can add rows, increasing the size. In the next row, we make a decrease to the required value, knitting st / s / n through one loop. We knit a few more rows and fasten the thread.
We knit a sweater strap.We knit from the end of the 15th row from the gate along the edge of the product 13 st / s / n. Each next row we start with 2 v / n lifting. Starting from the 21st row, we make a hole for the button, skipping st / s / n and knitting in / p. It is better to make 2 holes. In the last row we knit st / s / n without gaps.
We knit the finishing row along the edge of the product, including the untied part of the collar.
At the level of the 15th row from the collar, sew on a button.
We make a stylish knitted suit for dogs of any breed
The suit will be useful for small dogs in winter, so as not to lower hypothermia and frostbite.
A large collar can be added as desired by tying it with knitting needles.
Here is a universal pattern that is suitable for a pet of any breed. The main thing is to decide on the size. To do this, you need to carefully measure the length of the dog's back, then divide the resulting figure by 8. You need to measure from the collar to the tail. This will be the length of the side of the square along which you need to draw a pattern, as in the photo:

For a length of 31 cm, you need about 150 g of yarn, knit with a double thread crochet No. 3.
We start knitting st / w / n with a collar of the required height. We leave the third part for the chest and then we knit the back with double crochets with a “braid” pattern or another dense pattern. The patterns for this pattern look like this:

Then we crochet the breast. In the course of knitting all the elements, you need to apply the product to the pattern.

Next, we knit the sleeves. It is better to knit an elastic band with knitting needles, so it will be more elastic. It is not necessary to knit a collar-collar, but it is desirable, since the pet's ears are also very sensitive to cold. You can also knit a lining to a fur coat, if necessary.
How to knit a blanket and takes for a dog in a master class

We knit in multi-colored stripes, alternating 2 rows of each color (orange, blue and light blue).
We collect 42 v / p with blue yarn and knit st / b / n 24 cm, changing the color of the threads. Close the middle 15 sts and knit both parts separately for another 34 cm, then close.
We collect loops along the neck and knit st / b / n 6 cm. On the sides of the blankets at a distance of 11 cm from the start of work, dial 10 p. And tie strips 10 cm long with a blue thread of st / b / n. .
We make a multi-colored fringe around the perimeter of the blanket.
We tie the collar and fasteners with a “crustaceous step” with blue yarn. Along the edges of the blanket at the base of the collar, tie ties from 35 v / p.
Beretka: With a blue thread we knit a chain of 4 v / p., close it in a circle and knit in a circle of st / b / n, alternating colors (strip width - 3 rows) and adding 8 p in each row. After 12 rows, start decreasing .
After 4 rows, we close all the loops, we tie the edge with a “crustacean step”. We sew a pompom to the beret.
Video on the topic of the article
For those who want to learn more about knitting for pets and get new original ideas, we have prepared a selection of video master classes: