Home slippers knitted. Determining the size of the product. Slippers with "Merezhko" pattern: video master class
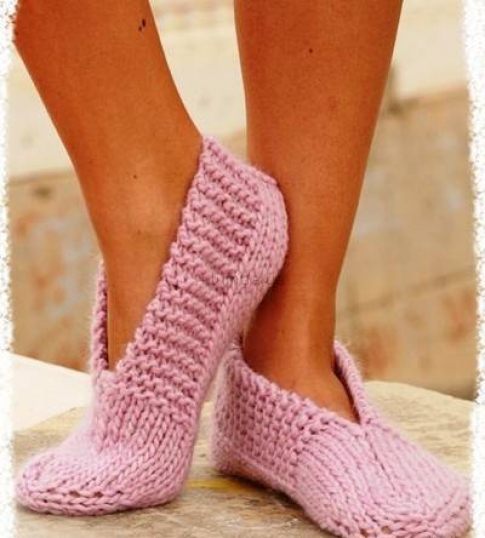
Agree, slippers are one of the most comfortable and comfortable inventions of mankind! It is especially pleasant if you made your own soft and warm home shoes. For example, knitting slippers with knitting needles will take you no more than a couple of hours and will help you to relax after a hard day at work.
Knitting slippers for beginners
It is not at all necessary to search for complex schemes on the Internet to make sneakers for the first time! To some extent, knitting slippers is similar to knitting socks with knitting needles - here again you need the size of the leg and its length in centimeters, in some cases the ankle girth.
If you have not yet learned how to knit even hosiery, do not be discouraged! In Japan, there is a kind of slippers that can be made even by those who are just learning to knit basic types of loops!
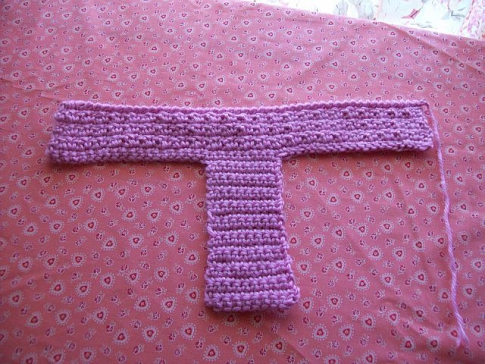
- Choose an arbitrary type of loops that is convenient for you to work with, and knit a T-shaped blank with it. The product should have the following parameters: the length of the lower rectangle to the junction with the upper one should be equal to the size of your foot, and its width should be equal to the width of the foot in the most voluminous place. The upper, horizontal rectangle should have the same width, but its length should be folded as follows: the length of the foot, multiplied by two, plus the width.
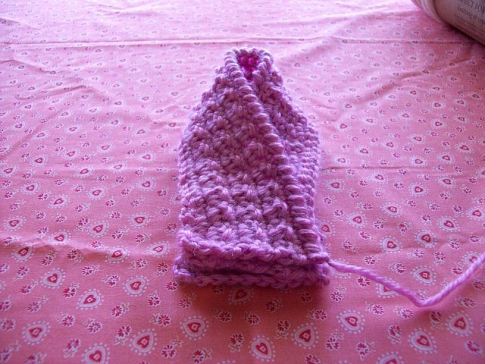
- Fold one of the sides of the upper rectangle towards the lower so that their long and short sides touch each other.

- Similarly, connect the second side of the long rectangle to the base.
- Basting the pieces together in the same position as you left them. Sew around the edge using a sewing machine or regular needle and thread and turn inside out.
- You can skip the previous step if you know how to knit a joining seam. Then you just need to fasten the parts in this way.
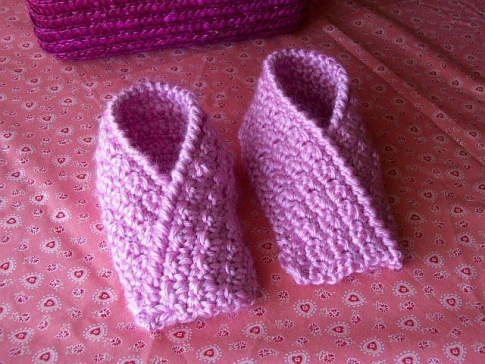
Slippers were nicknamed Japanese, not only because they were invented and worn with pleasure in the Land of the Rising Sun - they are a bit like the top of a wrapped kimono.
The products look best on the miniature children's feet of babies up to five years old, but you can safely use such knitting of slippers for any foot size, insulating the whole family in one fell swoop!
To decorate slippers, you can use several different types of knitting - for example, knit the middle rows in a horizontal rectangle with a pigtail. This will make it interesting to arrange the side part of the work.
Step-by-step patterns for knitting slippers
If you liked the previous version of working on home shoes, this master class will definitely not leave you indifferent! The principle of operation is similar - you will need to knit a solid canvas of a certain shape, and then simply sew its individual parts together, forming slippers.
The beauty is that the shoe blank has a very interesting initial shape, when folded, you will get an original warm product exactly according to your foot.

This master class shows how to knit slippers on two knitting needles for size thirty-seven - if your foot is less or more than this figure, calculate the amount of yarn and elements in the rows that suits you.
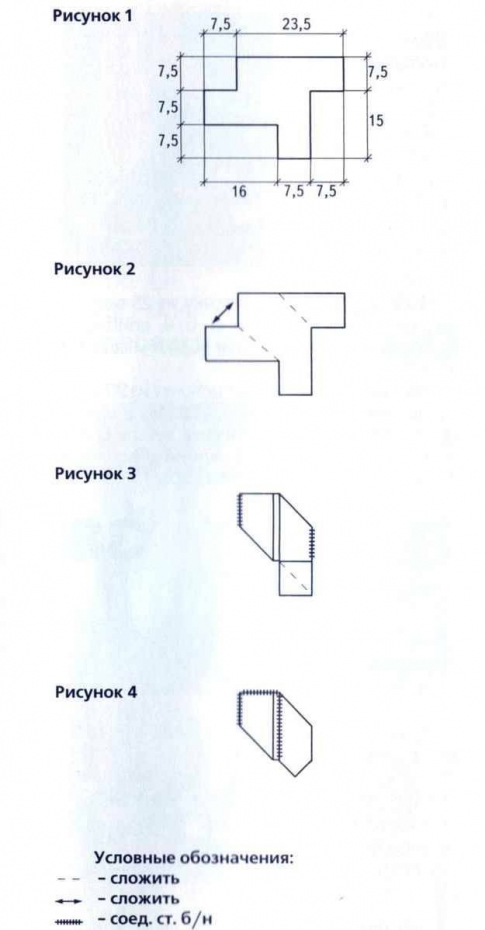
- Knit a canvas of the same shape and size as shown in the image. Take the following figures as a basis for calculations: knitting in the lesson was performed with ordinary yarn of 250 m / 100 g, consisting of wool and acrylic in a one-to-one ratio. A distance of seven and a half centimeters equals approximately seventeen loops.
- Using the symbols of the diagram, fold the required sides of the workpiece with each other - the dotted lines indicate the place of the fold, the arrows indicate the sides that need to be connected.
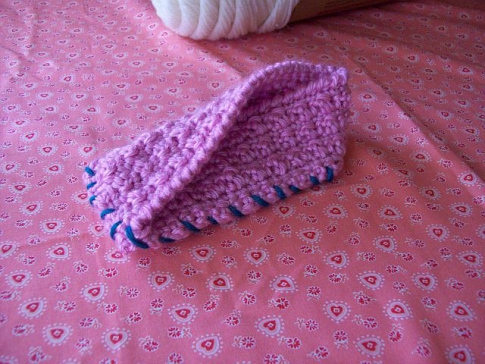
- Perform the connecting knit "crustacean step" - the line with strokes indicates the places that need to be sewn together.
To decorate the products, the connecting seam can be made with a contrasting yarn color to the body of the slippers. Due to the simplicity of execution knitting slippers in this way, you can practice with small children - they will like to watch how a nice pair of home shoes is gradually formed from an intricate figure, which they will definitely want to wear.
How to knit footprints?
Footprints are interesting products that can be considered a cross between slippers and socks. The fact is that slippers most often have a solid sole, and footprints are more like tight low ankle socks with an open top.
Many people prefer footprints to standard indoor shoes because of their softness and warmth. Knitting of slippers can be done in just a couple of hours, preparing a pleasant surprise for yourself or a good gift for loved ones in one evening. Products from the lesson are suitable for those with 37-39 foot sizes.
- Cast on forty-one stitches.
- You need to start knitting like this: make twenty knit stitches, mark the middle one with yarns on both sides, finish the remaining twenty knit stitches with knit stitches.
- Remember to knit all odd rows in the wrong way.
- The third row needs to be done like this: twenty front, yarn, one front, yarn, one front, yarn, one front, yarn, twenty front. That is, you need to add along the loop.
- In all the following purl rows, yarns need to be knitted behind the back walls before and after twenty front loops to get an openwork pattern with slots.
- In the fifth row, make twenty facial, fasten with a yarn, two facial, yarn, one front, yarn. Two facial, yarn, twenty facial. In the next rows, in this way, you will need to add one more loop each, forming three front loops instead of two in the seventh row, and four in the ninth.
The more additions you make, the longer the toe will be. After knitting it, you need to move on to creating the soles of slippers-footprints.
- Work six rows of garter stitch without adding elements.
- Only knit the middle nine to ten stitches, gradually decreasing them until you have only nine to ten stitches left on the knitting needles.
- Raise the loops on the sides of the slippers. Start knitting by removing the stitches again until you have about a dozen left.
- When you are done with the side loops and you have about ten loose loops left, just close them.
Your tracks are ready! Depending on what color of yarn you have chosen, the product can be left as it is. If desired, embellish the front or sides of the slippers with ribbons, cross stitches or beads.
A simple video tutorial will help you to thoroughly understand what it is - knitting slippers-footprints, and how to do it.
Knitted slippers keep warm well and will be a great addition to your home clothes in the cold season. They can be easily made by hand. This work will not take a lot of your time and effort. Such easy-to-make slippers can be imposed on your loved ones for any holiday, for example, for the New Year. Seeing the smile on their faces makes you want to make such gifts over and over again.
In this article, you will be presented with slippers knitted independently on two knitting needles, and we will analyze them with diagrams and descriptions. This technique is easy to master, so you only need a little patience and perseverance.
Knitting slippers on two knitting needles for beginners with diagrams and descriptions
Let's look at this technique with an example. Such cute slippers do not mind trying on any girl or woman.
We will knit on two knitting needles # 4, starting from the sole.
The diagram is shown for a foot size of 23 cm along the length of the insole.
Knitting density: 20 stitches in 20 rows.
We start with the sole. Cast on 26 stitches.
1 row: we knit all the loops with the front ones, adding one loop at the beginning and at the end. A total of 28 loops.
Row 2: knit with knit stitches.
Rows 3-16: Repeat Rows 1 and 2 (42 sts).
17 row: knit with the front loops, adding at the beginning and at the end 2 loops together with the front loops. A total of 40 loops.
Row 18: knit with knit stitches.
Rows 19-32: Repeat rows 17-18 (26 sts). 
Let's go to the top.
33 row: cast on 8 loops (for the heel) and knit (34 loops).
34 row: knit with front loops, at the end add one loop. 35 stitches in total.
35 row: knit with front loops.
Rows 36-48: Repeat Rows 34-35 (42 sts).
49 row: close with 24 loops, end the row with front loops (18 loops).
Row 50: Knit with knit stitches.
51 row: knit with purl loops.
Rows 52-56: Repeat Rows 50-51 (18 sts).
Row 57: cast on 24 loops and knit. 42 loops in total.
Row 58: knit with front loops, at the end we knit 2 loops together. There are 41 stitches in total.
Row 59: Knit with knit stitches.
Rows 60-73: Repeat Rows 58-59 (34 sts).
After that, we close all the loops, leaving a long thread.
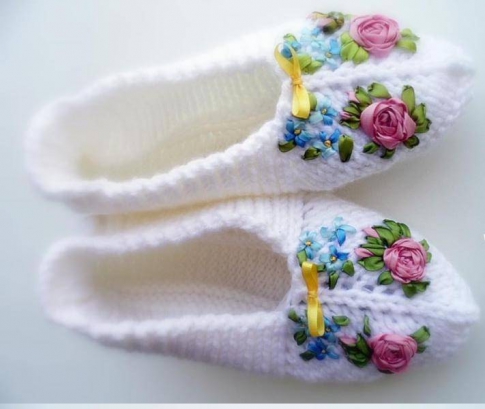
 That's all, it remains only to sew and your slippers will be ready. Decorate them as you like, for example with crocheted flowers.
We present to your attention another scheme that describes in detail how to knit slippers on two knitting needles:
The second version of an interesting product with your own hands
A very simple pattern for knitting such cute footprints:

It is best to use a medium thick wool buckle.
Cast on 30 stitches.
Rows 1-6: Knit with knit stitches.
Rows 7-22: front stitch (odd rows are knitted with front loops, even rows - with purl).
Rows 23-41: knit the heel. Knit 19, knit 20 and 21 together, turn the work over. We knit 9 purl loops, and 10 and 11 together with purl, turn over again, knit 9 front loops, 10 and 11 together front. So we continue, alternating rows 24 and 25, until 10 loops remain on the knitting needle.
42 row: we collect 10 loops from the braids of the side of the heel, turn the work.
43 row: we knit 10 front loops, then we collect 10 more loops from the other side of the heel. Only 30.
Rows 44-74: Knit with front stitch.
75 row: we begin control (7 knit, 3 together knit, 10 knit, 3 together knit, 7 knit).
76 row: knit with purl loops.
77 row: 6 knit, 3 together knit, 8 knit, 3 together knit, 6 knit.
78 row: purl loops.
79 row: 5 knit, 3 together knit, 6 knit, 3 together knit, 5 knit.
Row 80: purl loops.
81 row: 4 knit, 3 together knit, 4 knit, 3 together knit, 4 knit.
82 row: purl loops.
Row 83: K3, K3, K2, K3, K3.
84 row: purl 9 and knit the 10th from the pigtails (in total, we collect 18 loops from the braids on each side).
85 row: 4 knit, 3 together knit, 3 knit and 4th from the braid.
86 row: we knit in the same way as 84 row.
Row 87: Same as Row 85.
Repeat rows 84 and 85 until all the braids are closed. Close the remaining 9 stitches.
Related Videos Articles for Beginners
For a visual representation of the knitting process, it is best to watch a video. You can knit right away with the master.
Slippers
Slippers on 2 needles
The simplest footprints
2-spoke tracks
Two-color footprints
Beautiful and cute home slippers will decorate any home. Meanwhile, you can make such a charm yourself. All you need to create your own little masterpiece is threads and a hook (or knitting needles). In addition, the person should know the rules of crocheting for beginners. To do it yourself, very dense threads are used.
Some stores even have an indication on skeins that they are used to knit slippers. For a novice needlewoman, puzzled by the question of how, it is best to master it with a specific example.
Beautiful and interesting sneakers will fit perfectly on the leg and will delight the eye. However, initially the leg is measured in height and width, and according to the measurements, a pattern is made. To understand how to calculate a pattern and make it, take a look at the photo below.
Pattern of slippers
Suppose a person makes slippers as a gift, and he cannot try on the donee's leg, then a sign will help.
 size table
Crocheting slippers on your own is easy, usually even inexperienced craftswomen can do it. When all the necessary blanks are made, selected, we proceed to the execution of the sneaker.
- We do the heel first. We collect loops in the amount that is needed.
- We look at the patterns to clarify their number and density.
- After that we crochet single crochet.
- Add one loop on each side until the heel is finished.
- Next, we will make the canvas to the middle of the foot and again add one loop from the beginning, and then at the end of the row.
- We knit our fabric to the end of the little finger.
- After we do this, we subtract from both sides in an even manner with about 3 or four loops.
Now we create the upper part of the slippers step by step.
- We make it from the bottom up, making subtractions.
- We collect as many loops as necessary.
- We knit single crochet, and in the middle we subtract every 3 rows.
- We continue our knitting until we have made the height we need.
- It remains to assemble the product. We connect the sole and the upper part.
- And at the edges we knit connecting posts.
- When we made the slippers, we knit the second one.
- If you are crocheting slippers for the first time with your own hands, you can first use one color. But then you can make multi-colored - from two or 3 tones.
- At the end of knitting, we decorate our slippers with pompoms either.
You should get such cute slippers:

Slipper squares are used as part of the motif. You can make other things with the same squares - for example, a scarf, and more. Now let's move on to the example for the slippers.
 DIY square slippers
Do not forget about the pattern for the slippers - it must be done. Then we knit motives, while choosing simple patterns for knitting sneakers for beginners, or you can use the one presented below.

Knitting pattern for slippers
Such a knitting square is called grandmother's. To create it, create a chain of 4 loops, make a circle. The beginning of the row consists of three lifting loops, and at the end there must be a connecting post. Further, at the beginning it knits less than in the next arc.
Perhaps you do not quite understand how to crochet slippers with such squares. Experienced knitters advise trying to make 1 square for the pattern. Then it will be easier for you to navigate.
- The first row consists of 11 double crochets, which are tied into a ring.
- In the second row, knit two double crochets in each previous column. These two posts are connected to the following air loops (one piece).
- The third row is done this way. The previous row had air loops. Of them, 3 double crochets are made, which are connected to the next three columns with air loops - once 3 pieces, and 2 times one at a time.
- We make the 4th row. Our instructions will help you. We knit 3 air arcs from the third row like this: two double crochets, then 1 air loop, then one double crochet, again one air loop, and end with two double crochets. These arcs are connected by 1 air loop. An arc was made from one air loop. We knit three columns from it and connect with the next 1 air loop.
- The fifth row will be our last. In an arc consisting of two air loops, you need to knit 3 double crochets, connect 1 time with 3 air loops. The second time we connect one air loop with the column that comes next. In an arc, consisting of one air loops, we knit 3 columns with a crochet. We connect with the next 1 air loops.
This pattern for crocheting slippers for beginners helps to create a solid square or multi-colored. Slippers are combined as follows: connecting posts. Combine 4 squares, one large square is obtained, which I unfold in the shape of a rhombus. Another one of the same is applied to the edge of the lower corner, sewn together, the heel is sewn to the sole.
Then the side triangle and heels are divided into three parts. We sew all adjacent parts. When our sneakers are ready, we tie them on top with half-columns in the amount of 1 row.
To sew such slippers without a single seam, first we knit the sole according to the pattern that can be seen below. And our master class and tailoring will come to your aid.

Seamless slippers
We collect 23 air loops, in each row there are 3 air loops at the beginning. They are needed in order to raise the row, so they are left.
Knitting pattern without seam slippers for beginners:

Knitting pattern for seamless slippers
- 1 row. We knit two double crochet, then one st.s / n. Having reached the end of the chain, we knit 4 columns in the last loop. We knit a circle on the other side of the chain - 1 half-column in each loop, then you need to knit three columns with a crochet into the very first loop.
- 2 row. 3 lifting loop - to create 3 double crochets. Then in a circle we knit 15 columns with a crochet in each loop, another 20 half-columns, then 14 columns with a crochet, and between the loops two columns with a crochet.
Now we need to make up. Pull 3 air loops from the heel half-column. We break off the thread. We knit the first row with 56 double crochets. The second row is in this way: first there are three columns with a crochet and two columns made from one loop, 5 columns and 2 more also from one loop. Next 12 columns.
We skip one loop, make a rapport: two columns with a crochet from 2 knitted together, two loops with a crochet 2 times, we knit two loops together, from them we make a column with a crochet. Then we make 2 loops together in one column and two more columns, make a report, and knit 10 double crochet columns.
The third column consists of 26 double crochets, with two columns from one loop, then one double crochet. repeat 5 times and finish with 10 double crochets.
The fourth row is almost like 3, only 25 columns. Similarly, 2 columns from one loop and two columns with a crochet. Continue 6 times, then make 8 double crochets.
And finally, the fifth row, consisting of columns with a crochet, with which the slippers are tied.
We hope you figured out how to crochet slippers without a seam with your own hands. To decorate the edge of the sole, a crustacean step is used, and then we create a second slipper. Our beautiful slippers for beginners can be additionally decorated with embroidery or beads.
There are a lot of different models that you can make yourself with a hook and thread: flip flops, shoes, sneakers, in the form of some toys. To make such a pleasant surprise yourself, you just need patience, imagination and a little free time. You can also additionally watch the video instructions for children's slippers and products on the soles:
Knitted slippers keep warm well and will be a great addition to your home clothes in the cold season. They can be easily made by hand. This work will not take a lot of your time and effort. Such easy-to-make slippers can be imposed on your loved ones for any holiday, for example, for the New Year. Seeing the smile on their faces makes you want to make such gifts over and over again.
In this article, you will be presented with slippers knitted independently on two knitting needles, and we will analyze them with diagrams and descriptions. This technique is easy to master, so you only need a little patience and perseverance.
Knitting slippers on two knitting needles for beginners with diagrams and descriptions
Let's look at this technique with an example. Such cute slippers do not mind trying on any girl or woman.
We will knit on two knitting needles # 4, starting from the sole.
The diagram is shown for a foot size of 23 cm along the length of the insole.
Knitting density: 20 stitches in 20 rows.
We start with the sole. Cast on 26 stitches.
1 row: we knit all the loops with the front ones, adding one loop at the beginning and at the end. A total of 28 loops.
Row 2: knit with knit stitches.
Rows 3-16: Repeat Rows 1 and 2 (42 sts).
17 row: knit with the front loops, adding at the beginning and at the end 2 loops together with the front loops. A total of 40 loops.
Row 18: knit with knit stitches.
Rows 19-32: Repeat rows 17-18 (26 sts). 
Let's go to the top.
33 row: cast on 8 loops (for the heel) and knit (34 loops).
34 row: knit with front loops, at the end add one loop. 35 stitches in total.
35 row: knit with front loops.
Rows 36-48: Repeat Rows 34-35 (42 sts).
49 row: close with 24 loops, end the row with front loops (18 loops).
Row 50: Knit with knit stitches.
51 row: knit with purl loops.
Rows 52-56: Repeat Rows 50-51 (18 sts).
Row 57: cast on 24 loops and knit. 42 loops in total.
Row 58: knit with front loops, at the end we knit 2 loops together. There are 41 stitches in total.
Row 59: Knit with knit stitches.
Rows 60-73: Repeat Rows 58-59 (34 sts).
After that, we close all the loops, leaving a long thread.
That's all, it remains only to sew and your slippers will be ready. Decorate them as you like, for example with crocheted flowers.
We present to your attention another scheme that describes in detail how to knit slippers on two knitting needles:
The second version of an interesting product with your own hands
A very simple pattern for knitting such cute footprints:

It is best to use a medium thick wool buckle.
Cast on 30 stitches.
Rows 1-6: Knit with knit stitches.
Rows 7-22: front stitch (odd rows are knitted with front loops, even rows - with purl).
Rows 23-41: knit the heel. Knit 19, knit 20 and 21 together, turn the work over. We knit 9 purl loops, and 10 and 11 together with purl, turn over again, knit 9 front loops, 10 and 11 together front. So we continue, alternating rows 24 and 25, until 10 loops remain on the knitting needle.
42 row: we collect 10 loops from the braids of the side of the heel, turn the work.
43 row: we knit 10 front loops, then we collect 10 more loops from the other side of the heel. Only 30.
Rows 44-74: Knit with front stitch.
75 row: we begin control (7 knit, 3 together knit, 10 knit, 3 together knit, 7 knit).
76 row: knit with purl loops.
77 row: 6 knit, 3 together knit, 8 knit, 3 together knit, 6 knit.
78 row: purl loops.
79 row: 5 knit, 3 together knit, 6 knit, 3 together knit, 5 knit.
Row 80: purl loops.
81 row: 4 knit, 3 together knit, 4 knit, 3 together knit, 4 knit.
82 row: purl loops.
Row 83: K3, K3, K2, K3, K3.
84 row: purl 9 and knit the 10th from the pigtails (in total, we collect 18 loops from the braids on each side).
85 row: 4 knit, 3 together knit, 3 knit and 4th from the braid.
86 row: we knit in the same way as 84 row.
Row 87: Same as Row 85.
Repeat rows 84 and 85 until all the braids are closed. Close the remaining 9 stitches.
Related Videos Articles for Beginners
For a visual representation of the knitting process, it is best to watch a video. You can knit right away with the master.
Slippers
Slippers on 2 needles
The simplest footprints
2-spoke tracks
Two-color footprints
Knitting is an incredibly interesting creative process that will brighten up the leisure of any woman. This simple and fun activity allows you to create beautiful fashion items for men, women and children. Small knitted items - socks, mittens - do not take much time to make. And with the onset of cold weather, you should take care of your family and knit warm slippers, which will be much more pleasant to wear... We will provide you with simple instructions and knitting patterns with two knitting needles for house slippers and footwear and show you a video with step-by-step tutorials.
How to knit correctly
For knitting home slippers and footsteps for you you will need solid or colored threads and two knitting needles... During the description of knitting home slippers with knitting needles, you will see some words with abbreviations:
persons. p. - front loop;
out. p. - purl loop.
Knitting slippers on two needles without a seam
To knit slippers on two knitting needles, you will need blue and white yarn and knitting needles. Do not forget to remove the first loop at the beginning of knitting of each row.


- We knit 8 persons. etc. using a ponytail. Then we continue knitting using the warp.
- The next 7 loops are strung on a knitting needle from the other side and knit the front row.
Purl again
- Then we alternate faces. and out. rows to the desired depth - middle of the thumb - using white thread. You will have 24 stitches on the spoke. Loops that fit together fit into the back wall.
We start to decrease the loops
- we knit 5 p.;
- 3 p. - together;
- again we knit 6 p.
- 3 p. - together.
- We knit the remaining 6 sts.
Out. we knit a row without decreasing the loops.
- 4 p .;
- 3 p. - together;
- again 4 p.;
- 3 p. - together;
- we tie the remaining 5 p.

Front row:
- 4 p .;
- 3 p. - together;
- 2 p .;
- 3 p. - together;
Out again. row.
Front row:
- 2 p .;
- 2 p. - together;
- 2 more p. - also;
- and the last 2 p. - together;
- we tie the remaining 3 p.
You have 9 stitches left on the knitting needle.
We knit a sock
We knit out. p. to the end of the row. Having reached the last loop, we hook a loop from the side braid and knit it out. loop. Better to take the hinges from the inside. We get 10 loops. We turn the canvas over. In the future, in int. row we cling to one side loop. As a result, we get knitted slippers on two needles without a single seam.

Front row:
- we knit 3 p.;
- 3 sts together;
- 3 p .;
- 4 front loop is added from the side braid.
The purl row is knitted without changes.

We knit to the desired length of the sock.
End of knitting
Close the row:

Knitting children's slippers
Children most of all need to keep their feet warm. Socks fit very quickly. To knit slippers of 26 - 27 sizes, you will need semi-wool of medium thickness and knitting needles 2 mm thick.

We knit the first row of faces. n. behind the back wall. The subsequent rows are behind the front wall.

Shaping the heel

We knit 14 more rows.

We knit the following rows like this:
- 10 persons. n., then 2 persons. etc. together. Turn knitting over.
- knit again 9 out. p., and the 10th and 1st from the other sidewall - together out. loops on out. side. We turn over.
- 9 persons. p., then the 10th - along with the side extreme loop.
So we knit until there are no loops on the sidewalls of the product.
We tie the heel to the side (8 p.) Details. We knit persons. a row of heels and we collect 8 loops on the knitting needle from one side, knitting with face loops. Purl rows - purl. We sew the entire canvas as a whole.
Close the sock
We knit every 10th and 11th faces. etc. together. We knit the purl rows without changes. When there are 3 sts left, we make a sharp reduction in the loops, knitting two together. and persons. loops.
We fold the last 2 loops onto the first and pull the main thread inside the loop.

Sew the sock with a needle and thread.

Knitting booties
Knitting children's slippers with knitting needles can be an excellent basis for creating your baby's future wardrobe - —knitted scarf—, warm hats and mittens, pants and a variety of —knitted sweaters—. Even a novice craftswoman can cope with this task. Consider a simple knitting option for babies up to 3 months old.
You will need:
- knitting needles number 2;
- large needle;
- 25 - 30 g of baby yarn;
- hook.


Then we make an additional 3 rows of faces. etc. and using a needle and a working thread, close the row.
On the wrong side of the sole, we fasten the thread and make a seam "back with a needle" to form a ruffle.

Footprints are easy to knit, take the shape of a leg and look very beautiful.

- After that, we divide the loops in half (for this, an odd number of loops are typed) and mark the middle loop.

- Then we knit across the faces. a number of persons. loops, purl - out. p. But before and after the middle loop we make a yarn over. So we knit with the addition of loops to the desired length. If desired, you can change the color of the thread.


You can cast on more loops and turn the collars back. You can create simple and embossed patterns. You need to start with the simplest ones, gradually moving on to more complex and interesting patterns. Beautiful berets, socks, mittens, sweaters, blouses, vests are knitted using simple patterns that even lazy craftswomen can handle.

Men's knitted slippers
Many men also prefer to keep their feet warm. We will show you the steps of knitting original home slippers with knitting needles for men with a simple pattern with step-by-step photos. You can knit a product from two types of yarn.
- We connect the edges and crochet with white thread. To do this, we pass the thread through two loops and make single crochets. We start on the left side, moving to the right edge and bypassing the heel. The sheathing is finished with the "rachis step" technique.


As you can see, knitting such slippers is easy and quick.
- The following video shows and talks about knitting men's slippers in the form of moccasins. Knitting is done by “garter knitting”. You will need threads of any color and long and short knitting needles.
We hope you find our article useful. The provided video tutorials with detailed master classes are designed for both experienced craftswomen and novice needlewomen. They will help you create your own homemade masterpieces that will keep you warm in any cold weather.