DIY paper tree without glue. Christmas tree made of paper: wonderful DIY crafts
DIY paper tree instead of a fluffy forest beauty? Why not, such crafts will decorate your home and office, you can give them for the New Year to friends and acquaintances. How to make Christmas trees from scrap materials, is it difficult? We offer different options, and you choose the one that you like best.
How to make a Christmas tree out of paper with your own hands?
What is good about a DIY paper Christmas tree? She just has a lot of advantages: by showing imagination, you can come up with original models and create small masterpieces with your own hands.
In addition, your craft does not require special financial investments, because cardboard, colored paper, glue and scissors can be found in any home.
And also making Christmas trees is an exciting activity for both adults and children, plus it is extremely useful, developing and uniting.
It's such a great joy when beautiful crafts are obtained in the process of joint creativity. Even the smallest family members can actively participate in preparing for the New Year.
For example, it's funny and fun to make Christmas trees using children's hands:
Who would have thought that DIY colored paper Christmas trees could be so different. See what beauties you get if you make them using the origami technique:
And here is a beautiful do-it-yourself Christmas tree from modules:
How do you like such a tree with your own hands? The paper craft turns out to be delicate, airy and weightless, although we use a dense material - cardboard.

Such beauty can be made using handmade templates, or you can find and print ready-made ones. First, cut out the patterns with a clerical knife inside the openwork tree, then the outline and stand.
DIY paper tree - master class
If you have not been fond of crafts before, then it is better to start with simple options. And if you like it and get a taste, then you can choose a more complicated technique.
Let's learn how to make a New Year's beauty - it will be do-it-yourself volumetric tree made of paper.
What you need to cook:
- green paper;
- pencil;
- compass;
- ruler;
- scissors;
- glue;
- wire;
- a needle.
Here are our steps step by step:
- We draw a circle of the required size on a sheet of green paper using a compass, depending on whether you want a large tree or a smaller one. The circle will be the bottom tier of the herringbone.
- Draw another circle inside it - you need to retreat from the outer contour a little more than half the radius. Divide the circle into 12 sectors with a ruler.
- We make an incision along the lines - from the edge to the inner circle.
- We fold the sectors with a cone and fix them with glue.
- Using the same scheme, we will make all the other tiers of the tree, reducing each next in size.
- Use a needle to make a hole in the center of each workpiece.
- We roll the bottom of the wire in the form of a spiral - this is the base of our craft.
- And now we collect the tree, stringing the tiers on the wire, fix our tree on top with a cone, this will be the top.
That's it, Christmas decoration for your home or office is ready. It is done simply, but it looks pretty cute. You can decorate the Christmas tree with beads or sequins.
Quilling to help us!
Haven't heard of the quilling technique? Don't be intimidated by an unfamiliar word, there is nothing super complicated in our next craft. This will be a cute DIY Christmas tree made of colored paper.
Let's prepare for work:
- several green paper strips 5 mm wide, 10, 15, 20 and 30 cm long;
- 4 green stripes 1 cm wide;
- stripes of yellow and red, their width is 3-5 mm;
- toothpicks;
- instant glue and PVA.
The sequence of actions will be as follows:
- Pre-cut narrow strips (5 mm wide) alternately twist with a toothpick, remove, let them unwind a little. We glue the PVA to fix the tip of each strip, giving the resulting spirals a droplet shape. To do this, you need to pinch and pull one of the ends of the spiral up.
- We wind wide strips of green color around the toothpick tightly enough, gluing the tip so that it does not bloom. So we get the trunk of the future tree.
- We make a drop from a green strip 30 cm long - this will be the top of the tree.
- We insert a toothpick into the tree trunk and start attaching the branches using instant glue.
- First we glue the smallest branches at the top of the tree, there will be 4 rows of branches in total, on four sides of the trunk.
- A do-it-yourself Christmas tree made of colored paper is almost ready. It needs to be decorated - we will make toys by twisting pink and yellow stripes. You will get small cylinders if you twist tightly and glue the tips, or you can give them the shape of droplets and stick them on branches.
- Each tree has a crown - carefully glue the drop at the top of the craft.
- The final touch - at the very top of the crown, we fix the decoration with glue and admire our creativity.
And if you also want to make a stand for the Christmas tree, then you can make it from nine curls of white stripes. We glue the curls together and fix the Christmas tree with glue.
And here is another version of the Christmas trees
A Christmas tree decorated with toys has long been considered a symbol of the New Year holidays. And to put it in the house is a good tradition, as well as a way to create a special solemn atmosphere. But it often happens that due to constant employment, lack of free time, it is not possible to get poisoned for the acquisition of a green beauty. Some people who are in love with nature do not want to destroy a living tree in order to enjoy the fresh pine smell in the apartment and elegant appearance for a couple of weeks. It is in such situations that it will become more relevant than ever DIY Christmas tree, photos, ideas and 100 master classes on the manufacture of which we will tell in the blog home-ideas.ru.
DIY Christmas balls
DIY Christmas tree made of paper for the New Year
The paper Christmas tree has the widest variety of ideas and options for their implementation in practice.

Templates and diagrams for making paper fir trees
The easiest way to create a Christmas tree from paper is using a ready-made template. To do this, you need to print the selected figured scheme on thick sheets. Cutting it along the contour is carried out using a special clerical knife or, in the absence of such, using nail scissors. Each blank Christmas tree should be bent in half and the details of the tree should be glued together. You will get an unsurpassed openwork option.
How to make paper snowflakes - http://home-ideas.ru/2015/12/kak-delat-snezhinki-iz-bumagi/

Below are interesting diagrams and openwork patterns of different levels of complexity for creating a New Year tree from paper with your own hands, which can be used not only by an adult, but also by a child.


Master class on creating a fluffy paper New Year's beauty
There are other ways to make a holiday tree out of paper. And for a visual representation of how a fluffy Christmas tree is created with your own hands - the master class presented below.

To implement such an idea, you will need a list of necessary materials:
- cardboard;
- colored paper;
- glue;
- Scotch;
- scissors.
DIY crafts for the New Year
Step-by-step instruction:
1. Make a cardboard cone that will be used as a base for the tree. You need to fix the cone with glue so that it does not unfold.
2. Cut sheets of colored paper into thin stripes.
Important! Care must be taken to ensure that the stripes are approximately the same length and width. This will give the tree a neat, aesthetic appearance.
3. Glue the edges of the stripes to form the loops. It is also carried out with glue.
4. Glue ready-made eyelets onto pieces of double-sided tape.

5. Wrap the base cone with tape with loops from bottom to top. The result is a fun "shaggy" Christmas tree.

Herringbone made of beads: a master class on the embodiment of an idea
And now a Christmas tree made of beads is offered to the readers' attention - a master class with step-by-step photos. For such a creative process, you need to stock up on:
- wire with a diameter of 0.25 mm;
- beads of green and gold color.

First you need to collect 9 green and 1 golden beads on a piece of wire about 40 cm long. Without touching the golden bead, pass the other end of the wire through the green beads in the opposite direction. Thus, a needle is created for the future New Year's green beauty.
How to install a Christmas tree
At the next stage, you need to align the wire clearly in half, tighten the ends tightly. On each side, another pair of needles of this type should be made.
Important! It is necessary to arrange the needles so that they are next to each other as close as possible. This will give the product a neat appearance.
Such small branches should form a large branch for the Christmas tree. For the upper branches, you need to use 10 small branches, previously prepared, and for the lower ones - 15 each.
It is necessary to assemble a Christmas tree from beads in this order:
- for the top - one small branch;
- for the second tier - three large branches, each of which consists of 10 small ones;
- for the third tier - four large branches, each consisting of 10 small ones;
- for the fifth tier - five large branches, each of which contains 15 small branches.
The number of tiers and large branches in them may increase depending on how high the product is planned to be made. The photo below shows the step-by-step performance of weaving:

DIY felt Christmas tree
A fairly simple way of manufacturing is a DIY felt Christmas tree. Such a souvenir can be used as a New Year's gift for friends or acquaintances. The advantages of felt as a material for a Christmas tree are that it is able to keep its shape well, not prone to shedding.

To make a felt New Year's beauty, you need to use an arsenal of materials and tools, consisting of:
- felt;
- cardboard;
- scotch tape (glue);
- scissors.
First you need to prepare a cardboard cone, which is secured with tape or glue.
At the next stage, you need to cut out circles from felt, different in diameter - as they increase. You can pre-prepare cardboard circles-templates.
The base of the cone must be decorated with tinsel, which can also be attached using glue or tape.

On each of the cut out circles of felt in the center, make a crosswise incision and put them sequentially - from larger to smaller - on the cone. When all the pieces of felt are on the tree trunk, the resulting beauty should be decorated with an asterisk at the top of the head, and tinsel along the entire height.

Simple Christmas trees from scrap materials
If there is very little time left before the New Year's celebration, and the main symbol of the holiday is still not in the house, you can make a Christmas tree with your own hands from improvised materials, spending a minimum of time and resources. Consider several interesting options for such unpretentious creativity:
1. Christmas tree from a plastic bottle... Surely every home has a long-standing plastic bottle painted green. For this purpose, the container itself must be cut into rectangles (5-6 pieces to create tiers of a tree). Each of the rectangles should be cut into small strips, not reaching the top edge. Such cut rectangles must be wrapped around a pre-prepared cardboard cone and secured with tape. To dress a Christmas tree in needles should be from the lower tier, moving to the top.


DIY Christmas wreath
2. Herringbone from leftover yarn... Extremely easy to manufacture. A small child can cope with this process. As in the previous case, you need to make a cone out of cardboard and fasten it with tape / glue. Then the cardboard frame must be well greased with the same glue and the yarn is wrapped around it, leaving no gaps, tightly. Beads and sparkles are used as decoration.

3. Christmas tree made of tinsel... The step-by-step execution of such a souvenir completely repeats the version with yarn with one difference - instead of it, the remnants of New Year's tinsel are used.

4. Sweet christmas tree... Its distinctive feature is the use of sweets as decoration. They are often applied to a product made of tinsel. It is recommended to fasten the sweets with double-sided tape.

5. New Year's beauty from pasta... It will take more time and more care to make it, and perseverance will not hurt. As before, you need to start the process by preparing the cardboard cone. It should be greased with glue and proceed to pasta gluing. When pasta is glued along the entire length in the required amount, they can be painted with all kinds of paint colors.

6. Creative Christmas tree from old magazines... To implement such an idea, glossy pages with colorful pictures are best suited. It is necessary to form a cone from cardboard, which is secured with tape or glue. A large number of circles of the same diameter should be cut out of magazine leaves. Each of them needs to be wrapped around the pencil so that they take on a curled look. Such curled pieces of magazine pages should be glued to the cone from bottom to top. The crown of the beauty must be decorated with a small glossy cone.

If the calendar is almost New Year, and the green holiday symbol still does not decorate your home, there is absolutely no reason for frustration. After all, the variety of methods for making Christmas trees allows you to make them in a matter of minutes from the most primitive and unpretentious materials, and the product itself, despite its simplicity, will look interesting and original.


28 New Year decorations that can be done in 10 minutes
Favorite craft of all children - DIY paper tree, but adult craftswomen will also like such creativity, because using very simple and affordable material, you can get an original element of New Year's decor, a Christmas tree toy or a gift for your beloved grandmother. you can do at home with your kids while having fun with your family.
DIY paper Christmas tree
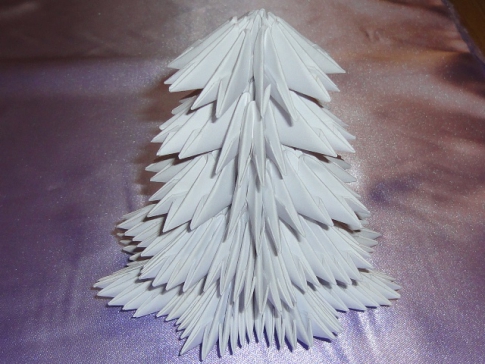
Curvy do-it-yourself paper christmas tree you will get it from separate circles, they will all be of different diameters, so for such a craft you may need a compass and a simple pencil, with which you will outline the necessary elements on a green sheet. To cut them out, we will use scissors and then glue the elements to the base using glue. You can use a pencil, wooden skewer, or a juice tube as a base.
This will be the first experience of working with a compass for children, so before giving them a tool, tell them about safety and the rules for working with it. Then make sure the child draws several circles on the sheet of different diameters. Their number depends on the desired size and splendor of the finished Christmas tree. Each circle should be of such a diameter that it is 2 cm smaller than the previous one. Each circle is one tier of our future craft, therefore, when you draw the contours, they must be carefully cut with scissors, and even if the edges are slightly uneven, this will not affect the beauty of the finished craft, because we will make each tier wavy.
Next, you need to fold each circle: once in half, then the resulting semicircle in half again, and this sector again in half. In total, we will add each circle three times. We should have clear lines, so we need to draw along the folds with scissors.
The corner of each folded circle should be cut off so that a hole is formed in the center of the expanded element, the diameter of which coincides with the diameter of the base - a tube or pencil. After that, the circles can be straightened.
The base must also be decorated, pasted over with green paper or wrapped with tape. When all the elements are ready, it can be collected do-it-yourself tree paper craft, for this, all the elements must be strung on a tube: from the largest circle at the bottom to the smallest at the top.
It remains only to decorate the top, for this you can glue a bead or a decorative red star. Sequins, small beads or sparkles can be glued to the lush "twigs".

DIY Christmas tree: paper craft
There is one more option, how to make a Christmas tree out of paper with your own hands, for which you will need the same set of tools and materials as for the previous craft. The main materials are a green leaf, a pencil and compasses, a ruler and scissors, and PVA glue. We will also use a wire and a needle.
In this case, we will also collect a Christmas tree from individual elements of different diameters, the contour of which we will draw with a pencil and a compass. The lowest tier will be the largest diameter, but in this case, we need to draw each cut out circle correctly, because it should have cone-shaped needles, as shown in the photographs.
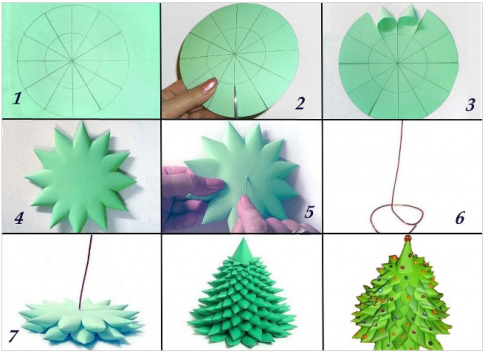
After you draw a circle, you need to draw another one inside, stepping back from the edge half the radius. Then it must be divided by a ruler into twelve identical sectors.

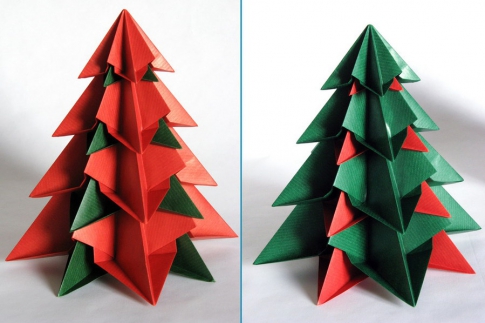
In the next step, we need scissors, with which we will make cuts along the line of each sector. The notch should reach the contour of the inner circle, after which at the end of each sector it is necessary to roll up the cone and glue it with PVA glue. When you roll up all the cones on one workpiece - there should be 12 of them, you can move on to the next workpiece, which must be drawn in the same way, cut and glue the cones.
In this case, the wire will be collected DIY paper tree, master class assumes that our airy tree is stable. Roll one end of the wire into a spiral. To make a spiral, you need to wrap the wire around the pencil, applying layer to layer, direct the rest of the segment up.
In the center of each circle, use a large needle to make a hole, and then string all the layers onto the wire. can also be made in the form of a paper cone.

How to make a Christmas tree out of paper with your own hands
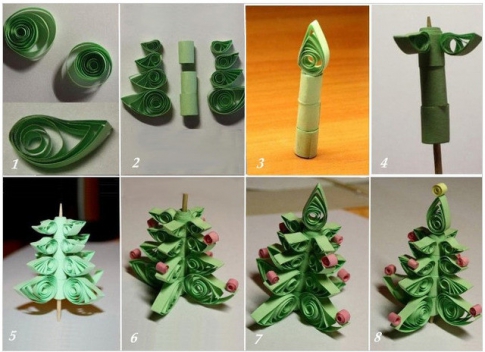
We have already done DIY Christmas tree toys made of paper and New Year's cards using the quilling technique. This time we will not make a flat figure, but use quilling to create a volumetric herringbone. You can cut the strips yourself or buy a ready-made quilling kit.
The stripes should be half a centimeter wide. The sheet must be cut into strips, and then cut them. Four more stripes one centimeter wide are for the base, and for decoration there are thin stripes of yellow and red. We will perform quilling elements without special tools, and we will wind the stripes only with a toothpick.

When working with paper, in order to ensure reliable fixation of the elements, it is enough to use only PVA glue, and it will last for a long time.
First, we will wind 5 mm green strips - you will need four of them of different lengths. 30, 20, 15, 10 cm - they must be twisted with a toothpick, then loosened a little so that the spiral is not tight and the tip is fixed on a drop of glue. With your fingers, you need to squeeze one edge of the spiral to get the shape of a "drop", and then bend it a little. As a result, we have a "blob", reminiscent of the popular paisley print.

Wide stripes must be wound tightly around the toothpick, because this will be the trunk of our future Christmas tree. The end of the strip must be fixed with glue so that the spiral does not unwind.
We need a 30 cm long strip for the top: it should also first be twisted into a spiral, and then slightly dissolved and given the shape of a drop.
Although it is done very simply DIY paper tree, video the lesson may be useful for you to get to know more about the quilling technique, because a beginner still does not know how to create the elements of "drop" or "eye" correctly, how to properly twist the strips.
When we assemble the Christmas tree, we should use the Moment glue, which provides instant fixation of all elements. You can first glue each tier with the trunk, and then collect the layers, or vice versa, first glue the details of the trunk, and then glue the "drops" - branches. DIY paper star on a Christmas tree can also be performed using the quilling technique.
The parts of the barrel must be glued together in sequence, and a toothpick must be inserted into the center, which will ensure the strength of the base. Then you can glue the twigs: we will start with the smallest "droplets" that are glued on top, and the largest twigs will go below.
We'll use the subtle red and yellow stripes to make it. This time, the paper can be twisted without a toothpick, but the tip must be fixed with glue, and then glue the balls onto the branches.
We can twist a stand for such a Christmas tree from white stripes, and make snowdrifts using napkins rolled into lumps, you can also decorate the stand with snowdrifts using cotton wool. We will get an original "Christmas tree in the snow" handicraft, which a schoolchild will be happy to do.

DIY corrugated paper tree
We have already considered several original ideas on how do-it-yourself corrugated paper tree... Corrugation is an ideal material for creating beautiful New Year's crafts; it will be interesting to work with both preschoolers and adult craftswomen. There are many ideas for making such a craft, but they all boil down to one technique: first, you should make a cone from cardboard, and then glue this cone with paper elements.

The cone can be made to any size using a piece of cardboard, a Whatman paper, or a piece of wallpaper. You can roll the sheet into a cone, glue the edges, and then cut off the excess paper from the bottom. This option is suitable if you are making a large cone. A small cone can be rolled up by first laying out the base. Draw a "sector" on a piece of cardboard. Draw a quarter circle with a compass, draw straight intersecting lines along its radii with an angle of 90-120 degrees.
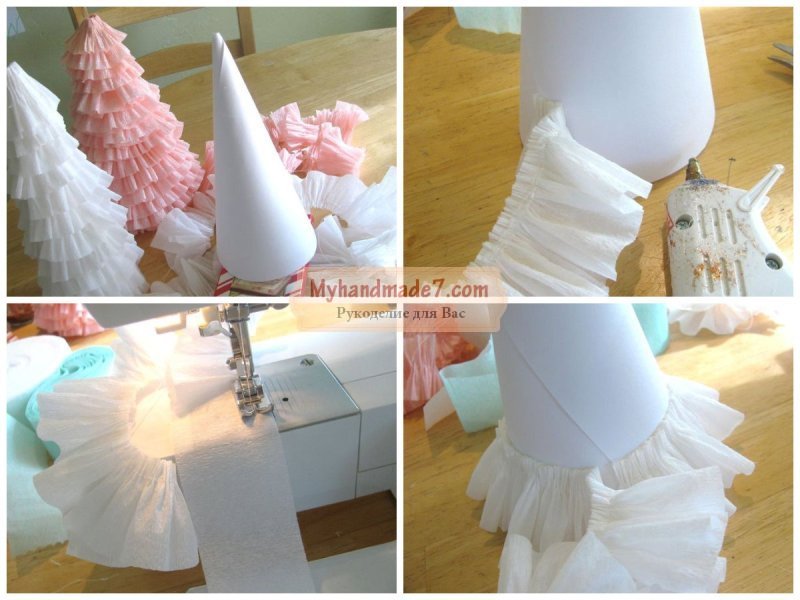
Then cut this sector and glue it along the seam. From below, the joint can be fixed with a stapler, the edges can be glued with double-sided tape. The cone-shaped base for your future Christmas tree can remain hollow, because corrugation is a very light material, and an empty base will withstand such a load. To give the base a finished look, you need to glue a circle from below. The radius of the circle must be one centimeter larger than the radius of the base of the cone. Then the edges of the circle must be incised in one and a half centimeters along the entire circumference. The depth of the cut should be one centimeter. Bend the resulting cuts up and grease with glue, and glue the bottom into the cone-shaped base.

DIY Christmas tree toy made of paper
If you take a small cone-shaped base, no more than 10 cm high, then you get an original New Year's DIY paper toy "Christmas tree", which can be a decoration for a festive tree. In addition to cardboard, you can also use a plastic bottle to glue the base. You need to cut off the neck and bottom from it, you still have a straight cylinder, which must be cut in a straight line on one side. We will twist the resulting piece of plastic into a cone.
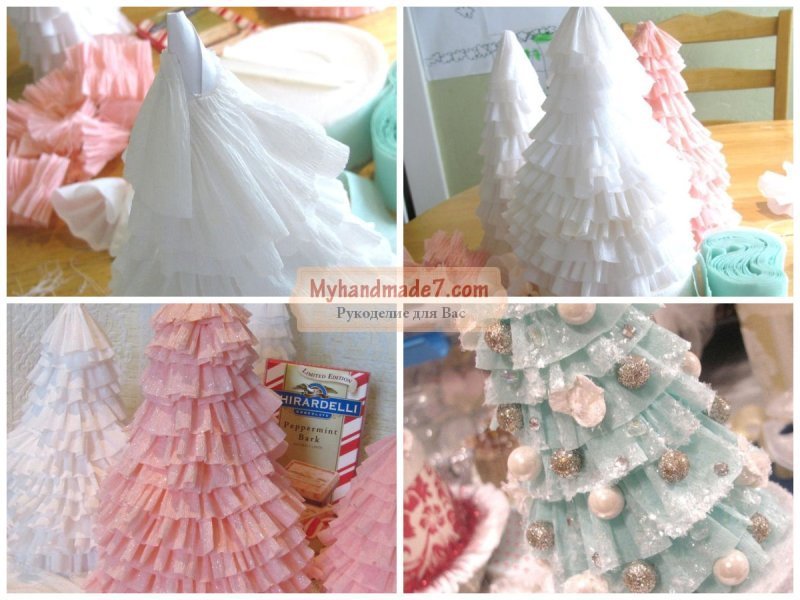
The corrugation should be cut into strips 5 cm wide. We will glue these strips to the cone in layers, and not in a spiral. One edge of the strip should be made wavy, twisting with your fingers, as shown in the picture. Then the second edge must be glued to the base, starting from the lowest tier. The second tier should cover the gluing point of the lower strip. This will cover the entire cone with corrugated strips and you will have a fluffy herringbone.
The cone base can be used for other children's crafts, it can be pasted over using the facing technique, using squares of napkins or corrugations, it can be pasted over with strips of wrapping paper, candy wrappers or foil.

If you want to hang the toy on a spruce twig, then you need to glue a satin ribbon on top and make a loop from it, tie a bow on the top of the head.
The Christmas tree is one of the main attributes of such a large-scale holiday as the New Year. No one forgets about her, acquiring live or artificial Christmas trees to his home and decorating it with various outfits, souvenirs, garlands. We will make a Christmas tree out of paper, which can be placed somewhere in the apartment (for example, on a table), or it will not even be a shame to give such a craft to relatives or friends. Next, we'll look at several ways to create paper Christmas trees.
How to make a Christmas tree out of paper (1 way)
You will need green paper, a ruler, compasses, glue, scissors and a pencil (or a tube for juices, cocktails).

- Using a compass, draw several circles on the paper. Each next circle is 1-2 cm smaller than the previous one. Choose the number and size of circles yourself, depending on what size the Christmas tree you want to see in front of you as a result.
- Fold each circle in half once, a second time, and a third time (that is, you need to fold each circle in half three times). To make the fold lines clear - draw along the edges with scissors.
- We straighten the circles. Cut out a hole in the center of each that matches the diameter of the pencil or tube (whichever we are going to use). It is also worth saying that the circles are the tiers of our future Christmas tree.
- Glue the pencil or tube with green or brown paper.
- Now we begin to collect the tree. We string all the tiers on a pencil.
- We decorate the top of the Christmas tree with a beautiful bead or star. You can decorate the tree, if you wish, with sparkles

How to make a Christmas tree out of paper (method 2)
You will need green paper, scissors, pencil, glue, compasses, ruler, needle, wire.
On green paper, draw a circle with a compass, the size of the lower tier of the future Christmas tree. Next, draw another circle inside the first circle, departing from the first a little more than half the radius.
- Using a ruler, divide the circle into 12 sectors.
- Along the lines of cases, an incision to the inner (second) circle.
- We fold each sector into a cone, which we fix with glue.
- Similarly, we create the rest of the blanks, gradually reducing their size.
- We make a hole in the center of each workpiece with a needle.
- We turn the bottom of the wire into a spiral.
- We collect all the tiers of our tree for wire. We fix a cone made of paper on top.

How to make a Christmas tree out of paper with your own hands using the quilling technique (3 way)
You will need: green paper strips 5 mm wide and four strips of 1 cm each, red and yellow stripes 3-5 mm wide, toothpicks, glue (instant and PVA).

- We use four green strips having a length of 30, 20, 15 and 10 cm. Using a toothpick, we twist them. Remove the part from the toothpick and let it bloom a little. We fix the end of the strip with PVA glue. We give all the spirals a drop shape by holding and slightly pulling one of the ends of the spiral up.
- We wind wide green stripes tightly on a toothpick and glue the tip to them, without giving it the opportunity to bloom. This will constitute our tree trunk.
- For the top of the tree, we make a drop from a green strip with a length of 30 cm.
- We now begin to collect the Christmas tree, securing its elements with instant glue. We glue the details of the barrel and give the glue time to dry.
- We insert a toothpick inside the trunk and glue our droplets-twigs. We start glueing with the smallest ones, which we glue to the top of the tree.
- We make toys from yellow and pink stripes by twisting the paper without using a toothpick. You can fasten the ends until the paper is unwound, or you can make the toys a little looser and shape them into small droplets. Glue the balls to the branches you like.
- We glue the drop at the very top (do not forget about it), and the decoration on it.
- You can make a stand, if desired. To do this, you will need to make nine curls from white paper strips. Glue the curls tightly together. Now we fix the tree on a snowy white stand with glue.
How to make a Christmas tree out of paper with your own hands (4 way)
You will need: green cardboard, glue, scissors, scotch tape, colored paints, pencils, felt-tip pens. Stickers, sequins, etc. can be used as additional decorations.
- Bend a sheet of cardboard in half and cut it along the fold line.

- Fold the parts in half again.
- Draw a half of the tree on one of the cardboard halves opposite the fold (see picture).

- Fold the sheets together and cut with scissors along the drawn line. As a result, you will end up with two trees of the same size.
- Subtly mark the middle of each tree using a ruler.
- Make an incision in one tree from the top to the middle, and on the other from the bottom (base) to the middle.

- Insert the trees into the cuts so that you end up with one voluminous tree.
- To give the tree more stability, use scotch tape - use it to glue the lower and upper halves.

- Use pencils, markers, glitter, and other materials to decorate the tree. You can use a hole punch to make small multi-colored circles, which are then glued to the Christmas tree. An asterisk can be glued to the top of the head with tape.

How to make a Christmas tree out of paper (5 way)
You will need: colored cardboard, glue, scissors, a hole punch, a small stick with a diameter approximately equal to the diameter of the holes that are obtained from a hole punch, ornaments to taste. 
A rectangular cardboard is taken, folded several times as shown in the picture above, and then pierced in the center with a hole punch. Then this cardboard is cut at an angle so that the craft does not end up looking like a Christmas tree (see picture). We drag our stick into the hole, and if it does not hold firmly, then it can be fixed with glue. Decorating the Christmas tree. Decorations can be attached with glue. Such a Christmas tree can be put somewhere (if you make a basis for it), or you can hang it somewhere. 
How to make an origami Christmas tree (method 6)
The material for such a tree will be one large magazine or several small magazines. If the magazine has a hard cover, you can simply remove it.
For each page, do the following procedure:
- Beginning at the top-right corner, fold the page to a 45-degree angle.
- Bend the sheet diagonally in half again.
- The corner that goes beyond the boundaries of the magazine at the bottom must be tucked up.
- We also do this procedure with the rest of the pages and, as a result, we get a beautiful origami tree.


How to make a Christmas tree out of paper using the origami technique (method 7)
First, you will need to make triangular modules, from which the herringbone will begin to fold. It's easy to make them. You just need to know how to do them and be careful when creating them.

Modular craft
1. Add the module
2. We collect twigs
3. We begin to collect the Christmas tree
How to make a Christmas tree out of corrugated paper (method 8)


How to make a Christmas tree from paper strips with your own hands (9 method)

You will need:
- colored cardboard or green colored / wrapping paper
- tape (in this example, its width is 6 mm and length is 25 cm)
- thin brush
- 1 brightly colored bead (in this example, golden)
- several beads of a different color (in this example, 12 brown beads)
- scissors
- ruler
- pencil
1. Draw and cut strips 4 cm wide and 8, 10, 12, 14, 16 and 18 cm long from colored cardboard.


2. Use the tip of scissors or a needle to make 3 holes in each strip: 1 on the right, 1 on the left, and 1 in the middle.


3. Take a thin brush and make a small loop at one end.


4. Start threading a thin brush through all the holes in the paper strips. Start with the longest strip and add the next one in descending order. Add 2 beads between each strip.
5. When all the paper strips are used, add 1 bright bead to the top of the tree.


6. At the end of the brush, make a loop to hang the craft. Cut off the excess part of the brush.
7. Pass the ribbon through the loop and tie the ends into a knot.

How to make a Christmas tree out of colored paper (10 way)
You will need:
- thick cardboard or fiberboard
- skewer
- PVA glue, super glue or hot glue
- colored cardboard (possible with patterns and ornaments)
1. Cut a rectangle out of cardboard, which should be slightly larger than the base of the future Christmas tree.
2. Stick the skewer into the cardboard and secure it with glue.


3. Cut out several circles of different sizes and colors from colored cardboard, 3 circles in each group. Make a small hole in the center of each circle.
4. Add a drop of glue to each hole and start stringing circles around the skewer, starting with the largest ones. The distance between the circles can be up to 1 cm.
5. Cut a star out of cardboard and glue it to the top of the tree.

How to make a beautiful Christmas tree out of paper with roses for the new year (11 way)


You will need:
- old newspaper or unnecessary book
- cone
- PVA glue
- scissors
- beads (optional)
1. Make a cone out of paper and make a lot of roses - a few large ones for the base of the cone, medium ones for the central part, and small ones for the top part.
* If you purchased a foam cone, then you need to glue it over with pieces of newspaper (see image).
To make roses (of any color), follow these simple instructions:

- Cut out 10x10 cm squares from thick paper.
- Draw spirals on the squares.
- Cut a circular strip along the marked spirals.
- Roll the paper spirals from the outside to the inside.
- Wrap the pink bud more tightly and fasten the tip with glue.


2. Begin glueing the paper roses to the cone, starting at the bottom of the cone and working your way up to the crown.

3. If you wish, you can glue 1 bead in the center of the roses - this way, you can decorate all the roses or only some.

4. You can add one more decoration to the crown - it can be a piece of tinsel, a bell or an asterisk.
* If you want to know how to make an asterisk, go.
How to make a Christmas tree out of paper (12th method)
You will need:
- colored paper, colored cardboard, old music book or unnecessary book
- PVA glue
- curly scissors and simple scissors
- thick cardboard
- skewer
- glue brush (optional)
- decorations (sequins, bows, beads, buttons, stars).
1. From cardboard, cut out a platform for the future tree.
2. Insert the skewer into the cardboard platform and secure with adhesive.
3. Start cutting squares out of the paper. It will be more beautiful if you cut with curly scissors (they can be found in stationery).
* You need to cut 9-10 squares - first 9 squares with a side of 20 cm, then 9 with a side of 18 cm, and so on, reducing each group of squares by 2 cm.
* Choose the total number of squares yourself. You can also choose the size of the squares yourself - if your tree is tall, then you can reduce the size of the next group of squares by more than 2 cm, and if it is short, then less - 1-0.5 cm.
4. Cut a few small squares out of the cardboard, which will be between the colored paper squares.
5. Start stringing 3-4 squares of colored paper, between which there will be a small cardboard square.
* If you use 3 squares between the cardboard pieces, then it is most convenient to cut out 9 squares of each size.
* You can attach the squares to the skewer with glue.
6. To decorate the tree, you can gently brush some glue onto the ends of the squares and then gently sprinkle glitter on them.
7. On the top of your head you can glue a button with a bow or something else - an asterisk or a bead, for example.
How to make an original Christmas tree from colored Japanese paper with your own hands (13 method)
You will need:
- colored cardboard
- thick paper with a pattern (can be replaced with colored cardboard)
- colored or brown paper (you can use a page from an old magazine)
- white sheet of A4 paper
- 2 skewers
- pencil and ruler
- PVA glue or glue stick
- scissors
- darning needle (if necessary).
1. Cut 14 rectangles of 2 of the same size from colored cardboard. In this example, 2 rectangles are 21 x 28 cm, two more are 18 x 28 cm, then (also 2 each): 16 x 28 cm, 13.5 x 26 cm, 12 x 26 cm, 9 x 25 cm, and 6 x 22 cm.
2. Preparing the base for the Christmas tree:
Cut plain A4 paper into strips 2 cm wide. Roll the strip into a circle, add a little glue at its end and glue the next strip (see image). Repeat the same process until you have glued all the strips into one large 3.5 cm circle.
* The larger the circle, the more stable the tree will stand.
3. Take a large rectangle made of colored cardboard and start folding it like an accordion, 1.5 cm wide. Cut the ends of the accordion in a rounded shape.
4. Fold the accordion in half and glue the sides - you have a semicircle.
5. Repeat the same with the second rectangle, then glue the two semicircles to form a circle - these will be the branches of the lower level of the tree.
* To secure the halves of one circle, you can thread a thin wire through them and twist its ends from the back.
6. Make similar images for 6 more levels of your tree.
7. Take colored or brown paper and cut several small rectangles from it, about 2 cm wide, with which you will later cover the skewers.
The skewers will play the role of the tree trunk.
8. Pass the skewers through one large circle. Since you need to leave gaps of about 2 cm between the circles, these gaps need to be hidden, so we will wrap them in small rectangles made of colored paper.
9. After each circle, wrap the skewers with 2 cm wide colored paper and glue the ends together. Continue repeating this step until all the branches of the tree are on the skewers.
10. It remains to insert the skewers into the round base (see point 2) and fix them with glue.
* You can decorate the top of the tree to your liking - a paper star, bead or button.
See also other videos on how to make a Christmas tree out of paper:
Now you know about many ways to create a Christmas tree out of paper. Happy crafts!
Theme DIY paper Christmas tree wide enough, because it covers cards with Christmas tree decor, and table samples for decorating a table or shelves, and Christmas tree decorations along with paper ones. And all this is complemented by a real New Year's tree, even if it is placed on the wall. Therefore, in today's article, you will find a large number of all kinds of ideas for such a craft, which should definitely be repeated before the upcoming holidays.
DIY Christmas tree made of colored paper
Paper becomes an excellent material for this, since the tree itself has a fairly simple, recognizable shape that is very easy to reproduce. Help with creation DIY Christmas tree made of colored paper you will come across various techniques for working with this material. This can be an appliqué, including three-dimensional, as well as origami, modular origami, quilling (the skill of folding shapes using rolled colored stripes), and so on. The simplest patterns are appliqués and their main purpose is to decorate postcards or become decorative adornments for gift boxes.
A simple form will allow even a preschooler to cope with the craft. It is always convenient and easy for children to cut out a Christmas tree on a sheet of green paper along the contour, then you can glue it on a sheet of paper and paint or glue balls of a different color on top. For more complex work, you may need to be able to beautifully fold a colored sheet, cut and combine. Examples of such DIY Christmas trees - photo from paper that you see above. For the first option, you will need beautiful wrapping paper that is thick enough to hold its shape well. It is cut in several semicircles of different sizes, so that later they can be folded in ascending order. Each semicircle is pleated, that is, it is folded like an accordion, smoothed out and then dissolved, and then glued onto a sheet of cardboard. First, the lower part is glued, then you move up, the last tier is closed by a bright star or angel. Postcards with a pattern using the quilling technique will also look spectacular, but for it it is worth taking not ordinary paper, but special one. It is not only pre-cut into strips of the desired thickness, but also has the optimum density for beautiful curling.

You can also use beautiful examples in your work. In one, the tree is folded with the help of multi-colored sheets, only each one is twisted into a neat tube and the outline of the tree is laid out with such tubes. Another interesting idea is to combine two simple shapes with the help of special cuts, then the postcard will be decorated not only with a beautiful image, but also with a volumetric one.
DIY paper Christmas tree: schemes
Small paper Christmas trees, which are installed as part of compositions, nativity scenes, decor on shelves and window sills, turn out to be elegant. It is all the more good that for this you do not need to buy expensive materials or tools for work at all. All you need is a few sheets of beautiful, high-quality paper and tutorials on how to make DIY paper Christmas tree, diagrams assemblies (when it comes to origami) or templates for cutting.

You can see examples of such finished works in the pictures above. For the first example, you will need to find or draw a template on your own, using it you need to cut out two identical elements that are glued to each other in the center (in the upper projection, such a craft will be the letter X). The purpose of such a decor is a beautiful window composition, which is lined with small garlands for additional illumination. Cone Christmas trees assembled from several parts are a fairly simple craft, moreover, this idea can be used to create. The circles are folded in half, then again and again in half, smoothing the corners, and when they dissolve, a volumetric figure is obtained. Place it on a wooden skewer or connect the elements with double-sided tape, drops of glue and the figure will hold for a long time. Openwork Christmas trees are two identical cut triangles, bent in half lengthwise and glued together.

Interesting, from our point of view, is a craft that is simple in form, which is perfect as a model when everything is laconic and simple in fashion. It is a cone of thick paper with holes cut in random order. Through them, light from an LED garland, which is placed inside, enters the room, resulting in a handmade lamp for a festive theme.

Unusual do-it-yourself Christmas trees made of paper
In the next section, I really want to consider enough unusual do-it-yourself Christmas trees made of paper, which will not at all look like children's crafts, but rather will remind of the most avant-garde examples of modern fashionable decor. If you follow fashion trends, then you must have seen interesting ideas for placing a large size pattern, similar in outline to a Christmas tree, on flat plain walls (and this is also a kind of fashionable design trend). Thus, you not only bring a little creative design to your interior, but also refuse to place a living Christmas tree. Such a pattern can be made in a variety of ways, using wood, metal, any materials at hand, but since we are considering paper as the main raw material, the examples that you see below are made on its basis.

To bring a big Christmas tree to life, you just need to fix the outline on the wall, for example, with the help of a luminous garland, and then fill the space inside the triangle with paper sheets, for example, a music book or diary. Then the decor will acquire an additional interesting idea. The second idea is fringe, which will require a fairly large amount of corrugated paper. Of course, it is better not to glue it directly on the wall, but to make the base to match the color of wallpaper or paint and attach rows of fringed stripes already on the base. The greater the number of stripes, the more textured, more magnificent the finished Christmas tree will come out. A very beautiful idea is to make branches using the outlines of the palms, especially if these palms are made by the whole family. Then it will turn out very conveniently, there will be big mother's and father's palms, which can be glued in the lower tier, and small prints of children's hands, for which there is a place in the rows above.

In addition, elegant decor can be tabletop, you can see examples of such an exquisite decoration in the photo above. The sheets that are planted on the base (knitting needle, wooden skewer) are also similar in shape to a Christmas tree, but you will get special beauty if you make a large number of small paper roses and glue them over a dense cone. These can not only decorate a room, but also beautifully serve a festive buffet table.
DIY Christmas crafts Christmas tree made of paper
And of course, an overview DIY Christmas crafts - Christmas tree made of paper- it is impossible to make it complete without interesting and simple master classes. The first one, which is presented below, is intended as an alternative for, because with the help of such toys you can very effectively decorate a real large spruce.

For work, you will need thick paper, if you don’t find enough thick material, you can glue it by folding several ordinary sheets together. You need to apply a drawing to the surface, in the event that your artistic abilities are extremely small and even such a task will be difficult, then use ready-made templates that you can find on the net. Then, armed with an office knife, you will need to carefully cut out all unnecessary, leaving only openwork outlines. The finished craft can either be hung using a loop or placed on a cardboard stand.

An equally interesting toy will turn out according to the following "recipe". You will need green circles, and you can also use single-sided paper, in this case only its colored side will be visible. Draw circles with a compass, and divide it into equal sectors with a ruler or protractor. With scissors, you need to cut each sector as shown in the photo, and bend the corners, securing them with a drop of glue. As a result, you should get such green volumetric blanks of several diameters.

The assembly is carried out using thick wire, on which the previously made elements are simply put on, similar to how a children's pyramid is assembled. When the whole structure is completed, it should be supplemented with small "toys" - shiny foil crumpled into lumps.
DIY corrugated paper Christmas tree
Another master class that will complete today's large selection of all kinds of crafts - DIY corrugated paper Christmas tree... For her, you will need a large amount of green material, but in the end, if everything is done correctly, an artificial paper branch will not be distinguished from a real one at all.

You need to cut the material into strips, about twenty centimeters wide. The strip is cut with a fringe, and then you perform a simple manipulation: each fringe must be twisted with your fingers into a small flagellum and, if necessary, fixed with glue, although the corrugated surface itself holds the given shape well. When all the strips turn into needles in this way, you need to take a metal pin or a piece of bent wire and twist the entire strip with a roll, at the end fixing it with glue and wrapping the place of attachment with a layer of paper.

Fasten several of these branches together, decorate with a paper cone (it is performed according to the same principle, if necessary, find a master class on its implementation) and decorate your house with this decor. Several of these branches can be part of a wall composition, complement a ceiling lamp, or you can put paper branches in a vase to replace living ones.