How to make carved door canopies. Sampling for installed loops. By location
Door hinges are the simplest mechanisms by which the door leaf is attached to the door frame. Currently, there are split and universal hinges. Detachable hinges are two parts of the mechanism, fastened together with a special pin. You can remove the door from such hinges without unscrewing the device. The universal hinge is one-piece. A distinctive feature of the universal mechanism is the ability of the hinge to withstand a heavier load. However, to remove the door, you will need to unscrew the hinge itself.
Scope of universal hinges
One-piece universal hinges can be installed on entrance or interior doors, furniture doors, bar sashes, and so on. It is not recommended to use one-piece hinges in rooms where it is often necessary to remove the door to move bulky goods (for example, furniture) and carry out repair work, since the constant unscrewing of the mechanism contributes to rapid wear and damage.
The universal hinges are equipped with bearings that ensure quiet and easy door opening. The number of bearings depends on the hinge size.

Types of universal hinges
Universal door hinges can be classified according to several criteria:
- by the method of fastening the mechanism to the door;
- by the material from which the devices are made.
Types of hinges, differing in the method of fastening
Universal hinges for doors, depending on the installation method, are:
- Overhead or card.

Surface-mounted or card-based universal hinges are easy to install. However, it is not recommended to use such a mechanism for fastening heavy doors, since the safety margin of the hinge, as a rule, does not exceed 50 kg.
A type of overhead loop is a butterfly loop.

- Mortise.

Mortise hinges require more careful and accurate installation. The advantage of such devices is a long period of operation and the possibility of a higher load.
- Screw-in.

Depending on the weight of the door, the number of pins of the device, which are the fastening elements of the hinge, changes. For the heaviest doors, a hinge with four pins on each side is used. The advantage of the hinges is that they can be adjusted in different directions.
- Hidden.

The principle of operation of the device is based on folding and expanding. When the door is closed, the hinge is not visible, which is why it is called hidden.
A type of hidden hinge is a bar hinge that allows the door to open both inward and outward.

For heavy doors, mortise hinges are used. For other types of doors, hinges should be followed, based on the weight of the structure and aesthetic preferences.
Materials used for the manufacture of universal hinges
For the production of door hinges can be used:
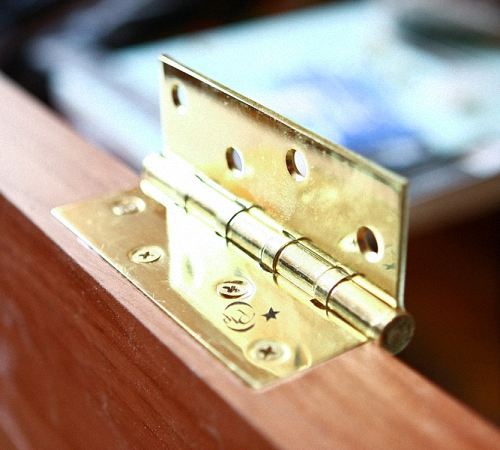
- brass. Brass fittings are distinguished by a high price and high quality. Brass hinges are virtually unaffected by the environment. The brass coating helps to protect the product from corrosion and gives the finished product a beautiful look;
- steel. Steel hinges are less expensive than brass hinges, but they also have a lower margin of safety;
- stainless steel. A big drawback of stainless steel products is the lack of a choice of colors. However, this disadvantage is offset by the low cost and strong wear resistance.
If the hinges are supposed to be located on the doors leading to the street, then it is recommended to purchase stainless steel or brass products. For interior doors, you can use hinges made of any material.
Hinge selection
The selection of the size and number of loops should be made based on the following table.

How to install different types of hinges
Installation of universal hinges is not a job that requires the involvement of specialists. Only hidden types of loops can cause difficulties.
Installation of a cover hinge
The universal overhead hinge is installed using a screwdriver or a screwdriver and a drill:
- at the first stage, the markup is made for mounting the device. The places on which the hinge will subsequently be fixed are marked on the door leaf and frame;
- a drill drills holes for fasteners, as a rule, available in the hinge kit;
- with a screwdriver or other device (screwdriver), the hinge is attached first to the door leaf, and then to the jamb.

A universal hinge without a tie-in is installed within 5 - 10 minutes. However, it will be quite difficult for one person to carry out all the work. It is more advisable to resort to the help of a second person when installing the loop.
Mounting the cut-in hinge
The insertion of universal hinges takes place according to the following scheme:
- a place is marked for future installation;
- a chisel removes a layer of the door leaf and frame, the dimensions of which correspond to the dimensions of the hinge;
- using a drill, holes are drilled for fasteners;
- the hinge is recessed into the prepared niche and screwed on with the self-tapping screws provided in the kit.

It is also recommended to carry out work on the installation of the mortise hinge in conjunction with a partner.
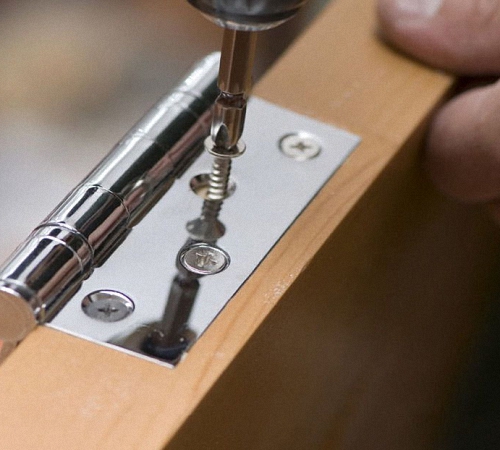
Installation of a screw-in hinge
Installation of screw-in hinges, as in the previous cases, begins with marking. This stage must be given maximum attention, since the performance of the structure after installation depends on the correct marking.

- holes for pins are drilled in the marked area (on the door and frame);
- screw the pins start from the door frame, and then screw it to the door leaf;
- the final adjustment of the loop is made;
- the holes are closed with decorative caps.
Installation of a hidden hinge

Concealed hinges are installed in a similar cut-in hinge pattern. The main difference is that a deep niche is made under the hidden loop, and not a superficial one. The hidden hinge itself is located inside the door.
Universal hinges are suitable for almost all doors: entrance, interior, furniture. The hinges are installed according to the exact preliminary marking. It is more convenient to carry out work on self-installation of the hinge with a partner.
As a rule, interior doors are sold without fastening elements, so after purchasing such a design, a home craftsman will have to install the fittings. Naturally, in order for the installation of door hinges with their own hands to be carried out correctly, it is important for the master to have basic skills in working with a locksmith's tool.
During the execution of such an operation, it is important to be extremely careful, because the incorrect installation of the hinges on the door will entail serious consequences. The most significant nuisance is the skew of the sash, which makes it impossible to close the door tightly.
All door hinges according to the installation method can be conditionally divided into the following:
- screw-in;
- invoices of the "butterfly" type;
- hidden inset awnings.
Installation of butterfly type door hinges is performed over the structure: one component is mounted on the door frame, and the second on the sash. In general, the "butterfly" is considered the most common type of fittings (it is used regardless of the type of door and the weight of the canvas).
Screw-in canopies are made in the form of threaded pins. Such fastening elements require utmost precision during installation: they are screwed into the canvas and the box.
Hidden elements have the most complex design: there are three pivot axes. Their installation is carried out in such a way that in the closed position of the door the fittings are not visible at all. That is why they got their name "hidden tie-in hinges" or "hidden awnings".
And yet, before proceeding with the installation of accessories, you need to choose the right one. Hinges can be left, right and universal.
Installation of surface-mounted fittings

What does a door hinge consist of?
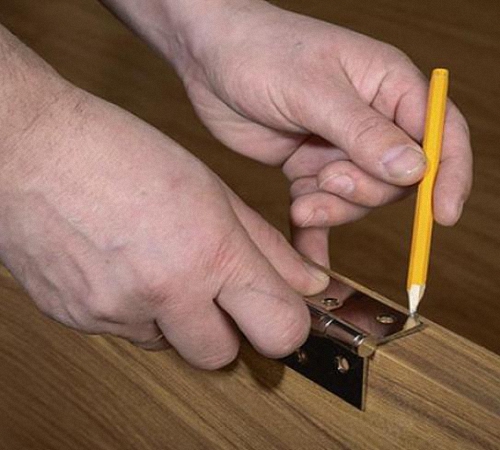
Installation of butterfly type fasteners begins with a marking: on the front side of the sash, mark 200 mm from the upper edge and exactly the same distance from the lower edge. When marking, the fittings are applied to the canvas so that the hinge part is directed to the front side of the door, and circle it with a pencil.
Then a recess is made along the contour line, the product is installed in this recess and it is fixed. In fact, this is one of the methods for attaching surface-mounted fittings.
The second method of fastening butterfly-type awnings provides a more accurate installation of the product.
It is implemented as follows:
- The canopies are fixed on the end side of the canvas with two screws.
- A small indentation is made along the contour with a knife.
- Remove the fasteners and remove the hinges.
- A thin layer of wood is removed along the contour line with a chisel.
Then the hinges are fixed to the structure using self-tapping screws or screws. It is important to pay attention to the following point: self-tapping screws must have countersunk caps, and the diameter of such caps must correspond to the size of the hole in the canopy provided for the fasteners.
Installation of screwed products
As a rule, three screw hinges are installed on low-weight sashes, but at least four are installed on heavy structures. Moreover, the more massive the sash, the higher the quality of the installed products.
Correctly installed screw-in products eliminate problems with closing the door. Some models are equipped with inserts made of self-lubricating material - nylon (such inserts reduce the coefficient of friction between individual structural elements).
The screw-in elements are mounted according to the template. In this case, the type of template depends on the type of the selected door system on which such awnings are installed. And besides, the number of screw-in hinges mounted on the sash depends on the height, width, and also the weight of the canvas.
So, the installation of fittings of this type is carried out as follows: you need to correctly markup, then you should drill the mounting holes for the hinge pins, install the awnings and fix them.
Inset of hidden awnings
Unlike overhead elements, which require a small recess for installation, hidden fittings need a deeper seat. To cut a groove for a hidden hinge, you need a milling machine: a hammer and chisel will not help here.
First, because with the help of such instruments, the operation will take a long time. And, secondly, for the reason that the hole must be made carefully, and this cannot be achieved with a chisel. A hammer and chisel can be used to cut the hinge counterpart into the door frame.
After the selection of the footprint is completed, they begin to install the hidden hinge. To do this, the canopies of the hidden inset are disconnected, one part (large) is installed in the hole, and the second (smaller) is attached to the door leaf. Self-tapping screws are used to fasten the hidden hinge.
Installing hinges on the door is not so difficult as it seems at first glance. The main thing here is attentiveness and accuracy: then everything will turn out in the best possible way, and the installed door will please the eye for many years and give you a good mood!
When choosing an entrance door or an interior door, people rarely think about the functional meaning of door hinges. It seems that the main thing is the beauty of the canvas, the reliability of the box, the appropriateness of the design of the door block for the comfort of the living space and not only. But do not forget that hinges play an important role in the operation of the door block. The blade itself is just a blank without properly sized canopies.
The hinges play a special role in the correct and trouble-free operation of the door unit.
The installation of hinges on the interior door depends on the correct choice of the required set of hinged fittings. Let's explore this topic in more detail to know how to choose loops? How to do it yourself?
Interior door hinges: the choice for every occasion
Perhaps you have paid attention to shelving with door fittings and may have noticed what a large selection of door hinges.
 Hinges for interior doors differ in design, color, size, material.
 They differ in size, number of holes, variety of fasteners, opening method. All this is no coincidence. Any hinge is designed for a specific type of door: wood, metal, plastic. The main nuance is the weight parameter of the canvas. You cannot hold a heavy metal door with two card hinges. Powerful welded elements are needed here. All door hinges are usually divided into the following types:

If it is possible to open the doors, the hinges can be divided into three more groups:
- left - with the ability to open the canvas to the left;
- right - open the canvas only to the right;
- universal - open in any direction.
This feature is an important point when choosing hinged fittings for interior, entrance doors. You should be guided in this way:
- stand to the doorway with your face;
- evaluate where the canvas will open - we take into account the fire regulations that the door should open forward in the direction of travel;
- for double-leaf, sliding doors, their own characteristics of hinged fittings.
This concludes the classification of hinges for interior and exterior doors. Now you need to study the specifics of the installation of each model.
Installing hinges on interior doors: a brief overview of all methods
The installation of hinges on interior doors or entrance doors depends on the type of fittings selected. The differences in the work algorithm are small, but it is worth dwelling on them in order to know how to install the loops with your own hands.
Installation of overhead hinges
This is the easiest DIY canopy available. It does not require special skills or adaptations. You need to prepare:
- canvas;
- door frame;
- a set of hinges (self-tapping screws are provided by the manufacturer);
- screwdriver;
- drill;
- roulette;
- level.
Overhead hinges are split or one-piece. This must be taken into account when installing. It is easier to install a detachable hinge by making the correct markings. The main thing is not to mix up the upper and lower parts of the canopy. Otherwise, the canvas will not be able to adhere to the box and will fly down. Check the function of the hinge before installation.
It is more difficult to install a one-piece loop - it is necessary to combine the canvas and the box parallel to each other, at the same level.
- If the hinges are not universal, check the possibility of opening the web in the right direction.
- Next, drill holes so that the timber does not crack if the door is solid.
- Screw the self-tapping screws into the holes using a screwdriver with a special nozzle.
- Check the operation of the door unit. If there is any imbalance, correct the defects.
Watch the video on installing the patch hinge:
Do-it-yourself installation of mortise hinges on an interior door
Mortise hinges require more time, skill, tools to install. The cut-in hinge, like the laid on, can be detachable or one-piece, universal or on a certain side. The cut can be carried out only to the thickness of the applied strip or set deeply (hidden hinges).
With your own hands, you can install a mortise loop of the first type. It is better to entrust hidden hinges to specialists if there is no special equipment available for excavating a deep groove. This is done with a milling machine.
Conventional mortise loops require a chisel, chisel, hammer for installation in order to make a small depression in the product.
- Take a tape measure and measure the required distance to install the hinge in the door with your own hands. According to the standard, it is necessary to retreat 200-250 mm from the top and bottom edges. If you need to place a third loop, mark in the middle or slightly lift it up. See the scheme for installing hinges on the door according to the standard:
- Attach the canopy with a bar to the markup and trace the outline with a simple pencil.
- Do the same with the second part of the loop.
- Now it is necessary, using a chisel, a hammer, a chisel, to make a depression along the outlined contour to the size of the strip thickness. Perform this step slowly and carefully. If you remove more, the hinge will be distorted, the door operation will be disrupted. So take your time.
- Place the plank in the groove you have created. If the hinge is flush with the surface, you can proceed to screwing it in.
- Drill holes for self-tapping screws in the right places.
- Tighten the screws, pulling the hinges tightly.
- Follow the same steps for the rest of the awnings.
- Connect the box to the door leaf and check the movement of the interior door.
This completes the installation. More details on the stages of installing mortise hinges on the door can be seen in the video clip:
It is more difficult to install hidden hinges, but we will describe the sequence of actions in case you decide to install the hinges on the door yourself. The sequence of actions differs little from the installation of simple mortise hinges.
You only need to have a milling machine to make the groove to the desired depth. The peculiarity of the hidden hinges is the difference between the composite strips. The liner-mounted part is larger than the rack-mounted part of the box. Therefore, do not mix up the elements in places.
- Lay out according to the sizing information above. Place the router in place of the hinge and make a recess.
- Check the depth of the groove by inserting the hinge element into it. Trim the excess with a chisel. The bar must be completely recessed into the canvas.
- Perform the same manipulations on the door frame.
- Fasten the elements with the supplied screws.
If all work is done correctly, the door will open and close smoothly. Watch a video about installing a hidden hinge with your own hands:
Additional Information
Installation of awnings for an interior door can be carried out at different times:
- when buying a new door; / li>
- when replacing old canopies on an old canvas.
There are several ways to approach the installation:
- if the door is new, then it is easier to install the hinges at the stage of assembling the door frame and together with the door leaf;
- you can hang the hinges after installing the door frame without the door leaf. It's harder to do it, skill is required;
- if it is just replacing old canopies, then there is no need to choose. Dismantling and installation must be carried out with an assistant in order to correctly adjust the level of the elements. The best way would be to buy hinges similar to the old ones and install them according to the old sizes.
In any case, installing hinges on an interior door with your own hands will be justified by cost savings, new experience in the repair business. Watch a video about installing hinges with your own hands in a story about installing interior doors:
Leave feedback, advice, comments. It is possible that you have your own ways of installing hinges on an interior door.
Very often, poor-quality fittings or not quite correct installation lead to door defects such as creaking, deformation of the door leaf and spontaneous door opening. Often the installation of doors is carried out by the company that installs the doors, but when buying a collapsible model, you often have to do the installation yourself. Or, sometimes the moment comes when it's time to put in a new fastener.
The sizes of the hinges are different, therefore, today you can install everything that, as it seems to you, suits your door leaf. The choice is really great. If we talk about the material, then today you can buy steel, brass, brass hinges.

Steel hinges are a fastener that does not grind, which means it will last a long time. Brass hinges are the most popular, everything is simple - brass is easy to process, chrome-plated, polished. For the manufacture of brass-plated compositions, different alloys are used, and on top they are coated with chrome, bronze, and gold.
The weight of the fittings on which the door is to be fastened is also very important. Sometimes a couple of loops are not enough to get everything right. Then the number of hinges increases to three if the door is heavy and massive. And if the products are also equipped with bearings, then they will not creak even under heavy load.
What hinges are best for interior doors
So, hinges differ in size, also in the number of holes, opening method, mechanism of action, etc. Two card hinges cannot hold a heavy massive door, in this case there must be heavy welded elements. Plastic doors use some awnings, wooden doors are usually installed on others, etc.

Types of door hinges:
- Overhead- they do not need any grooves or recesses;
- Mortise- they are installed in a certain recess, which is made both in the canvas and in the box;
- Screw-in- they have special screws that are built into the platform;
- Corner- these are the models that are used to install the pendulum system.
Also, the loops can be left, respectively, right, and it is also worth highlighting the popular series of universal loops. To determine what type of loops is needed, you can do the following. You need to face the doorway, evaluate exactly where the canvas opens, the door, remember, can only open forward to the direction of movement (this is if it is correct).
Precise insertion of hinges into interior doors
Marking is the first step in installing hinges. You can mark the attachment point like this: step back 20 cm from the top and bottom of the door leaf, the initial lines are outlined with a pencil. Then the loops are applied to the marks made, the contour is outlined, the points at the attachment points are indicated.

To ensure free movement of the fasteners, you need to make sure that the rods do not touch the door leaf. Inspect the location of the future fittings - there should be no defects, knots, etc. at the insertion points. Otherwise, the screws screwed into these places can cause distortions or even split the door.
After that, the door block is assembled, and in the same way it is necessary to make markings on the box, observing the gaps of 2-3 mm between the canvas and the frame. It is convenient to do this when the door is not installed. If the door leaf is heavy, you need to cut in a third hinge. Then the inset is not made in the middle, but with some displacement to the upper loop. This will regulate the load on the fittings.
Installation of flush-mounted door hinges
Very often today so-called hidden door hinge models are used today. They do not weigh down the facade of the doors, and besides, they are easy to maintain. And the design features of such models increase the class of such a category as burglary resistance, and if the entrance door is an important point.
29.jpg)
How to install invisible hinges:
- The position of the parts is outlined;
- An electric milling cutter makes a recess for the mechanism;
- A chisel is used to remove a layer of material in place for the fittings;
- The hinges are disconnected;
- The larger element is inserted into the door frame, fixed with self-tapping screws;
- The smaller part is fixed in the canvas;
- Both hinge parts must be connected and the fixing screw tightened.
Sometimes decorative inserts are installed over the mountings. And if you need to adjust the hidden hinges, this is done only in the open position. First, the decorative overlays are removed, then the screw is tightened with a hex key. The design features are such that the position of the door can be adjusted in three planes.
How to check the correct fit
To check if the loop is seated correctly, you need to take a ruler and press the loop with it. If the hinge is not cut in correctly, and it protrudes too much, there will be a serious gap between it and the door leaf, and on the other side the opening is insufficient for the door to close. To fix this, you need to unscrew the hinges and plant them deeper.

And if the hinge, on the contrary, is set very deeply, the door will press the box and pull the hinges. And the way out is this: a support-pad of the required thickness is cut out of thick cardboard, it is placed under the loop so that it fits into place. In order not to cut in-cut endlessly loops, you need to do the markup correctly.
How to embed hinges in an interior door (video)
Fixing hinges are made for wooden, metal, and plastic doors. Choose high-quality fittings, inspect them when buying for defects, and mount the fasteners according to the rules, with accurate markings.
Good results!
The installation of the door frame is accompanied by the installation of the door on the hinges. It is quite possible to carry out this process on your own, however, if you become familiar with the technology of its implementation. There are several methods for installing the door on the hinges. We will consider further how to embed the hinges into the door and how to remove the door from the hinges.
How to hang a door on its hinges: features of the professional method
This method of hinging the door is easy to carry out. It is most often used by professional workers, due to the speed of work. Therefore, in the process of work, you will need a special tool. First of all, you will need to use a hand-held milling machine to cut the hinges. With its help, it is possible to carry out work on the arrangement of a clean cut. Also, you should prepare a tool with which you can cut the loops.

This device has the form of a lining, which prevents damage to the door leaf by mechanical damage. In addition, with the help of some professional tools, it is possible to completely set the dimensions of the hole for the hinges on the door leaf. In this case, it is possible to significantly facilitate the process of installing the door on the hinges.
Please note that there is equipment with which it turns out to build a groove both on the surface of the canvas and on the door frame. With its help, the two parts of the door frame are connected together, so the process of aligning the groove joints disappears by itself. It is with the help of this equipment that it is possible to speed up the speed of installing the hinges on the door.
If you do not have such tools, you should not give up, since with the help of one milling machine, you can also perform the work of assembling the door on the hinges. This tool, if you have the skills to work with it, allows you to build a groove connection for hinges, both on the door and on the door frame. However, the disadvantage of its use is the low quality of the result obtained and more time to complete the insert.
Also, with a careless attitude to the mechanism, there is a risk of scratching the door and spoiling the attractiveness of their appearance. Therefore, the heel of the milling machine must be covered with a protective material such as felt.
How to hinge a door in a homemade way
This method is characterized by a lower quality of the result obtained than the previous version. To carry it out, a chisel and a hammer are enough. The popularity of this method is primarily due to the availability of materials for its implementation.
If the door is laminated, the result is that the edges of the hinge groove will be sloppy and aesthetically unattractive. Instructions on how to install the hinges on the door with your own hands are given below:
1. At the beginning of work, markings should be made for installing the groove. To do this, place the canopy on the end of the canvas, circle it with a pencil. Please note that at this stage you should be especially serious, since the hinges should be installed in proportion to the door leaf. Incorrectly installed hinges will not be able to rationally distribute the load and will lead to premature door failure.
2. The following is the process of making the groove edging. For these purposes, a hammer and a chisel are used. The chisel should be installed inside the door leaf by a few millimeters. This edging should be made in relation to the previously made markings.
3. The following is the process of sampling the groove connection itself using a chisel. In this case, the chisel is installed with a slight slope. The groove connection is knocked out with a hammer. At this stage, special care should be taken to avoid damaging the face.
This hinge installation method is suitable for a wooden door, which is subject to further painting. Since after its implementation, sloppy chips and samples are formed. Staining will help to eliminate and improve their appearance.

How to put hinges on a door: features and technology of the process
If you do not have experience in installing doors on hinges, then it is best to use this option. The use of a certain type of awnings allows you not to cut them into special grooves. There are two such ways of doing work:
1. Application of hinges without stitches. To install this kind of hinged mechanisms, you do not need to cut grooves either on the door or on the box. Their design is quite simple and allows them to be mounted directly on the door. After the door is closed, they are installed into each other, since the thickness of one part of the hinge is no more than 0.25 cm, then a technological gap is formed between them. To install this hinge, just screw it on the door and on the door frame. Among the disadvantages of using this method is, first of all, the unaesthetic appearance of the door, after their installation.
2. The use of screw-in loops is also important for beginners. In this case, the grooves on which the usual hinges are attached are replaced with holes. To install such a hinge, you will need two holes in the door frame and one in the door itself. To install the canopy, it is enough to screw it into the previously prepared holes. Please note that the holes must be in the correct order relative to each other. The appearance of such loops is more attractive than that of the previous version.
In addition, another alternative door installation option is the use of pivot hinges. Their insertion is carried out directly in the canvas. However, a certain design of such a loop hides the place from the inset, so the aesthetic side of the issue remains at the proper level.
This loop consists of two plates, the rotation of which is carried out around the axis. Installation of this device is carried out at the bottom and top of the door. In some cases, the top hinge is still visible, but only if the door is left open.
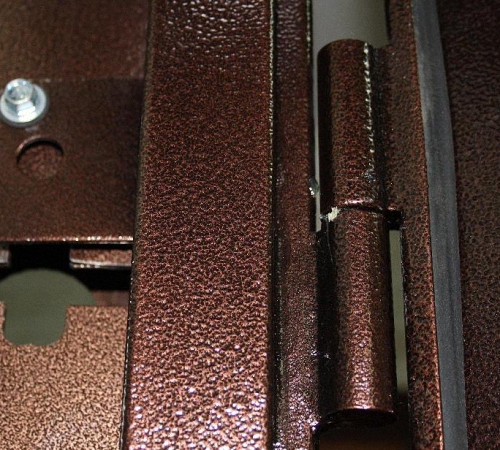
How to weld hinges on a metal door
To carry out these works, electric arc welding is used. In this case, you must have the skills to work with these tools. Correctly installed and welded hinges on the door will ensure their high-quality and soundless opening.
In addition, in the process of work, you will need to have:
- steel door hinges;
- plates;
- welding;
- electrodes;
- locksmith's hammer;
- grinders;
- special clothing, masks and protective gloves.
Most often, the hinges are in the form of a cylinder or differ in the presence of hexagons. The first version of the hinge is simpler and easier to weld to the door. For welding the loops, special platics are used.

All work is carried out outdoors, the surface for laying the door must be strictly horizontal. the scarves should be welded to the hinges using a continuous seam. Otherwise, the quality and reliability of the connection will be impaired.
In addition, the plaque should be selected in relation to the size of the loop. Also, the load from the door, its weight and dimensions should be taken into account. With the help of these elements, it is possible to equip a so-called working platform, on which welding work will be carried out. In addition, they will serve as a support between the door and the hinge.
Before installing the hinges on the door and before starting welding, the doors are installed in a vertical position. Next, their position in relation to the hinges is checked. After checking and marking the welding points, the welding process on the door frame follows. It is with the help of plates that it is possible to facilitate the welding process, for people who did not have experience in performing these works.
Use a laser level to check the correct installation of the door. It is he who will help determine the installation location of the second of the loops, after welding the first. This is followed by the baiting of the hinge, pressing the door to the canvas and continuing to work. After completing the welding of the loops, the seams are processed using a grinder.
How to hang hinges on a door: features of the choice of hinges
When it becomes necessary to hang hinges on a door, people who have never done this turn to specialists and spend quite a lot of money on this process. However, before attaching the hinges to the door, we recommend that you familiarize yourself with the recommendations that will help even beginners complete this process.
First of all, the installation of loops begins with their selection. You should also determine the number and direction of the hinges on the door, if they did not go to it in the package. If the door is double-leaf, then its installation will require two hinges for each of the leaves.
There are several options for door hinges:
- card;
- mortise;
- hidden;
- screw-type hinges.
Each of these hinge options has individual advantages and disadvantages. Card hinges are either removable or non-removable. The second version of the hinges provides two-way door opening. However, if the door needs to be removed, it is best to use the removable hinges.

The mortise version of the hinge is used if the total weight of the door leaf is more than twenty kilograms.
To install hinges on a single-leaf door, you must determine the type of door opening. The number of hinges is determined based on the weight of the door, the material from which it is made and the operational load that is assigned to it. To fix a door consisting of one leaf, two hinges are enough, if it is an entrance one, then it is better to use three hinges.
Tip: When buying buttonholes in a store, ask the seller to open them in front of you. Since quite often there are mechanisms with deformed rods inside.
In addition, make sure that the color of the hinges is in harmony with the overall tone of the door, fittings in the form of handles and a lock. The self-tapping screws must also match the color of the hinges. To carry out work on hanging the door on the hinges, you will need:
- plumb line;
- level;
- drill or screwdriver;
- chisels;
- hammer;
- measuring tape;
- carpenter's pencil.
The hinges are installed in relation to the upper and lower parts of the door by 20-30 cm. If there is a third hinge, its installation is carried out directly in the center of the door leaf. If you plan to install four hinges, then the total length of the door should be divided into five parts and the location of the installation of each canopy should be marked.
One part of the hinge is installed on the door leaf, without rods. The second part of the hinge is installed directly on the door frame.

In order to fix the hinge on the canvas, follow the instructions on how to install the hinges on the door:
1. Place the hinge on the surface of the door and trace around it with a pencil.
2.Using a chisel, remove the loop for installing the hinge. The depth of the layer to be removed should be equal to the thickness of the loop itself.
3.Using an electric drill or screwdriver, fix the loop using previously purchased self-tapping screws.
4. When choosing a drill diameter, stop on an element that is half a centimeter smaller than the self-tapping screw itself. Thus, it will be possible to increase the reliability of the fastening.
6. In these areas, you should also remove the top layer using a chisel. In these grooves, fix the second part of the canopy. Pay attention to the horizontal arrangement of the rods. Otherwise, it will not be possible to achieve a smooth door opening.
It is possible to change the order of actions. In some cases, the hinges are first fixed on the box, and then on the door.
If, when checking the door for operability, a creak is observed, then use machine oil, technical vaseline or solid oil to lubricate them. If the hinges are too deep, special linings based on rubber or thick cardboard are installed under them.

If there is a problem of too low position of the door leaf, then to raise it, install washers between the canopies. If during the installation of the hinges you have a stuck screw that cannot be pulled out in any way, then use a drill to remove it. The place where the screw was installed should be sealed with a wooden dowel, which was previously moistened with glue.
Installing hinges on the door video: