The crown of the snow queen is her own. Crown for the Snow Queen: making an elegant accessory for a little princess
At the New Year's carnival holiday, girls often play the role of a snowflake or a snow queen. If for the first case it is not difficult to choose an outfit, then in the latter case the problem of finding a suitable headdress may arise. Unfortunately, a beautiful crown for the snow queen is rarely found in stores. Therefore, you usually have to craft it yourself.
Ice accessory
This crown has a "candy" effect due to the use of non-standard material.

In work on the product you will need:
- transparent PVC film or plastic (you can take old document covers);
- tulle with a silver pattern;
- cardboard;
- shiny fabric (silver);
- thread, needle;
- scissors;
- thin wire;
- silver braid;
- elastic band 2 cm wide;
- hot glue;
- decorative elements (for decoration).
First of all, the circumference of the head is measured. Based on the resulting measurement, you need to calculate the width of the base of the tops of the future crown. There are seven of them in the product.

The height of the triangles is selected individually. You just need to take into account that the central triangle will be the highest. Details adjacent to the central part are cut out 2 cm shorter than the main one. The next two triangles are 2 cm lower than the previous ones, etc. Based on the above principle, 7 triangles are cut from the PVC film. The same parts are cut out separately from tulle.

A corresponding tulle detail is applied to each blank. A wire is sewn along the edge of the blanks using an overcasting seam. All triangles are framed with silver braid. It is advisable to bend the figures slightly so that they keep their shape better. The finished transparent parts are assembled with an elastic band. The most convenient way to do this is on a sewing machine. The ends of the product are connected into a ring.

To create a volumetric effect, you need to complement the crown with opaque elements. To do this, two triangles are cut out of cardboard. Since these parts will be located on the front of the crown, their height should be slightly below the transparent triangles.
Cardboard blanks are sheathed with shiny fabric and fixed with safety pins to the front "pieces of ice" of the crown, as in the photo.

Dense and transparent details are attached to each other. It remains to decorate the crown according to your own taste. In the work you can use rhinestones, beads, sequins, lace elements.

The royal ice accessory is ready.
Fast option
Advice! It is quite possible to make a crown faster, if you do not cut out each clove of the product separately, but use a continuous pattern technique.

To do this, prepare:
- cardboard;
- fabric packaging for flowers;
- scissors;
- gum;
- silver braid;
- silver-colored paper;
- threads;
- glue;
- sequins in the form of snowflakes.


A crown pattern is drawn on the cardboard. The workpiece is cut out. The pattern is applied to the fabric and outlined with allowance for allowances.

The fabric piece needs to be cut out, then put on a cardboard mock-up. The allowances are folded back and glued to the cardboard.

Glue is applied from the seamy side of the workpiece, after which the crown is glued onto silver paper. This hides unsightly allowances on the back of the product.

The crown is neatly cut. The product is decorated with large sequins in the form of snowflakes.

The outline of the crown is framed with silver braid. Depending on the quality of the braid, you can glue it with hot melt glue or sew it yourself.


The crown is ready. If the holiday is already "on the nose" and you urgently need to acquire a "snow" crown, then you can try a simplified version - a product made of cardboard. So that the crown does not look like a "hastily craft", it is advisable to replace the cardboard with a piece of light wallpaper with a pattern.

A mock-up of the crown is drawn on it. The template needs to be cut.

Then the workpiece is painted over with a silver spray paint. Since the aerosol tends to be sprayed in all directions, it is recommended to foresee this moment and paint in the corridor, having previously covered the floor with newspaper or polyethylene.
First, paint the wrong side of the product. On the front side, you need to carry out two stages of staining. After applying the first layer, you need to dry the product and repeat the staining.

When the crown is completely dry, you can start decorating it. The edges of the product are decorated with piping with rhinestones or any silver braid. The crown is decorated with additional elements corresponding to the theme of the carnival costume.

The final step is to sew a wide elastic around the edges of the garment. Measure the elastic in such a way that the crown fits snugly around the head.

A carnival headdress is ready to delight its owner. Any proposed master class will allow you to create an accessory not only for a child, but also for an adult. This is especially true for kindergarten teachers and heads of theater groups.
Related videos
The video selection will help you better understand the process and make the product faster.
Lyubov Lisenkova
I bring to your attention a master class on making a crown for the Snow Queen.
To work we need:
1. Thick paper (preferably cardboard or Whatman paper)
2. Self-adhesive film (ideally silver, but you can also blue)
3. Glue gun
4. Gun glue
5. White beads
6. Pearl sequins on a thread
7. Snowflakes are white
8. White half-beads on an adhesive basis
9. White semi-droplets on an adhesive basis.
11. Scissors

Manufacturing:
1. Made a crown pattern on thick white paper.

2. I pasted a self-adhesive blue film (before the New Year I could not find a silver film anywhere).

3. We proceed to the design of the crown.
4. Using a glue gun, I glue pearlescent sequins on a thread along the contour.

5. I decorate the crown with snowflakes (you can ready-made, you can squeeze out with a curly hole punch)
6. Since the Snow Queen's crown has corners, I decorate them with white half-beads on an adhesive basis.
7. In the central part I add white semi-droplets on a glue base to the snowflakes rays.


8. I string beads on a thread or thin wire and glue the resulting pendants to the crown.


Here's a crown I got.

Related publications:
 I needed a crown for my character for a lesson with children. I thought about it for a long time - from what and how to make it work and.
Scenario of the holiday "The Tricks of the Snow Queen" Purpose: to create a festive mood for children and adults who came to the holiday; to form love for the mother, respect for the woman; develop.
Synopsis of a musical lesson for children of a combined orientation group 6-7 years old "The Tricks of the Snow Queen" The Snow Queen's Tricks (Children enter the music hall) M. R: I am delighted to welcome you to the music hall. (Conducted communicative.
Integration of educational areas: cognitive development, speech development, social and communicative development, physical development.
 Purpose: Christmas decoration, attribute for role-playing game, toy, gift. Purpose: creating crafts using the origami technique. Tasks:.
Scenario of the holiday for children of the preparatory group "New Year's Adventures of the Snow Queen" Characters Adults: Leading Snow Queen Santa Claus Children: Snow Maiden Gerda Kai Snowflakes (6) Three white horses (3) Atamansha Robbers.
New Year's party "The Tricks of the Snow Queen" Leading. A wonderful day is coming. The New Year is coming to us. A holiday of laughter and inventions. A holiday of fairy tales for children. How beautiful it is in our hall, We.
"Crown of the Snow Queen", a fragment of a costume. Master - class from a series of master - classes "Working with waste material"
Kingdom of the Snow Queen
... On a sparkling piece of ice
I look dreamily
There, inside her is a picture
I find alive:
Beyond the transparent smooth edge
Perfectly clean and strict
Illuminated by the radiance
The royal palace is visible! ..
Illa Mushe
I offer you another idea of using junk material - SD discs.
Audience age: children of middle and senior school age, teachers of technology and teachers of additional education.
Purpose: Crown for the costume of the Snow Queen.
Target: Craft a crown for the Snow Queen costume.
Tasks:
- to work out the ability and skills to carefully cut out the details on the fabric with a burner according to the drawing;
- to form the ability to distribute the drawing according to a given shape;
- develop imagination and creativity.
The crown was made of precious metals (mainly gold) and was richly decorated with precious stones and pearls. Crowns had various shapes (tiaras, diadems, hats, crowns, hoops with leaves, teeth and plates, etc.).
While creating the Snow Queen's costume for the New Year's holiday, thinking about the Snow Queen's crown, something cold, icy, iridescent was imagined.
If you buy rhinestones, it turns out to be expensive for the price. And the disks are just that! When hit by rays of different colors, the disc shimmers in different colors of the rainbow. The illusion of rhinestones is created in the finished product.
At low cost, the product looks decent. The peculiarity of the product is that the choice of disc sizes is limited and therefore the size of the crown depends on the selected discs.
To create the shape of the crown, you need to turn on your imagination! I used one large and two small discs.
Progress:

1. Materials required for work:
- the remains of white fabric on a synthetic basis, bandeau, sequins, beads.
- SD disc, DVD big and small, threads, snowflake patterns.
- paper for transferring a drawing, tracing paper.

Instruments:
- scissors, pins, pencil, marker, ruler, fabric burner, copy table (illuminated glass), iron.
2. Step-by-step process of making crafts

- Making a crown pattern. To get a symmetrical pattern, fold the paper in half. Draw out the bottom edge of the crown with a curved line taking into account the size of the head (you can make an allowance for a different head size). We distribute disks. Decorating the top edge

- Cut out a drawing from paper (in this case, according to the principle of snowflakes). The size of the picture corresponds to the size of the disk from the outside. Do not go beyond the mirrored part closer to the center of the disk.
The drawing should resemble rhinestones of various shapes

- We translate the pattern of the crown into tracing paper, in the planned places we translate the drawing from the "snowflakes". We outline with a marker

- We attach a white fabric to the tracing paper with pins. We sit down at the backlit copy table and burn out the inner fragments from the middle of the work to avoid displacement or "bubbling" of the fabric.
Attention! If you burn it directly onto the disc, the disc will burn!

- Remove excess fabric

- We transfer the pattern of the crown to the bando and cut it out. (Bando is a thick adhesive fabric).
We glue the bando with an iron on the white fabric intended for the lower part of the crown

- We put the discs between the top and bottom of the crown

- Fasten with pins

We sit down at the backlit copy table and weld both layers of fabric along the outer contour of the bando, while simultaneously burning the contour lines of the two layers of fabric. A strong weld is formed along the cut line

- So that the discs inside the crown do not move, we fix them along the contour - we sew sequins. If desired, you can additionally embroider the entire crown with sequins

- We fasten the ends of the crown to the desired size on the head. The crown is ready

This technique can be used to make stage costumes, such as the Elvis Presley costume.
Enjoy your work!
Thank you for the attention!
Snow queens, princesses and snowflakes have always been popular. But after the release of the cartoon "Frozen", beautiful ice ladies are just in trend. Both small and big girls like to be the mistresses of frost and blizzards. Of course, demand creates supply, and buying a crown for such a suit will not be difficult. But such crowns are either very primitively made or not cheap. But the crown of the snow queen with your own hands is not at all difficult to do, you can save a lot and get your own unique decoration.
Simple and budget
The simplest do-it-yourself crown for a snow queen is made from a minimum set of materials.
You will need:
- Ready-made plastic snowflakes, abundantly covered with sparkles (in front of them there are many in stores, and after the holiday they can be bought for a penny at sales).
- A strip of white fabric measuring approximately 60 x 8 cm.
- Elastic band 2 cm wide, about 60 cm long.
- Scissors.
- White threads.
- Sewing machine (can be sewn by hand).
- or clear craft glue.
The work has to be neat, so you may need a three- or two-liter jar (depending on whether the crown is large or small). It will be convenient to put on jewelry on it and calmly work with a needle or glue.
To begin with, attach the elastic to your head so that it fits snugly, but does not cause discomfort. Cut off the required amount. Then measure the circumference of your head and make a strip of fabric to the desired length. Sew it into a tube of a size so that the elastic fits exactly in it. Do not make a common mistake and do not cut the fabric as much as the elastic, because it will stretch. Glue the snowflakes around the circumference, taking into account the future tension of the fabric.
Based on "Frozen"
Suitable for little girls in the style of the cartoon sorceress Elsa. To do it, use this master class. The crown of the snow queen with your own hands is made from inexpensive materials that are easy to find without even leaving your home.
You will need:
- Plastic comb from a hair clip.
- A sheet of thick cardboard measuring about 20 x 20 cm (even a dense cereal box will do).
- Scissors.
- Pencil.
- Gold-colored acrylic paint.
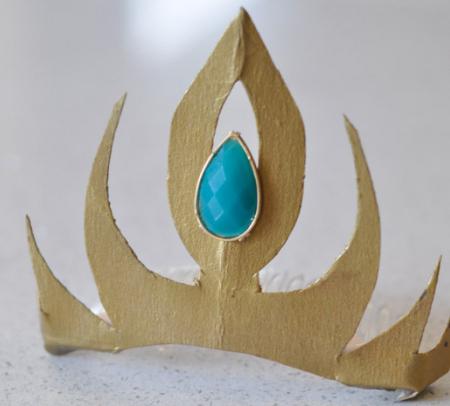
- A turquoise pebble with one flat side.
This crown is done like this: fold the cardboard in half and draw the outlines of the crown.

Look at the pictures from the cartoon, notice that the base of the crown is a central sharp protrusion, and three curls extend from it. It is not difficult to repeat the shape, but if it does not work at all, print out a picture of the crown and sketch. Add 1 cm along the bottom to attach to the scallop and cut carefully.

In the center, at the crown of Elsa, there is a notch and a turquoise pebble. Make this cut, but remember to leave some cardboard to glue on the bead. Paint with golden paint, glue a pebble. Slightly press the crown into a rounded shape and glue the comb.
More ideas for paper crowns
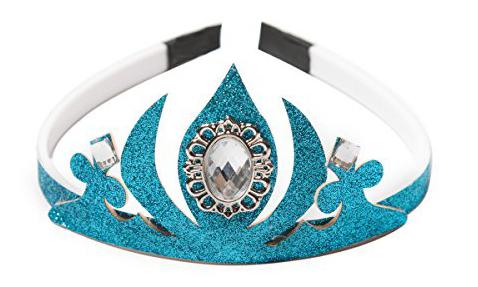
By a similar principle, the crown of the snow queen can be made with your own hands from cardboard, glue and glitter for manicure.

In order for it to acquire functionality, you need to glue a strip of cardboard inside, buy a white or shiny headband and glue this crown to it.
Well, and one more more complex variation made of cardboard, sequins, headband and brooches.
Sparkling Icicle Circlet
For an older girl, you will need a more graceful crown of the snow queen. It is also easy to make it with your own hands.
For manufacturing you will need:
- 70 cm of stiff wire.
- 5 m of very thin wire.
- Oval beads.
- Drop beads.
- Sandpaper.
- Colorless varnish.
- Nippers.
- Elastic band 20 cm.
A large crown for the snow queen with their own hands is made longer than children's cardboard counterparts, but she will calmly survive more than one carnival or photo shoot.

First you need to prepare the base of the crown. To do this, cut off the required amount of wire along the circumference of your head, leaving 2 cm of margin on each side. Bend the ends into a loop and treat with colorless varnish so that they do not scratch the skin and cling to the hair. The crown can be left in this form and fixed in the hairstyle with hairpins, or you can thread an elastic band through the loops and securely fasten it on the head.
Then, with a couple of turns, we fix a thin wire on the base and begin to make an imitation of icicles. To do this, string 10 beads, drop-shaped and one more oval. We pass the wire back through 11 beads, except for the top one. It turns out a small icicle made of beads. We do the rest in the same way, but of different lengths. In order for the icicles to stand evenly, you will need to intertwine them with each other horizontally. It turns out sparkling like a snow queen. With your own hands, you can make earrings or bracelets suitable for the suit from the remnants of materials.
Snow queen with their own hands. Master class with step by step photos
Master class for children "Morena-Snow Queen of the Slavs"
Author: Victoria Fomicheva, 11 years old, studying at the "Children's Art School named after A. A. Bolshakov", Pskov region, the city of Velikiye Luki.Teacher: Natalya Aleksandrovna Ermakova, teacher, Municipal budgetary educational institution of additional education for children "Children's Art School named after AA Bolshakov", Pskov region, the city of Velikiye Luki.
Description: work can be done with children of primary school age. The material can be useful for preschool and additional education teachers, teachers, children and their parents.
Purpose: character for table theater, interior decoration, participation in creative exhibitions.
Target: creation of the image of the Snow Queen.
Tasks:
- to acquaint children with the image, character and history of the Snow Queen in Slavic mythology;
- to teach how to create an image of the Snow Queen using the technique of modeling and painting on plasticine on a volumetric form;
- improve modeling skills, gouache technique;
- develop creative imagination, the ability to work according to a plan;
- foster interest in native culture and traditions.
Hello dear guests! From childhood, fairy tales enter our consciousness, our reading experience. And if the reader of different ages is offered to list the heroes of a fairy tale, then, undoubtedly, they will be primarily mythological characters - Baba Yaga, Koschey the Immortal, Serpent Gorynych and many others. The source of the creation of these characters is folklore, but it often happens that these mythological characters become images of the author's literary works.

Today our attention was attracted by the image of a special fairy-tale character - the Snow Queen, the mistress of Winter, the mistress of the winds, blizzards and blizzards. The image of the Snow Queen attracts and enchants with its cold unattainable beauty. A heart of ice is hard to break, but even harder to melt. The fire of passion will never be reflected in indifferent eyes, and tenderness will not flare up with a barely noticeable smile on the lips of the one created of ice. The blinding white snow will not melt in her soul, in which it is so easy to forget herself with the last, disastrous dream.

The fairy tale "The Snow Queen" was written more than 170 years ago and first saw the light of day back in 1844. This is the longest tale of Hans Christian Andersen, which, moreover, is very closely related to the life of the writer.
Andersen himself once admitted that he considers the "Snow Queen" a fairy tale of his life. She lived in it since the time when the little boy Hans Christian played with his neighbor, blond Lisbeth, whom he called his sister. She accompanied Hans Christian in all games and undertakings, and was also the first listener of his fairy tales. It is very possible that this particular girl from the childhood of the famous writer became the prototype of little Gerda.

Not only Gerda actually existed. Andersen's biographers claim that the prototype of the Snow Queen was the Swedish opera singer Jenny Lind, with whom the writer was in love.
The girl's cold heart and unrequited love prompted him to write the story of the Snow Beauty Queen, who is alien to human feelings and emotions.
You can also find information that Andersen was familiar with the image of the Snow Queen from early childhood. In Danish folk lore, death is often called the Ice Maiden. When the boy's father was dying, he said that his time had come and the Ice Maiden came for him. Perhaps Andersen's Snow Queen has a lot in common with the Scandinavian image of winter and death. Just as cold, just as insensitive. Her kiss alone can freeze the heart of any person.

In addition to Scandinavian mythology, the image of the Ice Maiden is also present in other countries. In Russia, this is Mara-Morena, the Great Goddess of Death and Winter, the wife of Koshchei, our Snow Queen!
Mara is the witch goddess. Her name is deciphered as "Ma-Ar Ra", "Ma", that is, mother, woman; "Ar" is joyous, fertile; and "Ra" is the one who sees the essence of things and has a soul. She is the goddess of darkness, the goddess of the night sky and momentary emptiness, the goddess of mystery.

In the mythology of any people associated with the annual cycle, spring has always personified life, youth and light, and winter - old age, death, darkness. The Slavic goddess of death, Marena, has a very ancient origin. Legends about Marena go back to the Proto-Aryan myths, from which she passed into the myths of the Germanic tribes, as well as the Scandinavian, Celtic and others.
November is a special month: according to calendar dates, it is still autumn, but according to the weather it is a real winter and according to the national calendar, it was in November that winter began.
In Slavic mythology, Marena (Marana, Morena, Marzhan, Marzhena) is associated with the embodiment of death, with seasonal rituals of the dying and resurrection of nature, as well as with the rituals of making rain. In the fall, the Goddess Marena chases away the warm, summer sun God Yarilu and establishes her Kingdom of snow and frost on the earth. On November 25, the Slavs met the day of the Goddess Morena, mistress of winter and night.

It was believed that on this day there is always disgusting weather - rain, snow, wind. On this day, it was forbidden to create any praises and sacrifices to the gods, since all of them would be unwittingly brought to Marena.
To fight winter, cold and death, people had only one means - fire. Only the light of a living flame could scare away all the forces of nature hostile to man, which always seemed to people to be controlled by someone's ill will. After all, winter with its frosts and hunger every year took away numerous lives of those who were weak - the sick, the old, the young ...

And so, in order to somehow protect themselves from Marena and show her that they are not afraid of her, intimidate, drive away, the Slavs gathered around the world and went to the most disastrous place - to the forest swamp. After all, it was also believed that it was in the forest swamps that all evil spirits belonging to the retinue of the dark deity, which was popularly called the one-eyed Kikimora, nest.
Flaming smut was brought to this swamp and extinguished in the Elani (unfrozen bog) in order to symbolically "rebuff" the goddess of winter cold and death. After all, there were long nights and short days without the sun ahead, from the most ancient times was considered the enemy of all dark forces and a friend of people.
But in the winter, cold world of Marena, the power of the sun is insignificant, it can do nothing to help people - it only occasionally shows itself to them to remind them that somewhere far away spring is going on a long journey, which will return and drive away the old witch Death. And then the straw effigy of Marena will be dragged outside the outskirts and burned on the merry hot fire of Maslenitsa by all those who have waited for the turn of the year in daylight.

On the first day of spring People believed that on March 1, nature is gradually beginning to recover from the cold and winter cold, that the God of the sun Yarila puts winter on his pitchfork in the form of sun rays, and the time for agricultural work is coming.
Our ancestors considered March 1 the beginning of the year, and honored the Goddess of winter Morena. Veneration on this day of the goddess Mara led people to the Kalinov bridge. After all, her possessions, according to legends, lie behind the river dividing Nav and Yav, and the Kalinov Bridge, guarded by the Serpent, is thrown across it. On this day, Morena is honored as a guide of souls to the afterlife.
(Our ancient ancestors, the Slavs, called themselves Orthodox, because they Glorified (revered) the Rule.
Reality is the manifested world, the material world. And not only material. It is also a world of ideas, thoughts, intentions. Because they are also evident at the level of our images.
Nav is an unmanifest world, something that is not manifested in this world, the other world, into which the dead, called "navi", leave. Although sometimes Navi can appear in our world, in Yav, for example, in the form of birds, to see how their descendants live.
Glory-love for the Gods, personifying our glorious ancient ancestors, the glorification of the divine forces inherent in the entire surrounding world, in all of Nature, including in man.
Rule the world of the gods. Universal rules, the laws of the Universe, as well as the rules established by our ancestors, who after death became Slavic Gods.
Orthodoxy is a very ancient Russian concept, it has several tens of thousands of years and takes its roots from the ancient solar worldview, which described the world order using the concepts of "Yav" (material world), "Nav" (prototypical world), "Rule" (shaping world ) and "Glory" (the creative world) - the four-level structure of the world order; at that time the Slavic people glorified "Prav", lived by Pravda and called themselves Orthodox).
March 1, Day of Morena, awakening of Kikimora Vyatka

Legends tell how Morana, with evil minions, every morning tries to watch over and destroy the Sun, but every time in horror retreats before its radiant power and beauty.
Her symbols are the Black Moon, piles of broken skulls and a sickle with which she cuts the Threads of Life. But Death, bestowed by Marena, is only a transition to the Life of Another, to a new Beginning, for it is so set by the Almighty Rod that after Winter, which takes away everything that has become obsolete, a new Spring always comes ...
Hymn-Rule:
Marena-Mother, Slavna and Trislavna wake up!
We, Ty, have always been dignified,
Bloodless Trebos and Gifts for, Ty, we kindle everything!
Grant us prosperity in all our deeds,
and save our cattle from the pestilence,
and don't let our granaries empty,
for great is Thy generosity,
now and ever and from Round to Round!
Tako you, tako, wake up tako!

It is believed that the Great Goddess Marena has in the far north Midgard (a world inhabited by people) -Earth of Ice Halls, in which She loves to rest after wandering around the Most Pure Svarga (Heavenly Worlds of Glory and Rule).
When the Goddess Marena comes to Midgard-Earth, all Nature falls asleep, retires, plunging into a long three-month sleep. And when Marena Svarogovna leaves for her Ice Halls, on the second day after the vernal equinox, Nature and diverse life awaken. In honor of the seeing off of the Goddess Marena to the North, the Krasnogor holiday, the Day of Maslenitsa-Marena, is annually celebrated, also called the Wires of the Goddess of Winter (the modern name is Seeing Off the Russian Winter).

Marena had several guises: a tall, beautiful woman with loose long hair, an ugly old woman, a young girl. She could be dressed either in torn black rags, or in luxurious white robes, but she always carried only one thing - death.
This gloomy goddess also had several incarnations, for example, the Pestilence Maiden, Mara, and other dark female deities who personified illness, obsession and death. However, in Russian folk tales, Marena turned into the beautiful Marya Morevna, a prisoner of Kashchei, whom the knight must steal and bring to people.
After all, Marena, like many deities, was just the dark side of the mysterious goddess, to whom all female deities of Proto-Indo-European mythology go back. And if in the winter Marya Morevna was a cold and evil death, then in the spring she, resuming the life cycle, appeared in her second hypostasis - the goddess of spring and youth, a beautiful young girl carrying light and love. And all the tales ended with the victory of the prince over the forces of darkness and his wedding with the beautiful Marya Morevna.

Materials and tools:
-Glass bottle
-plasticine (you can old)
-toothpaste (white)
-gouache, brushes
-a jar for water
-a cloth for hands and hands
-hair fixation spray
- nail polishes with glitters
- sheet of A3 paper
- simple pencil, eraser
-wax crayons

Master class progress:
We start work with creating a frame for sculpting Morena's torso. Cover the glass bottle with a thin layer of plasticine.

From a separate piece of plasticine we sculpt an egg-shaped cake - this is the head. Then we properly apply the workpiece to the neck of the mold.

Next, we roll up a lot of thin and long sausages, from which we will make the Snow Queen's hair.


Then we sculpt the character's hands from large sausages, fix them on the frame. We sculpt a nose and lips from small pieces, and cover the entire product with toothpaste (a thin layer) to degrease the plasticine.

When the paste dries up, we start working with paints, we select the color scheme.

Morena's dress will be blue. The hair will be in various shades of blue and purple, with the addition of white strokes. Let's make the complexion warmer, mix ocher and white.


Draw the cilia and eyebrows in black, the squirrels will be snow-white with blue pupils, choose purple for the lips. Next, we decorate the Snow Queen's dress with blue gouache, draw the edging on the neck, sleeves and hem of the dress.

Draw snowflakes to decorate the dress.

Our beauty is missing a crown, we blind it from blue plasticine. First, roll the sausage, then flatten it. With the help of a stack, cut out the notches on the flattened sausage. And we connect the resulting shape into a ring-crown is ready, it remains to align it with your fingers, smooth out all the irregularities.