Original crochet napkins scheme. Crochet napkins: patterns for knitting beautiful napkins. Video: How to knit a round napkin "Delicate patterns"
Crocheted napkins have long ceased to be an attribute from grandmother's chest and are actively used in interior design, for example, in the Provencal style, which is popular today. Even a novice needlewoman can master knitting a napkin, since a variety of techniques allows you to choose the work that you can do... With just a few simple knitting techniques, you can create an original piece of jewelry with your own hands. Those who have already mastered crocheting for a long time can make fabulously beautiful napkins more difficult using diagrams or descriptions from numerous magazines.
The most common forms of knitted napkins
Crochet napkins come in different forms:
- round;
- oval;
- radial;
- square;
- rectangular;
- diamond-shaped.
The knitting method depends on the shape of the future napkin.
Round napkin
We start knitting from the middle. We connect the air loops in a chain. In each next row, you need to make uniform increases, forming a pattern from circular rows.

Oval napkin
We begin to knit from the central chain of air loops. All the following rows are knitted around this chain on both sides. Knitting takes place in circular rows, but the increments need to be done only on the rounded sides on both sides.

Lucid napkin
As with knitting a round napkin, start in the middle. We connect the air loops in a chain. We expand the canvas in circular rows, making increments in the same place.

The principle of knitting round, oval and radial napkins is not much different. You can often see how needlewomen from the same pattern knit napkins of different shapes, making this a variety of sets.
Square napkin
A square napkin should be knitted, like a radial napkin, starting from the middle. To expand the circular rows, increments are made in four places, which will become the corners of the square.

Rectangular napkin
Knitting rectangular napkins combines the techniques of performing square and oval.
We knit a central chain of air loops. All the following rows are knitted around it on both sides. The additions must be made on four sides (at the corners of the rectangle). But if in a square napkin the increments were made at the same distance, then in a rectangular napkin they are added at the beginning and end of the central chain, thus forming two corners on each side.

Diamond-shaped napkin
The diamond-shaped napkin should be started from the chain of air loops. Further, the expansion of the canvas occurs following the example of a round or radial shape. After knitting several rows, subtractions should be made from two opposite sides of the napkin, continuing to knit the other two sides.

Sometimes, to give the napkin the required shape, it is not knitted in a circle, but starting from one side, such as napkins made by crocheting sirloin. In this way, you can achieve not only a square or rectangular shape, but also any other.


You can crochet a napkin using a detailed description or diagram. Schemes are image of the future product made with special icons. Legend is attached to each diagram.

- Start reading the scheme, as well as knitting, need from the middle- from the central chain. Sometimes the number of air loops in it can be counted, or it is indicated by a number.
- The beginning of each row is indicated by a number - number of this row... After the figure, lifting loops are required.
- Sometimes on the diagram it is indicated arrow knitting direction.
- If the badges are connected below, knit them need from one point(air loop, column or arch of the bottom row).
- The icons connected at the top of the diagram indicate that they have there must be a common top.
- Each next row of loops should be more than in the previous one.
It is easier for novice needlewomen to use a verbal description of the pattern.
Video about how to disassemble and understand circuits crochet napkins with a detailed description.
Crochet napkin patterns in various techniques
Crochet is distinguished by a variety of techniques and ways of making the canvas. Some of them are very simple and accessible even for beginners, since they use the simplest techniques: single crochet, double crochet and air loops. Others are the "aerobatics" of crocheting, but with detailed diagrams or descriptions, they can also be mastered.
The following techniques are used for knitting napkins:
- fillet knitting;
- openwork knitting;
- Irish lace;
- modular knitting with motifs;
- bruges lace;
- Romanian (lace) lace.

Simple crochet napkin patterns
Professionally written pattern descriptions use generally accepted universal abbreviations for brevity.
Cast on 12 air loops (VP) and connect them in a circle.
- 1st row: Run 3 lifting loops (instead of the first double crochet), then knit 31 single crochets under the ring (st. S / n), finish with a connecting loop in the third ch. lifting.
- 2nd row: Perform 3 lifting loops then 3 tbsp. s / n, one in each st. s / n bottom row; 3 vp, * 4st. s / n in the next columns of the bottom row, 3 VP ** repeat the rapport * - ** 6 more times, end with a connecting loop in the third lifting loop.
- 3rd row: Perform 3 lifting loops then 5 tbsp. s / n (the first in the lifting loops of the lower row, one in each item of s / n of the lower row and one in the upper row of the lower row); 4 vp, * 6 st. s / n in the last VP, the next columns of the lower row and the first VP, 4 VP ** repeat the rapport 6 times, finish with a connecting loop.
- 4th row: Perform 3 lifting loops then 7 tbsp. s / n (the first in the lifting loops of the lower row, one in each item of s / n of the lower row and one in the upper row of the lower row); 5 vp, * 8 tbsp. s / n in the last VP, the next columns of the bottom row and the first VP, 5 VP ** repeat the rapport 6 more times, finish with a connecting loop.
- 5 row: Perform 3 lifting loops then 9 tbsp. s / n (the first in the lifting loops of the lower row, one in each item of s / n of the lower row and one in the upper row of the lower row); 10 vp, * 10 art. s / n in the last VP, the next columns of the lower row and the first VP, 10 VP ** repeat the rapport 6 more times, finish with a connecting loop.
- 6 row: Perform 3 lifting loops then 3 tbsp. s / n, one in each st. s / n of the lower row of 10 vp, we skip 2 tbsp of the lower row, 4 tbsp of s / n in the next 4 columns of the lower row; 11 vp, * 4 st. s / n, 10 vp, 4 sts / n, 11 vp. ** repeat the rapport 6 more times, finish with a connecting loop.
- 7 row:* 5 vp, 15 st s / n under the arch from vp bottom row, 5 vp, half-column in the sixth vp next arch from vp. ** Repeat the rapport 7 more times. Finish with a connecting loop.
- 8 row:* 6 vp, 1 tbsp. s / n, pico repeat 8 times (in each odd column of the lower row), 6 vp, half-column in half-column of the lower row **. Repeat the rapport 7 more times. Finish with a connecting loop.
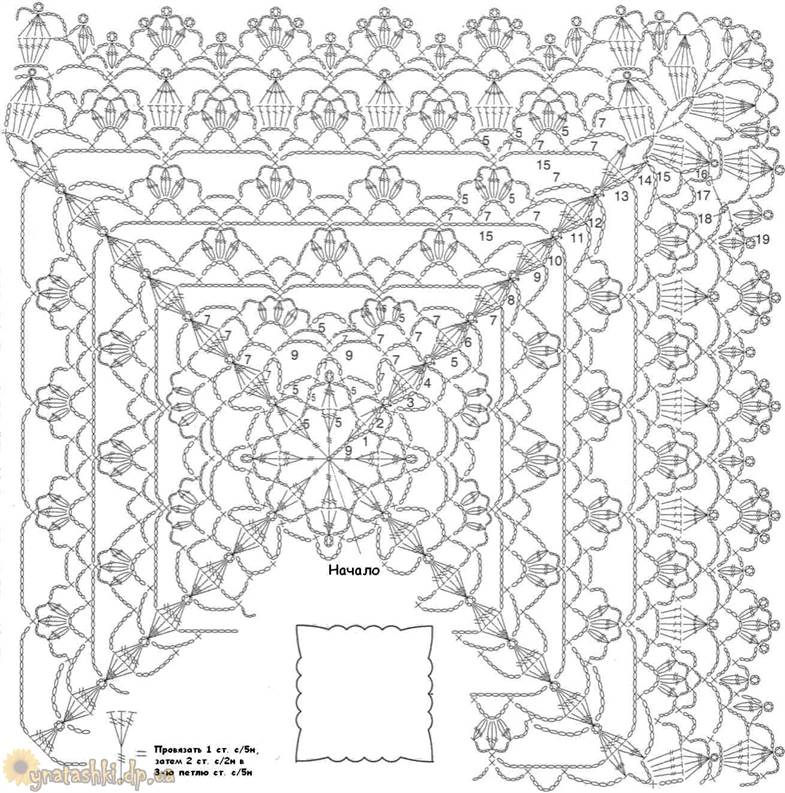
Here is a diagram of this napkin:

And here are some more simple schemes.:


Crochet napkins made using the crochet sirloin technique have patterns that contain the simplest knitting techniques: double crochet and air loops.


Crochet napkins video tutorials
Fillet napkin with roses
Oval napkin "Larch"
A simple openwork crocheted napkin. The lesson is divided into two parts. The needlewoman explains how you can increase the size of the napkin, if there is such a need.
(continuation of the lesson)
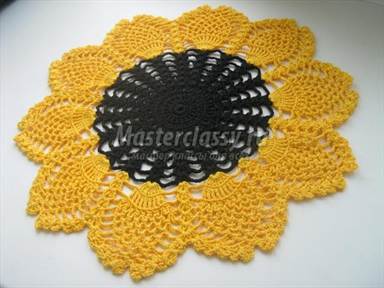
Napkin "Sun"
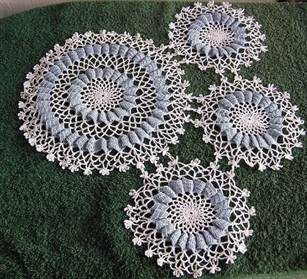
This unusual napkin, thanks to its volumetric elements, can serve as a table decoration or a plate stand.
All handicrafts require proper care. After knitting, the finished napkin is smoothed and steamed to give it the required shape. If you wish, you can lightly starch the product... In case of contamination, wash the napkin in warm soapy water, do not rub or twist, just squeeze it slightly and lay it out on a towel to dry, giving the required shape.
Openwork napkin patterns are often used for knitting collars, round yokes in dresses and blouses, as well as dress skirts, especially. If you use thicker threads or a cord to knit a napkin, you may succeed.

The topic of knitting napkins is very wide and multifaceted. It is impossible to describe everything in one article. If you are interested in the above ideas, leave your comments. The advice of experienced craftsmen will be especially valuable for readers.
In the modern world, when many functions have been taken over by machines, hand-made things are especially highly valued. The art of crocheting lace is easy enough to learn, and very easy to fall in love with - just look at the masterpieces coming out of the hands of the craftswomen. Of course, it is best for novice needlewomen to learn from simple products. For example, make simple napkins.
Crochet napkins for beginners
Small napkins are good because they knit quickly and, thanks to this, help to “fill your hand” well. We have selected a scheme that is easy enough that even a beginner could cope with it.

To knit a napkin, we need to take a crochet hook and thick woolen threads.
Step 1: we collect air loops in the amount of 6 pieces, after which we combine the ends with a connecting post.


Step 2: in the first row we knit 3 air loops (this will be a rise), we knit 11 columns, which are divided by one air loop.


Step 3: knit the 2nd row. Again we knit 3 air loops as a lift and knit a column through the 1 row air loop.

4 step: we knit an air loop, we knit into the previous V.P. two columns and 1 yarn. Then again also to the end of the row. The row will be closed. column.
Step 5: knit row 3. We knit a connecting post and raise it with three air loops.

This row is knitted further according to the following pattern: when we made a rise in the 1st chain stitch of the 2nd row. After two columns are knitted, we knit 1 VP, and in the next 3 columns with 1 crochet are knitted. The row is closed with a column, similar to the previous one.
Step 6: knit row 4. This is done in the same way as with the third. You only need to knit 4 columns with one crochet. And we close, respectively, as row 3.


Step 7: fifth row. We go to the double crochet from the 4th row and knit 5 VP.

We knit a single crochet through the air loop of the 4th row.

Then we knit 5 VP again and knit a single crochet between the two columns. And thus we knit the 5th row.

Step 8: in the extreme arch we knit 2 VP and a double crochet.
Step 9: knit the sixth row, extreme. In it, you need to knit 8 columns with 1 crochet, and in the arch of the napkin, a single crochet is knitted.
Step 10: we knit 8 columns with 1 crochet into the next arch. And we knit in the same way to the end. We end the row with a connecting post.
In the next arch we knit eight columns with one crochet. So we continue to knit until the end of the row. We finish with a connecting post.

So, we told you how to crochet a napkin, and as a result of our lesson you should have a little miraculous napkin.
Other napkins and schemes for them
We continue crocheting napkins: diagrams and descriptions are attached.
Using a crochet hook, for example, you can knit a wonderful napkin, the pattern of which resembles a pineapple:


To knit these napkins you will need AIDA threads and crochet hook No. 1.25.
Knitting of napkins should be started according to the patterns from point A. The pattern is knitted around the circle. The number of loops you need to dial is on the diagram.
The star napkin looks no less elegant:


Its final diameter is 49 cm. In order to knit it, you need: Cotton white yarn, about 280 meters, hook number 1.25-1.5.
In addition to such openwork and lace napkins, you can also knit a very stylish, modern napkin on the table:


To knit such a napkin, you will need multi-colored yarn and a 2.5-inch crochet hook. Since the napkin is knitted from 2 parts, the first part is knitted first, then we begin to knit the second and only on the fifth row should we begin to combine these parts.
All the napkins that we mentioned in our article must be washed after they are completed, and then very carefully straighten and stretch, otherwise they will lose their shape.
We hope we were able to interest you with this beautiful and graceful handicraft!
Video tutorials to help beginners
When deciding how to decorate a home interior, women most often prefer knitted napkins. True connoisseurs do not consider this a relic of the past and strive to implement both classic and the most daring decisions. Dining tables, dressers, shelves on the walls in living rooms and bedrooms are decorated with napkins. Crochet oval napkins is a bold decision, because an oval as a geometric figure does not fit into every interior. But the oval shape does not always imply exact outlines - it is enough to take this geometric figure as a basis. The strapping can be lace, combine pointed edges and symmetrical "hollows" on opposite sides.
A circle is most often taken as the basis for an oval napkin; later, by means of increments, it acquires an elongated shape. Knitting an oval napkin can also start with a chain of air loops tied on both sides. The product is knitted in a circle - this can be seen from the diagrams below. The further the knitting progresses, the longer it takes to complete one row. Oval napkin knitting patterns include flowers, squares, patterns and other unique elements. More often they are not sewn into the finished product, but are obtained by changing the pattern on each row in accordance with the scheme. We have selected for you crocheted oval napkins for every taste, including from foreign sources. Choose and dare!
Navigating the article
Pineapple pattern napkin


Material from a foreign edition, but using standard designations. Knitting begins with a circle, then goes into a pattern in the form of pineapples. The scheme can be supplemented by offering your own harness.
Pineapple napkin


Another napkin made with a similar pattern in a different modification - pineapples. It has a sharper shape, in which almost no oval can be traced.
Flower motif napkin


A napkin pattern from a Japanese magazine. Motifs in the form of flowers are knitted and sewn together. The peculiarities of their location give the napkin an oval shape. You can lay out the motives in your own way and choose a different strapping option, in the end you get an equally beautiful product.
Fillet napkin with flowers


The technique of fillet knitting is used. This pattern can be considered as non-standard, because knitting is carried out not in a circle, but according to a pattern using a special technique. We do not recommend taking this type of knitting without preparation.
Other oval napkin patterns
There are many more oval crocheted napkins than you might think. There is no point in describing each one. See the selection below. First there is an example, below - a diagram or a diagram with a description (click to enlarge).
Option 1


Option 2


Option 3


Option 4


Option 5


Option 6


Option 7


Diagrams without product examples
There are many crochet oval napkin patterns on the Internet, for which it is difficult to find an example of a finished product. But the schemes are designed in such a way that you can see the final result in advance. Below we will give examples of such schemes. Maybe they will be useful to you.


A variety of oval napkin patterns gives you the opportunity to choose. Even napkins made in the same style have many modifications. The peculiarity of the choice consists in the quality of the scheme: the presence of signatures, accompanying descriptions, the quality of the photo. Before you start knitting, make sure everything suits you. It will be a shame to quit your job when faced with unforeseen difficulties.
Handcrafted accents stand out in the interior of the stylishly decorated house. Guests will definitely pay attention to crocheted napkins: schemes allow even beginners to create a small masterpiece for those closest to them. Different ideas are embodied in weightless openwork products - from abstract and floral motifs to figures of animals and insects. Thread manufacturers offer a huge selection of colors and materials. The end result depends on the imagination, purpose of the accessory and the skill of the needlewoman.
Needlework is in trend again. Evenings for embroidery or knitting are spent by housewives and successful business women. For beginners, graphical instructions or textual conventions of conventions are most difficult. But gradually the crochet napkin pattern becomes an open book.
Conventions in text descriptions
For the convenience of needlewomen, the universal names of the main elements are adopted - loops and columns:
- The basic air loop forms the basis of lace accessories of any shape and size, denoted by the abbreviation VP;
- The second most important element is the semi-column, which is abbreviated as PS. Another name is the connecting post.
- Crocheting a napkin necessarily includes single crochet stitches (RLS) and crochet stitches - С1Н, С2Н, С3Н. The numbers decipher the number of yakids - there can be more than three of them. It all depends on the complexity of the technique.
The combination of the presented elements according to the instructions allows you to create various patterns. Typically, textual explanations are attached to graphical guides and provide process details. It is easier to navigate by them if difficulties arise.
Note to the craftswoman - decoding of abbreviations
Symbols in knitting patterns
Experienced knitters determine the structure of the pattern for the finished product and can repeat the pattern they like. Craftsmen who can draw well and have a spatial imagination create new napkins with crochet patterns themselves,
Authors' developments serve as a guide for less experienced followers. Magazine and Internet publications are easy to understand by graphical symbols. This is the universal language of the creators of lace accessories, understandable to needlewomen all over the world:
- Circle - air loop;
- "En dash" - half-column;
- "Plus" - single crochet;
- "Cross" with one or more cross dashes are double crochets, where the number of "crossbars" indicates the number of crochets.
The guides also provide additional elements that enhance the expressiveness of the pattern and help create various effects:

Symbols
How to read knitting instructions correctly
Without exception, all the manuals are standardized and it is not difficult to figure out how to crochet a napkin:
- If the process goes in straight or reverse rows, the scheme goes in order from bottom to top. When making round products, start from the center.
- Odd rows are considered obverse and are read "in Arabic" - from right to left. Purl even numbers are customary - from left to right.
- The repeating part of the figure - the rapport - is enclosed between the "asterisks" (* ... *). Such a symbol means that you need to execute all the elements again the specified number of times.
For the convenience of the master, the front and back rows can be designated in different colors or numbered. This makes it easier to navigate and not get lost, especially when knitting large items.

Two-color instructions are easier to read
It's important to know! "Round" instructions "read" counterclockwise - sequentially go from right to left.
Basic working techniques to make the process easier
How to crochet a napkin - this topical question begins a journey in the world of needlework. In order not to be disappointed after the first experiments, it is worth using the advice of experienced craftsmen.
Preparatory stage
Before starting the process, they are stocked with tools and consumables. It is not recommended to choose thin threads for opening processes. Openwork lace will wait a bit, but the first results will inspire skills improvement.
The best yarn to start with is Iris mercerized cotton threads. They are quite elastic, smooth, pleasant to the touch. Available in a wide range of colors. Disadvantages include the tendency to curl.
As the skills improve, the yarn becomes more docile and stops tangling. Also, acrylic and half-woolen threads are suitable for the first experiments.
A detailed master class makes the first steps easier:
It is better to start the debut crocheting of napkins with the tool No. 1.5-2.5 with an ergonomic handle. When buying, it is better to compare several samples, evaluate which hook fits comfortably in your hand, choose a suitable length.
Step-by-step photo instruction
For the first experiments, a simple, intuitive pattern is chosen without complex columns with more than two crochets. There will be fewer flaws in the finished work.

The optimal pattern for a successful debut
How to crochet a napkin for beginners:
- They start from the center of the future product - they collect a standard chain of air loops. In this case, 12.
- Loops are looped back with a connecting floor with a column.
- Go to the next row - knit the required number of VPs according to the schematic guide and move on to other elements - the pattern is based on С1Н.
- The ring is completely tied - it should turn out to be 32 С1Н. The circle is connected to a chain of 3 VPs and completes the row.
- The following elements are performed according to the scheme and follow the direction of movement counterclockwise.
- The extreme row is performed using the pico technique, which can be found in the video lesson:
Arrange the finished napkin in a conspicuous place


Step-by-step photos illustrate how to work.
Color variations
To diversify the napkins, for novice needlewomen, when crocheting, you can use a simple and effective technique - knit multi-colored products according to the same patterns or combine two or more colors in one accessory.

С1Н napkin - schematic representation

The finished result
Such a solution during the first experiments allows you to create interesting accessories. A simple pattern looks more interesting, the product looks original and does not create a feeling of being secondary. They can safely decorate a table or a window sill - arrange it under a flowerpot with indoor plants.

The original spiral beauty - a feasible challenge for beginners

The same design in a rainbow solution
Acrylic threads and iris are suitable for the process. The simplicity of the pattern is offset by a spectacular color scheme.

An example of a spectacular solution - sunflower

Sunflower diagram - the rest of the fragments are rapport
Trendy napkins for home and as a gift
The world of needlework has its own fashion and good omens. It is believed that accessories can positively influence family wealth and aura in the home. There are rituals associated with the beginning and end of the process. Crocheting napkins for beginners is no exception.
Money napkin
Belief is associated with this decorative element. The coin in the center of the product has a positive effect on the family budget and contributes to the well-being in the home. The craftsmen start working on the new moon. The future amulet is pulled out of the bag at random, where the "candidates" are pre-folded.
The coin must be odd, the denomination and country of origin do not matter. Knitting needs to be finished while the moon is growing. Schemes of napkins from foreign magazines are suitable - the shape is important, always round. Pattern and size are of secondary importance. They keep such a talisman in a place of honor to attract good luck to the house.
There are two ways to insert a charm into the center of an accessory:
- At the beginning of the process. It is necessary to knit an amigurumi ring, the diameter of which corresponds to the central part of the napkin and the coin. Further, knitting will go exactly according to the instructions, and the pattern will not undergo changes.
- At the end of the process. In this case, a model with a closed center is chosen and at the final stage an additional element is knitted - a kind of rapport of the central part of the napkin. The part is sewn to the product, a small gap is left and a coin is placed in the pocket. Then the hole is sewn up.
Crochet napkin - the diagram is presented below - differs from the usual one in execution. You can take almost any model as a basis. The central part is preliminarily assessed to see if the “core” is suitable for placing the coin.

Detailed money napkin diagram


The amigurumi technique is used for knitting the center.
Video lesson on knitting an amigurumi ring:
Openwork products
Weightless lace accessories decorate the dining table, chest of drawers, sideboards. Graceful, stylish and lace, they fit into any interior style. This is a great gift and a sign of attention. They invest in such work more than skill - inspiration and craving for beauty.
Beautiful crochet napkins - patterns can be very different - they look gentle and airy. Needlewomen have the opportunity to work with the shape and create not only round, but also oval and curly products.
The basis of the plots is floral elements, which are lavishly decorated with lace from air loops. Needlewomen often choose abstract or ethnic motives. Butterflies look beautiful and attractive.
Crochet openwork napkins according to the patterns are similar to the simpler options. The knitting order does not differ from the standard one. It is necessary to monitor compliance with the manual - due to a minor error, the entire process will have to be redone. Therefore, before starting it is worth assessing your strength and skill.

Guide to knitting an openwork accessory

Example of a finished product

Beautiful butterfly - interior decoration

Stylish home decor element
Bulky napkins
Aerobatics in needlework - unusual crochet napkins: you have to deal with the schemes, but the end result fully justifies the efforts. Bulky items look unusually beautiful and fascinating.
The guides for creating such masterpieces require meticulous design and attention to detail. They give a huge scope for creativity and implementation of ideas. In such works, various solutions are possible:
- multilayer "rosettes" for decoration - tightly starched, turn into a lace vase;
- floristic compositions - a bright unfading bouquet blooms on the table all year round;
- butterflies or swans - the lightness of some and the grace of others fascinate and delight.

An example of a graphic instruction and a finished result

In this process, each swan and flower are knitted separately and sewn to the base.

Bright flower arrangement will warm you even on a winter day

An effective combination of openwork elements and volumetric colors
The creation of such products is a laborious process. It takes skill, patience, skills. Master classes give a general idea of how to crochet tablecloths and napkins - diagrams and photos help to understand the general principle. For a high-quality implementation of the idea, it is best to contact experienced needlewomen.
Craftsmen work with ready-made magazine schemes and create author's compositions - this greatly expands the possibilities for creativity. Professional execution guarantees the absence of errors and flaws, accuracy and perfection. At the same time, you can learn a lot - invaluable knowledge and skills will come in handy in the future, when the time comes for your own master classes.
Modern knitting has been diversified with light, airy threads, the addition of beautiful beads and ribbons. The openwork is mesmerizing with its complex schemes, color choices and ways to decorate your creation. This article provides crochet napkin ideas with diagrams and descriptions.
Crochet square, oval, round napkins, in the form of stars and snowflakes, flower meadows, add crocheted flowers and petals, butterflies and other knitted animals. Crocheting is not a difficult task. First you need to figure out the schemes, the meanings of the symbols, find the desired pattern example, pick up the hook.


Best ideas
Beautiful napkins serve as a decoration for the room, creating a warm homeliness, and protect the surfaces of tables and other furniture.
Beginner knitters should not tackle complex patterns; when choosing threads, it is important to know that delicate laces are obtained from thin threads of cotton yarn or iris, the hook should be twice as thick as the volume of the thread.
An oval napkin measuring 28.5 cm by 77 cm. For work, you need 80g of yarn (100% cotton), hook number 0.6.


We knit a chain of 6 air loops and knit into a ring with a column with three crochets, then we knit a chain of such ovals (53 pieces) according to the scheme. At the beginning of the row, instead of 1 loop, we knit the specified number of lifting loops. We finish the row with connecting posts. If necessary, move with a connecting post to the beginning of the next row. Then we knit according to the scheme. If in the instructions the top of the symbols is connected, then the loops are connected with a common top, when connected at the bottom, a group of loops is knitted with one common base.
More oval napkin schemes:


Square napkins are knitted in the same way as round napkins from the center.

As you can see, a ring of air loops with single crochet is knitted, then a row is knitted and air loops are added at the corners. Then a circle of double crochets is knitted again, on the next row air loops are added to the corners and so on through one row. So you can knit a dense stand or rug.

To create a square napkin, small, connected motifs of a round or square shape are also used.
Square motif:


We knit the first row, knit one stitch with 5 crochets, then 2 stitches with 2 crochets in the third loop with a stitch with 5 crochets. Then 5 air loops are knitted. We repeat this 8 times. In total, you will need to knit 19 rows in a circle. Photo and diagram below.

Rectangular napkins look great on racks and tables.


Thick rectangular napkin with mesh.


More diagrams of rectangular napkins.

The original pattern of the napkin in the form of a sunflower napkin impresses with its bright color. The sunflower can be made with threads of suitable colors, jacquard pattern. We use 4 colors - brown, yellow, green and white.
You can take acrylic yarn if the pattern does not matter. For openwork crafts, of course, it is better to take thinner threads.


Knitting sunflower

With brown and black threads, we begin to knit the central circle.
1 row. We knit 8 stitches. Now we knit a ring with 20 posts with 1 crochet. The next row in each loop of the base is a single crochet stitch, separated by a single stitch. The third row again knit a column with 1 crochet in each loop of the base. Further, in each loop of the base, 2 tbsp. with a crochet, separated by 2 air loops. A new circle in each arch of 2 air loops formed by the previous row, we knit 2 tbsp. with a crochet, 2 air loops, 2 tbsp. with a crochet. 6 row = 5 row + 2 VP. 7 row = 5 row + 3 VP. 8 row = 5 row + 4 VP. 9 row = 5 row + 5 VP. 10 row = 5 row + 6 VP.


You will hide the tails of the threads in knitting at the end of the work. The finished napkin must be steamed, if desired, you can pre-starch.


The volumetric napkin "Swan Lake" is knitted very simply, even beginners can easily repeat it. Below is attached a crochet napkin pattern and a description of the work in stages.
The principle of operation consists in simple knitting of the central circle with thin threads of iris or other threads for knitting light laces and crocheting up to number 1. The simplest option is from waves of dense knit with a smooth mesh of arches of air loops.