Craft the moon with your own hands for the day of cosmonautics. A rocket from a toilet paper roll. Plasticine solar system - children's developmental craft
Salute everyone!
How are you, dear readers and guests of my blog? Have time to take a break from? I think it's not stressful to tinker with something and do it together with the kids. And now there is still one holiday ahead - the Day of Cosmonautics. And it falls on April 12. On the day when our Soviet cosmonaut Yuri Gagarin flew into space for the first time.
Usually this is a boyish theme - space. They are very fond of inventing flying machines, saucers and rockets. But some girls also keep up. Still would! It is very exciting, and you can make such works from waste and natural material that they will win any competition.
Let's take a look at a selection of interesting ideas. Most likely, they will push you to interesting thoughts and create your masterpieces. After all, fantasy here is where to roam. The work can include planets, satellites, flying vehicles, UFOs, rockets and much more.
Note that I also draw ideas from the Internet, from its public sources. Basically, these are cool and original creations for the kids in kindergarten and elementary school. Plus, I can recommend excellent options for paper airplanes in the article https://mognotak.ru/kak-sdelat-samoletik-iz-bumag.html
Well, let's go! As Yuri Gagarin once aptly said).
Interesting ideas on the topic of space with your own hands
First, let's look at what you can make on this topic. For younger kids, it will be possible to make (not without the help of parents) such a layout made of colored paper. All the planets of our Solar System are located on it. At the same time, of course, we teach kids the names of the planets.
Application Solar System

You can make such applications from small plasticine balls. Only such compositions are best drawn at first and even painted over with flowers. And then you can roll up small balls and just stick.
After all, is it really possible to submit to the competition?
Squirrel in a rocket

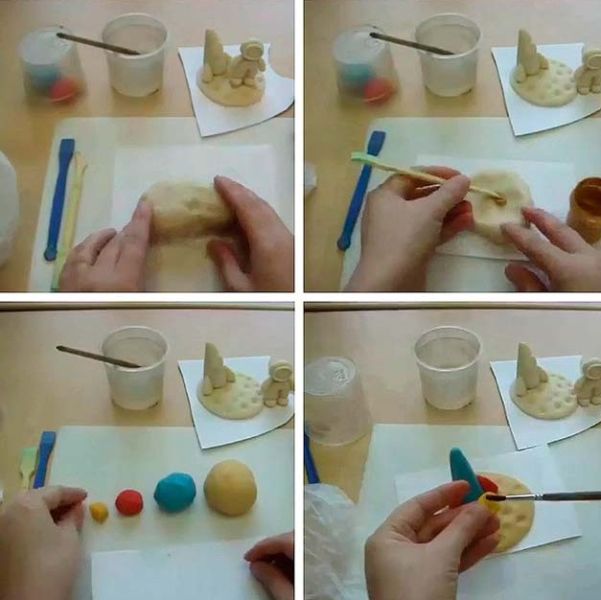
We sculpt figures of astronauts and a lunar rover from salt dough. Simple . It is pleasant to work with this material for several reasons:
- it hardens quickly and can even be placed in the oven;
- it is easy to paint it later in different colors with acrylic paints or gouache;
- environmentally friendly, you can even swallow it))).
Russian cosmonauts and lunar rover

Unpretentious paper rockets can be made by kids 4-5 years old. This turns out to be an uncomplicated kind of origami. And you can glue them on a dark blue background, which will personify outer space.
Rockets in the universe

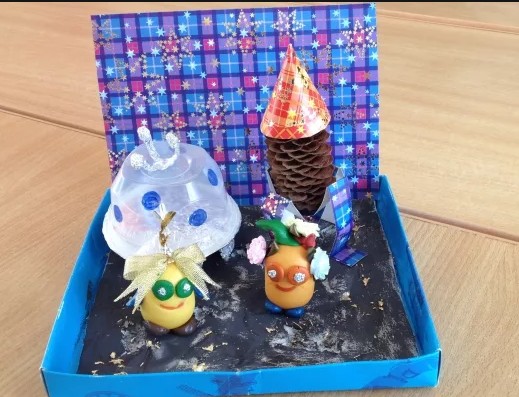
From toys, jars, tubes and plasticine we will stick just such funny aliens.
Funny aliens

Another option for the competition in the modular origami technique.
We turn on imagination and use everything: foam plastic foam, tree twigs, foil, wire. Even bushings are useful for making rockets.
Gagarin in flight

Plasticine composition with Saturn, stars, a rocket and our green planet.
Milky Way

And a little humor)
Cat in a hat from the planets of our solar system

I hope we have more or less chosen something for ourselves that we will make and move on.
Simple crafts for kids in kindergarten for Cosmonautics Day
I propose to make a rocket with the kids from a sleeve (you can even toilet paper) and colored paper. It turns out such a long and stable little thing that you can put on a blue background and next to a figure of an astronaut.

Add foil and you have a more realistic spacecraft.

Let's fold the paper starship. This can be done simply according to the diagram below.

And here is the ready-made version. Color it however you like.

Or we can fold an unidentified flying machine out of thick paper. You can make several such gizmos and apply them again to the blue sky.

Look at what colorful and at the same time original UFOs we get.

We put into play our favorite baby toy - plasticine. It is pliable, soft and adheres well to almost any surface.
Here are some of the applications you can make with it in disposable plates.
Plates - open space

Oh, and we parted! We sculpt a cute alien. It will just look good next to a paper flying saucer.
Funny alien

Don't feel like folding paper? So let's blind her too, because there is a lot of plasticine!
When working with plasticine, the first step is to explain to the children that this is an inedible material and you do not need to take it into your mouth.
Alien and plasticine flying saucer

Space idea from paper and cardboard on April 12
Of components such as paper and cardboard, it is easiest to do work in kindergarten and school. Because they are always in any home. As well as scissors and glue. If all this is available, then I propose to build such a composition from a flying spaceship, the sun and Saturn on a black background.

To work requires:
- Cardboard with a black background somewhere 30 * 25 cm;
- Toilet paper sleeve;
- Colored paper;
- Foil in gold and silver color;
- Semolina;
- Scissors;
- PVA glue;
- Pencil.
Manufacturing:
1. Cut the sleeve in half. Cut off the edges at one end to form the nose of the rocket.
2. Cut out three blue cones from blue paper and bend them in the middle. These will be our rocket engines. We glue them to the uncut (back) part of the sleeve.

3. Glue the rocket onto the black background.
4. Cut out two petals from red and gold paper. This will be the fire blowing out from the back of the ship.
5. We glue the flame and the cut out window.

6. Draw the sun on golden foil, and Saturn with a ring on silver foil. Cut out and glue both shapes onto black cardboard.
7. Apply glue to the background and sprinkle with semolina on top. This is our milky way. A beautiful craft is ready!

Do you like the collage? If you have schoolchildren, you can make a flying glowing object below.
Video about how to make a flying saucer from a plastic bottle
How to do it - let's see a short video clip. I'm sure the kids will like the process itself, and then they will play UFO with enthusiasm. After all, this is not just a craft, but with special light effects!
How to make crafts from space-themed discs?
CD-disks are already thrown into the trash, but in vain. After all, this waste material is very suitable for souvenirs for the Day of Cosmonautics. Its shiny and round flat surface is very suitable for the production of unidentified flying objects.
Here is a second grader's masterpiece. She used a disc under a flying saucer with a very cute alien.

And this is the newcomer himself with antennas made of springs and foil.

Interplanetary taxi from the children from the preparatory group in the kindergarten.

The cutest plate made of rhinestones and fluffy antennas.

O! And here is a whole group of funny humanoids with their vehicles.)

And one more idea how to use CDs.
3D step-by-step postcard in the form of a rocket
If you have never created voluminous postcards, then here's a step-by-step method for you. Again, everything is as simple as two and two. And the templates can be found at the end of my post.

We need:
- Blank A4 sheet of paper;
- The pencil is simple;
- Scissors;
- Colored paper;
- Glue;
- Gouache paints.
Manufacturing:
1. Bend A4 sheet in half. Draw half of the rocket on the fold.

2. Part of the rocket in the photo below is marked with a dotted line. This means that we will not cut it here. And cut all straight lines with scissors.

3. We try to do everything as carefully as possible.

4. We turn our spaceship inside out. It will fold inward and the entire postcard is outward.

5. Draw the details of the ship: nozzles, porthole, nose and flame below.

6. Paint the background black with gouache. And the rocket itself in matching colors.
Here you can dream up and make the face of an astronaut in the window of the porthole.
7. Draw beautiful flames.

8. Cut out different planets from colored paper. We glue them all over the background. You can also make foil stars.

Voila! Our cool volumetric postcard is ready. We give it for its intended purpose.
We make original works for the school competition
Let's get inspired by the ideas of kids who won space craft contests. They all tried, working out every detail in their masterpieces.
Any materials at hand were used in the work. These are twine, foam balls as planets, glass stones, felt and much more.
International station

Composition of planet Earth, rockets and two cosmonauts in outer space.
Russian cosmonauts

Solar System with satellite and planets.

And here is a great model made of plastic bottles.

We use felt for volumetric applique.

Intergalactic Travelers.

Beautiful applique from napkin balls.
To make it, you need to roll many, many balls from colored paper napkins. But the work seems to be worth it!

A squirrel and an arrow of salt dough are waving their paws).

A drop of imagination on the theme of the galaxy, starships and UFOs - and a wonderful work is already ready for the competition!
Space pictures and templates
I suggest using cute templates and pictures as backgrounds and pictures. They will fit perfectly when creating postcards or crafts on the topic of astronautics.


On this note, I say goodbye to you for a while. I wish you success in your work and pleasant moments spent with the guys!
You can add more variety and fun to the daily routine of children by mastering a new activity. To do this, you just need to captivate the baby. One of the developing and very original activities is making crafts with your own hands.
What crafts can be done for astronautics day with children
What materials and ideas are not used to make crafts on the topic of Space with their own hands. Space-themed items can be made from cardboard, discs, boxes, salt dough, plastic bottles, candy wrappers, plasticine, and other gizmos found at home. To arrange beautiful children's crafts for the Day of Cosmonautics, you just need to tell the child how to do it correctly.
From disks
The handicraft "Flying Saucer" made from a disc will look original and unusual. The halves from the Kinder surprise will serve as a cockpit for the aliens. The plastic egg can be partially used, so it will be much more convenient to fix it on the plate. Do not forget to paint the flying saucer with your baby or stick on top of the craft stars, toy eyes and other items as you wish.
From plasticine
To make an astronaut suitable for an exhibition in a kindergarten or school, you need to have plasticine of your favorite colors and imagination. Here is one of the ways how to make a craft in the form of an astronaut with your own hands:
- We roll up a ball of red plasticine - this will be a helmet.
- We fold the plasticine blue sausage and turn it into a spring. We make several spirals, which will become the arms and legs of the hero of the craft - the astronaut.
- From yellow or white plasticine we form a porthole for a helmet, draw a face.
- We attach gloves and shoes made of red color to the spacesuit.
- We cut several small strips of red tone, sculpt equipment for the astronaut and attach it to the spacesuit.
There is another option for making plasticine crafts on the topic of Space:
- We roll up two balls - these will be the head and body of the craft.
- We form ten small balls and six of a slightly larger size, small ones will serve as handles, large ones - legs.
- We flatten a piece of orange plasticine and attach the crafts to the body. We attach three multi-colored balls to the cover - we get the astronaut's control panel.
- We sculpt a porthole from white plasticine, frame it with a thin strip of red.
- We take black plasticine, make headphones and attach them to the helmet.

Salted dough
For the Day of Cosmonautics, you can bring an original craft in the form of funny aliens to the kindergarten. To make your own work, take:
- multi-colored salted dough;
- toy stars, buttons and eyes;
- wire;
- stacks.
Aliens can be sculpted in different shapes and sizes, whatever your little one wants. We make antennas out of wire, because what kind of alien would be possible without them? We glue small eyes on a creature from another planet, decorate the craft with buttons or stars. If the child cannot come up with an image of the future alien, tell him by making an example. You can decorate an alien as you like, it all depends on the imagination of the crumbs and the idea of \ u200b \ u200bwork.
Made of paper or cardboard
The rocket is one of the most popular DIY space crafts. To make it using the quilling technique, you will need corrugated stripes, an egg from Kinder surprise, PVA glue. The process of making paper crafts with children is as follows:
- Use the halves of the egg as a template for the circles.
- From the strips we wind the top of the rocket, wings, base and porthole.
- Insert an egg from Kinder into the center of the rocket, connect all the parts of the craft into a single whole.
Crafts from a plastic bottle
To make a space rocket soaring up with your own hands, you need:
- empty plastic bottle;
- cardboard;
- the pump with which the balls are inflated;
- Scotch;
- water.

The main purpose of this craft for kids is to launch it into a spectacular flight. The rocket will fall apart into small pieces, therefore, you should not be too zealous with the details. Follow the instructions:
- It is necessary to cut the top of the craft in the shape of a cone and 3 rocket blades from the cardboard.
- All received elements must be tied with tape to the container.
- After completing the previous steps, insert the pumping needle into the stopper. The hole must match the diameter of the needle, otherwise water will flow out of the rocket. If they do not match, water can be poured already before starting.
- It's time to power the pump and watch the rocket fly!
Step-by-step instructions for making crafts on the topic "Space"
Cosmonautics Day is a great occasion to tell kids about space and make DIY crafts on the topic of Space. Any materials at hand will help to create an original work. It is much easier to do any craft with step-by-step instructions in front of you. Use the guide below for detailed steps on how to glue or sculpt popular holiday attributes.
How to make a flying saucer
A self-made UFO will delight the baby. To make the craft, you will need a plastic bottle with a disposable plate. Let's get started:
- Using scissors or a utility knife, carefully separate the bottom of the bottle.
- Cut off its upper part, cut off the neck.
- Put the bottom of the bottle on a plate, draw a circle with a marker.
- Cut out the circle, departing from the drawn borders. We make incisions.
- Insert the upper part of the bottle into the resulting hole. It will be fixed thanks to the incisions.
- We fix everything with adhesive tape, we get a craft booth.
- Insert the bottom of the bottle from below, fix it.
- With the bottom of the bottle on paper or shiny cardboard, draw a circle and cut out a circle. We insert the plates into the hole.
- We trim the edges of the plate with scissors so that they coincide with the edges of the cardboard.
- Place the top of the bottle in the middle.
- We seat a plasticine alien inside the flying saucer - the main character of the craft.
- With the help of baking soda, vinegar and citric acid, you can make a real acid rain or a whole volcano! To do this, put a small amount of soda in a container, dilute the vinegar with water, gradually adding vinegar or citric acid to the soda. It will turn out to be an indescribable sight!

Rocket from a plastic bottle
Making crafts on the topic of Space with your own hands is very interesting. You can make an original rocket with a child if you have:
- white acrylic paint;
- plastic rectangular bottle;
- three lids of different colors and sizes;
- two cardboard tubes;
- thick cardboard orange, red, yellow;
- felt-tip pens and pencils;
- scissors;
- hot glue.
We make the craft step by step like this:
- Pour white paint into the bottle. Shake well so that the paint evenly stains the entire inner surface. It will be less laborious if you immediately take a white bottle.
- We paint the tubes in the desired color or decorate with a picture. We make tongues of flame from colored cardboard, glue them to the inside of the case. To make the flame develop beautifully, you can also cut it out of the newspaper. We attach the nozzles with fire to the bottle with hot glue.
- Multi-colored plastic covers will serve as portholes. We attach them to the front of the future rocket with a glue gun.
- Cut out two cardboard triangles, paint with felt-tip pens, glue on both sides.
- We attach the plastic cup to the bottom of the rocket. It will serve as another nozzle and a reliable base for the rocket.
- After the glue dries, the product will be completely ready, all that remains is to come up with a name.
Planets of the solar system from plasticine

For the Day of Cosmonautics, it is better to do crafts on the topic of Space with your own hands. This will help the child learn a lot and have fun with mom or dad. To sculpt the planets of the solar system is easy to sculpt when you have step-by-step instructions at hand:
- We take a dense sheet and colored plasticine to create an unusual composition.
- The sun will be the central object of the craft, with which we begin to sculpt. To do this, we mix yellow, orange, white colors, but so that they can be distinguished, it is not necessary to make a single color.
- Glue the resulting mass in the center of the sheet, smear it with your fingers in a circle.
- To get the orbits of the planets for crafts, we roll out thin threads of white or beige plasticine.
- Create nine rings around the Sun.
- Mercury is the smallest planet. We roll it into a ball, mixing small pieces of gray, brown and white colors. We squeeze craters with a toothpick.
- We make Venus three times larger from black, brown and gray. Set the relief of the planet with a wire.
- Earth is the brightest planet in the solar system and crafts. We create it from green, blue and yellow plasticine.
- The mysterious Mars is obtained by mixing orange and black.
- For a large Jupiter, you need beige, brown and orange stripes.
- We form Saturn, attach a ring around its axis.
- We sculpt uranium with a ring from shades of blue.
- Neptune looks like a regular blue plasticine ball.
- Little Pluto comes from gray and white.
- When finished, lay out the planets in order and attach them to the orbits in which they should be located. The process of sculpting the craft can be made even more creative if you draw a lunar rover or a comet on a sheet.
How to make a robot from scrap materials
One of the simple, but unusual, options would be a robot made of plastic lids. The assembly method for such an original product is simple:
- We pass metal rods between the covers, so the robot will be mobile.
- The craft can also be fastened with a glue gun.
- Putting a couple of covers vertically, we get wheels on which the space hero will move.
Find out what you can do with your own hands.
Video tutorials on creating crafts on the topic of Space for children
At all times, spaceships and stars are of great interest to kids. They can be easily implemented with detailed video instructions at hand. After watching a few videos below, you can make a beautiful and original craft on the theme of Space for kindergarten with your child. Classes will cause positive emotions in the crumbs and contribute to the development of his imagination, thinking, teach him to concentrate.

Hello dear blog subscribers and guests!
Can you imagine I completely forgot that in April there is another world holiday, which is always celebrated on the same day on April 12 - this is the Day of Cosmonautics. How can you forget about this (((.
I decided to improve right now and present to your attention a collection of original and unique crafts that you can do at home with your children and bring to a competition or exhibition. Ideas will vary from simple to complex, so you can choose from. After all, some have children already grown up and go to school, while others have very little kids - to kindergarten.
I think that everything is clear here, the most important symbol of this holiday will be a rocket, because it was on it that the world's first ejection into space was carried out by Yuri Gagarin, if you have not forgotten.
Yes, by the way, do not forget that Easter is ahead, and for it I have already given all kinds of things. Do you remember? Well, don't forget that in May. Wow, great, it's a whole petition.
Perhaps I'll start with the most common, and you guessed it, the most popular option, this is a rocket. You can make it yourself from what you always have at hand.
To do this, you can first take a toilet roll, if you do not have one, then you can twist the cardboard and glue the sleeve.

The stages of work will be so, not at all difficult, but on the contrary, using these pictures you can easily create this unique little thing.

To prevent the rocket from falling, it is necessary to make a support, that is, a stand and fix it on it.


You can create such a huge charm. The children will definitely fly))).

Well, or a lot of them.

From ordinary plastic bottles, this is what happened.


Here's another charm, the child did it himself, pasted over with newspapers.

You can also build a flying saucer.


What will you make it out of? Choose from what I found on the Internet, or write below under the article, from what else you can create.
From CD discs, as well as can be decorated with beads and rhinestones, chenille wire.


The legs can be made of wood sticks or skewers, and beads can be glued down.

Ha, the hands are made of clasps.

Healthy models, you can send directly to the exhibition.


Plastic cups also went here, it turned out to be a cabin.

Such a space base came out of plasticine and matches.

It looks cool, the main thing is that you can do it quickly and easily, without spending a lot of finance and investments.

And if you are tired of everything primitive, then get up, something creative and your own.

But that's not all, you can make any planet in the solar system, as you like, see how this is made from papier-mâché.


Or maybe all the planets can be depicted using modeling dough or ordinary colored plasticine. Twist into flagella, and then, like straws and into a ball.


There are not enough Martians for them. Wow, what kind of freaks came out from the authors, take a look. And the material is an ordinary egg from a kinder surprise, or rather her box.

What a puchiglazik, and the legs are made of wire and bottle caps.

Space craft ideas for kindergarten
We have come to the next stage, I will show you what you can do with our beloved kids. Place them in a circle and start performing the following steps with them, you will need paper, or rather square sheets.

The result will be as follows, you will definitely like it, and certainly the children.

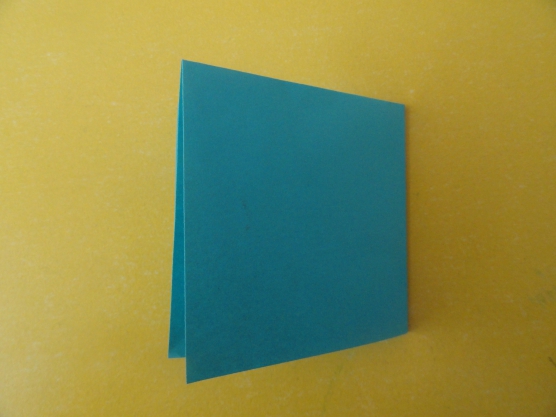
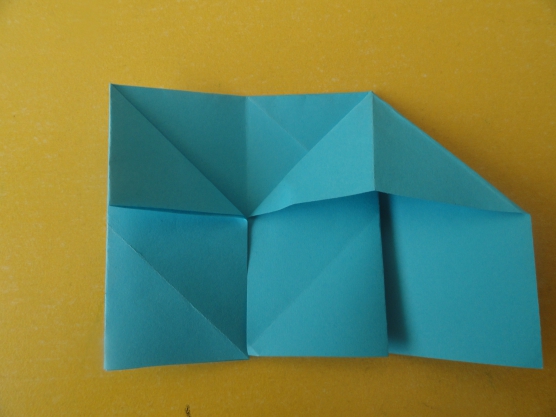
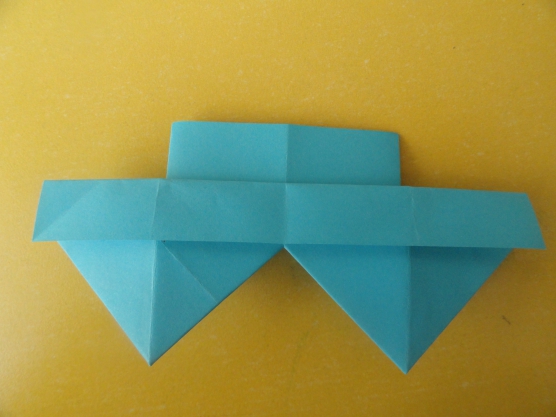
Everyone likes origami. What could be easier? So, fold the square sheet in half lengthwise.

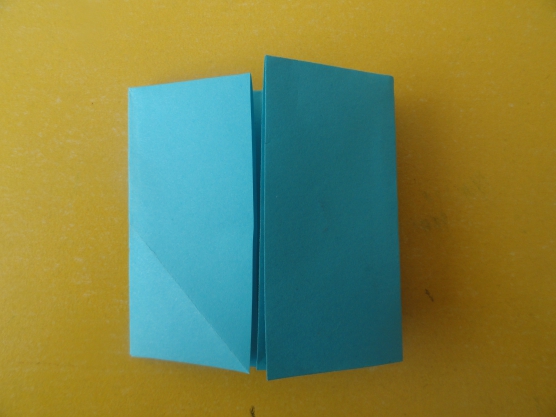
To this fold line, start making folds again on both sides.

Now fold back like this.
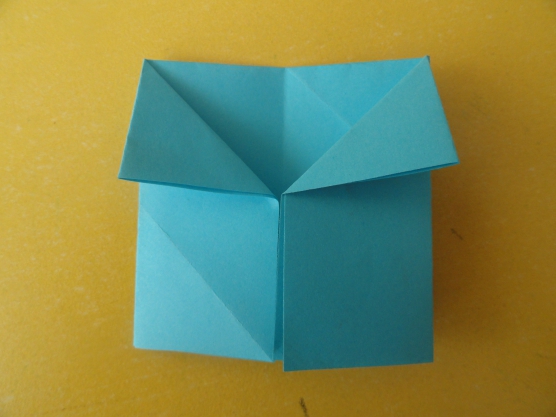
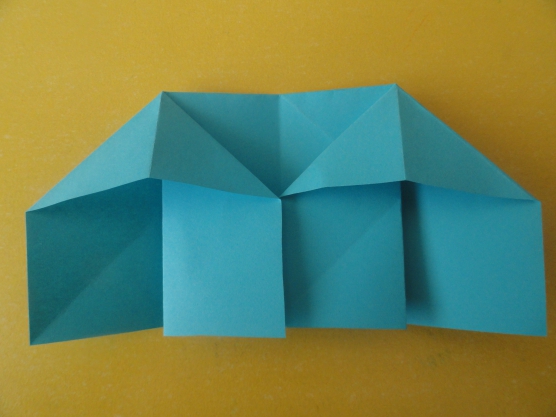
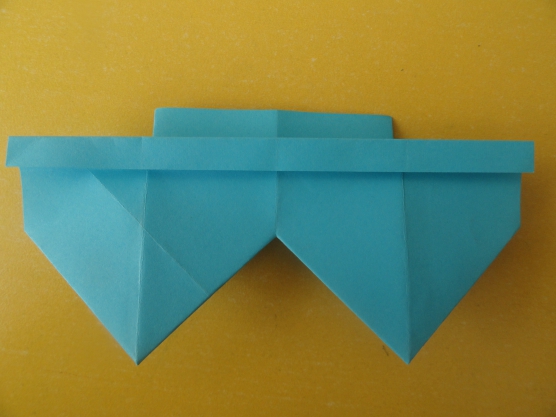
The next step, you have to cut off everything that is unnecessary.
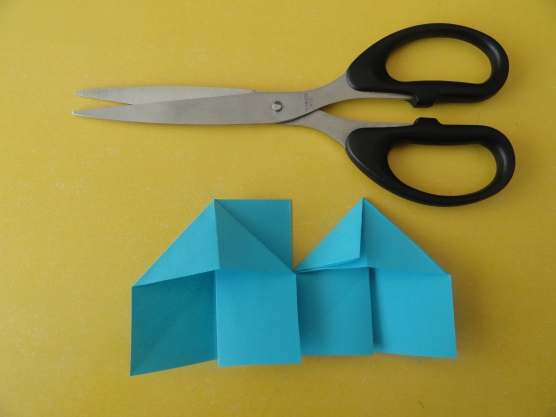
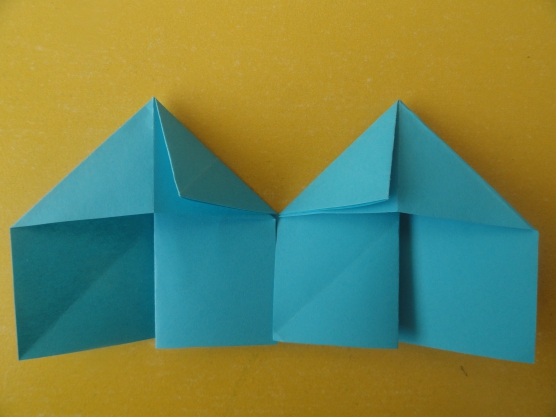
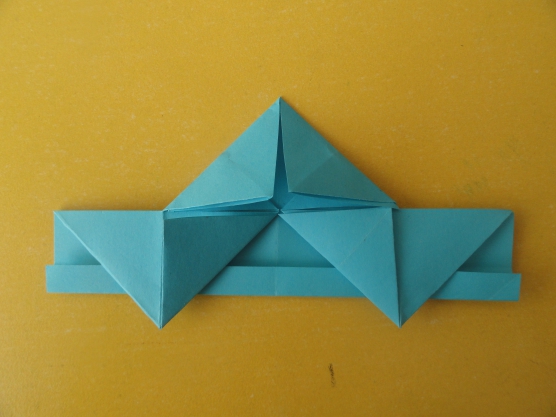
Begin folding like an envelope.

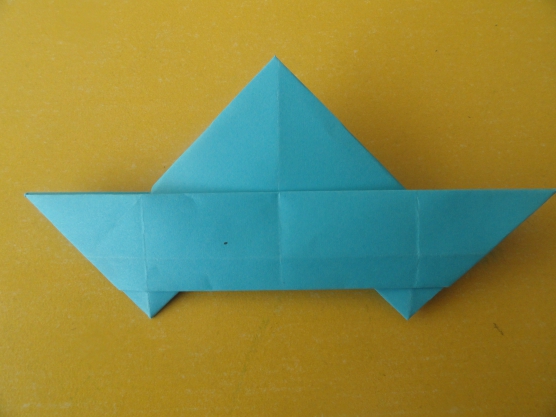
Then later, two triangular parts will already be visible. Follow the further instructions.


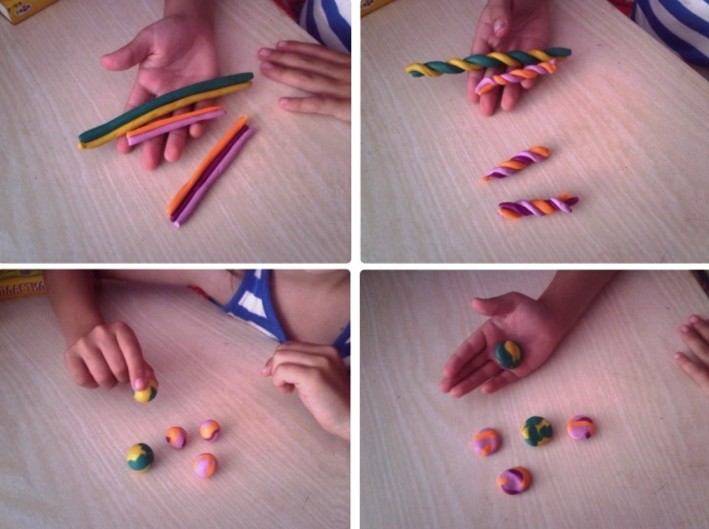
Also, do not forget about the fact that you can use plasticine here, roll up small balls from it and sculpt it.

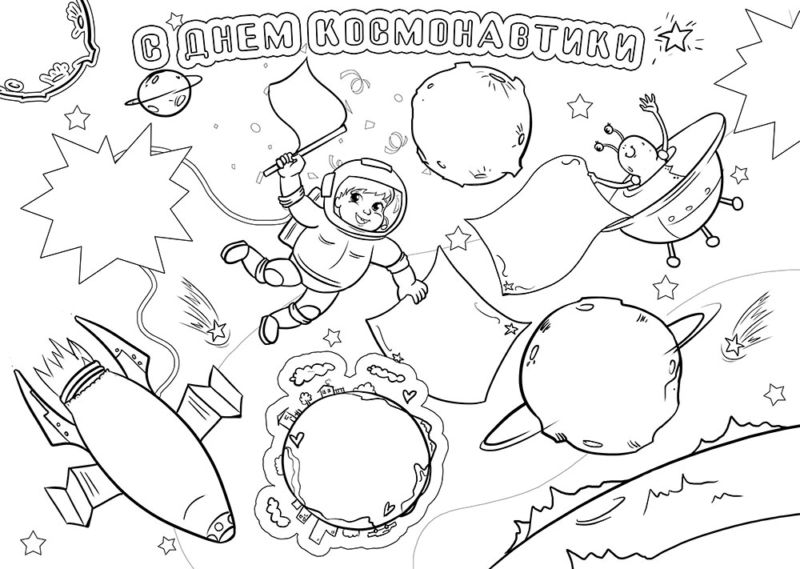
Draw or print an astronaut and a rocket for example.

And start painting the picture. This develops not only perseverance, but also attentiveness.

You can roll a little larger. Or even paint pumpkin seeds and stick them here, but this is already under the control of adults and at home with their parents.

Or very large lumps in the form of planets of the entire solar system. Foam rubber was used here.

Here is such a simple model and diagram of a flying object. You can use it further for its intended purpose, for example, for applications, etc.

You see how great it can look on a plain sheet of paper.

These are the other types of transport with stars.

You can also make an unusual craft for a skyscraper from colored paper.

You can also add people to this option, residents.

Or make your child a pilot, he will definitely be delighted. Here again, the children's palms have been adapted to you.

Or joint work of a group or class with children's photos of children.

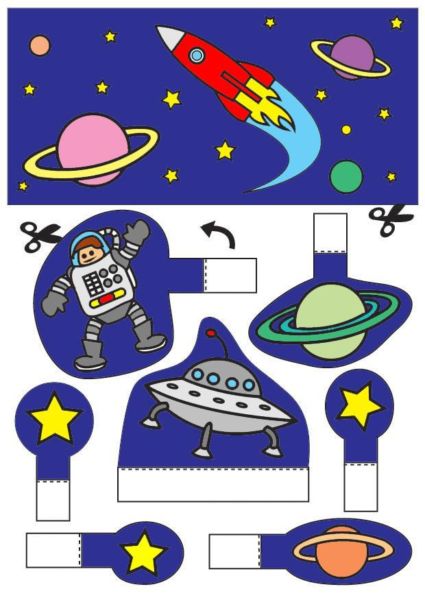
You can also take a ready-made template and cut it out, and preschoolers will arrange these details on an A4 sheet.

It all depends on you and your imagination.

Why not, everyone to make such a handout.

Also a great idea was to create an astronaut from a kinder surprise.

A video plot, it will help you with this, if you want, to make something new with your wards.
The simplest works About space made of paper and cardboard
Do not forget that you can take any coloring and paint it with felt-tip pens or watercolors, gouache.


Perhaps also such samples will be useful to someone for their work.


Or use colored paper and cardboard.

I found works in the country of craftsmen.

Here they even portrayed Gagarin.

You can print and cut such a sketch, then glue it together.

Don't forget to sign the product. It could be a stand newspaper.

Beautiful crafts about space to school
You will probably laugh, but this time I decided to find something unusual, and I did. Of course, you can take any thought as a basis and add something to it from yourself. Or make a humanoid out of foil and napkins).
The master class will be from Konstantin Kobzik.


You can make an Earth satellite. In order to create it, I suggest you watch this video.
Well, or lay out a whole composition of waste material. For example, take a box and paint it in a suitable background.

Glue the stars using self-adhesive paper.


It will be a space object. Attach all other parts to it from plasticine.

Think of something else, like an airplane.

Arrange as you see fit.

You can make such a picture, you can't do without your favorite cartoon characters. The product is made of dough for modeling.

You can also use corrugated cardboard and cans.

Here's the base.

Or people like robots that live on the moon, sleepwalkers).

Here is another idea from round pasta.

Take your pick, here, again, is plasticine.

The whole picture is sculpted from him.

It looks bright and stylish, your peers will definitely appreciate it.
Do not forget that you can also use the sun here, because this is also a planet.

In general, there are many options, so choose and get creative!
Cool works from the land of Masters
Here I suggest you look at the pictures taken from this site, maybe this will give you a new thought.
The first thing I saw was a work made in the style of modular origami. How do you like it?

Fast flight, uuuu!

Out of the croup, too, what the children have done, take a look.

Someone even managed to knit such a product.

Use the quilling technique.

Here are some more lovely ideas.


Space dish and aliens from waste material and polyurethane foam
Everything that you have at hand comes into play here. Let's think together together from what you can create space masterpieces. That's right, from anything. Take a look, from the usual shampoo, or rather the bottle packaging, they made a race.

Aliens nearby, wow aliens. Paper plates were also used, you can take plastic ones.

These are the cheldobeks. It turned out to be some kind of alien station, here, as you can see, there are discs and even pasta instead of hands, and the hair is made of straw.

Here are some more ideas from bottles and even a bow was adapted.


Uh, eggshell.

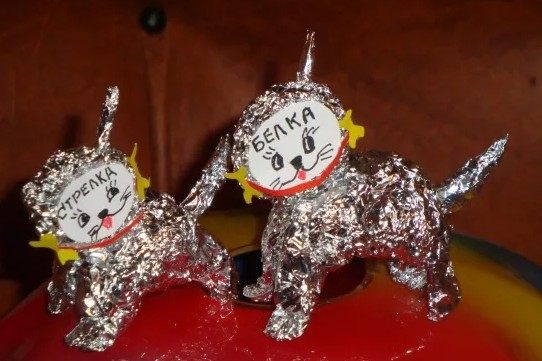
The work from foil, Belka and Strelka, also looks original, ha))).
Or look at the composition out of the box and a bump instead of a launched device.
This one I also liked, made of fabric and buttons.

And I also saw such a watch, super variance.

Have you ever tried making salted dough products?

If not, then this moment has come, watch this video from the YouTube channel and you will also have such a charm.
You can certainly use more fabric, such as felt.

Cool crafts, they look awesome attractive.


And here is a masterpiece made of polyurethane foam, it looks cool, an astronaut made of salt dough.

It is generally fashionable to create a bunch of crafts from dough.
The souvenir came out directly to order.

Just like paper, it looks like a tunnel.

Children's cards on the theme of Space
First of all, I want to immediately suggest that you make a postcard, but not simple, but voluminous. You need to choose a plot, if you liked this one, as in this sample, then write and send it to you. So, you print it out and then paint it with pencils or felt-tip pens.


But to make it look civil, you need to make a cover, fold it in half, and then glue the drawing to it.

Perhaps you will like this one.

Alternatively, use the facing method, it is ideal for this purpose as well.

Best regards, Ekaterina Mantsurova
Master class with step by step photos. "If you really want to, you can fly into space ..."
Gavrilova Olga Davydovna, teacher of MBDOU No. 180 "Kindergarten of general developmental type", Kemerovo.The topic of space is always interesting for children. In April, kindergartens host thematic weeks dedicated to Cosmonautics Day. The objectives of the thematic week are to develop children's interest in the world around them: to introduce the concept of space, the first cosmonaut, the cosmonaut profession, to educate children to desire to be brave, strong and healthy.
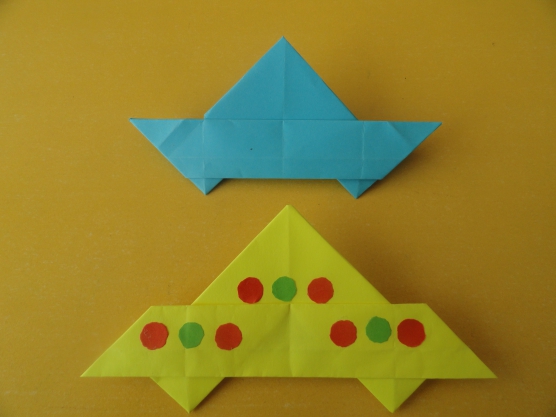
Master class "Cosmonaut"
I bring to your attention a method of making an astronaut's crafts based on a three-sided pyramid. This craft is multifunctional: you can give it to your family for a holiday, use it to decorate a thematic exhibition, or use it to familiarize yourself with the profession of an astronaut.

The master class is intended for the joint work of a teacher and senior preschool children, kindergarten teachers and parents of pupils.
Star house
Ships are launched into space -
Following the daring dream!
It's great that we could
Break out into the vastness of the Universe!
It's nice to know
Themselves as tenants in the Star House,
To the Worlds as to the rooms to walk -
Through the threshold at the cosmodrome.
V. Asterov
Target: learn to make crafts based on a three-sided pyramid.
Tasks: to consolidate the ability to work with paper and scissors, develop the ability to accurately perform work, develop fine motor skills of hands, creative thinking, and foster patriotic feelings.

red cardboard;
colored paper in red, white and black;
scissors;
lead pencil;
glue stick.
Stages of work:
1. Prepare templates for the torso, head, face.

2. Cut out 2 parts of the head from red cardboard using a template.

3. Cut a face out of white paper, 2 circles out of black paper, 12 mm in diameter. Made of white paper 1 circle, 12 mm in diameter. Then cut it in half. These will be the eyes. Cut a circle out of red paper, 6 mm in diameter, which must also be cut in half. This will be the mouth.

4. On one blank of the head, glue a part of the face, glue circles of black color, on them - semicircles of white color. Glue a small red semicircle - mouth. It remains to draw the nose. Glue the two parts of the head together.

5. Attach the torso template to the red cardboard and cut it out. On the back of the workpiece, draw with the tips of the scissors along the fold lines (this will make it easier to fold).


6. Glue the pyramid together. Cut a strip 0.5 cm wide from white paper for buttons. Cut into squares and glue on the pyramid.

7. It remains to collect the parts. The astronaut is ready!

Master class "Rocket"
The master class is intended for kindergarten teachers and parents of pupils.

For this work we need:

white and yellow cardboard;
some self-adhesive paper of a shiny red color;
scissors;
compass;
ruler;
steepler;
lead pencil;
glue moment.
Stages of work:
1. Cut a rectangle with sides of 27 cm from white cardboard. and 21cm. On the reverse side, draw a rectangle with sides of 22 cm and 19 cm. The figure will show 4 rectangles.

2. Rectangle, 5cm sides. and 19cm. cut into equal strips (strips width 1.5 cm) and cut.

3. Carefully bend the strips.

4. Glue the cylinder-rocket. The diameter of the cylinder will turn out to be 6 cm. Bend the strips in the middle and also glue them, overlapping each other. This will be the base for the rocket nose.


5. Cut a rectangle out of red self-adhesive paper with sides equal to 22 cm. and 6cm. Glue on the finished cylinder.

6. Let's start making the bow. On the back of the yellow cardboard, draw 2 semicircles with a diameter of 12 cm and 14.5 cm. Divide the semicircles into a larger and smaller part, as shown in the figure.

7. Cut out most of the workpiece (future cone), draw a narrow semicircle into equal strips.

8. Cut the strips and bend them carefully.

9. Glue the blank, you get a cone with a diameter of 6 cm too. Bend the strips in the middle, glue them, overlapping each other. The result is the nose of the rocket.

10. Now let's start making the rocket nozzles. On the back of the yellow cardboard, draw a circle with a diameter of 9 cm and divide into 4 equal parts. Cut the blanks.


11. From each piece make small cylinders with a diameter of 3 cm, connecting with a stapler.

12. Using a stapler, attach the nozzles to the rocket.

13. Cut 2 circles with a diameter of 2.5 cm from self-adhesive paper. for portholes. Collect all parts and glue. The rocket is ready!
For many centuries, the cosmos has been stirring up human consciousness, beckoning with its grandeur and mystery. Children admire the vastness and beauty of the unknown, so they often want to recreate outer space in crafts and drawings. To do this, we have prepared several master classes on crafts on the topic of space, which will definitely please your child.
Materials for products
To begin with, let's get acquainted with what you can make a "space" craft.
- Plasticine;
- Polymer clay;
- Disks;
- Salty dough;
- Paper cardboard;
- Plastic bottle;
- Boxes;
- Textile.

These are not all items that can be used to make crafts. The looks, colors and list of materials are limitless, just like human imagination.

Rocket from plastic bottles
A realistic space rocket can be crafted from ordinary plastic milk and beverage bottles. To do this, prepare:
- plastic bottles;
- ball pump;
- Scotch;
- acrylic or gouache;
- cardboard;
- water.

Let's start creating an interesting space craft:
- Cut a cone out of the cardboard that will serve as the top of the rocket. Cut out some space technology blades. Tie the received elements to the bottle.
- Decorate the rocket with gouache or acrylics. Draw the outer covering of the ship, a window, in the window you can draw astronauts.
- Insert the pump needle into the stopper of the product. If the hole does not match the size of the needle, pour water before launching the rocket. Use a pump. Your rocket can now take off. Enjoy the spectacle with your child!


Flying saucer from disposable saucers
In order to create a flying saucer, prepare several disposable saucers of different depths. Here are some tips for creating this easy craft:
- Turn the plate upside down, and on top glue another plastic plate of a different depth; You can cover the plate with foil, so it will look even more unusual;
- Paint the plates with silver paint. On top, you can draw various additional elements, such as stars, windows and aliens that inhabit the plate. You can make lanterns from buttons and rhinestones, which are located around the perimeter of the plate.
- If you wish, you can make a hole at the bottom of a deep plate (it will be the top of the alien transport), through which you can insert a thread. Next, tie the plate to the chandelier.


Plasticine planets
In order to create planets of the solar system from plasticine with your own hands, use the following instructions for creating crafts on the topic of space.

Here is a detailed algorithm for creating planets:
- Combine yellow, white and orange in one large plasticine ball. The ball should be one color and not contain streaks of foreign colors.
- Glue the sun to the center of the dark blue sheet. Previously, you can draw small stars and play on the sheet.
- Mix gray, brown and white in one small ball. Use a match or toothpick to make holes on the ball, these will serve as craters. The small ball will represent Mercury, which is the smallest planet in the solar system.
- Make Venus out of brown, black and gray. One should be 2-3 times more than Mercury. Use the wire to draw the texture of the planet.
- Make our planet green, blue and white.
- Make Mars out of orange, red and black.
- Jupiter needs to be made from beige, brown and orange. The planet is large enough, so spare no material.
- Blind beautiful Saturn. Don't forget to make the famous ring of the planet.
- Use blue and light blue to make Uranus, which also has a ring.
- Roll a ball out of blue plasticine, which will represent Neptune.
- Roll the white and gray colors into a small ball, symbolizing Pluto.


Once you've finished creating the planet, attach the planets to orbit in the correct order. In order to get acquainted with the correct order of the planets and original ideas for the background of the craft, we recommend that you familiarize yourself with the photo of space crafts on the Internet

Simple space crafts for kids from tin cans
From ordinary tin cans, which you can surely find in every home, you can make interesting space inhabitants. Use your imagination to the fullest and do not be afraid to experiment with the appearance of your alien.

First, prepare a tin can. Peel it off the label.

You can keep the original silver coating of the jar, but if you wish, you can paint the jar with acrylic paint, gouache or spray paint.


Draw the mouth, eyes, and ears on the jar. Punch a hole in the sides of the can to hold straws or folded pieces of foil to form handles.

The top of the alien's head can be covered with a metal washcloth, and bright straws can be placed on top. The result will definitely amuse you and your child.

Instead of painted parts of the face, you can use bolts different sizes as eyes.

Conclusion
There are a great many options for creating space crafts, differing from each other in material, color and style. Do not be afraid to experiment with these parameters, and in this case, you will be able to create an original model of space objects.

Photo craft space


