Restoration of an old plastic doll hair. Nostalgia for childhood. Or repairing an old doll. Stage: fixing the eyes
MK: Restoration of a doll named Katya.
The world is diverse and beautiful, and it is as it is, and people, by virtue of their individuality, see it each in their own way. Rather, I would say they simply see its different facets through the prism of their culture, worldview and understanding. For some, an old doll is a rag that has outlived its time, but for another person it is a memory of parents, memories of childhood and some amazing stories that can be repeated with their children, but in a slightly different way ... Just such a doll and fell into my hands. A doll that was once a good friend for a little girl Yulia and got her from her mother. Both mother and daughter loved the doll Katya very much, each in its own time, and now Julia would like to pass it on to her sons, but most likely not to them, but preferably to her granddaughters)). But Katya is already very many years old. It was created in the 60s of the twentieth century at the Podolsk toy factory. And over the long years of her life, she had to see and experience a lot. The doll is made of composite papier-mâché with sawdust and tied with an elastic band. So ... When Yulia was a little girl, she was presented with a doll, which she later named Katya. The girl liked the doll at first sight, but in order to check how it was arranged, Julia poked two fingers into the pupa's eyes, from which (it just happened) they fell inside the head (maybe the weather was wet and the plaster of paris, the holding mechanism of the peephole was damp, maybe poked strongly, we then you do not know for sure, but the fact is that they are inside). Of course, the girl Julia was very upset and cried, realizing what she had done. Dad, in order to calm his daughter, decided to correct the situation and probably with some kind of saw (judging by the notch marks on the back of the doll's head) opened the doll's head and inserted the eyes as best he could, and glued the cut part of the back of the head back with wood glue. It turned out not very neat, but the doll was still very much loved and played with it quite often (judging by the number of cracks and chips and the fact that the holes near the hinge hooks are very large). In addition, the girl Yulia never heard the doll Katya say ah-ah-ah, when she was thrown onto her back - a squeak (a device inside the doll for making different sounds) was broken even before her. As Yulia told me, the doll was restored about 35 years ago (and judging by the layering of paint and plaster, I will assume that they covered up quite a lot of hair and smoothed the ears, almost removing the relief behind the ears, and the toes were almost invisible - all this became clear after after I removed the paint and started sanding the surface of the doll's body).
Task: 1. The paint in many places was chipped and fell off 2. multiple cracks are small and rather deep 3. the body almost disintegrated at the seams (I don’t know how it was still holding - it almost disintegrated in the hands) 4. there was no little finger on the right hand 5. eyes not relatives, the mechanism is much wider than necessary and therefore the wires were bent at an angle, due to which the pupa had squint (but these eyes were already remembered by the current mistress as relatives, so it was decided to leave them, only to correct the squint and insert new cilia) 6 . the squeak is not working 7. the holes in all joints were very large, so the hinges with the hooks fell inward 8. the elastic band stretched out and only connected parts of the body so that they would not get lost.
Here's what I needed to fix. I am not a restorer and this is the first time I have encountered such work, so I didn’t quite calculate the time))) I thought I’ll do it in a week, in the end it took three). This is how the doll looked when it came to me:


We begin to disassemble for parts:

This is how the doll's head looked inside and outside:

And here is the body of the pupa, opened in half along the seam:

And here is the squeaker itself for spare parts (a fabric air bag with a cardboard bottom, a clay weight with an air hole and a squeak, well, a cardboard tube and a lid):

It looked like a peep - a concave plastic of a certain shape with an iron tongue attached to it. The air passing through this simple device created vibration and made a sound.

In general, I completely disassembled everything, cleaned it and put it together and the device worked))), which I was very happy about ... .. :-)

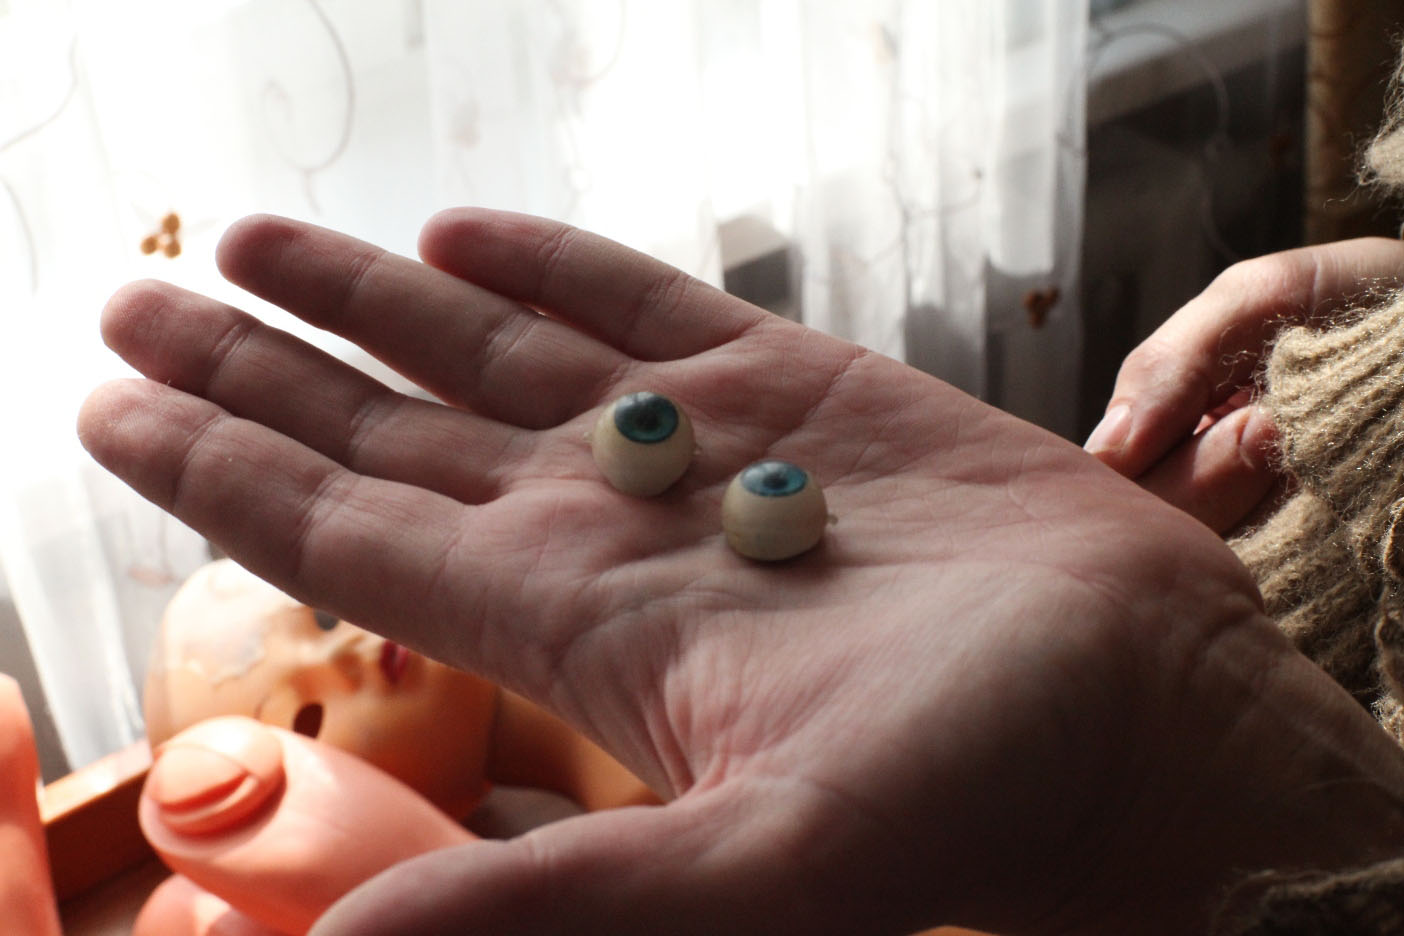
Eyes .. before:

Eyes after treatment. I just had to separate them and glue them again using papier-mâché, otherwise it was impossible to make them at an adequate distance and without squint:

So, we proceed to the restoration of the doll's body, since the internal parts of the doll are already ready for mounting. To begin with, it was necessary to remove all the paint from the doll, because if you just cover up the cracks, then the transitions in color and surface irregularities would still be very noticeable, and it would have held up worse. The paint held tight - it was painted wonderfully))) Therefore, I removed the paint with the help of a construction hair dryer, sandpaper and a paper knife. Especially large cracks expanded even more, so that after everything was thoroughly filled with papier-mâché - this is more reliable. a small digression and a small master class in one bottle)
Papier-mache recipe:
We take three egg trays and tear them into small pieces; pour boiling water and leave under the lid for 3-4 hours.

After that, we drain the water and beat the resulting mass in a blender or in a mixer or knead with your hands until you get a homogeneous masses:

Add flour paste (flour glue cooked in a steam bath with constant stirring: 100 ml of water three tablespoons without a mountain of flour; cook and stir until it turns yellow evenly) and three good tablespoons of PVA glue, you can also add carpentry if desired. I didn’t add sawdust, but it’s possible.

Knead again until a homogeneous, slightly sticky mass, quite pleasant to sculpt and very strong after drying. Strong as soft wood like linden.

I store it in portions in small balls wrapped in cling film in the freezer) It is necessary - I pulled out, thawed and blinded something interesting))) Only the layers of papier-mâché should not be very thick, otherwise it will dry for a long time, and even moldy ...

Almost cakes)))

With this freshly prepared mass, we close up all the large cracks and chips of the doll and form the missing finger and openings in the hinges. After the mass has dried, we sand everything with emery paper to the maximum evenness of the surface. If necessary, you can either level the surfaces with more layers of papier-mâché, or fill them with plaster a little:


After the entire body of the doll is putty and well sanded, it must be prepared for painting and microcracks removed with a primer. I used an acrylic primer. It has good grip and is very strong and durable:

Now the most interesting stage has come)) PAINTING! But the painting of this doll is different from the one I make for my dolls. Here it was necessary to observe certain historical features, which I tried to do. That the truth is, the dolls at the factory were painted by dipping in paint, and I painted in several layers with a brush and tamponing with a sponge. First, I went through 5 layers with a soft brush. to paint over all the grooves and depressions and give an even tone to the doll (the brush must be constantly dipped in water so that the acrylic paint lay evenly and softly and no brush marks are visible), and then gently applied a couple of layers of paint with a sponge with very fine porosity. Well, then painting cilia, eyebrows, sponges with teeth and hairs) To protect the eyes inserted in advance into the head, I put small paper envelopes on them, sealed with paper tape on top. And after the final painting and varnishing, she took them off.

This is what the doll looked like after painting:

And here are the handles with whole and painted fingers:

we proceed to the last stage of work on the doll - varnishing. I chose a semi-glossy yacht varnish. It gives maximum strength, durability and is waterproof. In general, it suits us well). I varnished with a diluted 50 x 50 solution of varnish and thinner in 10-12 layers, maybe more)) I sanded and polished the first layers of 8 to achieve the most even surface. Then the surface was already leveled well. The varnish gave a slightly yellowish pleasant old-fashioned shade to the doll. Drying:

The only thing left to do is to put the doll together on an elastic band. Flat elastic bands stretch faster than round elastic bands. Here on such a rubber rope I assembled a doll:

The hauling of the doll is done in two steps: the head-legs are connected with one rope, and the other hands are connected and we get a movable ready-made doll named Katya:

In the following illustration, the doll before and after restoration (or rather, from above - after restoration, and from below - such as it came to me):
Here's a story)))) I can't say that I restored the doll absolutely correctly and well, but I tried to preserve its original appearance and make it live a very long and minimally injury-prone life). Hope I got it)
Housewife Irina Vakhrusheva loved to play with dolls as a child. Growing up, she did not suspect that their restoration could become her favorite pastime ..
Irina says that she came to the restoration of dolls in a "strange" way.
“As a child I loved to play with dolls, but then I had a girl and had to put my dolls in order. I saw on the Internet that we have a flea market, that you can buy dolls from the Soviet Union. Since then, she began to collect. I fix the broken ones, and of course I come across whole ones. It is connected with my childhood and gives me great pleasure, ”she says.
During all these two years, she has repaired and restored about 150 dolls.
The main part of her collection is dolls created during the Soviet era, but there are also newer dolls.

The oldest doll is 60 years old. According to puppeteers' estimates, it was released for sale in the 50-60s of the XX century and is a rare specimen today.

There are many ways to find “ugly” dolls, says Irina - Internet forums and shops, flea markets in Bishkek, sometimes she finds them on the street. It so happens that people themselves bring their old dolls or send from abroad.

To fix the dolls, she uses "donor plastics" - parts of other dolls. The cheapest are Chinese dolls that go like scrap. Irina has to take parts of other dolls for restoration, because no toy manufacturer produces spare parts for them.


To whiten the doll's skin, you need to use an anti-acne agent, and to clean it from dirty spots, put it in a sunny place for a long time and the surface of the toy's skin will light up and become clean.
The restoration of one doll, according to Irina, takes a different amount of time - it all depends on the condition of the "patient" - it can be repaired in 1 day, it can be done in a week, it can be done in half a year.

In addition to restoration, Irina creates original outfits for her dolls, which she knits especially for each one.
“Children are interested in my hobby, and my husband can sometimes be indignant, but in principle he is loyal,” Irina shared with the website.
That being said, she says she does not sell refurbished dolls.

“I collect them. They are already like children ... or something, so I have repaired them - they have become so close to me, and I do not want to part with them, ”admits the doll restorer.

In the future, Irina plans to open a doll museum. She believes that many would be interested to come and see - maybe someone will see a toy from their childhood.
A large baby doll Sonneberger, 60 cm in height, was admitted to us for restoration:

The baby doll has multiple damage to the coating all over the torso.

Damage to the coating and cracks in the legs:
Eyes fell into the head:
After disassembling the doll, the damage to the mounting holes - brace supports became very obvious:
Let's get to work.
Let's get to work.
Step 1: disassemble the doll. The composite body is held together from the inside with a round thick elastic band. Parts (legs and arms) have metal hooks for fastening. The doll has the usual assembly scheme - the leg is fixed with an elastic band and stretches into the torso - the head - into the torso - leg # 2, the hands are tied together separately.
Disassembling the doll revealed previously hidden (or not obvious) traces of the previous restoration. So when disassembling the head, when the head fasteners were removed, it turned out that the eyes that had sunk into the head were already being repaired, glued, and in a cruel way - with epoxy glue:
Moreover, during the previous repair, the eyes were not completely restored, all the fragments were not glued together, holes were not repaired. The second eye is filled with epoxy glue - traces from the previous repair. Eyelashes are almost completely absent. The wax filling of the upper eyelids is peeling and dirty.
2. Stage: fixing the eyes
The old wax coating was removed from the upper eyelids;
- traces of epoxy glue were removed from the right eye;
- new eyelashes are glued to both eyes;
-a new coating of the upper eyelids was made on both eyes (tinted acrylic paint and glossy acrylic varnish);
-the hole of the left eye is filled with a transparent, hardening gel (during assembly, it became clear that if this was not done, the hole on the side of the left eye would be visible);
-the eyes are glued, inserted and fixed inside the head with a hardening acrylic mass.
3. Stage: face cleansing.
A gentle method of restoration was applied. The whole face was lightly brushed with the finest sandpaper and sanded with cloth. I did not intentionally restore the makeup, otherwise the doll would have acquired the appearance of repainted. In this case, it is better not to finish a little, than to make an unnecessary repainting.
4. Stage: work with the torso, legs and arms.
The restoration of the composite body was carried out in a major way. This will help prevent putty and touch-up stains. Complete repainting of the composite body will protect the soil layer from destruction, which in old dolls becomes soft and shabby like cardboard. The overhaul restoration saturates over-dried materials (cellulose and ground layer) with moisture from fresh putty and acrylic paint, and this moisture restores the elasticity of dried materials. So, the work has been done: - we sand the disassembled parts - we check the soil for "flowability" and remove the exfoliated areas, we expand even larger cracks even more so that afterwards we can putty everything well; -Apply several thin layers of flesh-colored plaster (the color was selected by trial and error, ideally, close to the color of the base coat), the tone is slightly less yellow than necessary, and a little lighter than necessary - it will darken when dry; - each applied layer was dried, sanded and sanded:
5. Stage: priming, finishing painting and fixing the paint with varnish.
We wipe the finished parts with a sponge cloth - remove the particles of the putty, otherwise we will get a color defect. We hang wire hooks on a stick, on which the "body parts" will be dried. After leveling and removing the traces of chips, a primer was applied to the entire surface of the torso and legs to eliminate microcracks. Then several thin layers of tinted acrylic paint were applied with a wet sponge with very fine porosity. Each layer was dried, then a new one was applied (10-15 layers). Drying of paint in suspension on hooks - 24 hours each layer. Above - covered with two layers of matt acrylic lacquer. Hanging drying on hooks - 2 days for each layer.

Although the doll had no injuries on its arms, the hands were also used to color the entire doll, as well as to reinforce the loose, worn layer of the old coating on the arms.
As a result, the doll took on the following appearance:

I would like to advise the customer after such a radical repainting
torso, rivers and legs, for a while (maybe even for a month-
two) do not put anything on the doll, do not allow it to come into contact with the fabric,
so that the acrylic varnish (which, unfortunately, takes a long time to dry) is dry
and was finally entrenched.
I would like to thank the wonderful master Natalia Krasnova
Alexandrovna for such a high-quality work. Our doll is already
not young, she is over 50! years, and about 30 of them she sat in the closet
due to the lack of a peephole. Natalya, you gave our girl
second life, thank you so much !!! If in the future there is
the need for doll restoration, then only to you.
Anastasia and Roman
Finally, the daughter has grown to the age when you can play with dolls from the heart. Sensing the joy of meeting old friends, I took out my dearly loved toys in childhood. But warm memories of sweet dreams in an embrace with an adored doll were replaced by caustic disappointment and shame: what am I going to show the child now? Tanya's doll has eyelashes torn out from one eye, and therefore the eye rolls up in a strange way, and Vanya's doll has a leg torn off. Well, of course, after me they were mercilessly exploited by the younger sister, and then the nephew left traces of his reckless childhood on them. "This will not work, we need to bring them back to normal," I decided.
The question of trying to fix toys on my own disappeared right there, I don't know how to insert plastic eyelashes into doll's eyes, that's why my search for a doll workshop began. Such a kind Doctor Aibolit immediately introduced himself, who, without any special worries and hassles, will sew a leg to my bosom baby doll and cure the eye of unfortunate Tanya. It was not so, it turned out that finding a doll workshop is not so easy. Internet search engines sent them to toy stores, and people on the forums, when asked about doll workshops, suggested that they should do the restoration themselves. By the way, many parents are in no hurry to part with broken toys and are also looking for toy craftsmen. Many are looking, but not all are found. So, where in Moscow can you get your favorite toy repaired?
Repair of vintage toys
"Puppeteer" is a virtual workshop, it does not yet have a real address. But on the site you can write to the masters, and then meet with them. The site is convenient in that it gives a complete description of all available services and their cost, so that you can immediately understand what needs to be done in each specific case and how much it will cost.
Puppet doctors can attach falling arms and legs and other vital organs, replace the doll's hair and make a beautiful styling, change the stuffing, fix the squeaker, clean out old stains, paint worn out elements and sew new clothes. It turns out that the "Dollmaker" is a hospital, a beauty salon, and a toy studio. Both new toys and old ones are taken to repair - the main thing is that they are loved ones.
If you want to discover the talent of a puppeteer and repair the doll with your own hands, and, perhaps, in the future, create your own workshop to the delight of many parents, then you need to investigate the issue of doll spare parts. As frightening as it may sound, you will have to look for suitable eyes, eyelashes, arms, legs, hair. There are much more shops selling Cheburashka's skin or a wig for Malvina than doll workshops, so, probably, many parents take up the needle and glue themselves. In addition, it is now very fashionable to create your own designer dolls, there are many forums on this topic on the Internet, where it is not a problem to find a detailed master class and get practical advice from experienced craftsmen.
Repairing electronic toys requires a completely different kind of workshop. Most often, it is the electronic filling that breaks down in such toys, it happens that the batteries oxidize and fill the contacts. You won't go to the puppeteer with such damage, but in electrical repair shops, they will be able to bring such toys to their original state.
In the Elemont TV repair shop, the possibility to repair electronic toys is spelled out in the list of services. But in other repair shops specializing in repairing household appliances, it is worth trying your luck.
Radio-controlled toys are loved by children and adults, especially dads. Now such toys are especially popular, which is easy to make sure in all the capital's parks, where miniature tanks, boats and SUVs cut across meadows, ponds and paths, and toy helicopters soar into the sky.
Unfortunately, these very expensive toys have an increased accident rate, and it is worth taking care of the topic of repairing such models immediately after purchase. But unlike other types of toys, radio-controlled models are repaired a lot. Suitable workshops are usually located at shops selling radio-controlled models.
At the last show, a nice young woman asked to tidy up an old composite doll. I rarely come across composite dolls, but we agreed to first look at the state of the toy, and only then decide who and what will do.
The damage turned out to be repairable and I took up the restoration.
This surprised girl from the 50-60s is the same doll ...
The doll was brought to me on a dark, dark night ... ... Disassembled.
The attachments for the legs were lost, the eye mechanism "fell through" in the head, there were almost no eyelashes, the wig was collapsed, there was a trash on the side of the body, there were no clothes and shoes ... ...


I immediately thought that this was not a USSR-ovsky doll. Too flat composite on the head and torso. The eye mechanism is flirting exactly like that of the KR-ki 126 of the late period.
Glass eyes. Thick plastic arms and legs. Synthetic wig "woven" into a thick rubber base cap. On the back of the head, under the wig number 3066/15 and that's it. Height 75 centimeters. Big girl :))
I climbed to look for what kind of "beast" it was. The muzzle of a typical late antique German girl.
In the forum on Dols-planet, I found a small description about a doll with such markings among the girls (THANKS TO THEM BIG). 

Here it is:
"After the end of World War II, the production of dolls was resumed on the basis of the Armand Marseille doll factory. the factory used some forms of AM, as well as forms of other brands of the region. Heads, etc.catches were made from composite and papier-mâché.
Early dolls are marked AM, but most are marked with "SP" in a circle.
Sonneberger Porzellanfabrik produced thousands of dolls and bobbleheads, but closed production fairly quickly in the early 50s. This is due to the emerging era of plastic dolls. Later on, they began to produce composite and later plastic Sonni dolls based on castings of SP models.
SP 3066 - large dolls with flirting eyes and open mouth. In early dolls, both the head and the entire body are made of composite. The later ones have plastic arms and legs, a wig on a rubber "cap-base" ".
That is, this is a doll - late 50s-early 60s. Germany.
Then there was a renovation.
Glued the torso. I cleaned the glue off my head, terrible glue.
I tinted the loss of paint on the head and body.
With the help of a sledgehammer and some mother, she took out a part of the rocker with eyes, apparently there was a plaster of Paris with glue. I glued the eyelashes to the eyelids right in my head, it turned out not as fluffy as I wanted, but very uncomfortable. Then she put her eyes in place, adjusted the eyelids and flirting rocker. I washed the wig, combed this "lamb". It turned out to be a very good fluffy wig. Well, panties, a T-shirt, socks, a dress, sandals, a bow.
Two dresses were made. Initially, the doll had a cornflower blue dress with a white collar and a lacy bib. There was no monochromatic fabric of this color at home and in stores it is not the season for summer fabrics. But in the flower I found as many as two vintage rags. That's why there are two dresses. Vintage buttons, modern cotton lace.
At the last moment I decided to glue the velvet paper "behind my teeth", although I did not find any traces of the old one in my head. Maybe, of course, the glue dried up and the backdrop just fell out.
Well, everything seems to be, now the pictures.


The only thing is that the child has "bruises" on the leg, but I don’t know how to get it out, but it’s scary to try everything, I don’t want to spoil it. Maybe someone took out "bruises" from plastic dolls?