Diagram of a hanging Christmas tree made of balls. Flying Christmas tree made of balls. Decorative Christmas tree made of balls for modeling
We will send the material to you by e-mail
Everyone remembers how funny clowns in childhood demonstrated miracles with their own hands, bending and rotating long balloons, turning them into different shapes. It's time for us to be masters with dexterous hands. The editors of the site tell about an interesting approach to decor for the New Year: very soon you will have a Christmas tree made of balloons. With our own hands, we will learn how to make a Christmas tree from round, long and different-sized balls.
It does not take a lot of time to decorate the spruce figure, especially if you are the owner of a hand pump for inflating balls or a special compressor.

To make a figure, you need a large number of balls of the desired color and diameter. The diameter is indicated on the package. At a worthy manufacturer, the balls are durable and will not burst at the most inopportune moment like an explosion.

If balls in green tones are often chosen for the base, then any colors and shades are used for decoration.
The point of the work is to assemble a single figure from a multitude of inflated products. For hitching, the twisting method is used, the ends are tied with tape or braid, sometimes double-sided tape is used.
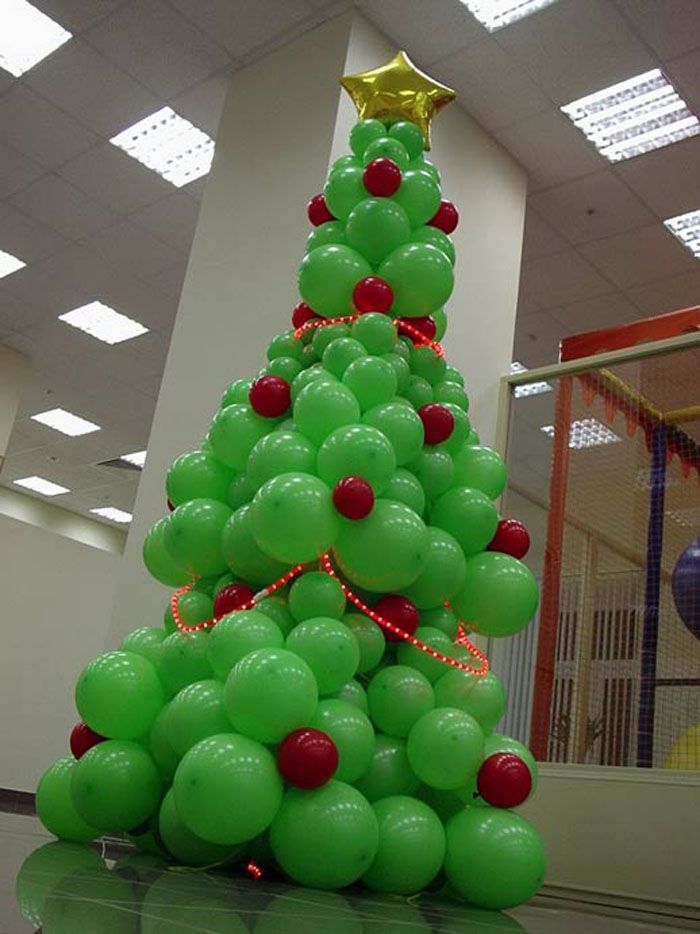
We collect a Christmas tree from round balls of different diameters
The most typical Christmas tree is made from round balls.
| Illustration | Description of action |
|---|---|
 | We inflate the green balloons, but not completely - we leave about 6 cm. |
 | We take a green "sausage", measure three fingers from the edge and in this place we twist, getting a small "sausage". |
 | We make a second twist and twist both elements with the main one. |
 | Twist a small little bubble. |
 | We measure out four fingers and twist. |
 | We repeat the previous steps. We pierce the rest of the main element and tie the tail. |
 | It turns out one tier of the future Christmas tree. |
 | Now our not quite appetizing sausage will be equal to 4 fingers. |
 | And we also make the bubble larger than in the previous tier. |
 | By repeating all the steps, we get a tier of different sizes from each SDM. We connect them in series using the remaining ponytails. |
 | We make 4 small bubbles from red SDM. We tie three of them to each other by twisting. |
 | We make 4 more bubbles, linking the last three together. In this way, we create a five-pointed star. We twist the last ball, tear off the rest for the tail very carefully (we need the inflated rest of the ball) and tie the structure. |
 | Twist two bubbles from the inflated remainder, connect them together, now we will burst the rest of the balloon and get a tail. This tail will serve as a connecting link for the center of the star. You can hang the decor on the tree. |
 | We inflate the bead-type SHDM: we consistently twist the bubbles. We attach the upper part to the star and stretch it to the base of the Christmas tree. So, we consistently decorate the entire tree. |
Related article:
: diagrams and stencils, their purpose for decoration, theme of protruding, tips for choosing vytynanka for the New Year, crayons and large protrusions, a method of fixing on a window, furniture, gift - read the publication.
Combined Christmas tree: how to make toys for such a beauty?
A Christmas tree made of balls, decorated with small balls, looks interesting. The whole difficulty is how to connect them to each other.


What you need to work
We need 50 balloons for a construction height of 220 cm in sizes 5 ", 9" and 12 ", a hand pump, many small balloons for decoration, a foil star.
How to assemble a tree
The assembly instructions are clear and understandable.
| Illustration | Description of action |
|---|---|
 | Pour water into one ball - we need it to make the structure heavier and more stable. We make a hitch of 5 larger balls and attach a weighting agent to them from below. We tie a long SHDM (160) to the center of the hitch. He will serve as a bunch for us. |
 | We make the second tier from the same parts, but without the weighting agent. We tie the row to the base using the SDM. We collect this row by row, gradually using smaller balls. We make the upper tier from five small balls. |
 | Take a star and inflate it with a pump. |
 | Choose the colors we need and inflate small balloons. |
 | We use double-sided tape for attachment. We glue the decorations and admire the work. |
Let's see how they make a Christmas tree from balloons in the video with their own hands:
Article
You must admit that it is impossible to imagine the New Year without a Christmas tree, especially if there are small children in your house who most of all expect gifts and miracles from this holiday. Today, many craftsmen and designers offer a lot of different solutions on how to place a Christmas tree in the house without using a living or even artificial tree.

- Creating a Christmas tree from Christmas tree and unusual balloons;
- Execution of a conical or even floating Christmas tree with or without a frame.

Wall spruce using Christmas balls
It is worth approaching the process of creating a wall Christmas tree as responsibly as possible, with imagination and creativity. For work you will need:
- Garlands and others;
- Christmas balls;
- Fishing line;
- Frame (wooden sticks will do).

It is worth noting that the color scheme and size of decorations for the Christmas tree should be thought out in advance!
The first step is to make a frame, on top of which balls will be located in the future. As an idea, you can make a triangle, in the shape of a spruce, or in several horizontal levels, where each upper segment will be shorter in length, decreasing to nothing. The frame is attached to the wall with nails.

The further design of the wall tree is entirely up to you and your imagination: arrange the New Year's toys and decorations as you wish, place the balls by tying them with fishing line to a wooden frame. Below are some ideas for a good design.


Soaring christmas tree
This option is perhaps the most unusual of all that you can think of to decorate your home for the New Year. The finished result should look like the tree is floating in the air, as in the photo below.

If there are small children in the house, then for greater safety, you can place the Christmas decoration at a higher height.
In addition to the hearth, a soaring Christmas tree can become an original decoration, for example, for a kindergarten and school during festive events.


For work you will need:
- Steam cooking net, which will act as a base for fixing balls;
- Thick line;
- Hanging chains for finished structures;
- Wire cutters;
- Christmas balls;
- A large number of carbines;
- Line clips;
- Hooks.
The number of the latter depends on the number of carbines!
The chain is cut into equal fragments using pliers, in the future the finished structure will be suspended on them. Hooks are needed to fix the chain in the net, as well as to connect the carabiners to their ends.

As you might guess, the balls will be suspended from the fishing line. To do this, the latter must be cut into pieces of various lengths. Each piece of fishing line is supplemented with a loop at the end, which can be done simply by tying the fishing line in a knot or using a special clip.
Install the base in the position in which the finished structure will be for the rest of the time. The silhouette of a Christmas tree is much easier to shape by weight. Place balls with a long line at the edges, with a short line in the center!

For a beautiful and graceful design of the New Year's air tree, you need imaginative and spatial thinking. You may not get the end result on your first try, but it's worth it. A beautiful spruce will keep you in a festive mood throughout the weekend, delighting you and impressing your guests.
Cone tree made of Christmas balls
To create a Christmas tree from balls with your own hands, you will need the following components:
- Wooden skewer;
- Bow, snowflake, tip, star or any other object that will decorate the top of the tree;
- Styrofoam cone. The dimensions of the finished product will depend on its size, so be guided by the size of the cone correctly;
- Organza, ribbons, etc .;
- Christmas balls;

It is worthwhile to think over the color scheme for the Christmas tree in advance by choosing the appropriate balls. Alternatively, you can use completely different colors without choosing any particular combination.
- Scissors;
- High-quality fast-setting glue either.

Work order:
- First of all, the foam cone is decorated with balls, and this should be done from the bottom up!
- With a glue gun, the balls are attached to the base. Moreover, the second row should be placed above the first so that the balls on top are placed between the balls of the first row;


When choosing any color pattern, it is worth observing it to the end, correctly alternating the balls with each other!
- The cone is filled to the top. It makes sense to use smaller balls at the top;
- The top is being formed;
- The voids formed between the balls are easily filled with beads or organza. In the latter case, it is recommended to cut the organza into small square pieces. Use glue and a wooden block to attach a couple of squares. The finished decoration is installed in an empty space. Alternatively, you can use tinsel.

It will turn out to make the conical tree even more festive and bright if you place a garland around the perimeter of the structure.
Every family celebrates the New Year every year, making this holiday a true tradition! Everyone approaches the preparation of the celebration in their own way, the main thing is to use creativity, imagination and creativity, and then you will spend the holiday as brightly and colorfully as possible. We hope our tips have helped you prepare for the New Year.
Christmas tree made of Christmas balls - a step-by-step master class

Necessary materials:
- Christmas balls of different colors and sizes;
- foam cone;
- glue Moment;
- white orgasm (1 meter);
- snowflake or star on top of the head;
- scissors;
- wooden skewer.
Manufacturing:

Christmas tree made of Christmas balls under the ceiling. Prepare the required number of identical small green balls. Attach a clear line to each ball. Fasten each ball at a certain height on a special blank.

You will get such a wonderful flying fir tree made of Christmas balls.

From Christmas balls you can make beautiful decor for a holiday or a composition in the form of a Christmas tree

To do this, the Christmas balls are attached to the base, whether it is a wire frame or a foam base from a cone.


Christmas balls are fixed to the base to make a Christmas tree craft using hot glue
First you need to make and select the base, and then fix the balls
From Christmas balls, you can quickly and beautifully make original Christmas trees for decoration for the holiday


In addition to the balls themselves, you can combine and make a Christmas tree with balls and other decorations


Christmas tree made of balls for New Year and Christmas - quickly, simply, beautifully, stylishly and not difficult to do with your own hands
And you can also format one plane

You can take an aluminum frame (or rather make it) and hook the balls to the wire. Or glue the balls to each other, and place cardboard, foam and any other inexpensive material at the base of the Christmas tree.
Or there is another cool option - hang Christmas balls from the ceiling so that they line up in the form of a Christmas tree:

Such a cute compact bow of Christmas balls can be made using a steel rod with a stand, you can take it from an existing prefabricated artificial bow.

The balls will be attached to wire rings of different diameters, it is necessary to prepare such rings so that they can be fixed on the bushings.
In this case, the most important thing is to figure out what size our Christmas tree should be made of Christmas balls. To begin with, we need to take such tools and materials as the material for the base of the cone (polystyrene, cardboard, polyurethane foam, etc.), a glue gun and Christmas balls, beads and other decorations of your choice.

Now we prepare our balls and we hang from the bottom up by this technology


You can also see a short course in this video.
If ordinary pines and spruces for the New Year's celebration seem too ordinary and boring to you, then a tree made of shiny Christmas balls will certainly appeal to you.

Moreover, such a Christmas tree will be relevant for more than one year, and it will not require much costs for its creation.
First of all, we buy Christmas balls (preferably plastic), four different sizes for work. The color of your choice. It took 20 balls to create such a Christmas tree.
Then we will take care of the base of our tree. Metal coils will do.
We will also prepare a knitting needle, about 14 cm long, a beautiful ribbon for decoration and a shiny star for the top.
Now carefully study the photo instructions.
We glue the metal coil for the base with a beautiful tape.

The knitting needle - the base is fixed in the coil with the help of foam.

Then we string the balls in layers: from the largest to the smallest.
Decorate the top with a star.

Simple, fast and cool!
A bow from Christmas balls can be made in different ways.
I want to bring to your attention several ways to make Christmas trees from Christmas balls with my own hands.
Method 1. To make a Christmas tree, I need: a base in the form of a cone, which can be made of cardboard, thick paper, tinsel, unbreakable Christmas balls, various decorations (tinsel, beads, serpentine), glue, scissors, the crown.
We take the cone, put it on the table, I remove the tips from the Christmas balls, I smear the tip of the toy with glue and glue it down in the circle of the cone, glue it all the way to the top. I decorate the top of the tree with the crown, near the balls I beautifully decorate with tinsel, or other decoration.
To make the bowls lush, you can glue other balls to the balls with glue.
Everyone is waiting for the New Year holidays like a miracle. Many have a New Year's mood, they want to go shopping and choose gifts for family and friends. Let's see with you how, in an elementary way, to do new year gift in the form... The main material that will be used to make the Christmas tree is sisal... Sisal is a natural fiber derived from the leaves of the Agave plant. Sisal can be purchased at any art store or flower shop. So we stock up on the necessary materials and start the creative process.
For work you will need:
- sisal green,
- glue gun, glue stick,
- scissors,
- nippers,
- disposable paper cup,
- cardboard,
- building plaster,
- Christmas balls,
- dark green stamens 8 pieces, raspberry stamens 30 pieces,
- beads,
- decorative berries in sugar 15 pieces,
- brown corrugated paper,
- raffia green
- Christmas balls small crimson color.

First you need to make sisal balls. To do this, tear off a small piece of sisal and twist a ball between your palms, like from plasticine.

Pour gypsum into a glass, a little more than half, pour in the amount of water indicated on the package. Mix well and set aside to dry.

While the stucco dries, we make a cone out of cardboard.

We glue the disposable paper cup with corrugated paper.

We glue the cone to the glass, the cone itself should be slightly larger in diameter than the glass in order to glue the cone to the pot without any problems.
We tie a bow out of raffia and glue it to the resulting pot for the future Christmas tree, thereby marking the front part. Raffia is a palm plant, from the leaves of which raffia is made; it is widely used for decoration. You can buy it in any florist store, or someone may have a bouquet of the presented flowers. It is not at all necessary to use raffia, it can be replaced with a regular satin ribbon.
Now that the structure is fully assembled, and we have decided on the front side, we can proceed to the next stage. We begin to glue the balls that we pre-wound. It is better to start gluing from the bottom so that the bottom of our Christmas tree is even.

Glue Christmas balls between the sisal balls.
We continue to glue the sisal balls and Christmas balls until the entire cone is completely pasted over.

Cut off the tails from the stamens, leaving about 1.5 cm.

Glue the stamens between the sisal balls.
When all the stamens are glued, we glue the berries in sugar to the empty spaces.

Too often with berries is not necessary, retreating, approximately equal distance from each other, glue the berries.

Now we glue the raspberry stamens.

Glue bright crimson beads with a diameter of 2 mm on sisal balls.
That's all! Good luck to everyone. Create with love.
How else can you do do-it-yourself Christmas trees, look in - many options!
Do you like the product and want to order the same from the author? Write to us.
Still interesting:
See also:
Hot water bottle "Santa Claus"
In order to keep the tea hot longer in the teapot, we crochet a Santa Claus-shaped heating pad, ...
Sweet gift "Winter house"
Gift of sweets for the New Year "Sweet House" On the eve of a wonderful and bright New Year's holiday ...
You will need: a round mesh (it can be a grill mesh, a double boiler, a fan mesh, etc.) in this case it is a grill mesh, diameter 45 cm; chain, 150 cm; small carbine; 100 twists (for attaching the threads to the structure); 100 hooks (the picture shows ear wires). By the way, paper clips are quite suitable for hooks; 1 reel (15m) of JV rope, line can be used; 200 stoppers (for making loops on a cable); pliers; 100 balls (or any other product) to create a suspended structure. So we have a grill grate. We remove the legs, since they are easy to remove, we leave one lattice circle. Now we cut the chains (or you can use cords) of a single size and attach them with hooks to our lattice. And from above we connect the chains with a carabiner. We cut the wire (or fishing line) and make loops on each side (we will attach one side to the structure, our ball will hang on the other). We mark our design in circles (In this case, 6 circles) Since our balls are 6-9 cm in diameter, we make the distance between the circles 4.5 cm.Cut, fix, sequentially, starting from the center and inner circles, ending with the outer circle according to scheme. We hang the structure from the ceiling and enjoy it.


