Schemes of simple paper crafts. Congratulations from the keyboard. Paper crafts for kids: useful pocket
For the creative, intellectual upbringing of kids, a huge number of programs and techniques have been invented and used.
Paper crafts for children rightfully occupy a leading position in children's creativity. This is due to the availability of material for creative work and the variety of techniques.
Paper crafts help develop a child's creativity. They instill perseverance and determination. Working with scissors teaches the baby to be attentive, scrupulous. Creating paper masterpieces, little fidgets at the same time develop fine motor skills of fingers. Working with glue and paints teaches the baby to be neat and clean. Children aged 1 year and older can create simple children's paper crafts.
All famous do-it-yourself paper crafts can be divided into the following large groups:
- Plane, which include applications.
- Voluminous works. To create voluminous crafts, cardboard is also used.
- Paper toys.

According to the technique of using the material, the following types can be distinguished:
- Crafted using scissors.
- Scissors free: origami and kusudama.
- Can be distinguished in a separate form and crafts using a variety of techniques.
Getting ready for work
Working with paper always requires accuracy and cleanliness. A crumpled sheet of a postcard or paper toys splattered with glue, or appliqués look unaesthetic, ugly and sloppy. The little man must be taught in advance to maintain order in the workplace. It is better to put the extra pieces of paper in a separate box right away.
For paper crafts, you should prepare:
- Paper: colored, white, and corrugated. Paper napkins. They are now available in different colors. Napkins are one of the main materials in the paper-plastic technique.
- Cardboard. Colored sheets of cardboard are often used so as not to paint the base of the craft with paints.
- Glue. It is best for the child to prepare a PVA glue stick for work.
- Scissors are one of the most essential tools for making crafts.
- Paints, felt-tip pens, colored pencils, plasticine, cotton pads, buttons, pieces of fabric (often paper is combined with other materials in children's crafts). For work using the decoupage technique, you can prepare old magazines with pictures or ready-made drawings.

Application
In children's creativity, the main thing is the baby's initiative. The child does not need to be forced. Children's initiative must be supported by adults. The very first paper craft available to a baby from an early age is an applique. Let the kid not know how to work with scissors, but he crumples paper lumps so well. Create with your baby his first creative masterpiece, for example, an autumn tree:
- Take a thick sheet of colored paper or cardboard as a base for your craft.
- Prepare several sheets of thin colored paper or colored napkins so that your child can tear it easily. For an autumn tree, red, yellow, orange colors are well suited.
- Cut or draw a tree trunk out of brown paper.
- Show your baby how to use a glue stick correctly.
- A fool does not know how to glue pieces of paper while holding the edge of the craft. Mom should come to the aid of the child. Hold the edge of the paper, show where the crown of the tree will be and where you need to glue the torn pieces.
In this way, you can make an application of fungus or flying snow. Imagine with your child. Look out the window. Create your own sun or cloud from which it rains. A simple application is done quickly enough. The crumb will not have time to get tired.

For children 3 years old and older, it is already possible to offer not such a simple task, but more complex topics for applications. The kid can already create not only light crafts, but voluminous compositions and toys. When creating their work, children combine different materials. For example, cotton pads and colored paper. The halves of cotton pads are glued instead of the roof of the houses. It turns out a snow-covered roof. Snowdrifts can be made from the halves of the white circles.
Volumetric applique
In children's institutions, classes are often held on creating volumetric applications. Postcards, panels with three-dimensional figures always attract attention. Children of 4 years old are happy to create the simplest crafts. Kids use paper circles, ovals in their work. The technique of working with circles consists in partial gluing of a blank - a circle.
An adult can, together with a child, make a funny cow from paper mugs. Make a meadow out of green corrugated paper. Flowers can be drawn with a felt-tip pen or glued from colored paper. The spots on the cow can also be pasted from paper that is contrasting in color.
You can make a three-dimensional image of a lamb. For volume, use strips of paper rolled from one end or lumps of corrugated paper.
Separately, it is worth highlighting the applications of napkins. The soft delicate texture of the napkins allows children to create extraordinary works. Lumps from napkins keep their shape well. The result is beautiful, voluminous and unusual works. The yellow napkin dandelion is simply adorable.
Beautiful postcard in the technique of paper plastic
Step one.
On thick paper or cardboard, glue a wrinkled napkin of salad, blue or pale pink color.
Step two.
We make dense lumps for the core of the flower from a yellow napkin, for the petals we take white napkins. The stem and leaves will be green. Immediately teach your child to order. Let the baby put the lumps of different colors in separate containers.

Step three.
Along the contour of the picture or template, let the baby glue the core of the flower. Then the petals and leaves with a stem. The edging of the postcard can be made with contrasting lumps of other colors from a napkin.
The basis of the paper-plastic technique is the use of lumps of colored paper for crafts. You can take corrugated paper or plain colored paper. Most often, colored napkins are taken for work of this kind.
Crafts from strips
Children also create many compositions with the help of multi-colored paper strips. For example, create a rainbow applique made of colored stripes.
Step one.
Prepare a blue base for the sky and 7 colored stripes for the rainbow. Also take a narrow transparent tape for application.

Step two.
Gently glue the colored stripes with tape to the base of the applique on one and the other side. The rainbow will look unusual if the fidget fixes the ends of the ribbons with tape so that the middle of the rainbow rises above the base.
Step three.
Cover the strips of duct tape with clouds on one side, and a rainbow may appear from the rays of the sun. You can remember the fairy tale about the magic pot from which a rainbow appears. The pot should be in a contrasting color. It can be decorated with buttons.
With this craft, you can teach your baby to remember the order of the color spectrum. “Every hunter wants to know where the pheasant is sitting,” this phrase is used to memorize the color scheme of the rainbow and its sequence.
With the help of adults, it is quite easy for a baby to make a bird out of multi-colored paper strips. The length of the stripes is different. They are collected in a ring and inserted into one another. The rings must be fixed with glue in one place.

Paper toy
The simplest toy is paper cones. The adult should prepare the toy cones in advance. You can buy either ready-made templates, or make yourself. Usually toys in the form of cones are made to decorate the Christmas tree. Snow Maiden, Santa Claus or an important gnome - such a bright toy will add a festive mood.
A simple volumetric toy is available for preschool children. For her, you need to prepare several colored paper sheets. For a chicken, take a yellow color, a bunny can be white. The preschooler can draw eyes with a felt-tip pen or cut out of paper and glue. If the baby is still small, he needs help to cut out small elements of a paper toy. It is enough only to control the child, to help him, but not to take the manufacture of the toy into his own hands.
If a child is interested in making paper toys, then templates are on sale in a wide range. The idea of a kid to create his own toy should find understanding and support from his family. Children's imagination must be stimulated with new ideas, not only with simple crafts, but also with the study, mastering of new techniques for working with this material.
Weaving from paper strips
Weaving is one of the oldest types of needlework. Using weaving paper strips or tubes, rugs and bookmarks for books are created. You can weave a colorful stationery box or a decorative basket. Weaving develops the eye and spatial thinking. Simple products turn into more complex works. 6 years old children are already creating real works of art.

More complex elements appear in paper crafts for children 5 years old. Creativity of preschoolers is a combination of several different techniques. The baby will not only make a postcard with an applique for her mother, but will decorate it, for example, with a bow. At this age, preschoolers can already master the origami technique, as well as quilling.
Quilling in paper crafts
An interesting type of creativity that may interest children is quilling or paper-rolling. Kids make panels, funny toys from twisted strips. Quilling postcard looks very beautiful and extraordinary.
You can make beautiful paintings using this technique. In kindergarten, the kid can learn the basics of working with this technique, and teach his mother at home.
Kusudama
This is a type of modular origami. In ancient Japan, special healing balls were made, when dried medicinal herbs were hidden inside each detail. Now preschoolers from 4 to 5 years old can create products using this technique.
Kusudama are colorful balls from separate modules. It can be triangles, flowers. Small modules are inserted into large ones to create volume.
Many master classes are devoted to the kusudama technique. Volumetric-spatial compositions made using the kusudama technique require special care and accuracy.
With the help of a sheet of paper, you can do interesting things that do not require any investment at all. Just a little patience and time. We are sure that you will like the result. Try with us.
5 paper home decor items you can make yourself
Colorful paper craft ideas for kids, adults, inspired by modern wall art or ethnic style wall decorations, create unique room decor accessories for modern home interiors.

Realistic - futuristic, fabric - paper flower ideas are fun room decorating designs to be done with baby.
Home decorations don't have to drain your wallet. Instead of visiting a store, reimagining, rearranging items that you probably already have in your home. With the help of a printer and a little artistic talent, you can give your home a new cosmetic look.
Use these five budget, color, lighting, furniture ideas to get you started.

Personal hanging mobile
Decorating an empty space on a wall with something other than the usual printed picture in a frame can be a budget gap.

But with some imagination, pictures, a collection of your favorite photographs, you can create a one-of-a-kind wall mobile in half a day.
Print your favorite pictures on a black and white printer, then cut them out into geometric shapes (such as circles or hearts).

Sew or glue a long line to the top of the images, attach on studs of different lengths, hang up and voila! Instant focus.
Add some contrast by alternating photographs with colored cardboard cut into shapes that match your home decor, or print the pictures in their original colors on photo paper.

Themed candle wrappers
Let the living room express your personality with this handmade candle wrapper. Create your own designs, patterns and fonts that you like, change them every season.

Small accessories like these that transform all home décor are often used to decorate the little things in the interior, so the idea of candlesticks is a great way to give a room some tone and accent with minimal waste.

You can use wrappers repeatedly. Add ribbons, garters, or sequins for extra chic.
Garland from Instagram photos
If you've got your Instagram feed filled with stunning shots, why not incorporate it into your home decor?

Create your own banners by printing a few of your favorite Instagram photos onto thick sheet, photo paper, in your city's Instagram booths.
Punch holes in the top two corners and thread a long piece of tape, patch, or string through them. Decorate photos with decorative ribbon, a few of your favorite phrases, or personalized embellishments from each family member. Hang up and admire your creativity!

Chinese lanterns
Lanterns are not just for outdoor activities. Bring the familiar summer glow into your home by making Chinese lanterns with paper and a few stationery.

Forget expensive applique paper from a craft store, search the internet for the colors and patterns you need.
Print a few of your favorites, draw a picture yourself, or use a page you like from a magazine.

Follow our guide below to fold paper into lanterns of various shapes, sizes, or place over electric candles, or under string light (the popular 'chain of light' decor).
Hang in clusters or simply scatter around the room to create soft, cozy warmth.

Individual chest inserts
Not all home decor updates need to be visible - you can cheer yourself up by placing your favorite pictures or inscriptions in places hidden from view.

When I wanted to add a detail just for myself, I transformed the chest of drawers with personal belongings.
You can do it your way, but I chose my favorite digital photos with funny captions.

Advice
You can also use a simple text with a motivational meaning or compliment for confidence, cheerfulness.
Prepare enough sketches to fill the bottom of each drawer, and securely attach the pieces of paper to the bottom with double-sided tape.
Chinese Lantern Workshop
Making your own Chinese lantern out of paper will not cause any difficulties even for a child, but it will perfectly decorate your home or any other room - be it a school, a cafe or something else.

Finding the right colors, swatches
You can hang them or place them on the table, singly or in groups. This is the easiest way to make paper jewelry and all the materials you need are always at hand at home, because all you need is paper, scissors, glue.
Bright red traditional Chinese lanterns are a staple of any Chinese holiday.

They are used to decorate temples, shrines, parks, shops, houses, offices, Chinatowns everywhere.
Chinese lanterns come in all shapes, sizes, and colors. You can try your favorite color scheme, but I stuck with reds and golds, which are traditional colors for Chinese people.
How I Made a Chinese Lantern in Six Easy Steps
Necessary materials:
- A4 sheet of red paper;
- A4 sheet of gold paper;
- pencil, ruler;
- scissors;
- glue.
So let's get started!
Step 1:
1.Fold the red paper in half. 2. Use a pencil and ruler to draw lines perpendicular to the folded side, about 2 cm each and leave 2 cm below the fold. 3. Use scissors to cut through the lines - they will look like an accordion in the middle of the lantern.
Step 2:
1. Roll the gold paper sideways to form a tube, this will be the center of the lantern. 2. Secure it with a little glue.
Step 3:
1. Unfold the sheet of red paper. 2. Connect one end of the red sheet to the gold tube at one end. 3. Secure with glue
Step 4:
1. Connect the other side, leaving the visible part of the gold tube depending on how long or short you want your lantern to be. 2. Secure with glue.
Step 5:
1. Cut off the excess gold tube from the bottom. 2. Or just keep it as part of the decoration by making a "fringe" and cutting into thin strips.
Step 6:
1. You can use excess gold stripe to make a pen. 2. Cut it off and glue both ends on top.
Ready! Once you have the basic knowledge, it is easy to try different options, depending on your imagination.

It will be interesting to you: OVERVIEW: Fireworks of ideas: How can you make a long and beautiful Paper Garland for the New Year? 100+ easy step-by-step DIY photos
Fantasizing
For example, you can add gold stripes to your flashlight by trimming them with simple or curly scissors, if you have them.

In this case, the gold stripes should be slightly narrower than the red ones, to which they will stick. Install them before gluing the lantern to the gold tube.

I've tried several different shapes and types, including the most common red ball lantern, a square lantern with a box, and some delicate prismatic shapes that are great for hanging.
VIDEO: Master class of Chinese lanterns
Chinese lanterns
A Detailed Guide to Making Chinese Lanterns
Making a bouquet of paper flowers
Now let's try to make with you a small bunch of cute flowers, using only paper, glue and a few handy tools.

The paper craft will sparkle with new colors for you with these little beauties!
You will need:
- colored paper in squares 15 x 15 cm, five colors;
- glue stick;
- PVA glue;
- hot glue;
- scissors;
- wooden skewers.

Making paper daisies
Step 1
First, I placed the first sheet on the table with the colored side down. I folded it in half perpendicularly to make a triangle, and folded the bottom corner up, folding the paper neatly.
Use a hard folder or the back of a metal spoon for sharp creases.

Then I took the bottom right corner and brought it to the top by making a triangle. I repeated it in the left corner. I got the shape of a diamond.
I opened the flaps and thus returned the original triangle.

Raised the bottom corners first on the right and then on the left so that the line of the previous fold coincided with the top edge of the edge.

The resulting "tails" bent back. Now I have all the folds that will come in handy for further work on the final product.
Step 2
1. Unfolded the paper to the primary triangle.
2. The triangles are tucked inward.
3. Fold down the lower level.
4. And once again folded the triangles inward. I prepared the glue.

Step 3
Using glue, I connected the parts and created a cone. Press the edges firmly with a clamp so that they stick together properly. The first petal of my chamomile is ready!

Step 4
I repeated the process 4 times to make a total of 5 petals.
Once the petals were ready, I used a hot glue gun to consistently secure them all to the skewer. They should neatly frame the skewer-stalk.
The chamomile is ready. Great job!
You can make many interesting and beautiful things out of paper. Among such interesting crafts there are even paper houses that you can use to decorate a Christmas tree or just use them as interesting toys. And most importantly, they can be made with your own hands for any adult and child, of course, for those who are older.
How to make a paper cracker
It is not necessary to shoot firecrackers loaded with confetti for a festive fireworks and fill the entire apartment with small pieces of paper. A paper cracker that does not contain any explosive substances can also clap loudly enough. She will add fun to the atmosphere of the general holiday: someone will jump in surprise, and the rest will laugh merrily.
div> .uk-article ")">
It is not at all as difficult as it might seem at first - to make a butterfly out of paper with your own hands. This task is within the power of an adult and a child; this is not really a kid. A butterfly can be hung on a string, it will float in the air in your room, it can be hung from a branch of a Christmas tree, this is also very beautiful.
From a simple sheet of paper, after a short work, you get a cute paper frog, which also knows how to jump. It can decorate your desktop, or it can be a fun children's toy. Kids can even have fun competitions for jumping distance or jumping frog speed.
div> .uk-article ")">
Send a letter - modern youth associates this action only with e-mail. But sometimes you have to send paper letters, and you need an envelope for them. In the era of electronics, such a trifle is not found in every home, so you have to think about how to make an envelope out of paper with your own hands. It seems that wisdom is not great, but without the ability to cope with such a task cannot be done.
Paper planes are easy to make, and most importantly, they do fly. This process is so interesting that any adult will be happy to make lightweight paper designs and, to the delight of children, send them flying. Well, older children themselves will be able to do aircraft construction.
div> .uk-article ")">
You can make many beautiful things out of paper, but the simplest and at the same time surprisingly beautiful are snowflakes. You don't even need to paint them: they must be white. It is enough to fold a sheet of paper in a special way and work a little with scissors to get a real patterned miracle.
It is easy to make a toy boat from a simple sheet of paper and put it on sailing along the stream and along the water expanses of the bath. You just need to remember a simple instruction on how to make a boat out of paper, how to fold it in order to obtain a structure that is stable on water. This is a simple but very exciting business.
Both boys and girls of any preschool and primary school age love to engage in construction. Bricks and construction sets, plasticine and paper - even the smallest children feel the urge to build the same tower of bricks. Early engagement by parents or caregivers with children directly affects the development of their abilities.
Construction helps the formation of imaginative thinking, improves hand motor skills, broadening one's horizons. At 3-4 years old, a child is already able to make an easy craft out of paper. He is able to fold paper, learn to cut with scissors, create volumetric structures, do-it-yourself paper crafts. At the same time, accuracy and precision of movements are developed.
The easiest way to keep a child busy with a paper craft, while not giving him dangerous scissors or glue, is origami.
Getting started with origami
It is better to start the first origami lesson by creating the lightest paper craft, the child's hand should get used to working with this material. Start by familiarizing yourself with the simplest geometric shape - the square. Try telling the square about what you can do with it. In a playful way, you can explain that it has sides and angles, and show the child how to find its center. Having taught how to fold triangles, the child can be shown how to make a composition out of them, by folding, for example, a herringbone. From a folded rectangle, you can make a door that can be glued to a base prepared with the help of an adult in the form of a painted house.

Gradually, tasks may become more difficult. From squares of different sizes, turned into triangles, the child can be asked to fold a Christmas tree, expanding downward. From a triangle and a rectangle folded by a child, you can construct a fungus. Origami-style paper craft templates can be found in specialty books. Below is the

Origami for advanced masters
The art of origami is a suitable creative activity not only for children but also for adults. It calms, creates a meditative mood, and allows you to eventually create a beautiful little thing with your own hands.
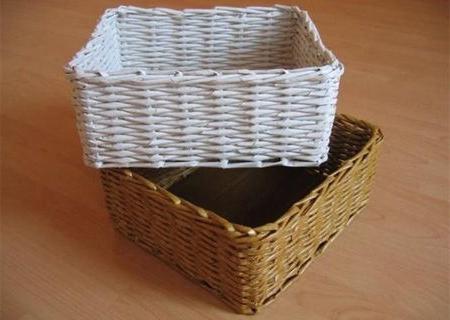
To twist the tube, you will need a newspaper, a long knitting needle, PVA glue, a stationery or a sharp kitchen knife. The newspaper spread is folded in half lengthwise and carefully cut with a knife. Then fold again and cut until you have four strips for four tubes. After that, they take a knitting needle and, applying it to the edge of the newspaper at a slight angle, begin to twist it gently. Having tightened it to the end, a drop of PVA glue is applied to the corner, slightly pressing it, remove the knitting needle and put the resulting tube aside until the glue dries. When weaving, the tubes must be held in order to give them the intended shape. Weaving begins with small-sized products, over time, taking into account and evaluating all the features of the material.
Baskets and boxes, photo frames and coasters for mugs, vases and wall panels are most often woven from newspaper tubes. But a developed imagination allows the use of this material and type of technology practically unlimited.
Quilling
Quilling is another type of paper craft that is gaining popularity. This is a technique of twisting narrow long strips of paper in a spiral and then modifying them to compose flat or voluminous compositions.
Quilling is native to Mediterranean Europe. This hobby is very common in America, England and Germany. It is also called "paper filigree". Despite this name, the technique allows even a child to make simple paper crafts. In skillful hands, paper spirals turn into flowers and patterns used to decorate gift wrappers, handmade cards, albums, photo frames. Products made in are used as wall decorations, and even make jewelry out of them. This is a budget, beautiful and simple type of needlework.
In quilling, dyed paper of a special density is used. It is important that both sides and the cut itself are the same color, although sometimes paper with two different colors on both sides of the sheet is used for a special effect.
Sets of ready-made paper are sold in specialized stores, but you can cut the strips yourself.

Facing
In this technique, you can make three-dimensional figures and images from paper. For trimming, thin and soft paper, for example, corrugated paper, is used. Small squares are cut out of it, which are then folded into cones or funnels. The top of this cone is greased with glue and glued to the base. Multi-colored cones glued to the base create a voluminous and beautiful panel. Thus, you can make a picture or a postcard, or you can create an interior topiary.
Iris Folding
This technique of paper art is not very common in Russia, but it has a rich history and unlimited opportunities for self-expression. At its core, it is a technique of folding paper strips in such a way that their pattern resembles a twisting spiral. The drawing is laid out from colored paper or paper with a pattern, carefully selecting shades so that it turns out to be harmonious. From above, the resulting pattern is covered with a frame - a motif or silhouette cut out of paper. As a result, even a child can make an easy craft out of paper - a beautiful panel or a postcard.

Papier mache
Papier-mâché is a simple and affordable technique with great potential for handicraft art. This technique is used to make caskets and boxes, vases and jewelry, theatrical props, dolls, figurines and figurines of animals, toys, covers with painting, embossing and varnishing. Even interior decoration elements are made of papier-mâché: from decorative panels for walls and doors to architectural stucco moldings for walls and ceilings. Frames for mirrors, candlesticks, lamps and even furniture made using the papier-mâché technique are distinguished by their beauty and originality. However, even the lightest paper crafts can be made using this technique.
Papier mâché (French papier mâché) means "chewed or torn paper". The basis of papier-mâché is paper, which easily turns into a mass that can be formed. Glue, gypsum or starch are added to the composition of the mass.

Three techniques for making papier-mâché products
The first way
A model of the product is being prepared, which will need to be pasted over with paper. It can be made of wood, clay, plasticine or gypsum. The model can be greased with glue and fixed under layers of paper, or it can be removed from the paper layer, for which it is coated with petroleum jelly in advance. Torn wet paper is applied to the selected model with glue. Alternating a layer of paper with a layer of glue, they are pasted over in layers, the number of which can reach up to a hundred. Previously, a starch-based paste was used for gluing, but nowadays special glue can be purchased. Gluing paper in layers is called waving.
Second way
The product is formed from a liquid paper pulp, for which the paper is cut or torn into pieces a day before they plan to start work and soaked in hot water. After that, the soaked mass is boiled. Then the water is squeezed out, the pieces of paper are loosened and dried. The dry mass is mixed with chalk and a special glue from the mixture and starch paste is gradually poured into it until a dough with a soft and plastic structure is formed. Such paper dough is poured into a mold or applied to a product.
The third way
This type of papier-mâché requires hard cardboard and PVA glue. The method resembles the technology for making plywood. The model is made by gluing together pieces of hard cardboard. After that, the cardboard is subjected to pressure, the specialists use staples and a stapler to fix the glued plates or vice and clamps. Dried products are putty, polished, primed, then painted and varnished or embossed.

Thus, paper is one of the most versatile, inexpensive and easy-to-use materials for creativity and needlework. You can make an easy craft out of paper, decorate your everyday life, transform the interior, make an original gift that resembles a work of art.