How to make a boomerang out of paper? How to make a boomerang out of paper How to make a boomerang out of cardboard that comes back
Throwing a boomerang is quite an interesting activity for children. Several centuries ago, the Australian aborigines preferred to hunt with the help of such a projectile. A very convenient design made it possible to launch a projectile into the air, and when it described an arc, catch it again in the hand. In modern conditions, the boomerang is used as a toy for entertainment. In our article we will tell you how to easily and simply make a paper boomerang in several ways.
Content:
Option 1
To begin work on the manufacture of sports equipment, you should prepare a workplace and materials:
- stationery scissors;
- landscape sheet or office paper;
- means for coloring the boomerang (pencils or other similar material);
- ruler.

Let's get started:
- Fold the prepared sheet of paper in half (Fig. 2), not forgetting to run a ruler or fingernail along the fold line;
- Unfold the sheet again to its original position;
- Bend each half (Fig. 3.) in half, draw something hard along the fold line several times (Fig. 4);
Advice! As you fold each half, make sure that each edge falls slightly short of the line in the center.
- Fold the resulting fragment in half, turn the sheet over so that the seams are in the middle (Fig. 5). The fold line will be at the top, and the edges of the paper will be at the bottom;
- Bend the upper right and left corners into triangles and smooth them with a ruler so that they fit snugly to the main part of the sheet (Fig. 6). Then you can return them to their original position (Fig. 7);
- The next step is to fix these small triangles inward (Fig. 8);
- Try to expand the resulting figure so that you get a shape like in Fig. 4. After all the previous manipulations, if you did everything according to the diagram, you should get what is shown in Fig. 9;
- Look at Fig. 10 and precisely unscrew one half of the structure. Diamond lines are very important to create a boomerang. Therefore, these lines need to be fixed again, smoothing them with a ruler;
- Next, bend the edges of the diamond inward so that you get the sketch from Fig. 11. These movements must be done with your fingers from the inside of the figure. Its sides also need to be folded into the middle, try to make a triangle, which is then folded in half again (Fig. 12). Pay attention to Fig. 13. This is a slightly enlarged scale of the part of the diagram circled in Fig. 12;
- Carrying out all the previous steps correctly and consistently, you should end up with the design shown in Fig. 14.

The next step will be the final formation of the boomerang, ready for use:
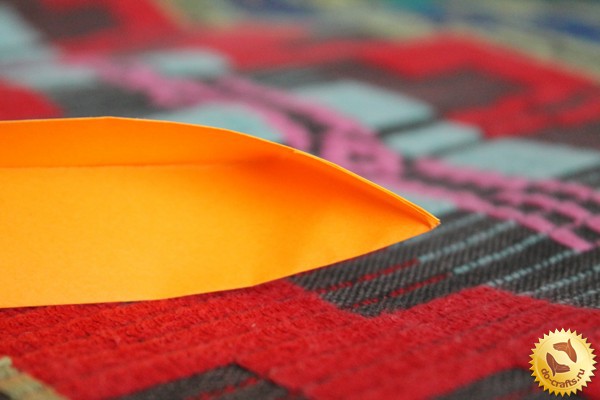
- Bend down the part of the sheet that is at the bottom (A), then do the same with the top part (B) (Fig. 15);
- From the hanging part on one side, pull the right part towards you from below (Fig. 16), put the left part located below on top;
- Pay attention to the arrows in Fig. 17 - these are the edges of the fold lines. They are designed to rotate a launched boomerang around its axis (Fig. 18);
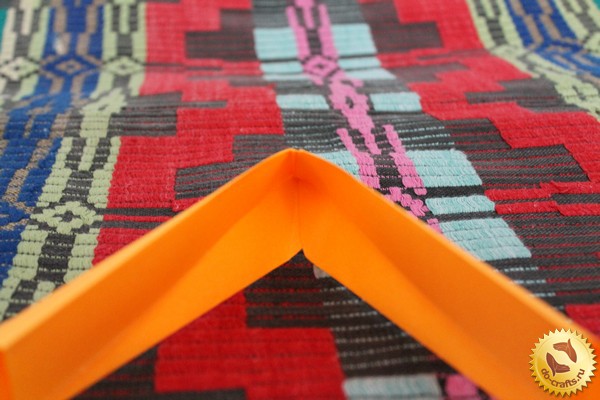
- Form an angle on one side of the structure and repeat on the other side (Fig. 19). Carefully draw a ruler along the folds, bend the shapes back and bend them again, but this time to the inside. An enlarged part of the diagram in a circle is in Fig. 20;
- Following the step-by-step instructions you should get a boomerang, as in Fig. 21;
- Now it’s time to start decorating the sports equipment - color it with paints or pencils. You can also use stickers.
Option 2

When starting the second option for creating a boomerang, prepare:
- Stationery scissors;
- Thick A4 paper or cardboard of such density that cutting it is not difficult (shoe box, etc.);
- Tools for coloring boomerangs (pencils, paints, felt-tip pens);
- Marker.
Let's get started:

You can check the resulting structure by throwing it. This is done by turning the hand. You can hold the projectile either in the middle or at any of the edges. You need to throw it straight, trying to present it so that it flies in the air parallel to the line of the ground.

Video
Video instructions for making a paper boomerang are given below:
The art of creating boomerangs goes back a long way. Previously, these devices acted as weapons in China, which is why at that time they were made of metal or wood. But the ability to return to the same place from which the boomerang was launched was noticed by the ancient aborigines who hunted birds. But at that moment the natives did not yet know what a boomerang was, but only threw sticks. Even then, they began to pay attention to the shape, thanks to which a neglected product could be returned; this made hunting much easier for ancient people.
Today, the boomerang is considered a popular toy for children. In stores that sell various children's products you can find plastic boomerangs available in a variety of colors. The cost of such toys is low, but it is better and more interesting to make a paper boomerang with your own hands together with your child; this will be an excellent family activity. In addition, it will be much more interesting for the baby to play with the product in the creation of which he took part.
How to make a paper boomerang?
In this case, there is a question of choice - paper or cardboard. Having selected the desired material, you can begin manufacturing. If you do everything according to the instructions, the product can be completed in a few minutes. It is important to know that a boomerang can have several blades. In accordance with the diagram, you just need to cut out the required number of elements for the product. When asking how to make a boomerang out of cardboard, you need to take into account that the finished elements are glued together overlapping. This is necessary for aerodynamic qualities. It is important that the next element is superimposed on the previous one on the same side. Please note that in the case of an odd number of blades, it will be impossible to make an angle between them of 90°; therefore, you should pay attention to ensuring that when gluing all the angles are approximately the same. Having learned how to make a boomerang from recycled cardboard, it is important to know that you can use it in any convenient place. It is desirable that this be an open area - a park, a yard. You can try launching a paper boomerang indoors, if the total area allows.

How to make a paper boomerang that comes back?
A paper boomerang is considered safe; it can be made using the diagram for a wooden product. Often, a light paper boomerang is made using the origami technique, but the design is not always easy to understand. That is why we will describe step-by-step instructions. To do this, you will need a standard sheet of paper that needs to be cut in half. Only 1 half will be used. Next, you need to bend the part in half and turn the workpiece out. Each side should be bent towards the pressed line in the middle.
Next, you need to bend the sheet in half, and on the folded side, bend the corners into a triangle. Having unfolded the product, you need to leave only one side in a folded position. To put it in simpler terms, it is important to get a diamond in the middle, and each edge should be made convex. As a result, you will need to make a boomerang from a straight blank. To do this, you need to turn the base into a vertical position so that the diamond is on the left side. The lower part of the diamond should be pressed downwards; accordingly, the part bends to the left. By completing this step, you will get the edge of the part located on the right side of the bend. The folded element must be pressed downwards with your hand. Next you need to move on to the body of the boomerang and make it more durable. To perform this action, you need to fold the edges of the element towards the central axis. So the body is ready, and the blades can be made from another sheet of paper by cutting and pasting them over the body.
A flying object that returns to its launcher has always attracted people. Although the term boomerang is primarily associated with Australia, such objects are also found on other continents. The classic boomerang is very labor-intensive to manufacture. It requires precision and competent selection of materials. In addition, boomerangs are considered by Russian law to be bladed weapons and are prohibited.
The proposed boomerang is made of paper and cannot cause any damage to people or furniture. In addition, its flight distance is only 1.5-2 meters, which allows it to be launched in an ordinary room. For all its simplicity and small size, it is a real boomerang that flies along a complex trajectory and has the ability to return.
Materials:
For manufacturing you will need the following tools and materials:
- Cardboard. You can buy it in a store or take it, for example, a box of chocolates.
- Pencil.
— A ruler at least 20 cm long.
- Scissors.
- Glue (optional)

Instructions for making a boomerang
1. Mark strips 20 cm long and 2.5 cm wide on a sheet of cardboard. Don’t be upset if the dimensions are not met. They can be changed within wide limits. If you have a large sheet of cardboard, then the boomerang can be cut out entirely.

2. Cut out the blanks.

3. Glue the strips in the center to form a cross. If you don’t want to glue, you can fasten it with a stapler. The perpendicularity of the parts is also not very important.


4. Easily (without allowing the paper to crumple or bend) straighten the blades and bend them to one side from the plane of the boomerang at a small angle. This is a very important point. The blades should not be twisted, as this reduces the flight range and distorts the trajectory. It is not necessary to give the blades any profile.
5. If desired, the finished boomerang can be painted.
The number of blades can be changed. You can easily make a boomerang with three or six blades. They will differ in their flight path. So, for example, a three-bladed boomerang has a slightly greater flight range than a four-bladed one, but is less stable.
Startup instructions
To launch, the plane of the boomerang must be perpendicular to the floor. The boomerang is held with the fingers of one hand, by any blade. The launch is made by flexing the wrist joint, so that the boomerang receives a forward movement, parallel to the floor, and a rotational movement around its axis. There is no need to put in much effort, everything needs to be done approximately the same as when launching a paper airplane.
Want to know how to make a boomerang out of paper? - Great, we will share with you all the intricacies and secrets of its manufacture.
Initially, the boomerang was created as a weapon, because its property of describing an arc in the air and returning back made hunting very easy. Today, boomerangs are used as sports equipment. As a rule, boomerangs are made of wood. But today we invite you to make a paper boomerang that you can safely play with right in the house.
Materials:
- Paper 1 sheet
- Scissors
How to make a boomerang out of paper
So, the materials for the robot are ready and it’s time to learn how to make a boomerang out of paper.
1) Fold a sheet of paper in half along the sheet, unfold it and cut along the fold line. We will work with only one half of the sheet.

If you are using colored or patterned paper, place the sheet with the colored side down.
We bend the leaf in half, along the leaf and level it. Due to this, we get a fold line in the middle.

2) Now we wrap the sides towards the middle, leaving a very tiny gap.

3) Fold the leaf in half crosswise.

4) At the top of the sheet, fold the corners towards the center.

5) Bend the corners back and unfold the sheet, turning it 90 degrees.

6) Turn the workpiece over and turn the lower part of the part down.

7) Now we have a difficult task ahead of us: in the photo below you see the dotted lines; in these places it is necessary to smooth out the folds thoroughly. This is a very important point, so be careful.


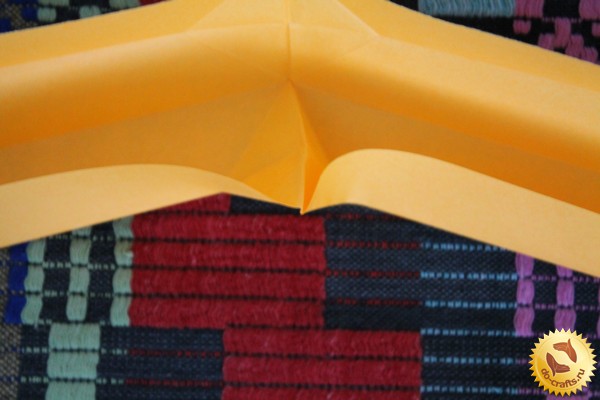
8) We bend the upper part of the future boomerang at an angle of 90 degrees.


Level the bottom of the top part:

Raise the upper corner and hide the lower part of the upper part under it:

Closer photo of the corner:

10) Lay the top of the top piece down and then lay the right side of the piece down.

We have a pocket in the middle, which, as you may have already noticed, opens up and needs to be hidden.
To do this, open our figure back:

Now we wrap the top of the top figure first, and hide the lower part of the figure in a pocket. The middle is ready!


11) Let's start with the sides of the boomerang:
First, let's take care of the bottom part, the one on the right. We unfold the bottom of the workpiece and bend both corners towards the middle. We turn away the left corner and hide it inside.

Not only adults, but also children know what a boomerang is. And if previously it was used exclusively for hunting, now boomerang throwing is considered more of an exciting hobby, allowing you not only to have fun, but also to develop dexterity, attentiveness and speed of reaction.


Today we want to tell you how to make a boomerang from origami paper. We hope that thanks to the step-by-step instructions, you will be able to assemble the returning origami boomerang yourself and delight your children with a new interesting toy made by yourself!
Boomerangs are made from various materials. But paper is still considered the most affordable material for making a gaming boomerang. The process of creating a paper toy in itself can be great fun for both adults and children!

To make a boomerang yourself using the origami technique, you need to prepare some materials and tools in advance:
- A4 sheet of paper
- Scissors
- Some free time
Photo and description of work
- Take the sheet and place it in front of you:

- Fold a white or colored paper blank as shown in the photo:

- Carefully cut the origami workpiece in half:

- Set one half aside and continue working with the other. First you will need to bend it in half:

- The part must be unfolded and its lower part must be pulled to the center so that it comes into contact with the fold line:

- After this, you need to tuck the top half in the same way:

- At the next stage of master class origami, the part needs to be bent in half, so that the previously folded parts are on the outside:

- Now you can bend the corner, as shown in the photo:

- After this, you need to pull another corner to the fold line:

- At the next stage of MK, the paper blank must be carefully unfolded:
 Having done this, you will see that you have formed lines along which the further assembly of the origami craft will “go”:
- The fold lines form 2 squares. It is according to them that we will continue assembling the origami figures.
Let's move on to the most difficult part of the training master class. Perhaps novice origamists will not be able to complete all the step-by-step actions the first time. But, you shouldn't despair! Remember that every failure brings you one step closer to your goal.
Continue folding the workpiece along the previously formed folds:
- As a result of all the manipulations, you should end up with something like this:

- The first square was used to form this piece. Now, following the template, bend the lines on the second square:


- First, turn the corner inside the shape:

- Then smooth the edges so that the paper blank does not fall apart during play:

- In order for a paper boomerang to turn into a returning toy, its corners must be processed correctly. First, turn the upper left corner:

- Then we unfold it back and stick it inside:

- Bend the bottom corner:

- Next, according to the instructions, insert the lower corner into the upper hole:

- The right side of the boomerang also needs to be processed step by step, but according to a different principle. First, the entire edge is put inside:

- Then the lower part bends towards itself:

- After that, it is inserted into the upper recess:

As a result, you should get the same corner as shown in the photo: