What paint can be used to paint cones for crafts. Christmas decorations: gold and silver cones. As a Christmas tree decoration
As I promised in the article about wreaths, I tell you how to paint the cones for the new year. I'm sure you will love it! And also, this is a way to keep your kids busy with "socially useful work", that is, to use their energy in a good cause!
There are working rules:
- Be sure to wash the natural material! Pour water into a bowl, add a drop of detergent.
- Fully opened cones look better. You can even bake them in the oven for 1-2 hours until they open.
- It is worth working with gloves. And if sprays are used, then in a respirator and in the fresh air.
It remains to find out what and how to paint.
What and how to paint
How can you color the buds?
There are many tools and methods that are suitable for this purpose:
- Sprays. Any aerosol enamel will do. We put a newspaper and paint at a distance of 15-20 cm. It is better to paint on a balcony or street, aerosols have a very strong unpleasant odor.

- Sponge. If you plan to decorate a lot of material, this method is quite justified. It is best to put the sponge in a container. Saturate it with paint. Dip the cones in, press in and twist on the sponge with all sides.

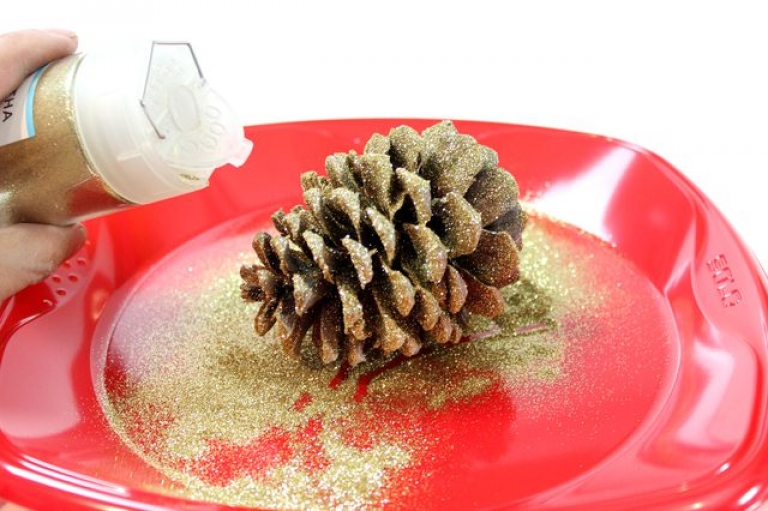
- Sequins and hairspray. To fix the glitter, you can use a strong hold hairspray. Sprinkle on the bump and then sprinkle it with glitter. Too much chicken out. This can be done several times until you achieve an even (or desired) coverage.
- Sequins on PVA glue. In a deep container, the glue is mixed with water. Pine cones go down, plunge several times. Then let the glue drain and leave to dry. You can apply glue with a brush, and rub it on top with glitter.
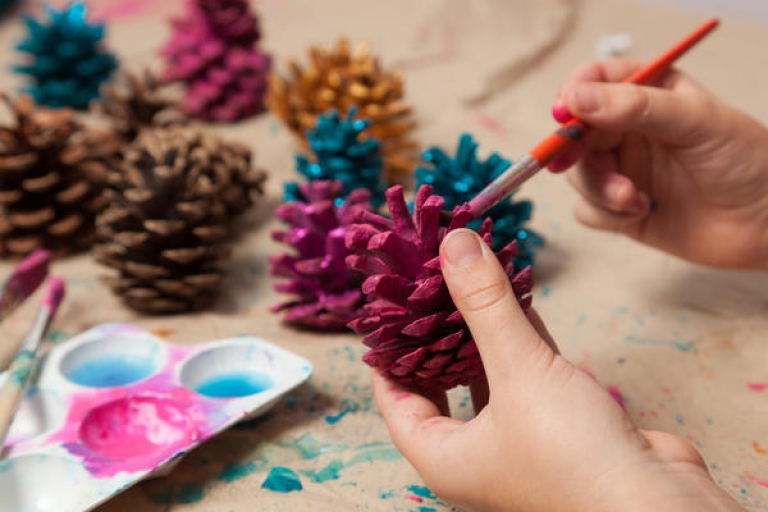
- Acrylic paint or gouache. Apply with a brush or sponge. Just keep in mind that the sponge will only touch the edges. The brush will reach much deeper.
- White. Fill the cones with white. Close the container tightly and put in a dark place. Already after 18 hours, the material will noticeably whiten. Don't be alarmed, the bumps will close; this is their reaction to moisture. But then they will open again. And one more thing, which I will warn you about. You can often see absolutely white shoots in the photo. But don't expect to get results like this quickly. To do this, it is worth doing the procedure several times. And every time the buds should dry well.
- A tin of paint. Yes, yes, this is the simplest, but the most expensive way to paint. We dip the lid on a string into a can of paint, take it out, hang it up so that the glass will have excess paint.

- Palm wax, stearic wax or candles. But this remedy is special. I'll show you a master class on how to work with it. They look not ordinary and pretend to be Christmas tree decorations. Another advantage is that they can be flavored.

How to work with polyethylene wax
It will take:
- Wax (in flakes) can be bought at a craft store or buy cheap candles;
- Dye (oil or liquid food is good);
- Aromatic oil;
- 2 bowls for a water bath;
- Wooden spoon.
We make original jewelry step by step:


A couple of tips:
- The wax should be neither hot nor cold. Only well warm, then it will lie in an even layer. When we lower the cone for the penultimate time, it is already thicker.
- Dip one last time in hot wax for a shine.
But there are other decorating ideas as well.
How to decorate pine cones for the new year
It is interesting that shoots can be done not only with the help of paints. There are other means:

Color combinations
Yes, and do not forget about color combinations, so that your composition of cones does not look like a cheap needlework. I myself am not guided in the color wheel, but I keep a guide to the useful plate below:

Well, a few combinations of cones directly. 
I think that with such a decor, which we prepared today, the holiday will become especially beautiful and elegant! Do you like the ideas? Share them with your friends and subscribe to other articles.
How to make colored cones for crafts for the New Year? Many craftswomen ask about this. After all, cones are considered an excellent material for making crafts. And she herself looks very beautiful and can decorate any interior for the holiday. Among other things, the cone is also considered a durable material, and crafts based on it will be stored for several years and look like new.
How to handle buds
Before starting work on a future masterpiece, you should first prepare the cones. If there is large contamination, it should be washed and dried in a well-ventilated area, but not near heat sources. If there is no strong contamination, then you can simply thoroughly clean the bumps with a stiff brush from the earth and debris, shake them off, and, if necessary, dry them.
If the cones were collected unripe and not completely open, then it is permissible to place them in a slightly heated oven, but it is imperative to leave the door a little ajar so that moisture can come out. This is required for the opening of the cones, the rash of the fruit. Having opened, the scales will resemble spruce branches.
It is also necessary to do this to dry the buds if they are wet, otherwise the finished product can quickly deteriorate.
The resulting blanks can be left in their natural form, selectively or completely painted, varnished, decorated with artificial decor, for example, using artificial snow. Everything will depend on your imagination and ingenuity.

How to color buds in different ways
Spruce and pine cones are beautiful in their original form, but if it is necessary to include colored components in the craft, then they should be painted. Due to the porous and dull surface of the buds, the paint is excellently absorbed and adhered to. You can paint them by any means, up to ordinary gouache or tempera, but this coloring will not last long and will get dirty. It is advisable to select the most stable paints, such as acrylic, for example.
Professional needlewomen most often use materials for work such as:
- A set of acrylic dyes (in jars or tubes), which is used to design individual strokes or to form texture.
- Spray paints. Automotive enamels can also be used. With their help, you can achieve a beautiful canvas and uniform coverage, and they also dry quickly.
- Aerosol paints - metallics of various shades. Using them, you can achieve excellent special effects.
- Finishing varnishes. In this case, it is also advisable to use an aerosol container - then the varnish lays down easily, quickly and evenly.
- Dyes and varnishes to give special effects - "frosty" coating, glitter, artificial snow and others. Using these materials is the easiest way to decorate buds, even when there is not enough time for work.

When working with paints and varnishes, and especially with aerosol and automobile paints, it should be noted that they are endowed with a pungent odor. Therefore, it is better to use them in a well-ventilated non-residential area or outdoors.
It is possible that it will be necessary to apply several layers of coating, but it should be borne in mind that each layer must be completely dry. Therefore, before applying the next layer of coating, it is worth making sure that the previous one is completely dry, otherwise the already drawn pattern or coating may be damaged.
How to paint buds white
To color the buds white (or even gold), you will need to use:
- A piece of foam rubber (preferably thicker or fold it in two layers);
- Gouache paint;
- File;
- Cones.

In this case, white gouache is used. It must be diluted with acrylic varnish and poured onto the foam rubber (the thicker it is, the deeper the bump will sink into it, and the better the scales will stain).
Place the file under the foam so that the paint does not leak. Then put the cone and gradually twist it in a circle.
It is better to put gloves on your hands.
In this case, the paint does not go away very much.
The foam rubber should be turned over to the other side at short intervals, because the paint gradually flows to the bottom.
In 30 minutes of work, you can cook here how many cones, as in the photo:

An example of what can be obtained from cones after painting.

Cones can be used in various types of conifers, in all kinds of shapes and sizes. Cones painted in gold, white or silver shades will look original and creative in the craft. In this case, you can use aerosol enamel. It is available in a huge variety of colors and shades, and dries quickly.
Related videos
Cones are a very fertile material for crafts, because they are very different in their shape and appearance. Spruce, pine, cedar, fir, larch - all these are conifers of trees and shrubs on which they grow and which have needle-shaped leaves - needles. It is about these trees that the proverb was invented: "in winter and summer in one color", because they are always green. And the cones are large and small, round, oblong, tuberous, hard, soft, smooth. They also differ in color and shape, and in the strength of the scales. Cones are available with closed and uncovered scales. 
You need to collect unopened cones, they take up less space, since they are much larger in volume than opened cones. Any unopened bump that is torn off will open and change its appearance when it dries. In order for the cone to retain its appearance longer, it is covered with a thin layer of wood glue.
How to process craft buds
To do this, the glue is melted with the addition of water and to such a consistency until it becomes liquid like water. Then, with tweezers or tweezers, the cone is slowly dipped into the glue two or three times with the base down. 
But if you only have a bump that has dried and opened, and an unopened bump is required, then it must be lowered into the water and kept until the scales tightly press one against the other and the bump closes. After that, you need to cover the bump with glue again.
If, on the contrary, during the preparation of the cones, an open cone is required for the craft, then it must be put in a warm, dry place, for example, in the oven, for a day. The bump will dry well and open. 
What you need to prepare buds
Bumps come in different shapes - but what if you still need a bump of a certain shape, but there is no such bump? Then you have to invent.
Take an even cone, dip it in boiling water and cook until it becomes soft and easy to bend. Then give the bump the shape you want and tie it with rope or tape it with adhesive. When the bump is dry, be sure to cover it with glue. 
When doing it, you have to drill and cut a lot, and since this violates the integrity of the adhesive layer, the places of drilling and cuts for the preparation of cones must be immediately processed with glue. In this case, you need to make sure that the glue gets behind the scales, and for this the cone is set for 20-30 minutes with the scales up so that the glue does not leak out.
Great skill during the preparation of the cones requires drilling the cones. It is not easy to drill a cone, especially a spruce one, since its scales are fragile, especially at the base, and they are easy to break. The bump crumbles. To prevent this from happening, you need to try to get the tip of the drill into the center of the cone rod and with light rotations, without pressing, deepen it.
In open bumps, it is more difficult to reinforce the details. Therefore, insert the drill deeper, and make the ends of the inserted parts with a margin. And cover the holes and scales with glue all the time.
If you need to insert sticks-legs into the end of the cone, then the end of the cone is simply sawed off and the sticks are inserted.
It is easier to drill unopened cones from the sides than unopened ones. It is better to try to insert stick pieces right under the scales at the opened cones, and then fill them with glue or cover them with plasticine. 
And further. Sometimes you only need cone rods. In the forest, you can find ready-made "naked" cones, which are good for making tails, necks for birds and animals. However, there would be a desire to dream up, there will always be a necessary lump.
In the next article, we will take a closer look at what crafts can be done with the help of cones.
The abundance of ready-made Christmas tree decorations and various items for decorating for some time saturated the market, and the art of creating various "homemade" interior gizmos for the New Year's holiday has slowly begun to be forgotten. But gradually, in the last decade, we were also covered by the world love for "handmade" - handicrafts. I had to urgently recall the skills acquired in childhood and generate new ideas.
To create New Year's decor and Christmas tree decorations, it is most logical to use such natural material as spruce and pine cones. They blend beautifully, naturally with popular New Year trees, are easy to process, look elegant, and can be used for a variety of purposes. Little ones really like cones, so the whole family can work with them, this will only benefit the closeness of parents and children.
Materials and tools for work
Decorating cones is a creative process, but not at all costly, it does not require very expensive equipment, and the main material for work can be collected in any park where trees and pines grow. You need to pick up fallen cones - those growing on trees are still too juicy and may not dry out completely, so the finished work can fail - become moldy or get an unpleasant odor. In addition, collecting cones is an exciting, healthy and environmentally sound activity.
In addition to cones, acorns, chestnuts, and various berries that have a beautiful color and, when dried, retain their shape and color, can be used for home crafts.
To work with such materials, you will need the following tools and accessories:
- Glue gun and a supply of special glue in sticks. If the work is carried out with small children, adults will have to glue or buy small light devices for the kids, having explained in advance that their "stings" are very hot and you can burn yourself great if you are not careful and careful.
- Scissors for cutting out parts.
- Nippers.
- Pliers.
- Brushes.
Necessary materials:
- Plant materials (cones, acorns, chestnuts, berries, bark, branches, leaves, and so on).
- Scraps of fabric, preferably with non-frayed edges (cloth, felt, dense non-woven fabric, etc.), pieces of leather and suede - artificial or natural.
- Buttons, beads, beads, ribbons, small artificial flowers and leaves, braid, lace and similar small decor.
- Wire, ready-made frames, stands, plastic tubes, wooden sticks and more.
- Paints.
- Lucky.
- Decorative coatings.
In the process of work, you may need ordinary sewing trivia, as well as glue for fabric and paper, pencil and paper for marking and making diagrams, and much more that is usually at hand in any home.

How cones are processed for crafts
Before starting work, you need to prepare cones for crafts. Heavily soiled can be washed and dried away from heat sources in a well-ventilated place. The rest can simply be thoroughly cleaned of soil and debris with a stiff brush, shaken off and, if necessary, dried.
If the cones are collected unripe and have not fully opened, they can be placed in a slightly heated oven, be sure to leave the door ajar to allow moisture to escape. This is necessary so that the cones open, the fruits spill out, and the open scales resemble spruce branches. It also needs to be done with the cones in order to get rid of possible moisture in them and to protect the finished product from damage.
The workpieces can be left in their natural form, partially or completely painted, varnished and decorated with decorative materials such as artificial snow. The appearance and effectiveness of the future thing depends on your imagination and ingenuity.

Means and methods for painting cones
Spruce and pine cones are beautiful on their own, but if the products involve the inclusion of a color component, they will have to be painted. Since the surface of the buds is porous and matte, it perfectly absorbs and retains paint. You can paint them with anything, even with ordinary gouache or tempera, but such a coating will be short-lived and will get dirty. It is best to choose a more durable paint such as acrylic. Ideally, you should have the following components to work with:
- A set of acrylic colors in jars or tubes for applying individual strokes or creating texture.
- Aerosol paints (you can use car enamels - they give a beautiful dense and uniform coating and dry quickly enough).
- Metallic aerosol paints in various colors. With their help, you can achieve especially expressive special effects.
- Finishing varnishes, it is also most convenient to use aerosol containers, with their help the varnish is applied easily, quickly and evenly.
- Dyes and varnishes for creating special effects - with "frosty" coating, glitter, artificial snow and so on. Applying them is one of the easiest methods to decorate a pinecone, even if you have little time to work.
The technology for working with paints and varnishes, especially aerosol and automobile paints, which have a pungent smell, provides for their use in ventilated non-residential premises or in the open air. It may be necessary to apply several coats, with each previous coat being completely dry. You can continue working with the painted material only after all layers have completely dried, otherwise an already made drawing or coating may be damaged.


Christmas decorations and decorations made of spruce and pine cones
With a certain diligence and accuracy, you can make almost any toy out of cones. Kids love gnomes very much, and making them is not at all difficult.
- For this, a spruce cone is used as the body of a gnome, while it is best to leave it natural.
- You can make the head of the figurine with a plastic or foam ball, draw a face on it and glue a beard made of threads.
- Legs and arms are made of wire wrapped with padding polyester and covered with fabric (you can use tights, including colored ones for children).
- Clothes are sewn by hand or on a sewing machine, and shoes are made of leather or thick felt, cloth or thin felt, dense non-woven fabric can be put on caps.
If you wish, you can show your imagination and make gnome girls with funny pigtails made of threads sticking out from under a bright cap.


Long spruce cones can be used as spectacular interior decorations and Christmas tree decorations. To connect to them with hot glue, tapes are attached and tied together with a large beautiful bow or laid with a braid with a rosette. Such a pendant is hung on walls, doors, a Christmas tree, or even used as New Year's grabs for curtains, ornaments on the corner of a tablecloth.


Cones give a huge scope for imagination. With them, you can create many decorative compositions, decorate the table, make children's and Christmas tree figures, make elegant wreaths on the front doors, elegant candlesticks and topiary, many figures and cute little souvenirs.
Christmas candlesticks made of cones
One of the easiest projects for beginners is to create decorative and truly New Year's candlesticks. They can be made from small and large buds, as well as from a mixture of various plant and artificial materials. To make a candlestick from small cones, you will need the following materials:
- A large candle or a small glass candlestick with a candle.
- A thick cardboard stand, flat saucer or plate, small tray or box lid with low sides.
- Accurate decor - beads, beads, rhinestones, tinsel, berries, dried or artificial flowers, and so on.
The candle or candlestick is placed on the base, and the prepared, painted or varnished cones are carefully glued with hot glue, laying them so as to obtain a beautiful ring composition. For additional attractiveness, you can use various decorative elements and details, including flowers, twigs and small decorations in the composition.
In order to make the product more voluminous and expressive, the ends of the scales must be painted over with a colored paint that contrasts with the color of the cone. For the same purpose, you can make a beautiful golden or silver dusting, use artificial snow, sparkles, or even stick rhinestones or beads on the tips of the scales of the cones.

Large cones with a loose core can be used to make small candles that look beautiful on the festive table between the dishes and glasses. To do this, you need to cut off the upper narrow part of the cone with pliers, and in the remaining part, align the area under the candle as much as possible.
If the surface still turns out to be very uneven, you can fill it with liquid wax or stearin from a melted candle, wait for it to harden and glue a decorative candle on it. You can use pill candles for low lights, or use tall, narrow candles for candlesticks.
A long and thick "gypsy" needle is stuck into the base of the cone, onto which a candle is then carefully and carefully pricked. To prevent the finished candle from turning over, you need to make a flat and even base at the bottom of the cone, glue it with hot glue on a small saucer, best of all on a heavy glass jam socket.
You can decorate the finished composition for every taste - leave it as it is, paint it, decorate it with tinsel or small details, berries or artificial, dry flowers.


Decorative Christmas trees from cones
For those who do not want to purchase a live Christmas tree or put up an artificial tree, as well as to decorate offices, classrooms, public spaces, corridors and rooms in houses and apartments, elegant and simple Christmas trees made of cones can be used as a spectacular decoration.
Large cones are almost ready-made Christmas trees. They need to be placed in a beautiful stand, for example, an impressively painted or draped clay or plastic flower pot, a jar of cream or any other cosmetics, a low capacity.
You can fill it with a piece of foam or even crumpled paper, and glue a circle of thick cardboard on top.
A beautiful big cone with open scales is painted green, sprinkled with silver or gold paint, artificial snow is sprayed on the edges, and after drying is decorated with elegant beads and tinsel.

If there are a lot of buds, you can make a bigger Christmas tree that you can place on the table. To create it, you need a foundation. You can buy it in a specialty store in the floristry department, or you can make it yourself by gluing a strong cone made of thick cardboard and securing it to a plate or tray.
The cones are glued to the base with hot glue, or they are pricked onto a cone made of a foamed "oasis" using a wire or pins stuck into the base of the cones. Work begins from the bottom, carefully attaching the bumps. The appearance of the product depends on the method of laying - small pine or long spruce cones glued in a spiral will set a clear rhythm, and laid out randomly will give a more informal, modern look to the product.
Additional decorations are added to the taste of the creator of the product. Just be sure to crown the tree with a fancy star at the top.

New Year's wreath of cones
The festive decoration of the home begins with the entrance doors. Before the holidays, I want to decorate them more smartly, replacing the autumn wreath that has already lost its relevance for its winter version. You can glue the cones on a different basis - use a ring from a floristic oasis for dried flowers, a foam product woven from flexible branches, or make a base for a wreath yourself, taking thick cardboard, a stapler and several layers of newsprint for the required volume.
Before starting work, it is worth making a sketch, and then laying out all the selected components of the composition. This will help you to see what is superfluous or missing in it, adjust the shape and size, slightly change the style or change the materials. If you plan to make the wreath multi-colored, the cones are painted before gluing, they are glued already completely dry. If the wreath is planned to be made more or less uniform, finishing work is carried out after the completion of gluing and hardening of the workpiece.
Such a wreath is very beautiful on a dark door, if you cover it with white spray paint, and on top with silver and artificial snow, on a light surface, dark cones with gilding, ruby and emerald inclusions look better.


Christmas star made of cones
The assortment of decorative cone products is not limited to toys and the usual round wreaths with candlesticks. If you have a large enough supply of cones, you can make a very effective and rather versatile decoration - a star. You can use it in different ways - hang it like a wreath on a door or on a wall, decorate the top of a Christmas tree, attach it to a chandelier, put it on a rack as an element of room decor, or even put it on a table as a candlestick or just decoration.
To create such a product, it is best to use beautiful spruce cones - they have an elongated shape and scales, more graceful and pressed to the body, it is much easier to assemble them into an expressive composition.
To begin with, lay out the future product on a sheet of cardboard approximately as it will look in finished form. Remember that the star must have the correct shape and neat outline. You do not need to lay out all the cones in one plane - make the product more voluminous by placing the parts at different angles. You can connect the cones with each other with hot glue, and for suspended products - also additionally with the help of wire.


Santa Claus figurine made of cones
It is very easy and simple to make such funny toys, even for kids. Finished products can be presented as souvenirs to all guests of the holiday.
To create Santa Claus figurines, they take wide "pot-bellied" open pine cones and paint them red. This is the body of the future Santa Claus. Now you need to make a head from a large bead or a plastic ball, stick hair and a beard made of cotton wool or yarn on it, attach a red cap or hat. The head is glued to a bump, boots are made of felt, and around the wide waist of the New Year's character they are girded with a rather wide shiny black belt with a buckle. Such a figurine can be supplemented with a loop on the head and hung on the Christmas tree as a decoration.


Topiary of cones for the New Year's holiday
A good idea for a festive winter interior decor is a composition of cones in the form of clipped trees - topiary. To create them, you will need gypsum, a beautiful or hand-decorated clay or plastic flower pot, a cylindrical stick made of wood, a ball made of plastic, foam or floral sponge. The ball is put on a stick, its second end is inserted into a pot, which is poured with gypsum or concrete mortar. It is necessary to monitor the strict verticality of the "trunk" of the future topiary. When the material in the pot has hardened and dried, you can start working. There are two ways to attach cones:
- Top in, base out. This method creates original "dense" and fairly even balls, the spaces between the cones are decorated with beads, rhinestones, dried rose buds, lavender sprigs, spikelets and many other details.
- Base inward, top outward. In this case, the tree will turn out to be "fluffy" and voluminous. Cones must be selected well in height and width, otherwise the product will turn out to be sloppy and disheveled.
The surface of gypsum or concrete in a pot is covered with various materials, moss, cloth, straw, covered with small pebbles, glass pebbles or beads.


Interior balls from cones
According to the principle of creating a topiary, a ball-shaped decoration is also made. It does not require a pot or a stick, only a base in the form of a ball. Here, too, you can stick the cones tops inward or outward, and paint the finished product as you like and decorate with various decorative elements.
A large ball can serve as a focal element for decorating a coffee table, it can be suspended by first making a loop when gluing the cones. If you use small cones to create balls, you can put several decorative elements in one basket, on a tray or plate.


Decorating the New Year's table with cones
One of the easiest ways to decorate a New Year's table is to make cards out of bumps to accommodate guests. You can simply insert a finished card into a cone, making a cut in it with a jigsaw, or turn the cones into funny little figures. In this case, you can get not only catchy table decor, but also small stylish souvenirs that guests can take with them.


Festive Pine Cone Garlands
You can complement the bright and festive New Year's decor with garlands of cones. They can be made very simply - just stick an ordinary tailor's pin with a ring at the end into the base of each bump, or screw in small threaded loops. Further - it is already a matter of technology. Decorated fancy cones can be simply strung on a wire or cable, and if you need to fix the position of each thread, just tie a knot on each loop or drip a little hot glue on it.


In making cones, only two things are important - your creativity and accuracy, then the resulting things can become real works of art.


Crafts from pine and spruce cones are an exciting and popular activity, in view of the natural decorativeness of the material. Do-it-yourself Christmas decorations from cones are especially common.
Cones for a wreath
In principle, you don't really need to come up with anything here: handicrafts from cones and a Christmas tree are the most natural combination. You can simply hang cones on thorny branches - it will already look interesting. But it is much better if the crafts made from cones shine and shine: after all, the New Year's tree is a magic tree, which means that the New Year's decorations must match it.
If you just pick up cones in the forest and paint them in certain colors, you will hardly be able to achieve a special decorative effect. In order for crafts from cones to look neat and bright, you need to carry out preparatory work.
How to turn buds into Christmas decorations
- When collecting cones for decorating the Christmas tree, take only those that will match in size. If the tree is small, large cones will pull the branches down, and the decorative effect will be lost.
- If the buds are loose or wet, don't worry; in a warm room they will dry out and open quickly.
- Once the bumps have opened up to the extent that you planned, stop any further opening. To do this, you need to weld wood glue, holding each bump with tweezers, dip them in the sticky mass and put them on a film or oilcloth.
- In order for crafts from cones with their own hands to subsequently stain well, just washing them is not enough. There is a lot of resin in the buds that needs to be boiled down. Wash the buds in hot water (several times), put them in a saucepan and cook with the addition of some kind of detergent for at least 3 hours. During this time, the water needs to be changed 5-6 times.
- Put the boiled cones on a film, let the water drain. Dry well (it is better if they lie in a warm place for about a week).
- Cones prepared in this way can begin to be turned into New Year's decorations. First, prime them with a primer on wood (it is more convenient to just dip the cones in it).
- After drying, the cones can be painted: with acrylic paints or spray paint. If there are a lot of future New Year's decorations, it is more convenient and more economical to use spray paint. But in any case, first you need to apply one layer of paint, and after drying - the second.
- To enhance the decorative effect, glitter can be applied to the edges of the buds. If the do-it-yourself cones are painted with an aerosol, this is where you can finish painting. Cones painted with acrylic paints should preferably be varnished (for wood, and so that the New Year's decorations sparkle, glossy).
- It remains to attach loops to the cones to hang them on the Christmas tree. It is more convenient to do this with a thermal gun, but you can simply glue it with some kind of glue (for example, "liquid nails", "Moment", etc.). The loop is well attached if you first drill a small hole in the bump.
NEW YEAR OWN HANDS
Leave your review |
|