Barbie doll with a skirt made of autumn leaves. Autumn crafts for kindergarten and school (136 ideas). Walnuts
Good afternoon, we continue to talk about autumn crafts. And today I have prepared a new batch of ideas for crafts on the theme of autumn. There will be the most beautiful works, feasible both for children in kindergarten, and more serious art objects worthy of the hand of a master. You will find a variety of autumn-themed crafts in our other articles - And I will also give you at the end of the article a list of links to other children's crafts for this fall.
Well, let's get started, let's see what beautiful and simple crafts I have prepared for you today.
Origami
On the theme of autumn
In the quilling technique.
Autumn is beautiful golden leaves. From narrow strips of paper, you can transfer openwork beauty autumn leaves. Here in the photo below we see simple openwork twists using the quilling technique. For such airy leaves, you don't need a lot of paper at all. And such works are quite simple to do for school-age children.

Young children can fold simple leaves - where each leaf element is ONE single large quilling roll.

And more complex leaf crafts on the theme of autumn are made in several stages... First, on a piece of paper, we draw the outline of a maple leaf. Then we fill this silhouette with modules with twists - starting from the center and gradually moving to the edges of the silhouette. After the entire inside of the sheet is collected, it remains only to glue the entire contour edge of the craft along with one continuous strip of paper.

Or you can start making crafts with veins(as in the left photo below). First, pull the veins out of the strips of paper - following the drawn contours of the veins on the paper - stick the pin into the end of the drawn vein, stretch the strip of paper, wrap it around the pin and glue the other half of the strip to the first half. After all the veins are collected and fixed on pins, we begin to lay the paper twist modules.

There are different quilling techniques for creating patterned twist modules. Alternating different patterns and shades of color, you can make real masterpieces, crafts on the theme of autumn (like these oak leaves with acorns in the picture below).

Quilling modules can be stacked in autumn picture-panel(as in the photo below). How to make such shaggy flowers, I told in detail and showed in photographs in a special article.

Birds, rowan twigs, squirrels, hedgehogs may appear on quilling paintings-crafts on the theme of autumn. Everything related to the autumn forest.


If you are just starting your first steps in the quilling technique, then on the topic of autumn it is better and easier to do rowan craft.

Such a craft has simple berries - round twists. And simple leaves - twists in the shape of an eye (that is, the same circle-twist was first loosened-unwound, and then squeezed with fingers on both sides, giving the shape of an eye).

Primary school children already have dexterous and strong enough fingers to twist and flatten quilling modules themselves. Therefore, for them, simple crafts on the theme of autumn using the quilling technique will also be within their power.
For example, it is easy to make such a hedgehog and a round relaxed tourniquet-apple.

Many more ideas and ways to make an autumn hedgehog craft and in the quilling technique, both from natural material and from paper, you will find in our article.
And when the child gets the hang of it, you can give him craft tasks with an already LARGE number of quilling modules (as in the photo with autumn crafts below).

For the manufacture of such children's crafts, it is better to use stencils. Many quilling stencils on the theme of autumn can be found on the Internet. I plan to write a separate article on autumn quilling and publish ready-made stencils in full size in it. In the meantime, here's an idea for an autumn tree made of paper rolls for the beginning.

Crafts on the theme of autumn
Corrugated paper.
Thin crepe paper (wrinkled or corrugated) is suitable for very beautiful fall-themed crafts for children. You can make a craft tree from a roll of toilet paper. Or craft an autumn flower on an ice cream stick.

The most important thing is to learn how to make multi-layered lush flowers-pom-poms. In the article "" I give detailed explanations of how to make such lush flowers quickly and simply with children's hands in kindergarten.
And here they post such a schematic photo-instruction. And I give a step-by-step description of your actions.

Step 1- put on top of each other colored sheets of paper (crepe or colored table napkins)
Step 2- fold this stack of colored layers in the form of an ordinary accordion (as when making a fan out of paper)
Step 3- from both ends of the folded fan we make a rounding with scissors (this is so that the edges of the flowers are oval)
Step 4- pull the middle of the fan with a wire or string, tie it to a knot.
Step 5- we move apart the blades of our fan from both ends and in both directions - and we move apart the colored paper layers, we unstuck them from each other. We get a lush rainbow cloud.
And now we either partially shove this cloud into the tree trunk (a roll of toilet paper) or attach it to the flower leg (an ice cream stick or a long skewer). And in the end we get a craft tree. Or craft an autumn flower.
Craft for the fall.
Newspaper wreath.
An ordinary newspaper can be a beautiful autumn gift or a craft for a school competition on the theme of autumn.

Newspaper sheets we paint with gouache in different colors of autumn. Next, we fold each sheet in half several times and on it we outline the silhouette of the blank for the future petal. The silhouette can be in the shape of a triangle (or heart). Cut out these colored silhouettes. And now we twist each of them so that the tip of the triangle (or heart) looks up.
We roll thin from the newspaper tubules-bundles... From them we twist the body-base for the wreath. We fix it with wire or rope.

Crafts on the theme of autumn
From ordinary buds.
Pine cones are a very versatile craft material. You can make animals and birds from them and many other crafts on the theme of autumn for children. I have a separate article Crafts from cones and here there is a whole menagerie on this topic. And in this article, I want to show the other side of the bump. Her wonderful inner world.
Namely world of a bump in a cut.
If the bump is cut in half with a knife. Then we see a flat center with scales similar to wooden flower petals... You can use forceps to pull out the extra petal scales. Or vice versa, glue it with glue and add the petals-scales to this cut of the cone.
And then decorate everything with gouache. Draw the colored edges of the petals, draw the middle, and even draw fluffy stamens with thin brush strokes (as in the photo below). Cones make beautiful flowers.

Crafts for coloring cones are very popular with children. You can make whole wall panels from cones-flower beds on the theme of autumn.

But below we see blanks for a cool craft - AUTUMN CLUB. You see orange flowers so similar to marigolds. Here, in the middle of the saw cut from a large cone, a small cone with lush open scales is inserted. Everything is beautiful in yellow. We paint the edges of the scales red. And it turns out the poured flower of marigolds. A realistic bouquet can be assembled. Open the Internet and see what their shape and coloring are, and repeat the same shades with gouache, stamens, stripes, specks - and you will get an autumn flower bed that looks like a real one.
This is a very gorgeous craft that is quite simple to do. With a flower bed like this, you can win any school autumn-themed craft contest. Rest assured. Moreover, I will now reveal to you three little secrets how to achieve perfection in this craft ...

Little secret. How beautiful to reveal the scales of the cone. Soak the buds in hot water. They closed themselves off from the water. Spread out of the water and put on a baking sheet in the oven. We fry them at a low temperature and they open up beautifully - spread out evenly in all directions.
And another little trick... You can use aromatic oils (available at the pharmacy) to keep your cone bed fragrant. The opened cones, even before they are painted with gouache, are put in a dense cellophane bag - we drip a few drops of aromatic oil there - you can mix, drop different ones drop by drop (this will not spoil). And close the package tightly, shake so that the droplets are distributed over the package. And let the bump lie there for a day, soak it properly.
And another little nuance... How to make your flower bed sparkle. After you have applied the main color and drawings, strokes, specks, etc. with gouache. Spray hairspray on top. This will fix the paint, it will not get your hands dirty and the color itself will become two tones juicier and brighter.
The middle of each cone flower can be decorated with a round acorn hat - also painted with colored gouache (as in the photo below). From such chic cones-flowers, you can make whole wreaths-crafts on the theme of autumn.

You can not decorate the decorated cones in the form of flowers, but simply stick them on a cardboard donut ring cut from a large pizza box.

Crafts on the theme of autumn
Natural material
In the technique of mosaic.
All children love bulk applications from cereals. And this is good. Because it is useful. Autumn applications-mosaics of cereals and seeds very soothes the psyche and develops fine motor skills of the hands.

Curly pasta can be added to cereals. We attach the material to plasticine or glue from a hot gun.
Small children can be given simple hand-made mosaics on the theme of autumn. For example, here is such a craft in the form of an autumn tree I really like all the kids in the younger group of the kindergarten.
We paint in advance watermelon seeds(or pumpkin seeds) in different gouache colors. And children lay out whole panels of these colored bones on PVA glue.
And even faster to make mosaic material on the theme of autumn from colored maple leaves... We simply cut them into cubes and pour them into bowls. Children choose the elements themselves and stick them on the crown of the painted tree.

Here are some more simple fall craft ideas for kids in school and kindergarten. The autumn leaf is divided into a sector and each sector can be filled with materials with different textures. If there are no seeds and groats, each sector can be filled with cut mosaics and maple leaves, but of a different color - a sector of yellow, a sector of green, burgundy, orange, red, etc.

And handmade hedgehogs made of natural material, beloved by all children. Hedgehog thorns can be laid out from watermelon seeds, their winged maple seeds. And an apple on a hedgehog barrel can be made from a walnut shell.

Crafts on the theme of autumn can be of a nondescript color - but the different texture of the bulk mosaic material will make it chic. The combination of rice, buckwheat and barley grits will give us a beautiful boletus mushroom.
Light oatmeal and maple seeds will help you make a wonderful squirrel with your own hands.

And here's my favorite combination of a mosaic of dry leaves and acorn caps.

You can make such a beautiful craft on the theme of autumn with your own hands - a silhouette of a squirrel from acorn hats. We print the silhouette on a printer. We cover it with black gouache. And we attach the acorn caps to the glue from a hot gun. A beautiful craft as a gift to friends and relatives.


MOSAIC techniques
for crafts for the fall.
Lump Mosaic . Lumps can be paper (crumpled balls of crepe or corrugated paper).

Or the lumps can be made of colored plasticine (as in the photo of the craft below).

Mosaic for adult art crafts on the theme of autumn can consist of more expensive material - buttons and beads. Autumn is rich in button craft ideas. It can be trees, pumpkins, and a red fox like autumn - the queen of the autumn forest.

But the child also loves to work with buttons. You can glue buttons on a glue gun or plasticine. You can lay out a long sticky track from a glue gun with your hand, and the child quickly fill it with bright buttons and sequins (as in the photo of the autumn craft below)

Autumn paper mosaic. This is a children's craft. When a sheet of colored paper is cut into squares. Each color is poured into separate bowls and the child begins to lay out the picture. It looks beautiful when everything is laid out on a black background, that is, black cardboard will do.

The smaller the child, the easier it should be a mosaic task for him. The contours of the future drawing should be drawn in advance on the background and serve as guidelines for the child for the boundaries of the layout of the elements.

You can cut the mosaic material different sizes... In order to fill in each sector of the picture with a different texture - small or large, cubic or triangular.

Can be cut out of thick cardboard jagged pieces of the future mosaic... First, cut the cardboard into jagged strips with curved edges. And then cut these long strips into short pieces, too, strongly obliquely and unevenly moving the scissors.

Collect a craft from such curved cardboard elements. And then cover up the cracks. Apply PVA glue to the spaces between the cardboard and cover these places with fine sifted river sand or sifted barley grits. Dry and top hairspray so that everything shines with gloss. You will get the effect of a real ceramic mosaic. An excellent, rather simple and chic in terms of result, craft on the theme of autumn. Suitable for both children and parents - everyone will find their own portion of labor both in cutting and in laying out.
Crafts from autumn leaves
in the technique of imprint.
Already not in the first article on the topic of autumn, we are talking about the technique of maple leaf imprint. Because a print made correctly is very beautiful. Children love these art activities where you can make stamps and prints. Against the background of such a sheet of paper stamped with leaves, you can make autumn applications with a squirrel or hedgehog.

Kids crafts from leaves
On the theme of autumn.
Children love to make fancy crafts from autumn leaves. On our site there is a large article on a variety of techniques for such children's creativity Crafts from leaves
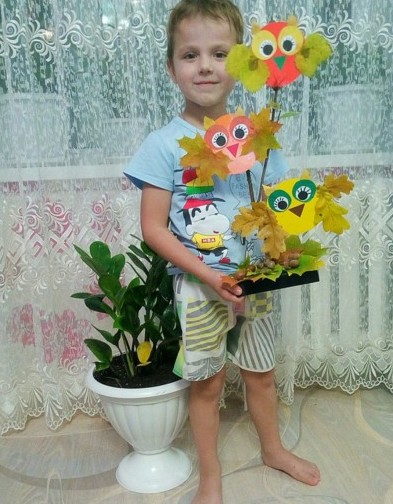
In this article, I'll show you a few more ideas for kids. These cute flowers with eyes are suitable for school and kindergarten age.

We cut out a round piece of cardboard - on it we glue white eyes and draw a smile and eyelashes with a marker. We turn the cardboard disc over and attach the leaves to the reverse side on glue or plasticine so that they look out with half a sheet over the edge of the cardboard round. On the back of the flower on plasticine or scotch tape we attach a tube-leg and put the flower in a vase from a toilet paper sleeve.
Here is a beautiful round aspen leaf applique. Or cut with scissors in the shape of a circle of maple leaves. We glue them on a sheet of paper, add sticks at the top, and glue down the silhouette of the bowl in which they lie. A simple craft for young children on the theme of autumn.

You can take a sheet of paper and stick autumn leaves on it in a chaotic manner. And on top, cover this leafy canvas with a sheet of cardboard with a silhouette-hole cut out in it in the shape of a maple leaf.

You can also make a carpet from a deciduous canvas. Cut an even circle out of it. And laminate the round on a laminating machine, we get a useful craft stand for table setting.

You will find even more interesting techniques for working with autumn foliage in the article.
Crafts for the fall
from leaves and paints.
Leaves can be painted with paints. And they will have new craft opportunities. The painted sheet takes on a new creative life. This is how it goes.
We took a long willow leaf and covered it with a pattern. We look at him and understand that he resembles the long feather of a wondrous bird.

Then we draw a new feather-leaf and another, each time changing the pattern. Then we lay out the feather-leaves on the table and now we see the silhouette of the future craft. A lovely firebird.

It is not easy for children to draw neat patterns with a thin brush. And it is not necessary. Let the children's painted leaves be bright spotted, not necessarily with an even symmetrical pattern. All the same, these works will be wonderful.

As an adult, you can paint whole mini-paintings on large leaves. I will not go into detail about the technique of such painting on autumn leaves, I already talked about this in the article

DIY lamps
Autumn theme.
This craft requires working with a sharp paper knife or razor blade, so children shouldn't tackle it on their own. Have an adult cut out the inner parts of the sheet. The easy-to-follow master class below will show you all the steps. They are simple and straightforward.

We cut out a long strip from cardboard - we fold it into 4 parts-sashes, plus on one side there should be a small overlap-stock for gluing. In one of the halves of the sides, cut a hole in the form of a sheet with a knife. We glue parchment on the inside. We glue the shutters to make a hollow cube. And inside we put a glass jar with a candle and a tablet at the bottom.

By the same principle, you can do candlesticks made of thick wrapping paper and rolled into a tube. On it we cut out the silhouette of a maple leaf, on the reverse side we glue transparent parchment paper painted with watercolors in a delicate color. We fold this two-layer sheet into a roll, fasten it with a stapler. We put a candle or a garland of LEDs inside.

And here are some candlestick jars, The most simple crafts on the theme of autumn. Banks are smeared with blots of gouache, or pasted over with pieces of colored napkins and on this blotted background we glue the silhouette of a tree trunk with branches. And you're done.

You can paint over the jars like this with a hole in the form of an autumn leaf... Cut out a sheet from paper. We glue it on the side of the can with regular soap. We cover the jar with acrylic paint. Moisten the paper sticker with water - the soap gets soaked and the sheet comes off. It turns out a candlestick. Pour grain inside and put a candle.

And you can also white christmas led garland decorate with autumn leaves - attach foxes to each diode with tape and get a glowing autumn garland. A beautiful craft on the theme of autumn, to decorate your autumn holiday.

Crafts-embroidery
on the theme of autumn.
If you loved to embroider as a child, then this fall you can make an embroidery craft on an autumn theme. It can be a beautiful yellow-green-red sheet, made in different techniques of an embroidery stitch (as in the photo below).

It can be a landscape painting on the theme of autumn, made using the satin stitch technique.

You can swipe at a large canvas with many elements. Or you can make a simple autumn tree.

You can decorate a useful thing with embroidery - for example, a pillow. An excellent DIY gift on the theme of autumn. The scheme for such embroidery you can draw yourself watercolor paints on paper in a small box- such paper is sold in the drawing department.

Crafts from beads
on the theme of autumn.
And autumn leaves look beautiful if they are made of bright beads. There is a great variety of beading techniques, therefore there are many ways to make an autumn leaf out of beads. Here I propose the simplest one - accessible for children, the one that is taught in children's creativity circles. We make the outer frame of the sheet with a central vein from thick wire. And already we braid this frame with a thin wire, stringing rows of beads on it along the way.
Greetings to all the guests and regular readers of the blog. Recently I touched upon the issue of making for various competitions and exhibitions in kindergarten and school. I realized that this question is very relevant, so I decided not to stop and devote a couple more articles on this topic.
However, today we will no longer create from an orange vegetable, but from natural materials, that is, from what can be found in the world around us. Most often, moss, bark, acorns, leaves, flowers, chestnuts, dry twigs, mushrooms, etc. are used for children's creativity, that is, all plant elements. Of the mineral, shells, sand, shells, stones are well suited.
We will do needlework on a certain topic, and on which one, I think you can already guess. Of course, all products should be close to the autumn theme, because the fall in all preschool and school institutions is the Autumn Festival.
Do not forget that in addition to organizing all kinds of competitions, matinees are always arranged. Therefore, it is great if you and your child not only work with your hands together, but also memorize a couple. But let's not deviate from the topic and proceed to the selection and creation of crafts.
What crafts from natural material on the theme of autumn can be done with your own hands quickly and beautifully
First, let's understand and figure out what can be done in general. Scrolling through a bunch of different sites, I selected different options for creative work. I note that they are all very similar to each other, but at the same time, each work has something unique.
And here's the first piece. The so-called autumn in the forest. Take cardboard, cut a circle out of it. Decorate (glue) the imaginary earth with leaves, berries. The house can be built from sticks or paper. The branches of a Christmas tree or pine are good for trees. Also use logs from dead thick branches. Don't forget about the pebbles. Well, plasticine will always help you.

But what kind of house can be made from twigs and colorful autumn leaves. Near the hut, you can settle some fairy-tale hero or forest animal.

Another variation of a house made from cereals and various natural materials. Looks very nice and bright!

How do you like such cute burdock hedgehogs? Well, just a miracle. By the way, you will find out how to make such a craft a little below, there will be a detailed master class with a description and step-by-step pictures. So do not rush to leave the page, read everything to the end.

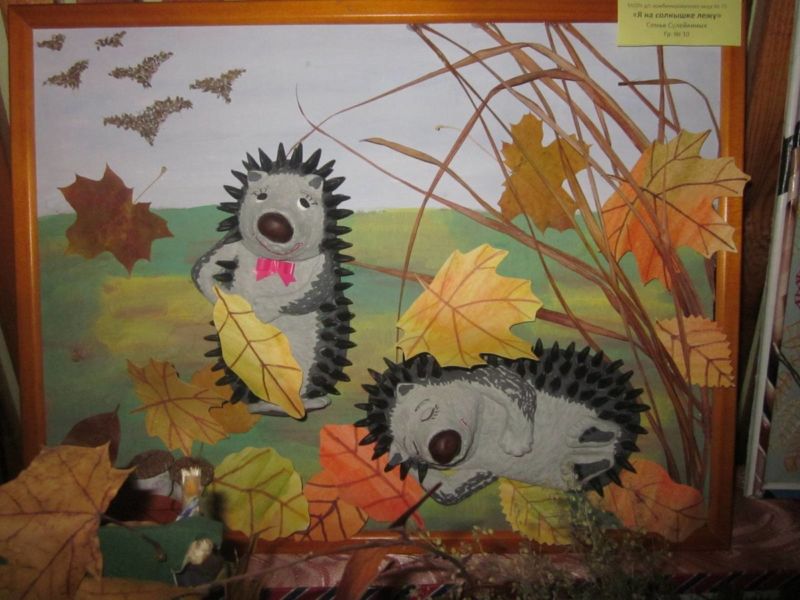
Here's another hedgehog idea. Only here a painting acts as a product. Kids can easily cope with this type of activity.

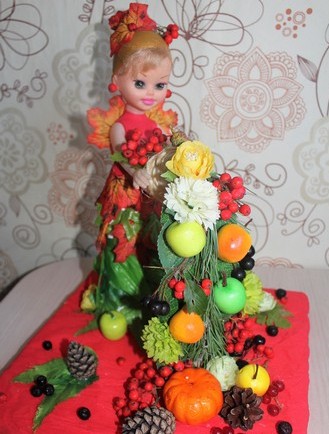
As an addition to any craft, you can use a Barbie doll in the role of the Queen of Autumn. And to make her more elegant, make her a dress out of maple leaves.

I really liked the next track. The cone animals are so cute and funny. The work is just great!

You can make any cartoon characters from chestnuts. They perfectly complement the forest clearing.

I don't know about you, but the photo below really hooked me. So subtly convey the whole mood of autumn, it's just a masterpiece.

Hedgehogs, hedgehogs! They are the most popular in crafts made from natural materials, so admire, well, do it yourself.

Forest deer, just handsome. They are made very easily and simply. Connect all the parts with brown plasticine.

Another idea is that you can paint the buds and make whatever you want out of them. Here is the autumn composition.

Ideas of autumn crafts from natural materials for elementary school for the exhibition
In fact, such creativity is very useful, and if your child gets carried away with it, then you will then have to prepare natural materials in advance and learn how to store them correctly. But this, of course, is another topic, today is not about that. Therefore, the following works to help you.
Option with a sailboat and a forest dweller. Simple, but tasteful.

I see that houses are also often found in products. Apparently because they look spectacular and are appropriate in any product.

And here is what I said above. That different animals, fairy-tale and cartoon characters are easily made from natural materials.

What a squirrel that brought a nut. Just a cutie. And for work you only need cones, acorns, leaves and a stand. And also plasticine.

Well, the owls are like real ones. And feathers are also part of natural materials, so do not forget about them.

Now hedgehogs are not from burdock, but from their favorite cones. Looks great too.

The following creation is great for schoolchildren. It develops imagination, perseverance and accuracy very well.

Here are some more works on the theme "Autumn in the forest". I think many will want to do this with their own hands.


And finally, these funny puppies who went out for a walk. Bravo to their creators! Looks original.

And I want to invite you to watch the next video plot. It describes in detail and shows how you can create a craft from natural materials, namely, to make a clearing with mushrooms. A great idea for creativity for kids.
Crafts from natural material for the autumn festival in kindergarten
Now let's see what our kids can do. Yes, as a matter of fact, everything. So all works are suitable for both schoolchildren and preschoolers. The help of adults is, of course, only welcome and will not be superfluous.
The next work is called "A birch tree stood in the field." Found a strong birch twig, yellow birch leaves and your tree is ready. Additionally, they built a hut of branches, covered the ground with moss, laid out the path with pebbles or grains, and everything is ready.

Here is a framed picture. All the same familiar materials: leaves, grass, plasticine and sunflower seeds.
And what a bright ladybug can be obtained from rowan berries. Indescribable beauty!

Do not forget that natural materials go well not only with plasticine, but also with vegetables from the garden. Such cute lambs and pigs!

Well, this craft is quite simple. But as a child, he will be happy with just such a creation.

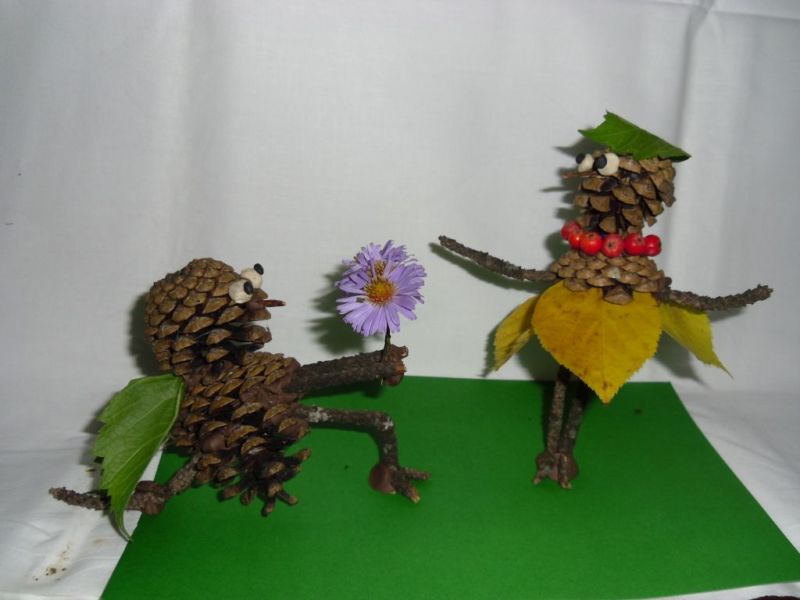
And what are these miracles? I think it's Goblin and his girlfriend. A funny and romantic composition turned out, do you agree with me?

Remember, just above it was shown closely how you can make forest deer? But now they are not separately, but in a whole composition.

So the autumn trees look almost like real ones. And cute and prickly hedgehogs are already there.

And another variation of making a wise owl.

I never tire of being amazed at how rich human imagination is and what our skillful hands are. I say "Bravo!" To the authors of the works.
Interesting DIY works for grades 1-3 using natural materials
Well, I also have some amazing autumn work for you. If you are not tired, then read on and be sure to choose products for creativity with your children.
For example, you can make such a three-dimensional picture. And you can call it like this - Autumn bouquet in a vase.

What do we see below? Wow, a real tree and a superb bunch of leaves. Class!

Oh, I can't stop, I found another chestnut hut. We have a lot of them in Tula.

And here is a hedgehog without a head and legs). So big and with a harvest on thorns.

And how beautiful you can decorate a basket from moss and berries! Moreover, the basket itself can also be woven from twigs on its own.

If time allows you and there is a forest not far from you, then wander through it in search of interesting materials for work. You are definitely in luck and you will find something special, for example, as in the picture below.

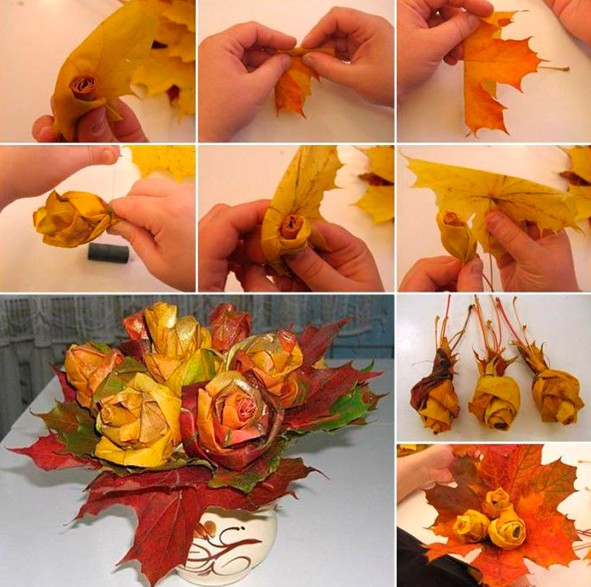
By the way, you can create bouquets of roses from autumn leaves. Looks very nice.

Here is another piece dedicated to the theme of autumn in the forest. Beauty, what else can you say.

Dancers girls made of leaves, acorns and twigs. Original, original!

And here is just a bouquet of roses from leaves. Just roll the leaves that have not yet been dried and the buds will be ready.

Original crafts from natural material and plasticine on the theme of golden autumn
Now I propose to look at the options for products with the inclusion of plasticine. I will not describe in detail what and how I will not, since everything is clear and understandable from the photographs. There will be questions, then we write in the comments, I will answer.
- "Caterpillar";

- "Collecting mushrooms";

- "Forest Animals";

- "Walk in the Woods";

- “Visiting Baba Yaga”;

- "Puppy";

- "Funny snails";

- "Animals";


- "Butterfly";

- Insects";

- "Life in the Forest";

- "Mushrooms".

Step-by-step master classes on making autumn crafts "Hedgehog", "Cockerel" and "Owl"
Well, as I promised above, I will tell and show in detail how you can make the most popular crafts from natural materials. Ready?! Then let's get started!
Burdock hedgehogs in an autumn meadow

You will need: leaves, twigs, cones, tree mushrooms, burdock, plasticine, sticks, any box, scissors, PVA glue, hawthorn berries, rowan berries or any others.
Work process:
1. To make a clearing, we need a cardboard box. Take any box and cut a piece of cardboard to the size you need.

2. Draw a forest edge on a cardboard box. Glue the leaf, cones, berries and tree mushrooms. And in order for the branches to stand, secure them with plasticine.

3. From yellow plasticine, mold a head for a hedgehog. And from black, make eyes and a nose.

4. Insert a non-fragile stick into the plasticine head.

5. Now form a torso with thorns from the burdock.

6. As a result, you should get a hedgehog like this. Do not forget to stick a piece of plasticine only on the end of the stick, otherwise the face will outweigh.

7. Put a couple of berries on top of the thorns.

8. Make another hedgehog and put them in an autumn meadow. Your craft is ready.

Cone cockerel

You will need: pine cones (large and small), plasticine, scissors, autumn leaves, rowan berries.

Work process:
1. Take two small, dense leaves, preferably with the greatest predominance of red. Cut them into narrow strips as shown in the photo. Cherry leaves are very good for this business.

2. Attach the resulting leaves to a large cone (body) using small pieces of plasticine.

3. Now make a long and striking tail. To do this, you need to use the technology described in paragraph 1. Take yellow, green and red leaves. Rowan, ash and grape leaves are good choices. Fasten the blanks with a piece of red plasticine.

4. Attach the tail to the top of the pinecone.

5. Make a stand for the cock out of green plasticine. Decorate the stand with rowan berries.

6. Attach the torso to the stand.

7. Now make the head. Take a small bump. And from red plasticine mold a beak, a comb, long earrings. Roll round eyes out of black plasticine. Secure everything to the bump.

8. Blind the neck out of orange plasticine. And take one leaf and cut it into strips too.

9. Attach the neck to the body, and then attach the head to the neck. Stick a cut leaf to your neck.

10. Finally, place the cock on a hard surface and decorate it with any autumn natural materials.
And for a snack the owl owl. The craft is made from dry leaves and a transparent bag. Everything is very, very simple. The result exceeds all expectations. So rather watch the video and follow the pattern.
And since I can't stop, catch some more cute ideas.
Chanterelle-sister from carrots. And her meadow is made of different natural materials.

Smeshariki also visited autumn. There is a fantasy - there is a result.

Another family of mushrooms. You can take the branches brown, and then just paint them with white paint.

And here is a hedgehog that found a ripe apple. There is a plot, which means the craft is ready.

Well, an invented forest dweller will decorate any work.

Well, now that's all, we have to stop, otherwise I won't finish writing). Finally, I will note that all the collected works are not mine, but taken from the Internet. So once again I will praise all the authors - "you are great," all the handicrafts are cool and for any age and taste. And I wish you, dear readers, to work hard and win prizes at exhibitions. Let your children receive their first certificates and awards. Goodbye everyone, goodbye.
Click Class
Tell VK
Let's get down to it and look at what it is generally possible to create a composition on the theme of "Autumn".
The simplest thing is to rummage in the pantry or refrigerator and fish out a couple of beautiful vegetable fruits.
With a little imagination, you can create an incredible variety of compositions from them.
For example, a family of eggplant penguins.

Girlfriends from beets, onions, pumpkin and cabbage. 
Funny corn farmers.

Miss Watermelon Charm. 
This idea just delighted me. What's the beautiful! But they just painted the apples with gold paint.

Such a panel can be created from any autumn berries: cranberries, rutabagas, mountain ash or rose hips. 
A potato bear greets guests at the door of the pumpkin house. 
The fruit hedgehog will not please everyone for long, because it will be eaten instantly. 
Rowan and black bird cherry ladybug. 
A couple of boiled corn minions. 
A real friendly family of onion heads. 
Now let's take a closer look at ideas from pumpkin and zucchini.
What can be made from zucchini
There are quite a few zucchini this year, so it's not a pity to use a couple of pieces for a craft. Moreover, we have already prepared enough of it.
Here is a locomotive carrying a carriage with gifts of autumn.

And this cutie just attracts the eye. 
A friendly onion family rides in a squash car.

The craft is worthy of a prize at any exhibition. even folk motives are felt in it. 
The pepper frog sports team travels to the zucchini competition. 
Beloved by all minions began to be often found in crafts. 
And Miss Elegance in general strikes on the spot! 
As well as this "Little Man". 
Girls are happy to sculpt such a snail. 
you can decorate crafts for everyone: beads, ribbons, natural or improvised material.
Unusual DIY pumpkin crafts
A lot has already been written about the pumpkin, so the selection will not be very large, but interesting.
Someone's family has recreated a fragment of a famous tale about the turnip.

I don’t know how they achieved such expressive eyes, but I simply couldn’t not show you this picture.

Pumpkin ship with carrot anchor and leaf sail. 
Kittens look out of the basket. 
Another cute face for inspiration. 
Even simply by drawing a face on a pumpkin, you can achieve originality and comic relief. 
The pumpkin bird and the stand are made of natural materials very neatly and harmoniously.

I wrote a little earlier how to insert bouquets into a pumpkin. The main thing is to pull the pulp out of the fruit, otherwise it will quickly ferment and smell. We also use seeds for crafts, I'll show you how to do it below. Inside the hollow pumpkin, we insert a jar, glass or floral sponge so that the flowers last longer. 
The pumpkin, like the apples above, can be dyed and you get a golden carriage for the doll.

For me, no princess would refuse such a thing.
Autumn crafts from natural material
one has only to go for a walk in a park or forest, as soon as you can collect a bunch of material for crafts. And sometimes you don't need to go anywhere, all the houses are at hand.
Walnuts
I remember that earlier my mother kept walnut shells specially for handicrafts. And for good reason. See how many of them you can sculpt.

Hedgehog with buckwheat needles. 
They must be peacocks. 
From plasticine and shells, you will get a beautiful swan floating in the lake.

The detailed description shows how to make a bird.
From the branches
Of course, branches help create whole compositions. We never cut them from a living tree. We collect only those that are already on the ground or have dried on the tree itself.
And now the composition with Baba Yaga in a mortar is made entirely of them.

Another composition of natural materials and a birch twig.

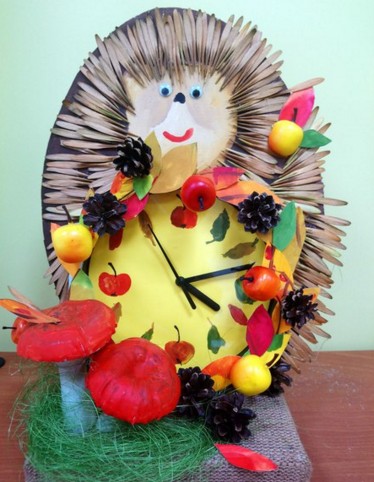
This autumn watch also has a frame made of wood.

In this photo there is a whole exposition of many materials. 
And now a small master class on how to make such a house from branches.

To begin with, we take a lot of plasticine. It can be replaced with polystyrene or polyurethane foam. The main thing is that the twigs stick well into this material.
We make a thick flat foundation from plasticine. In which we stick branches around the perimeter. Determine where the passage and the door will be.

We completely close the walls with twigs.

We make the roof. We connect the ends of the "beams" with a clerical elastic band.
If necessary, you can use a glue gun. 
We make the crossbars.

And cover the roof with leaves. 
A small craft made of twigs that imitate a spider's web.

This masterpiece makes you look at yourself for a long time!

A hut on chicken legs from twigs and needles and Baba Yaga from a pine cone.

A cute nest for a family of birds.

Ideas are just inspiring!
Wreaths made of natural materials
But you can also make autumn wreaths. Not even in a kindergarten, but as a decoration for home. Not all the same to sculpt them before.

Idea with natural and artificial flowers.


Such an original idea of twigs and dried flowers.

You can use a braid or thin wire for the base. 
The wreaths came to us from Europe and have not yet lost their originality.
From seeds
Sunflower seeds make cute hedgehogs. They can be made as the center of the applique or panel.

Or a whole composition with a pair of hedgehogs. By the way, it turned out very brightly and positively.

And here are corrugated paper sunflowers with real seeds in the middle.

From pumpkin seeds
Since we use the pumpkin itself as a vase for a bouquet, we will send the seeds to crafts.

Seeds can be painted over with watercolors or gouache and dried. Then the child will be very interested in creating applications.

For this panel, I immediately bring a tree template.

Cut it out and decorate it with multi-colored seeds.

This basket was made from pistachio shells, but seeds can also be a great substitute for them.

Bowls of abundance
These bowls are simply mesmerizing. You can use any natural materials - cones, branches, berries. Or you can take felt and artificial flowers and fruits. In general, there are a lot of ideas.

Or such an option.

Here is a detailed master class, where the whole process of its manufacture is very clear.
From rowan
Many details can be made from the leaves and fruits of mountain ash. Their bright colors often help to diversify and decorate the craft.

You don't have to bother too much, but just glue such an applique from the herbarium.

With cereals
Ideas are also created from leaves, blades of grass and cereals. For example, this panel is made using a variety of materials. Which are glued to PVA glue.

Lion cub surrounded by dried flowers. 
All cereals adhere well to double-sided tape and glue.
From dried flowers and fresh flowers
Well, we can't do without them. See what beauty a parent can do with children.

Another pond with swans!

Another hedgehog surrounded by fresh flowers. And nowadays quite a few of them still bloom: asters, yarrow, saintbrinks, etc.
A very neat little house with a fence made of ice cream sticks and a roof made of twigs.

A basket with a hedgehog and roses from leaves.

A cute mushroom from a good fairy tale.
More mushrooms. Made of paste and cotton wool. 
Panel from a box for sweets. It turns out a 3d effect.

Well, everyone will definitely recognize these heroes!

It is very convenient to attach material to the burlap. Both threads and fine wire can be used. 
Hedgehog again, we have a lot of them today.

The duck conquered everyone with its realism.

Such a portrait looks very nice.

A variant of a craft made from a hat decorated with dried flowers, fruits and a ribbon.

A fragment from life. After harvest.

The original idea was to make a roof of ears! 
The imagination of some creative people is simply mesmerizing. It's great that they share their results with us.
From plastic spoons
This is not a natural material, but this idea may be useful to someone.

The handles are trimmed, and the spoons themselves are painted with gouache or acrylic. You can connect them with plasticine or hot glue.

They can be used to decorate many crafts.
Light cones compositions for kindergarten children
Buds are also a very affordable material. And for many ideas, a large number of them are not needed.
As a child, there were Soviet picture books describing step-by-step actions. Here are some of these simple master classes.


Such a simple lamb.

There are many variations with cones at once. 
You can also collect a basket of flowers from them.
By the way, if you want the bump to open, put it in water for a day. However, when it dries up, it will close again. But such an experiment will definitely surprise a child.

The idea of the woodsman.

Or such a forest dweller.

Composition from a hedgehog and a squirrel.

Original deer.

And here is how to make such a dog.

More ideas with cones, chestnuts and acorns.

Funny helicopter

Cute animals with fluffy faces. 
Clearing with gifts of autumn from fir branches.

From cones and candies.

Another fragment from the tale.

Glade with a hedgehog and her children.

And this handsome man has apples made of thread and PVA glue on his back.

Another hedgehog with prey.

It seems to me that it is the handicrafts made from cones that are easiest to do for small children.
How to make autumn crafts from acorns
It turns out that you can also make a lot of chestnuts and acorns. They are not very frequent guests in the Urals. However, they also occur.

These are the similarities of animals can be made from acorns.

Do you like owls? Maybe you will be inspired by this idea.

Plasticine will help to fasten the elements.

Everyone will definitely like this doggie.

Here are some more easily recognizable characters from fairy tales. 
They can be supplemented with everything: leaves, feathers, wire.

Pencil holder with smiling leaves. 
There are many identical people.

Fabulous friends in red caps.

Butterflies and dragonflies are made very easily.

Good grandfathers with a finger. 
Another butterfly idea. 
Ideas of different animals and birds from the same Soviet book. 

This is already enough to make your own craft, right?
New Leaf Crafts
Of course. now there are a lot of leaf ideas waiting for you. What material is missing is theirs.
For any crafts, it is better to take leaves that are still elastic, which do not break when folded.
How do you like such a gorgeous owl?

This is a rear view.
Of course, again the idea of a topiary with a crown of leaves.

By applying different leaves, you can collect many animals and birds, for example, such an elephant. 
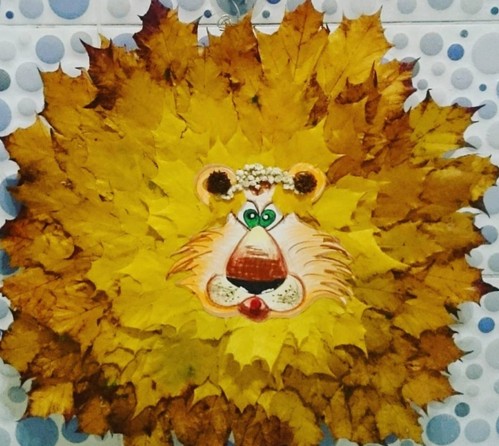
Make a lion cub's mane out of them. He reminded me very much of Simba.

Or such a goldfish in the sea-ocean.

The parrot looks like a real one.

Suspension of a hedgehog from birch bark. 
Panel of roses from leaves and needles.

Another applique idea.

A cute version of a framed panel.

Three owls on a branch.

Lion from hot Africa.

Whole leaves can be dyed for variety. Or bring out beautiful patterns on them. Acrylic and stained glass paints will do.

Not only the lion's mane, but also the clown's hair can be trusted with the autumn leaves.

This bird reminds me of a cockatoo.

For the smallest children, I propose an option for such a simple bird.

Schoolchildren can try to repeat such a turkey.

Decorate the snail house.

Easy crafts from a couple of leaves. When you just need to keep the child busy for half an hour.

The squirrel has a beautiful fluffy tail. 
Gulchata from Prostokvashino.

Panel where Autumn is swinging on a swing.

Or embodied in the form of such a cheerful girly.

The idea of a tree with twigs.

Again a bouquet of leaves.

Application with hedgehogs.

To add volume, it is better to use the material in layers.
You can also decorate the jar and use it as a candlestick on an autumn evening. 
The idea of a panel with bunnies. 
A family of birds. I think they are chickens.
This photo shows the step-by-step steps for creating a peacock.

Original dancers and ballerinas in leaf costumes.

Watercolor landscape.

Or maybe autumn looks like this.

Preschoolers will be interested in making such crafts.

Template for a lion.

Template for a hedgehog. 
You can glue all the leaves with PVA glue. This is the safest type of glue that can be used even by the smallest children. It is completely non-toxic.

Such is the ready-made hedgehog.

Another version of the king of beasts.

Or you can make a card with a maple leaf.

To do this, an A4 sheet is folded in half. The shape of the sheet is cut on the front side. And on the inside, you glue all the autumn leaves. Then cover with the first sheet and you get a drawing. 
Let's make such joyful daisies or sunflowers.

We need:
- colored cardboard,
- leaves,
- paper towel roll,
- cotton wool or gauze,
- lollipop tube,
- glue.
Cut out two identical circles from colored cardboard. With a diameter of 4 cm. Draw a muzzle on one part. We glue the leaves and a lollipop stick to it on the seamy side. Glue the leaves with the outside side up. And close the entire seamy side with a second round piece.

Now we are making a stand. Cut out a circle from cardboard that exceeds the diameter of the sleeve by 2 cm.
At the sleeve itself, we make 1 cm cuts from one edge and bend them outward. Fill with cotton wool or gauze.

Such a panel can be made by a student.

It is done with a toothbrush, paint and leaves.

We put the template on the paper. Apply paint to the brush and drive along the bristles with a stick. As a child, we ran the brush over a comb with large teeth. If you use a lot of water, drops will appear on the applique. Better to squeeze the brush a little. 
You can use several layers of different intensities and colors.

Another beauty is autumn in human form.

Nice little idea with a paper umbrella.

Options for creating insects and flowers.

You can portray a beautiful autumn in the form of a Barbie.

Applique with a goldfish.

May everyone's wishes come true!
Paper ideas for school
A lot of crafts can be made from paper. Moreover, this material is now sold in different formats. The paper can be corrugated, self-adhesive, velvet, metal, etc.

You choose the material that suits the idea.

Offer your child this craft.

Let's take:
- toilet paper roll
- PVA glue,
- stapler,
- felt-tip pens.
You need to cut this template. And roll up along the line indicated by the dotted line. 
You can simply transfer the template to paper by placing it on the computer screen.

Tighten the sleeve from one edge and fasten it with a stapler. Glue the back on the back. it remains only to draw the face and paws.

According to this scheme, such a charming hedgehog with a flower can turn out.

This hedgehog is glued together from two parts.

Cut out the body from colored paper.

And the back with thorns. 
It remains only to glue them together.
The flags with the outline of the leaves are beautifully made.

All gifts of autumn can be used.

Special blanks for crafts are on sale. They are very neat and come in a wide variety of colors and sizes.

idea of pendants from hedgehogs. 
Tie the blanks together. folded accordion.

Garland idea.

The links are connected as shown in the photo.

Possible templates for creativity.

The links can be connected with a stapler.
A funny wreath with mischievous little faces.

You can use these templates. 
A garland with a hedgehog will decorate a group in kindergarten.

How do you like the option of a wreath made of paper and thread materials?

It is done very simply. The basis is cardboard.

The idea of a wreath made of paper folded with an accordion.

Now a lot of tree ideas.
For example, you can use cotton pads.

Apply brightly colored paints to them using an eyedropper, spoon or brush.

And glue the PVA glue to the cardboard barrel.

You can make a trunk out of thick cardboard, and stick paper sheets to it.

Or simply sprinkle with paper pieces on top.

You can make a crown from multi-colored circles.

Or from volumetric rings.

To do this, we cut out many strips of the same length and width. We fold them into a ring and glue the ends.


You can take real leaves, dip them in paint and press them against paper. All veins and shape will be imprinted on the rnea.

Or use a gradient in the applique. They did dark and light shades.

This craft amused me a lot. I think the kids will definitely like it.

This option reminds me of the sun in the leaves.

Teach your toddler to draw on a wet sheet. To do this, wet it with a sponge and roll it in half. The fold line will be the strand. A drawing is applied to the upper part and we apply it to the lower side of the sheet. Inks are imprinted and out of shape. 
The idea of the applique with cotton swabs. 
We have prepared a lot of real conservation for the winter. And let the children prepare a lot of jars of fruits. The craft is carried out using a wine cork. An apple shape is cut out in the wide part with a clerical knife. And this cork is used as a stamp.

Paper urchins will definitely not be pricked.

Hanging craft with a chanterelle.

What a groovy autumn turned out to be for someone.

You can make such pieces of paper from pieces of tape or strips of paper. The strips have a length equal to the width of the workpiece. All ends of the stripes remain on the seamy side.

Or corn. 
Let me tell you how to make such a three-color leaflet.

We prepare materials. Take three different shades of double-sided paper.

Fold the sheet in half and transfer part of the sheet. Cut out and unfold the part.

From the bottom, horizontally, we begin to collect the accordion.

Then we find the middle of it and bend it up. 
We glue the long parts or connect them with a stapler.

It turns out three such blanks. Using glue, we connect them into one craft. 
Kids will love putting their pen to paper. Cut them out and make such a hedgehog.

If the child is still too young, then it is still dangerous for him to use scissors. Therefore, any craft is done under the watchful eye of an adult.
Autumn crafts from fabric
The fabric can also be used for creative purposes. For example, from a beautiful satin cut, the craftswomen came up with such a pumpkin.

At the satin circle we sew the edges with a needle-forward seam. Then we pull the thread and our workpiece is assembled like a bag.

We fall asleep inside the cereal. 
And tighten the seam. You can use a stick as a twig. 
Tweet
Tell VK
I am starting, or rather, continuing the rubric of creative works. I have already said how you can use the natural materials that autumn gives us. And today our topic will be: leaf crafts for kindergarten.
Leaf applications - pictures on paper for the middle group

We will need:
- birch leaves - 4 pcs.;
- felt-tip pens;
- glue.
How to do:
We need leaves in different sizes: 1 large, 2 small and 1 medium. It's good if some of them are yellow and some are green. Then the picture will be more interesting.
- The big one is the little body of the mouse. And its stalk will be the tail of the mouse.
- Arbitrarily place the leaf on the base. If horizontally, our animal seemed to run and stopped. Vertically - stood up on his paws. Thinking over a story with the baby. We glue it.
- Cut off the stems on the remaining leaves. Medium in size is the mouse head. We place it at the sharp edge of the large sheet. You can think of a head tilt or an animal pose. We fix it so that the sharp end points down.
- Small - ears. We glue them to the head so that the wide parts are at the top. The leaves themselves are at a slight angle.
- It remains only to draw the details with multi-colored felt-tip pens:
- Eyes;
- Spout;
- Mouth;
- Paws;
- Antennae.
- Put the picture under the press until it dries.

Using the shape and color of the autumn foliage, you can make other applications, for example, Butterflies, Hedgehog, Turtle, Elephant or Fox.


I really liked the work
@mother_of_an_inquisitive_son 
Leaf prints on salt dough for the younger group of kindergarten
In one of the articles we talked about how to deal with it. And here is an unusual application of the test. And kids can easily cope with this work on their own.
Would need:
- Salty dough;
- Various autumn leaves;
- Paints.
How to make an installation:

- Roll out the dough, but not too thin. Approximately 0.5-0.7cm wide.
- Squeeze out round workpieces with a glass. You can take cups of different diameters when you get an unusual gallery from several installations.
- Attach a leaf (1, 2, 3, as you wish and how much will fit) to each blank with the back side, where the veins are, and press it down. It is important that both the contour and the pattern of the veins are well imprinted.
- You can bake the dough or just let it dry well.
- After that, decorate either the background, or the entire picture, or the print itself. What and how to decorate, let the kid figure out for himself.
If you want to hang an installation like a painting, make a hole before baking.
Alternatively, in this way make a stand for pencils, a vase for sweets. By the way, such prints can be made not only on salt dough, but also on pottery clay or self-hardening polymer.
Here is our pot for topiary, which Oleg and I made from clay. 
Plaster leaf plates for older children
It's very simple but addicting! Mix the gypsum with water until it becomes sour cream and distribute it over the back surface of the sheet. In order for the plate to be deep along the dist, you need to pave a rag or paper to the desired shape. When the gypsum dries up, remove the sheet and get a beautiful plate, which you can also paint. It can be used as a candy bowl or for storing jewelry.
DIY leaf crafts - all new
There are many ways to design it. For example, as an applique on a cardboard base. But you and I will go the other way.
And we only need:
- Leaves (it looks most beautiful on maple leaves, but see for yourself, you can take poplar leaves and what others. The main thing is to be large, strong and with a long handle);
- Awl;
- Scissors.

- First, we shorten all the cuttings, cutting off the thickened part at the end. We do this with scissors at a slight angle so that the edge of the cutting is not blunt.
- We bend the first leaf along the vein that runs in the middle. Fold at a distance of about 1 cm from it.
- We thread the cutting of the second sheet, like a pin, into the double part.
- We bend the bottom of the second leaf to the level of the first.
- We insert the stalk of the next leaf into it ... and so on. Until we get the length we need for the crown on the head. Then we thread the last stalk into the first leaf.
Using this technique, you can make bracelets, only use smaller leaves as a material. Or a wreath.
If a base is used, then the cuttings are cut, and the leaves are glued to the cardboard. You can use different ones, large nutty ones, and small cherry ones.
Or you can make a dress for your favorite doll. 
Photo by @albina_naumkina_nails
But the video on how to make a beautiful autumn topiary is an excellent craft for the older group: grass, fly agarics, a pot of mushrooms, rose hips, a ball and acorns in a creative store. Can be replaced with natural materials, dried flowers, acorns, small cones. And you can blind from or. Then such a craft can be divided into several activities - lessons.
It is also easy and quick to make a wreath from soft birch, willow or willow branches. Combine rowan, cones, acorns, leaves, spikelets, sticks. The branches can be fastened with twine or any strong thread. Then grease them with abundant filling with PVA glue so that they do not disintegrate and keep their shape. It is better to glue decorative elements with hot melt glue. This craft develops a sense of taste in children, the concept of color and texture compatibility and their harmony.
 The author of the work
In order not to miss, click on the subscription button. And get complete information about autumn creativity with your kids.
Hello subscribers!
It's bad weather outside, or maybe the sun is shining? It doesn't matter, because there is an unforgettable time of the year ahead of us. It will be in multi-colored colors and with many surprises, because autumn always presents us with its gifts. But, besides this, it also opens its natural wealth to us. That is why in schools and kindergartens, crafts are immediately made from natural materials, together with other components. It can be vegetables, as well as paper or plasticine and many others. other.
Children, well, they just adore all such creative work, because they get various funny toys that they can then play with.
In addition to all this, you can even take autumn leaves and fold masterpieces or bouquets from them and insert them into or make something. Well, that's not all, cool souvenirs come from ordinary bumps. So, if you're curious, take a moment and scroll through the entire note from beginning to end. I'm sure you will find a lot of interesting ideas for what can be made from natural materials.
Well, if you have any thoughts on this topic, please share below under the article and write your feedback and comments.
I would like to start this conversation with the fact that you do not even mean and cannot imagine that everything is much simpler than you think. It turns out that to make masterpieces, you can take the most ordinary sticks, twigs, or maybe you have pebbles or shells. In general, we always have all this at hand, so why not take advantage of it.
I propose to dwell on products made of stones, which are always available in any area. If you were somewhere on vacation, you could bring these with you. It is advisable to take, of course, smooth stones. Take a log or plank and carefully use a glue gun to glue the composition you have planned. Here you can make flowers for example. And to make the craft brighter and more aesthetically pleasing, paint it, for this use acrylic paints.

The product in the form of a hedgehog is quite popular, take a look. In my opinion, there is still not enough mushroom or autumn leaves. So it's easy to fix, take colored paper and cut out the desired image.

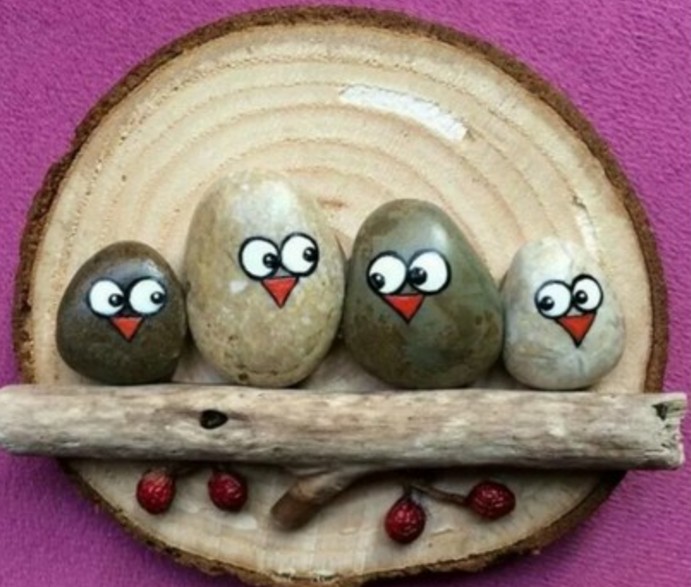
You can decorate the whole picture, make such a cheerful family in the form of birds on wood. As you can see, ordinary sticks are also involved here.
By the way, do the still life.

For the smallest kids, take the following composition as a basis. Draw a maple leaf or some other on a sheet of cardboard or A4 and then decorate it with multi-colored stones.

And if it's even simpler, then choose just such a minimalistic picture. Which do not forget to decorate with colorful paints.

A bird's nest made of straw is a great idea. You need to cut a circle out of cardboard.

And twist the flagellum from the straw.

And then twist a socket out of it along the diameter of the circle and fix the ends with threads.

Thus, wind in a spiral so that ultimately you get a bed in the form of a cup, glue the straw to the glue.


Then fill the souvenir with fluff or feathers and lay eggs, cones.

If you are a pumpkin or sunflower seed lover, then you can create nothing fantastically beautiful at all. Quickly see this photo. It was awesome! The author took and decorated a hedgehog, and its thorns with ordinary seeds and painted autumn.

But here pumpkin seeds were used, by the way, you can come up with a lot of all kinds of masterpieces from them. In I have already shown you several of these works. Now I'll show you this one. Seeds are painted who does not know with paints, gouache or acrylic, and then glued.

Here the artist did not use glue, but put everything on plasticine. The tree trunk is made of buckwheat grains.


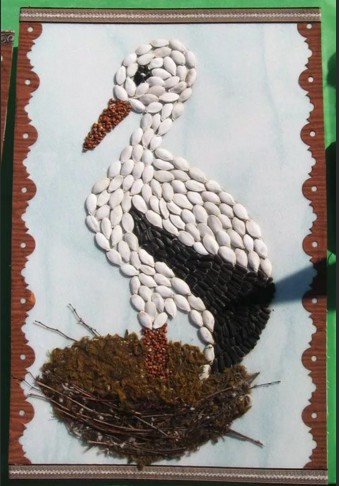
A stork is also made from pumpkin seeds, such a panel comes out, or hang it like a picture on the wall and admire it.
I was shocked by another amazing and cool craft, I mean a chicken from which the author made different seeds. For this masterpiece, you need pumpkin and sunflower seeds, as well as plasticine.

1. From plasticine, mold the base, that is, the head and body of the bird.

2. Then start decorating the chicken by sticking in the seeds one at a time, as shown in the picture. The wings will come first.

3. And then the ponytail. It looks funny already.
Do everything carefully and take your time, it is from your efforts that success will await you.


5. Make a tuft of red plasticine, and a beak of yellow.


I really liked these trees from beans and watermelon seeds.

And you can also combine several types of natural material and get a picture. For example, oats are also used here, and the rim is made of corn kernels.

And remember, when you were a child, you let airplanes, and I also recommend making souvenirs from them. I mean maple.

This also includes crafts made from dry materials. Such a radiant sun.

Or a clearing and a woodland.

Above all, use straw or acorns.

You will get not only pictures, but also people and insects from chestnuts.

At school, I always remember in labor lessons such cheldobeks were made.

Well, if you have a handful of pistachios lying around, or rather peels, then imagine you can become a real decorator. Make such a topiary.

Well, or a vase and insert dried or fresh flowers into it.

Well, in conclusion to this chapter, I want to impress you. I found one fun pattern that you can easily follow. All you need is a board, nails and woolen threads.
Circle a maple leaf on the plywood and hammer in the carnations along the outline.

Follow the outline with orange thread.

Then begin to confuse in a chaotic manner, as if applying patterns, a spider's web. Great, did you manage?

I also like such a funny plot in which the author took ordinary logs and laid out such birds.

These friends are somewhat reminiscent of snowmen.

Crafts for elementary school "What the autumn gave us"
Of course, in order to make compositions on this topic, it is enough to have everything you need at hand. This means you need natural material, and improvised means. Plus your desire, imagination and of course fantasy. If it's really hard to come by and inspiration doesn't come, then take these ideas and create.
I suggest the girls take their favorite doll and decorate her with such a golden outfit.

This is how it turns out you can go to the park and collect dry leaves and you are already a wizard).


Brilliant, isn't it? Such a queen emerged from an ordinary toy.

Do this kind of work out of physalis.

Or, for example, build an alarm clock or a clock from twigs.

A sprig of mountain ash and cones will help you decorate.

Well, and not in the last place, probably the most popular will be a craft using seeds. I always see such creations at exhibitions in kindergarten and school competitions.


Everyone knows autumn is rich, so make some wonderful masterpieces.


By the way, decorate your class awesomely by making garlands of acorns, chestnuts and rowan berries.

Or here's an idea.

Run the spider web and bring it to school.

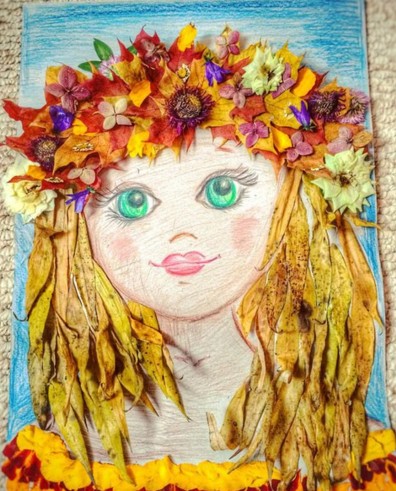
Probably the most enchanting will be such a charm, well, the symbol of this season in all its glory is direct, this is the face of a girl. Take any flowers, plants and create.


You can make such a portrait. I think elementary school students and even preschoolers will cope with such a job with a bang. Well, especially high school.


Such a gift looks superb, these are roses, but unusual, but from maple leaves.

You need to properly learn how to fold the leaves, here is the sequence of actions. Watch this short master class:
On this topic, how to create such a bunch, I found this video on the Internet on the YouTube channel. Maybe it will be useful to you too. Happy viewing.
You can decorate a wreath beautifully.


Do not forget that it will not be difficult to build a lot of creations from spruce branches.


What a cute owl came out, you can't take your eyes off.

You can build an oak tree, see how wonderful it turned out.

Here's another idea to take note of.

Autumn work in kindergarten from natural materials
I think the kids will love the work called applique. Cut the leaves into squares and stick them on the album sheet in the form of any character.

Such an unusual tree can also be a good idea. I would say magical, on the one hand it has winter, snow or frost, and on the other - foliage.

You will need to make a trunk out of plaster, like a stand and stick the collected branches into it. Let your baby decorate it now as shown in the picture above. Make snow from cotton wool, and greens from dry grass and leaves, flowers.

Or you can do spiders or a hut on chicken legs with Baba Yaga. After all, children are very fond of fairy-tale characters.


Do you want to go not the traditional way and take shavings from a simple or colored pencils as a basis and perform such beauty.

Also create bear figurines from walnuts.

And here is such a little mouse.

Here are a couple more mice.

The panel with the use of rowan berries also looks great.

You can take the following option as a basis, make the leaves from paper in the quilling style, and glue the mountain ash.

Here is such a funny kitten, well, it will obviously cheer everyone up.

And also I want to invite preschoolers to make a smart owl.


It is easy to construct the following from tree cuts.

Or make a lion cub or a lion.


Also, readily settle on simple models that are cut in the following way.

You can also draw, take dry leaves of trees as a basis in the form of stencils and simply dip them in paint to make prints.

Or, this is how you can arrange a drawing with birches.


Next work, draw an image of a woman or a girl, and invite the child to make hair.
Connect your imagination and build animals or animals.

It is interesting to design a boat.

Or dazzle a peacock or a firebird.

Pine cone toys and souvenirs: fast and beautiful
Well, now I present to your attention all the most interesting of acorns, cones and probably plasticine. Because it is this component that will help to recreate new toys and souvenirs.
Here is a picture made with paints, a background and multi-colored cones, which are also painted with acrylics.

The next work, this is such a cute topiary, from all that was in the forest. There are sprigs of Christmas trees, cones, berries, even acorns.

Love Masha and Misha from the cartoon, then you will like the next idea.

On this topic, I found new items for you this year in this video from the YouTube channel. So, don't miss it!
Well, and a couple more ideas that you can translate into reality.
These can be birds such as an owl or a swan, as well as a basket of cones.

It is easy to make an angel in the form of a doll, or a pendant.

They even make squirrels, but besides plasticine, felt fabric is also used.


In addition to all this, you can also take any fruits and vegetables and arrange any composition using natural materials.

Original crafts from leaves on the theme of Golden Autumn
If you have absolutely nothing to create from, then take and collect foliage in parks and you will not believe you can make such creations from it. Even kids 2-3 years old can handle it. Well, and even more so for schoolchildren. I have one child in our house who lives and studies in the third grade, so he painted the collected leaves like this.

And my son and I, who is already 5 years old, will almost soon be 6, we will make such a miracle. Here is such a butterfly, he chose the second one, and which one do you like best?

To be honest, I also really liked the hare and the fox. Look, even the bark has been adapted.


And what kind of bird is this? Peacock, wow and her tail is beautiful!

Well, the following composition in the form of an aquarium and fish can still be a great idea.


In addition to all this, insects can be easily and quickly created.

But perhaps the most beautiful and charming craft will be in the form of maple leaves, they are folded in an unusual way, in the form of roses. Here is an instruction for making such beauty. Repeat all the steps as shown in this picture.
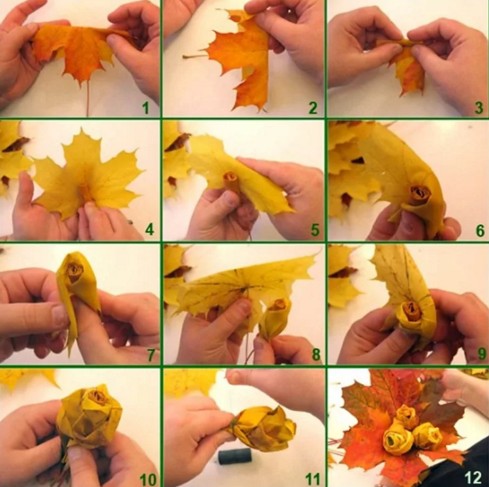
Here's what should come out in the end.

You can make flowers of any kind of leaves. This video will help you with this, watch the master class.
In addition, take a regular vase and place dry branches in it and decorate with foliage.

And also any photo frame can be presented in an unusual way.

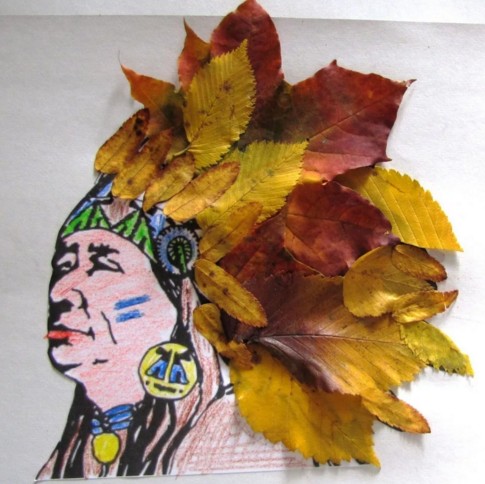
Well, for the boys who love Indians, make a leader.
And here are some more cool ideas on what leaves can be thought of and done. Here they are children's creations.


As you can see, there is so much here. A turtle, a snail, a helicopter and even a mischievous parrot.


Or lay out the fabulous Petya cockerel.

In addition to all this, you can go in a non-traditional way and make paintings.

And if the sun is not enough for you, then here's an idea for you.

You can also bring a vase made of maple leaves to decorate the interior, and, of course, to an exhibition in a school or kindergarten. How to do it? You will need PVA glue and a balloon.
In short, you can look at these steps and build such a creation today.

Or consider these stages of work.
1. Inflate a balloon, apply a PVA brush to it and apply the leaves immediately.

2. This is what you should get.

3. Apply glue on top of the leaves as well.

4. Now let the workpiece dry completely, and then pierce the ball with a needle. Now rub it with fruits and vegetables and faster for the holiday.

I think, after reading and viewing this note, you no longer have any questions about what can be made from natural material, I think I have found enough ideas. Just take it and do it.
All the best and most positive. Bye!
Best regards, Ekaterina