We learn to make toys for the Christmas tree with our own hands from anything. Christmas tree toy "Owl with colorful feathers
Do you like to do needlework? Then you will love making Christmas tree decorations with your own hands! This is a pleasant and exciting activity for the whole family, which will not leave anyone indifferent - you will spend several evenings with pleasure, making toys for the Christmas tree with your own hands.
What we use for the material
What will it take to make DIY Christmas decorations? You can use almost anything that comes to hand. If you want, you can buy special supplies (sold in creative stores), or you can use what is in any home. So what to prepare:- plain paper (good for making patterns);
- pencils and markers;
- plain, white and colored cardboard (you can use velvet);
- sharp scissors and a breadboard knife;
- glue (PVA or glue gun with rods);
- threads and needles;
- yarn of different shades;
- various decorative materials - it can be sequins, sequins, confetti, colored foil, stickers and much more.
Simple crafts from scrap materials
Of course, you have probably seen how Christmas balls are made from thread and glue with your own hands, but why not expand the range? We make different Christmas tree decorations with our own hands.From yarn
This is a simple and at the same time spectacular Christmas tree decoration that can decorate any tree.
For manufacturing you will need:
- yarn;
- tailor's pins;
- plate or bowl;
- porous material (eg disposable tray);
- cutting paper;
- marker.

The template must be attached with pins (or ordinary toothpicks) to the porous material, and on top lay the pattern you need - first the outline is laid out, then the interior decor. Do not cross the strings too often, the toy should be flat enough. After you are finished, dry the product and remove it from the pins, and tie a loop into the eyelet. If desired, you can decorate with sparkles or rain.

Wire
How to make DIY Christmas toys in just a couple of minutes? Use the wire!
To make toys you will need:
- two types of wire - thick and thin (thin can be replaced with bright threads, for example, floss. Pure white strong threads look very beautiful);
- beads, beads;
- colored tape;
- pliers.
The ends of the thick wire must be twisted. Beads and beads must be mixed on a thin wire, the end of the thin wire must be tied to the future Christmas tree decoration, and wrapped randomly.

When the toy is evenly wrapped, you need to wrap the loose tail of the wire around the toy, and tie a ribbon in the shape of a bow - your toy is ready.
Another original idea:

From ribbon and beads
Who said that DIY Christmas toys must be done for a long time and painstakingly? Not at all. In literally five minutes you can, which will decorate both the New Year's tree and the interior.
You will need:
- beads;
- narrow tape;
- yellow, golden or silver cardboard;
- glue "Second";
- needle and thread.

The interior decor made in this way looks very attractive.
From cardboard - in a couple of minutes
Some Christmas toys made of paper or cardboard take a lot of time to make, but not in this case - here you really need a couple of minutes to make an elegant hand-made Christmas decoration.So, you will need:
- ordinary cardboard;
- some twine or thick yarn;
- glue;
- paints and brushes;
- napkin or cloth;
- varied decor.

We wrap the tree in different directions with a free twine tail. After some thread pattern appears on the tree, you can start gluing with a napkin. You can tear the napkin into pieces, coat the tree well with glue, and glue it tightly with a napkin. This will give a nice texture to the future toy.

After the toy has dried, you can start coloring - paint the Christmas tree green.

After the paint is dry, shade the texture of the toy with a dry hard brush and white paint, and then decorate to your liking.

From bright shreds
You will need a sewing machine here, but if you really want to, you can do it without it. This is the best way to make Christmas toys out of cotton wool and fabric - just choose a fabric with a Christmas ornament, or use whatever is on hand.
Prepare some paper patterns - for example, deer, stars, gingerbread men, teddy bears, letters, and hearts. Cut out the blanks with your own hands from the fabric, sew in pairs, leaving a small gap (for stuffing), and through this small hole tightly stuff the toys with cotton wool or padding polyester. It is most convenient to fill with a pencil.
The patterns can be downloaded here:


By the way, do not forget - we sew on a typewriter from the inside, but if you decide to make toys from a dense fabric with kids, then it is better to sew with a decorative seam over the edge - the toy with your own hands will look simply charming and will suit even for a home tree, even for a kindergarten - Usually children make decorations for kindergarten trees.
Twine and cardboard
Christmas toys made of paper and cardboard will be much more interesting if you add a couple more simple materials to them. To make such a toy, you will need ordinary cardboard, simple paper or natural twine, a little felt or any other fabric, as well as plain paper, a pencil and a ruler, and a drop of glue.
The star template can be downloaded here:

First, make a pattern on plain paper, and then transfer it to cardboard. Do not forget that the star must be double. Do not make the asterisk too thin, it is better to make it from a centimeter or more. The twine tail is glued to the cardboard, then you need to gradually wrap the entire workpiece.

Place the thread as tightly as possible so that there are no gaps. In order to decorate the star, make a couple of leaves and berries from the fabric and decorate one of the rays. Your decoration is ready.

From yarn and cardboard
Do you want to make original and at the same time charming Christmas tree decorations with your own hands? Then it's time to make small gift hats with your own hands from scrap materials. This is a wonderful New Year's gift that looks cute and will keep you warm all winter long!
To make Christmas tree decorations in the form of hats, you will need:
- a couple of toilet paper sleeves (you can just glue cardboard rings together);
- the remains of colored yarn;
- beads and sequins for decoration.

Threads need to be cut into segments of about 20-22 centimeters. We fold each piece in half, pass the loop through the cardboard ring, and pull the loose ends of the threads through the loop. It is necessary that the thread was firmly fixed on the cardboard base. This must be repeated until the cardboard base is hidden under the threads.

All thread ponytails must be pulled through the ring so that our hat has a "lapel".

And now we pull the loose ponytails tightly with a thread and cut them in the form of a pompom - the hat is ready! It remains only to make a loop and decorate your toy on the Christmas tree with sequins and sparkles.

From beads
Making a minimalist Christmas toy is easy and simple - you need wire, beads and beads, a ribbon and a coin (you can replace it with a small candy, but it looks much more spectacular with a coin). Try to make this Christmas tree toy with your own hands, the master class is very simple.
Make a loop on the wire and string on it green beads mixed with large beads - they will play the role of Christmas balls on our Christmas tree. After the wire is filled, shape it into a herringbone by folding it in a spiral.
When your tree takes shape, fold the free edge into a loop.

Cut off a piece of tape, form a loop from it for hanging and stretch it through the Christmas tree, and decorate the free tail with a coin (the easiest way is to stick it on double-sided tape). We tie a decorative bow on the hanging loop - your decor is ready!

Christmas balls
How to make a Christmas ball from threads? As easy as shelling pears, watch our master class about spectacular lace balls on the Christmas tree.Would need:
- several balloons;
- cotton threads;
- PVA, water and sugar;
- scissors;
- polymer glue;
- spray paint;
- decor.

First you need to inflate the balloon - not completely, but according to the size of the future decoration. Mix two tablespoons of water, two teaspoons of sugar and PVA glue (50 ml), and soak the thread in this mixture so that the thread is soaked. Then you need to wrap the ball with a thread randomly. Let the balls dry for several hours. After the glue is completely dry, you need to blow off the ball and take it out, and carefully paint the thread ball with spray paint and decorate with sequins and sparkles.
DIY string Christmas balls will turn out to be very, very effective if you make them in different tones - for example, red, silver and gold. Try to make Christmas balls with your own hands using different techniques - you can sew or knit balls, make them from cotton wool with your own hands, or for example sew them out of felt - there are never too many such toys.
From paper
New Year's paper decorations are loved by both big and small admirers of the New Year's miracle - try to make paper Christmas balls with your own hands.
DIY paper Christmas toy is made like this: 
Decorating such a toy is not required additionally, it is already expressive.

Another version of the ball:

Or such a ball can be made according to the master class:


From felt
DIY felt Christmas toys look very warm and cozy, and it is very, very easy to make them. To create your own charming felt Christmas tree decorations, you will need:- red, white and green felt;
- strings of red, white and green;
- crystal glue;
- scissors and needles;
- cardboard;
- some satin ribbon;
- soft filler (cotton wool, holofiber, synthetic winterizer).

First, make sketches for your future toys. It can be anything. After the patterns are ready, transfer them to the felt and cut them out. What is good about this material - it does not sprinkle, you will not need to additionally process the edge of each workpiece.
Make the same decorative elements - for example, holly twigs (by the way, did you know that this is a symbol of joy and Christmas reconciliation?). The berries need to be glued to the leaf with glue, and then a decorative knot should be made - this will give the berries volume.
We sew each workpiece in pairs. By the way, it is best to sew with contrasting threads, it will be fun and elegant. And how to make Christmas decorations voluminous? Fill them with holofiber before finally stitching them up! Spread the product well, so the Christmas tree toy will be stuffed more evenly. You can use the back of the pencil for stuffing.
Sew on the decorative elements and your Christmas toy is ready!


Try to sew felt decorations not only for the Christmas tree, but also for your home - for example, a Christmas wreath decorated with felt toys looks very stylish. Look at a selection of DIY Christmas decorations with your own hands, photo master classes - and you will understand how many interesting things you can make from ordinary felt of two or three colors.

Master class on how to make a DIY Christmas garland from felt:

Below you can download templates and patterns of different Christmas trees for felt crafts.
What are good about Christmas tree decorations is that little material is required to make them, because they can be made even from very small scraps and scraps left after working on other toys.
An example of such a Christmas tree toy is a toy owl with multi-colored feathers. So, if you have a lot of scraps, you can start making it.
To make a soft Christmas tree toy "Owl with colorful feathers" you will need:
- any black fabric;
- shreds of fleece or felt of dark brown, light brown, black, white and yellow colors (shreds and other colors can be used)
- sequins and beads in green or any other color;
- threads of white, yellow, black and green colors;
- a needle;
- scissors
- cotton wool or synthetic winterizer
- a narrow satin ribbon of light green color.

The procedure for making a Christmas tree toy "Owl with colorful feathers"
1. Let's draw a toy pattern on paper. We need to draw the main part of a round shape, an oval speck under the eye, a round eye, a triangular beak, feathers for the head and body of a triangular shape.
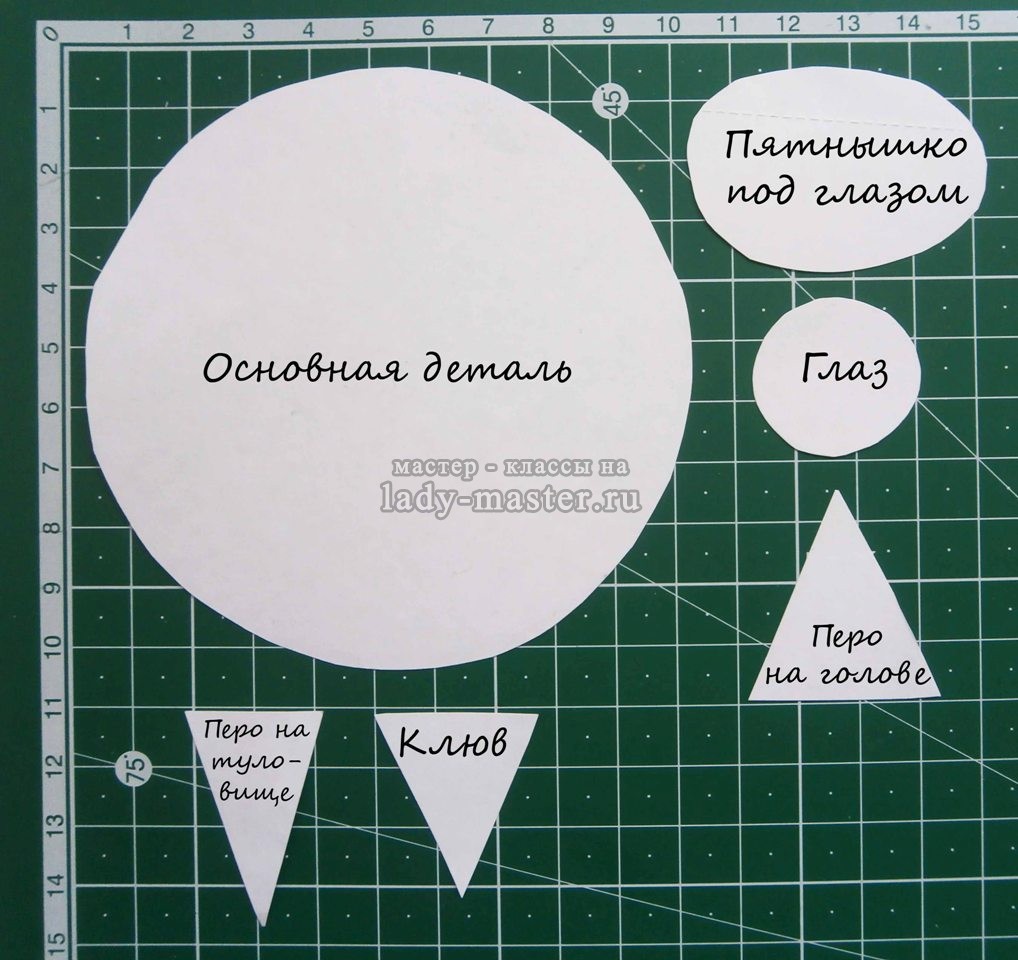
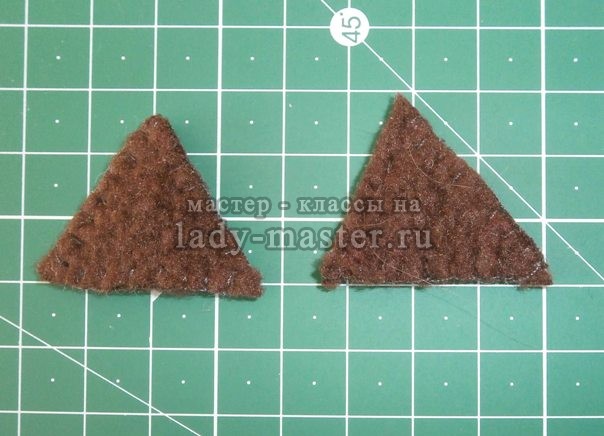
2. Cut out the necessary parts from the fabric - two main parts from black fabric, two parts of the beak from black fleece, four parts of feathers for the head from dark brown fleece, two parts of specks under the eyes from yellow fleece or felt, two parts of eyes from white felt or fleece.

3. From the dark brown and light brown fleece we will cut the feathers with which we will trim our toy.

4. Sew the main parts along the edge with a line seam, leaving a hole through which we can then turn out and stuff this part with cotton wool.

5. Sew together the details of the yellow spots and eyes, cut out of white felt or fleece. From black felt or fleece, cut out two parts of the pupil in the form of two circles with a diameter of 2 cm each.

6. Sew in pairs the details of the feathers for the head. We will sew the feathers with a buttonhole stitch, black or brown threads.
7. Sew two parts of the beak along the edge with black threads with a buttonhole stitch.

8. Turn out the main part on the front side, fill it with padding polyester or cotton wool and sew the hole through which we turned out and stuffed this part.

9. In the upper part of the toy we will sew feathers made of dark brown fleece.

10. Sew on our owl a forelock made of light brown fleece feathers. Then we will sew a row of light brown feathers on the bottom of the toy.

11. Above this row we sew a row of dark brown feathers, and above it a row of light brown feathers.

12. Sew a beak made of black felt or fleece over a row of feathers made of light brown fleece.

13. In the upper part of the toy we will sew the eyes, previously sewn from yellow, white and black fabric. Decorate the eyes along the edge - sew green sequins and beads. So our owl will turn out to be more elegant and festive.

15. Let's make a loop for our toy so that it can be hung on a spruce branch. To do this, take a narrow satin ribbon of light green (or any other color), cut a 19 cm long piece from it. Fold this segment in half and carefully sew it to the back of the toy.

Our Christmas tree toy. Such a toy can be made not only in brown tones. An owl can also be sewn from shreds of any other color, for example, combining green and yellow, blue and orange, white and black. If you want your toy to be brighter, you can sew a sequin with beads on each feather.

New Year is just around the corner. There is an approaching holiday in the air, which is slowly but surely moving towards our homes and hearts, because the New Year is a special holiday when you want to believe in a dream, hope for the best, and wait for miracles.
The New Year is a special and bright holiday for children, because on New Year's Eve, children often spend quite a lot of time with their parents, enjoying pleasant family joys.
And if parents usually do not have time, then on New Year's Eve they will definitely find it in order to take care of the New Year's troubles with the children.
A very entertaining and joyful thing for kids on New Year's Eve is the opportunity for everyone to decorate the New Year tree together.
If you can afford to buy Christmas toys by creating a stunningly stylish Christmas tree design - super !!! This tree will appeal to both children, adults and your guests.
If you can't buy beautiful toys for the New Year and new Christmas decorations for the Christmas tree, we advise you to get creative and create beautiful New Year's toys and decorations for the New Year with your own hands.
DIY Christmas toys and DIY Christmas decorations for the Christmas tree and at home are a very fun activity for the whole family.
Therefore, laziness in strontium !!! Let's look at what New Year's toys and New Year's decorations for the New Year can be made with your own hands without much effort, not only to decorate the house, but also to get even closer to your family members.
We create Christmas toys and decorations with our own hands
First, we immediately note that creating New Year's toys with your own hands, making homemade decorations for the New Year is a very fun activity. It can be compared with a ritual, with an exciting process, in the moments of which a miracle is born and a fairy tale takes over.
After all, making homemade Christmas toys and unusual, home-made Christmas decorations for the Christmas tree and at home, you breathe in them a piece of your love, warmth, so such Christmas decorations and beautiful Christmas tree toys turn out to be really special.
Hand-made Christmas toys will not only decorate the house, but also add a special atmosphere to your home, enriching it with bright accents and cozy little things.
What kind of New Year decorations can you think of so that it is not expensive, interesting, and so that such New Year decorations will transform your home.
In order to make Christmas toys and decorations for the Christmas tree and at home, stock up on all the necessary materials.
In order to make New Year's decor, namely homemade New Year's decorations and New Year's toys, you do not need special materials.
For this, such improvised materials as threads, a needle, of course, paper, pieces of multi-colored fabric of different textures, beads, sparkles and many other little things that may stand and wait in the wings to become an original mega fashionable New Year's toy are suitable.
Of course, you cannot start making New Year's decorations and toys without imagination, because it is she who is the driving force of the whole process.
New Year paper decorations look creative. They are not at all difficult to make, and for today's New Year's decorations in the style of papier-mâché and quilling are so diverse that even if you are not the greatest craftsman, you will undoubtedly get New Year's paper snowflakes, New Year's garlands, stars or balls for the New Year.
And if, in addition to multi-colored or white sheets of paper, you have ribbons and sequins, you just risk a quilling and papier-mâché master if you try a little.
New Year's decorations and New Year's toys are not only New Year's quilling and papier-mache.
For New Year's decor, Christmas toys, knitted with knitting needles or a crochet hook, will be an excellent option. And here there are no less ideas than paper decorations.
A Christmas tree in a retro style will look amazing if your Christmas decorations, crocheted or knitted with your own hands, resemble birds and animals.
The Christmas tree and the house will be decorated with New Year's bells, flowers, snowflakes and stars, balls made using decoupage technique, which will make the design of the Christmas tree and the house especially warm and cozy for family evenings.
A Christmas tree will look rich and tasty if there are New Year's garlands of sweets, fruits and other goodies on it.
Such New Year decorations will shine with bright colors on the New Year tree, and will become a delicious surprise for the little residents of the house.
You can make Christmas decorations for the tree and the house in the form of New Year's gifts. If old knick-knacks are gathering dust in your box, treat them with varnish and shimmer with sparkles, and you will have a very original New Year's toy.
Still very successful New Year's toys and decorations can be created from foam. Make blanks in the form of balls or cubes.
Glue the blank with bright ribbons, sequins, you can take beads, different types of cereals are also suitable, with which you can create a whole masterpiece, and not a New Year's toy.
New Year's decorations in the form of large multi-colored socks, felt boots and mittens, which are best made of dense fabric, have already become a tradition.
New Year's toys are very interesting and decorations are obtained from burlap and felt. It is easy to work with this material, and any decor on it will look very impressive.
Both children and adults will like making New Year's toys made using the kanzashi technique.
To make such New Year's decorations, you need to stock up on ribbons, beautiful fabric, beads, pearls, cords and wire.
New Year's toys in the form of garlands create an unusually festive mood. DIY Christmas garlands can be much more interesting than store-bought ones.
Garlands made of paper can be combined with garlands of foam balls, garlands of old toys decorated in a modern way, etc.
Do not forget that DIY Christmas toys can play the role of not only decorations, but also symbolic New Year's gifts, which will always remind you of pleasant New Year's evenings spent with loved ones.
Children especially love to make such New Year's toys, because they put a piece of their soul into such a homemade surprise for mom, dad, grandmother and other family members.
And now let's see what kind of New Year's toys and beautiful New Year's decorations, in addition to those mentioned, can still be made from ordinary materials, giving them a completely unusual and very important essence.
What kind of Christmas toys do you make with your own hands?
DIY Christmas toys: photo ideas for inspiration


There is a belief that making New Year's toys with your own hands attracts happiness to the house. DIY Christmas toys 2018 will be a great gift for relatives and friends. Let's look at what Christmas toys you can make with your own hands. How best to decorate DIY Christmas toys. In our article you will find beautiful examples of the design of New Year's toys in various countries of the world.


DIY embroidered Christmas toys
DIY embroidered Christmas toys can be flat and voluminous. For flat ones, you will need plywood or ordinary cardboard as a base, which will be covered with embroidered fabric. For embroidery, it is worth using multi-colored floss threads, which make the pattern colorful and bright. Do-it-yourself voluminous New Year's toys are made of fabric and stuffed with padding polyester. Beginners should purchase drawing patterns on the Internet or special handicraft stores, as well as special fabric with holes on which you can embroider with a cross. In the article you will find small patterns that can be transferred to fabric or simply follow them when making embroidery.
You can embroider Christmas toys with your own hands in 2018 not only with a cross, but also with a cobweb, satin stitch and other techniques. DIY embroidered Christmas toys can be additionally decorated with beads, satin ribbons or bows.


DIY Christmas toy from disks
Surely every home has old DVDs and you shouldn't throw them away. They can make a very unusual DIY Christmas toy. Take a multi-colored LED string with small bulbs and roll it up into a ball, leaving the free end with a power plug. This position can be fixed with clips or threads. Then the disks must be strung on the bulbs to make a ball, as shown in the photo. Use a heat gun to get the correct shape. A DIY Christmas toy made of disks will become a spectacular decoration in the daytime, and especially in the evening, when you turn on the garland and the interior will be filled with beautiful reflections.

DIY knitted Christmas toys
You can knit original Christmas toys with your own hands using knitting needles or a crochet hook. They can be made in the form of balls, icicles, figures of Santa Claus, Snow Maiden, etc. Snowflakes and angels, crocheted with openwork patterns, look very elegant. You can make knitted Christmas toys with your own hands in the form of funny animals, which, at the end of the holidays, will replenish the interior of the children's room.


DIY knitted Christmas toys: toy "owl"
Funny owlets always evoke affection, what can we say about their whole family. You can knit two identical torso shapes with ears and porches on a pair of knitting needles, sew them with the edges and fill with padding polyester. Do-it-yourself Christmas toy "owl" can be knitted on four knitting needles using the knitting technique of an ordinary stocking. Make eyes with a beak out of cardboard, or get ready-made forms at a craft store. The legs can be made from strong bendable wire. Decorate the owlet with a knitted cap, scarf or tinsel.

DIY retro Christmas toys: how to create an antique decoration
To make DIY retro-style Christmas toys, take a foam round blank ball or an old toy. Cut out lace patterns and glue them to our base, as shown in the photo. We paint such a blank with white acrylic paint and let it dry well. Next, apply a golden paint-varnish with a brush and blot everything with a dry sponge so that the layer turns out to be thin, creating a scuff effect.
Vintage New Year's toys with your own hands can be made using decoupage technique, picking up napkins with antique drawings, or even made in the “grandmother's” way from cotton wool and paper, because that is how they were more than a hundred years ago.


DIY Christmas toys from dough
The easiest and most economical way to make beautiful decorations is to make Christmas toys from dough with your own hands. First, we make an elastic salt dough, which after drying has a high strength, but, unfortunately, not very good taste properties. To do this, pour 2 cups of water into a bowl, add a glass of salt and mix well. Then add flour and knead it cool. The dough is ready and you can start to form original New Year's toys with your own hands.
They can be flat or bulky - after drying, their strength will be the same. You can immediately insert beads into the molded figures, if the decor suggests it. We leave the finished "semi-finished products" to dry in a ventilated room for a couple of days, or dry them in the oven at a temperature of 50 degrees (with the door ajar) for 5 hours. We paint the hardened products.


DIY Christmas toys from foam balls
Styrofoam balls are a great base for creating a wide variety of Christmas balls. They can be painted, pasted over with tapes, paper, tied, in general, various techniques can be used on them. Their special advantage is that the foam can be pierced and thereby ensure a reliable fixation. DIY Christmas toys from foam balls can be made using sequins, hairpins, beads, buttons and other little things. In the photo in our article, you can see examples of such designs, when sequins pinned to the ball with hairpins create beautiful jewelry.


DIY Christmas toys from recycled materials
The little things used in everyday life do not always deserve a place in the trash can, in some cases they can find their second life as jewelry. For example, a DIY Christmas toy from waste can be made using plastic bottles, when cut in half, excellent foundations for decorating bells come out.


The photo shows large Christmas snowman toys, with their own hands, festively decorating the street. They are also made from plastic bottles by artisans. Used light bulbs can become an excellent basis for making jewelry - they can be painted or decorated using the decoupage technique. Cute Christmas trees and other decorations are made from plastic forks.


DIY Christmas toys from shells
Often, having collected beautiful shells during a seaside holiday, we cannot always find a worthy use for them. But with their use you can get an unusual Christmas toy with your own hands. For example, you can make a cute dog's face, especially since it is a symbol of the coming year. Take one large base shell, glue two small ones identical from the sides to it - you get ears. Another miniature shell will serve to decorate the face. Glue the ribbon on the loop and decorate the product. Eyes and nose can be drawn or glue cut from paper blanks.


DIY Christmas toys from chestnuts
Consider what kind of New Year's toys you can make with your own hands from chestnuts. And here it will help out that they can be painted and pierced. Make a cone out of thick cardboard. Paint the chestnuts with green acrylic paint and dry. Then, using a thermal gun, we glue the chestnuts to the cone and, as a result, we get a pretty Christmas tree, which can be used to decorate the interior of any room or office. You can also create other New Year's toys from chestnuts with your own hands - garlands, snakes, fabulous ants and funny caterpillars, if you string them on threads and decorate them.

DIY Christmas toys
Hand painting is a rather painstaking process and requires certain skills. But in this way, you can arrange real exclusive New Year's toys with your own hands, which you will not find analogues. For such work, it is worth purchasing high-quality brushes of various thicknesses, as well as acrylic paints. As for the palette, it is worth purchasing white acrylic paint and a few basic dyes, for example, red, blue and yellow. By mixing with their help, you can get other different shades. By choosing colors for the general interior and thinking over the semantic content of the picture, you can arrange stylish New Year's toys with your own hands, which will not go unnoticed on a lush Christmas tree.


DIY Christmas toys from countries of the world
Interior decoration on the eve of the New Year and Christmas holidays is relevant in most parts of our planet. There are also some peculiarities inherent in this or that country.
In European countries, jewelry has many similarities, although there are special preferences. For example, original DIY Christmas toys made of straw, which decorate Christmas trees and interiors in Sweden.

The Christmas straw goat is a central character not only in Sweden, but also in Finland and Norway. It is not difficult to make such toys, but they are safe and environmentally friendly.

Americans prefer to see the top of the New Year tree, dressed up with an angel who drives away evil spirits. In the article, you will learn how to make such Christmas angel toys with your own hands. Pictures will demonstrate their step-by-step production.


In Germany, they prefer gingerbread men and nutcrackers, and in England they prefer to add mistletoe decorations to the interior, which were used by the ancient Celts in order to expel evil spirits. You can make an original Christmas wreath or pendant from mistletoe.


The Spaniards prefer creative DIY Christmas toys in the form of a variety of fruits, which can be made from felt or other material.
China is famous for its lanterns, which have become quite a popular decoration in European countries. You can make it from colored paper. Using scissors, cut strips of the same length and width of the same or different colors. We take a thread with a needle and string first one ends of the strips, and then the others in the reverse order. We press the structure a little and make a knot on the thread so that it does not straighten. The Chinese lantern is ready.

DIY Christmas toys 2018 in Japan: an age-old tradition
The most common New Year's toy in Japan is the temari. This is a ball that carries a certain symbolism. Such voluminous New Year's toys were made by grandmothers with their own hands and, putting in the middle of the paper with wishes of health and happiness, they presented them to their grandchildren on holidays. It is worth considering that each color of the ball has its own meaning: green attracts good luck, red - love, gold - wealth, blue - peace.


DIY Christmas toys 2018 in the Japanese style can be multi-colored fans that can be made of paper, figurines, dragons, sewn from fabric, etc.
In conclusion, I would like to note that, in addition to manufacturing, there are many ways to decorate Christmas toys with your own hands. You can safely use the tips of our material in order to breathe new life into the jewelry that has been boring over the years.
DIY Christmas toys 2018 - original decorations for 45 photos updated: December 27, 2017 by the author: Irina Kievskaya