Small box drawing. How to make a cardboard box for chocolates? Materials for making
Often we are accustomed to seeing in films how happy people take out from under the trees or receive a present as a present, but the key here is that the gift is packed in a beautiful box. This is done mostly to create intrigue, less often to preserve the integrity of the gift. Of course, it is much easier and less time-consuming to pack the prepared gift into the packaging from the store, but it is much more interesting to make a box
So, your product will look the way you want, besides, such boxes are unique in their kind, therefore you will make them yourself. Making such boxes is not difficult at all, and most likely you yourself will receive an indescribable pleasure from the work done by your own hands.
First, you will need to roughly estimate the size of your presentation, taking into account several important factors, such as the height, thickness of the gift, and allowances for gluing. We will take these dimensions as a basis for making a box for the new year with our own hands.
 We will need:
- Long ruler;
- Scissors;
- Thickened paper(better corrugated board) sizes 15x15 cm and 14x14 cm.
You need to draw squares of the indicated sizes, draw a diagonal and bend the corners to the center. Next, the same corners that you just bent at the middle need to be bent to the opposite fold line, and then to the nearest fold line.
Concentrate on the fact that we have got a square in the center, which will be our reliable bottom for a gift box, which we will make with our own hands.
Further, on both sides of our diagonal along the first deflections, we make cuts to our central square. The cut edges need to be folded along the bends - this is how we get the walls of the box for wrapping a gift. 
The sharp ends of the box must be bent inward, towards the center of the square-bottom. With the remaining non-bent ends, grab the bent ones and wrap them inward. This will be our cover.
We make the second box according to the same principle, and due to the fact that this square is smaller by a centimeter, the box will close perfectly. And if you are thinking about how best to make a beautiful box for a gift, then for the other half of the box, take thick paper, not cardboard. 
A gift of 5 or 6 cm in size and up to 3 cm in height will fit into such a hand-made box. approximately what could fit on your palm. If the gift is very small, and you do not want it to dangle in the box like a rattle filler, then you can put a light tissue paper on the bottom, prudently crumpling it up.
A more convenient alternative would be a simple napkin. As you can see, making such a small gift box is a snap.
Such a box with a gift inside should be tied with a ribbon or a beautiful ribbon.
And since it is not difficult to make such boxes for packaging, we want to show a few more options.
Cone box
 Necessary materials:
- Thick paper of any size;
- Compass;
- Glue;
- Pencil;
- Scissors.
First you need to decide what height the cone is needed, the size of the circle will depend on this. The higher the cone, the larger the circle. Once you've drawn a circle, divide it in half. Now form a cone and glue the edges. 
The bottom for such a gift box will be a piece of foil, which you will use to seal your box. The cone can be beautifully disguised by making a Christmas tree out of it.
Give it a try - it's great inspiration!
Prism box
Prepare the following: 
- 18x18cm square cut out of thick paper;
- Scissors;
- Ruler;
- Pencil;
- Ribbon and punch.
So, we draw a square in half and diagonally. Bend the corners to the center, and then from the center of the edge in the deflections of the central square, you need to draw even arcs. 
After that, cut off unnecessary corners with scissors, and at the rounded ends we pierce small holes with a hole punch and stretch a thin ribbon into them.
Box with a secret
And now we want to propose to make such a box for a gift, which will be with a small surprise. The box is a snag - when the lid is removed, it will disintegrate. By the way, the lid is made according to the same principle that we described in the classic box.
 So, we will need:
- Glue;
- Scissors;
- Thick paper;
- Decorative ribbons and other decorations;
- Beads, ribbon, old postcards.
If the bottom is made of 18x18cm sheet, then we take 1 cm more for the lid, i.e. 19x19cm.
Bottom: outline the sheet into nine even squares, cut off the corner ones. Bend the ends of the resulting cross inward, forming the shape of our future box for wrapping gifts. 
The inner surface can be decorated to your liking, glue the pictures of their old postcards, beads, and then put the gift in the finished box and wrap it.
Don't forget the ribbon!
Felt box
 We need:
- Felt of different colors;
- Thread and needle;
- Glue;
- Scissors;
- Ruler.
Line the fabric into nine squares or rectangles, cut out the corners. If desired, the outer side can be decorated with patterns, the walls must be evenly bent and sewn together. Even if the seams are noticeable, and the threads differ from the color of the felt, do not worry: consider this a design move. 
You can decorate the box according to your preference. Such a box will be good as a handmade Christmas gift box.
So that's all. These are just the basics, and more complex schemes are suitable for those who already have experience in creating simpler box models.
Good luck and inspiration!
A simple paper box version. This is my first instruction here and I tried to make it as clear and understandable as possible. It was difficult for me to explain some of the steps so that it was clear, but I think that everything will be clear from the photographs. If you have any problems, write in the comments and I will try to explain better.
I know that there are several versions of A4 paper boxes, but here I have not seen my way, so I hope it will be useful to you. Enjoy!
Stage 1: Materials

You will need:
- 2 sheets of plain office paper (box + lid)
- Scissors
- Pencil
- Ruler
You may also need some glue.
Stage 2

Fold a sheet of paper as shown in the photo.
Stage 3

With a pencil, draw a line, tracing one of the sides of the resulting triangle.
Stage 4

We cut a sheet of paper along the line.
Stage 5

Now you have a square (you can throw out the extra piece of paper).
Stage 6


Now you have to fold the square on the other diagonal and unfold it again.
Stage 7


Then fold all 4 corners of the square towards the center.
Stage 8


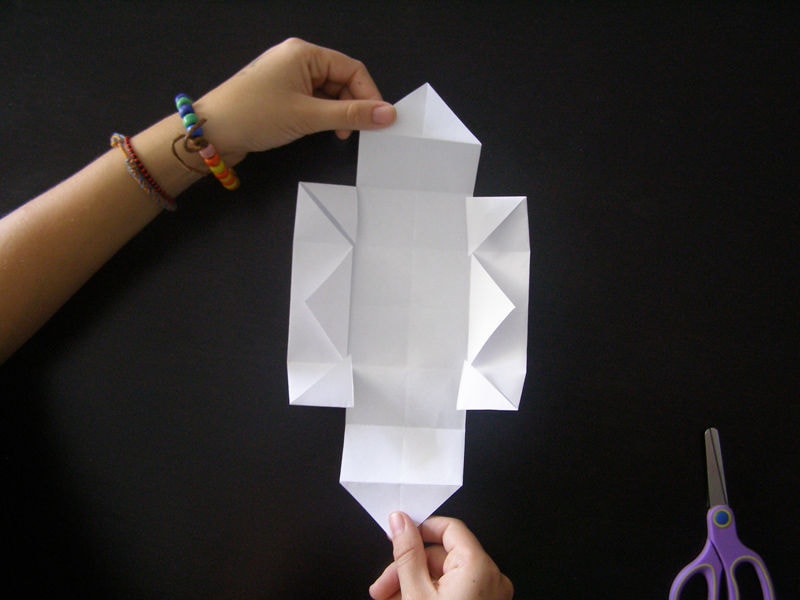
Fold one side of the square towards the center (as shown in the photo), then fold the opposite side in the same way.
Stage 9


Now bend the sides of the square that have just been bent. We rotate it 90 degrees and bend the other two sides of the square in the same way.
Stage 10


Make cuts as shown in the photo. The cuts should only be at the top and bottom, they should not be too deep or too short.
Stage 11

Expand the top and bottom as shown in the photo. Fold the other two sides so that you get a box.
Stage 12


The final stage of assembling the box. We bend the remaining two sides. Ready!
Stage 13


Now, if you have a desire, you can make the bottom for our box, i.e. the box we made in the previous steps will become a lid (it will be difficult to insert one box into another if they are the same size). In order for the lid to fit easily onto the box, we need a ruler.
It's pretty straightforward. First follow steps 1 through 5, then measure and draw a line 5 mm from the top and right edges of the square with a pencil. Then cut off these thin strips. The bottom and lid will now fit perfectly together.
It remains to repeat steps 6 to 12 and the box with a paper lid is ready!
Stage 14


If the inner triangles bend down at the top, then they can be fixed with glue.
Stage 15


All that's left to do is connect the boxes together.
How to make a box with your own hands for a small gift? For example, for brooches or candles. The topic is relevant, do you agree? For example, I know that handmade soap packaging- the eternal problem of soapmakers. And you can't always find it in stores, and sometimes the cost "bites". So I suggest you make a cardboard box with your own hands and present a step-by-step master class. I make eco-boxes from available materials. This option is especially suitable for those who "release" not too large batches of their own soap. DIY handmade soap packaging it is quite within the power of everyone, but in terms of time it is still costly.
I used boxes in which household appliances are packed. They are large, the sides allow you to use patterns of different sizes. The material they are made of is corrugated board... Usually light brown in color, the shade is very eco-friendly.

You can also buy this or any other suitable cardboard from art stores.

You will also need:
- scissors and a sharp knife for cutting cardboard;
- ordinary paper for patterns;
- thin transparent tape,
- tissue paper (silence) for gift decoration;
- stapler for fastening;
- beautiful ribbon (braid, lace, etc.) for decoration,
- cellophane, which is used to pack flowers.
Step by step, the whole process looks like this:
- we make a rectangular box with sides;
- we fill this box with paper filler;
- we put a souvenir (soap or candle, or other object) on a fluffy feather bed
- we wrap all this beauty with transparent cellophane, of which there are many in floristry shops and similar ones (goods for creativity, packaging materials, etc.).
How to make a box with your own hands for a gift
Let's figure out how to make a corrugated cardboard box with our own hands. Similarly, you can work with thinner cardboard, the principle of constructing a pattern is exactly the same.
Building a pattern of a box with sides
- Cut the cardboard packing box along one of the side edges, if it is glued, unfold. Folds are not a problem - they can be used as folds in your boxes.
 2. Draw the simplest pattern to start with. The base is a rectangle with the width and height corresponding to your gift (soap, candles, souvenir). A more or less standard size suitable for many forms of soap making is a rectangle with sides of 10 and 8 cm. But you can use other sizes as well. For a taper, it will be a more elongated rectangle, longer, but the essence of manufacturing remains.
The picture below is a universal pattern. You can make it in advance on plain paper and then use it on cardboard.

The bottom of the box is marked in blue, the sides are light orange, and the "wings" for connection are in orange. Green solid lines indicate where to cut, and dashed lines indicate folds.
Make the length and width of the bottom in accordance with what will fit in the box. Add extra space on the sides so that you can add beautiful additions in the form of sisal, slicing, etc.
Add about 3-5 cm to the rectangular bottom along the perimeter of the side strips.They are light orange in the figure. The height of the sides depends on the height of the product to be packed. For soap, the height of the sides is usually 3.5 cm.
The "wings" are bent inside the box, and the double side wings close them.
- Transfer the pattern to the cardboard, cut it out. Several punctures can be made in the folds to make it easier to fold if the cardboard is "stubborn".


Handmade box assembly
Fold the sides inward along the fold lines, while picking up the "ears" inward, which will serve as a fastener.

Assembling the box without glue and stapler
To keep the whole structure, and not fall apart (the cardboard strives to return to its original position), insert the bottom, cut out separately. It is this that will press the sides and "ears" and the box will keep its shape without additional fasteners.


Fastening "sides" with a stapler
If you don't want to do it with the bottom, or your box is falling apart (the bottom, apparently, needs to be made a little larger), you can try to connect it with a stapler.
If you choose this option, then additional double sides can be made single and you do not need a second bottom.

Helpful advice: since cardboard with corrugated insides is thick and not every stapler can "swallow" it, you just need to squeeze this notorious thickness with your fingers. And then the perfectly flat edge fits easily into the stapler.
Here's a box that turns out in the end. If the edges of the "ears" protrude slightly above the sides, cut them off with scissors or a sharp knife - whichever is more convenient.

Fastening the "sides" with tape or glue
The most difficult event, to be honest.
The fact is that the cardboard is not glued with tape. And ordinary glue does not work out quickly. Having fought with different adhesives, I realized that this stage can become very time consuming (until the selected glue dries up) ... I gave up and started working with a stapler, as described above. Yes, there are metal brackets, but they are almost invisible.
But for those who do not have this tool at hand, thin scotch tape will help out. They need to fit the entire box around the perimeter, thus pulling the side walls. And then decorate with paper in silence, for example. That is, cover the tape.
Cardboard box lid
As you probably guessed, the lid is made in the same way as the box itself. Only the height of the sides is limited to 2-3 cm and the bottom should be larger than that of the main box - about a few mm on all sides. This will allow you to close without tension.
If desired, you can cut a window into the lid and seal it from the inside with a transparent film.
Move on to the design of the box.
DIY box wrapper
A neatly crafted cardboard box is good in itself! Beautiful handmade soap packaging has an eco-friendly look, and is suitable for many DIY products. However, you can make a more festive outfit for her.
Wrap the box in pretty paper, either quilted or corrugated. It is not necessary to make a pattern, it is enough to make large allowances in order for it to be enough for the inside of the box.
Uneven edges will be covered with a bottom and filler.

Handmade gift wrapping filler
If sisal or any other ready-made filler is not available, make it yourself. It is enough to cut the tissue paper into small "noodles" and crush it.
Fluff the cutting with your fingers, it is not difficult, the paper will acquire the required volume under your hands. Remember not to make the straw look straight. In the photo you can see a cut of golden paper in silence. A large amount of slicing is obtained from one sheet, enough for a dozen boxes.

Fill the box with slices, put your gift in it and proceed to cellophane packaging if the box is without a lid.
Transparent cellophane wrapping of a gift box
Cut a rectangle of cellophane sized enough to leave loose ends for the sides when wrapped. Wrap the box in a circle and carefully fasten it with thin transparent tape from the side or bottom.

Excess cellophane must be cut off so that coarse winding does not work out. Attach a bow, tinsel, twig, or pretty braid for decoration.
The photo shows examples of such packaging in different sizes. 

In such a box, you can pack not only soap and candles, but also gingerbread cookies, handmade flowers, hairpins, brooches and much more that is created with your golden pens. Knowing how to make handmade soap packaging, do the same for other gifts. If the item is large, then the box can be made large.
Patterns and templates for handmade boxes
The patterns below are suitable for thinner cardboard boxes. Such boxes do not need to be additionally glued. The main thing is to bend it correctly along the required lines. It will be more difficult to make such small boxes from corrugated cardboard.
Pattern and assembly diagram of a handmade box made of solid cardboard
This version of the box is made of dense, well-shaped cardboard, but not very thick. Held by the creativity of the cardboard.

Pattern for a box made of thin cardboard
Thin cardboard allows you to make a box with your own hands, bending the side joints along diagonal lines. The picture shows how this is done.

Using decorative paper (for example, for scrapbooking), you can make such a box a handmade masterpiece.


Diy packaging box diagram is simple, in the picture below the example is the simplest.

If there is no need to make square boxes on your own, then craftswomen are always in short supply in round and shaped boxes. You can make packaging of this shape at home from ordinary materials at hand. In our article there is a unique master class on making round and curly decorative boxes with your own hands.
DIY gift box: simple schemes
First of all, you need to prepare stencils for the paper box. There are a variety of schemes for creating this type of souvenir. Gift wrapping can be rectangular, round or curly.
Today we use boxes in everyday life, for work, and as a gift. Meanwhile, these things appeared in our civilization relatively recently - in the 18th century. Their predecessors were bulky wooden boxes. The prefabricated structures were invented by the Scotsman Robert Geyer, who needed lightweight compact packages for seeds.
Square box diagram
The diagram shown in the photo will help those who need a classic square box. It is enough to make a paper or cardboard stencil and glue it along the fold lines.

Multifaceted box scheme
No cover required for original hex packaging. Such a product is easy to create with your own hands, even without having special artistic or design skills. It is enough to use beautiful thick paper. Elements of this shape are often made of cardboard.

Diagram of the original box in the form of a handbag
We offer a simple scheme for making a do-it-yourself gift box. The product has the shape of a small handbag. Even an expensive gift made of precious metals can be packed in a box.


Box layout in the form of pieces of cake
Are you planning holidays at work? Use the idea of decorating a gift in cardboard products in the form of cake pieces. A handmade present, albeit partially, will remain in the memory for a long time. This idea will surely please your colleagues.


Heart box diagram
Romantic natures will love any handmade gift. It is better to pack a present for them in a heart-shaped box. Made of bright paper or cardboard, it will be an excellent gift design. Use our scheme for making a gift box in the form of a volumetric heart with your own hands.

DIY round box: master class with video
The most difficult thing is to make a round paper box with your own hands, because there are no schemes for collecting it. To make such a product, you will have to cut all the elements separately, and then glue them one by one.

First, make stencils for the box out of paper. To do this, draw a circle and cut it out. You will apply the paper stencil to the cardboard, creating the base and lid components. Make the same blank for the sidewalls. It looks like a strip, the length of which should correspond to the size of the bottom circumference. Now you can start the main work:
- Cut out the first circle for the bottom and side of the cardboard.
- Cut off the outermost corner on the sidewall strip.
- On the other side of the strip, cut a corner of the same size and slope.
- Join the cardboard blank in a circle and glue the cut.
- Glue the bottom to the circle.
- Wrap the outside of the structure with a piece of decorative material.
- Stencil cut the same strip, but shorter and higher. It is needed to create the inside of the product.
- Insert the blank inside and wrap with decorative material.
- Cut a circle with a larger diameter than the bottom of the box.
- Make a strip of the side of the lid and join it with a new workpiece.
- Wrap the cover with paper or cloth.
You can decorate gift wrapping in any way. The most common option is tape. The product is wrapped several times, and a fluffy bow is tied on the lid. The decoration of the upper part with artificial flowers, leaves, beads or small soft toys looks beautiful.
The product is used not only for decorating presents. It can be useful to you in everyday life or to decorate the interior. The video shows a diagram of how to create a round box with your own hands from cardboard with decoration with a patchwork fabric:
Do you like to make gifts with your own hands? Looking for new packaging ideas? Now you will learn how to make a cardboard box with your own hands. The diagrams given in the text can be printed and used unchanged. If you love to add something of your own, customize them as desired.
Which shape to choose
You may never have guessed how easy and quick it is to make a cardboard box with your own hands. Schemes and blanks are very different, respectively, and the final configuration of the products is very different. It is often said that beautiful packaging is already half of the gift. If you want to surprise with your souvenir, come up with an unusual box shape. At the same time, not even additionally decorated, but simply made from a colored sheet, the packaging will look spectacular.
In the case when you do not want the attention to be distracted by the packaging, but you just need it for safety and ease of transportation, the usual shape in the form of a cube or parallelepiped will suffice. However, it is worth considering that you are preparing for the holiday, so it is good to add beautiful decor to the usual configuration. Any of the options can be used, and it will not be difficult to make a box according to a ready-made template, even if you have never done it.
What is required
You need to prepare the following so that you get a beautiful do-it-yourself cardboard box:
- Schemes, or, as they are also called, sweeps.
- Cardboard (white, colored, decorative).
- Printer or if you will build the template yourself.
- Scissors or knife.
- Knitting needle, non-writing pen or similar tool to draw invisible grooves along future fold lines.
- Glue or heat gun.
- Decorative items (satin ribbons, stickers, bows, flowers).
As you can see, the work on creating beautiful packaging will not cause much trouble. No complicated adaptations are needed. If you do not have a thermal gun and a printer, it is quite possible to do without them, using the self-construction of a scan of the box with a pencil and a ruler and gluing with ordinary PVA or a quick fixing compound.

Manufacturing technology
Consider how a cardboard gift box is made. The scheme of work will be as follows:
- Find the template that suits your configuration.
- Print it on a printer either directly on a large cardboard format, if possible, or on paper sheets, which you can then glue and transfer the template to a cardboard blank. The most convenient way, of course, is to work with boxes, the sweeps of which fit on A3 or even A4 format. This is usually the maximum capability of a standard home printer.
- So, here is a packaging template obtained in any way. Cut it out of the sheet along the contour and make cuts in the right places where the gluing will take place.
- Take the knitting needle or the tool that you have prepared and draw it along all the lines where the folds will be. It is better to do this on the back side, and not on the front. In professional slang, this operation is called creasing, and in printing houses it is, of course, performed by a machine. These grooves prevent the cardboard from creasing during folding, i.e. folding. So do not neglect it, otherwise the box may turn out to be sloppy and deformed.
- Make folds along the appropriate guidelines.
- Glue the volumetric shape from a flat workpiece.
- Decorate the package with satin ribbon ties, a bow, or something else.
DIY cardboard box: diagrams
Square packaging is the most commonly used. There are different options, both solid and consisting of two parts - a base and a cover. It's easier to make boxes out of one piece. Such a package can be closed with strings or with a cardboard "tongue" that goes into a slot in the opposite part of the box. Below is a simple cube-shaped packaging option.

As you can see, the base of the sweep is a square. The top of the product looks like a "roof" in the assembled state. A pretty ribbon can be used to secure the four top pieces together.
DIY cardboard box: simple but unusual schemes
If you want to customize your packaging, use one of the following models. The first photo shows the simplest version. It is very easy to make as there are only four folds to be made. At the top, the box is assembled due to the slot and the fastening element included in it.

If you have a triangular shaped souvenir, use the following packaging. Unfolding, although it looks quite complicated, the assembly is quick and easy. The main thing is to carefully make the fold lines. The gluing elements are small, made in the form of triangles.

According to the following template, a beautiful rounded cardboard box can be made with your own hands. The diagram is also simple and straightforward. The most important thing is to draw the arcuate fold lines evenly. It depends on how neatly the shape of the package will fold.

How to decorate the box
You have figured out the technology for creating the base, but just a white package will not work for a gift. It should complement and decorate your souvenir. You can turn an ordinary box into a masterpiece of artistic skill in the following ways:
- Choose beautiful cardboard or thick paper (design or for children's creativity). Sheets are metallized, mother-of-pearl with embossing, patterns and other decor options.
- Cut out the second roll of the box from thin wrapping paper or other paper used in arts and crafts, and glue it on top of the base. This option is suitable when you need to make a box of very thick cardboard, which cannot be found with a decorative surface.
- Apply drawings or patterns to the box with paints using a brush, stencils, stickers, decoupage napkins.
- If you own high-level computer graphic editors, you can come up with your own design of the box, complementing the selected outline before printing with any images, including photorealistic ones, for example, even with the birthday boy himself. The one to whom you present such a gift will definitely be surprised. It should only be borne in mind that if you are going to print on colored cardboard, all your pictures will acquire the appropriate shade, so you will either have to perform color correction of the blank, or not use colors that cannot be changed (portrait photos).
There are as many options for decorating the product as there are possible schematics. It is good to combine different ideas.
So, you saw how easy it is to make a cardboard box with your own hands. The above diagrams are easy to use to create beautiful packaging for a souvenir for any occasion. By scaling the templates, you can make boxes of different sizes that are the same in shape. Create, decorate, surprise your friends and relatives with your skills.