How to braid your hair of medium length. Braiding for medium hair. French braid with reverse weave
Pigtails for girls are perhaps the most popular hairstyle that caring mothers create every day when they send their little miracle to kindergarten (school). If you are also interested in weaving braids for girls, you want to learn how to create new, simple or complex hairstyles, be sure to read this article, in it you will find a lot of new things on this topic and learn how to braid a girl's braid simply and beautifully.
If we talk about children's hairstyles, then the expression “Beauty requires sacrifice” is completely inappropriate here, because the main priorities in children's hairstyles are:
- practicality- the hairstyle should not interfere with the child (not disintegrate during active games);
- rapidity fulfillment - when parents gather their child in kindergarten (school), they, as a rule, tend to do their hair faster;
- security- in order to fix the everyday hairstyle for girls, it is better not to use objects with sharp ends: invisible hairpins, hairpins or synthetic styling products, among which gels, varnishes, hair foams and others stand out;
- variability- new interesting styling options will attract increased attention to your daughter, she will want to please the boys, which contributes to the formation of the feminine essence.
Of course, it makes no sense to immediately start performing complex hairstyles, first, start with simple styling. Practice new ways of weaving braids on long, medium or short hair, try to combine different options, and also invent new ones if you suddenly have enough creative imagination for this.

Braid weaving methods
We offer you some of the options that are most popular today.
Weaving on 3 strands
You will need to divide your hair into 3 sections. Then shift the left strand to the right so that it intersects with the middle one, and the middle strand remains on the left side. Do the same for the right section of hair, move it to the middle. And so on, braid the braid until there is a small ponytail at the end. Finally, use an elastic band to secure the braid.
French spikelet
This weave also looks very impressive on children's hair. Thanks to the special purl technique, you can create a voluminous braid on top from smoothly combed hair. When using this kind of braiding, it becomes possible to create very beautiful children's hairstyles, for example, you can braid a braid diagonally, make interesting zigzags or lay out the braiding around the head.
Braids for girls: 20 hairstyles with a photo
Most of the braided hairstyles that are presented in this article involve the use of ribbons, adorable butterflies, straight or, conversely, sharp lines. Some of the hairstyles at first glance seem quite complex and difficult to implement, while others are quite suitable for the beginner level.
Hairstyle 1. Crossed low braids for girls with the addition of ribbons.

This is a very attractive hairstyle that can be used by girls with long hair. The hairstyle involves the back intersection of two inside out French braids, which create a very unusual design. By adding a beautiful ribbon to this hairstyle, you will make the image more harmonious and completely complete. It should be noted that crossing French braids for girls look really very profitable.
Hairstyle 2. Braids with bows.

This is already a slightly higher level of hairstyle creation, because here also baskets are used in hairstyles. You will need to divide your hair into three sections as you would for a traditional braid, but add four or more ribbons to create a complex and unique braid. The hair is then parted in the middle and secured, after which the braids are neatly curled into cute little buns. The adorable bows that adorn the top of each "bun" will add a spectacular finish to this hairstyle. You have to work hard to create this hairstyle, but the result will really be worth it.
Hairstyle 3. Double heart from braids.
 Photo of hairstyles with braids for girls
 This double heart, made in the form of weaving, is indeed much more difficult to create than it might seem to you at first glance. Internally, this weaving of braids for girls should be divided so as not to interfere with other weaving. After creating and securing both braids, you need to carefully weave a ribbon into your hair for a more effective and complex result. To round off this childish look, weave two bright purple flowered ribbons to each ponytail. With such an interesting hairstyle, your daughter will instantly feel like a real little princess.
Hairstyle 4. Asymmetrical floral braids style.

Break all the rules of modern styling by creating these interesting and unique pigtails for your girl. In this hairstyle, the braids surround the head in an original way and are securely fastened with cute little ponytails. Bright and bold accessories can diversify the image and add new notes to it, which will add even more attractiveness to the overall look of the hairstyle.
Hairstyle 5. Four braids with intertwined ribbons.

This symmetrical style is very attractive and creative. Try different ribbon colors to match your girl's main outfit. This unusual hairstyle can be done by girls with short, long or medium hair. All you need to do is just create four braids and add two long pieces of ribbon to them and use elastic bands. You need to make sure that this girls' braiding is really tight if you want a lasting result.
Hairstyle 6. Braid with twisted pigtails.

Twists and braids look very appealing in this chic kids' hairstyle. You need to create two or three braids high on the crown so that they go down diagonally, and then shape one of them into a ponytail. Completing the look will be two giant neon bows and your little princess will be able to enjoy an unusual and very stylish hairstyle.
Hairstyle 7. Double turns with cute buns.

Would you like to try creating such amazing curls with pretty buns? Of course, to create such braids for girls, you need to have long enough hair. You need to start with one turn at the top, and also make one at the bottom, and then attach two cute "buns" on both sides to two pigtails. The final detail of this look will be soft colored ribbons, which will also hold the braids at the same level.
Hairstyle 8. Pigtails separated by laces.

This hairstyle is a meticulous separation and skillful braiding. In this case, it is necessary to divide one French braid into two parts. Adding beautiful ribbons and flowers to the look will make this option most suitable for spring or summer weather. Don't underestimate the importance of ribbons and hair accessories. With their help, you can easily turn the most ordinary braid into an interesting and sophisticated weaving.
Hairstyle 9. Criss-cross braids decorated with lace buns.

Check out this awesome hairstyle! Six mini-ponytails intertwine diagonally at the back and end with two cute fluffy buns at the top of the head. Bright pink ribbons worthy of the little queen of pop music will be a necessary complement to the look.
Hairstyle 10. Pigtails of the future.
 Photo of hairstyles in kindergarten
 One cannot but agree that these French braids look quite futuristic. Loose strands hang down and then curl back to create an amazing spider web effect. This hairstyle option would be a very good idea to complement a Halloween costume, but it should also be done by someone who is really well versed in how to make French girls' braids properly.
Hairstyle 11. Classic long hair intertwined with ribbons.
 Photo of a quick and easy hairstyle for long hair
 This is a very inspiring hairstyle that can be created by anyone of almost any skill level. The classic ponytails are set high on either side of the head and then braided downward with the addition of stylish blue and purple ribbons. Is it difficult to find a similar hairstyle that would look so sophisticated and gorgeous?
Hairstyle 12. Intricate braids with ribbons.

The main motto of this hairstyle is: “If you can imagine it, then you can do it. A zigzag parting, thick braids and thick ribbons - all this forms a rather chic hairstyle. The ribbons are harmoniously woven into the braids, giving the hair the appearance of being lifted up. This hairstyle looks really cool, of course, it will take a lot of effort and time, but you will certainly remain satisfied with a beautiful and interesting result.
Hairstyle 13. Snake braids.

If your little one has super long hair and you want to show it off, this hairstyle is perfect for you. In this case, two pigtails gracefully go down along the line of the back and are fixed high at the temples with funny elastic bands. The hairstyle looks very beautiful and stylish, but to create it, you must have sufficient length and thickness of hair.
Hairstyle 14. Pigtails with chains of links.

Here's another great hairstyle for thick hair. Show others all your imagination by dividing the usual braids from the bottom into two parts. After that, once again divide each of the strands into three parts and twist them in curvy bends. To do this, twist the right strand of hair over your finger and add a little more left strand to create a rope braid. Finally, connect the two rope braids into one link using braid. You can also create three links of braids if desired and end up with two large braids. This version of the hairstyle looks very fun and unusual.
Hairstyle 15. Double braids with double buns.

Check out this fabulous hairstyle that combines braids and buns together! The thicker the hair, the better and more appetizing the "buns" will look. The colorful elastic bands that decorate the "buns" will add special appeal to this look. It's hard to imagine that there could be an even prettier hairstyle than this one.
Hairstyle 16. Crown.

Who doesn't love girls with braided hair? A beautiful braid braided at the top will create an interesting crown effect that fits perfectly with the style of French braids. The crown will help to hold the front part of the hair, it will look very gentle and unobtrusive, while beautifully framing the face of the little princess.
Hairstyle 17. Waterfall.
 Hairstyle Photo: Girls Braids
 In this version of the hairstyle, neatly styled ponytails look very unusual and stylish. Clean, straight lines and bright colorful elastic bands will make the look especially attractive. It should be noted that to create such a hairstyle, you need to stock up on remarkable skill and have extensive experience in creating French braids for girls.
Hairstyle 18. Large double bows.
 Hairstyle Photo: Girl with a braid
 These gorgeous, cleverly twisted black hair bows are absolutely fabulous in appearance! In this hairstyle, two double ponytails are pulled up the back and curled diagonally into bulky buns. With this super original hairstyle, you can definitely make your baby stand out from the gray crowd.
Hairstyle 19. Soft fish tails.

In this version of the hairstyle, the deep side parts allow you to achieve a more delicate result, the result is a very delicate and romantic hairstyle for your little miracle. In appearance, these pigtails do not look very neat, but on the other hand, you do not have to worry about styling and spend a lot of time and effort keeping your child's hairstyle in perfect shape.
Hairstyle 20. Weaving braids for a girl, step by step photo
 Photo: Braids for girls for long hair step by step
 This stylish hairstyle looks very cute and unusual. At its core, it is very simple and looks very stylish and extraordinary from behind. This braid combines flamboyant style and special relaxedness. She will definitely appeal to girls who prefer to stand out from the gray mass from childhood and have a good taste.
Video: fashionable braids in 2019
In the video for beginners, you will see step by step instructions for weaving braids for girls.
At the end of this article, it should be noted that modern braiding for girls is far from just two separated ponytails with intertwining strands. Braids can include a variety of swirls, buns, ribbons, flowers, and more! Don't miss this great opportunity to test yourself a little by trying something new and giving up on the boring classic hairstyles.
Regardless of whether you are a little girl at heart or you are already the mother of a little princess, you probably often wonder how to braid your hair beautifully.
In contact with
The weaves that are chosen to be worn in kindergarten and school (and in secret, they are able to rejuvenate the face of someone who secretly considers himself eternally young) include a waterfall, a basket, a plait and a dragon, so today we will learn how to weave them ourselves. ... We will not consider such an exotic option as dreadlocks.
Let's start sequentially dealing with each type of weaving at home.
Scythe harness
This is the easiest way to braid your own hair beautifully, which we'll be looking at today. Most of all, this styling suits business or casual style.
You will need:
Weaving technique:
- We collect hair in a ponytail at the top of the head, fasten it with an elastic band.
- Divide the hair from the ponytail into two equal parts.
- We twist each of these halves tightly with a tourniquet.
- When both strands are tightly twisted, we begin to weave them together, but always in the opposite direction to the one in which you wrapped both strands.
- We fix the end of the weaving with an inconspicuous elastic band.
How to braid a plait-plait for yourself - video:
The dragon braid is somewhat different from the classic French braid. And their difference is that the strands for the dragon are stacked from below from each other.
You will need:
- straight comb;
- spray bottle with water;
- medium hold hairspray or hair gel;
- thin hair tie.
Weaving technique:
Here we will consider only the basis of the dragon braid, and below - its different variations.
- We moisturize the hair to make it more flexible.
- We comb our hair, make an even straight parting from one ear to the other.
- Divide the hair gathered near the face into three equal strands.
- Then we place the left strand under the middle one and put the right strand under them. This is the foundation of your dragon.
- We continue to weave the braid, placing the subsequent strands from below from each other.
- Having reached the end of the braid, we fix the hair with an elastic band.
- We spray the finished result with varnish or process with gel, easily passing with fingers and gel along the braid.
How to weave a dragon braid on yourself - video:
The dragon braid will look most original on medium-length hair.
Different options for dragon braids:
It is very easy to braid a dragon braid, and it is also easy to make beautiful hairstyles out of it for yourself for a romantic, everyday and business look.
Spiral braid... We start to weave from the hair on the crown.
In the form of a wreath. We start weaving from the temple, beautifully weaving all the hair around the circumference of the head.
Weave along the forehead. In this hairstyle, you can braid bangs and depict a headband of hair.
Double Whelpling Weave. We weave not one braid in the middle of the head, but two parallel ones - on both sides of the even parting, drawn from the face to the back of the head.
Openwork braids. Weave the dragon as you like, and then slightly stretch the strands and spray them with additional nail polish to fix it.
Hairstyles for the holiday can be decorated by weaving silk ribbons into them, pinning natural or artificial flowers. These simple tricks will help give your styling an elegant and sophisticated look.
Spit-waterfall
This is the next weaving in terms of complexity.
If you have curly hair - this is what you need, otherwise - in advance, curl it from the middle of the length to their ends with tongs.
- The waterfall is a kind of classic French braid, in which part of the strands remains free and beautifully falls in curls on the shoulders.
Spit-waterfall is a good option to beautifully braid a little girl for a matinee or an adult girl to go out to a restaurant. The hairstyle looks amazing when done on long hair.
- A waterfall is a romantic version of weaving that can give the image a fabulous weightlessness and airiness. Highlighting and toning the hair emphasize the texture of the braid, its smooth curves and hair structure.
If you already know how to weave a French braid, then braiding a waterfall will not be difficult. Do not forget, however, that the main feature of this styling is the flowing curls.
You will need:
- straight comb;
- medium hold varnish;
- several invisible.
Weaving technique:
You can change the waterfall slightly, such as braiding it in two rows.
Once you've got your hands on it and you're quick to get this hairstyle beautiful, you can try adding only the top or bottom strands, or experiment with their width. With this styling, you will not be able to avoid the admiration of others.
How to braid a waterfall braid for yourself - video:
Braid basket
This is the next hairstyle in terms of complexity. A couple of centuries ago, every girl could independently braid her hair in a basket, but today many braiding skills have been lost, and it’s hardly possible to quickly and beautifully braid this braid right away from habit. But if you are not too lazy to practice a couple of times, you will get amazing styling for any occasion and outfit. This hairstyle is easiest to do on long hair.
A lady with hair styled in such an intricate hairstyle is very difficult to miss. The basket can be considered the quintessence of femininity.
You can try braiding this braid several times with the hairdresser to see what methods and tricks he uses. If you have already learned the basics of weaving, of course, it will be easier to master this wisdom.
Of course, most often this hairstyle is done for little girls for kindergarten and school, because every mom is moved by looking at how touching, sweet and defenseless her daughter looks with such a hairstyle. Of course, you need to do this hairstyle on hair washed in the evening.
You will need:
- simple comb;
- comb with a long tail;
- several inconspicuous hair ties;
- fixing varnish (if the hairstyle is not for a child);
- ribbon, flowers, elegant hairpins or hairpins - optional.
Basket weaving technique No. 1:
This braiding technique is perfect for grown-out hair, the longer the curls, the more textured and voluminous your basket will turn out.
- We comb all the hair, weave a regular braid.
- We wrap the long resulting braid around the head and carefully fix it with hairpins so as not to injure the scalp.
As you can see, this is the simplest way to style your hair beautifully in a basket, it only requires long hair and the ability to weave the simplest basic braid.
Basket weaving technique # 2:
- Divide the hair with a parting from ear to ear into two equal parts.
- We collect the upper half of the hair in a ponytail at the crown, fix it tightly with an elastic band, otherwise the basket may "slide" to the side. To keep your hairstyle tight, choose a thick elastic.
- We choose the width of the strands, they should be uniform throughout the hairstyle.
- Next, you have jewelry work: take one strand from the tail and two strands from the lower half of the hair and do the classic braiding.
- Continue to weave the basket clockwise around the entire circumference of your head.
- When you get to the tip of the braid, secure it with an invisible elastic band and hide it inside the braid, securing it with hairpins.
How to braid a basket-braid for yourself - video:
Such a basket turns out to be quite voluminous due to the fact that it starts from a high tail.
Basket weaving technique No. 3:
With this weaving technique, you will not get a classic basket, but its "half" version. It will look especially original if you decorate the beginning of the braid with a beautiful hairpin or flower or weave a ribbon into the braid.
- We comb all the hair.
- At the left temple, select a wide strand of hair, which we divide into three more strands.
- We put the top of the three strands under the middle one, then put the bottom strand under them (weaving technique of the classic French braid) and continue to weave like this. The peculiarity of this basket is that we take new strands only from those hairs that are closer to the back of the head.
- We continue to braid this way until we run out of loose hair. If you did everything correctly, then at the beginning the braid will be wide, and at the end you will get its thin tail, which must be fixed with an elastic band and hidden under the beginning of the braid.
If you regularly and competently care for your hair, it is in itself your pride, whether it is styled in an intricate hairstyle or simply slung over your shoulders.
However, it was not for nothing that women's heads were decorated with different braids. The wisdom of all nations says that by braiding braids, a woman weaves happiness, health and good luck into her hair. How can you refuse such an opportunity?
In summer, circumstances oblige us not only to lie on the beach, but also to go to work, take walks and dates. If you can put on a cool, light dress on your body, then the hair is more complicated. The high air temperature forces girls to look not only for stylish, but also quick ways to remove their hair. We offer 55 options for hairstyles of different styles that you canScythe
If you think that a classic braid is too trite for a summer walk, here are some fairly simple but stylish options that will be a great alternative to the traditional hairstyle.Option 1
First, part on one side and start braiding from the opposite temple. Move diagonally, weaving strands from the crown and forehead. As a result, you will get a stylish asymmetrical and not at all hot summer hairstyle.Option 2
This is a very simple and quick technique that will help refine the classic braid a bit. First of all, tie a not too tight tail with a thin, inconspicuous elastic band. Make a gap over the elastic in your hair and thread the ponytail through it. Then, braid your hair with any technique you like. Thus, a simple everyday hairstyle is ready.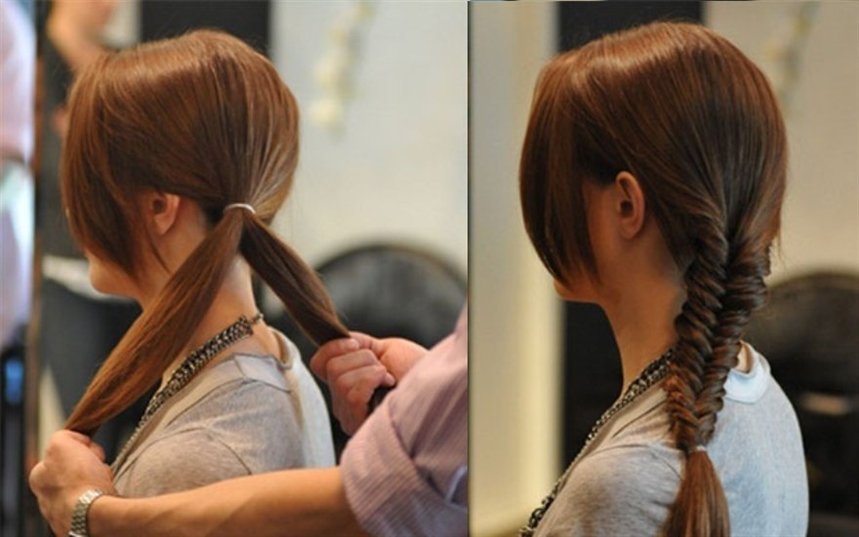
Option 3
This hairstyle looks great on long hair. First, tie a not too tight tail on the side. Make a gap over the elastic and pass all your hair through it. Relax a few strands to add volume. Just below, tie another elastic band and repeat all the steps again. The number of sections depends on
Option 4
To get such a sloppy, but stylish braid, you need to wind your hair in light waves and do a pile on the top of your head. Then braid the braid using whatever technique you are familiar with. When the braid is ready, pull it in different directions to add volume. At the end, divide the hair into two parts, tie it in a knot and secure it with an invisible hair on the inside.
Option 5
Separate one side strand at each temple (above the level of the eyebrows). Braid them. Grab a curl next to each braid and secure them at the back of the head with an elastic band or hair clip.Repeat the steps, separating the strands near the ears. Braid them, grab adjacent curls and secure at the back of your head. The rest of the hair can be left loose or braided.

Option 6
Part your hair with a side part. Separate the lock at the ear and braid with any technique. Don't braid too tight. Secure the end of the braid with a transparent elastic band. Release the strands from the braid to add volume. The final touch: spray the hair with varnish. This option will look most successful on curly hair. If you have straight curls, spend a couple of minutes curling with your curling iron.
Option 7
Part the side. Part the strand at the parting and start braiding, grabbing the hair that frames your face. Use any technique. When you reach your neck, change your braiding technique and weave the remaining hair into the main braid. When you're finished braiding, slide the elastic over the end of the braid. Release the strands, which will make the hairstyle seem more luxuriant. Finally, spray the hair with varnish.In the photo below you can see the combination of a simple braid and a fishtail. It looks very impressive.

Option 8
A quick and easy hairstyle that even a first grader can handle. Despite all the ease of weaving, the end result is styling that others will find extremely difficult.So, divide your hair into three equal sections. We braid one braid from each part, the ends of which we fix with small elastic bands. Now we take one braid and roll it up into a ball. We fasten it with hairpins at the base of the back of the head. We make balls from the remaining braids.
This hairstyle has only one drawback: the true Rapunzel will have to tinker, braiding their curls. But the owners of medium length hair will cope with braiding in a matter of minutes.

Option 9
An inverted braid seems extraordinarily difficult, but in reality everything is very simple. The braiding technique is surprisingly simple and with its help you will create a unique hairstyle in a couple of minutes.First level: separate one strand above the forehead and make a ponytail. To prevent the ends of your hair from interfering with your work, wrap the ponytail at the top of your head and secure it with a clip.
Second level: grabbing the side curls, we make a second tail. At the same time, we retreat a little from the first tail. Now we remove the clip. We divide the first tail into two halves, between which we draw the second tail. We put the tip of the second tail up and fasten it with a clip. We leave the ends of the first tail at the bottom.
Third level: grab a strand a little lower, connect it to the free ends (from the first tail). We make the third tail. Remove the clip, divide the ends of the second tail into two halves and pass the third tail between them. We fasten the third tail with a clip on the back of the head. We leave the ends of the second tail at the bottom.
We repeat the steps as needed. When finished braiding, secure the end with an elastic band. The final touch: gently release the strands, starting with the very first. The higher the strand, the more volume we give it. It is not necessary to braid your hair all the way - the hairstyle will look gorgeous even with three levels.

If you are looking for a simple but original summer hairstyle, an unusual ponytail will be a great option, both for everyday life and for an evening walk.
Option 1
To do this hairstyle, first twist the hair at the ends a little. Tie the tail with a thin elastic band. Make a gap in your hair and thread the ponytail through it. If necessary, curl your hair a little more or use your fingers to separate curls to add volume.
Option 2
For this hairstyle, the hair should be straight, so use a flat iron if necessary. Then, divide your hair into two layers: top and bottom. Gather the top layer of hair with a thin elastic band at the back of the head on either side of the head. From the bottom layer, weave a braid on the opposite side. The thickness of the braid depends on your personal wishes. Ponytail the elastic around the tail and secure the end with a small hairpin.
Option 3
To create a more elegant ponytail, you will need hair foam or wax. Part it evenly (center or side, whichever suits you best) and gather your hair on one side. Apply foam to them and divide into two equal strands. And then just tie a knot twice in a row. Secure with a thin invisible elastic band directly under the knot, and twist the ends of the hair a little or make a light bouffant.
Option 4
To make such a stylish ponytail, which is perfect for any kind of summer events, you will need a curling iron or iron, hairspray, invisibility and a little time. First, curl your hair at the ends. Then divide them into 4 parts: at the back of the head, at the crown and on both sides at the temple, and tie them with elastic bands so that they do not mix with each other. Take the hair from the crown and comb it a little from the inside, and then twist it with a flagella and secure it with invisible ones. Repeat with the hair at the temples. When the hairstyle is ready, sprinkle it with varnish, for reliability.
Option 5
Very romantic summer hairstyle. To do it, part your hair in two along the parting line. Braid on both sides of the braids, which converge from the temples at the back of the head. Tie them together with a thin elastic band. Then separate a thin strand from the tail and braid. Wrap an elastic band with it and secure with an invisible inner side. Comb the tail a little with a comb or curl it with a curling iron.
Option 6
The ponytail is one of the most popular and versatile hairstyle trends in the world. This option is very fast and original. First, curl your hair at the ends and then part it in two. From the hair at the top of your head, start to weave a loose braid, weaving all the strands into it along the forehead line to reveal your face. The braid should end at the back of your head, and then lift up the rest of your hair and pull it together with a thin elastic band. To hide the elastic, you can wrap a strand of hair around it and secure it with an invisible inner side.
Option 7
Another easy and quick way to make an elegant ponytail. Curl the ends of the hair to create light waves. Then divide them in two. Comb the hair on the crown a little and tie it high with a thin elastic band. Gather the rest of the hair a little lower and also tie with an elastic band. To create more volume at the top of your hair, loosen up a few strands at the crown.
Option 8
This is a great way to transform a regular ponytail into an original hairstyle in a few minutes. Tie all of your hair into a ponytail at the back of your head. Separate a small strand and wrap around the elastic to hide it, and secure with an invisible inner side. Then tie another elastic band just below. Make a gap in the resulting sections and run your hair through it. Tie another elastic band just below and repeat the procedure. The number of sections directly depends on the length of your hair. To make the tips look natural, twist them a little with a curling iron or iron.
Option 9
Divide your hair into 3 sections (center and 2 side sections). Secure each section with a rubber band if you are doing your own hair. This will prevent your hair from tangling. Roll the center strand into a rope and wrap it around the side ponytail on the right. Separate one curl from the left strand. Roll it into a tourniquet and wrap the right tail. We also wrap the remains of the left strand into a bundle and wrap the tail around it. We fix the hair with an elastic band.This hairstyle has several advantages. Firstly, we do not need to observe clear symmetry (uneven strands give a chaotic gloss). Secondly, the absence of parting allows you to mask some defects: unpainted roots, dandruff, or too thin hair.

Hair band made of ... hair
This is the easiest and most original way to replace a regular headband and remove hair from your face on a hot day.Option 1
First, part your hair in two. Gather the hair at the back of the head with an elastic band so that it does not interfere, and proceed to the strands at the front of the face. Part on either side and start braiding, weaving strands into it along the forehead. When the “headband” is ready, let go of the hair at the back of the head and enjoy the original hairstyle.Option 2
Part a small section of hair at the neck and braid it into a thin braid. Wrap it around your head and secure it with an invisible one on the opposite side. This hairstyle looks great on curly hair.
Option 3
Part it evenly and separate two strands from both sides of the head. Weave them into pigtails, not too tight, and tie at the ends with invisible elastic bands. Connect them together at the back of the head and fasten them with invisible ones.
Option 4
Having separated the strand in the area of the bangs, we make a bouffant. Separate one curl near the ear on the right and form a flagellum, twisting the hair away from us. Secure the end with a transparent rubber band. Take the invisibility and fasten the tourniquet at the back of the head, closer to the left side.We repeat the actions on the opposite side: we separate the strand at the ear; we form a flagellum; we fix the tip with an elastic band. We put the second flagellum under the first one and fasten it invisibly.

Hairstyle in 30 seconds
If you are running out of time and you are in a hurry to an event where you need to be smart, these options are for you!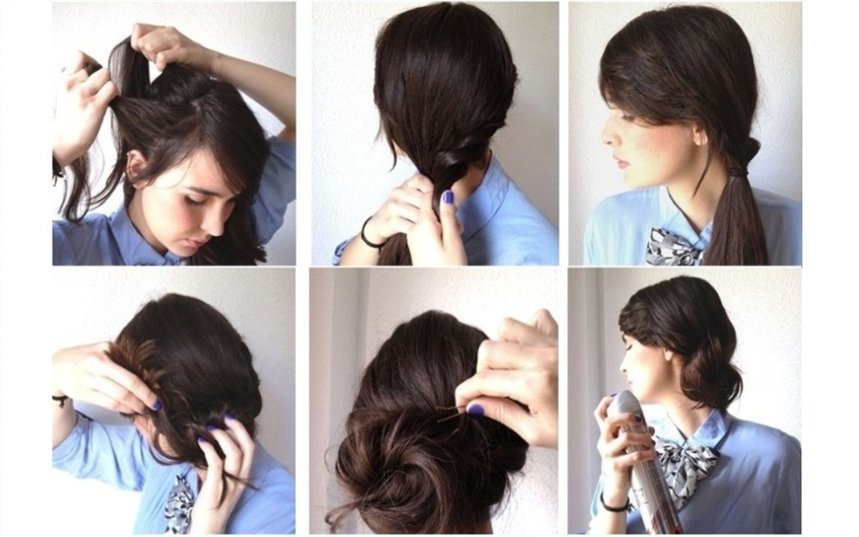
Option 4
Divide your hair into three sections. The average should be larger than the rest. Weave a volumetric braid out of it and roll it into a knot using bobby pins or hairpins. Roll the strand that is on the left into a bundle and run around the knot counterclockwise (bottom). Wrap the strand that remains on the right around the hair in a clockwise direction (through the top). Secure with invisibility or sprinkle with varnish.
Option 5
To do this hairstyle, you need hairspray, invisibility and a little time to practice. First, fluff your hair with your hands to get good volume, and coat generously with varnish. Then, gather your hair together and wrap it inward to form a shell. Secure your hair with invisibility. You can leave a few loose strands to add some subtle casual hairstyle.
Option 6
This is a very easy way to make a nape knot. First, tie the ponytail and divide it into two equal strands. Twist each strand clockwise with a tourniquet. Then start weaving the strands together (counterclockwise). Tie the tourniquet at the end with an elastic band and fold it into a knot at the back of the head, securing it with hairpins.
Option 7
Tie the ponytail at the back of your head, not too high. Make a gap above the elastic and pull your hair into it. Then, gently roll up the tail with a shell and secure with a hair clip or other accessory.
Option 8
To make a hair bow, you need a thin elastic band, invisible ones and 1 minute of time. First, tie a knot high on the crown of your head and divide it in two. Skip the tip of the tail in the middle and secure with an invisible back. This hairstyle is also called "Lady Gaga style bow".
Option 9
This hairstyle will take longer than the previous ones. You will need a foam donut and hairpins. Tie a high ponytail, put a "donut" on it and hide the hair under it one strand at a time, securing it with hairpins for reliability. At the end, the hairstyle can be decorated with a bow or other accessories.
Option 10
Curly "donuts" look much more interesting than ordinary round pieces if you like bunches of ballerinas. These "donuts" can be bought in specialized stores or ordered online. The technique of execution does not differ at all from the classical options. Hair must be plugged behind the "donut".
Option 11
Pull your hair into a ponytail high at the crown. Divide the tail into two halves, wrapping each with a flagellum. Now fold the harness around the elastic. We twist them tightly and in opposite directions (left - to the right, right - to the left). Secure the hairstyle with invisible hair and fix with varnish.
Option 12
Part your hair in half. Take the first strand, separate the curl at the forehead. We twist the curl away from ourselves, starting at the forehead and ending behind the ear. We tie the first ponytail low at the back of the head. We do the same with the second half of the hair. And now it remains to twist the bagels. Ready!
Perhaps the easiest way to escape the heat in summer and at the same time create a sophisticated hairstyle is a Greek headband.
Option 1
Slip the Greek headband over the crown of your head and thread small strands of hair under the elastic. You will have a perfect hairstyle in just a few minutes.
Option 2
This is a more complex example of how you can use the Greek rim. You will need two headbands for this hairstyle. Slip one under your hair, and then back the back of your head. The second - put it on the crown and wrap the strands under it. Voila!
"Malvinka"
One of the fastest and cutest hairstyles we know from an early age, thanks to Malvina, a girl with blue hair. The main difference between this hairstyle: the hair is loose, the upper strands are pinned high at the back of the head.Option 1
A great way to diversify your look if your hair is barely touching your shoulders.Separate the strand over the bangs and floss. We put a roller under the lock and fix it. Velcro curlers can be used as a roller. They stick better to the hair. We grab the side curls and (together with the combed strand) we fix them on the back of the head with an elastic band. Using any thin object, stretch the hair a little from above, giving it volume. A Chinese stick or an ordinary hairpin will do. It is better to pull the strands with your fingers on long hair, but not on short.

Option 2
Separate one strand at each temple (above the ear) and secure them to the back of the head with an elastic band. Under the first strand, we grab a curl, draw it over the tail and start it behind the first strand. We repeat from the opposite side: we grab a curl, hold it over the tail and start it under the lock. We connect the ends of all four curls with an elastic band. It turns out a pretty heart.
Option 3
Using a hair straightener, curl the ends on a few side strands. Separate one strand at the top of the head and comb it into a bouffant. To keep the strand in place, spray it with hairspray. Having styled the combed strand, pin the hair with a barrette, making a "malvinka". Ready!A great option for a romantic date, going to the theater and even for a wedding.

Option 4
Grab a wide strand (from forehead to ear) at each temple. Secure the strands at the back of the head with an elastic band, masking it with a thin curl. Randomly, in no particular order, braid a pair of fine braids. For more bloopers, you can curl the ends of your hair a little.
Option 5
Separate a strand at each temple and make two flagella (turning the strands away from you). Connect the flagella at the back of the head by tying them with an elastic band. From the loose ends of the plait, braid using your favorite technique. For example, ala "fish tail".
Emphasis on accessories
With the help of ribbons and scarves, you can turn even the most ordinary ponytail into a work of art. Someone might think that hair with a scarf resembles a collective farm style. And he will be wrong! It is fashionable and beautiful - even Hollywood stars flaunt in branded scarves skillfully tied to their hair. In summer, a scarf will protect you from the scorching rays of the sun. It also has other advantages: with the help of a well-laid scarf, you can hide hair imperfections, regrown roots, gray hair or a rare parting.Option 1
Loose and comb your hair. Tie a knot around the middle of the scarf. It can be a regular or decorative knot, according to your taste. Place the scarf over your forehead (so that the knot is slightly sideways). Tie a double knot at the back of your head and hide the ends of the scarf behind the base of the fabric.
Option 2
Love trendy pin-up looks? Then you will like this option.Divide your hair into two sections: back (crown and nape) and front (forehead). Pull your hair back into a bun You can pre-braid it in a braid to give your hair a hold. Twist the hair in front into a tourniquet, put it in a bagel and secure with invisible ones. A final touch: tie a cute scarf or shawl over your head.

Option 3
Another great version of the image of "pin-up girls". Create long bangs by separating a section over the center of your forehead. Collect the rest of the hair in one or more tails (the ends of which are curled with a curling iron). The most important stage is the formation of the bangs. It is the large bangs that are one of the distinctive features of this style. We wind the front strand on the curling iron. Give it the desired shape and spray with varnish. Behind the bangs we tie a small polka-dot handkerchief with a bow.
Option 4
The popularity of The Great Gatsby rekindled interest in 1920s American culture. And, of course, this interest has not bypassed the world of fashion. Ladies of that era, going to a party, preferred short hair, and long curls were removed under a flashy headband. However, the headband was also worn on short hair. In addition, the hair was often curled. If you love visiting Mafia clubs or jazz bars, then retro styling will come in handy. Let's take a look at one of the ways to create this hairstyle.Comb your hair to the side and wear a glamorous headband. We pass the hair through the bezel - strand by strand. Voila! We advise owners of short hair to smooth the curls with gel and (where can we do without it?) Put on a headband!

Among these hairstyles, you are guaranteed to pick up several for yourself
It is customary to wear long luxurious hair loose only on holidays and especially solemn occasions. And on weekdays, they can be laid and braided in a variety of braids, which have always been in fashion and currently do not want to give up their crown positions. In the hands of a professional master, long hair is transformed into a true work of art. But even on ordinary days, you can create especially original hairstyles using simple weaves.
Face shape and choice of styling options for braids
People's faces have a wide variety of shapes, so experts divide them into 5 main categories. This classification helps make-up artists, stylists and professional hairdressers find the most appropriate looks for each face type.
From the point of view of classical beauty, the oval face shape is considered the most correct, and therefore all types of hairstyles or styling are selected so as to try to visually bring the face shape closer to the oval, while hiding the shortcomings of women and girls.
Experienced stylists, taking into account the various shapes of the face, suggest choosing the following options for weaving hairstyles:
The most daring experiments with braiding are allowed with an oval face. A variety of variations and models of braids will look great on thick curls.
- For girls with a round face, it is most rational to use weaving starting above the crown of the head. This will give the face more expressiveness, visually lengthening it. The braid is braided over the entire length of the hair, only a small ponytail or knot is left at the bottom.

- The most smooth lines are used to visually smooth out the angular shape of a square face. First, a braid is braided over the entire head, the traditionally braided tip of the braid remains on the side or behind. Braids braided with the indicated options visually eliminate excessive angularity of the face, smoothly bending around its contours.
- Girls with a triangular face should use techniques that visually increase its volume below. Stylists recommend letting go of long bangs, then you can start braiding from the back of the head in the classical way or to one side.
Girls with a rectangular face should visually shorten its shape, while smoothing out the angularity of the face. It is advisable not to use long, traditionally straight braids here. Such voluminous weaves as a voluminous spikelet braided over the entire head or a French braid will look wonderful. The face is visually shortened due to the elongated bangs. Choosing a hairstyle in this case will be much easier.
Daily Braids Hairstyles - Basic Weaves
Mastering different weaving options will help to really diversify jewelry from long braids - this will allow you to create original and elegant hairstyles for every day.

In certain cases - a spikelet, an openwork weaving, a French braid - to create an unusual hairstyle, a rather only element is a braid. Sometimes, with the help of braids, as an additional element, you can create very interesting styling:
- The classic option is to divide the hair into 3 parts that are uniform in volume. Then the right strand of hair is moved to the center, between the middle and left strands. Thus, the right strand becomes the center. The left strand of hair is moved between the right and middle, this process is repeated until a certain length, then a small ponytail is left at the end. You can decorate a classic braid with an elegant elastic band or a bow.

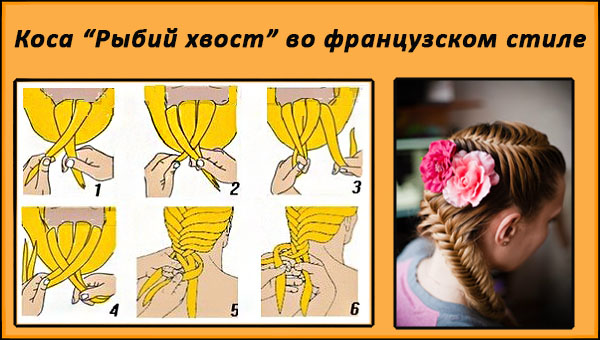
- Fishtail - unlike the classic version, only 2 strands are used here. The pigtail comes out voluminous due to thin strands. The thinner the strands are taken, the more gorgeous the hairstyle looks!
The hair is collected in a low bun and divided in half. A thin strand is separated from the right side from the inside and moves to the left. Thin strands of uniform volume are always laid on top of the main strand. The strand on the left, respectively, moves with another thin strand to the right.

Weaving continues with alternating shifting from different halves of thin strands, while the two main strands always remain in the hands. A free tail remains at the end, secured with an elegant elastic band or ribbon.
- French braid - this model differs from the traditional version in that the hair begins to braid, starting from the very top of the head.
Divide the hair into three equal parts, move the right strand to the center, adding to it a thin strand of loose hair on the right. The same action is performed with the left strand - it is thrown over the middle strand, a new thin strand on the left is added to it. French braiding is repeated over the entire length of the hair and ends with a classic braid or ponytail.
The French weave option allows you to create the most fantastic hairstyles. Tightly pulled small strands create a thin, neat braid. In the coming season, slight negligence is relevant, so fashionistas should take this moment into account.
If bulky strands are added during braiding, then the braids turn out to be quite thick, creating the effect of thick chic hair.
- Air braids are one of the options for French weaving. The result of this weaving is a visually airy and weightless structure on the head of a fashionista.
Creating an openwork-airy model, you should take 3 small strands on the back of the head, intertwining them with classic weaving twice. Then take a strand of the same size from the right temple, move it to the lateral extreme part. The same is repeated on the left side - on the left side, a new strand is attached from the left temple. Weaving continues to the end, with the constant addition of additional strands from the temples. Air-laced styling is fixed with a beautiful elastic band.
- Rope - This option helps you create trendy and stylish hairstyles pretty quickly. Styling "Rope" looks advantageous, neatly and firmly holding long hair throughout the day. The styling of this weave is simple and accessible to any girl.

They make a tail high on the top of the head, divide it in half into two parts. Each of the 2 strands is twisted clockwise to end up with a twisted rope-like weaving. Each tip is secured with small rubber bands.
Then they begin to twist both pigtails together, already counterclockwise. An important condition for this type of weaving is a rather strong tension on the strand and tight twisting of the "ropes".
Separately protruding hairs are additionally treated with gel and smoothed. This styling retains its attractive appearance for a long time. The hairstyle is secured with an elastic band.
- Double back braid - weaving such a voluminous original braid is somewhat more difficult than conventional styling.
To obtain this unusually beautiful option, you should divide all the hair into 2 equal parts, mentally numbering them. Each of the two parts is gradually divided into three more. The braid is not woven in the classic version, but on the contrary - downward.
Each of the woven "reverse" braids is fixed with thin multi-colored elastic bands, to give additional volume, the braids are carefully pulled out and fastened at the bottom with an elegant ribbon or elastic band.
To give yourself a flawless appearance, you should master the basics of weaving simple braids, which make up any of the most original hairstyles. With a little imagination and invention, you can freely create great styling, creating a wonderful mood for the whole day!
Braiding patterns with ribbons:


Detailed master classes for weaving braids
We offer you 20 options for fashionable, but at the same time simple hairstyles with weaving elements.


The braid was considered the best adornment of women at all times. Our great-grandmothers also walked with her, and modern girls are increasingly resorting to this particular styling option. But if it's not so difficult to make a beautiful pigtail on someone else's head, then problems often arise with your own head. Learn how to braid your own braids and become the ultimate hairdressing pro.
Preparing for braiding yourself
In order for the process of weaving braids on your head to be successful and fast, stock up on the following set of tools and tools:
- Large mirror;
- Hair spray;
- Several types of combs;
- Invisible pins, hairpins, elastic bands and hairpins;
- Medium to strong hold hairspray.
How to braid a plait for yourself?
A tourniquet is one of the most basic braids you can think of. You will braid it very quickly and easily.
- We comb the hair and collect it in a tight and high tail.
- We divide it into two equal strands. We twist each of them into a tourniquet clockwise or counterclockwise. The main thing is that the direction is the same.
- We intertwine both bundles - we get a spiral.
- We fix it with a thin elastic band.
More details can be found here:
Learning to weave a French braid
Weaving itself cannot do without a French braid - very stylish and beautiful. Weaving a "spikelet" on your hair is quite difficult, but you will be able to learn this even with our master class.
- Comb the strands back.
- In the crown zone, select one strand and divide it into three equal parts.
- We begin to weave a regular three-strand braid, gradually adding thin strands on both sides.
- We reach the base of the neck and weave the braid into three strands. If desired, you can immediately tie it with an elastic band, leaving the hair to develop.

Step 5. Sprinkle the "spikelet" with varnish.
How to braid yourself a one-sided headband?
The one-sided French braid in the form of a rim looks very cute and romantic. With a certain skill, you will learn to weave it very quickly.
Step 1. Comb the hair and divide it into two parts with a horizontal parting. The working part should be thinner.
Step 2. At the very ear, we separate three thin strands and begin to form a three-strand braid from them.
Step 3. Literally after a few turns, add thin strands from the side of the forehead. You cannot take hair from the crown!
Step 4. We continue weaving, moving from one ear to the other.
Step 5. We finish the tip in the usual way.
Step 6. We connect the braid with the rest of the head of hair and tie the hair into a ponytail. If desired, you can twist it into a bunch.
Mix of braids on your own strands
How to braid a pigtail for yourself, and even more than one? Everything is very simple!
2. On one side, we begin to weave a French braid, picking up additional strands on both sides. We reach a little below ear level and intercept the braid with an elastic band.
3. Wrap the other side in a tourniquet, twisting the strands up.

4. Connect both parts and braid them into a fishtail.

5. Gently stretch the weaving with our hands and fix the styling with varnish.
"Fishtail" to herself
Each of you will be able to cope with this task. We will gladly tell you how to weave a pigtail,.
- Comb the hair with a comb and divide it into two equal parts.
- For convenience, we tie the hair at the base with a thin elastic band.
- Select a thin strand on the left side and drag it to the right.
- Now select a strand of the same thickness, but on the right. We move it to the left. Watch carefully in the mirror for the thickness of the strands, the beauty and neatness of the braids depends on it.
- We continue weaving to the desired length. We tie a braid with an elastic band.
- We remove the auxiliary rubber band, it has fulfilled its role.
- We fix the "fish tail" with varnish.

Double-sided bezel to herself
Another very comfortable and romantic weaving option.
- We comb the hair and divide it into two parts with a horizontal parting.
- At the very ear, we separate three strands and begin to form a three-strand braid from them.
- Gradually add thin strands on both sides.
- We reach the ear and continue the classic three-piece weaving.
- We hide the tip of the braid under the hair and fix it with invisibility. Gently stretch the upper strands, forming a wreath.

Video selection of 3 interesting options:
How to weave yourself a reverse French braid?
On the contrary, the French braid visually reduces the density of the strands, so it is better not to do it on thin and thin hair.
- Comb the hair and separate a small section at the very face. We divide it into three identical strands.
- We hide the right strand under the central one.
- Now we skip the left strand under the right. It becomes central.
- Put the left strand under the central strand and add a small part of the hair on the left to it.
- Put the right part under the central part and add a small part of the hair on the right to it.
- We continue weaving to the base of the neck. The next step: we finish the process by weaving a regular braid. But the side strands must be passed not above, but under the central one.

7. Fasten the tip with an elastic band and gently stretch the strands with your hands.

Combining a simple braid with a French one
To braid yourself the most beautiful braid, it is enough to combine two simple weaves in one hairstyle.
1. Comb the hair on the side parting.
2. Separate the strand from the face itself. The bangs can be hidden or left. Divide this strand into three equal parts and weave a one-sided French braid.

3. We bring it to ear level and finish weaving with a regular three-strand pigtail.