How to make a bodily one. What paints can you get flesh from? Getting skin color by mixing paints
Novice portrait painters may find it difficult to create human faces with realistic skin tones when working. If you make it too pale, the portrait will look unnatural, despite the blush superimposed on top.
Experienced artists know how to achieve flesh color by mixing paints, so they can experiment endlessly with images.
General rules for obtaining flesh color
To make your skin tone close to natural, you have to try. The basis for its creation is white paint (whitewash), which must be mixed with other shades. You can work with a wide variety of paints: gouache, watercolors, acrylic colors, even pencils, although professionals prefer to use oil on canvas.
There are four main human color types, which are conditionally subdivided according to the seasons. They depend on the shade of the skin, eyes, hair. Winter color type is lighter than summer color type, spring color type is brighter than autumn color type. But even for people with a winter color type, the skin is not pure white: it still has a delicate milky beige tone. Therefore, you can make a flesh color only by giving it a natural "leather" shade, for which the following may appear in a mixture of paints:
- umber;
- sienna;
- ocher;
- red cadmium;
- yellow cadmium and others.
Nuances to consider
Unfortunately, there are no exact proportions for creating flesh paint. Each artist sees this shade differently, moreover, the complexion of men and women of the same ethnicity usually differs. Ladies boast fair, silky skin; the stronger sex has a rougher, darker skin. The shade of the arms and legs is always darker than the tone of the face, and when a shadow falls (for example, from a hat), it must be made even richer.
Here are other tips experienced artists give to newbies:
- If the color seems too dark, do not rush to inject white into it. This can lead to unevenness in tone, hiding the effect of a three-dimensional image. It is better to take a brush, wet it, then use strokes to achieve the desired color directly on the portrait.
- In advance, you must definitely try the shade that turned out when mixing, on a piece of paper, canvas, and wait until the paint is completely dry. Testing will help avoid problems during the main work.
- Pink tones tend to appear rather dark on a palette, although they look more natural on paper. If we are talking about watercolors, after drying, the pinkish tint will become about 1/3 lighter.
- Human skin in an art image should consist of several layers, and not be done in a single application of paint. Some shades are used for shadows, others for midtones, and others for lightened areas. The gradual overlay of tones will save the drawing from possible imperfections.
- Make the first base layer semi-transparent, while adding more white tone in the eye area. This will further help create a greater contrast between the skin and the eyes, because the shade of the latter should also not be pure white.
Best color combinations
If the drawing is done on paper, its white color will serve not only as a background, but also as a substitute for whitewash. The paper will show through the strokes and give the paint the desired tone. You can get skin color in this way:
- slightly smear the tip of the brush on the red paint;
- dissolve the paint in a drop of water;
- add a little yellow color to a weak pink solution;
- start painting a portrait on white paper.
Also, artists often use the following "recipe" to create a flesh tone: combine 6 parts of yellow paint with 1 part of red, mix well, getting orange. Introduce ½ part of the blue color scheme. The result of mixing is a brownish paint, which is diluted with white in the required proportion. The amount of white depends on the need: for a dark skin tone, they need less, for a light one - more.
Examples of perfect complexion portraits
Many classic artists, portrait painters of our time perfectly created a natural complexion, body in their paintings. An example of the successful use of flesh color can be called the works of Rokotov, Levitsky, Bryullov. The youth, freshness of the girl's skin is ideally expressed in Borovikovsky's painting "Portrait of Maria Lopukhina". Artists of our day, who make their masterpieces or reproductions, also know how to obtain flesh color by combining basic shades.
Getting skin color by mixing paints
To achieve a flesh color, it is important to choose the right paint and create the correct proportions. Otherwise, the finished tone will be far from perfect.
Flesh color in watercolor painting
Finding the right tones when working with watercolors is often a daunting task for beginners. Nevertheless, the principle will be the same: you just need to mix suitable paints together. Unlike oil colors, where whitewash is used for highlighting, in watercolor, a white sheet of paper or ordinary water, with which the paints are diluted, will play their role. Thus, making flesh in watercolor almost never involves using white paint.
First you need to prepare tools and supplies. The latter include the watercolors themselves, paper (cardboard), water. You will also need brushes, a white palette, which can be replaced with a plastic plate, a lid, or even the paper itself, so that it does not absorb moisture too quickly. It is best to purchase special watercolor paper with a special coating for painting.
The procedure for creating skin color is as follows:
- apply a tiny amount of red to the palette;
- introduce ocher (if it is absent, combine the usual yellow and a little brown);
- for a dark skin tone in the picture, add a slightly brown tone to the mixture of paints, for a light one, leave everything as it was;
- dilute the watercolor with water, but not too pale, because when it dries it will greatly lose its brightness.
The finished tone can be applied to areas depicting human skin, with their help, the base background is set. If the color came out darker or lighter than necessary, this is not a big deal, the situation is easy to fix. Cold shades should not be introduced into flesh color, because even the lightest human skin creates a feeling of warmth. Further, professionals use the techniques of overlaying shadows, accents, highlighted areas, for which they use a wide variety of colors (usually in a strong dilution):
- blue;
- green;
- Gray;
- Brown.
How to make skin color with gouache
Everyone can work with gouache. By mixing tones, you can create any background, even flesh, you need a basic set of colors.
Light skin tone
For the first time, it seems difficult to prepare such a color, because it should look natural, not too pale. Experts advise to combine such paints in equal parts:
- blue;
- yellow;
- red.
You can add a drop of each color to the palette, to a jar, any work surface will do, even durable cardboard. After obtaining a dark mass, you need to begin to lighten it a little by adding white gouache. It is recommended to place a photo within sight, a drawing from which the portrait will be painted, in order to make the color as close as possible to it.
If the tone turns out to be dark, you can drip more yellow paint into it, and then continue to add white. Yellow will add warmth to the color scheme, white - coldness. If the tone turns out to be unnatural, it is allowed to pour a little pink into it, but do not overdo it - otherwise, there will be a feeling of too "ruddy" skin. You can prepare several options, then choose the most suitable one for the picture.
Medium skin tone
This color is the most popular among artists, but it is somewhat more difficult to create. A large number of paint tones will be required:
- blue;
- White;
- yellow;
- Red;
- natural sienna;
- burnt umber.
Initially, they act in a standard way: they apply a drop of each paint on a white palette, except for white. Usually the first thing to do is combine equal parts of yellow and red to make orange. Then a drop of blue is injected, and then the same amount of other colors. As a result, the background should slightly resemble beige-olive, be dark, concentrated. After that, it is diluted with white until the desired tone is obtained, which is compared with the original or brought to close to the idea.
Dark skin tone
To paint the darkest, darkest flesh color, experiments begin with natural sienna and burnt umber. These paints, belonging to the brown range, are combined in equal parts, mixing thoroughly. Separately combine the red and yellow paints to make the orange color.
Then they begin to gradually connect the two masses with each other, comparing the shade with the original and bringing it closer to it. For greater saturation, add a little purple paint. The ideal option is to pre-mix black, purple and dark gray tones, and add this color to the original mixture. It is only important not to abuse black or completely replace it with gray.
The finished base is diluted with whitewash, but to create a dark flesh tone with white paint, much less is required than in previous cases. For a natural look, you can add a little orange (optional) to the finished material. To draw shadows on such a flesh background, it is worth using gray shades of gouache.
How to get skin color from plasticine
It is not easy to find natural flesh-colored plasticine in a store, it is usually not present in standard sets. You can make it yourself, the main thing is to be patient. You need to take plasticine in such quantities:
- white - a whole piece;
- dark pink - no more than 1/10 of a piece;
- yellow - about 5% of the total.
After that you need to mix all the pieces into a homogeneous mass. It will take a long time to do this, otherwise veins will remain in the plasticine. To darken the color, you can enter a little brown, blue, but only in a minimal amount. It is better not to add too bright colors, because if you get an unnatural shade, you will have to start over.
The finished mass is "diluted" with white plasticine, once again mixing the material well. It can be used in creativity and even in animation - plasticine will look natural and will allow you to create the most original characters.
There are several ways to achieve flesh tones by mixing watercolors. Unfortunately, when I first started painting portraits, I was not aware of these possibilities. I thought I knew exactly how to achieve flesh tone with just Jaune Brilliant # 1 and # 2, but I was always dissatisfied with the results. Burnt Umber, which I used to create dark and deep shades and added white paint to it, made the final look dull and lifeless. I was at a dead end, and did not know why.
It took a long time to realize my mistake and realize that white will never be the decisive color when mixing flesh shades. In fact, over the years, I've learned a few ways to bring portraits to life - none of which used Jaune Brilliant, Burnt Umber, or the white paint I've loved so much over the years.
If you want to achieve a Caucasian skin tone:
- Cadmium Red
- Yellow Ocher
- Cerulean Blue
The flesh tones are much more complex than the rosé tones I thought could be extracted from Jaune Brilliant. In fact, the creation of nude tones is based on a combination of red and yellow pigments. By mixing Cadmium Red and Permanent Rose together, you can get a gorgeous flesh tone that can be used to depict highlights and deeper shadows with the addition of Yellow Ocher. If you find that the resulting shades are too warm for your taste, then you can always add a drop of Cerulean Blue to make it a little colder.
As an alternative...
- Cadmium Red Light
- Cadmium Yellow Medium
- Dioxazine mauve (Dioxazine Mauve)
Blending Cadmium Red Light and Cadmium Yellow Medium also helps create a graceful base shade. For shades, add Dioxazine Mauve.
If you want to depict skin in dark shades:
The last palette mainly used the colors of the orange-violet spectrum, and it also led to some truly great results, in my opinion, the first palette that mixes Cadmium Red and Permanent Rose is much more versatile. ... Moreover, it is she who can be easily turned into dark shades.
- Cadmium Red
- Permanent Rose
- Burnt Sienna
- Raw Umber
Instead of Yellow Ocher or Ceruleum Blue, use Burnt Sienna for darker skin tones. If dark pigment is needed, add Raw Umber until you are happy with the final result.
Advice:
- There is no place for white when it comes to drawing a portrait! If you think the color is too dark, then you can be tempted to add a little white to lighten the tone. It is the addition of white that results in an uneven color and the portrait looks flat. It is much better to add a little water until the paper has the desired shade. If you have already scribbled paint onto the brush and suddenly feel that the tone is too dark, use water, a brush and a cloth towel to gently remove the paint from the sheet.
- Use a sheet of test paper to avoid unwanted color. Cadmium Pink mixed with Permanent Pink looks quite dark on the palette, but it looks quite natural on paper. That said, it’s not hard to forget that watercolors become lighter as they dry. It is for this reason that it is very helpful to have a sheet of test paper handy. Make sure the test paper is exactly the same quality as the one you are painting on, as the quality of the paper plays a major role in the final color.
- Work on the painting in layers. Skin is made up of many colors, not one color for shadows, another for creating midtones, and one for lighter areas. The power of watercolor lies in its ability to create layers that are nearly transparent, making it possible to create layers of deeper hue. The gradual overlay of colors will also save you from spoiling the entire drawing, for which you spent about two hours putting a thick layer on the paper, which you can regret later.
- Don't forget to add white when painting the eyes. When you start painting the first semi-transparent base layer of the portrait, don't be afraid to apply white in the eye area. There is no such thing as a pure white eye - in fact, it only seems so in photographs. It is possible to increase the contrast between the eyes and the skin when midtones and details are later added.
- Be aware of your surroundings. If you paint an image of someone near a red wall, chances are that the skin will be redder than that wall. Why? The light that illuminates the subject is likely to bounce off the red wall, absorbing the color. Try it yourself; find a piece of colored paper or a piece of plastic and stand in front of a mirror in direct sunlight. The closer a colored object is, the more its pigment is reflected on your skin.
The selection of the right shade in watercolor often seems quite difficult, but it is not, and just like in other types of painting (for example, in oil), it is created by mixing different colors. This also applies to how to get skin color from watercolors. In this article we will try to figure it out.
First, let's mention an important feature of watercolors. Unlike oil, which uses white to lighten the color, watercolor uses paper for this purpose, which shines through the paint layer, as well as water that dilutes the paint. Therefore, in order to make a flesh color with watercolors, it is not at all necessary to use white paint.
How to get skin color in watercolor
First of all, let's prepare watercolors, water and brushes. As a palette, you can use a paint cover, cardboard or watercolor paper itself - any surface that will not immediately absorb paint.
Next, we apply red to our palette, and then ocher (or, if it is not there, mix yellow and brown). They can be mixed in equal amounts or with a predominance of ocher, depending on the skin tone.
To make the color less saturated, we dilute it a little with water (but do not make it completely pale, given the fact that when the watercolor dries it often loses its brightness). Apply the resulting shade to the skin - this way we will make a "highlight", which will shine through the upper layers and set the overall tone.
It's okay if at this stage you can't get exactly the right shade, it's much more important now to set the right tone. The tone is warm or cold; in a living person, it is usually warm, even if the skin is very pale. Therefore, in order to correctly convey the color of the skin with watercolor, it is undesirable to add cold colors at the first stage. To show the lightness of the skin, it is enough to dilute the paint with water.
Further work process (layers)
When overlaying further layers, you can use other colors: brown, blue, green, earthy and their various variations. Cool colors are often mixed with warm ones (brown, ocher, yellow) to create shadows, sometimes they can even be used neat to contrast with warm fragments. In order to more accurately paint the skin, you should carefully look at the person's face, photograph or drawing from which you write.
Skin Tone Chart
To make it easier for you to choose the desired shade, we have compiled an approximate table of color ratios. Of course, there are much more shades, but using the example of the table you can get a general idea of the patterns of color mixing. In addition to the flesh color typical for Europeans, the table also includes others that are suitable for writing the skin of representatives of Asian, African and other races.
How to make skin color watercolor
We will teach you how to properly mix watercolor for flesh color when painting the skin of the hands and face. We consider all skin tones of people of different races
Good afternoon, friends and guests of my store! I want to tell you about the interesting experience of Alisa Lucinska, which may be useful to you. As with mixing acrylic paints from seven colors, you can get 40 shades.
Russian paints were taken as a basis "Ladoga" of the Nevskaya Palitra plant.
Here are 7 basic colors with their numbers, as they are written on the tubes: medium yellow (220), red (331), blue "FC" (500), pink light (2204335), burnt umber (2204408), black (810), titanium white (2204101) ).
1. Light colors
Light tones are obtained by mixing basic colors with titanium white.
2. Dark tones
Add some black paint to the main colors:
3. Shades of green
They are obtained by mixing yellow medium paint with black or blue "FC". The asterisks “*” mark the colors that are obtained as a result of mixing - and can be used further to obtain new shades.
4. Violet and magenta shades
These shades are obtained when we mix red or light pink paint with blue "FC". Adding whitewash will give lavender or purple hues.
5. Orange shades
Here we mix the red and pink light paint with the yellow medium. The two lower colors are already more complex formulas, so it's probably easier to stock up on ocher paint in advance
6. Earthy shades
Burnt umber is present in all of these colors. The addition of whitewash makes the dark earthy tones pastel.
Since paints are mixed "by eye", it is rather difficult to indicate the proportions to obtain a particular color. All the same, in the process of painting, you will have to mix shades, listening to your own feelings "Is this color needed now or a little darker / lighter / greener / redder", etc. Therefore, if you are not yet good at mixing colors, the author recommends investing one evening in a shade mixing training according to the formulas above, as well as in your own experiments to get new colors. After that, you will definitely never confuse the swamp color with emerald (as is often the case), since you will remember the process of obtaining them from your own experience.
And to make it easier for you: print for yourself just such a blank on an A4 sheet:
On it, you will sign with a pencil all the colors used and the resulting shades.
Mixing of acrylic paints (40 shades out of 7), adaptation
Good afternoon, friends and guests of my store! I want to tell you about the interesting experience of Alisa Lucinska, which may be useful to you. As with mixing acrylic paints from seven colors, you can get 40 shades.
An artist will be able to draw a natural portrait of a person only when, from the general rules, he deduces his own unique recipe for achieving a natural complexion on canvas. The article reveals the question of how to get flesh color from paints, in what proportions to mix them.
General rules for obtaining flesh color
In order to understand how to make a flesh color and paint a portrait in oil, you should look for whitewash in the bins, which is then gradually diluted with other paints.
Science classifies the color type of a person into 4 types according to the seasons (depending on what colors of skin, eyes and hair).
On paper, healthy skin is soft, warm beige. Even people with the lightest skin cannot claim that their face is white: just compare it with a blank sheet of paper - the difference will become obvious.
In addition to white, ocher, yellow and red cadmium, possibly sienna and umber (only for the purpose of shade, apply extremely carefully) will appear in the palette. You will need to apply a small amount of white on the palette, dilute with a solvent, then add ocher with red and yellow. In the latter components, the proportion of ocher in relation to other dyes is higher.
Points to consider
There is no perfect recipe for this or that shade - the result directly depends on the look of the artist and the complexion of the sitter.
Primary aspects to consider:
- the skin of women is paler and silkier than that of men,
- body, arms and legs - darker than the shade of the face,
- on the canvas depict a reflection of a color spot that is near an object (for example, a hat glare falls on the face).
Color combinations
Flesh color in watercolor painting
With watercolors, things are easier, but sometimes it can seem that the material is more difficult to work with than with oil. An alternative to whitewash when working with watercolors is a paper background that will show through the strokes.
Color compilation procedure:
- Take a plastic palette - apply a few drops of water on it.
- Use the tip of a soft squirrel brush to paint over the red watercolor.
- As a result of mixing a small amount of red with water, a faint pink tint is obtained.
- After getting the mixture - add a little yellow.
The consistency is ready to start painting the portrait.
One of the recipes for mixing flesh
In the theoretical works of contemporary artists, there is the following combination of colors.
- Mix 6 parts of yellow paint with 1 part of red, mix until a uniform yellow-orange consistency.
- Add ½ part of blue. After manipulation, a red-brown tint will appear.
- Add white dye to the resulting mixture. The proportion is not universal - the amount is directly proportional to the desired color: dark or light.
Examples of perfect complexioned portraits in painting
Many Russian artists have found a unique balance for depicting a face in a natural manner. Their names are known in the world of painting: Bryullov, Levitsky and Rokotov, as well as many of their colleagues. The reproductions of their work clearly show the hand of the master in the image of the most complex skin tones.
For example, the work of the hand of VL Borovikovsky "Portrait of Maria Lopukhina". The artist managed to depict the youth of the girl on paper, with her radiant fresh skin. Experimental artists of our day will be able to repeat the result only by picking up a flower combination with their own hands.
Getting flesh from mixing paints
To achieve flesh tones, the correct proportions of the other paints must be observed. You will need to apply whitewash, dilute with a solvent, add ocher.

There are several ways to achieve flesh tones by mixing watercolors. Unfortunately, when I first started painting portraits, I was not aware of these possibilities. I thought I knew exactly how to achieve flesh tone with just Jaune Brilliant # 1 and # 2, but I was always dissatisfied with the results. Burnt Umber, which I used to create dark and deep shades and added white paint to it, made the final look dull and lifeless. I was at a dead end, and did not know why.
It took a long time to realize my mistake and realize that white will never be the decisive color when mixing flesh shades. In fact, over the years, I've learned a few ways to bring portraits to life - none of which used Jaune Brilliant, Burnt Umber, or the white paint I've loved so much over the years.
If you want to achieve a Caucasian skin tone:
- Cadmium Red
- Yellow Ocher
- Cerulean Blue
The flesh tones are much more complex than the rosé tones I thought could be extracted from Jaune Brilliant. In fact, the creation of nude tones is based on a combination of red and yellow pigments. By mixing Cadmium Red and Permanent Rose together, you can get a gorgeous flesh tone that can be used to depict highlights and deeper shadows with the addition of Yellow Ocher. If you find that the resulting shades are too warm for your taste, then you can always add a drop of Cerulean Blue to make it a little colder.
As an alternative.
- Cadmium Red Light
- Cadmium Yellow Medium
- Dioxazine mauve (Dioxazine Mauve)
Blending Cadmium Red Light and Cadmium Yellow Medium also helps create a graceful base shade. For shades, add Dioxazine Mauve.
If you want to depict skin in dark shades:
The last palette mainly used the colors of the orange-violet spectrum, and it also led to some truly great results, in my opinion, the first palette that mixes Cadmium Red and Permanent Rose is much more versatile. ... Moreover, it is she who can be easily turned into dark shades.
- Cadmium Red
- Permanent Rose
- Burnt Sienna
- Raw Umber
Instead of Yellow Ocher or Ceruleum Blue, use Burnt Sienna for darker skin tones. If dark pigment is needed, add Raw Umber until you are happy with the final result.
Advice:
- There is no place for white when it comes to drawing a portrait! If you think the color is too dark, then you can be tempted to add a little white to lighten the tone. It is the addition of white that results in an uneven color and the portrait looks flat. It is much better to add a little water until the paper has the desired shade. If you have already scribbled paint onto the brush and suddenly feel that the tone is too dark, use water, a brush and a cloth towel to gently remove the paint from the sheet.
- Use a sheet of test paper to avoid unwanted color. Cadmium Pink mixed with Permanent Pink looks quite dark on the palette, but it looks quite natural on paper. That said, it’s not hard to forget that watercolors become lighter as they dry. It is for this reason that it is very helpful to have a sheet of test paper handy. Make sure the test paper is exactly the same quality as the one you are painting on, as the quality of the paper plays a major role in the final color.
- Work on the painting in layers. Skin is made up of many colors, not one color for shadows, another for creating midtones, and one for lighter areas. The power of watercolor lies in its ability to create layers that are nearly transparent, making it possible to create layers of deeper hue. The gradual overlay of colors will also save you from spoiling the entire drawing, for which you spent about two hours putting a thick layer on the paper, which you can regret later.
- Don't forget to add white when painting the eyes. When you start painting the first semi-transparent base layer of the portrait, don't be afraid to apply white in the eye area. There is no such thing as a pure white eye - in fact, it only seems so in photographs. It is possible to increase the contrast between the eyes and the skin when midtones and details are later added.
- Be aware of your surroundings. If you paint an image of someone near a red wall, chances are that the skin will be redder than that wall. Why? The light that illuminates the subject is likely to bounce off the red wall, absorbing the color. Try it yourself, find a piece of colored paper or a piece of plastic, and stand in front of a mirror in direct sunlight. The closer a colored object is, the more its pigment is reflected on your skin.
How to achieve skin tones with watercolors
It took a long time to realize my mistake and realize that white will never be the decisive color when mixing flesh shades. In fact, over the years, I've learned a few ways to bring portraits to life - none of which used Jaune Brilliant, Burnt Umber, or the white paint I've loved so much over the years. If you want to achieve a Caucasian skin tone.
In order for a pictorial portrait of a person to turn out to be vivid and natural, the artist must be able to compose flesh color well. Each painter has his own secrets, but still there are general rules and patterns, knowing which, you can easily compose any shades. Let's learn this art together!
Let's say you decide to write What paints do you need to have on hand to get a person out of them? Firstly, you need to stock up on whitewash, but you will need to delicately mix other paints with them in small portions. Healthy is always a gentle warm shade, because our entire skin is permeated with the smallest network of blood vessels. For the experiment, take a sheet of white paper, attach it to the face of the palest young lady, and you will see how strikingly different even the lightest flesh color is from the lifeless white color of the paper sheet.
So, whitewash must be accompanied by paints such as ocher, red, and, perhaps, sienna or umber can still be useful. But the last colors can only be used when applying shadows and very carefully. Squeeze some whitewash onto a palette from a tube, dilute them with a solvent and add a little ocher, red and yellow to them. In this case, more ocher should be used, and the rest of the paints, of course, less.
Different shades of flesh
In painting, there are no ready-made recipes for different shades, it all depends on the intuition of the artist and, of course, on the complexion of his model. After all, if you draw a person with dark skin, then his flesh color will differ significantly from the skin color of an unburned pale person.
Then you need to know that women's skin is lighter and softer than men's. And the flesh color of the trunk, arms and legs is also darker than the skin of the face. Color may vary from area to body. In painting there is such a thing as reflexes. This is a reflection on the surface of objects of color spots that are nearby. For example, if your model has a red cap on her head, then a warm reddish glow will certainly fall on the face you want to paint. All this must be taken into account when working on a portrait.
How to achieve skin tone when painting
With watercolors, everything is much simpler, but to some this material may seem more complicated than oil. The fact is that when working with watercolors, the role of white is played by the white background of the paper itself. After all, watercolor is transparent, and it should be applied very easily so that the lower strokes shine through the upper ones.

Now let's start composing the flesh color. Take a plastic palette and put some water on it. Then take a soft squirrel brush, wet it well and lightly, with the very tip, brush it over the red watercolor paint from the box. Then stir with this brush in the palette with water, and you get a faint transparent pink color. Add a little yellow there, just don't overdo it, just a little bit is needed. And you can start painting a portrait.
Examples of portraits in which the perfect flesh color is. Photos of these paintings
In the history of Russian painting, there were many artists who painted portraits beautifully. Rokotov, Levitsky, Bryullov ... Take a reproduction of portraits of any of these painters and examine it properly. With what skill they were able to convey the most complex bodily shades!
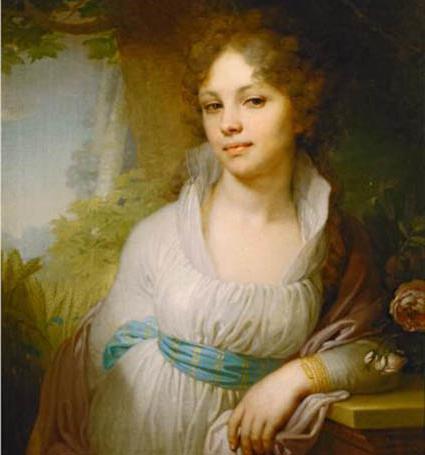
Here, for example, is the portrait of Maria Lopukhina by V.L.Borovikovsky. What a wonderful complexion this woman has and how skillfully the freshness and youthfulness of her skin is conveyed! Try to solve the artist's secret. What colors did he use to achieve this result, what do you think? It is best to sit at an easel with a palette and a paintbrush in your hands to try to unravel the secret of the great master of painting.
Every aspiring portraitist or painter should definitely learn how to create a realistic human skin tone. As you gain experience, you will develop your own, convenient for you, color mixing technique.
In general, the ability to correctly select and mix colors is a whole art, because each person has his own individual skin tone. Once you learn how to create realistic skin tones, you can experiment with surreal images and shades as well. Consider the options for how you can make the skin color.
How to make a skin color with gouache?
By mixing different shades, you can make your skin tone perfectly accurate. But first you need to determine which shade you need, since one or another combination of colors will be used to recreate them.
Create a lighter skin tone:
- Selection of colors - you will need to try mixing several colors. For a lighter skin tone, prepare the following colors:
- White;
- Blue;
- Yellow;
- Red.
- Mixing colors - it is most convenient to mix paints on a special palette. If you don't have one, any other work surface will do. For example, you can use a piece of thick cardboard. Apply a drop of each color to the palette.
- We mix all the paints in equal amounts - using a brush, mix the same amount of blue, yellow and red paint. By mixing the three primary colors, you get a dark base - this is how it should be, because then you will lighten it.
Important! Make sure to rinse the brush in a container of water before dipping it in paint with a different color.
- Compare the shades - there should be a shade in front of your eyes that you would like to copy. Compare your foundation with the shade you want to achieve. If you are sketching from a photo, then consider its lighting.
- Lightening - if you need to achieve a lighter shade, then add yellow and white paint. With the help of yellow paint, you get a warmer shade, and with white paint, a colder one.
Important! The paint should be added a little at a time and mix well before adding more.
- Add red paint. If you already have a fairly light tone, but do not yet have a realistic shade, then you can add a little red paint, but not too much, unless you are trying to get a skin tone that is sunburned.
- Correct the color - again compare the resulting color with the one you want to get. If the shade is too light, then you can add a little blue and red. But, if the shade is too different from the desired, it is better to mix it all over again.
Important! You can mix several color options, and then choose the one that best suits your painting.

Create a medium skin tone:
- Selection of paints of the desired shades. To achieve a medium skin tone, mix more colors. Prepare the following paints:
- Yellow;
- Red;
- White;
- Blue;
- Natural sienna;
- Burnt umber.
- Mixing colors - similar to the previous instructions, apply a drop of paint of each color to the palette.
- Mix yellow and red. By combining the same amount of yellow and red paint, you get an orange color.
- Add blue. Gradually add blue paint to the base. If you want a darker shade, try adding a little black paint.
- Compare shades. You should have the skin tone you want to copy in front of you. Compare your foundation with the shade you want.
- Add red paint - red is mixed in quite a bit. It is better to add paint little by little, so that you do not have to redo the base.
- For a darker olive color, mix equal amounts of natural sienna and burnt umber. You should have a dark, concentrated mixture. Add the required amount of this mixture to the base little by little.
Important! This mixture can be used instead of blue. For a darker olive color, add a little yellow mixed with green.
- Mix until you get the tone you want - match the colors until you have at least five shades that you are happy with. Of these, you can choose one that suits you.
Important! Better to use one or two shades.
How to create dark skin tones:
- Finding the colors you want - to achieve a truly realistic shade, you will have to experiment a little here. Prepare the following paints:
- Natural sienna;
- Burnt Umber;
- Red;
- Yellow;
- Purple.
- Mixing colors is all according to the same principle as before.
- Making the base. Mix equal amounts of natural sienna and burnt umber. Also mix equal amounts of yellow and red paint. Then slowly add the yellow-red mixture to the first mixture.
- Compare shades - Compare your foundation to the shade you want to achieve.
- Create a darker skin tone. To make the skin tone more saturated and darker, you can add a little purple. A dark purple is suitable here, which can be obtained by mixing dark gray or black with purple. You need to mix until you get the perfect one.
Important! Black paint can spoil the base, so it should be introduced very little and gradually. Try mixing until you get the perfect result.
- Create a lighter shade. To lighten a too dark color a little, use burnt umber instead of purple. Take a small amount of the mixture and see what color you get.
- Lighten the shade. This can be achieved by adding orange to the base. Orange will brighten the base nicely, giving it a natural look, while white can thin out too much.
- If you have achieved the desired result, start drawing.
Important! Use gray to add shadows and chiaroscuro. When painting skin, it is advisable to use several shades at once.
How to get skin color from plasticine?
In plasticine animation, living characters are often animated, therefore, to create their hands, faces and other parts of the body, a color is needed that is similar to the color of human skin. To make a leather color from plasticine, in fact, is not so difficult, you just need to show a little patience.
If you could not find the plasticine of the color you already need in the store, then you can get it by mixing other colors. To get skin color, we need the following colors:
- White is the whole piece;
- Dark pink - 3-4% of the whole piece;
- The rest of the colors are 5% each.
When you knead these colors into a homogeneous mass, you will approximately already see what color is obtained.