Mk artificial flowers with their own hands. How to make artificial flowers for a city apartment
Flowers are a great solution for additional decoration of the apartment. They give the house a warm, cozy spring look, and the smell of various flowers can turn an ordinary room into a beautiful fragrant garden. But not everyone can afford to keep fresh flowers at home: someone suffers from allergies, someone has a cat that turns everything he sees, and someone simply does not have time to care for plants. In such cases, do-it-yourself artificial flowers come to the rescue.


In our article, you will learn what materials you can make them from, you will see workshops on making artificial flowers, as well as photos.

Advantages and disadvantages of artificial flowers

pros
- Do not require care. If you are going on a trip, then worries about your green friends will not fall on your head, puzzling over who to ask to water and fertilize them. The most you will have to do is dust them from time to time.
- Durability. Everyone knows the property of flowers to fade and shrivel. It does not threaten artificial flowers. So, if you want to arrange a long photo shoot that needs wreaths, feel free to choose artificial flowers (especially since they will look brighter in the photos).
- Also, you are not threatened that various insects or diseases will start in your flowers;
- Antiallergenic. They do not contain any pollen, which makes it possible to create a flower decoration in the home for allergy sufferers.
- "Anti-dirt". If you have animals or children, overturning flowers, as well as scattered earth and spilled water, cannot be avoided. For artificial flowers, neither one nor the second is needed: you can forget about running around with a rag and a broom;
- The ability to put green pets in any part of the house, without risk to them.
Minuses

- No matter how beautiful and skillfully made flowers with their own hands, they will never repeat the smell of natural ones. Although some buy special sprays or essential oils with the smell of flowers, which are sprayed on their fake pets;
- If the flowers were made from low-quality materials, they may develop an allergy;
- Some materials tend to fade in the sun, but this will take about a year (or even more);
Materials for making flowers


You can create a flower arrangement from various materials. We will tell you about the most popular and relevant. So, what are artificial flowers made of:
- Paper;
- Fabric (chiffon, felt, silk, satin and others);
- Wood;
- Mastic, plasticine, clay;
- Herbarium;
- Porcelain;
- Candies;
- Skin and so on.
Also, for making flowers, you may need: hot glue, wire, threads, and various beads, rhinestones, ribbons, bows and buttons will help you make the design of bouquets that you only want.
Flowers for the home


For the home, you can create flower arrangements of any colors, styles and sizes: it can be a bouquet of roses, a flower garland, small individual flowers to decorate certain parts of the apartment and its elements (for example, a curtain). The main thing is that flowers should fit the interior, as well as be pleasant for you personally.
DIY boutonniere
We will need:
- Small pieces (rectangular) of cotton fabric of several colors (one for the bud, the second for the leaves);
- Wire for floristry;
- Decorative tape (width about 6 mm);
- Teip tape;
- Curly and regular scissors;
- Hot glue (in the absence of such, ordinary PVA is also suitable).
- Fold the fabric in half so that you get a square;
- Then fold the square diagonally to make a triangle;
- At the triangle, cut two corners: one at the base (longer side), and the second at the top. The resulting piece should resemble a droplet. Expanding this piece you should get a flower;
- It must be glued to the wire using glue.
Petal:
- Glue the fabric chosen for the petal to the wire, then cut everything in such a way that you get the shape of the petal (narrow at the edges, wide at the center);
You can also improve your product with various decorative ornaments.
Bridal bouquet of artificial flowers


We all know the old wedding tradition of throwing the bride's bouquet at a crowd of bridesmaids and other female guests who want to steal a piece of happiness. But often wedding bouquets are quite heavy, and hardly anyone wants to accidentally hit them on the head when catching. In such cases, an understudy bouquet is often used, which is lighter. The ideal solution for him is to create a bouquet of artificial flowers.
You can also use it as a small commemorative gift: such a bouquet, created by the hands of a friend and presented on the wedding day, will melt the heart of every bride.
They are very different - plastic, fabric, paper ...
They can decorate a homemade postcard, a fashionable lady's hat or even a whole house, just give it to someone for a holiday.
In order to make artificial flowers with your own hands, you will need:
Crepe (corrugated), velvet or wrapping paper - in principle, even ordinary colored paper will do. You can also purchase the material you need for crafts - usually this kind of paper is sold in stores offering quilling products.
Wire. The road will lead to shops selling fabrics and sewing accessories. The wire for beading is thin, soft, and, what is important, colored. However, in some houses the simplest wire can be found in almost unlimited quantities.
Wooden sticks (long skewers). They are sold together with culinary products - one package is usually enough for three or four lush bouquets.
Tapes. Satin and nylon, wide and narrow, long and short - everything will fit.
Scissors, needle, strong thread (silk or cotton bifold), glue - a standard set of materials.
Loose powdered sequins, glue rhinestones for decoration.
artificial roses
Lovers of roses, whose color can tell the recipient a lot, will surely like such a voluminous craft.
It will require a sheet of velvet paper of the desired color, as well as an oval blank and transparent glue:

In order to enhance the similarity of crafts with a real flower, you can use several shades of velvet paper. Moving along the edges, you should stick light paper, and closer to the center and top - the one that is slightly darker.
To create the effect of "rain", you can use transparent nail polish, dropping it in several places. It is not necessary to smear the drop, and even, on the contrary, it is worth waiting until it completely hardens. You can speed up the drying process in the refrigerator by placing the work there.
Roses can also be made from maple leaves. When the finished flowers dry out, that is, the leaves become brownish and brittle, they can be decorated: chocolate, wine-red, crimson powdered sparkles will do.
Transparent glue should be applied with a brush to the edges of the “petals”, and then gently sprinkled with sparkles from the bag. After half an hour or an hour, when the glue dries, the rose must be gently shaken - the extra sequins that are not fixed with glue will disappear.
The process of creating a basic flower is shown in detail in the picture:

DIY artificial flowers: kanzashi
DIY artificial flowers can also be made using the popular Japanese technique called kanzashi.
The resulting flower can be attached to a hairband, or make a brooch.
For the latter, you will need to buy an iron blank for the badge in a sewing accessories store and “plant” the product on glue.
You can do it easier by securing a safety pin with a few stitches. The junction can be smeared with glue or transparent varnish.
DIY artificial flowers ... from sweets. candy bouquet
This craft is perfect if you need to make an individual, original gift.
She will need candy in the package; corrugated, wrapping or plain paper, wooden skewers, as well as glue, wire or thread. The process is extremely simple, so it is suitable even for beginners.
On a bamboo skewer, which must first be wrapped with a strip of paper of the desired color, the packaged candy is fixed with wire or thread.
Then a strip of cream paper is wrapped around it, which is also fixed with a wire on a skewer. Since the bare "stem" does not look very beautiful, it must be made as short as possible (ten to fifteen centimeters). However, if this option does not suit you, you can add leaves by cutting out the required amount, wind it onto the stem with bobbin thread to match.
For strength, it is better to coat the winding points with glue or varnish - so the thread will not unravel, even if the knot is untied.

You can use the resulting flowers in different ways.
A topiary tree will look charming if you add artificial flowers made by yourself to it.
For this craft, you will need a foam ball, bamboo skewers, plasticine and a glass. Plasticine needs to seal the bottom of a glass or a small pot - this will serve as the basis for the "trunk", which should be taken as about half a wooden stick.
A foam ball is placed on the sharp end of the improvised trunk, but if it is not found, it can also be molded from plasticine.
In this case, it is better to take a sculptural one, which is sold in art stores - it does not melt as much as an ordinary one, so the topiary will not lose its shape.
However, if the remains of polystyrene are lying around at home, you can build something original, the crown will be square.
If some details need to be fixed with glue, it is worth remembering that the most popular "Moment", regrettably, corrodes the foam.
You can use special glue for ceiling tiles.
Artificial flowers of the new generation simply amaze with their graceful luxurious beauty and their perfect external resemblance to natural counterparts. However, no one will argue with the generally recognized and obvious fact that the most skillful, talented and unsurpassed artist on the planet is mother nature. Charming and breathtaking landscapes, born by her caring and loving hands, have always attracted, attract and will attract our enthusiastic and close attention. But after all, man is also a creation of the forces of nature and an integral part of it. So, he is a worthy child of his mother. And the most talented and gifted among us apply all their skill, skill and enthusiasm to repeat the unique and imprint what they see for a long time.
Modern artificial flowers and artificial trees, which you can even buy through the Internet, are an impressive and stunning result of human efforts. Flowers are the pinnacle of natural art. Miniature and large, catchy and inconspicuous, with a pronounced rich aroma and subtle subtle fragrance, they always amaze with their grace, elegance and perfection. And the artificial flowers of the new generation, created by man, are an ideal and perfect imitation of this miracle of nature.
How artificial flowers are made
How did a person manage to achieve such mastery and why artificial plants of a new generation have such a natural appearance and are so similar to their natural counterparts? Modern technology for making bouquets of artificial flowers and artificial trees of a new generation has taken a huge step forward in this human desire to achieve the maximum similarity of artificial plants with living ones.
The basis of this difficult process of turning raw materials into artificial flowers is a detailed analysis of a real plant into its individual constituent elements. Then, according to the shape of these received elements, templates for future artificial flowers and artificial trees are made: stems, branches, leaves, cuttings, petals, stamens, buds, buds, pistils, thorns and other parts of the plant. These patterns will determine the shape and size of future artificial flowers and artificial trees, and, accordingly, completely repeat and copy the shape and size of a living plant. And the final result will depend on the chosen material, which is used to create all these small parts of the plant: how artificial flowers will look like natural ones. In the production of artificial plants today, a huge number of various materials are used.
Most often, the petals and leaves of artificial flowers and artificial trees are made from fabric. The range of fabrics used is simply limitless. At the very beginning of the process of formation of the production of artificial plants, it was, as a rule, silk, parchment, cotton. A little later, when man invented and widely introduced the production of artificial fiber, the already familiar artificial plants with silk, parchment and cotton leaves and petals were joined by artificial flowers and artificial trees, the leaves and petals of which were made of latex, polyester and airy organza. This has significantly expanded the possibilities of artificial plant manufacturers.
Before the material takes the form of leaves of artificial trees or petals of artificial flowers, it is carefully impregnated with various means with specially developed compositions. This is done so that in the process of giving the material the necessary shape, it is sufficiently malleable and “obedient” so that its sections do not crumble along the fibers, and the elements of future artificial plants have a certain shape and do not lose it. After the fabric is processed, petals and leaves of artificial flowers and artificial trees are cut out according to previously prepared patterns. The crown of artificial plants is painted in natural colors, colors and shades.
Artificial flower petals and leaves of artificial trees are veined similar to real flowers for authentic appearance, and the edges of leaves and petals are wrapped to give artificial plants a natural and natural appearance. After this painstaking effort, through which artificial flowers and artificial trees have petals and leaves that are almost indistinguishable from the original, the petals are assembled into a single whole with pre-prepared stamens, which are then attached around the finished core.
Modern artificial flowers
Today, in the production of artificial plants, a variety of tools are used to manufacture and process individual elements, from which artificial flowers and artificial trees are then collected:
- Rings, which are circles of steel wire of different diameters. They are needed for curling the petals of artificial flowers and leaves of artificial trees.
- Bulks are special steel balls located on metal rods with wooden handles;
- Tweezers, which are needed for assembling small parts that make up artificial flowers, for painting them, for corrugating the petals;
- A single strand knife is a blunt, curved steel wire blade with a wooden handle. It is designed to process the leaves of artificial trees and artificial flowers.
- A double-strand knife, having a similar design with a single-strand, only with two blades. It is used in the production of artificial plants for the same purposes as single-core.
- Wire cutters, which are necessary in order to cut the wire.
- Scissors that are needed to cut artificial flower petals and leaves of artificial trees, as well as other necessary details of artificial plants from fabric.
- Die cutters are a special tool that is needed to make artificial flower corollas with very small petals. Basically, such a procedure requires artificial flowers of forget-me-not, lilac or lily of the valley.
- The iron is a metal parallelepiped measuring 10 cm by 10 cm and 3 cm. It has five holes of different diameters: 1.2mm; 1.5mm; 2mm; 3mm and 3.5mm. Strips of starched dry cloth 0.5 cm wide are pulled through these holes.
- An awl is a round steel needle with a length of three to five centimeters. It is necessary in order to make holes in the petals of artificial plants that have the shape of a corolla.
- Pillows measuring fifteen by twenty centimeters, made of hard or semi-soft rubber. The thickness of such pillows is from one and a half to four centimeters. Flowers, artificial rose petals and their leaves are treated with bulbs on just such pillows.
Artificial plants of the new generation have such a perfect look, identical to natural plants, also due to the fact that artificial trees and artificial flowers are made using specially processed rhizomes and trunks of living plants or dry wood as trunks and branches. Also widely used in the production of artificial flowers and artificial trees of a new generation of papier-mâché, plastic, wire. Artificial plants are often stamped from tin, made from wax and plastic, carved from soap, molded from porcelain or polymer clay.
But it would be a mistake to assume that it is enough just to conscientiously mechanically cut, paint and put together all the components in order to get perfect artificial flowers that will be difficult to distinguish from living ones. In order for any artificial plants: both trees and flowers, to have a natural appearance, you need to have high powers of observation and a good artistic flair, a sense of proportion. After all, each branch that artificial trees consist of and each petal of artificial flowers must be unique and not repeat the rest. Otherwise, artificial plants will not have a natural look. Because nature does not repeat itself, and in nature it is impossible to meet two completely identical leaves or flowers.
Therefore, only a real artist can create artificial flowers similar to living ones. Moreover, in order for artificial flowers and artificial trees to reproduce all the nuances of living plants one hundred percent, you need to be a good botanist. In the structure of plants, in their differences, in details, one must be able to navigate well enough to be able to correctly convey any little thing the way nature created it - leaves, petals, their veins - all that without which artificial flowers will not be flowers ...
It so happened that the ancient craft of making artificial flowers has experienced a complete decline over the past few decades. Graceful bouquets of silk, satin and velvet, which were used to decorate hats, hairstyles, fans, corsages dresses or used for interior decoration, gone into oblivion.
And few people know that the first school engaged in the production of artificial flowers was opened in Europe in the 17th century and since then Italy, France, Switzerland, Bohemia and Saxony have been supplying ladies and gentlemen of all classes with elegant flowers made from various fabrics. By the way, it was these products that contributed to the emergence of the "language of flowers", which allowed interlocutors to exchange secret messages that did not arouse any suspicion among jealous husbands and wives.
Artificial flowers were so popular that to meet the demand for them in New York alone, in the middle of the 19th century, 9 large factories for the production of these products were opened. Tens of thousands of girls were engaged in home-based work on making flowers - sometimes this way of earning money became a family business, in which all family members, including young children, were involved.
Let's take a closer look at this ancient craft and learn how to make artificial flowers with your own hands, drawing on an 1897 second-hand bookseller's professional edition.

How to make a pattern of flowers
On the page below, diagrams and ready-made patterns of petals of various colors will be given, but for those who want to comprehend the old craft from scratch, there is a little theory.
The main element of an artificial flower is its petals. The quality of the finished product will depend on the accuracy of the transfer of its shape and texture. Very small petals are recommended to be "cut down" with special forms: the fabric is folded 6 or 8 times, wrapped in paper and placed on a small metal platform. The mold is held evenly and hit with a hammer, getting the petals ready for further work.
Large petals can be cut with scissors. The best patterns are those for which real, fresh flowers serve as models. To do this, the plant is disassembled into its component parts, the petals are carefully straightened and dried either under pressure between two sheets of thick absorbent paper (coffee filters can be used), or - best of all, according to all the rules making a classic herbarium .
Then all the dried parts of the flower are carefully laid out on a sheet of paper, traced around them with a pencil, then the sheet is glued onto cardboard, and only after that each part is cut out separately. Do not forget to mark each pattern - what is the name of this flower and the number of the petal.
As for the leaves, stamens, buds and other parts of plants, the author of the book, who cares about saving the flower girl's time, recommends that she buy ready-made blanks. But at the same time, she makes a reservation that if the craftswoman has free time, patience and taste, then, of course, it is best if all these details are made by hand.
Tools for making artificial flowers
To make artificial flowers as similar as possible to real ones, to give the work grace and subtlety, you will need a pretty decent set of tools:
- Tweezers or tweezers for shaping or crimping the petals;
- metal balls with a wooden handle (bulks) for squeezing out the petals;
- large and small sharp scissors;
- awl;
- thin and thick wire;
- knife for creating veins;
- mortar for squeezing out petals in the manufacture of rose flowers;
- tissue paper or thin silk, cotton wool - to create the stem and other parts of the flower;
- rubber plate for extrusion of small depressions;
- metal platform for knocking out the desired shape;
- molds for cutting blanks;
- fabric: silk, satin, batiste, satin, velvet, plush, taffeta, muslin
- dyes for fabric and brushes of different sizes;
- stand for drying flowers;
- glue for connecting flower parts and making stamens.
As a good adhesive composition, which simultaneously serves for the production of small buds, flower cores and other small elements, a pasty mixture is recommended, which is made from 60-70 g of gum arabic made from acacia resin and the same amount of starch.
Gum arabic is diluted with a third glass of warm water and left until completely dissolved, after which starch is added to the vessel and mixed thoroughly, avoiding the appearance of lumps. The longer this glue lasts, the better its quality. If the surface of the glue dries slightly, then you can “refresh” it by pouring hot water over it and immediately draining it.
To glue the petals of glue, they take in a very small amount, applying a drop to the very tip of the part. As needed, the glue can be tinted in the desired color. It is very important that cherry gum is not used as gum arabic. - according to the manual, only acacia tree resin is suitable for making artificial flowers.
How to use the tools
The most necessary tool for a flower girl is tweezers, which are not only convenient to take small parts, but also give them the desired shape, bending or straightening them. You can also make veins on the petals and leaves with tweezers, if you hold the tool sideways, and it is convenient to lubricate the details of the work with glue with a wooden handle.
The mortar and pestle must be smooth, without cracks or notches, so as not to damage the material. In such a mortar, it is convenient to give a rounded shape to four petals at once: for this, petal blanks are placed in a mortar, their upper edges are left outside, and a pestle is drawn from the bottom to the middle of the petal, giving them a curved shape.

The same applies to bulbs - tools for extruding petals: the surface of the balls should be smooth and well polished.

How to prepare fabric for making artificial flowers
In order for the flower petals to keep their shape well, the fabric must be starched. Now there are many ready-made proposals that facilitate this process, but since Since the retro blog adheres to all the standards of the old technology, the fabric preparation process should be as follows:
For 2 meters of fabric, a paste solution is usually enough. prepared from 30 g of starch dissolved in two glasses of water. Starch is placed in a container, water is gradually poured into it and thoroughly stirred with gradual heating. When the composition cools down a little, the fabric is immersed in it, squeezed out, shaken well and pulled over the frame to dry.
Plush (with a low pile), satin and silk fabrics are starched like this: lay the fabric evenly on the board or pull it over the frame. From the wrong side, the fabric is smeared with a paste using a wide brush, then a very thin muslin is applied over the glue and again smeared with a paste.
When dyeing, petals made of velvet, plush, satin and silk are moistened not in water, from which the material deteriorates, but in alcohol. For corrugation, hot bulbs are used, which are used for squeezing only from the wrong side of the petal. To extrude large petals, you can not use a pillow or a rubber pad: the heated bulb is placed with the ball up, and the handle is held with your knees. The petal is held with two hands and slide it over the ball, while pulling the ends of the workpiece down (in case the entire petal is elongated).
For taffeta and sometimes silk, lubrication with gelatin alone is sufficient. In principle, a gelatin solution can also be used for fleecy fabrics (velvet), even without gluing with muslin - it all depends on the type of flowers produced.
For making leaves the fabric is dyed in the desired color - dark green, light green, light green, etc., then after drying, the fabric is varnished, giving a natural shine, or the fabric is passed over with a brush dipped in a starch solution - in the event that the leaves need to be given a velvety view.
And a very important point is the fabric, no matter what it would be intended for: for petals, buds, sepals or leaves, always cut or embossed with an oblique shape!
The basic techniques for the production of artificial flowers with your own hands
When they start making a flower, the first thing they do is take a wire, wrap it around it with cotton wool, bend the upper end of the wire in the form of a hook, and then tightly wrap the workpiece with tissue paper or thin silk, which originate inside the loop.

Having fixed the strip on the upper hook, the wire is quickly turned with the forefinger and thumb of the left hand, due to which the paper (silk) lies evenly and very tightly. When winding leaves or buds to the stem, cut off the excess strip. They do the same when wrapping the stem with cotton wool: the material is straightened, giving it the appearance of a long thread and wound around the stem, cutting off the excess. In specialized literature, there may be a professional name for such a stem - liton (or leton in ancient literature).
You should remember this rule: if the stalk should be thin, then the cotton wool is taken quite a bit - just to cover the wire; if it requires a thick flexible stem, then you need to take more cotton wool. if you need to make a spherical core or a bud, then the cotton wool is tightly wound on the upper end of the wire, bent with a hook, and the material is given the necessary shape with your fingers.
For the manufacture of stems of very small flowers - for example, lilac or mignonette, cotton wool is not used at all: the wire is immediately wrapped around paper or silk.
Dyeing artificial flowers
Flowers made from cambric or any other paper fabric need to be moistened first. The cut petals are folded 6 or 8 times, after which they are lowered into a saucer with water, squeezed (without crushing) by hands and laid out to dry on paper that absorbs water well - a filter, a blotter, a paper towel, etc.
A small amount of the desired paint is dripped onto a slightly damp petal, which is then leveled with a finger or a thin brush. If the color needs to be reduced to completely transparent, then a small drop of water is added to this place, which blurs the paint. After these manipulations with a brush, stripes, specks and other elements are drawn that bring the color of the flower closer to natural.
After all the blanks are dry, you can start shirring, pleating or squeezing out with hot / cold bulk - depending on the type of flower.
Corrugation artificial flowers are made either with tweezers or with a spherical tool (bulk). An approximate algorithm of work will be as follows:
- the petal is folded in half along the long side;
- put it on the palm of the left hand, and with the right hand, with the help of tweezers, scratch grooves on it from top to bottom;
- after the blank is unfolded, identical grooves will be found on it, symmetrically located relative to the center of the petal;
- the same is done for the lower part of the petal or by directing the grooves radially away from the center.

If the petal needs to be given a convex or concave shape, then it is convenient to use a tool with a spherical nozzle: small blanks are placed on a rubber plate, larger ones on a dense tight pillow (you can fill it with fine river sand) and take a bulb with the desired ball size in your right hand .
The tool is used with light rotational movements, sliding the ball from the edges to the center of the petal, gradually giving it a rounded shape.

flower assembly
The most time-consuming and painstaking work is the connection of parts. First, the petals are assembled near the inner part of the flower. Petals one by one are captured with tweezers, the tips of the blanks are dipped in the adhesive composition and connected to the core of the flower, around which they should be located.
Thus, a base is obtained, under which the rest of the petals are glued in a natural order and in the correct alternation. At the same time, the lower end of the stem is held in the left hand, and the core of the plant is turned downwards. This technique is convenient when assembling large inflorescences, but when fixing the petals of a small flower (forget-me-not, lilac, etc.), the stem can be held with the flower head up.
Also, those flowers are held upside down, the bottom of the petals of which will later be fixed with cloth or paper - tulips, irises, etc.


The next stage is the connection of a flower with buds on a branch and other elements on the main stem. Having attached the cup to the flower, the leaves and buds are wrapped with silk or paper ribbon.
DIY artificial flowers step by step
First, let's see how to make artificial flowers with your own hands using a rather simple plant as an example - forget-me-nots.

For the manufacture of this flower, fabrics such as satin, cambric, satin or velvet with a small pile are suitable. The fabric is folded 8 times and round petals are cut out; if there is no shape, then you will have to cut it manually with scissors. The work requires accuracy and scrupulousness - the appearance of the flower will depend on the quality of the cutting.
For coloring forget-me-nots, they take bright blue paint, which is applied with a small brush to the edges of the petals - as a rule, in a live forget-me-not, the middle looks paler than the tips. Very small petals can be painted with a pinkish-blue tint.
After the painted blanks have dried, they are placed on a rubber pad and first the tips of the petals are squeezed out with a small bulb from the inside, then the blank is turned over to the front side with tweezers and the center of the petal is squeezed out with a slightly larger bulb.
The finished petals are put on a twisted green tube: the upper edge of the tube is slightly smeared with adhesive, sprinkled with dry yellow paint and threaded into the petal so that its edges are flush with the tube.
After a sufficient number of blanks have been made, a thin wire is taken and 5-7 buds, 2-3 small flowers, 3-4 medium-sized flowers and 2-3 large ones are attached to its upper end. Then, with the help of paper, leaves are grafted - one opposite the other, after them you can add one small flower and a few more leaves.
To make leaves, according to the pattern proposed below, blanks are cut out, along the front side of which veins are drawn with tweezers: longitudinal and several lateral. The color of the fabric for the leaves is desirable to use two tones: light green for large leaves, dark green for small ones. Large leaves from the inside are glued with a thin stalk (lithon) made of wire, laid along the entire length of the sheet and retaining a tip of 1 cm for fixing to the stem; small and medium leaves are attached at the bottom edge
One or two more are attached to this branch, a little shorter and with fewer inflorescences. It is very desirable that the flowers are not monophonic, but differ in shades. Such branches look very beautiful in a small porcelain vase. If forget-me-nots are made to decorate a dress or hat, then flowers made of velvet look the most spectacular.
Forget-me-not details pattern:


Satin, satin or velvet are suitable for making this flower. For the core of the flower, woolen threads are fixed in the center of the wire loop and twisted tightly, fixing them with tissue paper. Then the core is straightened, cut in a circle, cutting a small depression in the center with scissors, like a real chamomile. The edges of the part are smeared with glue and sprinkled with dry yellow paint.
The petals cut according to the scheme are corrugated with tweezers: first, one longitudinal groove is drawn along the wrong side of the petal along its entire length, then two lateral grooves are made on the front side, so that the longitudinal groove becomes convex.
The flower is glued with two green stars, the edges of which have a barely noticeable brown color; when gluing the stars, the petal of one of them should fall on the free gap of the other.
Leaves of different sizes are cut out of a green matte fabric, a vein is drawn through them from the inside, then lateral veins are made from the front side. Each leaf is glued with a very thin lithon (stalk) and grafted to the stem in this order: first small, then larger, placing them at some distance against each other.
Pattern of chamomile details:


How to make a fabric tulip

Tulip petals are cut out according to the scheme below from satin or silk of the desired color. Small veins are made on the petals with tweezers, and then the workpiece is given the desired shape: the center of the petal is squeezed out with a hot bulb with a large head, and a tool with a small head is passed along the edges.
With tweezers in the center of the petal, very carefully pinch a narrow fold, trying not to damage the spherical shape of the workpiece. From the wrong side, each petal is glued to the middle with a white lithon (very thin stem).
The core of the tulip consists of three small yellow balls connected to each other, surrounded by five brown anthers. Six finished petals are grafted to this core with silk or paper. The wire stem is threaded into a green tube made of fabric, to the bottom of which leaves are attached.
When making leaves, long longitudinal strips are made without fail with tweezers or a knife; a tulip bud is made from three corrugated petals, tightly glued together along the edges.


The petals of this flower are made from starched cambric, satin or silk; the bottom of the blanks are tinted yellow. For work, you will need 6 petals, which are folded two together, after which they are drawn along them with tweezers, forming a central groove. With tweezers, the edges of each petal are slightly bent.
The core of the flower consists of five yellow stamens threaded into a small circle of cambric with corrugated edges and tinted with yellow or pale green paint; also, a red graceful rim is often drawn along the edges of the circle.
Three smaller petals are glued around the core, and the remaining three larger petals are glued in between them. The flower is inserted into a tube of green batiste, then they take tinted wax or a very thick adhesive composition, which was described at the beginning of this issue, and moistened fingers make a triangle out of it, which is connected to the tube. The stem is wrapped in green paper. An additional petal is cut out of the gas fabric, which is used as a cup surrounding the flower stem. This petal is attached to the stem so that it touches the green wax part.
A flexible stem about 20 cm long is threaded into a green cloth or rubber tube.
3-5 narrow leaves are attached to the lower part of the stem. Having cut out two sheets according to the scheme, one of them is lubricated with an adhesive composition, a thin lithon is glued along the sheet, then a second sheet is applied on top and pressed firmly. With tweezers, the necessary veins are formed on the sheet.


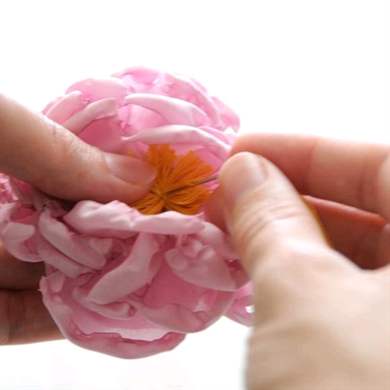
Making a fabric peony

This flower is made from starched cambric or silk. For work, you will need 48 inner petals of the first magnitude and 10 of the second magnitude. The edges of these petals are slightly crushed with tweezers, after which the workpieces are wound around the finger, pulling quite strongly. After these manipulations, the petals are again wound on the finger, but in the opposite direction. The petals thus prepared are glued tightly to the core so that it is completely hidden from view under the inner petals.
These petals are followed by internal blanks of the second size: they are pleated and squeezed out at the edges with a ball, after which they are glued five pieces in a row. After these petals there are two outer rows, the middle of which is squeezed out by a large bulba, and the edges are slightly bent back with tweezers.
The cup of a peony consists of five petals: two long and three short. As a rule, these blanks are cut from dark green fabric and slightly dyed reddish. Indentations are also made on these petals, and the tips of the blanks are compressed with tweezers. The core of the flower is a tight ball of a small size of pale green color, to which the petals are glued in the indicated order.
For a branch, you will need several dark green leaves, the stem is wrapped around paper of the same dark green color.
Half-opened buds consist of eight outer petals and five inner ones, which are also crushed with tweezers and squeezed out with a ball. After the bud petals are glued to the core, they are squeezed again with tweezers and lightly glued around the edges to give the bud a blooming look. Completely closed buds consist of a green ball covered with calyx petals.


How to make an iris flower

This graceful noble flower is made from starched cambric, silk or thin satin of lilac, lilac, white, yellowish or blue. On six petals, longitudinal grooves are drawn with a brush, the color of which should be darker than the color of the petal itself. On three petals of the third size, they either do not draw a vein at all, or put a dark spot, which is smoothly shaded so that the upper edges of the blanks are lighter than the main color, and the bottom has a yellowish or pale green color.
The first three petals (first size) are folded in half and obliquely pleated with tweezers, on the next three (second size) small folds are made, and a longitudinal convex vein is drawn in the middle (from the wrong side) and the edges of the petal are slightly rounded inward.
The last three petals (third size) on the front side are scratched with tweezers; a longitudinal groove is also drawn from the wrong side, and the edges of the blanks are slightly pulled out with fingers.
The middle petals are half glued with wire wrapped in paper to match the color of the petals, and a small yellow fringe is glued to the last three petals. To do this, cambric or yellow silk is cut into strips 4-5 cm long, 1 cm wide; these strips are plucked from both long sides so that literally no threads remain from the material. This fringe is folded in half, smeared with glue from the inside and glued to the middle of the petals (from the middle to their bottom). For a more spectacular look of the flower, the last three petals can be made of velvet.
The core of the iris consists of yellow stamens attached to a wire: first, three small ones, followed by medium ones in between, and the last, which are slightly bent down. Instead of a cup, the bottom of the flower is wrapped around with green film or paper. Long leaves are attached at the very base of the stem.

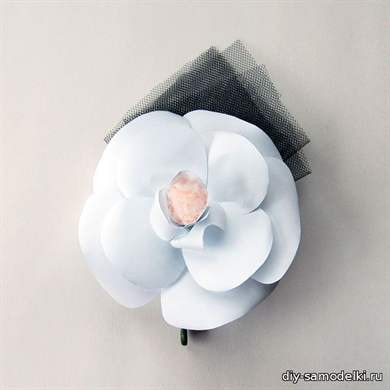
How to make a fabric rose

To make a half-open rose, for its core you will need five petals of three sizes, corrugated with tweezers. To do this, three petals of the first, second and third sizes are superimposed one on top of the other and are connected at the very base with an adhesive composition.
The smallest petal is located closer to the core of the rose, followed by medium and large. These three blanks are folded in half and pinched with tweezers several times along their entire length. Then the petals are slightly straightened and glued slightly obliquely to the center of the flower, consisting of fluffy yellow threads.
The outer part of the fabric rose is made as follows: first, ten petals of the fourth size are glued, scratched with tweezers, having several noticeable folds at the very top and squeezed out with a ball in the center. This is followed by nine petals of the fifth size, which are also squeezed out in the center, but do not have folds in the upper part - these petals should be slightly rounded along the upper edges.
10-15 outer petals of the sixth size are prepared in the same way: the center is squeezed out with a bulb, the upper edges are rounded. when fixing all the petals, it is necessary to ensure that they fit as closely as possible to each other. This is especially important for the very first petals - in order to get a realistic half-opened rose, these petals should almost completely hide the core.
An "asterisk" made of dark green dense fabric acts as a gluing to the lower part of the color; this detail is followed by a cup made of green wax or cotton. To make it from cotton, it is enough to wrap a small amount of it under an asterisk, cover it with a green-tinted adhesive, lightly sprinkle with starch and immediately blow it off to leave a velvety dust.


How to make a bouquet of artificial flowers
Having studied the basics of the ancient craft of making artificial flowers, you can try your hand at composing various compositions: bouquets, garlands, wreaths, boutonnieres, etc. skewer or twig of the desired length. Having roughly connected the stem of the flower and the twig extending it, wrap the place of fixation with cotton wool and mask it all with a strip of green paper or cloth about 1 cm wide.
When connecting branches in a tree or bush, it is advisable to use strips of bark-colored paper: dark or light brown for mature branches or light green for young shoots. Also worth remembering. that the leaves located at the top of the branch are usually lighter than the middle ones, and the middle ones are lighter than the lower ones.
The basis for a garland of artificial flowers is a wire frame, wrapped in cotton wool and paper. Individual elements are attached to this frame with a lithon or a strip of paper: flowers, buds, twigs.
If a flower arrangement is created in a basket or a large vase, then it will be much more convenient to fix flowers and branches in these vessels if they are filled with moistened sand. When all the elements of the composition take their places, the sand is masked with moss.
In the event that there is not enough sand at hand, then you can fix the flowers in the basket in a simpler way: the stem of each artificial flower is wrapped from below with napkins or crumpled newspaper in such a way that it looks like a soft onion. Such branches are placed in a basket, after which the "bulbs" are masked with moss. Do not neglect live fern branches - they fit very gracefully into any flower arrangement.

Making flowers with your own hands is an interesting and exciting option for needlework. At the same time, you always have the right to choose among master classes, thanks to the possibility of using absolutely any materials.
Handmade flowers can serve as decoration in various situations. With the help of hand-made flowers, you can decorate hair accessories - hairpins or headbands, clothes, when the flower acts as a brooch, and also with the help of crafts of this kind from various materials, you can get wonderful interior decor components.
It is no secret that the modern needlework market offers various materials for use, from which you can easily and easily make flowers of any type and size. Starting from the simplest flowers made of paper:

Napkins:

From paper for quilling technique:

And ending with more complex compositions made from various fabric combinations:


You can use handmade flowers in various situations:


DIY flower made of paper and napkins
This way of creating a flower is the easiest. Interestingly, from plain paper you can create absolutely any color options, you just need to stock up on perseverance and show a little imagination. Moreover, it is not at all necessary to master the basics of the origami technique. For example, using an ordinary napkin and a twig from any tree, you can create a flowering sakura branch.

To create flowers, any colored napkins are suitable. If they were not found in the house, then you can use any multilayer toilet paper of a suitable color. In addition, you will also need the following set of components:
Green threads;
First, tear off a piece the size of a matchbox from a napkin. At the same time, leave the edges uneven, this can be done on purpose. Roll the piece so that it resembles a folded flower.

Wrap the tail of the flower with green thread or tape.

A flower should be attached to a branch with green threads. If using no one turned out to be too difficult for you, you can use a simple adhesive tape for fastening.

We make the desired number of flowers and enjoy the result.

You can also make flowers with your own hands from simple colored paper using the origami technique. For example, the lily technique is quite simple to master:

Flowers in the form of balls are interesting, which will amaze you not only with their simplicity of execution, but also with their size:

All you need is 8 sheets of paper, wire and scissors.
First you need to fold all 8 sheets on top of each other and fold them with an accordion. Using a thin wire, make a mount in the center of the craft. Cut the edges of the workpiece in a semicircle.

Expand layer by layer, starting from the center. The flower is ready!

Chrysanthemum lovers may like this manufacturing technique:

Stock up on green paper;
Sheet for notes (10x10cm);
scissors;
Wooden skewer.

Make 8 elements from white paper, which will be the base of the flower. For the manufacture of each element, white paper should be folded as for cutting a snowflake: in half, in half, subdiagonally. Round off the edge of the triangle. Cut into thin fringes. As a result, we get:

We assemble a whisk from the elements and glue it on a round base:

We fluff the upper parts with our fingers, and also create three more such elements, making each of them shorter than the previous one by 2-3mm.

Cut into fringes, lift the ends and glue.

We supplement the flower with leaves and a stem.


From paper, using various techniques, you can make magnificent options for roses:


Corrugated Paper Flowers
As an alternative to plain paper, you can use corrugated paper, which allows you to get the perfect options for flower arrangements. Of course, more time for work and perseverance will be required here than in the case of making a flower from napkins or plain paper. However, the result will surely please you.
To get a bouquet as in the photo below, you will need several rolls of paper:

The number of rolls and their colors can completely depend on your imagination and the number of color options that you would like to see in the end. In addition, you need a thread and a clothespin.

We fold each roll of paper with an accordion so that it is longer than the previous one.

We cut the end of each strip with triangles.

We connect the edges with a clothespin and cut into pieces.

We put the parts on top of each other and tighten the resulting multi-colored roll with threads.


Be sure to straighten each petal.

Exotic flower is ready!

Using corrugated paper, you can get various options:


fabric flowers
Fabric flowers are used to decorate garments, interiors and hair accessories. Modern needlework has hundreds of ways to create fabric flowers, and any needlewoman can invent each new one on her own.