An original volumetric snowflake with your own hands for the competition. Paper snowflakes for the new year
What's New Year without snow and snowflakes? But if suddenly the weather let down, and the snow did not fall, then you can make yourself a good mood with the help of paper snowflakes. DIY snowflakes- a traditional decoration for the New Year's interior during the winter holidays.
Required tools and materials:
- 2 sheets of A4 white office paper,
- scissors,
- white threads
Procedure:
- The ballerina's skirt is made of plain paper in the shape of a snowflake. To do this, take an A4 sheet and fold any one corner to make a square. Cut the rest
- Then fold the square in half to make a triangle.
- Now fold the right corner in half, so that the tip of the corner extends over the edge of the sheet.
- Fold the left corner in the same way and fold in half again.
- Use a pencil to draw patterns for the future snowflake.
- Cut out the drawn patterns along the contour
- A beautiful snowflake for a ballerina skirt is ready
- Print the template and cut out the ballerina figurine
- Insert the ballerina figurine into the center of the snowflake. Spread out your skirt. The snowflake ballerina is ready.

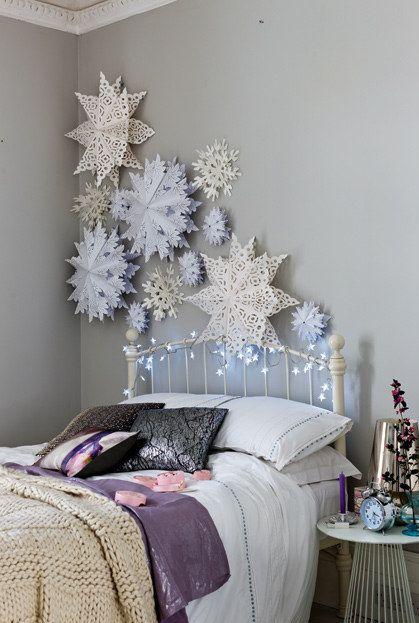
Bulky paper snowflakes from Tifani Lyn will create a special fabulous charm in your home.

To create these snowflakes, you will need:
- Old book,
- glue gun,
- fishing line or thread,
- glitter paint or glue
- acrylic lacquer.
Cut strips about 2 cm wide from book sheets.

In total, 140 strips need to be cut. Cut the first 20 strips to the length of the page, cut the next 40 by 1 cm, cut the next 40 by 2 cm, and cut the last 40 by 3 cm.

Now fold each petal using 5 strips of each size. We take the longest strips, for the central ray of the snowflake, once, the rest twice (once on each side).

We glue and place under the gluing press.

For security, you can temporarily tie the tip of the petal.

Additionally, we cut out more strips for the central part of the future snowflake. We also glue this ring and fix it for the successful setting of the glue.

When the petals are glued, we process the end of the workpiece with a glue gun.


Then we glue the petal blank to the center ring.

Thus, we glue four petals, gluing them so that we get a cross.

Then glue the remaining petals. This method allows all workpieces to be glued symmetrically.

Then we glue the petals together so that the snowflake does not fall apart.

Decorate the snowflake with sparkles.

Your snowflake is ready! We hang it on the tree!

- 8 strips of paper (1 cm wide and approximately 11 cm long)
- toothpick
Sequencing:
- Fold each strip of paper so that one end is about 2 cm longer than the other
- Twist the ends of the strips with a toothpick
- Glue the strips of paper in pairs first, and then all 4 pairs together. You will get a beautiful quilling snowflake
- You can attach a silver thread to it and hang it on a Christmas tree as an original New Year's decoration

To make quilling snowflakes, cut thick paper into strips. Using a ballpoint pen or knitting needle, twist each strip of paper into a tight spiral. Let the paper unwind a little, then glue the ring. You can use a paper clip to hold the ring together while the glue dries.
You can slightly squeeze the resulting spiral ring on one side, and then you get a "droplet". Or on both sides, then you get an "eye".
Make more blanks for future snowflakes using the quilling technique, and then glue them together.

You can decorate your house for the New Year with the help of very beautiful snowflakes grown from a solution of borax crystals in water. Borax can be purchased at a pharmacy, a hardware store, or in a supermarket in the laundry supplies section.
Required tools and materials:
- special brushes for cleaning smoking pipes (sold in tobacco shops)
- food coloring (optional)
If you are unable to purchase pipe cleaners, you can replace them with wire wrapped in thick woolen thread.

Sequencing:
- First you need to get a supersaturated solution of borax in water. To do this, gradually add borax to the hot water while stirring. The approximate proportion is 3 full tablespoons per glass of water. Only after achieving complete dissolution of the last portion, add the next one. Borax needs to be added so much that the water becomes cloudy, almost opaque. As you add, if you clearly see undissolved borax crystals in water, do not add more: undissolved crystals in the mixture will act as a "distracting" element, and crystals will begin to grow around these particles, and not around your snowflake. Therefore, it is better to strain the solution.
- Pour the mixture into a glass beaker, bowl, jar or pitcher (depending on the size of the crystal you want to grow). Glass containers should have a sufficiently wide mouth.
- Make a snowflake out of a pipe brush. Tie a rope to it or attach a wire. Wrap the other end of the rope (wire) around a pencil (stick) 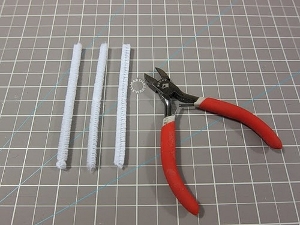

- Submerge the snowflake in the borax solution 
- Place a container with a suspended structure where no one will disturb all this for a long time. In about a day, the snowflake will be ready! 
1. If you want colored snowflakes, add dye to the borax solution, or use colored pipe brushes. 
2. Borax solution can be reused by preheating in the microwave. But the crystallization process will take a little longer.
3. If the borax begins to crystallize when you pour the mixture from the saucepan into the glass container, try preheating the container with clean hot water.
4. Make sure that borax and borax crystals do not fall into the hands of small children! If borax is swallowed in large enough quantities, it becomes toxic to the body. All materials that have come into contact with the borax must be thoroughly rinsed. Materials contaminated with brown must not be used for cooking and eating.
5. Growing a crystal snowflake from borax is not only an exciting but also a useful activity - an entertaining scientific experiment on growing crystals at home.

Required tools and materials:
- matches,
- cardboard,
- scissors,
- PVA glue,
- a little fantasy.
Sequencing:

- Draw the silhouette of a snowflake on paper.
- We burn the matches from the side of the head.
- We spread the drawing of matches on cardboard, glue the matches.
Useful Tips
Many have already learned how to make paper snowflakes.
Such snowflakes can be used to decorate windows, a house and a Christmas tree, while snowflakes can be of various colors and sizes.
But there are difficult snowflakes that look very beautiful and are made a little differently.
Some of these original snowflakes are not easy to make, but if you succeed, you will see that you did your best, as complex snowflakes are sometimes very beautiful and unusual.
Unusual snowflakes for the New Year: a simple volumetric snowflake

You will need:
Any color paper
Scissors
Glue (if necessary)
Stapler.
1. Prepare 6 paper squares.
* If the snowflake is small, use plain paper, and if the snowflake is large, use thick paper or cardboard.

2. Each square must be folded in half diagonally.
3. Put the resulting triangle in front of you, draw with a pencil and a ruler the strips as shown in the image (not reaching the fold) and make several cuts along the lines.
4. Unfold the square and fold the first row of strips into tubes. You can fix them with glue or a stapler.
5. Flip the square over and fold the second row.
6. Repeat this process (remembering to turn the square) until all the strips are bent into tubes.
7. Repeat steps 3-6 for the remaining squares.
8. Using a stapler, first connect 3 blanks into one half of a volumetric snowflake, and then another 3. Then connect both halves. You need to connect in places where the workpieces are in contact.
* The stripes can be made wavy, then the snowflake will turn out to be even more original.
Making a voluminous snowflake (video)
How else can you make a 3D snowflake (video)
Unusual paper snowflakes

You will need:
White or colored paper
Stapler
Double-sided tape or glue
Scissors.
1. Take a piece of paper and start folding it like an accordion. If after the last fold there is a little sheet left, cut off an unnecessary piece.

2. Use a stapler to fix the accordion paper in the center.

3. Draw a simple pattern on the accordion and cut it out with scissors.

4. Unfold your accordion and connect the ends with double-sided tape, creating half a snowflake.

5. Repeat the entire process to create the second half and join both parts into one beautiful snowflake using double-sided tape or glue.

Unusual DIY snowflakes for the New Year: snowflakes in the form of the heroes of the movie "Star Wars"
Here you will find the necessary Star Wars snowflake patterns.

You will need:
a printer
Scissors
Stationery knife
Print them out, cut out a circle, fold (better with an accordion) and cut out the gray area from the snowflake (you can use a clerical knife).
The entire set of Star Wars-themed snowflakes can be found .


How to create an unusual snowflake (video tutorial):
DIY unusual paper snowflakes: a spirograph snowflake

What does the drawn diagram mean:
- - - (dash-dash-dash) bend the ends of the paper up. The fold of the valley is called.

-. - (dash-dot-dash) bend the ends of the paper down. The mountain fold is called.

You will need:
Square sheet of paper
Scissors
Protractor
Pencil.
* The paper must be either very thin or large, as it will have to be folded many times.
1. Fold in half diagonally to make a triangle.


2. Fold the triangle in half again.

3. Rotate the shape 45 degrees (see image).
4. Use a protractor to make marks every 18 degrees.

5. Starting at the open side, fold the top layer over the markings, maneuvering between the mountain fold and the valley fold. You should get an accordion.


6. Turn the piece over so that the accordion is on the bottom. Fold the end of the shape in the same way as in step 5, using the already folded accordion as a template.


7. Press down the entire structure well.

8. Using scissors, cut off the top and slightly the bottom of the folded accordion.


9. Cut off a small triangle as shown in the picture.


10. Expand the shape and you should have a very unusual and beautiful snowflake.

Complex snowflakes featuring Doctor Who characters

You will need:
Pencil and eraser
Scissors
Stationery knife.
1. Take a square piece of paper and fold it in half diagonally. Next, fold the resulting triangle again and then again.


2. Draw one of the following designs on the side and carefully cut it out.


* Use a utility knife to cut out the inside of the workpiece.

* Since everything that will be drawn will be mirrored on the other side of the paper, it is worth drawing only half of the drawing (half of the face or building).
* Cutting out small parts is not easy, so be patient and carefully cut the paper with a utility knife or scalpel.

A few more options:


What is difficult to imagine the New Year without? That's right, without the corresponding decorative elements, the main of which are snowflakes. And our collection of paper snowflakes is constantly growing! Surely you all have already seen and know how to make such easy ones:
Winter is the most creative time of the year! Yes, don't be surprised. If you count how many postcards, various crafts, decorations, gifts and snowflakes are made in the world (this is not counting the production of snow in clouds), then this whole huge set will more than cover other pre-holiday preparations! And every year I want to do something new, original and pleasing to the eye. If you are looking for such an idea, then you are on the right track. Moreover, 2018 is coming to an end.
We propose to make new volumetric snowflakes from paper - many step-by-step master classes, in stages, diagrams and different photos of ideas for the New Year 2019! If you have your own original snowflake ideas - send to!
Snowflake from openwork napkins
To begin with, we propose to make a convex round snowflake from openwork napkins according to the new master class in 2018. Very light and beautiful, suitable for children, see detailed instructions.

To create such a snowflake, we have prepared:
- openwork napkins (6 pcs are enough);
- scissors;
- glue;
- decorative rhinestone for the middle.

We will make the snowflake itself from a kind of small bags. To create them, we first need to bend the openwork napkin in half. After that, we cut it with scissors along the fold line.

Then bend each half in half again and cut. As a result, we get 4 blanks from one napkin.

Now we will use glue and connect the edges of this blank so that we get a little bag.

In total, our snowflake will need 12 such bags.
We take another napkin, it will serve as the basis for our snowflake. First we glue 2 small bags on it opposite each other.

Then we fix 2 more blanks in the other direction.

After that, evenly distribute the remaining bags and glue them on an openwork napkin.

For the middle of the snowflake, we will use other blanks. To create them, it is enough to cut a napkin in half.

After that, we immediately make bags from the halves of openwork napkins.

We make 4 such blanks in total.
We begin to glue them in the middle of the snowflake.

We fix all 4 pouches evenly.

And we decorate the middle with a decorative rhinestone. Our lace napkin snowflake is ready.
"Snowflakes in the snow"
The master class was prepared by Anya Valerievna Solodovnik.
Snowflakes made from paper can be beautiful additions to your Christmas tree or to decorate a room.
 To make it we need:
- colored or white paper;
- ruler;
- pencil;
- glue stick;
- skewer for curling curls.
For the snowflake, you need to make 6 pieces of rectangles with sides 7.5 x 14 cm.

We measure 2.5 cm on each side, as shown in the figure.

We bend along these strips. Glue the bent strips together.

We bend the resulting strip in half and glue it.
Draw and cut out the template as shown. We outline the rest of the details and cut out.

We glue all the details together.

We make blanks for curls. To do this, you need to make cuts into three parts, as shown in the figure.

We take a skewer or ampoule and make curls. Here's what you should get:
Volumetric paper snowflake No. 1

To create this craft, you need to take:
- - 2 square sheets of blue paper;
- - scissors;
- - glue.

Our snowflake will consist of two equal parts, giving it volume on both sides. Let's start creating one of them. To do this, fold the square diagonally.

Then fold the resulting triangle twice more.

On one side of the workpiece, you can pre-apply lines along which the cuts will pass. In this case, we pay attention to which side the fold is located on (in our case, it is on the left side). It is in the place of the fold that you do not need to cut through to the end, this will be the center of the snowflake.

We take scissors and cut along the lines outlined earlier.

At the very bottom of the workpiece, you can make additional slots, which will add delicacy to our snowflake.

Expand the first blank.

The central strips of all 4 rays should be bent to the center and glued.

We make the second blank for the snowflake using the same principle.

Now it remains to glue them together, slightly shifting to the sides so that all the rays are evenly spaced.

As a decoration, a rhinestone can be glued to the center.

A new volumetric blue paper snowflake is ready.

Simple but effective 3D snowflake:
To create a New Year's atmosphere, it is required not only to put up and decorate a Christmas tree, but also to create the appropriate decor in the room. And the easiest way to do this is with a variety of snowflakes. We offer a simple master class showing how to make a volumetric snowflake from plain white paper. Photo 1.

For work you will need to take:

Let's start by folding the accordion. In order for it to turn out even, first fold a sheet of paper in half several times in the transverse direction. So we will outline the lines for the future harmonica. Photo 3.

Now we fold the accordion along the outlined lines. Photo 4.

We outline the middle of the resulting accordion with a pencil and, focusing on it, draw the places where you want to cut. In the photo they are indicated by shading. Photo 5.

We take scissors and cut out. Photo 6.

From the second sheet we fold the same accordion, marking and cutting out elements on it, as on the first accordion. Photo 7.

Now we take white threads and tie together two accordions in the middle, securing the end of the thread. Photo 8.

We straighten two accordions in the form of a circle and see the places that require connection. Photo 9.

In these places, carefully glue the snowflake at the bottom of it. Our volumetric paper snowflake is ready. Photo 10.

Beautiful furry snowflake:
Creative paper snowflake number 3
The feeling of New Year's holiday comes long before December 31st. And this is largely due to the creation of a festive atmosphere. The use of a variety of New Year's decorations will help in this, many of which can be made by hand. In our master class, it is proposed to do a simple snowflake from separate modules Green colour. Photo 1.

For work you will need to take:
- - 6 square sheets of green paper (we used a size of 8x8 cm);
- - scissors;
- - pencil;
- - glue.

Let's start making a snowflake from one of the modules. To do this, we fold one sheet of paper in the transverse direction in half and draw lines with a pencil for subsequent cutting. In this case, the Christmas tree will be the central element of each ray of the snowflake, therefore it is its outline that needs to be drawn in the center. Photo 3.

With the help of scissors, carefully cut through all the lines, removing the excess, which was completely painted over with a pencil at the previous stage. Photo 4.

We unfold our blank, this is how one of the modules of the future snowflake looks like at this stage. Photo 5.

But it still needs to be finalized. To do this, take the central strip, fold it over and fix it with glue. Now one of the modules is completely ready. Photo 6.

We make 5 more elements according to the same principle. Photo 7.

Now let's start assembling our snowflake. To do this, using glue, we connect 2 elements together with a slight overlap. Photo 8.

So we continue to glue all 6 modules. Photo 9.

Our snowflake is ready. To decorate its center, you can add some kind of decorative element, we used a rhinestone. Photo 10.

Blue-white snowflake from modules
Modular origami is available to everyone; using this technique, you can create a variety of crafts, including New Year's. Snowflakes made from separate modules look especially interesting. We propose to make one of these snowflakes according to our master class.
 To create such a snowflake you will need:
- 6 blue square sheets of paper;
- 6 white sheets;
- a small circle of blue paper;
- PVA glue. Photo 2.
 First, we will make modules from blue paper. To do this, take a square and fold it diagonally. Photo 3.
 We unfold the square and fold its sides in the direction of the central fold. Photo 4.
 Turn the blank of the module over to the other side. Photo 5.
 Let's fold the sides again. At this stage, the module is shaped like a diamond. Photo 6.
 We turn it over to the other side. Photo 7.
 The layers located on top need to be bent to the sides. Photo 8.
 We make 5 more blue modules using the same principle. Photo 9.
 Now let's start creating white modules, they will be located on the inside of our snowflake. To do this, fold the white square along two diagonals and unfold it. Photo 10.
 The corners of the square must be bent towards the center. Photo 11.
 Turn the blank of the module over to the other side. Photo 12.
 We will fold the sides of our workpiece. Photo 13.
 Unscrew the sides from the back of the module. Photo 14.
 And now we will bend them in the direction of the central vertical line. Photo 15.
 For our snowflake, you need to add 6 such white modules. Photo 16.
 Let's start assembling the snowflake. We take a circle and glue two blue modules on it, placing them opposite. Photo 17.
 Glue the remaining 4 modules evenly in a circle. Photo 18.
 Between the fixed blue rays of the snowflakes, we fix the white modules with glue. Our snowflake is almost ready. Photo 19.
 It remains to decorate its core at will. Photo 20.

Volumetric snowflake from modules:
Marina prepared master classes.
Blue snowflake from modules
In the modular origami technique, you can perform not only voluminous crafts, but also simpler figures. For example, in this master class, we propose to make a snowflake from individual modules.
 To create such a snowflake, we took:
- blue paper;
- ruler;
- pencil;
- scissors.

How to make a snowflake using modular origami technique
Immediately, we note that we will make our snowflake without glue. It is based on 6 identical modules that are simply connected to each other. For the blanks of the future snowflake, we will prepare 6 rectangles measuring 12x6 cm.You can also take blanks of a different size, but it is important that their sides have a ratio of 2: 1. Photo 3.

Now we will fold each rectangle in a certain way. First, make a longitudinal fold in half. Photo4

Then fold the workpiece in half in the other direction. Photo 5.

Now we will straighten our rectangle and see that in the middle there is the fold line we just made. Photo 6.

Focusing on it, bend the sides down at a right angle. Photo 7.

Now we need to fully unfold our blue rectangle, and change the diagonal folds so that they are directed upwards. Photo 8.


Bend the lower part on the right side up at an angle. Photo 10.

Make the same fold on the left side. Photo 11.

In place of these folds, we make internal folds. Photo 12.

Now bend the lower triangles on one side up. Photo 13.

Turning the blue workpiece over to the other side, we also bend the lower corners up. Photo 14.

Now we bend these triangles again so that small triangles are formed. Photo 15.

On the other hand, let's do the same. Photo 16.


We fill these triangles from above and below. Photo 18.

We straighten our blue blank and see that we have received the first ray of the future snowflake. Photo 19.

Using the same principle, we make 5 more elements from blue rectangles. Photo 20.

Now it remains to connect these rays together. We do not need glue, but it will be enough to insert one part of the ray into a similar part of the other ray. Photo 21.

Aligning these triangular pieces completely, we have connected the two elements. Photo 22.

After connecting 6 elements, our modular snowflake is ready. Photo 23.

It remains to decorate the middle with a blue rhinestone. Photo 24.

More snowflakes from the modules:
Unusual openwork snowflake:
Openwork snowflake using false quilling technique
Our master class on creating an openwork snowflake using the false quilling technique will help you make a decoration from strips of paper with minimal time and materials.

For the creative process, you need to prepare the following materials:
- sheet of white (or double-sided blue, silver) A4 paper;
- simple pencil;
- ruler;
- eraser;
- glue;
- scissors.
How to make an openwork snowflake using an unusual false quilling technique
The snowflake will consist of three types of elements, for the creation of which you need strips 1 cm wide. Each type of element should consist of six parts, so we need to draw a sheet of 18 stripes. The first 6 stripes should be the length of the entire sheet. Draw the next 6 stripes perpendicular to the first. Draw the third type of stripes under the long ones, starting from the perpendicular stripes.
 Cut out strips of paper and fold them in three rows, depending on their length. In places where pencil lines are very visible, use an eraser.
 To make it easier to work with the strips, wind them around the pencil and remove. Unlike the "" technique, our task is somewhat simplified, since we will not work with dense curls, but with their similarity.
 Take a strip from the "short" row. To wrap a strip in a ring, wind it around your finger, close the edges and glue. Make the next turn a little looser and glue at the base again. Make a third turn in this way. Cut off excess paper with scissors.
Do this for the other five short stripes, making sure they are the same size.
 Make exactly the same curls with stripes from the middle row.
 Bend the longest of the strips in half.
 Wrap each end tightly around the pencil and carefully remove the ring - you get such double curls.

 Press the smallest curl rings on both sides with your fingers, giving them an almond shape.
 Press the middle curl rings from the ends to the center to form a four-pointed star (diamond) shape.
 We start collecting the snowflake. Connect the six almond-shaped pieces together with glue. You will end up with a semblance of a flower.
 Glue double curls between the "petals".
 For convenience, glue the double curls across one petal.
 Then glue in the remaining double curls.
 Glue the "stars" at the junction of the double curls.
 That's all, the volumetric openwork snowflake is ready!
Look how twisted, like lace!
Thanks to the volumetric elements, it is easier to fold such a snowflake than when creating a quilling figure. Small children can also cope with such creative work, if you show them everything and help, if necessary. Older children will figure out the intricacies of work on their own. You can also come up with other elements and make some snowflakes to decorate a festive fir tree or interior. The main thing is desire, and you will succeed!
Snowflake made of paper squares

What to prepare for creating snowflakes from paper squares:
- squares 8 * 8 cm, cut from decorative double-sided colored paper (scrap paper);
- scissors;
- pencil;
- glue;
- rhinestones, sequins, sequins.

How to fold unusual snowflakes from ordinary paper squares
To work, you need two squares of the same size. If you want to make small snowflakes, use small squares and vice versa.

Cut out squares of decorative paper to the desired size. It is best to use paper that has a pattern on one side and a base color on the other, then the snowflake will look original.
Fold the squares in half twice.

Spread out the squares, the main lines will appear on them.

Bend the edges to the midline, pressing the folds with your finger.

Do the same on the other side. When you straighten the squares, you will see that the markings of small squares have appeared on them.

Use scissors to cut along the center folds to the length of one square.

Bend the corners at each end as shown.

Glue the corners so that the patterned side is on top.

Stick one part of the snowflake on top of the other so that the rays do not overlap each other.

Decorate the resulting snowflake with self-adhesive rhinestones, or glue the sparkles.

A beautiful curly snowflake from squares is ready!
So, with quite a bit of effort, we got an unusual snowflake. Such beauty was created from two squares, which is hard to believe! You are convinced that children will cope with such work, which means that you can make many wonderful snowflakes and decorate rooms with them, gifts for loved ones and relatives, a festive fir tree or a Christmas wreath. And if you connect several snowflakes, then you can make a garland, pendants or a crown decoration for the holiday.
Volumetric snowflake from foamiran
How to make a brilliant volumetric snowflake will be shown in her new master class by our regular author Marina.
Snowflakes can be crafted from a variety of materials. In this master class, we propose to make such a craft for the New Year 2019 from shiny foamiran. But you can also choose colored paper, there is only one folding technology.

To make such a snowflake, we have prepared:
- shiny (glitter) foamiran of blue and silver color;
- scissors;
- a toothpick;
- sharp knife;
- ruler;
- glue gun.

Step-by-step instruction
We decided that our snowflake will be two-colored, so we use two colors of foamiran - blue and silver. If desired, such a craft can be done in one color. The snowflake will consist of separate elements - rectangles. First, from the blue foamiran, we cut out 3 rectangles measuring 2.5x14 cm.
The traditional, familiar and beloved room decoration for the New Year holidays is paper snowflakes. They can be large and small, voluminous and flat, singular and in a garland. There is a mass option, everyone will choose the right one for themselves, and in the article we will look at the most basic ways how you can make snowflakes for the New Year with your own hands from paper with detailed descriptions and photographs.
For work, we will need 1 A4 sheet, it can be colored or white. We fold it exactly in half lengthwise, then into an accordion. The accordion edge is equal to two centimeters. Expand and cut in half along the fold line. We got 2 identical accordions.
On the outside of the accordion, draw out the outlines of a snowflake, as in video 1, and cut it out. Draw the second accordion and cut it out the same way.
We glue openwork accordions together, fasten the middle with glue. We got a beautifully carved snowflake.
Huge snowflakes from paper bags
Let's try to make voluminous ones with our own hands for the New Year, a photo step by step with a description is given below. These paper snowflakes are very unusual and interesting.
They come out voluminous, beautiful due to the fact that they need to be crafted from paper bags, which can be bought or glued together beforehand.

For this work, we need (for 1 snowflake):
- Paper bags 30 * 9 cm.
- Cardboard strips 20 * 9 cm and 20 * 1 cm.
- Simple pencil and ruler.
- Scissors.
- Glue or thin double-sided tape.
We make a snowflake like this:
- Draw a pattern of one repeating part on a 20 x 9 cm cardboard and cut it out.
- Transfer the template to packages and cut out. For 1 snowflake, you need to use 10 packages, from which we get 10 snowflake rays.
- Further in the center we glue each ray with the neighboring one. To do this, we spread a strip of glue or glue double-sided tape or duct tape.
- We unfold our volumetric snowflake and also fasten the extreme rays together.

Any snowflakes can be lightly smeared along the edges with glue and sprinkled with sparkles, or you can walk over them with a dry brush, with a small amount of paint of any color, so you can shade the snowflake.
Asterisk - snowflake
For this amazing and unusual, bright star - snowflake, we need:
- Colored paper. Sheets 11 by 16 cm. Six sheets of different shades.
- Glue and scissors.
We fold each sheet into a tube and glue it, then fold it in half and cut it into 2 even parts. We glue all the parts, overlapping each other.

Cut off the top of the entire stack into a sharp corner on both sides. Expand the stack and glue the ends. The result is an asterisk with sharp tips.
Children will love these stars - snowflakes. They are bright and unusual, voluminous and large. They can decorate the whole room.

Big and colorful beauties
Let's see how to make multi-colored large paper snowflakes with our own hands for the New Year. Such beauties are quite simple to make, but they look bright and beautiful. They are good for decorating children's rooms, kindergarten or school. Of course, they can be made plain white, as is customary, for this you can use office paper.

For creativity we need:
- Colored paper of any shade, double-sided is better. For 1 snowflake you need 2 leaves.
- Scissors.
- Glue.
We start to create:
- Fold a piece of paper into a triangle at an angle, cut off the excess.
- Fold in half again exactly from the top.
- Next, bend the corners of the triangle in different directions to the middle.
- Draw a line from the center to the corner and cut out the droplet.
- Mark with a pencil and make cuts to create the lace of the snowflake.
- Expand the snowflake and bend to the middle of the strip of rays, glue them.
- Make 1 more of the same layer and glue them together in the center so that the rays of the upper layer fall into the gaps between the rays of the lower layer.

That's all. The snowflake can be hung on the braid and decorate the room with it.
Snowflake in modular origami technique
Origami is a technique for creating amazing shapes from modules made from squares of paper. You can also make a snowflake using this technique. It will be unusual, beautiful and compares favorably with the flat and voluminous snowflakes we are used to. To work on a modular snowflake, we need:
- Squares of one-sided blue paper 10 x 10 cm - 8 pieces.
- Glue.

We collect the snowflake from 8 modules. They all add up the same:
- Bend the square diagonally with the blue side out. Fold in half and unbend again
- We bend the long side to the vertical center line and bend the corner up. We also fold the second side.
- We open the paper square.
- Putting the module in the other direction along the folds, as in video 2.
- We do all 8 modules in the same way.
- Now we add the modules. We put the white triangle of one module into the pocket from the other module, fix it with glue.
This is how we connect all the modules. We attach the braid and the snowflake is ready.
Snowflake - fluff, we make from paper squares
Beautiful fluffy and voluminous snowflakes for the New Year with your own hands can be made from squares of paper. Colored squares can be cut out of double-sided colored paper, or you can use office paper for writing in the form of squares. 1 snowflake will take 6 squares. 
To work you will need:
- One and a half sheet of colored double-sided paper, we will make squares from it.
- Scissors.
- Glue.
We make a snowflake like this:
- Cut out 6 squares, or take pre-made squares.
- Fold them diagonally into a triangle.
- Cut in strips 0.5 or 1 cm wide towards the center so that the center is not cut.
- These will be fluffy rays of a snowflake. Now we glue each ray one by one at the ends, then in one direction, then in the other.
- Now let's connect 3 rays, and after that we glue all the triplets together in the center.
The main thing is to do everything carefully and follow the instructions. The snowflake will turn out to be joyful fluffy and cheerful, it can be used to decorate a nursery or any other room.
Shining fluff
This type of snowflake - fluffs in autumn is similar to the method of making carved paper snowflakes, which you can easily and quickly do with your own hands for the New Year. But we will sprinkle it with sparkles, and it will shine. For one snowflake, we again need 6 squares, one for each ray.

We make a snowflake as described above. We use squares for writing for the snowflake or cut our own according to their size and any color. After that we make sparkles. We take tinsel and cut its terry finely onto a sheet of paper. After that, lightly glue the rays of the snowflake with glue and blot them in sparkles. Attach the braid to the snowflake and hang it boldly on the tree or wall.
Christmas fluff
And now let's figure out how to make beautiful snowflakes - paper fluffs with our own hands for the New Year. These are fluffy and weightless creatures, they will create an amazing winter, New Year's mood in the room. Making them is simple, you only need paper, scissors and glue to work.
For 1 fluff, we need to make 3 squares of different sizes. They should have a side of 20 cm, 15 cm and 10 cm.

We fold these squares diagonally into a triangle three times, cut out a ray and cut it, forming fluff. Then we unfold and glue them together, overlaying the smaller ones on the largest layer.
That's all, the fluffs are ready. They can be mounted on a wall, on curtains, and so on. You can sprinkle them with glitter or color them using double-sided colored paper.
Snowflakes in an unusual technique
You can use napkins and a trimming technique to create a large fluffy snowflake. To do this, you need to cut out a large snowflake pattern from thick paper. It should be quite simple, just 8 rays from the center. Next, we will prepare napkins by cutting them into squares. Use any shade of napkins you like.

Now we do this:
- We coat a piece of ray with PVA glue.
- We wind 1 square of napkin on a stick and trim it to the surface smeared with glue. So we fill in the entire snowflake, attaching each subsequent square rather tightly.
- The closer the napkin pieces are to each other, the fluffier the snowflake will turn out.

Such a snowflake should be hung on a string or placed on a table or shelf. It can be decorated with sparkles or any small decorative elements, supplemented with artificial spruce branches.
To visually imagine how to make some more types of snowflakes for the New Year with your own hands from paper, watch the video on the topic.
Hello everyone! Today I want to continue the topic of crafts and show you how at home you can easily and quickly create wonderful toys in the form of paper snowflakes. The other day my little sons and I made such beauty that now this wonderful creation pleases us. Watch and do with us.
I remember how as a child I sat and cut snowflakes, it gave me so much joy and pleasure. And then she ran and pasted it on the window. Time passed, but until now nothing has changed, and now I love this occupation, only now I am doing them with my children.
I'll start, as always, with the simplest manufacturing options, and there will be more and more complicated options along the way.
In order to create a snowflake, just one tool is enough - scissors and a sheet of paper and a great mood.

Then you need to correctly fold the paper in the form of a triangle, and then draw a suitable pattern and cut it out. You will need a simple pencil yet))).
The main thing is to take a square-shaped sheet, fold it in half (1), then in half (2), repeat steps (3, 4), almost done! Draw with a pencil what you will cut out, for example, as in this photo:

So, from this triangular blank, I propose to make such magically beautiful and light versions of winter snowflakes that you can use everywhere, even bring them to kindergarten, school and decorate the rooms in the apartment, in the stairwell and windows with them.
If you like everything openwork, then this look is for you:

If you like the classic options more, then choose these weird little snowflakes:

The following layouts and diagrams will be a little more complicated:

In general, I really liked this selection of all kinds of decorations on snowflakes, which I saw on the Internet:

Look at how picturesque and patterned they are, it's just super beautiful, and most importantly, it's possible to make it for every child of preschool age, even a schoolchild and us adults.
For the little ones, you can offer such a craft in the form of striped curls.

Cutting snowflakes from napkins or paper
Have you ever seen such, yes, such that the cutest snowflakes appeared from the napkins that absolutely everyone would like. I have found these and am sharing with you, a simple and easy way, and besides, budgetary, you will need glue, napkins, scissors, a pencil or pen and cardboard.
Interesting! The napkins can be replaced with any other type of paper, such as corrugated paper.
The stages of work themselves are not complicated here, but these pictures show the whole sequence, so watch and repeat.
 The end result of the work will be unrealistically beautiful and will be remembered by everyone, and if you decorate with more colored sequins or something like that, then it will be cool in general.

Or such, depending on who decides how to decorate the initial sample.

Well, now I will show you a rather primitive, old way, before such cute snowflakes did everything in labor lessons or in kindergartens on fine arts. You will need paper and a good mood, of course, scissors and glue. From paper, you will need to cut long strips from a regular A4 sheet, the width of the strip should be 1.5 cm, and the length should be about 30 cm.

Such multi-colored, you can make monochromatic stripes, you should get 12.


This is how, one by one, step by step gluing these stripes together.

It turned out unusually original, this one can be hung even on a Christmas tree, even on a window or on a chandelier))).

Another similar option from paper stripes.

At a friend's, I saw a snowflake made from ordinary newspaper, then you can cover it with shiny varnish or glue the mesh.

Or you can twist cones out of paper and glue them in a circle, alternating colors.

DIY volumetric snowflake with step-by-step descriptions
To begin with, I want to offer you this way of working, maybe you will like it better than the following:
This type of work is a little more complicated, but it is the most interesting in my opinion, because it looks eats such a snowflake as if in 3D. Of course, it's time consuming, but it's worth it, my child and I made such a masterpiece in 1 hour. We are happy to share the step-by-step master class with you.

Stages of work:
1. You will need 6 squares of paper (blue and 6 other, white), we took the usual squares that we already had, they are sold as notes for notes. If you don't have any, then do it yourself.
Fold each square in half from one end to the other.

It will turn out something like this, and the last figure lies on the table, this is the result of the work.

2. Then wrap the two ends of the paper over the fold line on both sides.

Flip the finished templates over to the wrong side.


Now again turn the craft over to the other side and rip off those parts that stick out.

4. This is how it should turn out, absolutely not difficult.

The next step is to prepare 6 white squares, from which we will make the following blanks.

5. So let's start, this work is even easier than the previous one, again we will make origami out of paper.

So it should turn out, there should be 6 blue blanks, white also 6.

6. Well, after you have cut the white squares, fold each leaf in half, taking one end and attaching it to the other.

Do after the envelope.

7. Now turn all the envelopes over to the other side.

My youngest son also helped, and the older one joined a little later.

8. Bend the sides.

Flip over and fold the sides, then fold them towards the center. Cut a small circle out of the paper and attach all modules.

9. Now go to the gluing.

Take your time, do everything carefully. Use a napkin.

10. Almost everything is ready, it remains to somehow decorate and cheer up yourself and those around you.

Therefore, I called my eldest son for help, and this is what we did with him.

11. A photo was glued to the middle, such a funny and mischievous modular snowflake made of paper. We will hang such beauty tomorrow on a booth in the kindergarten. Live it looks just amazing and much brighter). So be sure everyone will like this miracle!

In fact, there are a lot of voluminous options, they can be made using the origami technique, or it can be done in the most usual way.
I dug up these on the Internet, I hope they will be useful to you, take paper, scissors and glue:

Here's another similar option.

If you have a lot of time, then you can make volumetric snowflakes more complicated, I know that usually the halls of kindergartens, schools, universities, universities and even shops are dressed up like that.
Interesting! You do not need to glue the parts, but use a stapler to get it done faster.


Video on how to cut a Christmas paper snowflake for children
At first I wanted to show you a primitive video, and then I thought that you can easily do the most ordinary things yourself. So I thought, I thought and ... I propose to cut out an unusual snowflake in the shape of an angel:
Simple snowflake patterns for beginners in origami technique
As far as I know, origami is also divided into subspecies, for example, modular origami from paper. Which one do you like the most? I give some interesting ideas.
Or the simplest and easiest to execute, even school-age children can figure it out:

Modular origami is already going on more difficult, here you initially need to learn how to fold the modules correctly, and then everything will go like clockwork.

You will need to make a lot of modules to put together such a composition, but you will develop fine motor skills)))

Each of these modules can be easily inserted one after the other, so you yourself can come up with any options on the go.

It remains for me to wish you good luck and creative success.

Schemes and templates for cutting paper snowflakes for the New Year
As for a variety of ready-made schemes, I suggest you these types of snowflakes. The main thing is to remember that first you need to fold the sheet correctly, as I showed you at the very beginning.
Now outline what you want to see and cut along the contours.

If you want to make the snowflake more voluminous, use ready-made templates, for example, like this one:

Then for this purpose you will need to cut out 3-4 templates, and then sew or glue them in the center, press down with a stapler. Who needs such ready-made blanks and diagrams, write a comment below, I will send you an email absolutely free of charge, I have a lot of them in my piggy bank, I will gladly share a whole bunch of them.


By the way, you yourself can compose your own pattern, see how it looks, try it, creative lesson:

I once thought it was last year, and fiddled with such a charm:

For those who love delicate and very complex options, although there is nothing complicated, I can offer this video for viewing, in it, by the way, the paper is folded differently, look, there is something to learn:
Quilling style snowflake master class for beginners
This type of toy is rather complicated if you have never done quilling in such a well-known technique. But this is at first glance, because the main thing is to understand the essence.
The simplest scheme and a snowflake can be obtained even by a beginner, even by a child:

And also this video will help you with this, in it everything is available and step by step painted and shown. You just have to repeat all the actions for the presenter and you will get a masterpiece.
Snowflakes using the quilling technique, this one is stunningly beautiful and charming. Try to do.
Well, I gave you a whole bunch of ideas for realizing a festive mood, decorate your house, apartment. It will just look great, especially with your own hands, such crafts will always bring warmth and comfort to every heart))).
See you! Have a great day, sunny mood! Come to visit more often, join my group in contact, write reviews and comments. Bye everyone!
Best regards, Ekaterina Mantsurova