Paper crafts for the new year. DIY original crafts for the new year
The New Year is certainly a fun and long-awaited holiday, but often the joy of the celebration is overshadowed by long receipts from stores and colossal cash costs. If you want to forget about the "wind in your wallet" once and for all - learn to make New Year's toys out of paper! Free, exciting, and most importantly - with a soul! Isn't this a gift each of us dreams of?
Toy "Bunny"
Instructions on how to make a New Year's toy will come in handy if you want to decorate a room or present a gift in an unusual package! You can put sweets, money, cute trinkets or any other gift into such an unusual shape!
All that is required is to print the scheme you like on a color printer and glue the elements! Even a child can cope with this task, so you can safely engage in this fascinating hand-made with the whole family!
Paper toy "Bunny" can be a great decoration for a Christmas tree or a cute gift wrapping.


Paper lantern
Children's New Year's paper crafts are stunning in their variety. Help your child cut and glue such an openwork lantern, which can be a wonderful gift wrapping at the same time.
Follow the scheme shown in the photo, and you will definitely succeed! As a material, you can use thick paper or cardboard.


If you want to make a paper Christmas toy, download these schemes for free!


Volumetric snowflake
Volumetric paper snowflakes look very impressive and beautiful. Making such beauty with your own hands is quite simple. We offer you schemes of volumetric paper snowflakes of varying complexity. Among them, you will definitely find the one that you like the most.
Fold the two square sheets diagonally and then again to form isosceles triangles. Then cut out the "petals", as shown in the photo, and in each of them make 2 equally spaced cuts, not reaching the core.

Expand the resulting blank and glue the middle "petals" to the core. Do the same with the second triangle, and then fasten both blanks with the back sides crosswise.

Even a small child can make such a voluminous paper snowflake. Fold a sheet of paper like an accordion and staple it in the center with a stationery stapler. Cut out any drawing you like or punch the "accordion" with a hole punch.

Make a second exactly the same blank, unfold them and fasten together with a stapler or transparent tape.

Such New Year's paper crafts can be decorated with sparkles or made from multi-colored materials.

We hope you found at least one instruction on how to make a Christmas toy useful. Such creativity significantly improves the mood and creates the desired festive atmosphere. Therefore, if you feel that the joyful bustle for some reason bypassed you, try to "lure" it by starting to make paper toys for the new year! Finally, the video material will allow you to "stir up" your imagination and, perhaps, throw up a couple of creative ideas!
Do not think that New Year's paper toys are boring and primitive, because everything depends on you! Choose an unusual paper and create real miracles with it!
If spending on New Year's paraphernalia is not included in your plans, then do-it-yourself New Year's paper toys will be a way out for you. In addition, such an original Christmas tree gift will be remembered for a long time.
The sacramental meaning of the New Year and Christmas is in bringing family members closer together. And what brings people together better than joint creativity ?! Making New Year's toys with your own hands in the company of household members is an exciting activity in itself, not to mention its results - original New Year's decorations that can be hung on tree.
If you make toys with your own hands from glass, porcelain, beads, then it will take a lot of time and require certain skills. Against this background, paper toys are a simple option that can be made with your child and put on the Christmas tree. Here are step-by-step diagrams and videos of master classes - 2017 making such crafts with your own hands.
Christmas balls made of paper 2016
To make this Christmas tree decoration with your own hands, you will need a minimum of materials. The main thing here is patience and sleight of hand. Do not be discouraged if you do not get a toy right away, as in the photo - such decorations require a certain skill that will come with time. Therefore, immediately tune in that the first toys will not turn out to be the most accurate. But the result will exceed all expectations and justify your efforts!
Christmas balls made of paper 2016: making stencils
So, in order to do this with your own hands christmas ball on the tree, you must perform the following sequence of actions:
- Print the stencil on the printer. We suggest using the following pictures:
- Then take thick sheets of colored paper and trace the stencil with a pencil.
Advice! If the printer allows, stencils can be printed immediately on colored paper. This will save time and effort.
- Carefully cut out the details of the future toy.
- Place the resulting blanks in the shape of a flower. Fasten the center with a circle cut out of colored paper, firmly gluing it, as shown in the photo.
Christmas balls made of paper-2016: main work
Further work will require manual dexterity.
- The most important and interesting step is weaving. To do this, sequentially weave one strip into another, as shown in the photo.
Advice! Use different colored paper to make the toy more interesting and colorful. And so that the toy does not fall apart during weaving, use clothespins.
- When you are almost done braiding, glue the ends of the paper ribbons together.
- In the part of the ball where you glued the circle (see step one), make a small cut in the form of a line. Insert a nice tape into it and glue it on. NS It is better to burn it beforehand so that it retains its original appearance.
The original New Year's paper toys of the new 2017 are ready! Using different stencils and colors, you can create a wide variety of balls. Another interesting version of the 2017 ball with your own hands can be seen in the video:
Interesting New Year's paper toys for the celebration of 2017 can be made in the form of lanterns. This version of New Year's decoration came to us from our grandmothers and was popular in those days when toys were hard to find on sale. The flashlight is even easier to make than the previous toy. Even a child can be involved in the process of creating it. An interesting version of the craft in the shape of a flashlight can be seen in this video:
Magic lamps
Lamps for the new 2017 can be made from scrap materials. To do this, you only need scissors, glue and colored paper or cardboard packaging:
- Take two sheets: one is yellow, the other is contrasting, for example, purple. Cut out two rectangles. Yellow - 100x180, purple - 120x180 (in millimeters).
- Take a yellow rectangle and glue its edges in a tube shape. Next, set it aside and move on to the purple part. Fold the sheet in half and make cuts with scissors, leaving space at the edges. We also glue in the form of a tube, like a yellow sheet of paper or cardboard. The photo shows how to make a red flashlight. The sequence of actions is similar.
- If you cut everything neatly, then the yellow tube should go into the purple one. Moreover, it must not be pushed through to the end. Its edge must be greased with glue, and only then insert the resulting yellow flashlight into the purple tube completely. The same must be done on the other side of it. Pull up on the purple part slightly to release the yellow part. Cover it with glue. This will lock the yellow leaf into the purple.
- To make the flashlight more realistic, you should make a handle. To do this, cut a narrow strip of purple paper or cardboard and glue it to the flashlight.
- Your magic flashlight is ready. This is one of the simplest crafts, even a child can handle it.

How to make a do-it-yourself flashlight for the celebration of 2017, you can see in this video:
3D paper star
Another popular Christmas tree toy for celebrating 2017 is the star. A rare tree can do without it. This toy is both effective and easy to make. To do this, you will need the same materials as for the previous jewelry. All that remains is to add a thread. Read a master class or watch a video.
- Two 10x10 squares need to be cut out of colored paper. You can use your imagination to the fullest: your stars do not have to be yellow. Use purple, red, blue, pink colors! And your tree will sparkle with different colors.
- Make two folds in half on a piece of colored paper, and then two folds diagonally.
- Make small cuts on the edges of the paper and fold into the corners (as shown in the photo).
- Glue the corners in the center, leaving the rest of them free (this will give the future star volume). You should get some kind of rays.
Advice! Hold the corners while gluing with your finger. This will make them stick together better.
- Repeat this procedure with the second sheet of colored paper.
- We glue the two halves of the star into one. Do not forget to put the edge of the ribbon between them, for which you hang the star on the tree.
- Give the star time to dry. It will take about 20 minutes.
Hello!
Today, on the eve of the New Year, I would like to offer you another wonderful craft that we will make out of paper. This is a voluminous Christmas tree that you can easily do with your own hands right now. Because you will have everything you need, these are diagrams and the necessary templates. The forest beauty will turn out to be lush and fluffy.
Well, if you want to do a more difficult job, you can look in, there we created products from various improvised means, and even made a stamp.
Don't forget to decorate your apartment with others as well.
Well, let's start to consider and choose the works we like and roll up our sleeves to create and amaze everyone. I wish you all good luck and patience.
You always want to make such a decoration yourself, because it will look original and at the same time beautiful. All you need is a piece of paper from which you can easily fold an amazing Christmas tree craft.
In addition, such work can captivate your child and he will be happy to sit and bother. Well, take a white sheet or possibly a colored green, but then double-sided. Fold it in half with the short side of it. And draw the symbol for the Christmas tree. Here are some examples of templates that you can use.

Then start cutting along the lines, and then make cuts and fold them in the way shown in these figures. You need to make a blank in triplicate, and then glue them together. It will come out stylishly and very delicately, but of course also voluminous, which will undoubtedly please everyone.

The next option is no less interesting and charming in its simplicity. Take these stencils and print on a printer, and then you will receive a job in the form of a ZD.


Where you see the main contour, take it and cut it out with scissors, but make only notches in the recesses so that you can turn it out afterwards, as shown in the photo. Two pieces of the same shape are further glued to each other.

And if you want to really surprise or defeat everyone, then make a whole composition, that is, a forest beauty, and even not one, but with a fawn.


And one more version of 3D crafts, which I propose to cut out on a simple album or office sheet, and then paint it with gouache paints to make a real masterpiece.
You can use a spray can of glow-in-the-dark paint for a shimmery effect.

Just look with what zeal and aspiration a child does this kind of work.

And this is what we have in the end. The beauty is indescribable.

The next option, also quite interesting, the Christmas tree is made of green paper in the form of loops, read this instruction and create with me. This year we made such a charm with my son. It turned out great.


Well, if you still have any questions, then I will be happy to share with you this video, which shows this master class.
Origami Christmas tree (simple diagram for children with a description)
I think that as a child, everyone was fond of such an activity as origami. This is because, it would seem, from an ordinary sheet, an awesome result comes out. Preparing for this article, I did not even suspect that such a decoration, like a herringbone, can also be made using this technique. Imagine, and that's what I was lucky enough to find.

Any old book without a thick cover or a notebook will do. And the sequence of folding actions will be as follows. Fold all the pages of the book from the left corner to the middle.

And then make a bag, that is, one more fold.

Cut off all unnecessary, do it carefully and efficiently, take your time.

Then unfold the product on the table, and sprinkle with tinsel or sparkles.

If you decide to make the work a little more difficult, for example, if your children already go to school, then they can be offered to create such a forest beauty.


The next work that is done in labor lessons in elementary school or classes are held in kindergarten. Description and all folding actions are presented in this illustration. Forward to the cause.

If you love modular origami, and own this technique, then make such a souvenir.


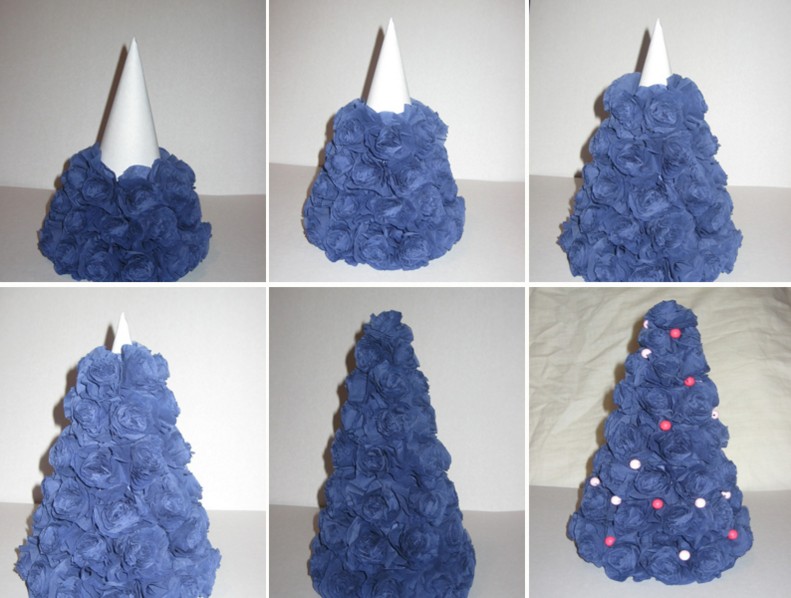
How to make a voluminous Christmas tree out of corrugated paper for the New Year

We will need:
- cardboard or thick paper
- green corrugated paper
- any glue
- scissors;
- bows, red paper, beads
Stages:
1. Make a cone out of ordinary cardboard, then glue it with corrugated paper.

2. Now it remains to build twigs, like needles for the future product. To do this, cut the corrugated paper into strips, cut the edges to create a fringe and twist each on a wooden stick into a reel. It will look like a flower.

3. And using the facing method, glue the workpieces to the cone. For a spruce 15 cm high, you will need 120 small blanks in the form of lush flowers. You can take a ready-made bow for decoration, or make it yourself from the same corrugated paper. Also use cotton wool with glitter, this will give the tree a chic and elegant look.

The next option is no less intriguing, as if the herringbone is made in a spiral, it is also based on a regular paper cone.

Make a base for the tree to get the following. Use glue, scissors, and heavy paper or cardboard.

2. Take corrugated paper with a width of 18 cm, but the length should be about 2 m. Fold the strip in half with the long side. Apply glue from the edge, leaving a 1 cm gap.

3. And start pulling a little to make a skirt.

4. Wrap the product with such a prepared strip, drip glue here and there so that everything is firmly seized.
Wind it only in a spiral so that the work turns out to be voluminous.

Here is another marvelous variant.

Forest beauty made of colored paper and cardboard
The next beauty will be made of colored cardboard, but make decorations from colored paper. The Christmas tree is folded in such a simple technique that in a couple of minutes you will create this magnificent gift or souvenir that can be kept for a long time on the shelf.

You will need three blanks in the form of semicircles of different diameters, on which make just such a fringe. Then fold each sample and glue it so that the cone comes out. Then put a little less on top and further smaller on top of the largest cone.


There is also an option, which is made of one paper cone and pasted over with circles. It looks wonderful, you can't take your eyes off.

By the way, I found a similar job in this story, who needs to go for it. There, the author came up with the idea of making circles with the help of one little thing, in general, see everything for yourself.
In addition, you can still completely fold the Christmas tree in this way, using circles as a basis, and use wooden caps instead of a stand.


If you have wrapping paper lying around, then twist the bag out of it, cut the edges so that they become round at the base and decorate.

Moreover, you can make a huge craft in this way, while gluing together several cardboard sheets.

Then decorate the cone with packaging and glue the edges to the base.

Cut off everything you don't need and decorate with stars or balloons.

Now we will complete the craft using cardboard that we will fold.

To create such a product, print this stencil.

Then attach it to the cardboard and circle the stencil, cut it out. And fold the blank in half. Make 8 such products.

Go through the edges of each Christmas tree with a hole punch, and then, where the middle is, the fold line that you made before, go along it with double-sided tape.

Now it remains to sew the edges where the holes are.


Spray glitter or fake snow and add a star to the top.

Next work, take a cardboard base and stick a stick into it and secure with glue. And then cut out circles of different sizes from old postcards and stick them on a stick.

Something like this can also be done from candy wrappers or just newspaper or magazine sheets.

Or you can create a souvenir from children's hands. It looks good too, especially since schoolchildren or preschoolers are always happy to do this kind of work.

By the way, here's another idea from a newspaper or magazine.


Can you make a green tree out of an accordion? Roll up a salad-colored office sheet in the form of an accordion and pierce the center with a hole punch. Insert a stick into the resulting hole.


Among other things, on the Internet, I saw such a lovely composition.

Who is good at what, there are so many ideas, take it and do it, friends.

A simple toy can even turn out from ordinary ribbons, which you cut, and then roll up with a snake and connect.

Here are a couple more ideas, write your suggestions or adjustments, how and from what else you make such cute Christmas trees.


They even managed to create a real masterpiece from the leaves for writing.

For kindergarten children, this kind of work is suitable, take thick cardboard and cut it out in the shape of a triangle. A base will come out, on which you ask the child to stick the strips.

Well, and in conclusion to this chapter, here is another invention, this is a quilling-style herringbone.

Master class on making a New Year tree from napkins
It turns out that you can also quickly build a Christmas tree from ordinary napkins, and if you dream up with color, then it will turn out to be absolutely unique.

Such a masterpiece is made in this way, circles are drawn on a napkin, and after that the middle of each figure is connected with a stapler. Then cut along the contours of the workpiece.

And straight to the middle, begin to crumple the edges, lifting them. To make a flower. And then glue it to the tapered base, which you make in advance. You can even arrange it in the form of a topiary. Then decide for yourself.

In more detail, if you are interested in this work, you can also use such step-by-step instructions in pictures:


Christmas tree stencils for cutting and printing
For those who love masterpieces in the style of vytynanka, he will take these stencils as a basis. Using an ordinary clerical knife, cut out the Christmas tree, or you can take a special tool that the masters of this business have.

Cut two blanks at once, cut a strip on top of one, and bottom on the other.


Here are a couple more ideas, what kind of beauty can appear, see it all for yourself. Delicate and white forest beauties who are so attractive.

Take a leaf and fold it in half, draw patterns and a contour of the fir. Cut out all parts with a cutter.

Take your time, this work does not require fuss.

You can print the template, and not fold and draw the tree yourself. Remember to also leave gaps on the bottom of the paper so that you can twist and glue them later.

This is what I mean. Once you make these two blanks, connect them together.


And I suggest downloading the stencils right now from my blog:


By the way, you can create a whole composition with a hut. This is well known to all. Wow, and beauty will be! Request templates through comments if you liked the house.

Volumetric Christmas tree for a New Year's card (step by step instructions)
Of course, on New Year's Eve, we give everything to each other, and we do it together with the children, and of course. Here I propose to arrange them unexpectedly, namely, use the origami technique. This can be done using regular triangles, which are obtained by folding regular squares.

The next work, you will need two sheets to complete it. On one, you print a Christmas tree and make cuts along the dotted lines, and then glue this blank to the background.
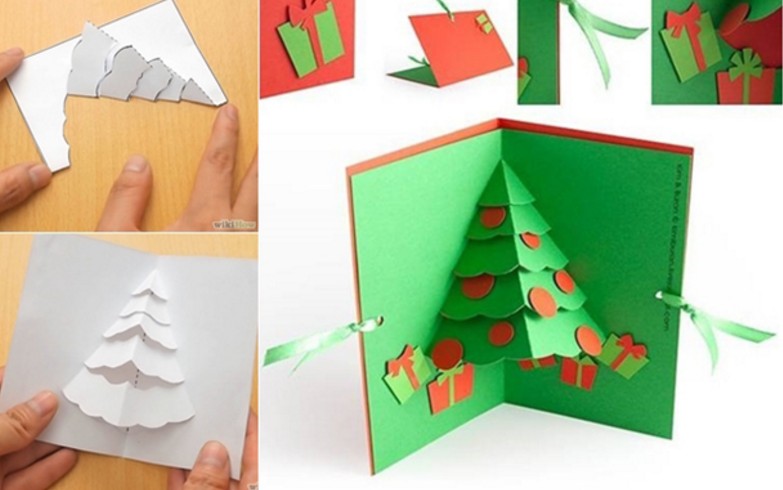
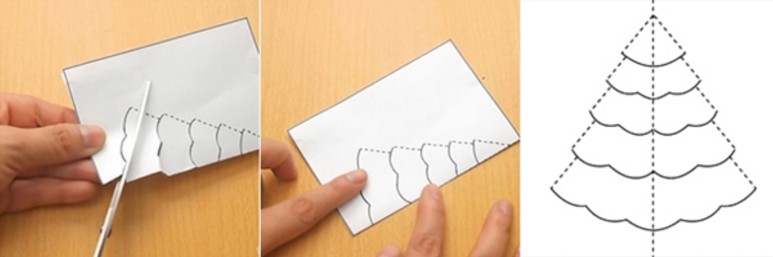

Anyone who does not understand the stages of work in this picture may well use the video hint.
Another masterpiece, using all the same origami technique, you will get a cool little thing that you can give your mom or your loved one. See instructions and repeat step by step.


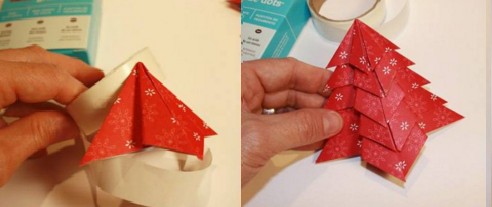
These are the ideas of work you can take as a basis.


Paper tree on the wall
For a long time I could not find a suitable option, but then I stumbled upon these ideas. It turns out that there is nothing difficult in creating such a huge and tremendous Christmas tree. See everything for yourself, and weird, it's so great when you and your family are together.

In addition, I also found a funky paper beauty that can be glued to any wall.
This decor can be used to decorate any nursery or kindergarten room. I was struck by this idea and I am sharing it with you. It is necessary to download templates (you can request them from me, I send them free of charge to your email address). And voila, let your imagination run wild, paint with your children. There will be 22 stencils in the file, which must be printed on a large A4 sheet and then colored.

Here's what you can do, go for it. By the way, there are still other options for coloring for the New Year for children, go ahead and take a note.


Thadam that's all, the article has come to an end. It was a pleasure for me to share everything that I found. I hope you were completely delighted with scrolling through this page.
Have a good day and sunny mood to everyone. Bye!
Best regards, Ekaterina
The last days of December are busy. Each hostess is trying with all her might to create a fabulous atmosphere in her home. But in order for your home to become even more beautiful on New Year's days, it is not necessary to buy a bulky and heap of Chinese decorations. It is enough to arm yourself with scissors, glue, a sheet of cardboard and a pack of colored paper. From these materials, you can make very unusual and cute crafts that will become a wonderful decoration for your home or office. Some products can be used like, while others can be used on their own. A few hours spent making paper jewelry are worth the joyful smiles of your family!
Paper herringbone
Original Christmas tree with lace-up edgesThe Christmas tree is the main decoration of the New Year's interior. creates a solemn mood and makes us happy all winter holidays. Well, the decorative paper tree that will decorate your windowsill can be stored until next year. To make this craft, prepare:
- 8 Christmas trees, cut out of thick paper or cardboard
- cutter
- scissors
- hole puncher
- Double-sided tape
- white thread or thin cord
- white sequins
- white acrylic spray
- ruler
- sheet of cardboard

Since there are no Christmas trees without stars on the top, make the top first. Draw the outlines of the shape on the cardboard. Then, using a ruler and cutter, carefully cut out the sprocket. Assemble a Christmas tree using eight pieces of paper. Connect it with double-sided tape. The edges of the product should be symmetrical, so it is better to fasten the corners with glue.
 Examples of the design of cardboard Christmas trees
 Punch holes along the edges of the craft and paint your item with white spray paint. Make the trunk of the tree 5 cm wide.Then pull a white woolen thread or cord through the holes made earlier. Use a needle with a large eye for easier stitching. Sprinkle the star with white paint and attach at the top with glue. Decorate the entire piece with glitter. To do this, you can use golden rain, Christmas decorations or multi-colored paper glued to the sides of the Christmas tree.
House for sweets
 These houses will be an excellent packaging for New Year's cookies.
 This craft can be used to decorate a home, hang it on a Christmas tree, or use it as a packaging for sweets. To make it you will need:
- house template ()
- scissors
- stationery knife
- ruler
- double tape

 Creating a flat pattern of a cardboard house
 First of all, print out the template for the house. You can also draw a similar sketch of your choice. Then cut out the template. For particularly delicate items, use a utility knife. Bend the workpiece along the dotted lines using a ruler or a card folding tool.
 Step-by-step instructions for making crafts
 Use double-sided tape to glue the house together. Decorate and decorate the product as you like. Fill the craft with your favorite sweets and you can please the children with it! Well, if you print templates of houses on colored paper, you will have a colorful New Year's town.
Christmas lantern
 A cardboard flashlight ideal for kids' creativity
 Lanterns will create a fabulous atmosphere in the house. They can be made from colored paper in just a few minutes! Cut the ribbons of the same length and width (the dimensions depend on the size of the future product). To make one flashlight, prepare about 15 strips of paper. Then stack them and use an awl to make holes at both ends of the blanks.
 Step-by-step instructions for making a flashlight from paper strips
 Thread the thread through one side. Attach its end with tape to the strip. Then pass this thread through the second hole. Stretch it so that the paper bends into an arc. Secure the thread with a knot. It should be large and not slip through holes. At the final stage, straighten the strips so that a ball forms. So our flashlight is ready! Several products of different colors and sizes, hanging side by side, look very beautiful.
Volumetric snowflake
 3D snowflake looks impressive and easy to create
 Traditionally, most families use it as a New Year's decor. They are made mainly of paper and decorate the whole house with "snowfall": a Christmas tree, walls, windows. There are many techniques for making this craft. For example, you can make a spectacular volumetric snowflake. To do this, you need to stock up on:
- paper (white, colored and wrapping)
- scissors
- glue
- stapler
 Step-by-step instructions for creating a volumetric snowflake
 Cut six square pieces. Fold each square diagonally and cut the inner cuts with scissors. Open the square and lay it out in front of you on the table. Roll the first row of strips into a roller and fasten its edges with a stapler or glue. Then turn the snowflake to the other side and similarly connect the two strips of paper that are closer to the center. Turn the product over each time and secure the remaining strips.
Fold the other five blanks in the same way. Connect the three pieces of the snowflake with a stapler in the middle. Fasten the remaining three parts in the same way. Now glue these two halves together. To keep the shape, it remains to connect the snowflake where each of the six parts is in contact with the neighboring one. The decoration can be made of any color of paper.
Christmas Angel

The magic spirit of Christmas will always be present in the house, decorated with figurines of angels. They can be created with:
- colored paper
- PVA glue
- scissors
First, make a patterned snowflake. To do this, prepare a sheet of white paper measuring 20 by 20 cm. Fold it in half, then in half again and fold two opposite corners together. Cut with sharp scissors. Instead of paper, you can use openwork napkins. Glue half of the snowflake on colored paper and cut a semicircle out of it.

Thoroughly coat its edges with glue and connect into a cone. Cut the wings out of paper and attach to the back of the product. Draw the face of the future angel: eyes, nose, mouth. Hair can be made from cotton wool. Attach a pendant to the toy so that the Christmas angel can decorate your Christmas tree.
Paper star

The origami technique can be used to create Christmas decorations. From paper squares folded in a special order, you can easily make a star for the New Year's table. Stock up on colored paper and patience.
- Fold the paper square in half.
- Bend the right corner of the resulting triangle up.
- Then fold it halfway down and then up again.
- Unfold and flatten the top of the corner.
- Fold the top corner back as shown.
- Fold back the left corner as well.
- Make eight of these elements. Put their wide part in a small square.
- Flip to the other side and bend part of the small square, hooking it over the large square of the other part.
Cardboard snowman

What is New Year without a snowman? However, it doesn't have to be made of snow. Instead, you can use cardboard or heavy paper. This craft is suitable for home decoration and gift wrapping, or can be used as a Christmas tree decoration. To make a snowman, you will need:
- cardboard
- colored paper
- scissors
- black tissue paper

Glue the cylinder out of white cardboard. Make serrated cuts on one side and fold them inward. Cut out a circle of the appropriate diameter and glue it onto the cylinder. This will be its bottom. On the other side, attach a cover of the same size. Paint the top edges of the cylinder and the brim with black. Cut out black eyes and buttons from colored paper, and a nose from red paper. Make the snowman's hands out of strips of tissue paper.
New Year is approaching imperceptibly and inexorably, like a snow leopard, on soft white paws. However, unlike a beautiful but predatory animal, a cheerful winter holiday gives us positive, joyful emotions. Every hostess wants her house to sparkle for the New Year not only with cleanliness, but also with a beautiful, stylish home decor.
In stores there is a huge selection of all kinds of decorations for a house or apartment. But you can decorate your home before the New Year and Christmas holidays with your own hands! For example, paper decorations for the new year 2019 will transform your home and finally prepare it for a joyful magical holiday.
DIY New Year's volumetric vytynanka
In fact, it is quite simple to create a great New Year mood, both for yourself and for your loved ones. It is enough just to have a desire and some items necessary for this.
Such openwork products, as, will favorably decorate a room, as well as a voluminous protrusion or a composition from many of these can be presented to grandparents, colleagues, and friends. Just a few hours of your time and a real winter fairy tale can appear on the window.
To create a volumetric vytynanka you will need:
- printouts of a drawing for vytynanka;
- a stationery sharp knife and a cutting stand (you can take a regular cutting board;
- glue.
Step 1. First of all, you need to print the selected template, of which there are just a dime a dozen on the Internet, on paper in duplicate for each drawing.
Step 2. Place the printout on the board and, using a clerical knife, carefully cut out all the drawings along the contour of the future "holes", leaving the bottom of the drawings a little space for "fastening".
Step 3. When all the patterns have been cut out, make paper “fasteners” at the base of the models and fix them with glue as shown in the photo.
Step 4. From above, two pieces of one paper craft just need to be glued together.
DIY Christmas paper snowflakes

Probably, there is no adult in the world who has never cut a snow-white snowflake out of paper to decorate a window or a Christmas tree at home, a classroom or an assembly hall at a school with it. And, indeed, do-it-yourself snowflakes are a quick, cheap and incredibly beautiful way to dress up a room for the New Year.
Our site has collected for you a small archive with templates for New Year's snowflakes, which you can safely use and, if you wish, make your own adjustments to the finished design. Snowflakes can create a fabulous New Year's atmosphere at home in the blink of an eye!
To create snowflakes you will need:
- paper;
- scissors;
- fishing line or thread to hang (glue or tape to glue the snowflake to the wall or window glass).

Step 1. First, you need to cut a square out of paper. To do this, fold a sheet of any format diagonally so that the edges of the resulting triangle are ideally connected to each other. Cut off the excess. Your snowflake will be the size of this square.
Step 2. To make a snowflake, fold the square diagonally and fold the triangle in half several times. The more folds of the triangle, the more rays the snowflake will have. But, at the same time, the more times you bend the triangle, the more difficult it will be to cut, in view of the multi-layer of not too thin paper.
Step 3. Now transfer the drawing from the template (or your own drawing, relying on imagination and creativity) onto paper.
Step 4. Take sharp scissors and carefully cut the pattern along the outline.
Step 5. Unfold the snowflake and admire the result. You can hang!
Multicolored paper garland for nursery

You can make a very unusual and original one with your own hands from colored paper of the brightest shades. If you use templates of geometric shapes, you can create wonderful layouts, from which it is then easy and simple to assemble a garland.
This interesting decoration will bring liveliness and color to both the nursery and the common room, because the funny garland will raise the mood of both children and adults. Also, the garland can be hung on a Christmas tree as Christmas tree beads.
To make paper garlands you will need:
- colored paper or colored cardboard;
- pencil;
- ruler;
- scissors;
- glue.
Step 1. Download templates of geometric shapes and print them on colored paper, or, armed with a ruler and a simple pencil (preferably with an eraser), make a drawing of three-dimensional geometric shapes, again, on colored paper or colored cardboard.
Step 2. With the help of scissors, you need to cut out each future geometric shape along the contour.
Step 3. Now glue the figures, remembering to pull the thread in time, so that, when assembled, the thread of the garland remains inside the figure. The garland is ready!
The main guests of the holiday are Santa Claus and the Snow Maiden made of paper

What New Year is complete without the kind wizard Santa Claus and his beautiful Snow Maiden? Even if you already have worthy figures of these heroes of the winter holidays, which you put under the Christmas tree every year, the symbols of the New Year made with your own hands will seem to you a much better solution. If there are no figurines at all, there is nothing to think about, arm yourself with the necessary tools, materials, a little imagination and hard work, and on the road - create beauty!
To create New Year's heroes you will need:
- white paper;
- red and blue cardboard;
- compass;
- rod from the handle;
- pencil;
- glue;
- paints;
- felt-tip pens.
Father Frost
Step 1. Using a compass, draw a circle on the red cardboard and cut it out.
Step 2. Fold the circle in half and cut half, and from the semicircle roll a cone and glue the edges.
Step 3. White paper should be cut into strips, which, in turn, you will need to cut into fringes on one side, a little more than half a strip.
Step 4. Add "curl" to the fringe by twisting it around the shaft of a ballpoint pen.
Step 5. Cut a small oval out of white paper and draw the face of Santa Claus on it, then glue the oval just above the middle of the cone. If the quality of the paints allows you to paint directly on the figurine, it will be even better.
Step 6. Now, with the help of the chopped and twisted fringe, make Santa Claus a fur coat (gluing the fringe to the base of the cone - this is the hem of the grandfather's robe), beard, eyebrows and the edge of the hat.
Step 7. Draw mittens, a hat for Santa Claus with paints and decorate a fur coat with a pattern. The fairytale wizard loved by all children is ready!
Snow Maiden
Step 1. Make a cone out of blue cardboard, taking as a basis a semicircle slightly smaller than for Santa Claus, and, additionally, cut out a small semicircle for a kokoshnik.
Step 2. On a small semicircle you need to make a small incision and bend the edges in different directions so that you can “put on” the kokoshnik on the Snow Maiden. With the help of scissors, make the top of the future kokoshnik slightly similar to a church dome.
Step 3. Now glue the kokoshnik to the cone.
Step 4. Draw your beauty's face (you can directly on the cone, or you can also draw on a small oval of white paper), also draw a bang, and in the back - a braid.
Step 5. Make curly fringes out of white paper and, like Santa Claus, decorate a fur coat, decorate a collar and make snow-covered eyelashes.
Step 6. Paint the Snow Maiden with mittens and patterns for a fur coat and kokoshnik at your discretion. The granddaughter is ready!