DIY foam balls toys. DIY Christmas balls. Interesting ideas and master classes
The first Christmas balls appeared in Germany in the 18th century. In those days, Christmas trees were decorated with apples and handmade decor, but 1848 turned out to be a barren year, glassblowers urgently made the first apples from glass, and the local population liked them. Thus, they gradually replaced natural jewelry and artificial crafts. But time does not stand still, and now everything again returns to manual creativity. Handmade may not be perfect, but the soul is put into it, and nothing can replace the warmth of handmade products. Today, in this review of the site, we will tell and show several master classes on how to decorate your home in an unusual way with the help of self-decorating Christmas balls.
Paper as decoration is the cheapest and easiest option for decorating Christmas balls. Even if something doesn't work the first time, it's okay, you can try again.
Unusual decoration with corrugated paper roses
Before making unusual Christmas balls out of corrugated paper, you need to prepare a glue gun, scissors and beads.
The order of work is as follows.
- Cut the wrapped paper into 5 cm pieces.
- At an angle in the form of a scallop, cut each workpiece, without finishing cutting to the end of about 1 cm.
- Dissolve the workpiece and twist it in the form of a rose, glue the edges.
- Glue all the roses to the foam ball. Additionally, you can decorate with beautiful beads or rhinestones.
- Glue on the loop.

Step-by-step decoration of balls with paper tubes
To decorate Christmas balls with paper tubes, it is better to use bright glossy magazines. As a blank, you can use foam or twist a ball from a newspaper and wrap it tightly with threads.
- Roll several long tubes from magazine pages, then twist them into flagella.
- Lubricate the surface of the ball with glue.
- Press one end of the tube tightly to the top of the ball, then begin to twist the strip in a spiral.
It is interesting! Old newspaper or cloth can be used instead of magazine pages.

Decorating balls for the New Year with paper flowers
To surprise guests on New Year's Eve with unusual and delicate Christmas balls decorated with paper flowers, you need to buy a special hole punch for scrapbooking, with which you can quickly make the same details.

To decorate a foam ball, you can use either plain paper or a combination of 2-3 shades. All flowers are fastened with safety pins with decorative beads.

Decorating the interior with origami balls
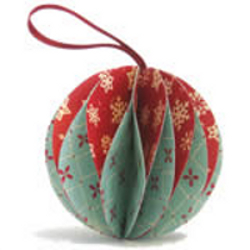
The main feature of the origami ball: it does not require a base. Today we will tell you how to make a beautiful ball of lilies with your own hands, which is used to decorate not only the Christmas tree, but also the interior of the room.
| Illustration | Description of action |
 | Make a square out of a sheet of A4 white paper, fold it in half with a triangle, the edges of which bend in such a way that you get a square again. |
 | Unscrew the edges and smooth out the center. |
 | Bend the tops of the protruding triangles, and then their edges inward, so that the figure again takes the shape of a square. Roll up the workpiece in the form of a cone and glue the sides with tape. For one flower, you will need 5 blanks. |
 | Connect the two blanks with tape, first along the upper edge, then below. Fasten all the parts together in the same way. |
 | In this technique, collect 10 flowers from paper of different shades. |
 | Glue the flower petals one by one with double-sided tape. You can use a stapler or PVA glue. |


Beautiful felt decorations for Christmas balls
Needlewomen fell in love with soft felt for a long time. It is convenient to work with the material, it does not crumble, it lends itself easily to drapery, and bright colors can be chosen to decorate the interior for any holiday.
How to make felt roses to decorate Christmas balls
Pre-prepare felt of different colors, a foam ball blank, scissors and a set of safety pins with beads. The order of work is as follows.
- Glue the decorative loop-loop to the workpiece.
- Prepare circles from felt, then cut in a spiral with a thickness of no more than 1 cm.
- Fold the snail-shaped strip and secure the base with a thread. You can take a ribbon of two shades and roll it together, you get a more voluminous and colorful flower.
- Make blanks from different colors.
- Secure to the Styrofoam ball with safety pins.

It is interesting! You can make multi-colored felt blanks, put 2-3 pieces on top of each other and connect them with a safety pin.

Soft felt Christmas tree decorations
To make a Christmas toy, we need felt, a little padding polyester or any stuffing, rhinestones, a decorative ribbon and a needle and thread.
Work description.
- Cut 2 circles out of felt.
- Glue rhinestones or any decor on the front side of both parts.
- Connect the two circles together and sew with a buttonhole seam around the perimeter. Shortly before the end of the work, put a synthetic winterizer inside and sew a loop.

How to make a Christmas ball with fabric decor
New Year's crafts decorated with fabric look mesmerizing. They can be made in the general style of the interior and in any color scheme.
Master class for decorating Christmas balls with ribbons
Before you make a New Year's ball with your own hands, you need to prepare:
- satin ribbons from 2 cm wide in two colors;
- glue gun;
- decor from beads or rhinestones;
- foam ball;
- decorative cord for the eyelet.
Let's consider decorating in more detail.
| Illustration | Description of action |
 | Cut the ribbons into squares. Apply a little glue to the top of the ball and glue one element. |
 | Fold a triangle from a square of the second color, then bend it in half and fix the edges with a drop of glue. Make several of these blanks. |
 | Apply glue to the long side of the triangle and glue it to the corner of the square with an angle to its middle. Glue 3 more elements in the same way to completely cover the square. |
 | Glue the next row of triangles with corners to the center of the ball. |
 | Burn the edges a little with a lighter so that they do not bloom. |
 | Further, all rows are glued in the same way. We alternate pink and blue. |
 | Glue one blue square on the bottom of the toy and fasten the triangles almost to the end. |
 | Take a pink ribbon 15 cm long, singe the edges and sew along the edge with a needle and red thread. |
 | Assemble the bow, secure the edges and glue it to the base. |
 | Glue a special mount or a satin decorative loop to the top. |
In more detail, the master class can be viewed in the video:


DIY decoration of Christmas balls using the patchwork or kinusayga technique
In the patchwork style, you can decorate Christmas balls in two ways:
- pre-sew a blank from the scraps;
- decorate the ball without using a needle.
A simpler and more interesting idea is the performance in the kinusaiga technique. By this principle, you can create whole pictures not only for the New Year. For work we need:
- foam blank;
- pieces of fabric;
- glue stick;
- thick darning needle, awl or stack needle;
- decor.
The order of work is as follows.
| Illustration | Description of action |
 | Make markings on the foam blank and cut the lines with a clerical knife. |
 | Apply glue to one section of the workpiece, attach a piece of fabric and use a thick needle to embed the edges inward. |
 | Cut off excess fabric. |
 | Gently tuck all edges of the fabric inward. Process the entire workpiece in the same way. |
More details about this technique can be found in the video:
Additionally, you can decorate the New Year's ball with ribbons, beads and rhinestones, as well as perform more complex patterns


How to decorate Christmas balls with hand embroidery
Handmade embroidery looks beautiful and unusual as a decoration of New Year's balls. To do this, it must be done on a prepared fabric or canvas, and then cut and glued to the workpiece. The rest of the surface should be decorated with an applique made from a suitable material. You can embroider several pictures separately for each side of the toy, and then glue them on the foam, then complete the decoration with rhinestones, sequins or beads.


Master classes on unusual decoration of Christmas balls
You can use not quite familiar objects to decorate Christmas balls. The result is a completely unique product that will not leave anyone indifferent.
How beautiful you can decorate Christmas balls with your own hands using cords and beads
Christmas balls decorated with beads look very nice. To do this, you can disassemble an old necklace or buy items in stores for needlewomen. In addition, we need a foam blank.
Option 1
String the beads on a cord and glue the whole ball with them. A selection of different shades will look beautiful.
Option 2
String the beads onto safety pins and attach them to the workpiece. Repeat the same actions until the ball is completely closed. Finish with a loop for fastening.


Buttons, coins and pasta for an unusual decor of Christmas balls
Christmas balls decorated with buttons look unique on the tree. The buttons can be matched in different colors and sizes, which makes the jewelry more unusual.
It is interesting! You can replace the buttons with pasta or coins. First, it is necessary to wrap the workpiece with foil so that the base does not shine through. Additionally, the entire ball can be painted with spray paint, covered with glue and applied with glitter powder.


Fabulous patterns of threads and beads for decorating Christmas balls
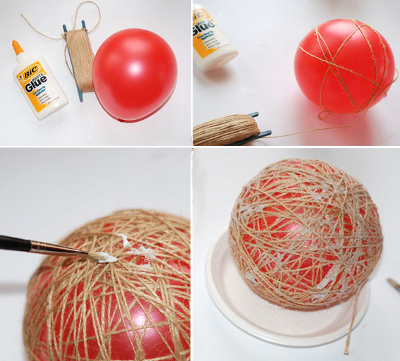
Christmas balls made of threads can be used not only to decorate a Christmas tree, but also as an element of decorating a festive interior. For work we need a balloon, PVA glue, threads and decorative braid. You can also decorate an old Christmas tree toy in this way, which over time began to look unpresentable.
The order of work is as follows.
- Inflate the ball, coat it completely with glue.
- Wrap it in random order with threads, then coat it again with glue.
- After the glue dries, pierce the balloon and gently pull it out through any hole.


Decorating a New Year's ball with beads is a painstaking task that requires professional skills. You can simply string the beads on the fishing line in a certain order and glue them to the base. Experienced needlewomen use complex schemes to create a real masterpiece, which, if desired, you can always figure it out on your own.


Magic painting of Christmas tree balls
Another option for decorating Christmas balls is decorative painting. You can draw whatever you want, and additionally the balls are decorated with shiny powder, semolina or sequins.
Creativity for the little ones: handprints and fingerprints on balls
Even kids will like such creativity, and you can make the decoration in a playful way. For work, you need to prepare the ball, first degrease it. You will also need acrylic paints and fine brushes. Here comes a big field for imagination:
- you can paint the entire palm of the child and let him hold on to the ball. After the paint has completely dried, you need to apply a drawing: your fingers can be snowmen, and your palm can be a snowdrift;
- you can draw an angel from handprints;
- from fingerprints you get funny faces.


Artistic painting of Christmas balls with stained glass paints
Painting with stained glass paints is a real work of art. You can do it according to a sketch or apply arbitrary lines in the form of falling snow or drops with thin lines, additionally sprinkle the drawing with shiny powder or add phosphor pigments that will glow in the dark.


How to decorate Christmas balls with your own hands using decoupage technique
Decoupage technique is already familiar to many. With its help, they decorate not only Christmas balls and small objects in the house, but also furniture, giving it a second youth. For work, you need to prepare:
- blank;
- napkins;
- sponge and acrylic paints;
- PVA glue, finishing varnish.
It is important! Patterns from napkins for decoupage must be torn off by hand: so uneven edges will not be so noticeable under a layer of glue on the finished product.
A step-by-step master class on decorating a Christmas ball with snow using decoupage technique.
| Illustration | Description of action |
 | Pre-degrease the surface of the ball. |
 | Apply the paint with a sponge using dabbing movements. |
 | Tear off the picture you like from the napkin. |
 | Attach the drawing to the workpiece and glue it with a brush and PVA glue, you need to apply movements from the middle to the edges. |
 | Sprinkle uncoated surfaces with semolina. |
 | After drying, coat the finished ball with varnish. |
 | Using the decoupage technique, you can decorate the entire ball or its individual sides. |
In more detail, the master class can be viewed in the video:
Conclusion
For the coming year of the Yellow Pig, decorating Christmas balls with acorn hats, cones or small twigs will be relevant. Toys decorated with openwork lace or simply wrapped in a translucent fabric in the form of gift wrapping will add home comfort. As you can see, there are a lot of ideas for decorating, and such products look completely different in the interior than those bought in stores. In addition, co-creation will bring all family members together.
Did you like our ideas? Which one have you already planned to bring to life? Let us know in the comments.
Finally, be sure to watch the video selection of unusual decorations for Christmas balls - perhaps it is in it that you will find a great idea for yourself.
MAYBE YOU WILL ALSO BE INTERESTED IN:
Christmas balls are an integral part of decorating a Christmas tree. Of course, you can always buy them in the store, but you must agree that DIY Christmas balls are something special! In addition, if you have the time and desire, you can easily make your unusual Christmas toy, and we will show you several ways of how you can make a Christmas ball with your own hands.
First, let's make a reservation that in order to make a New Year's ball you need a base: it can be an old New Year's glass ball, plastic, foam, foam, or even a papier mache ball. True, in the latter case, you will have to tinker, but I will not dwell on how to make a ball out of papier mache. Let's agree that you already have the base and talk about how you can decorate / change an old ball or make a new one from transparent glass (plastic) balls.
Master class Christmas balls do it yourself photo
Everyone has old Christmas balls - therefore, we start with them. The simplest thing that can be done with last year's Christmas tree decoration is to cover it with some beautiful fabric, tie a thread for hanging, then, at your request: tie it with a ribbon, add some more decorations (spruce twigs, berries, snowflakes, lace - everything whatever your heart desires). It turns out very beautiful New Year's toys, and most importantly, for the next New Year, you can remove all the decor and do something new.


And you can use not a single piece of fabric, but strips or ribbons. And in this case, again, you can use an old New Year's ball or any other round base.


Christmas balls pasted over with round fabrics look good.

Or even a yo-yo flower decor. By the way, they are done very simply. Cut out a circle template from cardboard, trace it on the fabric, cut out the circles from the fabric. Sew our fabric circles around the edge with thread (photo # 3), then tighten the thread - the seam should be in the center, fix it and cover it with a piece of fabric and a bead. Glue the finished yo-yo flowers to the ball. We decorate the top with twigs, cinnamon sticks, roses, etc.

In addition, beautiful multi-layered Christmas balls are obtained from the fabric. True, in this case, you need a foam ball and tailor's pins. The manufacturing technique is shown in the photo. In principle, nothing complicated, and most importantly, you can create different color combinations.


In addition to fabric, you can also use a lot of materials for decorating Christmas balls. You can glue them with sequins, threads, acorn caps, pistachio shells, buckwheat, buttons, pieces of old CDs, strips of paper and even tree leaves.


Or you can make adorable New Year's cupcakes from old balls, as shown in the photo below.


Or from a foam ball and large sequins.

Christmas balls with snow
Christmas balls with snow - (of course with artificial snow) are great! Not sure how to make artificial snow with your own hands? In fact, everything is simple, in order to make artificial snow with your own hands, you will need: semolina, white paint and glue. We mix everything together and the artificial snow is ready (experiment with the proportions, because there are no comrades for taste and color). With the resulting mass we cover the balls in whole or in part, let them dry, decorate on top with sparkles, beads, ribbons, etc. It turns out original Christmas tree decorations - Christmas balls.


A similar effect (not so textured, but still) can be achieved using regular white paint - you just need to apply it with a sponge - in several layers.


Decoupage Christmas balls
Decoupage is always beautiful, and decoupage of Christmas balls is doubly beautiful. We glue the "background" pieces onto the ball, then the main drawing in the first photo is: an angel in front, and flowers in the back. Then we put glue on the ball in places (on the top, in the center of the flowers) and apply the potal, press it with a piece of cotton fabric. Then, with light movements of the brush, brush away the gold leaf from the areas not covered with glue, in the end you can cover everything with varnish. And, of course, we attach a beautiful loop.

Decoupage of Christmas balls can be done in different ways: use not only potal, but again artificial snow or even coarse salt - you get unusual Christmas balls.


Another idea that deserves attention: not just decoupage, but decoupage with voluminous contours. In the first case, a napkin is glued, and then on top of the same flower, previously glued to thick paper (cardboard). Then, using glue and sparkles, we create more voluminous bright accents - it turns out cute.

In the second case, we use voluminous lace. We cut out the necessary details. Apply soil to the ball. Then we glue the pieces of lace. After the glue has dried, paint the ball with white acrylic paint. Next, the most difficult thing: on the palette, mix wax and dark brown oil paint. Apply colored wax to the lace surface with a brush. Then we rub the wax into the volumetric surface with a foam rubber sponge or sponge, thereby revealing the relief. Remove excess wax with a cloth with solvent, lightening the surface gaps between the lace and the protruding parts of the lace. Next, rub a colored wax-patina into the decorative surface of the ball with your finger, giving an even more aged look to the product.
Now let the patina dry for several hours. If desired, the surface can be protected with alcohol varnish. The varnish must be applied in two layers, allowing each to dry properly. The varnish will allow you to wipe the surface with a damp cloth. Decorate the finished ball with ribbons and admire the result!

Decorating transparent christmas balls
Transparent balls are just as interesting to work with. First, glass balls can simply be filled with what? Anything! Threads, strips of paper, pebbles, berries, cones or even sand with shells - you get an original sea ball.


Or you can glue them on the outside. The palm print looks original; it can be done with paint or pure sparkles.


It turns out originally if you apply glue to the ball, let it dry, then rinse it off - you get a slightly pale glass (frosted).

Or you can paint them from the inside, and make a painting on the outside.


Those who have split balls can only be envied. You can make a difficult painting of New Year's balls, but work hard and make an unusual composition inside - a three-dimensional image, as was done before with decoupage. Reuse gold leaf, artificial snow, beads, etc.


Styrofoam Christmas ball decoration
Shown above are beautiful layered fabric balls paired with tailor's pins. Using the same pins, you can beautifully wrap them with threads, ropes, twine.

The beauty of foam balls is that they are "soft" in them you can use a clerical knife to make slots into which you can stick a cloth or paper with a nail file. You can directly press in paper or fabric without a preliminary cut. And then we glue the seams with beautiful lace, ribbons or beads. By the way, using this technique, you can make different images: stars, Christmas trees, cakes, etc.


And if you make a small basket out of cardboard or wire and attach it to the balloon, a charming toy in the form of a balloon will come out.

By the way, such a New Year's toy can also be made from glass balls.

Good luck with your experiments and a happy new year!
The New Year's ball is one of the great classic New Year symbols. Making such jewelry with your own hands has recently been especially popular; this activity allows you to give a festive atmosphere an exclusive unique look and comfort.
Our grandmothers made Christmas balls with their own hands at a time when factory decorations were not available. They were made from papier-mâché, cheap glass blanks, cardboard and other materials at hand. And now, taking out old toys from the shelves, you feel the warmth of the hands of your relatives. Do you want your children to cherish these precious memories as well? Dedicate New Year's Eve to organizing a unique workshop that will involve members of the whole family, creating their own fantasy Christmas balls.
Decorating blanks
One of the easiest ways to create your own Christmas tree decorations is to decorate those that are sold in all craft stores and are inexpensive. Cheap, simple balls can be purchased as such devices.
Ready-made balls are made from different materials:
- foam;
- plastic;
- glass or ceramics;
- cardboard;
- wood;
- fabrics and padding.
Foam blanks are perfect for decorating with special pins and sequins, beads and beads. It is easy to stick such needles into soft foam, laying out any ornament.
Ball of foam blanks and sequins
Plastic balls can be pasted over with a variety of materials: cloth, paper, glitter, beads, twigs, cones, dry leaves, varnished or painted. This is a great and affordable option for decorating.

Jewelry made from natural materials
Glass and ceramic blanks are ideal for decoupage, painting with paints. Some glass balls can be decorated from the inside, which means they can be filled with gel, water, a beautiful composition with a plot can be created inside the ball (for example, a Christmas ball with snow), tinsel or other decorative material can be put there. Ceramics are a stylish and expensive option for staining.
Transparent plastic balls can also be used as glass balls. It will be cheaper, but no less beautiful and safer.

Christmas ball with glass snow
Cardboard blanks are often used for children's crafts. Any details are easily attached to them with glue.
Wooden toys are painted with special paints and varnished. Before that, you can cut out a fantasy drawing on them. Decoupage technique, burning and, of course, gluing with various materials is also a good idea for such blanks. In the photo below, a wooden Christmas ball is decorated with thick thread.

Wood blank decor
You can sew Christmas ball toys yourself. Taking a piece of fabric and putting a filler (cotton wool or synthetic winterizer, foam rubber) in the middle and making a kind of bag, you can get a convenient blank on which it is easy to sew any jewelry.
Decorating a glass ball with beads
An exclusive decoration for a Christmas tree can be made in a couple of minutes if you have a plastic or glass blank, beads, an openwork ribbon and all-purpose glue. Such a craft does not require special skills, you just need to be careful.
Following the photo below, apply glue to the New Year's ball and distribute it evenly with a brush. Then, while the glue is not dry, sprinkle the workpiece with small beads, slightly pressing each piece and making sure that the beads fill the entire surface.
It remains to thread the lace tape into the loop and let the toys dry.

Beading a glass ball: applying glue

Spread the glue over the workpiece.

The blank with glue must be covered with beads

Ready Christmas balls (photo)
This method of decoration also has a minus - beads may crumble over time. This can be avoided if you stick it on the inside - fill a transparent ball with glue and pour light beads or sparkles into it in sufficient quantities. Then you need to properly distribute the beads by rolling the ball. Attached to the glue, the beads will decorate the transparent walls from the inside and will not crumble later.

We decorate a transparent ball with beads from the inside
Preserving memories in Christmas toys
Winter holidays are traditionally considered family ones. A great idea is to make several toys every year, symbolizing the changes that occur with loved ones in time.
While your children are still small, and their foot can fit on a ball, make prints of their legs on paper and transfer their image using paint to decoration, so that later you can remember how small and cute they were.

Christmas tree toy with a picture of a child's legs
Another idea is to place photos of your loved ones inside the transparent blank, surrounded by tinsel or other decorative details. You can also use a photo to glue the ball on top, complementing such a design with beautiful ribbons, as in the illustration below.

Ball of photos
Decorating a Christmas ball with cloth and paper
Decorating Christmas balls with cloth and paper is one of the easiest ways to decorate these toys.
You just need to cover the toy with fabric or wrap the blank in it and fix it. The main thing is to find unique and interesting material, since it is he who will play the main role in this design.

Christmas tree decorations made of fabric

The ball should be placed in the middle of a piece of fabric

Then secure the fabric with tape

The decor is ready
Decorating with paper is even easier. An interesting way of such decoration is presented in the photo collage below. The blank was pasted over with tubes from newspaper, and then the entire surface was painted over with gold paint from a spray can. An elegant ball for the Christmas tree is ready!

Decor for a paper ball
An excellent option is to make jewelry from threads. If you know how to knit (it's best to crochet), it will be easy to do: you just need to knit it according to one of the patterns, and then starch the product, after putting it on an inflatable ball of the right size (sugar syrup can be used instead of starch).

Crochet Christmas tree toys
You can make Christmas balls, the photo of which is posted below, by simply winding threads on a ball and smearing with PVA glue. When the toy dries up, taking the desired shape, the ball must be removed and the product must be decorated with glitter varnish.

Ball for New Year made of threads
Rough twine can be wound around the workpiece, after applying glue to it. This country style decoration looks very relevant.

Country style ball
Decoupage toys
Decoupage of Christmas balls is one of the most exquisite ways to decorate blanks.
The specific technique for performing this decor depends on the base material for the drawing. It is best to choose glass, ceramics or wood for this.
We will use the following components:
- napkins for decoupage with the image of the world map;
- scissors;
- decoupage glue and finishing varnish;
- blank for a foam ball;
- ribbon and eyelets for Christmas tree decorations;
- brush.

Christmas balls (master class): materials
Manufacturing:
- We make a hole in the foam blank for securing the loop.
- Cut out the image of the desired size from the napkins.
- We apply glue to the workpiece, apply napkins and carefully level it so that there are no "bubbles" of air. Let it dry.
Add the ribbon and the necessary accessories.
Our balloon is ready!

Making a hole for the tape

We prepare drawings from special paper

Apply glue to the surface of the workpiece

Gently glue the paper, and the ball is ready!
Thus, you can apply almost any pattern to Christmas tree decorations. The most popular among children are New Year's Smeshariki. It is not difficult to find paper with these characters, but the toy will become the most popular with your child.
Christmas balls, a master class on the manufacture of which you could see among our photos, is not only a wonderful craft for the whole family, but also a good gift created by your imagination and soul. Fill your home with things that have true value, and therefore are a real treasure, because joint creativity does not lose its relevance over the years, but gives memories a special entourage!

Decorating balls with paper

Rustic or country style jewelry

Master class on decorating balls with lace

Natural ball

Decoupage toy

Simple decoupage of a cardboard blank
Comfort for your home!
New Year is rushing to us! Christmas ball parade!Christmas balls made of fabric
To create a New Year's ball from fabric you will need:
Foam ball with a diameter of about 7 centimeters;
- colored synthetic fabric;
- a lot of safety pins;
- a thread of white beads;
- scissors, thermal gun.
Christmas balls made of fabric step by step:
Cut the fabric into squares with sides about 5 centimeters. For a special texture, it is advisable to use squares of two shades (photo 2).

To simplify your workflow, draw median lines directly on the styrofoam ball. In total, you need to make eight lines located to each other at an angle of 45 degrees (photo 3).
Take a square of fabric and fold it in half, then in half again. Attach the square to the axis of the intersection of the median, pin with a safety pin (photo 4).
Also, fold the squares of a different color into four parts and each pin the balls crosswise to the surface (through one median) (photo 5).

This is followed by a layer of squares that need to be pinned in the same way as the first, but stepping back a little from the center and closing the gaps (missing medians) (photo 6). Continue pinning the fabric squares to the ball until you cover exactly half of the ball's surface (photo 7). It is advisable to make the other half a single color (photo 8).
On the back side of the surface of the ball, glue a string of beads using hot glue, twist this element in a spiral (photo 9). During work, a cobweb of glue may remain on the beads - this is not a problem. After a few minutes, when the glue is completely dry, the cobweb can be easily removed (photo 10).

The fabric Christmas ball is ready! As you can see, there is nothing difficult in this technique. With a great desire and perseverance, you will receive an originally decorated Christmas tree.
Author of MK: Madame Gritsatsuyeva (Margarita)
New Year's patchwork ball.

To make a New Year's patchwork ball, you will need:
Scraps of fabric;
- blank foam ball (any size);
- pins;
- felt-tip / pen;
- tape measure / centimeter;
- glue stick;
- wooden skewer;
- model knife, compasses, scissors;
- lace, ribbon, etc. for decorating the ball.
New Year's patchwork ball step by step:
Take a foam ball as a basis, in this case 60 mm in diameter. Using a centimeter, mark the center line on the ball, halve the circumference, mark with pins - this will be the lower and upper points of the ball (photo 1). Draw another line through these points using a centimeter, dividing the ball into four uniform parts (photo 2). Similarly, halve each bead of the ball, so you divide the bead into eight equal beads (Photo 3).

Now draw a cross line down the center of the ball. To do this, divide each line from the lower and upper points of the ball (where it was marked with pins) in half, and draw a transverse line along the marks (photo 4-5).
Next, take a compass, set it first at the top point of the ball, draw a circle, then do the same on the other side (photo 6). As a result, you will receive a blank, as in photo 7. Make cuts along all the lines (which were marked) with a clerical knife approximately 1-2 cm deep (photo 8).

You will need two templates, one in the shape of a triangle and the other in the shape of a trapezoid. Draw the templates on the paper, adding an allowance of about 7-8 mm. We advise you not to rush and not cut out all the elements at once. First, try to cut out one piece, and fix it on the ball. It is likely that you will need to adjust the template, increase or decrease the stock.
In this case, only two types of fabric were used, therefore, 8 triangles and trapezoids were cut from a plain red fabric and the same number of elements from fabric with branches (photo 9). To fix small elements, use a glue stick, which fixes the fabric parts and prevents them from moving (photo 10).

Then, using a wooden skewer, begin to carefully tuck the excess fabric into the slots, paying due attention to the corners. For convenience, use a large, blunt needle. For large items, a sandwich knife with a rounded tip is suitable (photo 11-12).
By analogy, fill in all the parts (photo 13). And after a couple of hours admire the result (photo 14-15). Now all that remains is to decorate the ball with ribbons, cords, beads, bells, pompoms, bead hats (photo 16).

Christmas balls made of threads.

To create Christmas balls from threads, you will need:
Air balloons
- dense decorative threads or thin multi-colored cords
- PVA glue + container for glue, in which you will need to make holes
- needle, scissors
Christmas balls made of thread step by step:
Take a balloon and inflate it to a suitable size. Tie up. You can wrinkle the ball a little in your hands to give it a more rounded shape.
Thread the decorative thread through the needle and poke through the empty plastic container for glue. It is better to do this closer to the bottom of the container.

When the thread passes through, pour PVA glue into the container, which will take quite a lot. It is not advisable to dilute it with water.
If using a thin ribbon, you can soak it completely in the glue (Figure 3).
Pull the thread through the container with PVA, saturating it entirely with glue, and wind it around the base ball. When winding the thread, the ball must be turned frequently. At the same time, do not forget that the balloon will need to be removed in the future, so leave some space in the area of the balloon tie.

When the desired tightness of the ball is achieved, cut the thread, leaving a small tail to create a loop (for suspension).
Next, the ball must be left to dry completely for 1-2 days or dried with a hairdryer for about 5-10 minutes. After the glue is completely dry, pierce the balloon with a needle and carefully remove it. It is more convenient to do this through the place of its tie. Make a loop from the remaining tail of the thread, tie it to the ball.

Decorate the resulting ball as you see fit. You can paint it, trim it with sparkles and sequins, or leave it without decor.
The ball is ready!
Christmas ball made of fabric

To create these Christmas balls, you will need:
Styrofoam ball with a diameter of about 10 cm
- tailor's needles with a metal cap
- three types of fabrics (three colors).
The process of creating Christmas tree balls from fabric:
First thing you need to do is cut a lot of fabric squares. If your ball will be 10 cm in diameter, then cut the fabric into squares with sides 3 inches. Make 8 squares from one fabric and 16 squares each from 2 other fabrics.
You can also use two small pieces of the first type of fabric so that the foam ball does not show through the first layers. First, we will make one half of the ball.
Pin one of the 2 fabric squares to the center of the ball, it may bulge a little, but in any case it will be completely covered by the next layer (Figure 2).

Then take one square of the first material and fold it 4 times to determine its center (Figure 3). You need to stick a pin into the center of the square from the inside out (Figure 4). Stick a pin with a cloth square into the styrofoam ball (Figure 5). The fabric must again be folded in half, pinning the corners (Figure 5).


You need to pin three more fabric squares to the ball (first material). The result should be a completely closed fabric tip (Figure 6).
Take squares from the second cloth and start pricking them onto the ball (Figure 7).
Start with 4 squares, which are like a continuation of the previous layer. Make the distance between the layers as desired. In this case, it is about 1 cm. Use something like a template to keep the same distance for all pieces of fabric.
Attach four more fabric squares between them, as in Figure 9-10.

You can stop at two layers or make a third layer by analogy with the previous one (Figure 12).
Next, the ball must be turned over and the above described actions must be repeated with the second half of the ball. However, when placing pieces of fabric on the second side of the ball, the first half must be taken into account, but 100% compliance is not necessary, since the joint will be covered with fabric.
So, the excess material at the junction of 2 sides can be cut off. Then you can close the joint with the material of the second layer, decorate with organza ribbon. Pin one end of the tape and sew on the other.
You can also make a bow from a ribbon, for which the ball can be hung on a Christmas tree.
Glue or sew on as desired.
Ball made of fabric using artichoke technique. Master Class.

An excellent master class on creating a completely textile ball with your own hands from scratch.
To create a fabric ball using the artichoke technique, you will need:
Base fabric;
- template paper + pencil;
- needle + thread, sewing machine;
- stuffing (sintepon / cotton wool).
To decorate a fabric ball:
There are two red squares on the lining, 8 beige squares measuring 5 * 5 cm, 16 squares of the same size, but of a different color (in this case with green stars), 16 squares of the third color.
- beads for decoration.
Artichoke fabric ball step by step:
1. Creation of a tissue ball - the basis.
Prepare a pattern out of paper (Figure 1). Transfer to the wrong side of the fabric (Figure 2). You will need to create 4 petals. Cut out, remember to leave a seam allowance (Figure 3). Sweep the petals together in pairs (Figure 4-5).

Sew on a typewriter on one side (Figure 6). As a result, you will get "pockets", as in Figure 7. Fold them together with the front side (Figure 8-9).

Sweep or pin off. Then we grind (Figure 10-11). Leave a hole on one edge of each petal through which the future ball will be turned inside out and stuffed (Figure 12-13).

Fill the ball with filler and then blind-stitch (Figure 14-15). As a result, you will get a ball, as in Fig.16.

2. Ball decoration:
Take all the squares for decoration (besides those for the lining), fold in half and iron (Figure 18).

Lining squares - place in the middle of the ball, and pin with pins so that they do not fidget (Figure 19).
Then take the ironed beige squares (rectangles) and fold them into triangles (Figure 20-21).

Place such a triangle in the middle of the future fabric ball, as shown in Figure 22 and pin it with pins.
Pin the 4th triangles and get a blank, as in Fig. 23. Start sewing the corners of the triangles. Sew the opposite corners of some triangles (Figure 24) and then others (Figure 25).

Sew on a beauty bead at the junction (Figure 26). Withdraw the needle under the triangles as shown in Figure 27. And carefully sew the triangles along the edge to the base of the ball (Figure 28).
As a result, you will get, as in Fig. 29. Proceed by analogy with the rectangles with asterisks. Fold them into triangles first, then place them on a ball and pin them. Arrange the triangles in the correct order (Figure 30-31). Sew in the same way as in the previous steps (Fig. 32-34).

Apply triangles of the third color (Figure 35-38).

As a result, you will get just such a half of the ball (Fig. 39), by analogy, make the second one.

After that, cut the strips 5 * 10 cm in size and fold them, as in Fig. 41. Iron everything. Attach to the ball and pin with pins (Figure 42). This must be done in order to decorate the sides of the ball.

Cut the strips 5 * 10 cm long again and fold them as in Figure 43-44.

Place these triangles on top of the previous ones, as in Figure 45. Overlap (Figure 46). Scalle everything with pins (Fig. 47) and sew on (Fig. 49-50).

The ball made of fabric using the artichoke technique is ready!
Thanks to the author Natalia Semenova for the excellent MK.
Bump using the kanzashi technique. Master Class.

To create a bump using the kanzashi technique, you will need:
Satin ribbon about 2.5 cm wide (two colors);
- ball-base for ping-pong;
- thread, monofilament or thin line;
- thermal gun;
- tweezers;
- a bead or attachment to Christmas tree decorations.
Kanzashi bump step by step:
Initially, cut squares of ribbons of two colors with a side of 2.5 cm and fold them in half into triangular modules (photo
1). One fabric square needs to be fixed on a ping-pong ball, having well glued the center and edges (photo 2). The base ball must be placed on a small jar, for example, from under the cream - this way it will not roll on the working surface.

Fold the triangular modules in half again (photo 3). Then make the first row - glue four modules at once on the surface of the ball so that it looks like a square (photo 4). Subsequent rows should consist of 2 parts, four modules each.
Glue the second row of modules. Glue the first part of four modules between the details of the first row (photo 5). And glue the second part between the parts of the first part so that the lower part of both parts of the second row is on the same level (photo 6).

Also glue all subsequent rows, alternating the colors of the modules (photo 7-8).
After gluing the penultimate row of modules - glue a piece of satin ribbon, hiding the surface of the ball (as well as at the beginning of the working process) (photo 9-10). Next, glue the last row of modules (photo 11-12).

An almost finished kanzashi cone needs to be decorated, starting from the top of the Christmas tree toy. For this, collect a satin ribbon on a thread and pull it off, forming such a bow (photo 13). Hide the middle of the bow by gluing the holder for the Christmas balls to it (photo 14).

A pine cone using the kanzashi technique is ready to decorate the New Year tree.
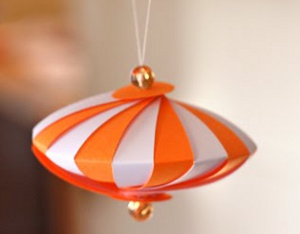
Ball on a Christmas tree using the kanzashi technique.

To make a ball on a Christmas tree, you will need:
Satin ribbon 2.5 centimeters wide in the main color (about 2.7 m) + ribbon for spirals (about 1.1 m);
- ping pong ball;
- wire, awl;
- decor: sequins, beads, pin, string for hanging;
- thermal gun and all other tools for kanzashstroyeniye.
Christmas tree ball using quillig technique step by step:
The base will remain inside the Christmas tree toy, so inexpensive ping-pong balls that are very light are best suited. The ball tolerates hot glue well, so there is no need to wrap anything and you can glue the "petals" directly onto it.
You will also need to securely attach the hanging strap. Of course, you can just glue the bead, but you can also fix it more securely, for which roughly mark the middle on both sides and pierce it through with an awl (photo 1). Then fix the wire with the fixed bead (photo 2). Try on the top (photo 3).

Glue on a sequin or other decoration, form a top (photo 5). And start glueing the petals.

1st row: 2 white, 2 red, 2 white, 2 red
2nd row: 1 white, 3 red, 1 white, 3 red
3rd row: increase, glue 2 petals. 2 white, 6 red, 2 white, 6 red
Continue in the same spirit without increasing the amount.
In photo 10, it is noticeable that the petals are starting to "crowd" too much, it is clearly necessary to reduce to the original 8 petals. And the last row is also 8. It took 144 petals to make this ball.

You can, of course, take not 8, but 10 petals in the first row, and then the ball will turn out to be more magnificent, since the petals will be attached in a more dense way.
The ball on the Christmas tree using the quillig technique is ready!
New Year's toys from sequins and beads.

To make Christmas toys, you will need:
Foam ball (about 6 cm in diameter);
- sequins and beads;
- needles with a pearl.
Christmas toys made of sequins and beads step by step:
Sequins on a foam base can be fastened in a chaotic manner using accessories of various colors. So, take a sequin and put it on your pearl needle. You can also fix several sequins of different shapes at once. For example, first put a blue sequin in the shape of a snowflake on the needle, and blue and / or purple on top.

Begin to gently stick the needle into the foam ball, trying to fill its entire surface without gaps. You can go with one sequin on another, but in this case, you need to make sure that all sequins are located at an equal distance from each other.

Christmas toys made of sequins and beads are ready!
DIY unbreakable Christmas balls

To create shatterproof toys you will need:
Floss threads of different colors + needle
- a foam ball, you can cut it yourself from foam or make it from foil, newspapers, tightly tied with threads. You can use different materials, just be careful not to make the balls too heavy.
- all kinds of decor (you can even use ready-made New Year's applications)
Unbreakable Christmas balls step by step:
The first things you need to do is wrap a round workpiece with threads, for which take it and start winding it crosswise several times. You need to rewind tightly enough. Finally, lock the end of the thread to prevent unraveling.

Now we start decorating the ball (everything here will depend on your imagination and the availability of decorations). If you know how and love to embroider, then you can embroider all kinds of New Year's ornament. You can also sew a suitable applique to the toy, decorate with beads, beads, fabric flowers.

In the end, do not forget to make a holder for the finished Christmas tree toy in the form of a rope, for which the ball will be hung on the tree.
Sweet Christmas balls. Master Class.

To create Christmas balls, you will need:
Chocolate glaze;
- Balloons;
- kandurin;
- soft wide brush;
- baking paper;
- mastic / marzipan;
- wire;
- a colander.
Sweet Christmas balls step by step:
Fill a balloon with water, tie and send to the freezer for 24 hours. Melt the chocolate frosting and fill the baking paper bun with it. Remove the ball from the freezer and remove it from the ice ball formed from the water in the freezer.

Place the ice ball on a piece of baking paper and paint the ball on all sides with chocolate icing. Any glaze that accidentally fell not on the surface of the ball, but on the baking paper, after hardening, remove from the paper and use again.

While the ice is melting and flowing through the holes in the chocolate painting, prepare the top for the balls. Twist a loop out of the wire, and blind the top from mastic or marzipan. Cover everything with silver / gold canandurine. Combine the tip with the ball using melted chocolate.
Note: For pearlescent and silver balls, we recommend using white chocolate icing.
New Year's openwork paper balls.

We suggest that you make such bright, openwork Christmas balls for the New Year, which will perfectly fit into the interior or help you decorate the New Year tree.
To create openwork Christmas balls, you will need:
A4 sheets of thick colored paper;
- knife for artistic cutting;
- a needle and thread;
- glue, scissors;
- beads for decoration;
- template (presented at the end of the article).
The process of creating Christmas balls from paper:
First thing you need to do is print the templates on paper. If desired, you can resize the template proportionally.

Next, start cutting out the patterns using your breadboard knife. Part of the paper with a pattern can be covered with a sheet of paper in order not to accidentally overwrite the circuit during operation (Figure 2-4). After cutting the pattern, start cutting the sweep of the ball along the contour (Figure 5).

Now you need to give each part of the cut out scheme a rounded shape, for which you can use a round pencil (Figure 6-7).
Then poke holes on both sides at the end of each petal (Figure 8).
Roll the cut paper into a ball and glue the edges of the reamer (Figure 9).


It remains to make a loop from the thread - and the New Year's ball is ready for hanging.


Author of MK: Olga Kachurovskaya
Christmas ball made of fabric and foam.

To create these Christmas balls, you will need:
Foam ball with a diameter of about 7-8 cm;
- satin fabric or other at will;
- braid or ribbon, decorative beads;
- glue pistols;
- scissors, knife.
Christmas ball made of fabric and foam step by step:
First, mark the ball. To do this, take a thread, wrap it around and tighten it so that a small groove forms on the ball for further work. The ball can be divided into any number of parts - 4, 6, 8, etc. In this case, it was divided into 4 parts. You can draw the lines with a pencil, for convenience.


Then, using a knife / scalpel, make cuts along the marked lines, with a depth of about 7-8 mm. This should be done quite carefully so that the ball does not disintegrate in the hands, especially with its small diameter (less than 6 cm).
Cut a petal out of the fabric that is larger than the wedges on the styrofoam ball and start tucking the edge of the satin fabric inward in a neat way. Insert to a depth of about 3-5 mm first. After going around the entire contour, cut off the excess fabric, and hide the edges. Thus, cover the entire surface of the ball wedge by wedge.

Then start decorating. Tuck the ends of the beads into the inside of the ball. Secure the loop with drops of hot glue. From glue of the "Moment" type, the foam can begin to melt. Pull the beads tightly so that they do not dangle when finished. And also with the second half of the beads.

Cut the eyelet to the desired length, drip glue, insert the ponytails, press down.
The New Year's ball made of fabric and foam is ready!

You can tie a bow, paint snowflakes, or glue on sequins!
Such a ball will be a great gift for the New Year!
Decoupage of Christmas balls.

To decoupage Christmas balls, you will need:
Plastic balls with a diameter of 8 cm;
- three-layer napkins with a pattern;
- acrylic paints of different colors: white, blue, yellow + brush;
- PVA glue;
- acrylic lacquer;
- a little semolina;
- sparkles;
- contours for ceramics and glass;
- a piece of a sponge for washing dishes;
- plastic board for modeling.
Decoupage Christmas balls step by step:
You can purchase simple balls without a pattern in any color (gold, purple, silver, matte or glossy.

Take a ball and a piece of sponge, put a little white paint on the board, blot it with a sponge in the paint and apply it with dotted movements on the ball. Make sure that there is always paint on the sponge, then you will get the effect of a snow deposit on the ball.
Paint in this way, hang all the balls to dry for about an hour.
In the meantime, prepare napkins. To do this, separate the upper bright layer from the white one. Cut out the design carefully.

Dilute PVA in half with water and glue the drawing to the ball. Begin gluing from the center of the pattern, gradually working towards the edges. Do this action with all motives.
For the balls with bunnies, make a light yellow paint and apply it with “banging” movements around the motif on a white background.

After the paint is dry, cover the ball with varnish.
Next, we will create a winter effect, for which take a small amount of white paint and mix it with semolina until you get a thick porridge. Using a thin brush, apply to the ball in the places where we will have snow. 
Let dry. Then take varnish and small silver sequins, and cover the semblance of "snow" first with varnish, and then apply sequins.
The decoupage of Christmas balls is over!
Author of MK: Slastina Elena
Woolen Christmas ball.

In this master class, you will see the process of making New Year's wool balls. The process is quite simple and does not require you to master the skills of felting from wool.
At first glance, it may seem that it is very difficult to learn how to felted felt toys. But such beautiful things can be done without certain skills and special tools. However, in this case, you still need to purchase wool from a needlewoman store, and then you can make exactly the same woolen Christmas ball. Children will be delighted with such balls - they can be removed from the branches and played with snowballs right in the apartment!
To make woolen Christmas balls you will need:
Felting wool of different colors;
- synthetic winterizer (other filler ");
- sewing needle + thread, scissors;
- pins with pearls;
- nylon stocking;
- optional decor: beads, sequins.
Woolen Christmas ball step by step:
Form a ball of padding polyester, tie it with threads so that it keeps its shape. Then evenly wrap a padding polyester blank with colored wool for felting, fix it with a felting needle or ordinary pins.

After you completely wrap the ball with wool, put it in a nylon stocking and tie a knot. All you need is to wash the workpiece in hot water (in a washing machine) on the "boil mode" and squeeze it out at maximum speed. Then remove the ball from the stocking and dry it.
Start decorating - mark the future drawing with pins. Decorate the ball with woolen threads, securing them with pins with pearls, thereby laying out the desired pattern. Fix the resulting decor using sewing threads, while decorating the ball with beads and sequins in the places where the pattern is fixed.

Attach a loop of beads on top of the Christmas ball and you can hang it on the Christmas tree.
Happy Holidays!
Painting a glass ball on a Christmas tree.

To paint the ball you need:
Glass bowl;
- contour for glass and ceramics;
- lacquer-based stained glass paint (here from Hobby Line);
- paint to create pearls (here from Viva Dekor);
- thin synthetic round brushes number 1 or 2 (ideally, each color has its own brush);
- the most inexpensive nail polish remover (acetone);
- cotton pads, rag.
Painting a glass ball on a Christmas tree step by step:
First, think about what you will represent on the ball. Here, lace elements were used as inspiration (photo 2). Draw with a silvery outline. Previously, you can draw a schematic drawing using a washable marker and make sure that the outline is located next to the line, and not on it. During painting, the ball can be put on a mug or glass - this way it will be fixed and will not turn over (photo 3). Since the ball is round in shape, first paint one part and let it dry (so you do not happen to overlap the drawing in the process) (photo 4).

After you have painted the entire surface of the ball and let it dry completely, proceed directly to painting. White and blue stained glass lacquer paints were used for this ball. For the third color, they were mixed together in the lid (photo 5). Gently drip paint onto a section of the drawing and stretch to the edges. The advantages of varnish paints include - quick drying and the complete absence of air bubbles on the surface, which is quite important when painting small elements (photo 6). Let the paint dry before starting to paint the adjacent element so that the colors do not mix (photo 7).

Take your time to paint the entire surface of the glass ball. Let it dry by hanging it somewhere, just make sure that the paint does not flow (photo 9). Decorate the balloon with pearl paint (Pic 10). Place droplets in different sizes wherever you like. Let dry.

Clean paint brushes with nail polish remover and cotton pads. By changing the color of the outline and paints, you can paint a couple more balls.
Author MK: Hamster Paradise (homorai)
Decorating a Christmas tree ball with polymer clay.

To create such a ball, you will need:
Clay of two colors (in this case red + white);
- glass ball;
- two 18-inch strips about 2x4 long;
- extruder;
- waxed paper;
- glue;
- rope / ribbon for suspension.
We decorate the Christmas ball with polymer clay step by step:
Drill a hole at the top of the bar, which should be slightly larger, of your extruder. Fasten the two planks with a connecting loop. Next, you need to close the planks and create a shallow hole in the lower plank in the same place. This will prevent the piston from slipping. To use this design, simply insert the clay extruder into it.


Then put together two pieces of clay of different colors and wrap them in waxed paper, the ends of which should be slightly longer than the "sausages" (Figure 8-9).
Now, using the extruder, you need to extrude the two-color stripes of clay (Figure 10). Then clean the piston from the extruder and proceed to the next step (Figure 11).

Take one of the thin resulting strips and lay it out on your work surface. Cut one end and start twisting into a spiral (Figure 13).

Then place the twisted spiral of clay in the lower center of the glass ball and gradually begin to wind this strip around the ball in a spiral (Figure 13-14). Use glue to hold the clay to the surface of the ball. When you have covered half of the ball, carefully cut the end of the sausage.
Clay is easier to work with when not raw, so hang the ball on a wooden stick or toothpick and place the ball in a glass container and bake in the oven for 30 minutes at 265F. After the ball has cooled down, remove its iron top-mount and continue wrapping it with clay.

Continue until you completely cover the surface of the ball with clay. Try to connect the "clay sausage" as clearly and evenly as possible. Then replace the iron ball mount and bake for 30 minutes.

Decorate the finished ball with a beautiful bow!
Summary: Christmas balls on the tree. Making Christmas balls from paper. How to make a Christmas ball with your child with your own hands. Schemes of Christmas balls made of paper, photos of decorations on the Christmas tree.
1. DIY Christmas ball (option 1)
To make this New Year's decoration, you will need colored paper, thin wire, stapler, glue. The balloon you see in the photo above was made from paper in three different colors (pink, blue, and cyan).
Work plan:
1. Take a small glass or glass (wine glass) and trace it on paper with a simple pencil 12 times. You should have 12 circles (4 circles of each color). Cut out the circles with scissors.
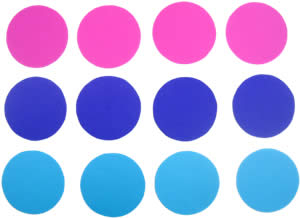
2. Fold each circle in half and stack them together as shown in the illustration below. We use three colors of paper (A, B and C) to make this Christmas ball. Stack the mugs in the following sequence - ABBCCAABBCCA. If, when making a New Year's ball, you used paper of two colors (A and B), then in this case the circles had to be folded in the following sequence - ABBAABBAABBA.

3. Secure the paper circles together using thin wire wrapping around them along the fold line. Twist the ends of the wire together. If you don't have wire, you can use a regular stapler to staple the circles together.


4. Straighten the circles and glue the adjacent halves of the circles together. Each half should be connected to one adjacent at the top, and to the other at the bottom.
2. DIY Christmas balls (option 2)

Cut out three circles of the same size but different colors from colored cardboard or heavy paper. In the first of them, cut a cross (Fig. A), in the second circle, make a horizontal incision in the middle and two cuts perpendicular to it in the direction from the circle to the center of the circle (Fig. B), and in the third - four cuts in the form of a cross, also along direction from the circle to the center (Fig. c). Pass the circle "c" into the circle "b". In the circle "a", bend the corners formed as a result of its notch; you get a square hole. Pass the circles "b" and "c" into it, having previously folded them. Then unfold the corners again (Fig. D). Attach a thread to the resulting ball.
3. Paper Christmas balls (option 3)
From old postcards or colored paper, you can make such cute Christmas tree toys - Christmas balls. Detailed instructions for making this New Year's decoration can be found at the link >>>>

It is not at all necessary to make a large, complex ball, you can make a small Christmas ball from fewer parts.


5. DIY Christmas ball (option 5)
To make these wonderful Christmas lanterns, you will need to cut colored paper into strips of equal length and width. The length and width of the stripes depends on the size of the flashlight you want to make. To make one paper lantern, you will need an average of 14-16 strips of paper. For a detailed New Year's master class, see the link >>>>

When making Christmas balls, you can use strips of paper of different colors and beads to decorate Christmas toys with your own hands. See link >>>>

If the strips of paper are bent in the middle, then you get such a New Year's decoration. Link to the New Year's master class >>>>
6. How to make a New Year's ball (option 6)
We invite you to make such a cute and easy-to-make New Year's craft from old postcards together with your child.

1. Using a small glass or glass, draw and cut out eight identical circles.

2. Using another object with a round base, but with a smaller diameter, draw and cut out two small circles.

3. Fold each large circle in half and then in half again. See the photo below.

4. Glue the four folded large circles onto one small circle and the remaining four onto the other. As a result, you will have two halves of your future Christmas tree ball.
It is very IMPORTANT to correctly position the quarters of the large circles on the small circle. Try to gently unfold the "pockets" of the folded circles and estimate the correct location before gluing. In this case, be guided by the very first photo, which shows a ready-made ball.

5. Now you just have to glue the two finished halves together and, when the glue dries, straighten all the pockets. The Christmas ball is ready!

7. DIY paper balls (option 7)

Making balls from threads:
1. You will need: scissors, balloons, fat cream (petroleum jelly), any yarn, PVA glue, a bowl.
2. We dilute PVA glue with water, approximately 3: 1.
3. Inflate the balloon to the desired size, give it a round shape, tie it with a thread.
4. After unwinding the required amount of yarn, put it in a bowl and leave for 5 minutes.
5. Spread the ball with fat cream and wrap it with yarn, leaving a large distance between the thread to begin with.
6. Gradually reduce the distance between the threads until the ball is completely wrapped in yarn and resembles a cocoon.
7. Cut the thread and glue it to the ball. We leave it to dry (for at least a day).
8. Gradually untie the balloon, gently blow it off, then remove it from the thread cocoon; we tie a rope for fastening to the thread ball from above.
9. The ball is ready!
When making a ball, you can use yarn (threads) of any color or paint with any paint or sparkles (spray). Especially for the New Year, you can decorate this thread ball with tinsel, stars. Hang small balls on the Christmas tree, decorate the room with large ones. Dream more daringly!
If you are unable to wind the glue-soaked thread around the ball, you can wind the dry thread, and then thoroughly saturate it with glue using a brush or sponge.
Sugar syrup or starch paste can be used instead of glue. To prepare the paste, take 3 teaspoons of starch in a glass of cold water, mix thoroughly and bring to a boil. Instead of a thread, you can take a thin copper wire and wind it around a ball in the same way.
9. New Year's do it yourself. New Year decoration
Old Christmas balls can be updated by wrapping each of them in a piece of beautiful fabric and tied with a ribbon.
