Foamiran rose is a simple option. Foamiran flower workshop: The simplest way to create a rose. Small roses from foamiran - video master class
Friends, I want to show you the secrets of creating a delicate and versatile flower that can be used in the decoration of hairstyles, clothes and accessories.
MATERIALS AND TOOLS
- milky
- Nail scissors
- Petal blanks
- Oil paints, brush, cotton pad, oil paint thinner
- (if there is)
To create a rose flower, we need to circle and cut out 30 petals: 10 small, 10 medium and 10 large details. I trace and cut the workpieces so that there is less waste in order to save material. When you use the finished blank as a template, the petals are smoother and smoother. The petal shape can be found online to create a silk rose.

As an example, I am attaching my pattern:

One cell corresponds to a notebook cell (5 mm).
It is not necessary to print the pattern, it is enough just to save it on your computer, then simply enlarge it on the screen to the desired size and attach a sheet of paper to circle it.
IRON WORK
After cutting out, give the petals a shape. We apply each petal to the iron (set your iron to the “cotton” mode or 2 points) until the workpiece begins to bend and move away from the iron.

Twisting
We quickly and thoroughly twist the heated workpiece in the upper part of the petal, and bend the middle part even more inward. Thus, the petal at the top will be thin and concave in the middle. We repeat these steps with each petal. At the largest petals, we twist the edges on the sides outward.


Toning
After shaping the petals, you need to set them a tone. This is done using oil paints (as one of the options for tinting foamiran). Place the matched paint color on the palette and pour the oil thinner into a small container. After slightly dampening the brush with thinner, remove excess (if necessary) by blotting the brush on a napkin, then take quite a bit of paint with the tip of the brush.

Apply paint to the petal, wipe off excess color and thinner with a cotton pad. You can paint the petals both from the inside and additionally from the outside, but you can only along the edge of the petal. This completes the preparatory part, we proceed to the assembly of the flower.


On the preparation of the bud, we begin to glue the petals. We start with the first petal. It needs to be glued tightly, as if wrapping the whole bud with it. First, estimate which petal will look better and will not create holes in the center of the flower, and only then glue the desired one. Apply the glue in very small portions, otherwise there will be excessive thickness.

We also wrap the second petal tightly around the base. If there is room, then you can put one edge of the second petal under the first. It will be more elegant this way.

We glue the next 7-8 petals, maintaining the shape of a beautiful bud. It is necessary to glue the bottom of each petal well, the excess, if any, must be cut off. The petals should follow tightly to each other, in a circle at the same height or with a slight upward displacement of no more than 0.5 mm.

The middle petals are glued more freely. That is, the distance between each can be increased. It is important to consistently glue the petals, observing the same height. Large petals stick less frequently than medium ones.

The more space you give between the petals, the more the rose will open up.

Ready!
A LITTLE TIP
If you want to create an open, flat rose, then choose a small bud base (as in the master class above). Conversely, the larger the base, the more the rose will close, but you can get by with fewer petals.
You can work out the technology of creating flowers, learn the secrets of fom-floristry, as well as ask all your questions, at “live” master classes.
Find out more on deco-flowers.net in the training section or at [email protected]
Rose is the queen of flowers, a beautiful plant whose beauty has been admired and admired by many. Delicate petals with a subtle fresh aroma, collected in graceful buds, serve as a wonderful gift. Why not learn how to make graceful roses from foamiran with your own hands? They look like real ones, but they will never fade. And if you periodically add a couple of drops of tea rose oil, the flower will delight you with an unsurpassed aroma.
Where can you use foamiran roses?
Having learned to work with revelure (foamiran), you can decorate your clothes, accessories and interior with beautiful designer products. Having mastered the skill to perfection - to build your own business on the creation of designer jewelry and other interesting things. Another great solution is to create spectacular gifts for family and friends.
It is easy and pleasant to create with the help of master classes
In this section, we have collected a number of master classes on making roses from foamiran. Each lesson is accompanied by clear explanations and detailed photo illustrations. The pictures are of the highest quality, and the recommendations are as complete and intelligible as possible. Even a novice needlewoman can easily figure them out.
Mastering a master class on roses and making a flower will take some time. You will have to try, show accuracy, perseverance and imagination, but the buds will come out like real ones. And by varying the color of the material and the methods of toning it, you can create roses of a wide variety of colors. Whatever you want. Also, depending on the technique, you can change the size and shape of the buds.
In case of any difficulties, you can always leave a comment on the lesson page. We will help you solve the problem and get back to the creative process as soon as possible.
Great inspiration and creative success!
Master classes
How to make an English rose Tamora from foamiran
Tamora from early English roses - she appeared in 1983 and saw the beginning of their popularity, and, incidentally, contributed to her. This is quite understandable: from the usual pink bud of Tamora, an extraordinary rosette appears - the visiting card of the Ostins.
We will make this rose from foamiran in its blossoming state.
How to make a Raubritter rose from foamiran
Rose Raubritter (translated from German - a robber knight) is remarkable in that it was bred in the middle of the 20th century by crossing an ordinary rose hip with a small-flowered rose Rosa macrantha, whose existence is recognized by flower growers, but not by official botany.
The rose is unusual, it differs not only in small, only 4-6 centimeters, spherical flowers, but also in the very structure of the plant, which combines the properties of bush and climbing roses.
It is impossible to pass by such a miracle, and this rose will be the object of our MK.
How to make an Art Nouveau rose from foamiran
The Art Nouveau rose variety was bred in 2009 by breeder Peter James. This semi-double floribunda is remarkable in that it turns out from the classic rose bud in blooming form ... almost a small dahlia. I do not know why the English roses of the Austin dynasty are so popular, and the extremely extraordinary roses of other breeders are unknown? After all, Peter James has many other creations ...
Our master class will show you how to make roses of this variety - Art Nouveau.
How to make a miniature rose "Mini Boca" from foamiran
Miniature roses are small, usually three to five centimeters in diameter, a copy of the well-known roses. They originate from China, but the flowering of miniature roses is in the middle of the 20th century. But there is also a significant difference - a bush of miniature roses is simply strewn with flowers.
This MK presents the Serbian rose "Mini Boca".
How to make a bourbon rose "Baron Giraud de l" En "from foamiran
At the beginning of the 19th century, a new flower was discovered on the island of Bourbon, a French colony in the Indian Ocean, presumably a hybrid of Damascus and Bengal roses. The found plant was transported to France, and as a result of crossing with European roses, a new group of varieties appeared - the Bourbon rose. This rose quickly gained popularity, and more and more varieties appeared during the second half of the 19th century.
Our MK is dedicated to one of these roses - the variety Baron Giraud de l "En.
How to make a Gallic rose Tuscany from foamiran
The Gallic rose grows wild in Europe from the Crimea and the Carpathians to Provence and Languedoc. It was with the Gallic rose that the selection of these flowers began. It was the Gallic rose that was placed on the coats of arms of noble European families.
The Tuscany variety also has a long history - it appeared in the 16th century.
This master class is devoted to the manufacture of a Gallic rose from foamiran, a Tuscany variety.
From surprisingly plastic foamiran, you can create blanks of almost any shape. And the best part is that this material is almost impossible to spoil, it is enough to heat it up again and give it the desired shape.
For work you will need:
- foamiran 2 colors: white and green,
- half file or tracing paper,
- acrylic paint,
- nippers,
- mold,
- a piece of sponge,
- foam ball with a diameter of 1.5 mm,
- toothpick,
- floristic wire,
- a pen,
- scissors,
- cardboard,
- iron,
- glue heat gun,
- a couple of pieces of paper.
Step 1: Preparatory phase.
I took the patterns from this book for flower making, by Nadezhda Chereda!

I liked the Camellia pattern.


But the gluing is from the rose.

I translate to film (you can use tracing paper).


And now I'm translating it onto cardboard, it's more convenient to work with.


We circle the templates with a toothpick.

We also outline the pasting on a green background.

We got: 2 whisk -a; 2 whisk - b; 3 corollas - in; gluing; 2 stripes of Thomas and 2 leaves of arbitrary shape.

Divide the wire into 3 parts.

We make a loop at the end of the wire, but do not bend it completely.

We take a foam ball (diameter about 1.5 cm) and pierce it from above and pull on the wire, the loop should drown in the ball.


Step 2: Tint the petals and leaves.
I took acrylic paint, although I always tint with dry pastel, well, I really liked its color. 🙂

Little by little we add paint to the sheet, as acrylic dries very quickly.

We tint the corollas.

Everything is ready, gluing and leaflets can be slightly "browned".

Now all the corollas need to be cut before reaching the center, for small ones 5-7 mm, for medium ones 7-8 mm, for large ones 1 cm.

Step 3: Heat treatment, form the petals.
Heat treatment, start with small ones, one petal to the iron, quickly on the right palm and press with your thumb into the middle of the petal.

This is how you need to press, but on the palm, I could not physically show, the other hand is occupied by the camera. 🙂

And heat the middle petals one at a time and holding the petal with both hands from the edges, stretch it a little and press it with your thumbs into the middle, you should get a boat and quickly turn it over to the other side with a bulge upward, continue on ....

As we turned it over, we also hold the petal with both hands and quickly, simultaneously twist it on both sides, and then turn it over from above.

The beaters are ready!

Now we heat the gluing on the iron and collecting all the "rays" in a pile, knead.

To print a leaf, we need a mold, this thing remarkably imitates the structure of a leaf. You can buy it in the departments with goods for ceramofloristics.
We heat the sheet, apply it to the mold and press it.

Everything worked out great for us! Now everything is ready, all that remains is to collect the rose!

Step 4: collect the flower.
Pierce the middle of the small rim.


We arm ourselves with a glue gun. And the first petal should be glued just like that, with a cone, the hole from the top should be tiny.

The second is opposite. The third and fourth are respectively opposite each other.


Pierce the second whisk.

We glue in a spiral, starting the petal behind the previous one.

Be sure to twist the edges with our fingers, give it liveliness until the flower is collected, this can be done easily.

The next whisk is exactly the same as the previous one.


This is how it turns out.

Do not forget to twist the petals.

The petals are located in the gaps of the previous row.

The last three corollas with 5 petals are also glued in a spiral one after the other.

And, finally, the last whisk is put on the wire, you can pinch the petals by pinching it with your fingers.

This is how the flower's “bottom” should look like.

We bite off the wire so that there is no hint of it, not a tiny stump sticks out.
We glue the gluing, four rays can be glued, the fifth is still floating in the air.

We wrap the wire with Thomas, we get a summer.


We need to make 2 of them, according to the number of leaves.
We put the sheet with the print down, gently coat the leton with hot glue and glue it to the middle of the leaf, retreating from the spout of the sheet 0.5 cm.

This is how our leaves look like!

We do not need long stems, wrapping the Foma with a strip, fix (glue) both stems and bite off the excess with pliers.

We put our leaves under the not glued "ray" and, piercing the middle of the flower with a wire, insert the leaves, previously smeared with glue.

Now, whoever likes what, a brooch or a hairpin!

I have a brooch, I glue the blank under a ray and cover it with a ray. All is ready!

Here's what we got!


Thank you all for your attention!
Creative success in creating flowers! I would be very glad to see a photo with the works made according to this master - class!
The rose is considered to be the most luxurious flower. Its aroma is beautiful, and it is simply impossible to see enough of the delicate petals. There are a lot of species and varieties of this flower. And they all differ in shape, shade and size. That is why the rose is a versatile element suitable for any floral arrangement. Whatever the bouquet, a rose will always fit into it, it can be dark, and light, and bright, and restrained, and a lush flower and a modest bud. Therefore, everyone who decided to take up flower arrangements will find the ability to make a rose very useful.
One of the best materials for making artificial flowers is foamiran. Of course, it will not convey a subtle floral scent, but the products from it are very beautiful. DIY flowers can be used for festive bouquets and interior decoration. And if you fix the rose on a brooch or hairpin, you get an original decoration that will favorably emphasize your style.
Making roses from foamiran, you can show your imagination, choosing any shades for the petals and making bright unusual compositions. Moreover, such products will delight the eye for many years - artificial flowers do not fade.
Everyone can create a wonderful composition. But for this you need to be patient, tune in to the result and carefully study the step-by-step instructions.
Foamiran varieties
The modern market offers a wide selection of materials from different manufacturers. Let's list the most popular types of foamiran:
- Iranian material from Foam Eva company. It is sold in the form of squares measuring 0.6 m by 0.6 m. This plastic suede is a classic version of foamiran. It is she who is recommended to novice needlewomen. It is easy to work with such a foam; it does not shrink from heating. Products made from it are durable, keep their shape well. In this case, it is worth considering one point. The thickness of the Iranian Foma can vary from 0.6 to 1 mm. This is considered the norm.
- Turkish foamiran. The range of its shades is less than that of the Iranian one. And all sheets have the same thickness. It is 1 mm.
- The revelor is Chinese. It is not used in artificial floristry, since it is up to 4 mm thick. More suitable for making dolls and other toys. Recommended for children's creativity.
- Marshmallow Chinese Faomiran. It is particularly thin - the sheet thickness is only 0.5 mm. This delicate material does not withstand heat treatment; it begins to shrink from temperature. It retains its shape very poorly, so it will not be suitable for roses. Their swirling petals will begin to align very quickly. But for cherry and apple flowers, marshmallow fom from China is just a wonderful material.
- Marshmallow Iranian fom. This airy material is 1mm thick. Often used to make flowers with fleshy leaves. It can be made thinner if necessary. To do this, they put it in paper and iron it with an iron. After such a procedure, air will come out of the foamiran, and it will become thinner than papyrus.
What glue is used for work?
To make flowers from foamiran, the following types of glue are used:
- Transparent fast action (for small items).
- Hot from a glue gun.
- Moment.
- Cosmophen.
What are molds?
Mold is a special tool that allows you to subtly work out the texture of floral elements (petals, leaves). They are different in size. For those who are just learning, the most suitable option would be a universal large device. And at first it will be possible to do without it altogether. It is enough to simply scroll the blanks of rose petals between your fingers.
What colors are used to tint flower petals?
Several types of paints are suitable for these purposes:
- Pastel (oil or dry).
- Acrylic paint.
- Oil paint.
What are foamiran roses useful for?
The scope of application of such products is very wide. Roses can be used to decorate hairpins, headbands, brooches and other accessories. They can be used to make wonderful compositions for interior decoration or suite design (bouquets with sweets). From the hands of experienced needlewomen come out such roses, which in appearance are no different from fresh flowers.
Artificial roses are in great demand at weddings. They delight the newlyweds and guests at the festive table, serve as a decoration for the cortege, make bouquets of them, which the brides throw to their friends. Therefore, the work of a skilled craftswoman will always be in demand.
We offer you to get acquainted with three simple master classes and try your hand at this amazing art.
Master class №1. Making a rose from solid patterns
This workshop will teach you how to quickly collect beautiful roses from foamiran. For work you will need:
- Foamiran for petals (choose a shade to your taste).
- Foamiran for leaves (green).
- Stamens.
- Glue gun.
- Scissors.
- Iron.
- Awl.
First you need to print ready-made templates. So that you can make any flower of any size, templates are given without a specific size. You can change the size of the petals. At the same time, keep in mind one important point: if you changed the size of a large petal, then do not forget about the proportions and change the sizes of the rest accordingly.


The splendor of the rose depends on the number of blanks. The more there are, the more voluminous the flower will be. This master class offers an option for 6 blanks (2 for each size).
So, let's get down to business. Choosing a suitable shade of foamiran and working on the petals. To do this, we circle the templates on the shape with an awl and cut them out.
To give the petals a natural shape, they need to be ironed. This is not difficult to do. Take the petal with tweezers and attach it to the iron for a couple of seconds. Immediately fold it into an accordion, twist the tips to the sides. Spread out, stretch the middle. To get the relief, the petals are processed very quickly, because if the material cools down, it will no longer be able to take the desired shape.

Now let's move on to preparing the leaves, for which we need green foamiran. We take the material and draw a sepal at random. The length of its leaves should exceed the length of the petals. We process the blanks with an iron and hands, bringing the ends together.

We combine the stamens into a bunch, we must glue all the strings. Smaller petals need to be cut a little, then it will be easier to collect the bud.

We glue the stamens into one petal, wrap the second around. Attach another layer in the same way. Cut off the excess stamens from the stamens, and attach the remaining petals to the back side. That is, the bud is glued into a blank with petals. Each next layer must be placed between the petals of the previous layer.

And the work ends with the attachment of the sepal. If everything is done according to the instructions, you should get a beautiful volumetric flower.

Master class number 2. Making small rosebuds
This master class will help you master the art of making delicate flower buds of roses, which are ideal for decorating your hair.
To make buds, take:
- Foamiran (peach, pink, green).
- Wire.
- A piece of cardboard.
- Pastel pink.
- Water.
- Foam sponge.
- Round nose pliers.
- Glue gun.
- Awl.
- Iron.
First, we prepare the templates. To do this, draw a drop (2 x 1.5 cm) and a four-pointed sepal on a cardboard. Remember that the leaves should be twice as long as the petals. The tip of the petal should not be sharp, so it should be trimmed lightly.
One bud will have 5 petals. We apply the template to the shape, outline the outline and cut out the workpiece. Next, the petals need to be toned. To do this, saturate the sponge with pink pastel and paint the edge of the petal, then shade inward.

The next stage of work is the preparation of the sepal. We make notches along its contour with scissors, and then we process it with an iron for 2 seconds. After that, you need to collect the ends and twist. We do the same with the petals. Each workpiece must be machined separately. That is, first we complete the work with one, and only then move on to the next.
Then all the blanks need to be straightened, and the middle of the petals should be slightly stretched.
Then we take a five-centimeter wire - this will be the stem. With the help of round-nose pliers, we fold the tip of the stem into a loop. And we attach a petal to the loop, folding it properly. Glue all the remaining petals in the same way. They will be slightly open. You can also make fully closed buds. Three blanks are enough for this.


The sepal is attached last. Put it on the wire and glue it to the rosebud. You will get a delicate and very cute jewelry for all occasions.

Master class №3. Hairpin with a large rose
If you want to decorate your hair in an original way, make a hairpin with a large foamiran rose with your own hands. You will learn how to do this correctly from this master class.
First of all, stock up on the following materials and devices:
- Peach and green foamiran.
- Dry pink pastels.
- The beads are large.
- Iron.
- A piece of wire.
- Toothpick.
- Awl.
- Foil.
- Hairpin.
- Glue gun.
- Scissors.
- Paper.
First of all, decide what size your rose will be. After that, make a paper template for the petals. It's not difficult at all - you just need to draw and cut out the drop. Attach the finished template to the shape and circle it many times with a toothpick. Remember that the volume of a flower depends on the number of petals. The more there are, the more magnificent the rose will be.
We paint the tips of the petals well with pastel, shade to the middle. Do not feel sorry for the paint and do not be afraid that the color will be too intense. After processing, everything will look different.
Separately, we make three petals for the bud and paint their rounded edges. Then we process the workpieces with an iron, quickly squeeze with an accordion and twist. Then we straighten and pull the middle to make them more voluminous.

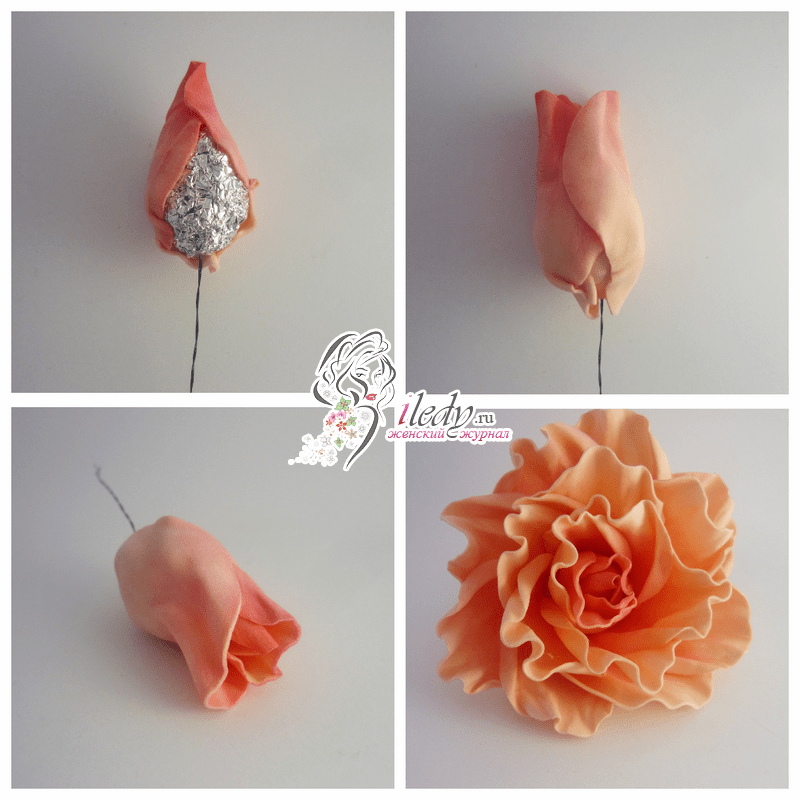
Next, we prepare a drop of foil (according to the size of the future bud). We wind the bead onto a piece of wire (15 cm). Using an awl, pierce the center of the bud to insert the wire. Pour glue into the hole and fix the bead on one side, and the wire on the other. After that, we attach three petals intended for the bud.
We fix the first petal with the painted part upwards, so that the foil completely overlaps. The top will look like a dense bud of unopened petals. The rest of the blanks are attached less tightly. They themselves will begin to adjust to the basis.

Then collect the second layer of petals, they are fixed with glue slightly below the middle. In the third layer, only the ends are attached with glue.
We attach the hairpin with the remaining wire and glue everything together. We arbitrarily cut out a sepal from the green Thomas, make notches along the edge. We process it to shape with an iron, like the petals. We put it on a hairpin so that the cuts of the petals overlap. Then we will prepare connected small leaves for the middle - they should overlap the hairpin.

Now a beautiful hairpin is ready, wear it with pleasure and delight others in a gentle feminine way.
Roses made of plastic suede captivate with their beauty, especially if they are made with soul and are close to natural colors.
There are many ways to create this adorable flower with your own hands. But mostly two are used. The first is the formation of many petals gathered together. The second is made up of five petal parts, glued together using the "through one" method. In this master class for beginners, the foamiran rose will be collected in an easier and faster second way, accessible to beginners. Step-by-step photos will dispel all doubts and simplify the work.
Preparation of materials and tools for the lesson
To assemble a charming and luxurious flower at the same time, prepare:
- foamiran of delicate pink color;
- foamiran green;
- thick paper templates;
- pastel green (two shades), yellow;
- bright pink acrylic paint;
- a piece of sponge or sponge;
- glue gun;
- a toothpick;
- scissors;
- wire;
- food foil;
- iron.
from individual petals, take a look in our master class on making and in for hair. Perhaps you will find time for all the crafts, because they are so beautiful and versatile.
How to make a rose from foamiran
Cut three circles of different sizes out of the cardboard for the petal patterns. The diameter of the largest one is 9 cm, the middle one is 7.8 cm, the smallest one is 6.5 cm. Divide the circles into five parts and cut out the petals, not cutting to the center about 0.5 cm. Round each sector, turning into a flower petal.

Using a toothpick, transfer the contours to the foamiran, outlining the pattern of the rose petals.

Cut one piece of each size for one flower. If you make several roses, then cut out the details for everything at once, this will save time.

The naturalness of the foamiran rose can be given by painting the petals. This can be done with pastels or acrylics. It is much easier to paint with pastels, but it is not always suitable for this, sometimes only acrylic paints can give brightness and color saturation.
The paint can be used both ready-made and slightly diluted with water. But add water literally with a drop.
Take a piece of sponge, dip it in paint, beat off the excess on paper. With abrupt movements, lightly touching the foamiran, apply the pigment to the petals. Pay special attention to the tips (they should be tinted harder). Leave to dry. Then color in the other side like in the step by step photo.

Heat the iron and start forming the petals as you did when making. Apply one petal at a time to the iron and with your fingers, using stretching movements, add a bulge (view from the left). Then twist on both sides (right side).

Shape all foamiran blanks to assemble a rose.

To form a bud, you can make separate 2-4 petals. But this is optional.

Make a cone out of food foil (suitable from under the chocolate), glue a stick into it.

Glue the first petal.

Glue the second one on the opposite side so that the foil is not visible.

Take a small piece and put it on a toothpick.

Glue on the base.

Now put on the glue on the petal using the technique "through one", that is, glue the first, third, fifth, second and at the end of the fourth petal.

The first row is formed.

Plant the second.

Glue all the petals in the same way as before.

Add some splendor to the rose with the last large foamiran detail.

You can make any shape of a rose by varying the number of details:
- one of each size, as in this master class;
- take one small, two medium, one large;
- use one small, two medium, two large.
In each of the options, a do-it-yourself rose from foamiran will have its own unsurpassed shape.
Cut out a five-petal backing from green plastic suede.

If the tone of the material does not fit, this is not a big deal, it still needs to be toned and give liveliness to the leaves. Paint over the backing first with dark green pastels, then bright green and yellow.

Use a nail scissors to make small cuts.

Heat the workpiece on an iron, trace the veins with a toothpick over warm foamiran.

Heat the tips of the leaves and pull them out.

Replace the toothpick with wire. Seal the junction between the rose and the wire with pistol glue to create an elevation. Glue the leaves.

Cover the wire with green tape. The shade of the rose and the overall appearance depend on the coloring of foamiran.


Using the provided pattern, it is easy to make unblown buds for a bouquet. You can choose another shade and tint a little differently - using pastel, paint only the tips of the petals.


The realistic foamiran rose is ideal for hairpins, hoops, brooches. Take a look... Today, this handicraft is very popular and loved by women of all ages.
We hope to see you in the groups of our site in VK and OK. Learn about new publications and see what beauty other community members are creating with their own hands.