DIY sequin balls on a Christmas tree. Christmas tree toy Master class New Year Application Master class DIY Christmas toys from sequins Beads English pin Sequins rhinestones Styrofoam. How to make a Christmas ball from threads
Greetings, dear friends! On this beautiful day in our master class you will find an interesting step-by-step instruction on how to make DIY Christmas toys from beads and sequins. There is not much time left until the new year, so let's make a wonderful Christmas decoration for your home right now.
Tools and materials Time: 1 hour Difficulty: 2/10
- beads, pendants, beads of different sizes, sequins, pendants;
- glue;
- scissors;
- needles, or pins;
- decorative ribbons, braid;
- plastic balls, foam balls or seashells.
Step-by-step master class with photo
If you want to make your home really bright and memorable, at least for a few holidays, it is better to make Christmas toys from beads and sequins with your own hands. Moreover, in such a difficult matter, you can let your imagination go in all four directions, let ideas come from everywhere. Each time you see jewelry made with your own hands, your heart and soul will be filled with pleasant warmth and joy.
It's already November, which means that very little is left before the fabulous holiday. But you still need to buy a Christmas tree, and decorate accordingly not only the green beauty, but the whole house. So, we offer our master class on making New Year's toys.
These materials can be useful to us in our work:

Step 1: outline the rows
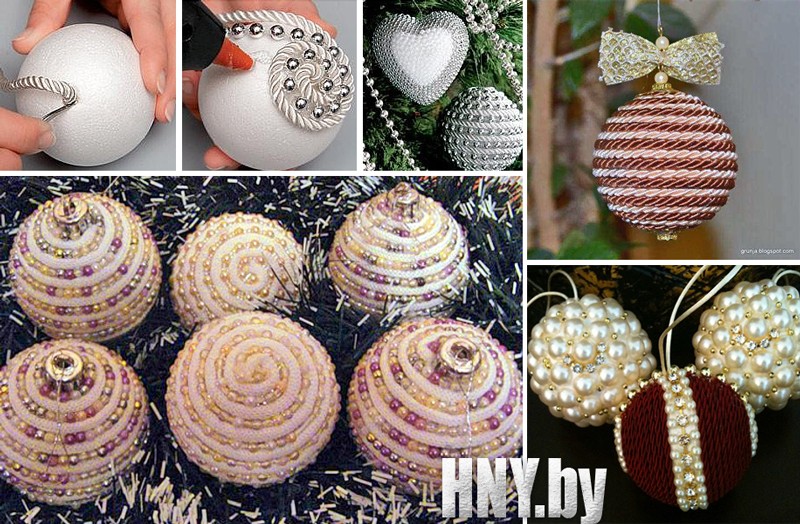
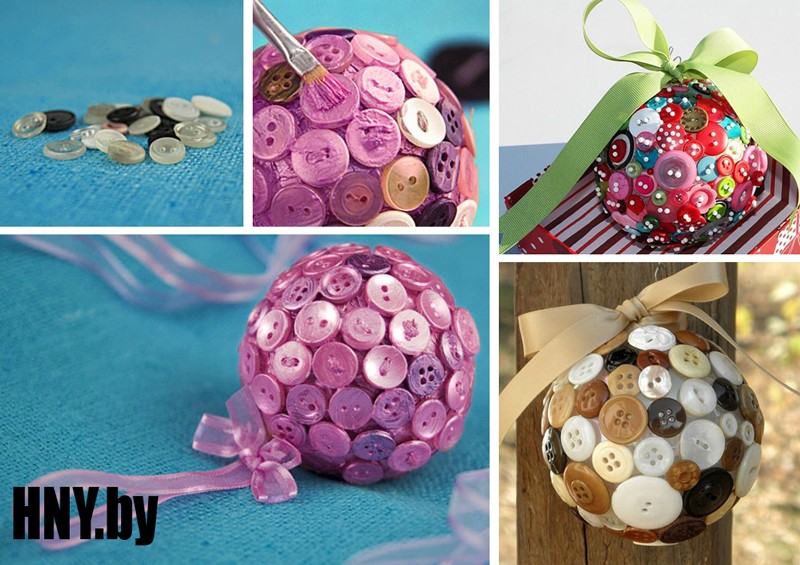
Before work, it is worth marking rows on our plastic or foam ball. The step width here is the sequin height. And then everything is as easy as shelling pears - we take a sequin with tweezers, dip the tip into the glue and adjust it to its place on the ball.

Step 2: glue sequins and beads
And in the center of the sequins, you can stick one bead at a time, alternating them with small beads. This will make our ball more voluminous.

Step 4: decorate the shells
It's even easier with shells. It is enough to take a thread with beads strung on it and wrap it along the curls of the shell itself. It seems that everything is simple, but look at what a smart toy has learned.


And here are some more striking examples of New Year's toys made of beads, sequins and any materials that come to hand.


So, after spending a little time, you can create exclusive New Year's toys from beads and sequins with your own hands.
We hope you enjoyed the master class, we invite you to see a few more ideas of beautiful New Year's beaded toys that will be appreciated by your loved ones and guests. Make your tree the best!
Christmas toys from beads video
How to make spectacular DIY Christmas balls? Easy! Nothing super complicated, everything is elementary.
Very little starting materials are required - foam as a base plus sequins.
Many people have a question - how to attach (maybe glue) the decor to the ball? Secure with pins or just glue.
But the first option is preferable - the decor holds up better, it looks more interesting in my opinion.
DIY Christmas toy ball - mini master class
In the picture below you can see both all the items necessary for work, and the actual master class of New Year's decoration itself. It is so simple and accessible, the photo speaks for itself that more is not required.
The advantage of this method is the availability, as well as the cheapness of materials, the simplest technique, the balls do not break, leaving fragments.
So, I'll list it again. All you need is:
- Styrofoam balls (or other shapes)
- Flat head or round head pins (depending on the desired result)
- Sequins (one or different colors)
All this is sold in such round and square packaging, as seen in the photo. It is not necessary to make everything monochromatic, but it also looks good, more elegant.
Sequins should be tried to be attached close to each other so that there are no gaps. Then the entire surface will shine glossy, and the craft itself will look almost like a real glass shiny New Year's ball, to which we have become accustomed since childhood.

For hanging, before starting work, you can fasten a thin cord on the ball, for which the Christmas toy will be hung on the tree or somewhere else. It is better to do this before starting, and it will also be more convenient to hold the ball when you pin the sequins.
But this is optional. If you make a large ball, then it is not necessary to hang it on the tree, it will look good separately, as an interior decoration, on a table or windowsill. especially if there are several different sizes. You can choose the color scheme, the diameter of the ball according to your taste, desire and based on specific goals. It's up to you to decide.
Such a ball will serve as a small New Year's gift for friends or an addition to it for loved ones.
Styrofoam - the basis for creativity
On sale you can find many options for foam shapes, different in shape and size, which are quite suitable for this technique of creating Christmas tree decorations. These are snowflakes, cones that can be decorated in the form of a Christmas tree, spirally decorated with a garland (sequins of a different color), bells.

I already had a similar master class, very simple and doable even for young children to create Easter decorations with their own hands. The only thing that must be considered if you work with children is that the pins can get lost, and this is very dangerous. Therefore, watch this very carefully, and I also advise you to get a special magnetic stand for small metal objects (paper clips, etc.), which will keep all the pins you need for work in one place. The likelihood that one accidentally gets lost will be much less.
It is now fashionable to make Christmas tree toys using natural materials. Cones - spruce, pine, even alder - can be easily found in the forest, only you need to take care of this in advance - collect them in the summer at the dacha or in the fall for walks in the parks. Harvested, they are stored dry for a long time until the time comes to make crafts.

Original huge or very small balls for the New Year can be made by using completely unnecessary things that we get for free. Separately, two halves of approximately the same size are made using glue, which are then joined into a single whole - a sphere that looks more than unusual thanks to non-standard materials.

Absolutely the same option, only these are not DIY Christmas balls, but the testicles - only the shape is different. Sequins are fixed with pins alternately on the foam, which serves as the base. The only difference is not the New Year's decor. Here you will find many different colors and other nuances that also apply to Christmas balls.
There are factory Christmas tree decorations in almost every home. They are certainly very beautiful and, when well combined with other decorations in the house, can cause a decent aesthetic effect. But just getting Christmas balls is boring. Uniqueness can be achieved only by making a do-it-yourself decor for Christmas balls.
Christmas balls made of threads
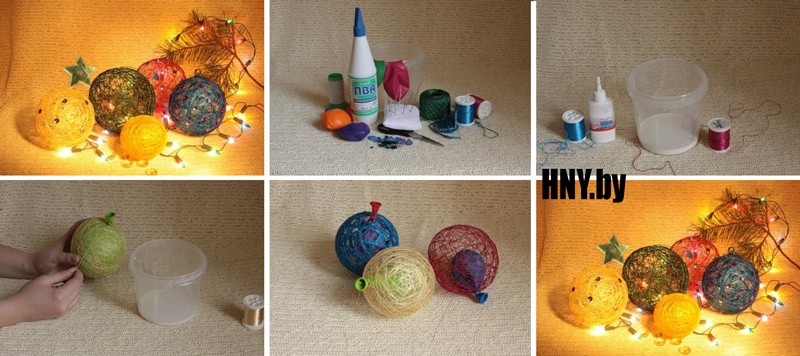
The method of making balls from threads has been used for a long time. The products are spectacular, amenable to additional decor. It is possible to vary the size.
For manufacturing you will need: threads (with a large percentage of natural fibers in the composition for good impregnation with glue), PVA glue, a disposable glass, round balloons.
Manufacturing steps:
- Prepare the glue for work. Dilute very thick until sour cream is thick.
- Inflate the balloon to the extent that the toy is intended to be sized.
- Soak 1 m pieces of thread in the glue.
- Wrap in a "cobweb" method so that the free holes do not exceed a diameter of 1 cm.
- Let the glue dry (12 to 24 hours).
- Remove the ball from the product by gently bursting it and pulling it out through the hole in the ball.
- Decorate the product. To do this, use: glitters, paper cuttings of various shapes, sequins, beads, semi-beads, etc. Products made of threads can be painted with paint from a balloon or acrylic. Watercolors and gouache will not work, as they can soak the product and lead to its ruined appearance.
Having made Christmas balls of different diameters, they can decorate any corner of the house: a Christmas tree, candlesticks, compositions in a vase, on a windowsill, etc. The decor of the balls can be done as follows: put a garland of light on a tray, lay products of different sizes on top, but of the same color. When the garland is on, they will be highlighted and create an interesting effect.
From beads
Balls made of beads will look very beautiful and impressive on the Christmas tree. In this case, the decoration of the foam spheres of the blanks will take place. In addition to the foam blank, you will need beads, pins (sewing needles with hats, like on carnations), and a ribbon.
The manufacturing method is very simple:
- String one bead onto one pin.
- Attach the pin to the foam base.
- Repeat actions until there is no free space on the basis.
- At the end, attach a loop for hanging the decoration.
It is advisable to take the beads of the same size in order to avoid empty places on the base. The color scheme is chosen both in one tone and in different ones. It all depends on individual preferences and the general style of decorating the room.
Instead of a foam base, you can use plastic factory balls. Only now the beads will be attached not on pins, but on hot melt glue.
From buttons
Balls made of buttons will look no less original and unique on the Christmas tree. Old unnecessary buttons do not have to be selected in the same color scheme. After all, you can always repaint them and achieve the desired shade. They look spectacular in gold, bronze, silver shades, as well as all colors with a "metallic" coating.
To make such a decor of New Year's balls, you will need: buttons (it is possible with through fastening and hidden), hot melt glue, foam or plastic blank, tape.
- Apply a small amount of hot melt glue to the inside of the button.
- Attach a button to the base.
- Carry out the actions from point 2 until the entire surface is covered with buttons.
- Attach the tape so that the ball can be suspended.
When placing on a tree, you need to make sure that there are not too many of them concentrated in one place. It is better to dilute such decorations with others.
From paper
Original Christmas balls can be made simply from paper, without using any base.
Ball of colored paper
To do this, you will need thick (approximately 120 g / m2) paper, scissors, pins, clips, tape. It is very simple to make a blank yourself.
- Cut 12 strips 15 mm x 100 mm out of paper
- Fasten all the strips on one side and on the other with pins, retreating from the edge by 5-10 mm.
- Spread the stripes in a circle, forming a sphere.
- Attach the tape to the base of the ball.
Strips can be cut not straight, but with other uneven lines. You can use curly scissors.
Corrugated paper
Corrugated paper also comes in handy. Balls-pom-poms are created from it. To do this, you will need: corrugated paper, glue, scissors, tape.
- If the paper is new and wrapped, then measure 5 cm from the edge and cut off. Then again measure 5 cm and cut off.
- Cut two blanks with a "scallop" with a stripe interval of 1 cm, without finishing to the base of 1.5 cm.
- Dissolve one workpiece and begin to twist the "flower" in a circle, gradually gluing. You will get a lush pom-pom. Repeat the same actions with the second workpiece.
- Connect two pom-pom blanks with glue at the gluing point. You will get a lush ball. Attach a loop tape to the gluing point. Fluff up the resulting pompom.
Made of double-sided colored paper
You can also make a ball out of double-sided colored paper. To do this, you need: colored paper, scissors, glue, a round object (a cup, for example), tape.
- Circle the cup on paper 8 times. It will turn out to be 8 equal circles. Cut them out.
- Fold each circle in four.
- Cut an additional circle with a smaller diameter.
- Glue the blanks to it with corners to the center on one side (4 pieces will fit), and on the other side as it is.
- Open each fold and glue together at the junction. You will get a ball with "petals".
- Attach tape.
Paper balls, as a rule, do not last long and are used for one season. It is not worth placing them in large numbers on the tree, it is better to "dilute" with other decorations.
From fabric
If there is an old blouse in the closet, which is a pity to throw it away, then refusing to dispose of it was the right decision. You can make a cute Christmas tree toy out of it. For manufacturing you need: knitted fabric, scissors, a sewing needle with thread, cardboard, tape.
- Cut as long as possible strips of fabric 1 cm wide. Stretch each strip so that it curls the edges.
- Cut off the cardboard 10 cm x 20 cm.
- Wind the resulting strips onto the cardboard along the width.
- In the center on one side and the other, connect the strips with a needle and thread. Pull out the cardboard.
- Cut the formed loops along the edges.
- Fluff up and attach the tape.
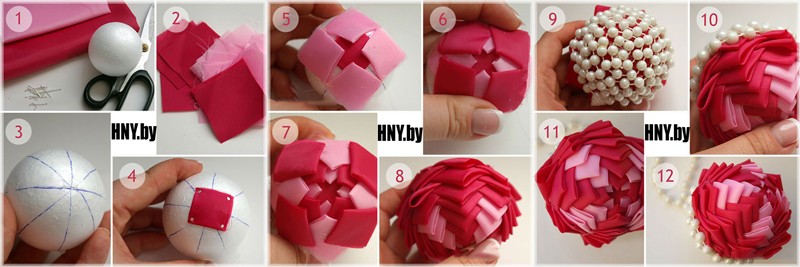
There is another way, which involves decorating the blank with a foam or plastic blank with a cloth. You need any fabric (you can have different colors), hot glue, scissors.
- Cut the fabric into 3 cm x 4 cm rectangular shreds.
- Fold them like this: fold the two upper corners to the center of the bottom.
- Glue to the workpiece in rows, bending inward, starting from the bottom.
- Paste over the entire ball. Attach tape.
Various fabric applications can be made, using also additional improvised means - beads, braid, rhinestones, ribbon.
With embroidery
Decorating Christmas balls with your own hands is also possible in this way. Embroidery for Christmas tree decorations has become a new trend. For this, a pre-embroidered image is used. You also need a fabric, a blank made of foam or plastic, hot melt glue.
- Attach the embroidered image with glue.
- Decorate the rest of the ball with a fabric applique.
Instead of appliqués, you can use the same fabric on which the embroidery was made. Alternatively, you can make a pattern from fabric, where one of the parts will be embroidery. You can also decorate each part of the pattern with separate embroidered images and secure. After these steps, you can additionally add beads, rhinestones, sparkles, sequins as decor.
With filling
Such specimens will look spectacular both on a Christmas tree and as part of compositions from balls. To make unusual balls, you need to stock up on plastic transparent blanks.
By opening the hat-holder, you can create various compositions inside:
- Pour acrylic paint of different colors inside, shake the ball so that all the inner walls are painted, let dry. The pigment will color the inside of the workpiece and it will take on a unique color.
- Fill the inside with small colored feathers and beads.
- You can also put different colors of confetti inside.
- Pieces of old tinsel are used for filling.
- Favorite photos are also placed inward. To do this, you need to twist a small photo into a tube (look at the diameter of the ball) and straighten it inside. Add confetti or sequins.
- The inside is filled with colored cotton wool and supplemented with beads. You can choose different colors. It is better to paint in acrylic paint. Fill after the cotton wool is completely dry.
- Multi-colored sisal can be placed inside and enjoy the color and originality of the decoration.
Fantasies about filling a transparent ball can be different. They all relate to personal preference and mood during needlework.

You can make toys for the Christmas tree yourself and completely from scratch. The advantage of the techniques demonstrated in these master classes is in the variety of decor. Get creative with whimsical characters or repeat the steps in the instructions. In any case, the result will be original, and your tree will be different from others!
Master class number 1: Christmas balls in the form of ninja turtles

In addition to the classic Christmas tree balls, the main symbol of the New Year is decorated with toys of various shapes made from scrap materials. Children especially love cartoon characters. You can make similar ones together with your child. After repeating everything exactly, you will get four Christmas balls at once in the form of popular ninja turtles.
Materials (edit)
To make Christmas balls with your own hands, you will need:
- foam base in the form of a ball;
- sequins in different colors;
- beads of different colors;
- sewing needles;
- scissors;
- marker;
- glue;
- ribbon;
- toothpicks.

Step 1... Take a marker and a styrofoam ball. Draw an encircling line exactly in the middle of the shape. This will be the markup for making the character's eyes.

Step 2... String one white bead onto sewing needles. Use these to secure the sequins of the same shade to form the eyes. First attach 4 sequins in the form of a square, and then 4 more pieces in between the first.


Step 3... Send a black sequin to the center of the eyes.

Step 4... Place the mask around the eyes with sequins. Make masks in different shades for each character. Beads for attaching studs also match tone to tone. You will need masks in red, blue, orange and purple.


Step 5... Make green sequin headbands around the mask.

Step 6... With green sequins, departing slightly from the center line on each side, lay out even stripes. Fasten the sequins in the way you already know, putting one green bead on the needles.

Step 7... Fill the inside of the green strip with red sequins in two rows.

Step 8... Fill the rest of the tree ball with green sequins.


Step 9... Cut a piece of tape.

Step 10... Fold the tape in half and grease both ends with glue. Using a sequin and a needle, secure the ribbon in a loop so that you can hang the ball on the spruce's paw. Press down on the base of the mount with your fingers to allow the adhesive to set.


The ball is ready!

Master class number 2: Christmas balls in the form of a Pokemon ball

From sequins, working in the same technique as in the first master class, you can make a variety of balls, for example, a toy in the form of a Pokemon ball. How exactly, see below.
Materials (edit)
To make a Christmas ball from sequins, prepare:
- foam base;
- sequins and beads in black, white and red;
- studs for fastening or sewing needles;
- tape;
- glue;
- marker;
- scissors;
- a toothpick.
Step 1... Exactly in the middle of the ball around it with a marker draw a black line.

Step 2... Use white sequins and beads to make a ball button.

Step 3... Frame the button with black beads and sequins.

Step 4... Use the line marked with a marker to make a strip of sequins and beads in black.

Step 5... You should have two halves of the ball empty. Close the upper part using red sequins and beads, and the lower one with white.


Step 6... Make a loop of the red tape.

Step 7... Secure the loop itself with glue and a carnation with a sequin and red beads.

Master class number 3: Christmas ball made of threads
A beautiful Christmas tree ball can be made completely from scratch, without resorting to the use of wood or foam bases. An ordinary balloon will help you create the desired shape, and the walls of the toy will be made of threads. Such a ball is easy to decorate with different materials. The latter can not only be glued from the outside, but also placed inside the product.
Materials (edit)
To create a Christmas ball from threads you will need:
- Balloon;
- PVA glue;
- needle;
- small plastic bottle;
- a skein of cotton threads;
- brush;
- sparkles.
Step 1... Inflate the balloon to the desired size of the Christmas tree decoration.
Step 2... Pour PVA glue into an empty plastic container.
Step 3... Pass the thread through the eye of the needle. Do not break the thread itself, it should remain in the form of a skein.
Step 4... Pierce the plastic container with a needle through. So the thread will be wetted in the glue, and the excess will remain in the jar. As a result, consumables will be used sparingly, and the work surface will remain clean.
Step 5... With the prepared thread, completely braid the surface of the ball. Will the walls be dense or transparent, depending on the frequency of the turns.
Step 6... After winding the thread on the surface of the ball, go over it with a brush and glue to fix the shape. Leave the product until the glue is completely dry.
Step 7... Pierce the ball with a needle, remove it. Your product is almost ready, all that remains is to attach a ribbon to it in the form of a loop.

Step 8... You can decorate the balloon. To do this, grease its already finished surface with glue and sprinkle with sparkles. After the glue dries, shake off the excess glitter from the surface of the toy.
Today, on store shelves, you can find a huge number of a wide variety of Christmas tree decorations, so it will not be difficult to turn an ordinary Christmas tree into a real festive beauty. However, New Year is a special day! The day when the old year is left behind, and new adventures, new events, new victories await. But after all, the old year did not pass without leaving a trace, warm memories, bright events, your personal victories and achievements remained from it. It would not be bad to remember the passing year for many years. And you can do this with the help of a DIY Christmas ball. Each time you decorate a Christmas tree, you will get Christmas balls out of the box, and with them remembering the past.
Making Christmas balls with your own hands is quite simple: for this you need inspiration, a desire to create and a little perseverance. We have prepared for you 15 DIY master classes for making Christmas balls.
To make such a ball, you will need: a simple glass or plastic ball, old CDs, scissors, tape, glue.
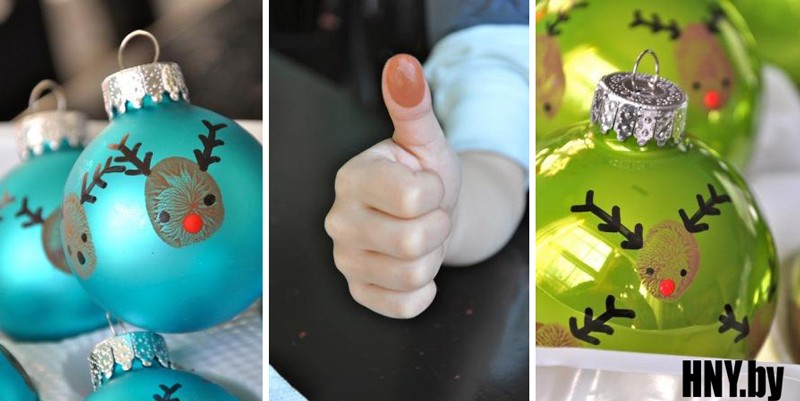
# 2 Christmas ball with fingerprints. We decorate Christmas balls in an original and simple way
To make such a masterpiece, you will need: a glass or plastic ball without a pattern, paints (watercolor, gouache, acrylic), felt-tip pens or markers, brushes.

# 3 Christmas ball made of paper tubes. Manufacturing master class
To make a New Year's ball from paper tubes, you will need: a foam or plastic ball, glue, thin paper, threads.

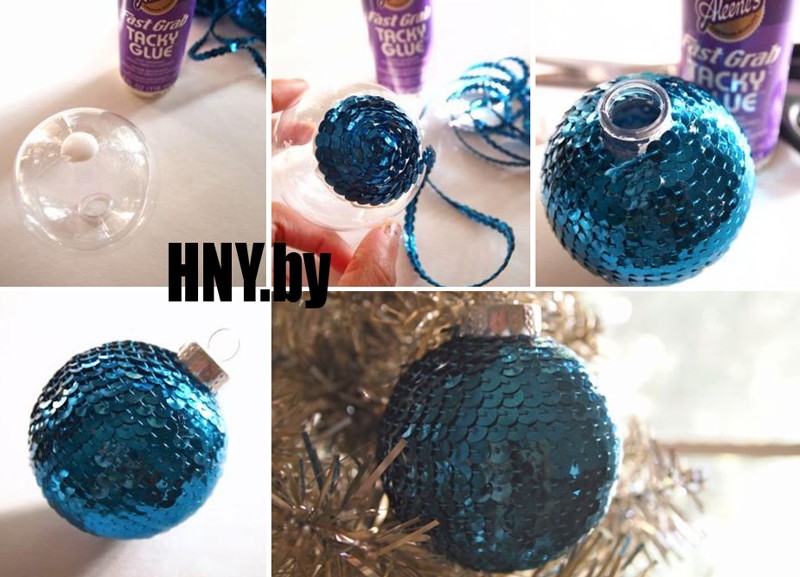
# 4 Christmas ball made of sequins. Step-by-step master class
To make a New Year's ball from sequins, you will need: a foam, plastic or glass ball, a ribbon with sequins, glue.
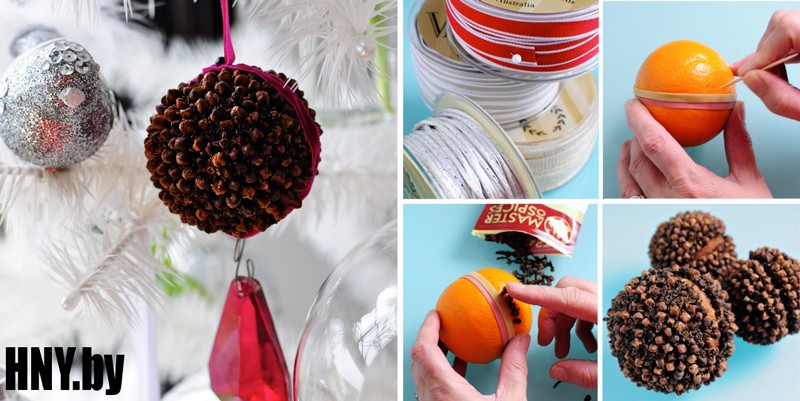
# 5 Do-it-yourself fragrant Christmas ball
New Year is a holiday of smells! Why not add some flavor to your Christmas tree? To make such a ball, you will need: an orange, lemon or any other citrus fruit, ribbons, a wide elastic band, a toothpick, New Year's spices (cinnamon, cloves, etc.).
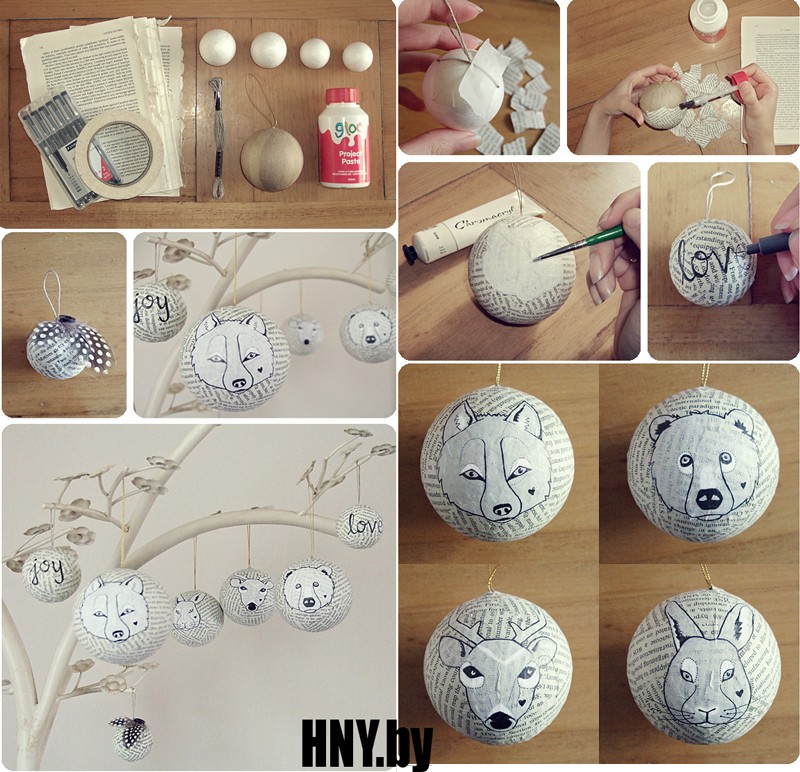
# 6 New Year's ball from old newspapers
Christmas balls decorated with old newspapers look very original. To do this, you will need: a foam or plastic ball, newspapers, glue, masking tape, thread, paints, felt-tip pens or a gel pen.
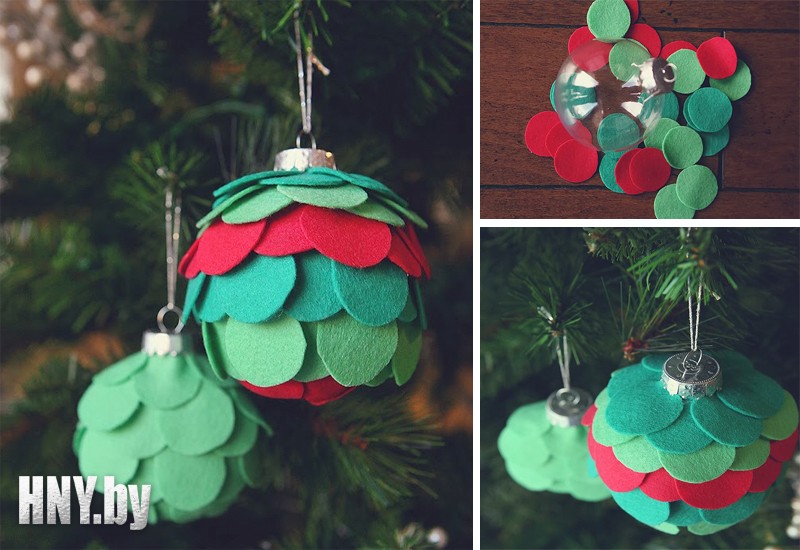
# 7 Christmas ball decorated with felt. We make decorations for the Christmas tree with our own hands
To create an original Christmas ball, you can use pieces of felt or other fabric. To create such a ball, you will need: a ball (plastic or foam), felt or other fabric of several colors, glue, thread, scissors.
To make a New Year's ball from fabric, you will need: a foam ball, fabric of several colors, safety pins (a lot!), Beads, scissors, glue.
# 9 Christmas ball made of patches
If you want to make an original New Year's ball with your own hands, then pay attention to the patchwork ball. To do this, you will need: a foam ball, a stationery knife, fabric of different colors, a felt-tip pen, a tape measure, glue, safety pins, a wooden skewer or a toothpick.

# 10 DIY Christmas ball made of threads
The New Year's ball made of threads is incredibly popular among needlewomen. To make it, you will need: a balloon, threads, PVA glue.
# 11 Christmas ball decorated with stained glass paints
An excellent Christmas decoration can be made using stained glass paints. To create such a ball, you will need: a glass or plastic ball, stained glass paints. You can do it in several ways: draw directly on the ball or make preliminary blanks, and then glue them onto the ball.


# 12 Christmas ball made of cord and beads. Do-it-yourself Christmas balls
To make such a New Year's ball, you will need: a foam or plastic ball, cord, beads, glue.
# 13 Button Christmas ball. Decorating a Christmas tree with children
Even the smallest residents of the house will be able to make a New Year's ball from buttons. For such a craft, you will need: a foam ball, multi-colored buttons, glue, thread.
# 14 Christmas ball with beads
Balls decorated with beads look very nice on the Christmas tree. You can decorate the ball with beads from the outside or from the inside. Which of the ways to choose is up to you, but we, for our part, will notice that the external decoration may crumble after a while. In any case, you will need: a plastic or glass ball, glue, beads.


# 15 Decorating a Christmas ball with cloth or paper
If there is very little time left, and you really want to decorate the balls, you can use a very simple and original technique: decorating the ball with wrapping paper or fabric.

# 16 DIY Christmas balls using decoupage technique
If you want to make a truly unique New Year's ball, then it's time to master decoupage. To make a New Year's decoupage ball, you will need: a plastic ball, themed napkins, white acrylic paint, PVA glue, acrylic decoupage varnish; fan-shaped brush, foam sponge, sequins for decoration.

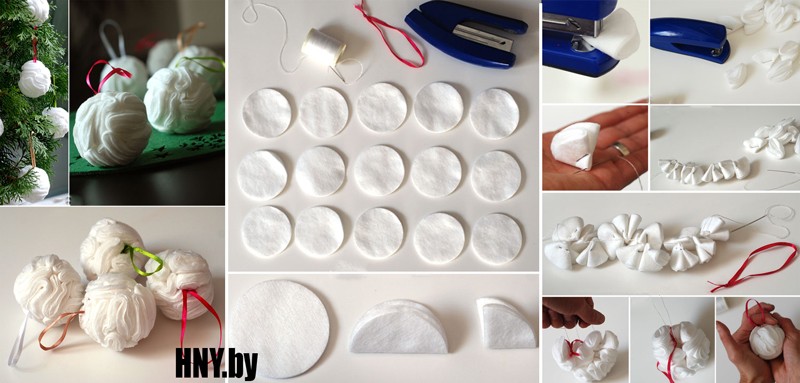
# 17 DIY Christmas balls from cotton pads
An excellent option for a New Year's ball would be a toy made from ordinary cotton pads. To make it you will need: cotton pads, stapler, needle, thread, tape.
# 18 Paper Christmas balls
Well, the last version of a DIY Christmas ball will be a paper ball. For him you will need: double-sided thick paper, scissors, glue, ribbon.

Help us become better: if you notice an error, highlight the fragment and click Ctrl + Enter.