Making paper Christmas decorations with your own hands: photos, pictures, examples. How to make a paper lantern
The tradition of decorating your home with lanterns came to our country from China. In the Celestial Empire, there is even a festival-festival dedicated to this uncomplicated, but such an attractive accessory. It will not be difficult to make a spectacular creative flashlight with your own hands, even for a child who will surely like a simple and bright toy. Our article will tell you how to create a spectacular luminous miracle on your own.
Lantern Festival - an ancient Chinese custom
Did you know that the Lantern Festival is one of the oldest Chinese customs?
The first mention of this celebration dates back to the 2nd century BC. The local population considers this day to be the beginning of real spring. In 104, by the decision of the emperor, the Lantern Festival was declared an official public holiday.

Practically each of us in our youth, in labor lessons, cut out a New Year's lantern, which was later used to decorate the school fir-tree. To make it, you will need colored paper, scissors and glue (or tape). The algorithm of actions will be as follows:
- Fold the piece of paper in half lengthwise.
- On the side of the fold of the sheet, make even cuts with scissors, leaving 1-2 cm uncut to the edge.
- Unfold the sheet and twist a tube out of it, gluing the edges.
- Cut out one centimeter strip and make a handle out of it to hang the craft from.

Advice
The flashlight, if desired, can be slightly upgraded. To do this, wrap the rolled up tube around a cardboard roll of tea towels.
Original paper flashlight
In order to make an exclusive flashlight out of paper, prepare colored paper, glue (if not, you can use ordinary tape), strong thread or rope and a hole punch. To create a craft, you should adhere to the following sequence:
- Fold the paper sheet like an accordion and unfold it.
- Along the entire perimeter, above and below, stepping back from the edge of half a centimeter, make holes with a hole punch at an even distance.
- Roll up the tube and glue its edges along its entire length.
- Fold the workpiece in half in the middle, then bend it to the other side and straighten it again.
- Through all the holes located at the bottom and top of the flashlight, carefully pull the thread or rope that you need to pull off and tie into a knot.
- Straighten the fold in the middle and you can enjoy your work.

Output:
Making a paper lantern is an affordable activity even for a child. You will need the minimum amount of materials and tools that you can always find close at hand. The simplest models for making are the classic New Year's lantern and the original version, assembled on a rope.
New Year's paper lantern
DIY paper flashlight
DIY sky lantern
At night, you can't cope without a flashlight - the main electrical device for vision. Without this object, it is generally not possible for a person to see anything in the dark. The reason for this lies in the fact that a person in the dark is not able to distinguish between colors.
Every year, more and more photos of homemade flashlights appear on the Internet, which is quite logical, since, thanks to such an invented device, you can see absolutely everything in the dark.

There are several types of flashlights today. You can find not only the classic options, known to everyone, but also lights that provide for self-regulation, if necessary, the beam of light. In this article, we will consider in detail how to make a flashlight with your own hands, using only prepared materials and step-by-step instructions.

Lanterns made of paper
If you look at various diagrams and instructions on how to make a flashlight yourself, you will easily notice that making it out of paper is easier than out of any other material. Moreover, even a child under the supervision of an adult can make a beautiful flashlight out of colored paper.

You can see countless samples on the Internet and by looking at them you can execute them quickly enough. If you want to make a beautiful flashlight, then you can additionally decorate it with such an accessory as a paper ribbon.


A paper flashlight acts as a rather cute symbol, so even if some homemade lighting assistants do not shine at all, they are forgiven for their lack of functionality.

In addition, they are so beautiful that making them is very interesting not only for children, but also for adults. Today, simple and powerful do-it-yourself flashlights become an object that is made even with kids in kindergarten.

How to decorate a flashlight?
A classic paper lantern can be interestingly transformed, for example, with the help of various decor. Ikea company demonstrates this especially successfully. Every year, their magazines show more and more different uses for garlands of lanterns on the walls and ceiling. Thanks to such an interesting piece of furniture, you can quickly and cost-effectively transform the appearance of any room.

So what does it take to make a flashlight at home? Paper, scissors, glue and some decor. Otherwise, there is a real scope for activity, which is not limited by anything.

More holes in flashlights
Today, in various magazines, you can find many different paper lanterns that can be made with a child of any age. You can, for example, try to make a bright pot with holes, which will decorate even a classic flashlight model. Most importantly, it will definitely replace a general developmental activity with a child over three years old.

Flashlight house
If you want to try to make ultraviolet and LED flashlights popular today, then you can try to choose the shape of a house for them. Beautiful lanterns in the form of houses or even palaces are quite simple to make. On the Internet, you can find a template for almost every taste. If you want to spend more time with your child, you can even try to draw a template for your future craft yourself.

The main thing to consider when creating this type of flashlight is the obligatory creation of grooves. In this case, you will most likely not even get dirty in the glue.


In addition, the thing will become truly unique and no one else will find it anywhere else. You can make such a flashlight in just a couple of hours. The main difference during creation will be only in the material used. Otherwise, they are made in the same way as lanterns in the form of cardboard houses.

When creating such lamps, keep in mind that the accessory will never be able to become a full-fledged source of lighting. In this case, the lantern can be used as a night light in a children's room or as an additional source of lighting, for example, in the kitchen, provided that the main lighting is sufficiently bright.

DIY photo flashlight

Note! 


Note! 


Note! 


Making a Christmas lantern out of cardboard
Author: Belyaeva Marina Valerievna, teacher of special and general education disciplines, Astrakhan College of Computing MachineryWork description: this development is intended for children of senior school age, teachers and parents.
The purpose of the master class: original decoration under the Christmas tree.
Targets and goals:
To acquaint with the simplest techniques of using the decoupage napkin technique
To help the participants of the master class in their desire to make their work practically meaningful.
Soon the new year will come to us, yesterday we are starting to put things in order at home, decorate the Christmas tree, decorate the house. And every time I want to create something unusual, how you can surprise your guests.
In my master class, I want to show how in just a week we will create a New Year's lantern under the Christmas tree, which will be the original decoration of your room.
Master class on creating a New Year's cardboard lantern
We need:
Cardboard with a thickness of at least 3mm
Ring 4cm high cut from toilet paper cardboard base
Three-layer napkins with New Year's ornament
Scissors
Decoupage glue or PVA glue
White water-based paint
Latex putty
Sandpaper (zero)
Stationery knife
Pliers
Decoupage varnish or quick-drying varnish for interior use
Glue "Titan"
Awl
Double-sided tape
Acrylic paints
Brushes for glue and varnish
Compass
Aluminum wire
Working surface
Progress:
1. Cut out blanks for a flashlight from cardboard:
Square 13 cm * 13 cm - 2 pieces
10 cm * 10 cm square - 2 pieces
Rectangles measuring 14 cm * 10 cm - 4 pieces
Rectangles 0.7mm * 10cm


2. For the upper part of the flashlight, we draw circles with a radius of 1.5 cm on two squares (large and small) using a pencil, a ruler and a compass

3. For the lower part of the flashlight, we draw circles with a radius of 2.5 cm on two squares (large and small) using a pencil, a ruler and a compass

4. Draw inner rectangles on two rectangles using a pencil and a ruler for subsequent cutting.

5. The next step - with the help of a clerical knife, cut out the inside of the blanks along the lines drawn.
6.Using PVA stationery glue, glue squares of different sizes together

7. Next, we varnish our workpieces. I use a quick dry interior varnish.

8. After drying, I cover all ends with putty and let dry for 24 hours.

9. Next, sandpaper the details and again varnish

10. The next step is to cover the blanks with white water-based paint using a sponge.


11. After the parts have dried, we begin a new stage - decoupage of the side parts of our flashlight. To do this, we need napkins with a New Year's motive, glue and brushes for decoupage.

12. For a three-layer napkin, separate the bottom two layers

13. Apply the napkin ornament to the side of the workpiece and coat the surface with glue. If irregularities and bubbles from the glue appear, gently level and press the napkin to the workpiece with your index finger.

14. Next, gently tear off the edges of the napkin with your fingers, slightly pressing the irregularities to the edge of the parts.
Note: It is not always possible to evenly glue the napkin to the part, especially when it comes to large surfaces. But I found a new way out for myself. First, cover the part with glue. Let it dry well. After that we apply a napkin ornament, parchment or cotton-paper cloth on top and iron the surface with a hot iron. The result is a 100% flat surface. It remains only to grease the edges with glue and you're done!

15. Next, we begin to paint the inner sides of the side parts and the upper and lower blanks of the flashlight. To do this, stir the blue acrylic paint with a water-based emulsion and, using a sponge, "smack" the surface. After painting, let it dry for 24 hours. After drying, we cover all the parts with varnish.


16. After drying, we begin to create windows in the side details of the flashlights.
To do this, we need a transparent film, double-sided tape and scissors.
Cut out rectangles from the film of the required size and glue them to the side parts with double-sided tape


17. The main and slightly laborious step is the assembly of all side parts using Titan glue. I alternately coat all the ends of the parts with glue and let them dry for 2-3 minutes, and then I just connect the side parts to the bottom of the workpiece. The details dry for a day.


Note: I do not glue one side part. Then I will simply insert it into the ends so that it would be possible to insert a small electronic lamp inside
18. Glue the upper part of the part in the same way. And let it dry well. For strength, I put a cast iron pan on top of the flashlight. We also glue the painted parts of the upper part of the flashlight.


19. The next step is to "smack" the poorly painted parts of the parts with red acrylic paint using a sponge and glue the upper part to the flashlight.


20. It remains with the help of an awl to make holes in the upper part of the flashlight and using pliers we fasten the aluminum wire
In China, paper lanterns have a special function - they protect the home from the evil spirit. We use them for decoration during the New Year holidays. We offer you to learn how to make paper lanterns with your own hands for the New Year. Further in the article, there are several step-by-step photo lessons and videos that you can use to make such beauty!
Traditional Lanterns for Beginner Craftsmen
Quite a simple and effective decoration that you can make with your own hands with your children. These paper lanterns can be used to decorate an office, a classroom at a school, a group in a kindergarten and a room in the house.


Let's look at how to make paper lanterns in stages from a photo for beginner craftsmen. The following is a detailed master class.
Such creativity will be interesting for children, so you can involve them in this simple and interesting work. The joint activity of children and adults creates a special festive atmosphere.
It will come in handy for us:
- colored paper of any shades;
- scissors;
- PVA glue or ordinary stationery for paper;
We start to create:
- A piece of paper must be folded in half along and from the side of the fold, make cuts every 1 - 1.5 centimeters.
- We unfold the paper and fold it across into a circle, glue the joint at the top and bottom.
- Cut out a strip of colored paper and glue the handle. The flashlight is ready, but variation is possible here.
You can leave the flashlight like this for the New Year 2018, or glue a cylinder from another sheet of colored paper (you can use the same shade or take a different one) and insert it inside, gluing the cut sheet around this cylinder.

Paper lantern diagram
Make some of these simple and bright paper products and hang them on a string, depicting a garland, or decorate the Christmas tree with them.


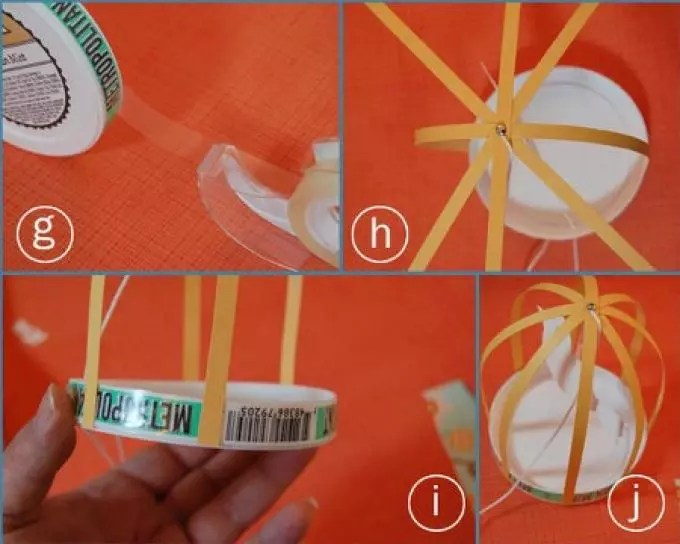
Ball-shaped lanterns 2 options
The first option is a ball of stripes. To implement it, we need:
- Any colored paper or cardboard. You can use old postcards.
- Rivets or thread with a needle and a pair of beads.
- Loop rope.
- Scissors.
- Awl.

PHOTO: Round Christmas paper lanterns
We do this:
- We cut strips, the width of which is 1.5 centimeters, and the length is 15 - 18 centimeters, if desired.
- We stack the strips together and make a hole on both sides with an awl.
- We insert rivets or a bead strung on a thread with a needle into the hole.
- Spread the stripes around the circle.
- We attach a loop on one side.

Step by step
The toy is ready.
These stylish lanterns can be used to decorate a Christmas tree or a room.
Another round shape
For the second version of paper lanterns in the shape of a ball, which you can make with your own hands for the New Year, there is a diagram describing the manufacturing process.

Round flashlight
We will prepare everything you need:
- thick colored paper, cardboard or all the same old postcards.
- hooks or straightened paper clips for the loop. You can also use a textile loop made of thin ribbons, jute rope, braid.
- satin ribbon.
- glue.

Step by step photos
Such toys are made simply:
- We cut out circles of the same diameter from colored cardboard or paper. One flashlight needs 10 such circles.
- Bend each circle in half with the colored side inward.
- We glue all the circles together, leaving the last 2 sides not glued.
- We glue a hook or loop from the braid, glue the remaining sides.
- We decorate the toy with a beautiful ribbon bow or attach any other decor to it to our liking.
But these are not all variants of this interesting and familiar to us from childhood New Year's toy. Let's look at a few more ideas below.
See how to make lanterns for the New Year 2018 with your own hands according to photos and diagrams:


Curly paper lanterns
You can make curly paper lanterns for the New Year with your own hands, a description of which with a diagram is given below. The process of creating such a New Year's miracle is very similar to the previous description.

Curly

How to make them step by step
First, let's prepare everything that will come in handy in the work:
Thick paper, cardboard or old postcards that we love.
- glue;
- double sided tape;
- scissors;
- needle and thread;
- tape, 0.5 centimeters wide;
- decorative elements: berries, beads.
Now let's get started, in the process of work you need to be careful and attentive. It is important to do everything according to the sequence and not to miss the details:
- We make a curly stencil of one side of the flashlight and cut out several identical parts. For one piece, make 10 - 20 pieces as desired.
- Fold the blanks in half exactly.
- Now the most crucial moment is gluing. It is necessary to do this according to the picture at the required points. First in those that are marked with "1", then in those that are marked with "2".
- Now connect the edges of the ovals, sew with thread. Can be glued onto double-sided tape.
- Now unfold the flashlight and pin the edges together.
- Attach a loop of ribbon and decorations on top.
Step-by-step photos of a New Year's product:


Make some of these lanterns, they will create an amazing holiday mood. They can be used to decorate a New Year tree, a room, any room. And if you take laminated paper or thin plastic, then lanterns can also decorate a street tree.


Tissue paper lanterns
This type of flashlight is unusual, not the one to which we are all accustomed from childhood. But it looks more like Chinese lanterns, traditional for celebrating the New Year in this exotic country. Tissue paper lanterns are very simple to make.

They add brightness to the holiday. You can also use corrugated paper for them. Let's get ready for the process:
- thin paper. One flashlight needs 2 sheets;
- needle with thread;
- Double-sided tape;
- braid or jute rope for the eyelet.
That's all that might come in handy, now let's start:
- We connect 2 sheets and bend it in half lengthwise.
- We fold them in an accordion, carefully ironing the folds with the palm of your hand.
- Expand the sheets. We connect one edge along the folds, sew with a thread.
- Now, in the same way, we sew the second edge with a thread.
- We connect the joint with double-sided tape.
- Now we hang the flashlight on the string.
You can make several lanterns of the same color, or choose beautiful shades for a bright multi-colored holiday.
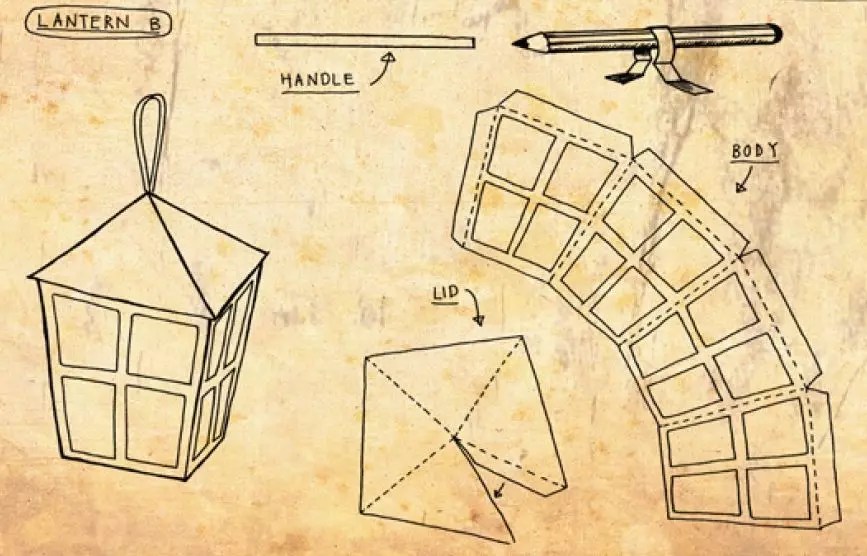
Master class for imitation of a real flashlight made of thick paper with decor
Now let's see how to make an interesting flashlight - an imitation of a real street lamp. We will make it out of paper and beautifully decorate it with decorative twigs and New Year's decorations.

To work you will need:
- thick colored paper or cardboard. The paper should be double-sided, that is, colored on both sides;
- ruler;
- scissors;
- pencil;
- sheet of paper for the template;
- glue and brush;
- New Year's decor.

This decorative toy is made very simply, you just need to be careful when making patterns and cutting out details, and the effect is amazing. It is quite possible to make such a flashlight together with children.
These are such beautiful paper lanterns you can make with your own hands for the New Year 2018! Follow the steps outlined in the video and you will have an amazing decorative item that will add style and flavor to your holiday!
For centuries, bright paper lanterns have decorated festive processions in China. This tradition has become widespread, and now all over the world almost no holiday can do without colorful lanterns, be it a birthday or a wedding and, of course, the New Year.
You can make such a decoration yourself, and preparing a holiday with your children will make it even more joyful and unforgettable.
The options for making and using Chinese lanterns are varied. You can take colored, corrugated or foil paper. Finished products can be placed one by one in the interior or make a spectacular colorful garland.
For the most affordable way making paper lanterns, which elementary school children will perfectly cope with, you will need:
- paper of various colors;
- Ruler and pencil;
- straight or curly scissors;
- glue or stapler for fixing parts;
- beads or sequins for decoration.
 To begin with, we fold a colored A4 sheet in half lengthwise and draw a line, stepping back a centimeter from the edge. From the side of the fold, we make cuts to the outlined line. Expanding the paper, we get the outer part of the flashlight.
For the inside, it is better to use paper of a different color. We retreat two centimeters from the edge and draw a line. We cut off this strip so that later we can use it as a pen, and we twist the rest into a cylinder, securing the edges with glue or a stapler.
To connect the outside and the inside, apply a strip of glue on the top and bottom of the cylinder, and then press the outside on both sides.
It remains to fix the handle with glue - and the decoration is ready.
You can experiment with sizes and different color combinations. And decorated with beads or sequins, this decor element will take on an even more festive look.
If you attach small paper lanterns to a Christmas tree garland, you get a beautiful Christmas decoration. However, for this purpose, you can only use those garlands whose bulbs do not heat up during operation.
Decorations from paper strips
Round lanterns, which are made of strips of paper, look like Christmas balls. They are easy to make and impossible to break. Sizes can be very different - from tiny balls to huge paper balls.
For manufacturing you need:
- paper with a beautiful pattern or spectacular structure;
- ruler with pencil;
- stapler and hole punch.
 The paper is cut into strips of equal width. The larger the ball you want to get, the greater the length and width of the stripes.
At the ends of the strips, having stepped back a few millimeters from the edge, it is necessary to make holes.
The strips are folded in a pile, and rivets are inserted into the matching holes, below and above. The rivets are fixed and they begin to distribute the strips around the circle, pushing them in turn.
A hand-made round New Year's paper lantern looks very decorative, if you attach a brush made of beads or threads to the lower part, and make a decorative loop on top.
Cardboard circles
The craft from cardboard circles looks original. In order to make a cardboard flashlight with your own hands, you just need to cut 10 circles from colored cardboard and bend them in half with the front side inward. The circles are glued in pairs. In the center of the sphere, a straightened paper clip is fixed with hot glue and a convenient hook is obtained for which it is easy to hang the decoration. The finished product can be decorated with ribbons, lace or beads.
Christmas stars
Star-shaped paper lanterns will bring a Christmas atmosphere of coziness and expectation of miracles to your home. To create this beautiful decoration, you need to print and cut out templates from suitable paper according to the diagram, as you can see in the photo. How many rays the star will have, so many parts we prepare, and then glue them together.
Tissue paper lanterns
 Elegant and lightweight products are made from tissue paper. They look especially impressive when illuminated from the inside.
One sheet of tissue paper is needed for making put on the other and bend in half along the length, smoothing the fold. Then the paper should be unfolded and assembled like an accordion, without separating the sheets. The width of the folds is 1−1.5 cm. First, from one and then from the other side of the sheet, a dense thread is pulled through the accordion with a needle. Tighten the thread, straighten the folds evenly and fix the edges of the sheet with double-sided tape.
If you do not tighten the loop to the end, you will get an equally original version of a tissue paper flashlight.
Such decoration Like a paper lantern, it is easy to fit into any decor and combine with the rest of the festive decor. In addition, it is believed that such crafts ward off evil spirits! And if you involve family and friends in the process of creating magic lanterns, your house will not only be decorated in an original way, but also filled with an atmosphere of joy, love and creation.
Attention, only TODAY!