Sew a bathroom organizer with your own hands. DIY organizer for small things. How to sew pockets for small things with your own hands: a master class. Tin cans are great storage containers
Pockets in the cabinet for the kindergarten
So we have grown to the kindergarten. I decided to sew the pockets myself. Of course, similar things are sold on the market, but I wanted to make it myself. Sewed quickly and without problems. I will share my experience .
I measured the dimensions of the cabinet door in advance.
I bought a simple oilcloth for the household. store (it is kind of dense) with a bright, childish pattern.
I cut out the base. In my case, it is a rectangle 22 * 79cm (here the drawing does not play a special role, since it will be covered with pockets).
At home, I found an oblique inlay in a contrasting color, with which I processed the upper cut of each pocket.
Then, on each of the 3 large pockets, I made markings for the folds (it turned out 4 marks at 6,12,18,24 cm). I laid small folds: 2 to the right, 2 to the left of the center, secured with pins. The folds are needed so that the pockets are bulky and not flat. Someone also uses an elastic band around the edge of the pocket for this.
I start to collect. First, I work with the bottom pocket. The distance from the bottom of the fabric (main) to the place where the pocket is sewn is about 4 cm.
I put the pocket on the main one tightly, face to face down, with a pattern so that the bias tape is at the bottom and the folds at the top. I sew with a simple line on a sewing machine at a distance of 0.6 cm from the edge. I put away the needles, I raise the pocket. The front side is clean, the seam is inside the pocket. I connect short cuts to the main canvas with pins. I sew the other 2 pockets in the same way. The distance between the top of one pocket and the bottom of the other is 1-1.5 cm.

When the large pockets were sewn on, a small pocket was sewn into the free space. It turned out flat, just for a handkerchief.
After the pockets, I took up the whole canvas.

From above, I had 7 cm left, I bent them and sewed them 1 time. In the resulting space, I inserted a cardboard 22 cm long (along the width of the main canvas) and 3 cm wide (along the width of the fold).
I sewed a bias tape along the entire perimeter, capturing the edges of the pockets. From 2 edges at the top, I left tails of 5 cm for the loops. I tucked the loops and sewed them separately. It turned out a canvas with 4 pockets, which can be easily wiped and folded up everything you need.
1 pocket - for a handkerchief; 2 pocket for changing to physical; 3 pocket for a T-shirt, panties, T-shirt, shorts; 4 pockets for tights and socks.

Bright, convenient, fast, functional. The main thing is that she did it herself!

Organizers are great tools that make our life easier and keep things in order. They are very different in their purpose, material, type, color, etc. You can buy a suitable model in the store, or you can sew an organizer yourself. It is convenient to use them at home, in the kitchen, in the children's room, in the car and in the country. How to sew an organizer on the wall with your own hands - a master class on this topic will allow you to do everything simply and easily.
Organizer is a convenient tool for keeping order
This item provides a rational and practical arrangement of things, their storage and functional use.
Organizers will be an irreplaceable assistant in the following cases:
- In the kitchen - they will allow you to conveniently place various little things, as well as sort out spices.
- In the children's room - they will help the child to store and fold toys, books, stationery and materials for creativity. In addition, it will be a convenient device for a mother to take care of her little baby.
- In the bedroom, the organizer will provide a woman with the opportunity to place cosmetics, creams and other personal care items in the most comfortable way.
- Do-it-yourself wardrobe organizer - ideal for storing small wardrobe items. For example, underwear, socks, tights.
- In the hallway - organizers are used to store keys, mail and even shoes.
- In a closet, garage or in the country - with the help of such devices it is convenient to place tool kits.
- In the car - they allow you to conveniently store various accessories in the trunk, or find their use in the car interior.
And these are not all the options for using organizers in everyday life. There are several ways to arrange such an optimizer for space and placement of things:
- Hang on the wall.
- Hang on the cabinet door or door.
- Place directly in the closet, on a shelf.
- In the car on the back of the seats.
Important! The installation of the organizer depends on its construction, design, size and material.
Bathroom organizer
A convenient optimizer is a must for a bathroom. It is in this room that there are a large number of various objects and little things, among which you need to put things in order:
- Personal hygiene products and items - toothbrushes, pastes, shampoos, gels.
- Cosmetics.
- Men's shaving accessories.
- Cleaning products.
For so many accessories, a convenient organizer is needed so that using them is comfortable and simple. We offer to sew a bathroom organizer with your own hands.
Materials and tools
- Terry cloth. In our case, such a material is used, but you can replace it with any other that you like, or use oilcloth, which will even be more justified in a bathroom.
- Cloth for the back of the organizer.
- Braid for decoration and reliability.
- Non-woven fabric for stiffening.
- Wooden slats - 2 pcs.
- Measuring tape.
- Sharp scissors.

Sewing instruction
We start by cutting out all the details of the organizer:
- On the fabric, draw a rectangle of the following dimensions: width - 42 cm, length - 58 cm. This is the basis of the device.
- Fold the fabric in half, measure 5 cm to the side at the top of the fold. Make a mark.
- Then step back from the top along the fold 4 cm down. Mark this place.
- Connect the marks with a smooth line along which cut the part. The resulting semicircle will serve as a hole for the handles.
- In the same way, make a pattern for the non-woven fabric and the back of the organizer.
Important! When cutting parts, do not forget to make an allowance of 1 cm.
- We cut out the pockets. Here you are already guided by your imagination and needs.
Important! Pockets can be the same and symmetrical, or they can have a variety of sizes and shapes: narrow or wide, long or short, roomy or small.
Sewing a bathroom organizer with your own hands is easy:
- First, attach non-woven fabric to the pattern details for structural rigidity.
- Tape around all the pockets, then stitch them to the front of the organizer.
- Sew the front of the garment to the lining. You need to sew the parts from the seamy side, then turn out the base.
- At the top of the product, fold 3 cm under the wooden slats.
- We sweep and sew on a typewriter.
- Thread the slats through the holes.
Important! Choose the color of the material to match the style of the interior, so that in the end the product is in harmony with the decor of the bathroom.
The best place to place an organizer in a bathroom is on the door or wall of the room.
We organize the space in the closet
If there is often a mess in the closet in your underwear, socks and other little things, then in this case, a do-it-yourself clothes organizer will help you.
Materials and tools
For manufacturing you will need:
- Thick fabric.
- Braid for decorating pockets.
- Sewing machine, matching threads, needles.
- Measuring tape.
- Sharp scissors.
Sewing instruction:
- We build a pattern. In this case, it will be a rectangle measuring 40 by 80 cm. Two pieces of such parts are needed.
- We connect these two elements on the sewing machine from the seamy side.
- We turn out the base and make a line on the front side of the product. Along the perimeter of the rectangle at a distance of 1 cm from the edge.
- Next, cut out the strips. We will need 4 such details, from which it is necessary to form 4 lines of pockets. In this organizer model, each strip will be divided into three pockets.
Important! You can make the number of pockets in one row based on your desires and needs.
- We turn up the top edge of each strip, process it with braid.
- We form two folds for each pocket, which are not fixed from above. This is how we create depth to the branches.
- Using a sewing machine, we attach each strip to the base from three sides. We also make seams between the pockets.
- We trim the very bottom line of the pockets in the lower part of it with braid.
Your organizer is ready! And you can place it inside the cabinet or on its door. To do this, attach the cord to the top of the product on both sides, hang it from the door handle or hook.
Important! This option is also suitable for the hallway to place gloves, children's mittens, hats, scarves and kerchiefs.
We store clothes conveniently
Another do-it-yourself clothes organizer master class. It can be made from a cardboard box. It will be convenient for lovely ladies to store their underwear in such a box.
Materials and tools
For these purposes, you need to prepare:
- Shoe box.
- Thick cardboard.
- Pasting paper. It can be wallpaper, self-adhesive paper, wrapping paper.
- Scissors.
- PVA glue.
- Double sided tape.
Manufacturing process
- We glue the cardboard box with paper on all sides.
- We measure the dimensions of the box - length, height, width.
- Then, according to the obtained values, we cut out the required number of strips from cardboard, which will serve as partitions.
- At the required distance, we make cuts, so that later, using the strips, form the compartments of the organizer.
- Trying on the received parts for the box.
- If everything matches, we fix the partitions to the bottom of the box using double-sided tape.
The result is a convenient organizer that can be placed on a shelf in a closet or in a drawer.
Organizer for stationery in the children's room
Many objects are always present in the children's room, especially during art or school lessons. How to sew an organizer on the wall with your own hands? A master class for making it is described below.
Materials and tools
For manufacturing you will need:
- Material for the base of the organizer.
- Material for making pockets.
- Cardboard.
- Decor elements.
- Sewing machine, matching threads, needles.
- Measuring tape.
- Sharp scissors.
How to sew organizer pockets on the wall:
- Determine the dimensions of the future organizer, and then cut out a rectangle of the specified size from the fabric. Of course, the dimensions depend on the amount of things to be stored.
Important! Choose a fabric for a baby organizer that is bright and beautiful.
- Bend the edges of the part around the perimeter by 0.5 cm, sew on a typewriter.
- In the upper part in the center, fix the loop for hanging the product from the wall.
- We cut out the pockets from cardboard. Since an organizer is needed to accommodate office supplies, the size of the compartments should be very diverse.
Important! It will be convenient to store pencils, pens and felt-tip pens in wide pockets, a rubber eraser in a very miniature one, rulers and scissors in narrow ones. In addition, the shape of the branches can also be original. You can design your organizer with round, triangular, square or heart-shaped pockets.
- Based on the templates obtained, we cut out the pockets from the appropriate material.
Important! Make 1/2-inch seam allowances.
- After that, it is necessary to lay out all the details on the basis, to think over the composition.
- Sew the pockets to the canvas.

Decorating
It seems to be ready, but the final touch remains - decorating the organizer, because this is an accessory for a children's room.
You can decorate the product in the most incredible way:
- Place stickers with your favorite cartoon characters.
- Sew beautiful and funny applications on the pockets.
- Sew pictures corresponding to the filling of the pockets, that is, an image with them on the compartment under the scissors, etc. By the way, such a system will teach the child to be organized and independent.
- Use bright buttons, beautiful ribbons and bows, flowers, beads and sequins.
Important! You can entrust this process to a child, and he will paint his pockets with paints or pencils to his taste.
Now you know how to sew organizer pockets on the wall in a nursery. Such a product can be used to store books. In this case, the organizer model will have larger compartments, and it will be convenient to place such an optimizer near the child's bed so that you can always read your favorite book before bedtime.
And also a practical device is simply necessary for a young mother who is caring for a baby. Convenient pockets fit perfectly on the side of the crib. And in the departments you can store the necessary little things - napkins, a pacifier, a comb, your baby's favorite rattle.
Original ideas for organizing order
Do-it-yourself organizer can have an original idea and no less original design. We will talk about such examples further.
Old jeans - a second life
If there are several pairs of old pants or shorts in your closet, then you can sew the fabric organizer on the wall from their pockets. It is very easy to do this:
- Buy fabric for the base of your garment. Cut out a rectangle of the desired size.
- Take pockets from old clothes.
- Place on the base as you like, type-stitch to the canvas.
- Consider wall mounting at the top. For example, a loop in the center or two on the sides, a rope, a hole.
How to store documents?
And this method is unprecedentedly simple. To ensure that the documents are always in a certain place and at the same time do not wrinkle, dense files are suitable. These office supplies are sold in stores. Place the folder on your cabinet door or wall and place the papers in it. The organizer is ready!
Important! This option is also suitable for the kitchen to store your favorite recipes.
And don't forget about the decor - plastic files can be decorated with colorful stickers.

Tin cans are great storage containers
The unnecessary tin containers can be effectively used as towel holders in the bathroom.
You need the following materials:
- Several cans.
- Light-colored acrylic paints.
- Satin ribbon.
- Decoupage material: napkins or fabric.
- Glue gun and glue.
- A sheet of plywood that will serve as a base for fastening.
- Several screws.
Master class on how to sew an organizer:
- We paint the plywood sheet and cans with light-colored paint. For example, cream or beige. It is necessary to paint containers from all sides.
- We make decoupage cans. To do this, we put an ornament on the front side of the containers, which can be cut from napkins, patterned fabric or special cards for decoupage. We glue the decor to the jars.
- Glue the satin ribbon to the top edge of the cans.
- We attach the bottom of the cans to the plywood base with screws.
- Also decorate the perimeter of the base with a satin strip.
Important! Rolled towels can be placed in such containers. And such an organizer looks very unusual and stylish.
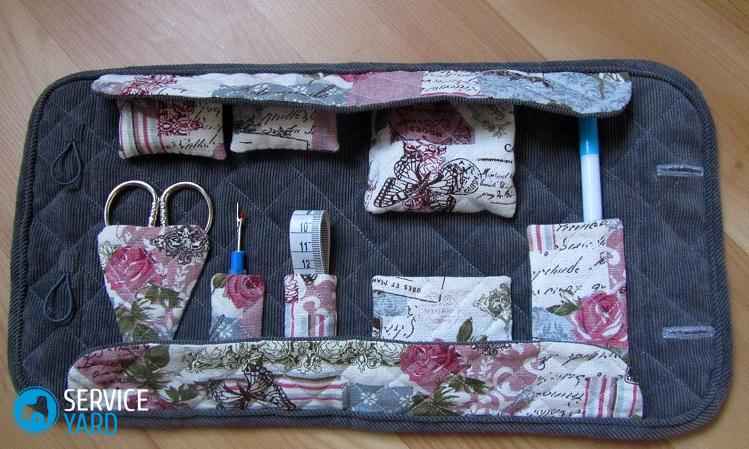
Convenient cosmetic bag
In the arsenal of the female half, there are always a lot of personal care products and tools. These are a variety of brushes and tweezers, scissors, mascaras, lipsticks of many shades, pencils. In order not to look for these items every time in your purse or drawer of the dressing table, you can sew an organizer for them.
With organizers, you can put things in order anywhere: in the bathroom, in your closet, at your desk or in the car. Thanks to these devices, each thing will take a certain place, and order will reign in the room. Irritability will disappear when it is impossible to find the right thing for a long time. We have given basic information on how to sew organizer pockets on the wall, and following your imagination, you can complement these products with colorful details, original decor and exclusive execution.
Often there is no storage space near the sink or under the mirror. An organizer can help in solving this issue, helping to organize things. Thanks to him, you can quickly find a comb, cream, razor.
A hanging bathroom organizer can be purchased at the store. It is not necessary to use ready-made solutions from the retail network, it is not at all difficult to make an organizer with your own hands. In this article, we will tell you how to make these accessories in a smart, functional way, which will allow you to organize your cosmetics, toiletries, and make it possible to use space wisely.
How to make a wall organizer?
An organizer is a container divided into compartments, shelves, drawers, suitable for storing items of different sizes. Depending on the needs, it can have one or several levels, different sizes. An open organizer provides direct, quick access to the things you need, while a closed one protects them from dust. These accessories are usually made of clear plastic, making it easier to find the item you want, such as eyeliner or the right shade of nail polish. Various models can be found on sale:
- wooden;
- glass;
- wicker;
- knitted;
- textile;
- mesh;
- iron.

The organizer greatly simplifies the arrangement of rooms, storage of small items. It is especially relevant in a small bathroom, where you need to limit the amount of stored items. Using simple objects, you can quickly make an organizer that can be successfully integrated into the decor of any room.
The ideal model will make it easy, comfortable to organize cosmetic accessories, bathroom accessories. The structure should have separate compartments for items of different lengths:
- high - for a set of brushes, pencils, mascara;
- slightly lower - for lipstick, nail polishes.
It is advisable to have a separate place for cotton pads, cosmetic sticks. For nail enthusiasts, we recommend racks specially designed for storing varnish and other accessories. This will allow you to select the correct shade. Painting your nails can damage freshly applied nail polish, so keep accessories within easy reach.
Cosmetics, accessories can be arranged using various sizes of wicker baskets. They are especially useful in the bathroom. The basket set will contain all the necessary items, including toiletries, towels.
Organizer shelf
Homemade aesthetic shelves are not as difficult to make as they might seem. Thanks to this practical accessory, we get additional storage space for cosmetics and other toiletries.

We will need:

How to make an organizer - step by step instructions
An organizer shelf is an ideal place for toiletries, accessories that are inconvenient to store in the closet, convenient to have at hand. You can install such an accessory almost anywhere: under the mirror, next to the sink.
Wooden Hanging Organizer
What can be done with banks? For example, a stylish organizer that allows you to save a lot of space in the bathroom, all the necessary accessories will be at hand.
To work you need:
- 1 long board with dimensions, for example: 115 × 24 × 1.5 cm (length, color, material are randomly selected);
- 5 glass storage containers;
- 5 metal clamps, preferably stainless steel (the size of the clamps is chosen for glass containers - 7-9 centimeters);
- 5 wood screws with a diameter of 3.5, 12 mm long;
- 2 dowels 8 mm long and corresponding screws (adapted to the type of wall);
- drill;
- drills for wood (1-2 mm);
- drills for metal (3 mm);
- dowel drills (depending on the wall).
Step-by-step instruction

Now cosmetics and accessories will acquire a “new home”, pleasing to the eye with an original appearance. You can enjoy harmony, order in the bathroom.
Wall mounted cosmetics organizer
Keeping cosmetics is tricky, especially if the bathroom isn't too spacious. The ideal solution is a practical, extremely effective organizer to be placed on the wall next to the mirror or elsewhere. This easy-to-use gadget will forever end the chaotic search for cosmetics every morning, keep all your makeup, face, body, hair in harmony, order.
What you need:
- double-sided tape;
- decorative paper;
- magnetic board;
- magnets;
- self-adhesive hooks for tiles, metal;
- several different trinkets - baskets, boxes.

How to make an organizer for cosmetics - step by step instructions

Hanging organizer with hook
Needlewomen who love to knit or crochet will have no difficulty in knitting several baskets of dense thread held together by rings. Rings can be braided with thread. You can choose the number of baskets at your discretion, attach a hook to the upper basket, which will hold your own hand-made hanging organizer. This accessory is useful for storing clean towels, hair dryer, hair straightener.

What can you buy in stores?
Accessory manufacturers offer a wide range of organizers of various shapes, sizes, colors. The containers are mainly used for storing cosmetic items, varying in size, shape, pattern, texture, allowing them to be matched to any bathroom. Among the accessories there are:
- wicker;
- plastic;
- rattan baskets for cosmetics;
- containers for detergents, napkins;
- hanging containers.
The small waterproof basket is ideal for showering and is best placed in the shower cubicle right next to the mixer.
Models with several compartments in interesting colors can be placed near the sink, they will enliven the interior of a minimalist bathroom.

The organizer for toys is becoming a necessary attribute in the house where small children live. It's hard to imagine bathing without toys that can distract your baby while we wash his head. To store toys, you need a convenient box, a hanging bag. The range of accessories is wide enough. With a little craftsmanship, you can sew the organizer yourself from easy-drying fabrics, the outer wall can be made of a mesh that allows water to drain quickly.

The organizer grid for toys is a useful gadget in every home. It goes well with the bathroom as a toy attachment. When the mesh is dirty, it is easy to rinse it out.

Plastic shelves with compartments for accessories of various sizes will be an excellent addition to a bathroom cabinet, in which you do not have to turn the entire contents over to find the necessary lipstick, nail file.


It is convenient to place such accessories in the drawers of the vanity unit. Some cabinet accessories allow you to store accessories on multiple levels, saving space by increasing the functionality of the drawer units.

The rotating organizer is the perfect solution for keeping your cosmetics tidy. It will fit here: powder, eye shadow, lipstick, mascara, pencils, and other accessories that are conveniently stored in one place. Large models can hold up to 200 cosmetic items. With such a device, it is much easier to do a quick make-up without wasting time on endless searches for the right brush, lipstick. Additional convenience allows the device to rotate in any direction 360 degrees.
 A toothbrush holder can have a pretty interesting modern design, adding extra charm to the room. It is convenient when the brushes are collected in one place without interfering with each other.

Shaving cream, cotton pads, makeup brushes, mascara, lipstick ... Even in a small bathroom, you need to allocate space for many cosmetics, accessories for face and body care. Many lovers of cleanliness and order are concerned with the question of how to avoid clutter, to organize conveniently necessary things? Problem solving is a practical organizer.
It is not necessary to be a beautician, make-up artist to appreciate the order in the placement of everyday toiletries, the comfort of using accessories. Well-organized objects take up little space and are easier to find. An aesthetically pleasing collection of lipstick, nail polish can create an interesting element of room decoration.
Dozens of necessary little things accumulate in every house. The bathroom is no exception. Personal hygiene products, cosmetics, men's shaving supplies, detergents - these items should always be at hand. Organizers will help to keep them in proper order and not to wreak havoc in the interior of the room. Their use is especially important in small rooms. You can buy a ready-made organizer or make it yourself.
Tin can organizers
Original organizers can even be made from junk material, such as empty cans. They will not only decorate the interior of the bathroom, but will also be very useful.
To make them you will need: tin cans, acrylic paints, glue, glue gun, colored napkins or cloth, satin ribbon.
Toilet paper holder

Procedure:
- Paint the jars the desired color. The outer side need not be painted, as it will be pasted over with decorative material.
- Cover the outside of the jar with decorative napkins or cloth.
- Glue a satin ribbon edging along the bottom and top edges of the can.

- Bind the jars with tape and secure with a glue gun.

Organizer for towels with decoupage

For the manufacture of the organizer, you will additionally need a sheet of plywood or chipboard, screws. Procedure:
- Paint the plywood sheet and jars with acrylic paints in one of the light colors (white, beige, lemon, salad). In this case, the cans are painted on all sides.
- For decoupage, use special decoupage cards, napkins or ornamented fabric. Cut out the ornament and glue it to the jar.
- Make a stencil from the fragments of the ornament and apply an additional pattern with paints.

- Cover the top of the jar with satin ribbon.
- Screw the bottom of the cans onto the plywood.
- Apply decorative tape around the perimeter of the plywood sheet.


Another type of organizer is a storage pouch that can be hung on a wall or bathroom door. It can be sewn from terry cloth or oilcloth.
To make an organizer, you will need about 0.5 m of terry cloth, fabric for the back of the cover, non-woven fabric, braid, two wooden slats. If desired, one or more pockets can be made transparent by using organza.
- Cut the fabric according to the pattern, adding 1 cm each along the cuts for the allowances. The fabric is cut along the lobar thread.

- To reinforce the details, sit them on the non-woven fabric.
- Trim each pocket with bias tape and stitch to the base.
- Sew the terry cloth to the lining.
- Make folds for threading the slats.
- Trim the top edge of the case.
Thanks to organizers, each thing will be in the place allotted to it, and order and comfort will reign in the bathroom.
I must say right away that the idea of these pockets is not mine, but when I saw it on the Internet, I realized that this was a cool thing, and took note of it 🙂
The thing is really very convenient and practical!
I sewed these toy pockets for the bathroom.
It is sewn quite simply and quickly, and it is even easier to cut!
But the cool thing is that using this idea you can sew not only pockets in the bathroom, but also a lot of other things 🙂
I'll tell you briefly about the materials.
Because this is for the bathroom, and there it is constantly, then steam, then water, then the most important requirement for the materials is that they dry quickly, and the fungus does not go.
I chose the hardest mesh (tulle) and edged it with piping.
Tulle dries quickly, and it is almost invisible on the wall, and keeps its shape well.
In general, there are only advantages. I haven't found any minuses yet (maybe they'll come out over time).
Now a little about cutting and footage.
It is clear that everyone's bathrooms are different, and the amount of free space is also different, but I will write the sizes that I personally used, and which can be seen in the photographs.
2 vacuum suction mounts.
Fatina I bought everything - 70 cm with a width of 180 cm;
Oblique inlay it took - 4.40 m (but I would advise you to buy at least 10 cm more - maybe they will not cut it very accurately, maybe plant a slant somewhere);
The foundation- 66 cm (length) * 40 cm (width);
Bottom pockets- 66 cm (length) * 24 cm (width), 4 folds 3 cm deep;
Mid pockets- 66 cm (length) * 21 cm (width), 4 folds 3 cm deep;
Top pockets- 66 cm (length) * 17 cm (width), 6 folds 2 cm deep.
Dimensions are with hem and seam allowances.
Pocket pattern:
In general, everything is so visible and understandable from the photograph, but I will explain a little.
1. I divided the upper pockets into 3 pieces. From the top edge of the base to the top edge of the pockets 2 cm. 6 folds 2 cm deep.
2. From the bottom of the upper pockets to the top of the middle ones 2.5 cm.
The pockets are divided in two. 4 folds 3 cm deep.
3. From the bottom of the middle pockets to the top of the bottom 2.5 cm. Also 2 pockets and 4 folds, 3 cm deep.
On this with a pattern and reveal everything. Now I'll tell you about how to sew.
1. I started by processing the lower pockets - it was more convenient for me.
We frame the upper cut of the pocket blank with an oblique inlay.
Then we outline the middle on the base and on the pocket blank, put it on top of each other, aligning the marks and stitch it. Now let's move on to the bottom cut.
We combine the sections and edging, not forgetting to lay the folds.
We do not lay the folds from the very edges, because then you will need to edge the edges.
2. We trim the top of the middle and upper pocket blanks, as well as the top of the base itself.
3. Next, I sewed on the top pockets. But they are not sewn on like the bottom ones, but a little more complicated.
We divide it into three equal parts and somehow mark it (with pins, we lay threads - each has its own technique).
We first apply tulle (already with folded folds), and sew.
4. Then we turn the pockets upwards, combine the pocket separator marks with the marks on the base (we also divide the base into three equal parts in advance and put some marks) and lay the separator lines.
For greater strength and aesthetics, we fasten the laid seam by laying a 1 mm line along the bottom of the pocket.
5. Sew the middle row using the same principle.
6. Well, now it remains to finalize the sides.
We trim them too, but remember that at the top you need to make loops on which you can hang this work of art.
I made the loops of 12 cm in finished form (plus we don’t forget the sewing allowances).
7. Here is such a "bathroom assistant" settled in my bathroom.
The thing is very convenient and very helpful, because competently organizes the workspace.
If such a master class of mine helps someone, then I will be very glad!