Paper flowers are simple and fast. How to make paper flowers
Svetlana Simonova
Appointment: making flowers to decorate the group.
A very simple and quick decoration idea. Just roll up colored paper into acute-angled tubes and fix them on a round base in layers. It is important to note that this decoration looks good at long distances, but is not very impressive for the viewer up close. Therefore, find a suitable place for it, and it will become a bright spot in your interior!
Such flowers can be used to decorate walls for a holiday, and also be used as "Hats" for a masquerade - for this, attach an elastic band to the base on both sides. If you take smaller details, you can make a very beautiful hair accessory.
Progress:
1. We will prepare the materials necessary for work
Cardboard (the foundation)
- note paper.
Scissors
Cut out a circle with a diameter of 13 cm from cardboard - we will stick on it flower... We take paper squares... The number of squares depends on the diameter of the circle. For a circle D = 13 cm, you need 24 squares for the first layer, 22 squares for the second, 17 squares for the third layer and 12 for the fourth. 15 squares for the middle flower.


We make from squares using glue "Little bags"... Apply glue to one side of the square. We take the square by the corners and turn into "Bag".

Thus, we turn all squares into "Little bags" and we get petals flower.

When "Little bags"- the petals dry up, glue them with the back side to the base, in a circle, leaving a little space in the center for the second and third rows.


The flower is ready.
Related publications:
Applique made of curled corrugated paper, a type of creativity available for any age, contributing to the development of fine motor skills in children.
Corrugated paper rain flower (master class) Dear colleagues and friends, good time of day. Today I bring to your attention.
Paper lotus flower using origami technique (master class) Dear friends, good time of the day. Today I suggest you make it completely.
I want to present to you a master class on making a flower from colored paper, which can be done with the children in preparation for.
PAPER FLOWER To decorate the central wall of the music hall, I try to use inexpensive materials at hand. I use it a lot.
Dear colleagues, I offer you a master class on a corrugated paper flower. I made such flowers for our girls. At the matinee dedicated.
Purpose: to form the ability to create gifts with your own hands. Tasks: develop the ability to fold paper; develop fine motor skills of the hands; bring up.
To decorate a room or the facade of a building, a tree or an arch, it is best to do them yourself. Master classes for making such jewelry are presented here to users.
Bulky large paper flowers with a stapler
You can make such decorations very quickly. To make them, you will need thick colored paper. You can use whatman paper, previously painted with paints, or colored cardboard for children's creativity. To make large paper flowers brighter, it is recommended not to make the craft one-color. Let each petal be red and yellow and blue and orange at once.

- First, the lower petals, the largest, are cut out.
- Then three others are prepared, from other flowers and smaller ones.
- The parts are stacked as the size decreases, the smallest should be on top.
- In order for such large paper flowers to receive volume, the bottom of the entire stack of petals is folded with a boat and fastened with a stapler.
- Four more details are made out in the same way. In total, to make a large flower out of paper, you will need five such voluminous petals.
- Each piece is again fastened with a stapler at the bottom, grasping the side of the adjacent petal.
Such large paper flowers look beautiful and bright. They are used to create arches.

without cutting out petals
You can make a large flower from paper using the method of making ordinary small blossoming buds. That is, the master folds the material around the stem with an accordion and clamps the strip at the bottom, straightening the upper part of the product.
To make these voluminous large paper flowers brighter, several shades should be used in the manufacture of one craft. You can even mix blue and red, purple and pink, orange and burgundy.

- A piece of fleecy is placed in the center of the flower. Bright beads are fixed at its ends. In the middle of a piece of chenille, a stem is wrapped - a thick wire or a wooden skewer. These will be stamens.
- Now the first layer of paper is laid out around the stamens with a skirt. You can fix the workpiece by wrapping the bottom with threads or soft wire.
- The second layer of paper is laid in the same way, only the upper edge of the strip needs to be slightly stretched along the corrugation. This will create a lush effect.
- The same is done with the third row.
- At the very end of the work, a row of green paper is used. Only the strip needs to be taken quite narrow - these will be sepals.
Aster, cornflower, carnation
The above method is an example of making a fantasy flower. However, asters, carnations, cornflowers are made in almost the same way. The difference is that a strip of corrugated paper needs to be prepared before use.

It is necessary to make one of its edges serrated using special scissors or cutting triangles by hand. You can make transverse cuts on the strip to the middle.
Flower bow
You can use stylized imitation flowers for decoration. Such a large paper flower is made from loops made of colored stripes.
The petal folds quite simply. A section of a wide strip is folded in half across, but the fold does not need to be ironed. Isn't it true that the petal resembles a half

Both ends of the strip are in the same place. They are squeezed and laid around the stem. Having collected the required number of petals, the master fixes them at the bottom with threads or wire.
Sepals are made in the same way as in the above embodiment.
Dahlia made of paper
According to the algorithm for making a flower-bow, you can build an imitation of a dahlia. To do this, at the time of folding across the paper strips, section cuts are made at the bottom. They should be equal to about three quarters of the length of the folded loop and not reach the cut so that the petal does not disintegrate. The rest of the work is done according to the scheme described in the previous section.
Corrugated paper rose
The queen of the flower garden has always been considered a beautiful rose. This is one of the most difficult crafts to perform. In order to make flowers out of paper (large or small - not the point), resembling a rose, you will need to cut out each petal and work on it.

- So, they prepare the right amount of heart-shaped parts with a slightly smoothed top - do not sharpen it, let it be better to have a concave arc.
- Each petal should be stretched slightly in the middle, giving it a convex shape.
- The upper parts protruding above the concave arc are wound on a pencil - twisted.
- The inner bud is usually not open in roses. Therefore, it is better to twist the first petals inward. By folding them with your palms, you can get an unopened inner bud. In the same way, it is recommended to lay a couple more petals.
- The next row is made of parts twisted outward. To make a large voluminous flower made of paper as similar as possible to a real one, you will need a lot of such petals. The more there are, the more magnificent and attractive the rose will come out.
- Below the flower has sepals. Wrap the stem with green tape. In the absence of such a roll of green corrugated paper can be cut across so that you get a thin roll about a centimeter wide. Having glued its end to the stem under the flower, the craft itself is taken in the left hand and lightly twisted clockwise. right hands press and pull lightly on a strip of green paper. Each loop descends a little down the spiral. Thus, the entire stem is wrapped.
- You can insert a green leaf during wrapping - this will give the rose a greater resemblance to a real living flower.
Rose "waste-free"
You can simplify the work of making the queen of flowers. This method excludes cutting out each petal separately. It is quite simple to make transverse notches equal to the width of the petal on a wide strip of corrugated paper. Each right corner of a strip rectangle is wound around a pencil in a known manner. The first four petals are twisted inward, the rest - outward.
Then you should stretch the petals in the middle - each separately. Lay the whole on the prepared strip around the stem, straightening the petals and squeezing the strip from below with an accordion, giving the product the required volume.
Further decoration of the craft is carried out in accordance with the algorithm described above.
Pleated petal poppy
This flower is easy enough to make. To make it, you need to cut petals out of thick colored paper that resemble drops in shape. You only need eight of these parts. The petals are folded along the accordion, then straightened.
On a small green circle - sepal - blanks are glued, slightly gripping the lower part so that they rise above the plane. The first row has five parts, and the second has three. Moreover, the inner layer should rise above the outer one.
For the middle of the flower, you will need to cut out two circles: the yellow one should be slightly larger than the black one. Around the circumference of the yellow parts, many cuts are made to make stamens a centimeter wide. They are curled with scissors (ironing with force) or with a pencil. The middle is glued one by one: first the yellow part, and the black one on top.

Briefly about the main thing
In order for the flowers to turn out beautiful and lush, neatness and desire will be required from the master. Bright materials will also do the trick. And the master classes published here will help beginners complete the presented models.
Volumetric flowers perfectly decorate the room, if they are. Placed on the wall - they will give an unusual accent to the celebration and will be remembered for a long time.
Each has its own personality - a gentle slope of the stem or beautiful color transitions of petals, and all this adds joy to our life.
The proposed do-it-yourself flower models will suit any holiday.
Volumetric paper flowers on the wall by templates

Master class with a photo of all stages of creating a flower
- We need thick designer paper in two colors: red and white. The paper size is 102 x 70 cm. You will also need a metal ruler along which you will have to work with a breadboard knife. And also, as usual, scissors and a glue gun.

2. Take a petal template drawn on paper with a petal length of 15 cm and a width of 16.5 cm. The horizontal stripe at the bottom of the petal is 7.5 cm in size.

3. Cut out the template carefully with scissors.

4. Along the borders, the template is cut out without much difficulty.

5. Put the cut out template on a red sheet of paper and cut off a strip according to its width (a little with a margin).

6. Then we put the petal template on the strip in height and cut off the square. Place the cut square on top of the strip and cut the required number of squares.

7. Put the template on top of all the squares collected in a pile and secure it with a clothespin.

8. Easy to cut 5 red petals at once. The first row will require 7-8 petals and they have already been cut out.

9. Measure the width of the second strip according to the template and cut it off. One strip for the petals of the 1st row will not be enough.

10. Cut out a red circle with a diameter of 14 cm from one of the squares. This will be the center of the flower. Place the circle on the table and try on two opposite petals. The petals go over the circle within 1 cm. Mark this size on the circle for gluing with glue.

11. The flower should be about 40 cm in diameter.

12. And now you need to cut each petal of the first row in half to the center, as in the photo.

13. And now, with the help of a glue gun, we will create the volume of each petal.

14. Take a glue gun and apply a thin strip of glue along the length of the cut and glue, making an overlap, of the cut parts. Thus, we give a volumetric shape to all the petals of the first row.

We form volumetric flowers for the petals of the 1st row
15. Take a glue gun and apply glue to the back side of the lower part of the volumetric petal. Press the part of the petal smeared with glue to the circle, as in the photo.

16. Repeat all the same steps with the second petal and glue it to the circle with an overlap on the first petal.

17. We continue to glue and collect the volumetric petals of the first row.

18. The first row of paper flower petals is ready.

Assembling the petals of the 2nd row
19. Draw a petal template for the 2nd row on paper. Its dimensions are: height 13 cm, width 14 cm and at the base the horizontal width is 6 cm.

20. Now we perform all similar actions when forming the 1st row: we put the template of the petal of the 2nd row on a sheet of paper, cut off a strip of the desired width, put the template on the strip and cut the squares.

21. We fasten the template to the stack of squares with a paper clip and cut out the petals for the 2nd row.

22. Cut the petals of the 2nd row in half to the center, apply glue along the edge of the cut and overlap. The volumetric petals of the 2nd row are ready. We glue each petal in the central circle of the flower with an overlap.

23. The second circle of petals is glued.

Assembling the petals of the 3rd row
24. Draw on a piece of paper a petal template for the third row with the following dimensions: petal height 11 cm, width 12.5 cm with a base length of 6 cm.

25. Cut out the petals for the 3rd row and glue them to the central circle, performing all the same actions when creating the 1st and 2nd rows. The 3rd row is ready and it consists of 5 petals.

Formation of the middle of the flower (stamens)
26. Bulky flowers with a center look more original. We measure 16 cm on a sheet of white paper.We will say in advance that the height of the stamens is intended to be 8 cm in size.

27. Cut off a strip of white paper 16 cm wide.


29. In order not to injure the table, put a sheet of thick paper, put a white strip on it and, using an iron ruler and a breadboard knife, cut the strips without reaching 7-8 mm from both edges of the strip. The thinner you cut the strips, the more delicate the middle will be. A maximum of 0.5 cm is allowed.

30. On a strip of red, we also cut very narrow strips. Can be cut with a sharp clerical knife.

31. The paper is double-sided and therefore we glue both cut strips along the edge on one side.

33. And glue the second edge of both strips together, it will be a little more difficult because of the different widths.

34. This is how the glued cut strips will look from the side.

35. Spread the glue from the pistol and press the edges of the strips tightly.

36. Once again, grease the edges of the glued strips with glue and press them together again, as in the photo.

37. It will be a little difficult, but you should deal with these without any problems.

38. Then, like this, we will twist the middle of the flower with white and red stamens, periodically applying drops of glue. It is very important that the base of the flower is flat.

39. Before gluing the middle, you need to think about how the flower will be attached to the wall: using double-sided tape or wire loops.

40. We pierce the floristic wire (or another) not in the middle of the flower, where it is thin, but where the petals are glued, right through them in two opposite places of the circle, pull it a little and drip glue into the holes with the wire.

41. Apply glue to the lower part of the center with stamens.

42. And press with palms in the central circle of the flower.

43. The middle is glued. The flower turned out to be large and voluminous.

You have learned how to create volumetric flowers with your own hands using templates.
How to make voluminous flowers out of paper with your own hands - video
There is always a space between large flowers that can be filled with smaller flowers and of a different color. In this video, voluminous flowers are made white and also original.
Smaller flowers dilute the wall decor and make it more attractive.
Large paper flowers - master class
Now we will learn how to make large decorative tropical flowers that can be used to decorate the wall and transform the house for a party in an original way.

Instructions for creating large flowers
- We create patterns of petals with our own hands. First, let's draw large petals for the first row of the flower.

3. Cut out the drawn template.

4. Put the template on a sheet of yellow paper and draw 5-6 petals according to the template with a pencil.

5. Make a small cut at the base of the petal.

6. Bend the upper part of the petal, giving volume, and glue the cut with an overlap as in the photo.

7. Volumetric petals are ready.

8. Glue the petals together at the bottom with an overlap.

9. Approximately as in the photo.

10. The first row of petals is glued together.

11. For the second row, make the petals a little smaller.

12. Glue the second row of smaller petals with an overlap. Place the fragments of the petals so that they cover the connections of the petals of the first row.

13. For the third row, draw a petal pattern that is even smaller than the previous one and repeat all the previous steps.

14. Make the central part of the flower. We bend the rectangular sheet in half and cuts on the side of the fold.

15. Unbend the sheet and bend it in the other direction, glue the edges.

16. The edges must be glued evenly.

17. Twist into a tube, gluing along the way.

18. Glue the bottom of the tube with glue.

19. Press the tube with stamens to the center of the flower and fix it with glue.

20. These beautiful paper flowers can be made in any color, according to your imagination.

Volumetric flowers of large sizes are made simply and easily.
Video on how to easily and easily make a large paper flower
Volumetric flowers on the walls of the festively decorated hall cheer up and inspire approval.
Summary: DIY paper flowers. How to make flowers out of paper. Corrugated paper flower. Paper flower master class. Volumetric paper flower. Outline flowers. DIY gift for mom.
March 8 - "International Women's Day", the holiday of Spring and Love. On this day, you cannot do without a bouquet of flowers for your beloved women: wives, mothers, grandmothers, daughters! And if these flowers are made by hand, then they are doubly pleasant to both give and receive! In this section, we have collected for you a large number of DIY master classes on making paper flowers.
1. Paper flowers. Paper flower
Origami tulip
With older children, you can make a more complex version of the tulip out of paper. A master class on making a tulip using origami technique, see the link >>>>

And here is another very beautiful paper tulip. you can download ready-made templates for making this paper craft, and follow this link to read the instructions.
 Flowers from paper. DIY gift for mom
 Another spring paper flower invites you to make the site Krokotak.com. For detailed instructions on how to make paper hyacinth, read

You can make a beautiful paper origami flower as a gift to your mom or grandmother with your own hands. For instructions on how to make such a flower out of paper, read the link.

How to make flowers out of paper
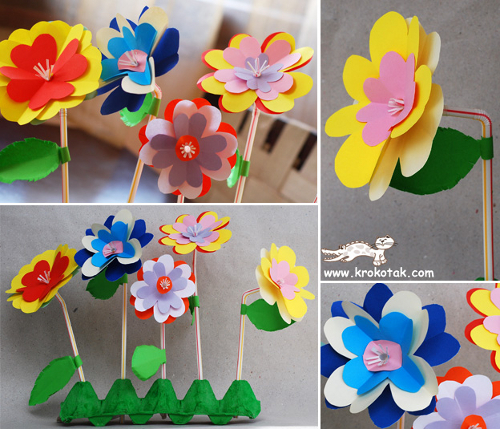
Paper flower stalks can be made from plastic tubes. Multilayer flowers cut from colored paper of different colors look beautiful, as in the photo below. Flower stand - half of a cardboard chicken egg tray, painted with green paint.
How to cut paper flowers. To cut a flower out of paper, use the scheme shown in the photo below.


How to make a flower out of paper
To make a festive bouquet of paper flowers as a present for your mom for her birthday or March 8, see the instructions on this site.

2. Paper flowers master class
3. Volumetric paper flowers. Volumetric paper flower
In general, egg cartons are a very suitable material for making flowers with your own hands. For detailed instructions, see the link >>>> To decorate homemade flowers, the author of the craft used buttons. Flower stalks made from the so-called. chenille (fluffy) wire.


Flowers can be made from plain or corrugated paper. Attach them to the twigs with tape, a glue gun, or string.


More tree branches (with or without green leaves) can be decorated with small paper roses. It is very simple to make such roses. A spiral is cut out of double-sided colored paper, which is then twisted from the outer end into a multilayer cone. You can wind the spiral around a toothpick. For detailed instructions, see the link >>>> If you want to make such flowers for your mom by March 8, then cut a few tree branches in advance and put them in the water at home. When green leaves bloom on them, decorate them with paper roses.

5. Paper flowers master class. Flowers from circles
This flowering twig is made using mixed media. Petals and leaves - using origami technique from circles. The techniques of twisting into a tourniquet and rolling into a ball are also used. For a detailed master class paper flowers, see the website
Making an accent in your home, decorating a souvenir packaging, or complementing a gift with a unique bouquet - this is now available to everyone. It only takes a little effort to get the desired result.
How to make beautiful paper flowers? - about this below the article. In it you will find several detailed master classes.
How to make a simple and beautiful paper flower with your own hands?
Recently, flower arrangements made of paper have become an alternative: both in the design of halls and in souvenirs.

Try to make such simple but beautiful flowers yourself. Detailed instructions and a diagram are below.
To work you will need:
- colored paper;
- scissors;
- diagrams and templates for cutting out parts;
- pencil or pen;
- glue.
Manufacturing process:
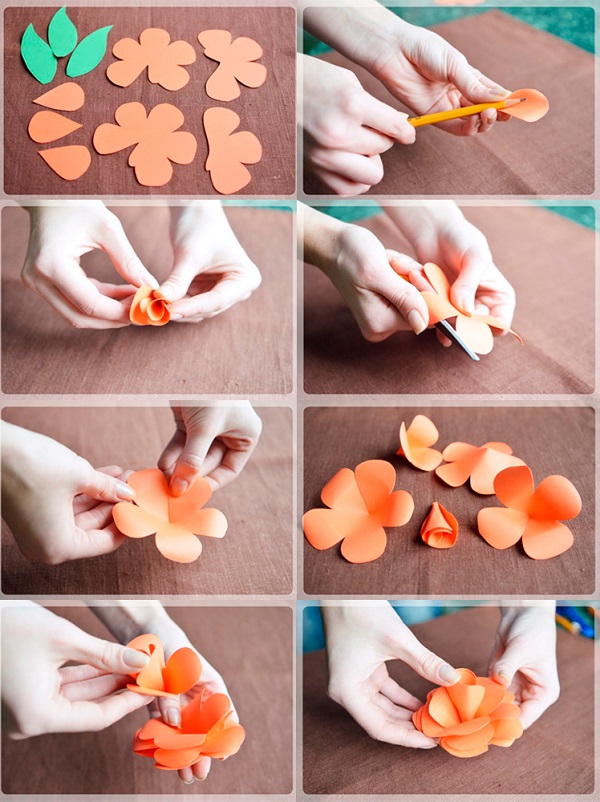
- It is necessary to cut out details for the future flower from paper according to templates (for each product you will need: 3 parts in the form of a droplet, 1 - four-leaf, 1 - three-leaf, 2 - five-leaf, 3 green parts - leaves).
- A pencil (pen, you can use a brush) will help to give the necessary shape to each detail for the future product.
- All blanks are glued together. At the beginning, you need to glue larger fragments, and then small ones. Repeat everything according to the diagram below.
There is another interesting option for simple but lush paper flowers.
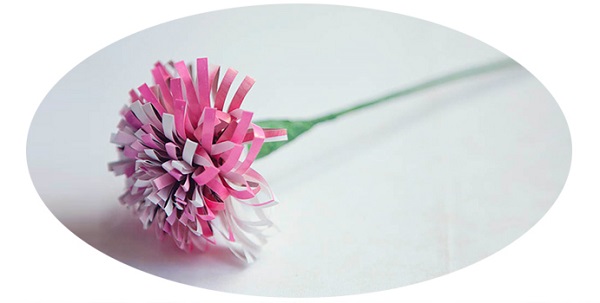
They are made by the type of quilling.

What you need to work:
- Illustrated magazines.
- Adhesive tape (green).
- Glue.
- Scissors.
- BBQ skewers.
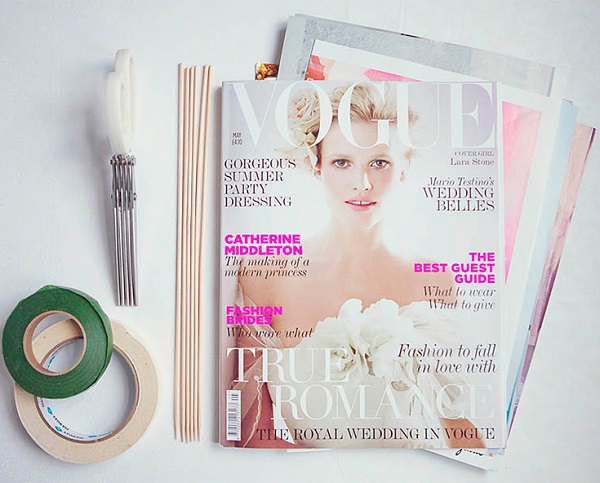
Step-by-step instruction:

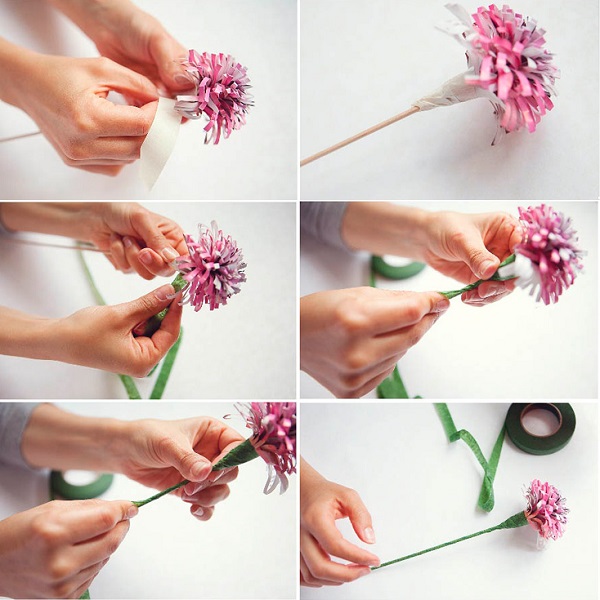
Here's how to make a bouquet of flowers out of paper is very simple and effective.
Large paper flowers - master class
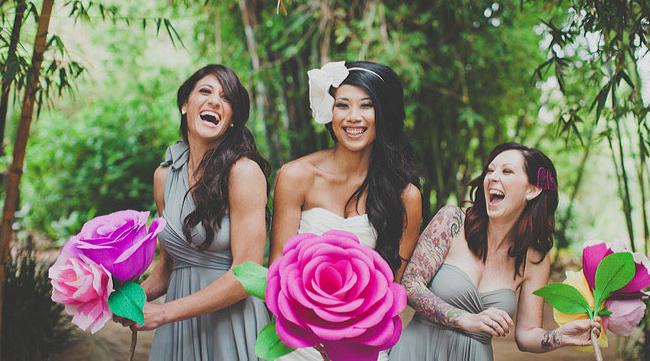
 Huge buds allow you to create a unique interior for celebrations. Thanks to them, you can accentuate or highlight a place for a photo shoot.
Large flowers can be grouped into arches, various arrangements on the ceiling or wall. It will be quite simple to make such a decoration.
Materials for work:
- patterns (diagrams) of parts;
- scissors;
- adhesive tape;
- colored paper (on both sides);
- stick or skewer (thicker).
How to make a paper rose?

These are the roses you can make as a souvenir or decoration for a photo shoot.
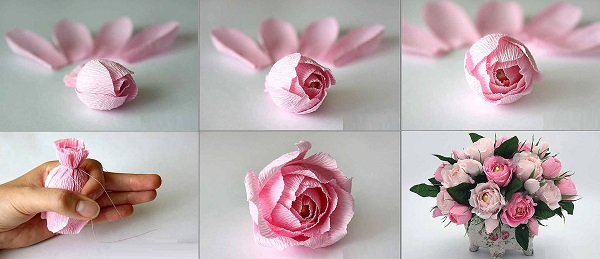
DIY crepe paper flowers - schemes
To make beautiful buds, you can choose one of the instructions below. Small or huge flowers can be made in a few hours.

Wonderful lush peonies or a pink bouquet will be a wonderful addition for an interior or a souvenir.
These wonderful blue flowers can be made from crepe paper with your own hands, if you follow the step-by-step scheme in the picture.
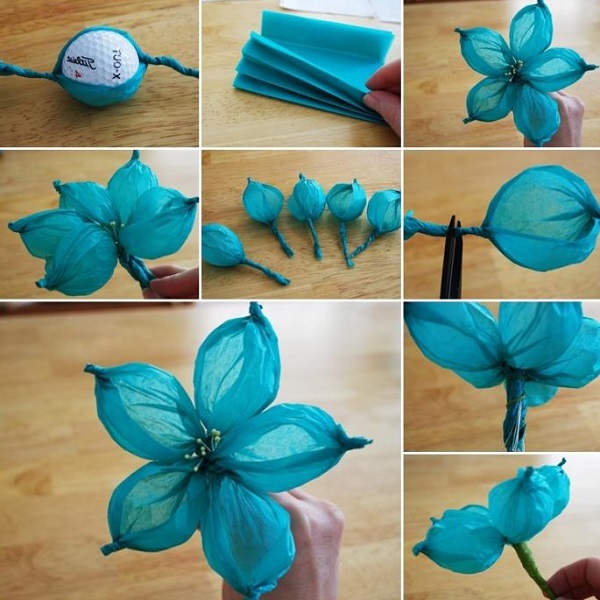
Volumetric corrugated paper flowers - step by step photo
From crumpled paper, you can create beautiful bouquets, for example, a crocus arrangement.
To work you will need:
- corrugated paper;
- glue;
- toothpicks;
- scissors;
- brush.
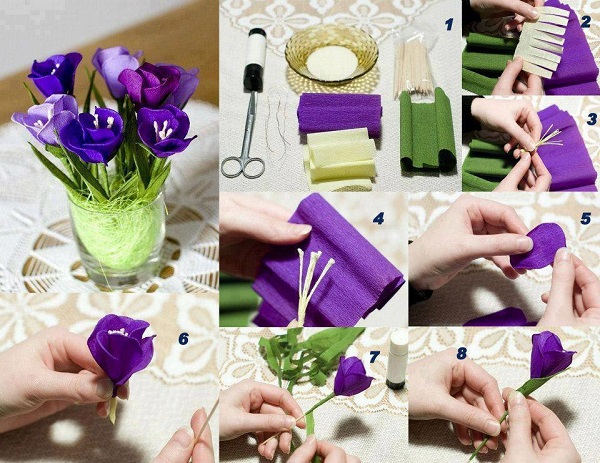
Composition making process:
- The paper must be laid in such a way that the relief is on the short side.
- Now you should cut the paper into rectangles measuring 8 * 4 centimeters.
- The workpieces need to be crumpled in the form of an accordion.
- Now from these additions it is necessary to cut 6 identical petals, then they need to slightly twist the tips with a toothpick.
- Now it's up to the stamens. They are made from the same rectangles as the petals. The blanks are cut with a fringe, leaving a narrow strip (see the diagram above).
- The fringe (each of its elements) must be twisted into a flagellum, and then the future stamen must be rolled up into a tube. To do this, a toothpick is wrapped with a blank of paper.
- The bottom of each of the stamens is smeared with glue, after which the petals of the flower begin to be fixed one by one.
- The completion of the manufacture of each flower will be wrapping the stem with green paper, and then the leaves are attached to it.
How to make paper flowers for a postcard?
Decorating souvenirs makes each giver think about how interesting and original packaging is to decorate.
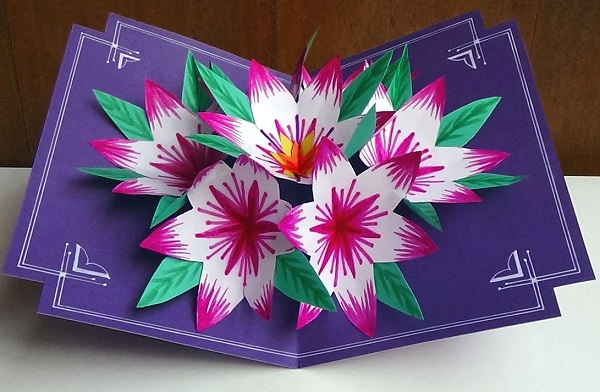
A simple ribbon bow has gone into the distant past, replaced by paper flower arrangements.

Even do-it-yourself cardboard flowers will allow even a little person to create unique gifts for friends or family.
What is required for labor?
- colored paper (several colors: pink, red and green, you can choose another color scheme);
- a postcard purchased or made by yourself;
- glue;
- scissors.

How to make small decorative flowers?
- Round blanks are cut from thin cardboard or paper. The edges are serrated in a circle. The more such elements, the more magnificent the bud. Flowers can be made in different sizes.
- Each blank is folded in 4 or more folds - it depends on what shape you want to give the bud.
- Each part is fixed with glue on a postcard.
- The stem and leaves will complete the paper plant.
These interesting master classes with step-by-step instructions for your attention were selected and presented in this article. Imagine, create - everything will work out!